
Chapter 2
Laying Out Text and Pages
IN THIS CHAPTER
![]() Starting new lines, sections, and pages
Starting new lines, sections, and pages
![]() Changing margins and page indents
Changing margins and page indents
![]() Numbering pages and handling headers and footers
Numbering pages and handling headers and footers
![]() Handling bulleted and numbered lists
Handling bulleted and numbered lists
This chapter explains how to format text and pages. A well-laid-out document says a lot about how much time and thought was put into it. This chapter presents tips, tricks, and techniques for making pages look just right.
In this chapter, you learn what section breaks are and why they are so important to formatting. You discover how to establish the size of margins, indent text, number pages, construct headers and footers, determine how much space appears between lines of text, handle lists, and hyphenate text.
Paragraphs and Formatting
Back in English class, your teacher taught you that a paragraph is a part of a longer composition that presents one idea or, in the case of dialogue, presents the words of one speaker. Your teacher was right, too, but for word-processing purposes, a paragraph is a lot less than that. In word processing, a paragraph is simply what you put onscreen before you press the Enter key.
For instance, a heading is a paragraph. If you press Enter on a blank line to go to the next line, the blank line is considered a paragraph. If you type Dear John at the top of a letter and press Enter, “Dear John” is a paragraph.
 Knowing what Word considers to be a paragraph is important because paragraphs have a lot to do with formatting. If you click the Paragraph group button on the Home tab and monkey around with the paragraph formatting in the Paragraph dialog box, your changes affect everything in the paragraph where the cursor is located. To make format changes to a whole paragraph, all you have to do is place the cursor there. You don’t have to select the paragraph. And if you want to make format changes to several paragraphs, simply select those paragraphs first.
Inserting a Section Break for Formatting Purposes
When you want to change page numbering schemes, headers and footers, margin sizes, and page orientations in a document, you have to create a section break to start a new section. Word creates a new section for you when you create newspaper-style columns or change the size of margins.
Follow these steps to create a new section:
- Click where you want to insert a section break.
On the Layout tab, click the Breaks button.
You open a drop-down list.
- Under Section Breaks on the drop-down list, select a section break.
Figure 2-1 shows what the different section breaks look like in Draft view. All four section break options create a new section, but they do so in different ways:
- Next Page: Inserts a page break as well as a section break so that the new section can start at the top of a new page (the next one). Select this option to start a new chapter, for example.
- Continuous: Inserts a section break in the middle of a page. Select this option if, for example, you want to introduce newspaper-style columns in the middle of a page.
- Even Page: Starts the new section on the next even page. This option is good for two-sided documents in which the headers on the left- and right-side pages are different.
- Odd Page: Starts the new section on the next odd page. You might choose this option if you have a book in which chapters start on odd pages. (By convention, that’s where they start.)

FIGURE 2-1: Section breaks in Draft view.
To delete a section break, make sure that you are in Draft view so that you can see section breaks, click the dotted line, and press the Delete key.
 In the same way that paragraph marks store formats for a paragraph, section breaks store formats for an entire section. When you delete a section break, you apply new formats, because the section is folded into the section that formerly followed it and the section you deleted adopts that next section’s formats. Because it’s easy to accidentally delete a section break and create havoc, I recommend working in Draft view when your document has many section breaks. In Draft view, you can tell where a section ends because
 Section Break and a double dotted line appear onscreen. The only way to tell where a section ends in Print Layout view is to click the Show/Hide ¶ button on the Home tab. (You can make section information appear on the status bar. Right-click the status bar and choose Section on the pop-up menu.)
Breaking a Line
To break a line of text before it reaches the right margin without starting a new paragraph, press Shift+Enter. Figure 2-2 shows how you can press Shift+Enter to make lines break better. The paragraphs are identical, but I broke lines in the right-side paragraph to make the text easier to read. Line breaks are marked with the ↲ symbol. To erase line breaks, click the Show/Hide ¶ button to see these symbols and then backspace over them.

FIGURE 2-2: Break lines to make reading easier.
Starting a New Page
Word gives you another page so that you can keep going when you fill up one page. But what if you’re impatient and want to start a new page right away? Whatever you do, don’t press Enter again and again until you fill up the page. Instead, create a hard page break by doing one the following on the Insert tab:
- Click the Page Break button (or press Ctrl+Enter). Word starts a new page at the cursor position. (You can also go to the Layout tab, click the Breaks button, and choose Page on the drop-down list.)
- Click the Blank Page button. Word enters two hard page breaks to create an empty, blank page at the cursor position.
Figure 2-3 shows, in Draft view, the difference between a soft page break and a hard page break. Word inserts a soft page break when the page is full and another page is needed; only you can create a hard page break. In Draft view, soft page breaks are marked with a dotted line; hard page breaks are marked with the words Page Break and a dotted line. You can tell where hard page breaks are in Print Layout and Draft view by clicking the Show/Hide ¶ button on the Home tab.
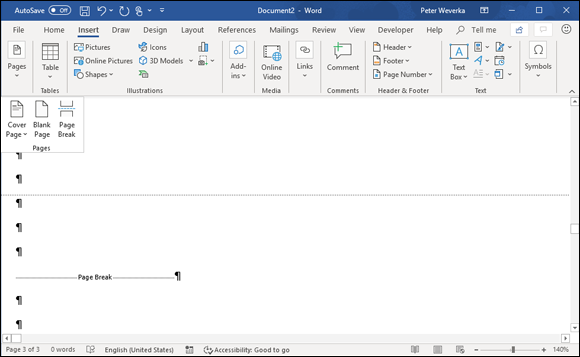
FIGURE 2-3: In Draft view, a soft page break (top) and hard page break (bottom).
To delete a hard page break, switch to Draft view (or click the Show/Hide ¶ button), double-click the words Page Break, and press the Delete key.
Setting Up and Changing the Margins
Margins are the empty spaces along the left, right, top, and bottom of a page, as shown in Figure 2-4. Headers and footers fall, respectively, in the top and bottom margins. And you can put graphics, text boxes, and page numbers in the margins as well. Margins serve to frame the text and make it easier to read.

FIGURE 2-4: Margins in a two-sided document.
When you start a new document, give a moment's thought to the margins. Changing the size of margins after you have entered the text, graphics, and whatnot can be disastrous. Text is indented from the left and right margins. Pages break on the bottom margin. If you change margin settings, indents and page breaks change for good or ill throughout your document. By setting the margins carefully from the beginning, you can rest assured that text will land on the page where you want it to land.
Don’t confuse margins with indents. Text is indented from the margin, not from the edge of the page. If you want to change how far text falls from the page edge, indent it. To change margin settings in the middle of a document, you have to create a new section.
To set up or change the margins, go to the Layout tab and click the Margins button. You see a drop-down list with margin settings. Either choose a setting or select Custom Margins to open the Margins tab of the Page Setup dialog box and choose among these commands for handling margins:
- Changing the size of the margins: Enter measurements in the Top, Bottom, Left, and Right boxes to tell Word how much blank space to put along the sides of the page.
- Making room for the gutter: The gutter is the part of the paper that the binding eats into when you bind a document. Enter a measurement in the Gutter box to increase the left or inside margin and make room for the binding. Notice on the pages of this book, for example, that the margin closest to the binding is wider than the outside margin. Choose Top on the Gutter Position menu if you intend to bind your document from the top, not the left, or inside, of the page. Some legal documents are bound this way.
- Using mirror margins (inside and outside margins) in two-sided documents: In a bound document in which text is printed on both sides of the pages, the terms left margin and right margin are meaningless. What matters instead is in the inside margin, which is the margin in the middle of the page spread next to the bindings, and the outside margin, which is the margin on the outside of the page spread that isn’t affected by the bindings (refer to Figure 2-4). Choose Mirror Margins on the Multiple Pages drop-down list and adjust the margins accordingly if you intend to print on both sides of the paper.
- Applying margin changes: On the Apply To drop-down list, choose Whole Document to apply your margin settings to the entire document; choose This Section to apply them to a section; or choose This Point Forward to change margins in the rest of a document. When you choose This Point Forward, Word creates a new section.
If you’re in a hurry to change margins, you can change them on the ruler. Display the ruler (select the Ruler check box on the View tab) and drag the Left Margin, Right Margin, or Top Margin marker. You can find these markers by moving the pointer onto a ruler and looking for the two-headed arrow near a margin boundary. It appears, along with a pop-up label, when the pointer is over a margin marker.
 To get a good look at where margins are, go to the File tab and choose Options. In the Word Options dialog box, select the Advanced category, and click the Show Text Boundaries check box (you find it under “Show Document Content”).
Indenting Paragraphs and First Lines
An indent is the distance between a margin and the text, not the edge of the page and the text. Word offers a handful of ways to change the indentation of paragraphs. You can change the indentation of first lines as well as entire paragraphs. To start, select all or part of the paragraphs you want to re-indent (just click in a paragraph if you want to re-indent only one paragraph). Then click an Indent button, fiddle with the indentation marks on the ruler, or go to the Paragraph dialog box. All three techniques are described here.
Clicking an Indent button (for left-indents)
On the Home tab, click the Increase Indent or Decrease Indent button (or press Ctrl+M or Ctrl+Shift+M) to move a paragraph a half-inch farther away from or closer to the left margin. If you created tab stops, text is indented to the next or previous tab stop as well as to the next or previous half-inch. This is the fastest way to indent text, although you can’t indent first lines or indent from the right margin this way.
“Eyeballing” it with the ruler
You can also change indentations by using the ruler to “eyeball” it. This technique requires some dexterity with the mouse or your finger, but it allows you to see precisely where paragraphs and the first lines of paragraphs are indented. If necessary, display the ruler by going to the View tab and clicking the Ruler check box. Then click in or select the paragraph or paragraphs that need indenting and use these techniques to re-indent them:
- Indenting an entire paragraph from the left margin: Drag the left-indent marker on the ruler to the right. Figure 2-5 shows where this marker is located. Dragging the left-indent marker moves the first-line indent marker as well.
- Indenting the first line of a paragraph: Drag the first-line indent marker to the right (refer to Figure 2-5). This marker determines how far the first line of the paragraph is indented.
- Making a hanging indent: Drag the hanging indent marker to the right of the first-line indent marker (refer to Figure 2-5). A hanging indent is one in which the first line of a paragraph appears to “hang” into the left margin because the second and subsequent lines are indented to the right of the start of the first line. Bulleted and numbered lists employ hanging indents.
- Indenting an entire paragraph from the right margin: Drag the right-indent marker to the left (refer to Figure 2-5).

FIGURE 2-5: Indenting with the ruler (top) and Paragraph dialog box (bottom).
Notice the shaded areas on the left and right side of the ruler. These areas represent the page margins.
Indenting in the Paragraph dialog box
Yet another way to indent a paragraph or first line is to visit the Paragraph dialog box, as shown in Figure 2-5. Click in or select the paragraph or paragraphs in question, go to the Home or Layout tab, and click the Paragraph group button (the small button to the right of the word “Paragraph” in the Paragraph group). You see the Indents and Spacing tab of the Paragraph dialog box. Change the indentation settings. If you want to indent the first line or create a hanging indent, choose First Line or Hanging on the Special drop-down list and enter a measurement in the By box.
Numbering the Pages
How do you want to number the pages in your document? You can number them in sequence starting with the number 1, start numbering pages with a number other than 1, use Roman numerals or other number formats, and include chapter numbers in page numbers. What’s more, you can number the pages differently in each section of your document as long as you divided your document into sections.
When it comes to numbering pages, you can proceed in two ways, as shown in Figure 2-6:
- Put a page number by itself on the pages of your document.
- Include the page number in the header or footer.

FIGURE 2-6: Ways to display page numbers on document pages.
After you enter a page number, you can format it in different ways in the Page Number Format dialog box (refer to Figure 2-6) and (Header & Footer Tools) Design tab.
To handle page numbers (as well as headers and footers), you must be in Print Layout view. Click the Print Layout view button on the status bar or go to the View tab and click the Print Layout button.
Numbering with page numbers only
Follow these steps to insert a page number by itself in the header, footer, or margin of the pages:
- On the Insert tab, click the Page Number button (it’s in the Header & Footer group).
- On the drop-down list, choose where on the page you want to put the page number (Top of Page, Bottom of Page, Page Margins, or Current Position).
On the submenu that appears, choose a page number option.
The farther you scroll on the submenu, the fancier the page number formats are.
If you change your mind about the page number format you choose, switch to Print Layout view and double-click in the header or footer where the page number is displayed. The (Header & Footer Tools) Design tab opens. Click the Page Number button and make a different choice, or choose Remove Page Numbers.
Including a page number in a header or footer
To put the page number part in a header or footer, double-click in the header or footer where you want the page number to appear (later in this chapter, “Putting Headers and Footers on Pages” explains headers and footers). Then follow these steps to insert the page number:
- On the (Header & Footer Tools) Design tab, click the Page Number button.
Choose Current Position.
You see a submenu with page number choices.
Scroll through the submenu and choose a page number format.
The “Page X of Y” option is for listing the total number of pages in a document as well as the page number. For example, page 2 of a ten-page document is numbered “Page 2 of 10.”
Changing page number formats
Change page number formats in the Page Number Format dialog box (refer to Figure 2-6). To display this dialog box, make sure you’re in Print Layout view and double-click your header or footer. Then use one of the following methods to change page number formats:
- On the Insert tab, click the Page Number button and choose Format Page Numbers.
- On the (Header & Footer Tools) Design tab, click the Page Number button and choose Format Page Numbers.
In the Page Number Format dialog box, make your page numbers just so:
- Choosing a different number format: Open the Number Format drop-down list and choose a page-numbering format. You can use numbers, letters, or roman numerals.
- Including chapter numbers in page numbers: If your document generates chapter numbers automatically from headings assigned the same style (a subject not covered in this book), you can include the chapter number in the page number. Click the Include Chapter Number check box, choose a style, and choose a separator to go between the chapter number and page number.
- Numbering each section separately: Click the Start At option button (not the Continue from Previous Section button) to begin counting pages anew at each section in your document. Earlier in this chapter, “Inserting a Section Break for Formatting Purposes” explains sections.
- Start numbering pages at a number other than 1: Click the Start At option button and enter a number other than 1.
To keep some pages in a document from being numbered, create a section for those pages, and then remove page numbers from the section. To paginate your document, Word skips the section you created and resumes numbering pages in the following section.
Putting Headers and Footers on Pages
A header is a little description that appears along the top of a page so that the reader knows what’s what. Usually, headers include the page number and a title, and often the author’s name appears in the header as well. A footer is the same thing as a header except that it appears along the bottom of the page, as befits its name.
These pages explain everything a mere mortal needs to know about headers and footers. Meanwhile, here are the ground rules for managing them:
- Switching to Print Layout view: To enter, read, edit or delete headers and footers, you must be in Print Layout view. You can’t see headers and footers in the other views.
- Displaying the (Header & Footer Tools) Design tab: As shown in Figure 2-7, you manage headers and footers by way of buttons on the (Header & Footer Tools) Design tab. To display this tab after you create a header or footer, switch to Print Layout view and double-click a header or footer.
- Closing the (Header & Footer Tools) Design tab: Click the Close Header and Footer button or double-click outside the header or footer.
- Placing different headers and footers in the same document: To change headers or footers in the middle of a document, you have to create a new section. See “Inserting a Section Break for Formatting Purposes,” earlier in this chapter.
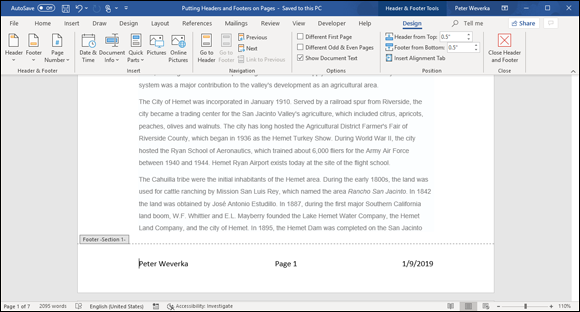
FIGURE 2-7: Manage headers and footers on the (Header & Footer Tools) Design tab.
Creating, editing, and removing headers and footers
Follow these instructions to create, edit, and delete headers and footers:
- Creating a header or footer: On the Insert tab, click the Header or the Footer button, and choose a header or footer on the gallery. The gallery presents headers or footers with preformatted page numbers, dates, and places to enter a document title and author’s name. Click More Headers (or Footers) from Office.com to download headers or footers from Microsoft. (Later in this chapter, “Fine-tuning a header or footer” explains how to insert the date and time and change headers and footers from section to section.)
- Choosing a different header or footer: Don’t like the header or footer you chose? If necessary, double-click your header or footer to display it. Then click the Header or Footer button and choose a new header or footer from the gallery.
- Editing a header or footer: Double-click the header or footer. The cursor moves into the header or footer so that you can enter or format text. You can also click the Header or the Footer button and choose Edit Header or Edit Footer on the drop-down list.
- Changing the appearance of a header or footer: Click a shape or text box in a header or footer and visit the (Drawing Tools) Format tab to change the shape or text box’s color, background, or size. (Book 8, Chapter 4 describes the Office 365 drawing tools.)
- Removing a header or footer: On the (Header & Footer Tools) Design tab, click the Header or Footer button and choose Remove Header or Remove Footer on the drop-down list.
To switch back and forth between the header and footer, click the Go to Header or Go to Footer button on the (Header & Footer Tools) Design tab.
As you work away on your header and footer, you can call on most of the text-formatting commands on the Home tab. You can change the text’s font and font size, click an alignment button, and paste text from the Clipboard. Tabs are set up in most headers and footers to enable you to center, left-align, and right-align text. You can click the Insert Alignment Tab button on the (Header & Footer Tools) Design tab to insert a new tab.
Fine-tuning a header or footer
Here is advice for making a perfect header on the (Header & Footer Tools) Design tab:
- Inserting a page number: See “Including a page number in a header or footer” and “Changing page number formats,” earlier in this chapter.
- Inserting the date and time: Click the Date & Time button, choose a date format in the Date and Time dialog box, and click OK. Click the Update Automatically check box if you want the date to record when you print the document, not when you created your header or footer.
Changing headers and footers from section to section: Use the Link to Previous button to determine whether headers and footers are different from section to section (you must divide a document into sections to have different headers and footers). Deselecting this button tells Word that you want your header or footer to be different from the header or footer in the previous section of the document; selecting this button (clicking it so that it looks selected) tells Word that you want your header or footer to be the same as the header or footer in the previous section of your document. To make a different header or footer, deselect the Link to Previous button and enter a different header or footer.
When the header or footer is the same as that of the previous section, the Header or Footer box reads Same as Previous; when the header or footer is different from that of the previous section, the wordsSame as Previousdon’t appear. You can click the Previous or Next button to examine the header or footer in the previous or next section.- Different headers and footers for odd and even pages: Click the Different Odd & Even Pages check box to create different headers and footers for odd and even pages. As “Setting Up and Changing the Margins” explains, earlier in this chapter, documents in which text is printed on both sides of the page can have different headers and footers for the left and right side of the page spread. The Header or Footer box reads Odd or Even to tell you which side of the page spread you’re dealing with as you enter your header or footer.
- Removing headers and footers from the first page: Click the Different First Page check box to remove a header or footer from the first page of a document or section. Typically, the first page of letters and reports is not numbered.
Adjusting the Space between Lines
To change the spacing between lines, select the lines whose spacing you want to change, or simply put the cursor in a paragraph if you’re changing the line spacing throughout a paragraph. (If you’re just starting a document, you’re ready to go.) Then, on the Home tab, click the Line and Paragraph Spacing button and choose an option on the drop-down list.
To take advantage of more line-spacing options, open the Paragraph dialog box, as shown in Figure 2-8. Use either of these techniques to open the Paragraph dialog box:
- Go to the Home tab or Layout tab and click the Paragraph group button.
- On the Home tab, click the Line and Paragraph Spacing button and choose Line Spacing Options on the drop-down list.

FIGURE 2-8: In the Paragraph dialog box, choose Spacing options to decide the amount of space between paragraphs and lines.
Besides single-, 1.5-, and double-spacing, the Paragraph dialog box offers these Line Spacing options:
- At Least: Choose this one if you want Word to adjust for tall symbols or other unusual text. Word adjusts the lines but makes sure there is, at minimum, the number of points you enter in the At box between each line.
- Exactly: Choose this one and enter a number in the At box if you want a specific amount of space between lines.
- Multiple: Choose this one and put a number in the At box to get triple-spaced, quadruple-, quintuple-, or any other number of spaced lines.
To quickly single-space text, click the text or select it if you want to change more than one paragraph, and press Ctrl+1. To quickly double-space text, select the text and press Ctrl+2. Press Ctrl+5 to put one and a half lines between lines of text.
The Design tab offers a command called Paragraph Spacing for changing the overall look of paragraphs. Click the Paragraph Spacing button and choose an option on the drop-down list to make paragraphs and lines of text more compact, tight, open, or relaxed.
Adjusting the Space between Paragraphs
Rather than press Enter to put a blank line between paragraphs, you can open the Paragraph dialog box and enter a point-size measurement in the Before or After text box (see Figure 2-8). The Before and After measurements place a specific amount of space before and after paragraphs.
Truth be told, the Before and After options are for use with styles (a subject of the next chapter). When you create a style, you can tell Word to always follow a paragraph in a certain style with a paragraph in another style. For example, a paragraph in the Chapter Title style might always be followed by a paragraph in the Chapter Intro style. In cases like these, when you know that paragraphs assigned to one type of style will always follow paragraphs assigned to another style, you can confidently put space before and after paragraphs. But if you use the Before and After styles indiscriminately, you can end up with large blank spaces between paragraphs.
Go to the Home tab and use one of these techniques to adjust the amount of space between paragraphs:
- Click the Line and Paragraph Spacing button and choose Add Space Before Paragraph or Add Space After Paragraph on the drop-down list. These commands place 10 points of blank space before or after the paragraph that the cursor is in.
- Click the Paragraph group button to open the Paragraph dialog box (see Figure 2-8), and enter point-size measurements in the Before and After boxes (or choose Auto in these boxes to enter one blank line between paragraphs in whatever your line-spacing choice is). The Don’t Add Space Between Paragraphs of the Same Style check box tells Word to ignore Before and After measurements if the previous or next paragraph is assigned the same style as the paragraph that the cursor is in.
Creating Numbered and Bulleted Lists
What is a word-processed document without a list or two? It’s like an emperor with no clothes. Numbered lists are invaluable in manuals and books like this one that present a lot of step-by-step procedures. Use bulleted lists when you want to present alternatives to the reader. A bullet is a black, filled-in circle or other character. These pages explain numbered lists, bulleted lists, and multilevel lists.
Simple numbered and bulleted lists
The fastest, cleanest, and most honest way to create a numbered or bulleted list is to enter the text without any concern for numbers or bullets. Just press Enter at the end of each step or bulleted entry. When you’re done, select the list, go to the Home tab, and click the Numbering or Bullets button. You can also click the Numbering or Bullets button and start typing the list. Each time you press Enter, Word enters the next number or another bullet.
Meanwhile, here are some tricks for handling lists:
- Ending a list: Press the Enter key twice after typing the last entry in the list.
- Removing the numbers or bullets: Select the list and click the Numbering or Bullets button.
- Adjusting how far a list is indented: Right-click anywhere in the list, choose Adjust List Indents, and enter a new measurement in the Text Indent box.
- Resuming a numbered list: Suppose that you want a numbered list to resume where a list you entered earlier ended. In other words, suppose that you left off writing a four-step list, put in a graphic or some paragraphs, and now you want to resume the list at Step 5. Click the Numbering button to start numbering again. The AutoCorrect Options button appears. Click it and choose Continue Numbering, or right-click and choose Continue Numbering on the shortcut menu.
- Starting a new list: Suppose that you want to start a brand-new list right away. Right-click the number Word entered and choose Restart at 1 on the shortcut menu.
Constructing lists of your own
If you’re an individualist and you want numbered and bulleted lists to work your way, follow these instructions for choosing unusual bullet characters and number formats:
- Choosing a different numbering scheme: On the Home tab, open the drop-down list on the Numbering button and choose a numbering scheme. You can also choose Define New Number Format. As shown in Figure 2-9, you see the Define New Number Format dialog box, where you can choose a number format, choose a font for numbers, and toy with number alignments.
- Choosing a different bullet character: On the Home tab, open the drop-down list on the Bullets button and choose a different bullet character on the drop-down list. You can also choose Define New Bullet to open the Define New Bullet dialog box, shown in Figure 2-9, and click the Symbol button to choose a bullet character in the Symbol dialog box (Book 1, Chapter 2 describes symbols). The dialog box also offers opportunities for indenting bullets and the text that follows them in unusual ways.

FIGURE 2-9: Customizing a numbered or bulleted list.
Managing a multilevel list
A multilevel list, also called a nested list, is a list with subordinate entries, as shown in Figure 2-10. To create a multilevel list, you declare what kind of list you want, and then, as you enter items for the list, you indent the items that you want to be subordinate. Follow these steps to create a multilevel list:
On the Home tab, click the Multilevel List button and choose what kind of list you want.
If none of the lists suit you, you can choose Define New Multilevel List and create a new kind of list in the Define New Multilevel List dialog box.
- Enter the items for the list, pressing Enter as you complete each one.
Select a list item (or items) and click the Increase Indent button (or press Ctrl+M) to make the items subordinate in the list; click the Decrease Indent button (or press Ctrl+Shift+M) to raise their rank in the list.
Repeat Step 3 until the list is just so.

FIGURE 2-10: Examples of multilevel lists.
Working with Tabs
Tabs are a throwback to the days of the typewriter, when it was necessary to make tab stops in order to align text. Except for making leaders and aligning text in headers and footers, everything you can do with tabs can also be done by creating a table — and it can be done far faster. All you have to do is align the text inside the table and then remove the table borders. (Chapter 4 of this minibook explains tables.)
A tab stop is a point around which or against which text is formatted. As shown in Figure 2-11, Word offers five tab types for aligning text: Left, Center, Right, Decimal, and Bar (a bar tab stop merely draws a vertical line on the page). When you press the Tab key, you advance the text cursor by one tab stop. Tab stops are shown on the ruler; symbols on the ruler tell you what type of tab you’re dealing with.

FIGURE 2-11: Different kinds of tab stops.
By default, tabs are left-aligned and are set at half-inch intervals. Display the ruler (click the Ruler check box on the View tab) and follow these steps to change tabs or change where tabs appear on the ruler:
- Select the paragraphs that need different tab settings.
Click the Tab box on the left side of the ruler as many times as necessary to choose the kind of tab you want.
Symbols on the tab box indicate which type of tab you’re choosing.
Click the ruler where you want the tab to go.
You can click as many times as you want and enter more than one kind of tab.
To move a tab stop, drag it to a new location on the ruler. Text that is aligned with the tab stop moves as well. To remove a tab stop, drag it off the ruler. When you remove a tab stop, text to which it was aligned is aligned to the next remaining tab stop on the ruler, or to the next default tab stop if you didn’t create any tab stops of your own.
Sometimes it’s hard to tell where tabs were put in the text. To find out, click the Show/Hide ¶ button on the Home tab to see the formatting characters, including the arrows that show where the Tab key was pressed.
Hyphenating Text
The first thing you should know about hyphenating words is that you may not need to do it. Text that hasn’t been hyphenated is much easier to read, which is why the majority of text in this book, for example, isn’t hyphenated. It has a ragged right margin, to borrow typesetter lingo. Hyphenate only when text is trapped in columns or in other narrow places, or when you want a very formal-looking document.
Do not insert a hyphen simply by pressing the hyphen key, because the hyphen will stay there even if the word moves to the middle of a line and doesn't need to be broken in half. Instead, when a big gap appears in the right margin and a word is crying out to be hyphenated, put the cursor where the hyphen needs to go and press Ctrl+hyphen. This way, you enter what is called a discretionary hyphen, and the hyphen appears only if the word breaks at the end of a line. (To remove a discretionary hyphen, press the Show/Hide ¶ button so that you can see it, and then backspace over it.)
Automatically and manually hyphenating a document
Select text if you want to hyphenate part of a document, not all of it, and use one of these techniques to hyphenate words that break on the end of a line of text:
Automatic hyphenation: On the Layout tab, click the Hyphenation button and choose Automatic on the drop-down list. Word hyphenates your document (or a portion of your document, if you selected it first).
You can tell Word how to hyphenate automatically by clicking the Hyphenation button and choosing Hyphenation Options. You see the Hyphenation dialog box shown in Figure 2-12. Deselect the Hyphenate Words in CAPS check box if you don't care to hyphenate words in uppercase. Words that fall in the hyphenation zone are hyphenated, so enlarging the hyphenation zone means a less ragged right margin but more ugly hyphens, and a small zone means fewer ugly hyphens but a more ragged right margin. You can limit how many hyphens appear consecutively by entering a number in the Limit Consecutive Hyphens To box.
- Manual hyphenation: On the Layout tab, click the Hyphenation button and choose Manual on the drop-down list. Word displays a box with some hyphenation choices in it, as shown in Figure 2-12. The cursor blinks on the spot where Word suggests putting a hyphen. Click Yes or No to accept or reject Word’s suggestion. Keep accepting or rejecting Word’s suggestions until the text is hyphenated.

FIGURE 2-12: Telling Word how to hyphenate (left) and deciding where a hyphen goes (right).
Unhyphenating and other hyphenation tasks
More hyphenation esoterica:
- Unhyphenating: To “unhyphenate” a document or text you hyphenated automatically, go to the Layout tab, click the Hyphenation button, and choose None on the drop-down list.
- Preventing text from being hyphenated: Select the text and, on the Home tab, click the Paragraph group button. In the Paragraph dialog box, select the Line and Page Breaks tab, and select the Don’t Hyphenate check box. (If you can't hyphenate a paragraph, it’s probably because this box was selected unintentionally.)