
Chapter 6
Desktop Publishing with Word
IN THIS CHAPTER
![]() Putting borders, watermarks, and drop caps on pages
Putting borders, watermarks, and drop caps on pages
![]() Working with graphics, text boxes, and other objects
Working with graphics, text boxes, and other objects
![]() Running text in newspaper-style columns
Running text in newspaper-style columns
![]() Printing landscape documents on various sizes of paper
Printing landscape documents on various sizes of paper
Once upon a time, word processors were nothing more than glorified typewriters. They were good for typing and basic formatting, and not much else. But over the years, Microsoft Word has become a desktop publishing program in its own right. This chapter explains a few desktop publishing features that can make your documents stand out in the crowd — themes, columns, text boxes, page borders, watermarks, video, and drop caps, to name a few. (Book 7 describes Publisher 365, another desktop-publishing application.)
Experimenting with Themes
A theme is a colorful, ready-made design for headings and text. Each theme imposes a slightly different look on a document. If you want to experiment with themes, theme style sets, theme colors, and theme fonts, more power to you, but be prepared to click the Undo button and backtrack as you rummage around for the right look for your document. Figure 6-1 shows some theme experiments.
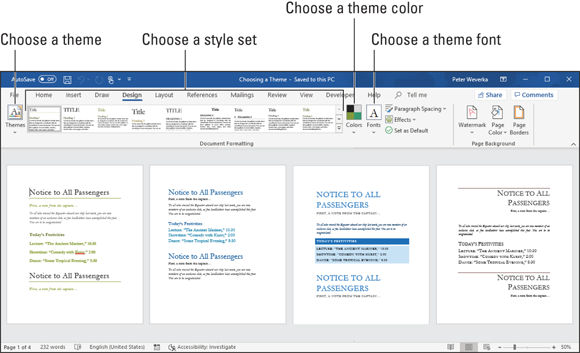
FIGURE 6-1: On the Design tab, experiment with themes, style sets, theme colors, and theme fonts.
Starting on the Design tab, follow these instructions to experiment with themes:
- Choosing a new theme: Click the Themes button and choose a theme on the drop-down list.
- Choosing a new style set: On the Theme Styles gallery, choose a style set.
- Choosing a new set of colors for your theme: Click the Theme Colors button, slide the pointer over the different color sets on the drop-down list, and see what effect they have on your document.
- Changing the fonts: Click the Theme Fonts button and choose a combination of fonts on the drop-down list for the headings and text in your document.
Sprucing Up Your Pages
You can play interior decorator with the pages of a document by putting a border around pages, splashing color on pages, and taking advantage of the predesigned cover pages that Word provides for you. Keep reading if making the pages of your document a little prettier interests you.
Decorating a page with a border
Word offers a means of decorating title pages, certificates, menus, and similar documents with a page border. Besides lines, you can decorate the sides of a page with stars, pieces of cake, and other artwork. If you want to place a border around a page in the middle of a document, you must create a section break where the page is.
Before you create your border, place the cursor on the page where the border is to appear. Place the cursor on the first page of a document if you want to put a border around only the first page. If your document is divided into sections and you want to put borders around certain pages in a section, place the cursor in the section — either in the first page if you want the borders to go around it, or in a subsequent page.
With the cursor in the right place, follow these steps to decorate your page or pages with a border:
Go to the Design tab and click the Page Borders button.
You see the Borders and Shading dialog box, as shown in Figure 6-2.
Under Setting, choose which kind of border you want.
Use the None setting to remove borders.
- On the Apply To drop-down menu, tell Word which page or pages in the document get borders.
- Select options to construct the border you want and then click OK.

FIGURE 6-2: Putting borders on pages.
The Page Border tab offers a bunch of tools for fashioning a border:
- Line for borders: Under Style, scroll down the list and choose a line for the borders. You will find interesting choices at the bottom of the menu. Be sure to look in the Preview window to see what your choices in this dialog box add up to.
- Color for borders: Open the Color drop-down list and choose a color for the border lines if you want a color border.
- Width of borders: Use the Width drop-down list to tell Word how wide the lines or artwork should be.
- Artwork for borders: Open the Art drop-down list and choose a symbol, illustration, star, or other artwork, if that is what you want for the borders. You will find some ornate choices at the bottom of the long list.
- Borders on different sides of the page: Use the four buttons in the Preview window to tell Word on which sides of the page to draw borders. Click these buttons to remove or add borders, as you want.
- Distance from edge of page: Click the Options button and fill in the Border and Shading Options dialog box if you want to get specific about how close the borders can come to the edge of the page or pages.
Putting a background color on pages
Especially if you intend to save your Word document as a web page, you will be glad to know that putting a background color on pages is easy. You can’t, however, pick and choose which pages get a background color. Putting background colors on the pages of a document is an all-or-nothing proposition.
To grace a page with a background color or gradient color mixture, go to the Design tab, click the Page Color button, and choose a color on the drop-down list. Choose Fill Effects to open the Fill Effects dialog box and apply gradient color mixtures or patterns to the pages.
Getting Word’s help with cover letters
Writing and designing a cover page for a letter, resume, or report is a chore. Word can’t dictate a cover page for you, but it can provide a handsome preformatted cover page that looks nice at the front of a report or article. Figure 6-3 shows examples of cover pages.

FIGURE 6-3: Examples of ready-made cover pages.
To place a cover page at the start of a document, go to the Insert tab, click the Cover Page button, and choose a cover page on the gallery.
Making Use of Charts, Diagrams, Shapes, and Photos
Figure 6-4 shows a newsletter that includes a chart, diagram, shape, and photo. You are invited to include these items in your Word documents, and you’ll be glad to know that including them isn’t very much trouble.
- Charts: A chart is an excellent way to present data for comparison purposes. The pie slices, bars, columns, or lines tell readers right away which business is more productive, for example, or who received the most votes. Book 8, Chapter 1 explains how to create charts.
- Diagrams: A diagram allows readers to quickly grasp an idea, relationship, or concept. Instead of explaining an abstract idea, you can portray it in a diagram. Book 8, Chapter 2 explains diagrams.
- Shapes and lines: Shapes and lines can also illustrate ideas and concepts. You can also use them for decorative purposes in Word documents. Book 8, Chapter 4 explains how to draw lines, arrows, and shapes.
- Photos: Photos make a document livelier. They add a little color to documents. Book 8, Chapter 3 explains how to place photos in documents.

FIGURE 6-4: This newsletter includes a photo, chart, diagram, shape, and image.
Working with the Drawing Canvas
As Book 8, Chapter 4 explains, shapes and lines are a great way to illustrate ideas. You can in effect doodle on the page and give readers another insight into what you want to explain. In Word, however, drawing lines and shapes is problematic unless you draw them on the drawing canvas.
The drawing canvas works like a corral to hold lines and shapes. After you create a drawing canvas, you can draw inside it as though you were drawing on a little page, as shown in Figure 6-5. You can treat the drawing canvas as an object in its own right. You can move it, along with the things inside it, to new locations. You can also, by way of the (Drawing Tools) Format tab, give the drawing canvas an outline shape and fill color. The drawing canvas makes working with objects on a page, especially lines and shapes, that much easier.

FIGURE 6-5: The drawing canvas — a corral for shapes and lines.
Follow these steps to create a drawing canvas for holding lines and shapes:
- Place the cursor roughly where you want the drawing canvas to be.
- Go to the Insert tab or the Draw tab.
Create the drawing canvas.
How you create the drawing canvas depends on where you are:
- Insert tab: Click the Shapes button and choose New Drawing Canvas.
- Draw tab: Click the Drawing Canvas button.
 The drawing canvas is an object in its own right. You can wrap text around it, give it an outline, and give it a color fill. You can drag it to a new location. To change its size, drag a handle on the side or corner.
Positioning and Wrapping Objects Relative to the Page and Text
“Object” is just Office’s generic term for a shape, line, text box, image, photo, diagram, WordArt image, or chart that you insert in a document. Book 8, Chapter 4 explains how to manipulate an object — how to change its size, shape, and other qualities. When you place an object in a Word document, you have to consider more than its size and shape. You also have to consider where to position it on the page and how to wrap text around it. In Word lingo, wrap refers to what text does when it butts heads with a shape, text box, photo, diagram, or other object. You must be in Print Layout view to wrap and position objects on a page.
 When you insert an object, it lands inline with text. That means it lands against the left margin and text doesn’t wrap around its side. Before you can change the position of an object, you must select it and choose a text-wrapping option apart from Inline with Text.
Wrapping text around an object
Figure 6-6 illustrates the 15 different ways you can wrap text around an object. Select the object you want to wrap text around and use one of these techniques to wrap text around the object:
- Click the Layout Options button (it’s located to the right of the object) and choose an option on the drop-down list, as shown in Figure 6-7.
- On the Layout or Format tab, click the Wrap Text button and choose an option on the drop-down list, as shown in Figure 6-7. (You may have to click the Arrange button first, depending on the size of your screen.)
- Open the Layout dialog box, go to the Text Wrapping tab, and choose a wrapping style and side around which to wrap text. Figure 6-6 shows what the different combinations of Wrapping Style and Wrap Text options do. To open the Layout dialog box:
- Click the Layout Options button (to the right of the object) and click the See More link on the drop-down list.
- Click the Wrap Text button and choose More Layout Options on the drop-down list.

FIGURE 6-6: All the ways to wrap text in a Word document.

FIGURE 6-7: Choosing how to wrap text.
 Wrapped text looks best when it is justified and hyphenated. That way, text can get closer to the object that is being wrapped.
Positioning an object on a page
To position an object in a Word page, you can drag it to a new location. As Book 8, Chapter 4 explains in torturous detail, dragging means to select the object, move the pointer over its perimeter, click when you see the four-headed arrow, and slide the object to a new location.
To make positioning objects on a page a little easier, Word also offers Position commands for moving objects to specific places on the page. For example, you can place an object squarely in a corner or middle of the page.
Select your object, go to the Layout or Format tab, and use one of these techniques to move your object precisely into place:
- Click the Position button and select a With Text Wrapping option on the drop-down list, as shown in Figure 6-8. (You may have to click the Arrange button first, depending on the size of your screen.) These options position an object squarely in a corner, a side, or the middle of the page.
- Click the Position button and choose More Layout Options on the drop-down list, or click the Size group button on the Format tab and select the Position tab in the Layout dialog box. Then choose position options. Go to the Layout dialog box when you want to place objects in the very same position on different pages.

FIGURE 6-8: The Position options place an object on one part of the page.
When you insert an object, Word attaches it to the paragraph where the cursor is located when you make the insertion. For that reason, if you move that paragraph to another page or the paragraph gets moved as you edit text, the object moves right along with the paragraph. You can locate the paragraph to which an object is connected by clicking the object. The anchor symbol appears beside the paragraph to which the object is connected.
Working with Text Boxes
Put text in a text box when you want a notice or announcement to stand out on the page. Like other objects, text boxes can be shaded, filled with color, and given borders, as the examples in Figure 6-9 demonstrate. You can also lay them over graphics to make for interesting effects. I removed the borders and the fill color from the text box on the right side of Figure 6-9, but rest assured, the text in this figure lies squarely in a text box. (Book 8, Chapter 4 explains how to give borders, shading, and color to objects such as text boxes.)

FIGURE 6-9: Examples of text boxes.
You can move a text box around at will on the page until it lands in the right place. You can even use text boxes as columns and make text jump from one text box to the next in a document — a nice feature, for example, when you want a newsletter article on page 1 to be continued on page 2. Instead of cutting and pasting text from page 1 to page 2, Word moves the text for you as the column on page 1 fills up.
Inserting a text box
To create a text box, go to the Insert tab, click the Text Box button, and use one of these techniques:
- Choose a ready-made text box. Scroll in the drop-down list and choose a preformatted text box.
- Draw a conventional text box. Choose Draw Text Box on the drop-down list, and then click and drag to draw the text box. Lines show you how big it will be when you release the mouse button.
After you insert the text box, you can type text in it and call on all the formatting commands on the (Drawing) Format tab. These commands are explained in Book 8, Chapter 4. It also describes how to turn a shape such as a circle or triangle into a text box (create the shape, right-click it and choose Add Text, and start typing).
Here’s a neat trick: You can turn the text in a text box on its side so that it reads from top to bottom or bottom to top, not from left to right. Create a text box, enter the text, go to the (Drawing Tools) Format tab, click the Text Direction button, and choose a Rotate option on the drop-down list.
Making text flow from text box to text box
As I mention earlier, you can link text boxes so that the text in the first box is pushed into the next one when it fills up. To link text boxes, start by creating all the text boxes that you need. You can’t link one text box to another if the second text box already has text in it. Starting on the (Drawing Tools) Format tab, follow these directions to link text boxes:
- Creating a forward link: Click a text box and then click the Create Link button to create a forward link. The pointer changes into a very odd-looking pointer that is supposed to look like a pitcher. Move the odd-looking pointer to the next text box in the chain and click there to create a link.
- Breaking a link: To break a link, click the text box that is to be the last in the chain, and then click the Break Link button.
Dropping in a Drop Cap
A drop cap is a large capital letter that “drops” into the text, as shown in Figure 6-10. Drop caps appear at the start of chapters in many books, this book included, and you can find other uses for them, too. In Figure 6-10, one drop cap marks the A side of a list of songs on a homemade music CD.

FIGURE 6-10: Creating a drop cap.
To create a drop cap, start by clicking anywhere in the paragraph whose first letter you want to “drop.” If you want to “drop” more than one character at the start of the paragraph, select the characters. Then go to the Insert tab, click the Drop Cap button, and choose Dropped or Drop Cap Options. Choosing Drop Cap Options opens the Drop Cap dialog box shown in Figure 6-10, where you can experiment with these options:
- Position: Choose which kind of drop cap you want. In Margin places the drop cap to the left of the paragraph, in the margin, not in the paragraph itself.
- Font: Choose a font from the Font drop-down list. Choose a different font from the text in the paragraph.
- Lines to Drop: Enter the number of text lines to drop the letter.
- Distance from Text: Keep the 0 setting unless you’re dropping an I, 1, or other skinny letter or number.
Click the Drop Cap button and choose None to remove a drop cap.
Watermarking for the Elegant Effect
A watermark is a pale image or set of words that appears behind text on each page in a document. True watermarks are made in the paper mold and can be seen only when the sheet of paper is held up to a light. You can’t make true watermarks with Word, but you can make the closest thing to them that can be attained in the debased digital world in which we live. Figure 6-11 shows two pages of a letter in which the paper has been “watermarked.” Watermarks are one of the easiest formatting tricks to accomplish in Word.
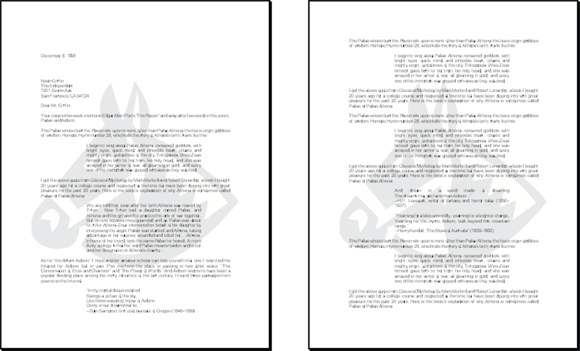
FIGURE 6-11: Watermarks showing faintly on the page.
To create a watermark for every page of a document, go to the Design tab and click the Watermark button. From the drop-down list, create your watermark:
- Prefabricated text watermark: Scroll down the list and choose an option. You will find “Confidential,” “Urgent,” and other text watermarks.
- Picture watermark: Choose Custom Watermark, and in the Printed Watermark dialog box, click the Picture Watermark option button. Then click the Select Picture button. In the Insert Pictures dialog box, select a graphics file to use for the watermark and click the Insert button. Back in the Printed Watermark dialog box, choose or enter a size for the graphic on the Scale drop-down menu. I don’t recommend unchecking the Washout check box — do so and your image may be so dark it obscures the text.
- Text watermark: Choose Custom Watermark and, in the Printed Watermark dialog box, click the Text Watermark option button. Type a word or two in the Text box (or choose an entry from the drop-down menu). Choose a font, size, color, and layout for the words. If you uncheck the Semitransparent check box, you do so at your peril because the watermark words may be too dark on the page.
To tinker with a watermark, reopen the Printed Watermark dialog box. To remove a watermark, click the Watermark button and choose Remove Watermark on the drop-down list.
Putting Newspaper-Style Columns in a Document
Columns look great in newsletters and similar documents. And you can pack a lot of words in columns. I should warn you, however, that the Columns command is only good for creating columns that appear on the same page. Running text to the next page with the Columns command can be problematic. If you’re serious about running text in columns, I suggest either constructing the columns from text boxes or using Publisher, another Office program. Book 7 explains Publisher.
Sometimes it is easier to create columns by creating a table or by using text boxes, especially when the columns refer to one another. In a two-column résumé, for example, the left-hand column often lists job titles (“Facsimile Engineer”) whose descriptions are found directly across the page in the right-hand column (“I Xeroxed stuff all day long”). Creating a two-column résumé with Word's Columns command would be futile because making the columns line up is nearly impossible. Each time you add something to the left-hand column, everything snakes — it gets bumped down in the left-hand column and the right-hand column as well.
Doing the preliminary work
Before you put text in newspaper-style columns, write it. Take care of the spelling, grammar, and everything else first because making text changes to words after they’ve been arranged in columns is difficult. Columns appear only in Print Layout view.
Running text into columns
To “columunize” text, select it, go to the Layout tab, and click the Columns button. Then either choose how many columns you want on the drop-down list or choose More Columns to create columns of different widths.
You see the Columns dialog box shown in Figure 6-12 if you choose More Columns. Here are the options in the Columns dialog box:
- Preset columns: Select a Presets box to choose a preset number of columns. Notice that, in some of the boxes, the columns aren’t of equal width.
- Number of columns: If a preset column doesn’t do the trick, enter the number of columns you want in the Number of Columns box.
- Line between columns: A line between columns is mighty elegant and is difficult to draw on your own. Choose the Line Between check box to run lines between columns.
- Columns width: If you uncheck the Equal Column Width check box, you can make columns of unequal width. Change the width of each column by using the Width boxes.
- Space between columns: Enter a measurement in the Spacing boxes to determine how much space appears between columns.
- Start New Column: Select this check box to put empty space in a column, perhaps to insert a text box or picture. Place the cursor where you want the empty space to begin, choose This Point Forward on the Apply To drop-down list, and click the Start New Column check box.

FIGURE 6-12: Running text in columns.
Word creates a new section if you selected text before you columnized it, and you see your columns in Print Layout view. Chapter 2 of this minibook explains sections.
To “break” a column in the middle and move text to the next column, click where you want the column to break and press Ctrl+Shift+Enter or go to the Layout tab, click the Breaks button, and choose Column on the drop-down list.
Landscape Documents
A landscape document is one in which the page is wider than it is long, like a painting of a landscape, as shown on the right side of Figure 6-13. Most documents, like the pages of this book, are printed in portrait style, with the short sides of the page on the top and bottom. However, creating a landscape document is sometimes a good idea because a landscape document stands out from the usual crowd of portrait documents and sometimes printing in landscape mode is necessary to fit text, tables, and graphics on a single page.

FIGURE 6-13: A portrait document (left) and landscape document (right).
You’re ready to go if you want to turn all the pages in your document into landscape pages. To turn some of the pages into landscape pages, create a section for the pages that need to appear in Landscape mode and click in the section (Chapter 2 of this minibook explains sections). Starting on the Layout tab, use these techniques to change the page orientation:
- Landscape pages: Click the Orientation button and choose Landscape on the drop-down list.
- Portrait pages: Click the Orientation button and choose Portrait on the drop-down list.
Printing on Different Size Paper
You don’t have to print exclusively on standard 8.5 x 11 paper; you can print on legal-size paper, A4 paper, and other sizes of paper as well. A newsletter with an unusual shape really stands out in a crowd and gets people’s attention. Go to the Layout tab and use one of these techniques to change the size of the paper on which you intend to print a document:
- Click the Size button and choose an option on the drop-down list.
- Click the Size button and choose More Paper Sizes. You see the Paper tab in the Page Setup dialog box. Choose a setting on the Paper Size drop-down list. If none of the settings suits you, enter your own settings in the Width and Height text boxes.
Showing Online Video in a Document
When words and pictures don’t do the job, consider making video a part of your document with the Online Video command. This command establishes a link between your document and a video on the Internet. After you establish the link, the first frame of the video appears in the Word document. Clicking the Play button in this frame opens a video viewer so you can play the video.
To insert a video in a document, go to the Insert tab and click the Online Video button. As shown in Figure 6-14, the Insert Video dialog box appears. Take it from there:
- Search for and insert a YouTube video. Enter a search term in the Search YouTube text box and press Enter. Videos from the YouTube website appear in the search results window, as shown in Figure 6-14. Scroll to a video you like, select it, and click the Insert button. The search results window gives you the opportunity to preview a video by clicking the View Larger button (the magnifying glass).
- Enter the embed code of a video. Paste the embed code of a video on the Internet in the Paste Embed Code Here text box and press Enter.

FIGURE 6-14: Making a YouTube video part of a Word document.