
Chapter 3
Entering the Data
IN THIS CHAPTER
![]() Entering data on a datasheet
Entering data on a datasheet
![]() Changing the look of a datasheet
Changing the look of a datasheet
![]() Creating a form for entering data
Creating a form for entering data
![]() Finding and replacing your data
Finding and replacing your data
At last — you can start entering the data. If you set up your database tables, named the fields, and established relationships between the tables, you’re ready to go. This short chapter explains how to enter the data in a database table. It shows you how to enter data on a datasheet or enter data by way of a form. This chapter also describes how to find missing records in case one goes astray.
There’s no getting around it: Entering data is truly a tedious activity. But if you set up the fields well and take advantage of input masks and other field properties, it isn’t so bad. It’s better than stepping on a shovel blade, anyway.
The Two Ways to Enter Data
When it comes to entering data in a database table, you can take your pick between Datasheet view and a form. Figure 3-1 compares and contrasts the two. Here are the advantages of entering data in Datasheet view:
- Many records appear simultaneously.
- You can compare data easily between records.
- You can sort by column with the commands in the Sort and Filter group on the Home tab (as discussed in Chapter 4 of this minibook).
- You can scroll up or down to locate records.

FIGURE 3-1: Entering records in Datasheet view (left) and in a form (right).
Here are the advantages of entering the data in a form:
- You don’t have to scroll left or right to see all the fields.
- Getting from field to field is easier.
- Fields are clearly labeled so that you always know what to enter.
Entering the Data in Datasheet View
Entering data in Datasheet view is like entering data in a conventional table. As with a table, a datasheet has columns and rows. Records are entered in rows, and each column represents a field. Fans of Datasheet view like being able to look at a dozen records simultaneously. For fans of Datasheet view, these pages explain how to enter data in a datasheet and change a datasheet’s appearance.
Database tables open in Datasheet view when you double-click their names in the Navigation pane. But if you happen to be gazing at a table in Design view, click the View command on the Home tab or the Datasheet View button on the status bar.
Entering data
In Datasheet view, the bottom of the window tells you how many records are entered in the database table and which record the cursor is in. To enter a new record, move to a new, empty row and start entering the data. To create a new row, do one of the following:
- On the Home tab, click the New button.
- Click the New (Blank) Record button in the Datasheet navigation buttons. These buttons are located in the bottom-left corner of the Datasheet view window.
- Scroll to the bottom of the Datasheet view window and begin typing in the row with an asterisk (*) next to it.
- Press Ctrl++ (the plus key).
A pencil icon appears on the row selector to let you know which record you’re dealing with. To get from field to field, click in a field, press the Tab key, or press Enter. Table 3-1 lists keyboard shortcuts for getting around in a datasheet.
TABLE 3-1 Datasheet Shortcuts
Press… |
To Move… |
↑ |
To the previous record. You can also press the Previous button on the Navigation buttons. |
↓ |
To the next record. You can also press the Next button. |
Tab or Enter |
To the next field in the record. |
Shift+Tab |
To the previous field in the record. |
Home |
To the first field in the record. |
End |
To the last field in the record. |
Ctrl+Home |
To the first field in the first record. You can also press the First button. |
Ctrl+End |
To the last field in the last record. You can also press the Last button. |
Page Up |
Up one screen. |
Page Down |
Down one screen. |
To delete a record, click its row selector and press the Delete key or the Delete button (located on the Home tab). You can also click in a record, go to the (Table Tools) Fields tab, and click the Delete button there. After you delete a record, it is gone forever. You can’t resuscitate it.
Two tricks for entering data quicker
In a database table with many fields, it’s sometimes hard to tell what data to enter. When the pointer is in the sixth or seventh field, for example, you can lose sight of the first field, the one on the left side of the datasheet that usually identifies the person or item whose record you’re entering.
 To freeze a field so that it appears onscreen no matter how far you travel toward the right side of the datasheet, right-click the field’s column heading and choose Freeze Fields on the shortcut menu. To unfreeze the fields, right-click the column heading and choose Unfreeze All Fields on the shortcut menu. You can freeze more than one field by dragging across field names at the top of the datasheet before choosing to freeze the columns. Is it getting cold in here?
Another way to handle the problem of not being able to identify where data is supposed to be entered is to hide columns in the datasheet. To perform this trick, select the columns you want to hide by dragging the pointer across their names; then right-click the column heading and choose Hide Fields on the shortcut menu. To see the columns again, right-click any column heading and choose Unhide Fields on the shortcut menu. You see the Unhide Columns dialog box. Select the fields that you want to see on the datasheet.
The fastest way to hide a column is to drag the border between it and the next column to the left until the column disappears.
Changing the appearance of the datasheet
To make the datasheet a little less cluttered and unwieldy, try experimenting with its appearance. Access offers a few handy shortcuts for doing just that:
- Rearranging columns: To move a column to a different location, click its name at the top of the datasheet and drag it to the left or right.
- Resizing columns: Move the pointer between column names at the top of the datasheet, and when you see the double-headed arrow, click and start dragging. To make a column just large enough to fit its widest entry, move the pointer between column names and double-click when you see the double-headed arrow.
- Changing fonts: The default font for a datasheet is Calibri 11-point, but the Home tab offers commands for changing fonts and font sizes. Look for these commands in the Text Formatting group.
- Changing the look of gridlines: On the Home tab, open the drop-down list on the Gridlines button and choose options to change the number and thickness of gridlines.
- Alternate row colors: On the Home tab, open the drop-down list on the Alternate Row Color button and choose a color for alternating rows on the datasheet.
To experiment all at one time with the many options for changing a datasheet’s appearance, go to the Home tab and click the Text Formatting group button. You see the Datasheet Formatting dialog box, as shown in Figure 3-2. If you want a customized look for all the datasheets you work on, visit the File tab and select Options. Then go to the Datasheet category in the Options dialog box and go to town.

FIGURE 3-2: The Datasheet Formatting dialog box.
Entering the Data in a Form
Forms like the one shown in Figure 3-3 are very convenient for entering data. The labels tell you exactly what to enter. Personally, I prefer entering data in a form to entering data on a datasheet. On a form, you take it one step — make that one record — at a time. Not looking at a dozen records makes the task of entering data a little easier. These pages explain how to create a form for entering information in a database table. You also get advice for moving around with the Navigation buttons.
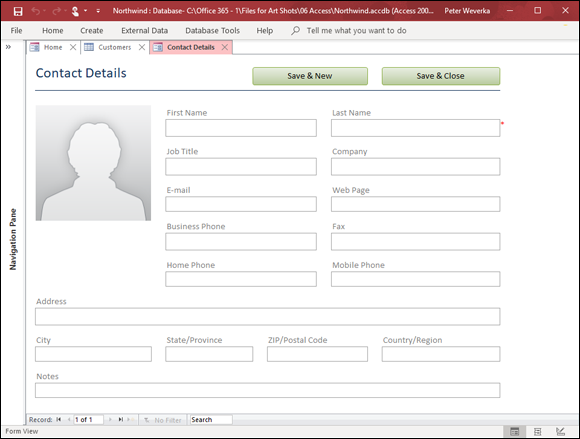
FIGURE 3-3: A form.
Creating a form
Fortunately, the Form Wizard makes it very simple to create a form for entering information in a database table. All you have to do is start the wizard, choose the table, and make a couple of design decisions. To create a form, go to the Create tab and click the Form Wizard button. You see the first of several Form Wizard dialog boxes. Answer these questions and keep clicking the Next button until the time comes to click Finish:
- Tables/Queries: From the drop-down list, choose the name of the database table you need to enter data in.
- Selected Fields: Click the >> button to enter all the field names in the Select Fields box.
- Layout: Select the Columnar option button. The other layouts aren’t much good for entering data in a table. If you choose Tabular or Datasheet, you may as well enter data straight into the datasheet rather than rely on a form.
- Title: Name your form after the table you created it for so that you can identify the form easily in the Navigation pane.
To delete a form, right-click its name in the Navigation pane and choose Delete on the shortcut menu.
Entering the data
To open a form and begin entering data in its database table, display the form’s name in the Navigation pane and then double-click the form’s name. You can also right-click the name of the form and choose Open.
 To enter data in a form, click the New (Blank) Record button. This button is located with the Navigation buttons at the bottom of the form window. A new, empty form appears. Start typing. Press the Tab key, press the Enter key, or click to move from field to field. You can move backward through the fields by pressing Shift+Tab. If you enter half a record and want to start over, press the Esc key to empty the current field. Press Esc again to empty all the fields.
The Navigation buttons at the bottom of the form window tell you how many records are in the database table and which record you’re looking at. From left to right, the Navigation buttons take you to the first record, previous record, next record, and last record.
Finding a Missing Record
Sometimes data goes astray. You scroll through a datasheet but simply can’t find the item or record you need so badly. For times like those, Access offers the Find command. Use the command to scour a database for errant information.
Open the database table with the data that needs finding. If you know in which field the data is located, click in the field. You can save a little time that way. Then, on the Home tab, click the Find button (or press Ctrl+F). You see the Find and Replace dialog box, as shown in Figure 3-4. Fill in the dialog box as follows:
- Find What: Enter the item you’re looking for. If you’re looking for a null value, enter null in this text box. Enter “” (two double-quotation marks) to find zero-length strings. Table 3-2 describes the wildcard characters you can use in searches.
- Look In: If you clicked in a field before choosing the Find command, Current Field is selected in this box. To search the entire database table, choose Current Document on the drop-down list.
- Match: Choose the option that describes what you know about the item. Choosing the Any Part of Field option can make for a long search. For example, a search for the letters chin finds, among others, China, Ching, and itching — any word with the consecutive letters chin.
- Search: Choose an option — All, Up, or Down — that describes which direction to start searching.
- Match Case: If you know the combination of upper- and lowercase letters you’re after and you enter the combination in the Find What text box, select this check box.
- Search Fields As Formatted: If you’re searching for a field that has been formatted a certain way, select this check box and make sure that the text or numbers you enter in the Find What text box are formatted correctly. For example, if you’re searching for a record with the date July 31, 1958, and you choose the mm/dd/yyyy format, enter the date as 07/31/1958.

FIGURE 3-4: Finding data.
TABLE 3-2 Wildcard Characters for Searches
Character |
Description |
Example |
? |
A single character |
b?t finds bat, bet, bit, and but. |
# |
A single numeric digit |
9411# finds 94111, 94112, 94113, and so on. |
* |
Any group of consecutive characters |
t*o finds to, two, and tattoo. |
[xyz] |
Any character in the brackets |
t[aio]pper finds tapper, tipper, and topper, but not tupper. |
[!xy] |
Any character not in the brackets |
p[!io]t finds pat and pet, but not pit and pot. |
x–z |
Any character in a range of characters |
[1–4]000 finds 1000, 2000, 3000, and 4000, but not 5000. The range must be in ascending order. |
Click the Find Next button to conduct the search. The item might be found in more than one location. Keep clicking Find Next (or pressing Alt+F) until you find the item or you die of thirst on the hot sands of the digital desert.
To quickly find the first value of a search term, start typing in the Search box in the form window or in Datasheet view. As soon as you start typing, the cursor moves to the first instance of the data you enter. The search box is located at the bottom of the screen.
Finding and Replacing Data
Finding and replacing data is remarkably similar to finding data. The difference is that you enter data in the Replace With text box as well as the familiar Find What text box and other option boxes. Figure 3-5 shows the Replace tab of the Find and Replace dialog box. Does it look familiar? If it doesn’t, read the preceding topic in this chapter, “Finding a Missing Record.”

FIGURE 3-5: Replacing data.
To find and replace data, go to the Home tab and click the Replace button (or press Ctrl+H). You see the Replace tab of the Find and Replace dialog box. After you enter the replacement data in the Replace With text box, make sure that Whole Field is selected in the Match drop-down list. Conducting a find-and-replace operation with Any Part of Field or Start of Field selected in the Match drop-down list can have unintended consequences. For example, a search for Brook also finds Brooklyn, Middlebrook, and other words that include brook. Blindly replacing the brook text string with stream produces, for example, Streamlyn and Middlestream.
 Unless you’re as confident as a gambler with four aces, don’t click the Replace All button to replace all instances of the text or numbers in the database table or field you’re searching in. Instead, click the Replace button to find and replace text or numbers one instance at a time.
By the way, you can also find and replace data with an update query. Chapter 4 of this minibook covers update queries.