
Chapter 1
Office Nuts and Bolts
IN THIS CHAPTER
![]() Introducing the Office applications
Introducing the Office applications
![]() Exploring the Office interface
Exploring the Office interface
![]() Opening, saving, and closing an Office file
Opening, saving, and closing an Office file
![]() Clamping a password on a file
Clamping a password on a file
Chapter 1 is where you get your feet wet with Office 365. Walk right to the shore and sink your toes in the water. Don’t worry; I won’t push you from behind.
In this chapter, you meet the Office applications and discover speed techniques for opening files. I show you around the Ribbon, Quick Access toolbar, and other Office landmarks. I also show you how to open files, save files, and clamp a password on a file.
Introducing Office 365
Office 365 is a subscription service from Microsoft. Subscribers can install and run Office applications on their computers; they can also take advantage of the Office cloud-based services. In computer jargon, the cloud is the name for servers on the Internet where individuals can store files and run online software. Microsoft offers many different versions of Office 365, some aimed at home users and some at business users. Visit this web page to compare and contrast the different versions of Office:
Office 365 applications
Table 1-1 describes the Office 365 applications. Not all versions of Office 365 include Outlook, Access, and Publisher.
TABLE 1-1 Office 365 Applications
Application |
Description |
Word |
A word processor for writing letters, reports, and so on. A Word file is called a document (see Book 2). |
Excel |
A number cruncher for performing numerical analyses. An Excel file is called a workbook (see Book 3). |
PowerPoint |
A means of creating slide presentations to give in front of audiences. A PowerPoint file is called a presentation, or sometimes a slide show (see Book 4). |
Outlook |
A personal information manager, scheduler, and emailer (see Book 5). |
Access |
A database management application (see Book 6). |
Publisher |
A means of creating desktop-publishing files — pamphlets, notices, newsletters, and the like (see Book 7). |
 Windows 10 must be installed on your computer to run Office 365 applications. The applications don’t run on computers running earlier versions of the Windows operating system.
 If you’re new to Office, don’t be daunted by the prospect of having to study so many different applications. The applications have much in common, with the same commands showing up throughout. For example, the method of choosing fonts is the same in Word, Outlook, PowerPoint, Excel, Access, and Publisher. Master one Office program and you’re well on your way to mastering the next.
Office 365 cloud services
Besides the applications described in Table 1-1, an Office 365 subscription entitles you to these goodies from the cloud:
- The opportunity to install Word, Excel, and PowerPoint on iPads and Windows tablets.
- Automatic updates to the Office software on your computer. As long as your subscription is paid up, Microsoft updates the Office software automatically.
- Storing and sharing files with OneDrive, Microsoft’s cloud service. As well as keep files on your computer, you can keep them on the Internet so that you can open them wherever your travels take you. Subscribers to Office 365 get 1 terabyte (1,024 gigabytes) of storage space for their files on OneDrive. You can invite others to work on files you store on OneDrive. (Book 10, Chapter 2 explains how to store and share files with OneDrive.)
- The opportunity to use the web (online) versions of Word, Excel, and PowerPoint. To use a Web application, you open it in a browser and give commands through the browser window.
- Storing and sharing files with SharePoint, Microsoft’s cloud service designed especially for businesses. (Book 10, Chapter 3 explains SharePoint, a service available only to Office 365 Business subscribers.)
- Microsoft Teams for sharing files, chatting, and participating in voice and video calls with coworkers. (Book 10, Chapter 4 explains Microsoft Teams, a service available only to Office 365 Business subscribers.)
Finding out what software and Office version you have
Follow these steps to find out which version of Office 365 you have and which Office applications are installed on your computer:
- Open any Office 365 application.
Click the File tab.
This tab is located in the upper-left corner of the screen. The Backstage window opens after you click the File tab.
Select the Account category.
As shown in Figure 1-1, the Account window opens. Under “This Product Contains” is an icon for each Office application that is installed on your computer.
Click the Manage Account button.
Your web browser opens to a Microsoft web page that tells you what type of Office 365 account you have. (If you aren’t signed in to your Microsoft account, sign in to view the web page.)
Return to the Office 365 application and click the Back button in the Account window.
The Back button, a left-pointing arrow, is located in the upper-left corner of the Account window.

FIGURE 1-1: The Account window tells you which Office applications are installed.
Finding Your Way around the Office Interface
Interface, also called the user interface, is a computer term that describes how a software program presents itself to the people who use it (and you probably thought interface meant two people kissing). Figure 1-2 shows the Word interface. You will be glad to know that the interface of all the Office programs is pretty much the same.
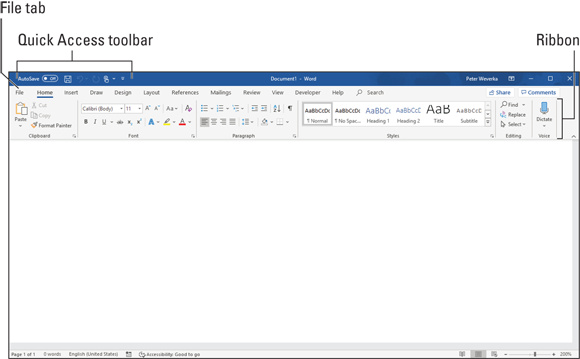
FIGURE 1-2: The File tab, Quick Access toolbar, and Ribbon.
These pages give you a quick tour of the Office interface and explain what the various parts of the interface are. Click along with me as I describe the interface and you’ll know what’s what by the time you finish reading these pages.
The File tab and Backstage
In the upper-left corner of the window is the File tab (see Figure 1-2). Clicking the File tab opens the Backstage (Microsoft’s word, not mine). As shown in Figure 1-3, the Backstage offers commands for creating, saving, printing, and sharing files, as well as performing other file-management tasks. Notice the Options command on the Backstage. You can choose Options to open the Options dialog box and tell the application you are working in how you want it to work.

FIGURE 1-3: Go to the Backstage to manage, print, and export files.
To leave the Backstage and return to the application window, click the Back button. This button, an arrow, is located in the upper-left corner of the Backstage.
The Quick Access toolbar
No matter where you travel in an Office program, you see the Quick Access toolbar in the upper-left corner of the screen (refer to Figure 1-2). This toolbar offers the AutoSave button, the all-important Save button, the trusty Undo button, and the convenient Repeat button (as well as the Touch/Mouse Mode button if your screen is a touchscreen). You can place more buttons on the Quick Access toolbar as well as move the toolbar lower in the window. I explain how to customize the Quick Access toolbar in Book 9, Chapter 1.
The Ribbon and its tabs
Across the top of the screen is the Ribbon, an assortment of different tabs (see Figure 1-2); click a tab to view a different set of commands and undertake a task. For example, click the Home tab to format text; click the Insert tab to insert a table or chart. Each tab offers a different set of buttons, menus, and galleries.
Context-sensitive tabs
To keep the Ribbon from getting too crowded with tabs, Microsoft has arranged for some tabs to appear only in context — that is, they appear on the Ribbon after you insert or click something. These tabs are called context-sensitive tabs.
In Figure 1-4, for example, I inserted a table, and two additional tabs — the Design and the Layout tab — appear on the Ribbon under the heading “Table Tools.” These context-sensitive tabs offer commands for designing and laying out tables. The idea behind context-sensitive tabs is to direct you to the commands you need and exclude all other commands.

FIGURE 1-4: After you insert or select an item, context-sensitive tabs appear on the Ribbon.
If you can’t find a tab on the Ribbon, the tab is probably context sensitive. You have to insert or select an item to make some tabs appear on the Ribbon. Context-sensitive tabs always appear on the right side of the Ribbon under a heading with the word Tools in its name.
The anatomy of a tab
All tabs are different in terms of the commands they offer, but all are the same insofar as how they present commands. On every tab, commands are organized in groups. On every tab, you find group buttons, buttons, and galleries. Group buttons, buttons, galleries — what’s up with that?
Groups and group buttons
Commands on each tab are organized into groups. The names of these groups appear below the buttons and galleries on tabs. For example, the Home tab in Excel is organized into several groups, including the Clipboard, Font, Alignment, and Number group, as shown in Figure 1-5.

FIGURE 1-5: Each tab is organized into groups; some groups offer group buttons.
Groups tell you what the buttons and galleries above their names are used for. On the Home tab in Excel, for example, the buttons in the Font group are for formatting text. Read group names to help find the command you need.
Many groups have a group button that you can click to open a dialog box or task pane. (Officially, Microsoft calls these little buttons dialog box launchers, but let’s act like grownups, shall we?) Group buttons are found to the right of group names. Move the pointer over a group button to open a pop-up help box with a description of the dialog box or task pane that appears when the button is clicked (refer to Figure 1-5).
Buttons and galleries
Go to any tab and you find buttons of all shapes and sizes. What matters isn’t a button’s shape or size but whether a down-pointing arrow appears on its face. Click a button with an arrow and you get a drop-down list with options you can choose.
 You can find out what clicking a button does by moving the pointer over it, which makes a pop-up description of the button appear.
Built in to some tabs are galleries. A gallery presents you with visual options for changing an item. When you move the pointer over a gallery choice, the item on your page or slide — the table, chart, or diagram, for example — changes appearance. In galleries, you can preview different choices before you click to select the choice you want.
Mini-toolbars and shortcut menus
A mini-toolbar is a toolbar that appears onscreen to help you do a task, as shown in Figure 1-6. You can select an option from a drop-down list or click a button on the mini-toolbar to complete a task. Mini-toolbars are very convenient. They save you the trouble of going to a different tab to complete a task.

FIGURE 1-6: A mini-toolbar (top) and shortcut menu (bottom).
Similar to mini-toolbars are the shortcut menus you get when you right-click, as shown in Figure 1-6. Right-click means to click the right, not the left, mouse button. Right-click just about anywhere and you get a shortcut menu of some kind.
In Word, Excel, and PowerPoint, you see a mini-toolbar and a shortcut menu when you right-click text.
Office 365 for keyboard lovers
People who like to give commands by pressing keyboard shortcuts will be glad to know that Office offers Alt+key shortcuts. Press the Alt key and letters — they’re called KeyTips — appear on tab names. After you press the Alt key, follow these instructions to make use of KeyTips:
- Go to a tab. Press a KeyTip on a tab to visit a tab.
- Make KeyTips appear on menu items. Press a KeyTip on a button or gallery to make KeyTips appear on menu items, as shown in Figure 1-7. After the KeyTips appear, press a letter or letter combination to give a command.

FIGURE 1-7: Press the Alt key to see KeyTips.
Saving Your Files
Soon after you create a new file, be sure to save it. And save your file from time to time while you work on it as well. Until you save your work, it rests in the computer’s electronic memory (RAM), a precarious location. If a power outage occurs or your computer stalls, you lose all the work you did since the last time you saved your file. Make it a habit to save files every ten minutes or so, or when you complete an important task.
These pages explain how to save a file, declare where you want to save files by default, and handle how files are saved automatically in the background.
Saving a file
To save a file:
- Click the Save button (you’ll find it on the Quick Access toolbar).
- Press Ctrl+S.
- Go to the File tab and choose Save.
Saving a file for the first time
The first time you save a file, the Save As window opens. It invites you to give the file a name and choose a folder in which to store it. Enter a descriptive name in the File Name text box. To locate a folder for storing your presentation, see “Navigating the Save As and Open Windows,” later in this chapter.
Saving AutoRecovery information
To ensure against data loss owing to computer and power failures, Office saves files on its own every ten minutes. These files are saved in an AutoRecovery file. After your computer fails, you can try to recover some of the work you lost by getting it from the AutoRecovery file.
Office saves AutoRecovery files every ten minutes, but if you want the program to save the files more or less frequently, you can change the AutoRecovery setting. Auto-recovering taxes a computer’s memory. If your computer is sluggish, consider making AutoRecovery files at intervals longer than ten minutes; if your computer fails often and you’re worried about losing data, make AutoRecovery files more frequently.
Follow these steps to tell Office how often to save data in an AutoRecovery file:
On the File tab, choose Options.
The Options dialog box appears.
- Select the Save category.
- Enter a Minutes setting in the Save AutoRecover Information Every box.
- Click OK.
Navigating the Save As and Open Windows
The Open window and Save As window offer a bunch of different ways to locate a file you want to open or locate the folder where you want to save a file. Figure 1-8 shows the Open and Save As windows. To open these windows, click the File tab and choose Open or Save As.
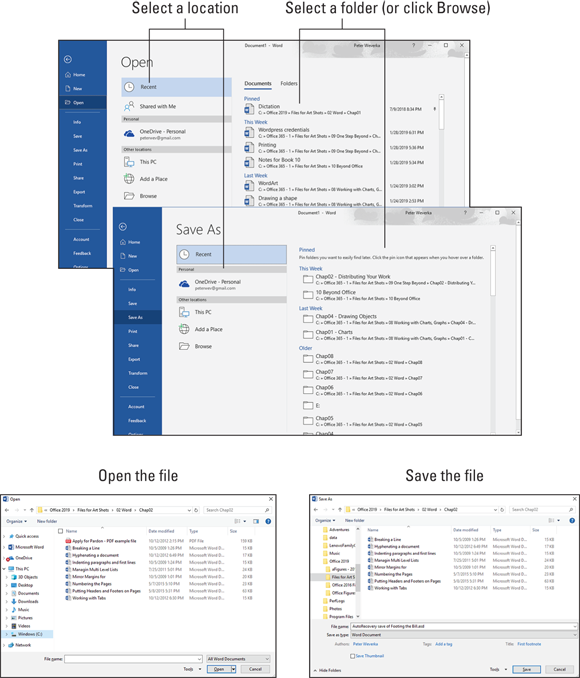
FIGURE 1-8: The Open window (top) and Save As window (bottom) work much the same way.
Follow these steps to open a file or save a file for the first time (or save a file under a different name or in a different location):
- Click the File tab.
Choose Open or Save As.
The Open or Save As window opens (refer to Figure 1-8).
On the Recent list, the Open window lists files you recently opened. You can open a file on this list by clicking its name. To list files you open frequently at the top of the Recent list, click the Pin This Item button (it looks like a push-pin). You see this button when you move the pointer over a filename on the list.Select the location where you expect to find or want to save the file (select This PC, most likely).
Select This PC to rummage in folders on your computer. You can also list network and OneDrive locations in the Open and Save As windows. (I explain OneDrive in Book 10.)
Select the folder where you expect to find or want to save the file.
The window provides a couple of shortcuts for finding that folder:
- Recent Folders: Click the name of a folder you opened recently.
- Browse button: Click the Browse button, and in the Open or Save As dialog box, locate and select a folder.
The Open or Save As dialog box appears.
Open or save the file.
At last, the moment of truth:
- Open the file: Select the filename and click the Open button (or double-click the filename).
- Save the file: Enter a descriptive name for the file and click the Save button.
Opening and Closing Files
To get to work on a file, you have to open it first. And, of course, you close a file when you’re finished working on it and want to stop and smell the roses.
Opening a file
Follow these steps to open a file:
On the File tab, choose Open (or press Ctrl+O).
You see the Open window. It lists files you recently opened (and files you pinned to the Recent list).
If the name of the file you want to open is on the Recent list, click the name to open the file.
If the name isn’t on the list, go to Step 3.
Click the location — This PC, OneDrive, a network folder — where the file is located.
Click This PC if the file is located on your computer.
Select the folder where the file you want to open is stored; if the folder isn’t listed in the Open window, click the Browse button and select the folder in the Open dialog box.
The Open dialog box appears.
- Select the file.
Click the Open button.
Your file opens. You can also double-click a filename in the Open dialog box to open a file.
The fastest way to open a file is to locate it in File Explorer, the Windows file-management application, and double-click its name.
Closing a file
Closing a file is certainly easier than opening one. To close a file, save your file and use one of these techniques:
- On the File tab, choose Close. The program remains open although the file is closed.
- Click the Close button — the X in the upper-right corner of the window.
- Press Alt+F4.
Reading and Recording File Properties
Properties are a means of describing a file. If you manage two dozen or more files, you owe it to yourself to record properties. You can use them later to identify files.
To read property descriptions, go to the File tab, choose Info, and examine the Info window. Property descriptions are found on the right side of the window, as shown in Figure 1-9.
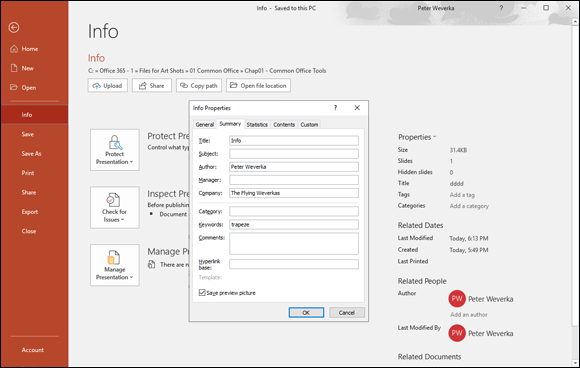
FIGURE 1-9: View and enter properties in the Info window.
To record even more descriptions, click the Properties button (located at the top of the file descriptions) and choose Advanced Properties on the drop-down menu. The Properties dialog box appears. Enter information about your file on the Summary and Custom tabs.
You can read a file’s properties without opening a file. In File Explorer or the Open dialog box, right-click a file’s name and choose Properties. You see the Properties dialog box. Go to the Details tab to see descriptions you entered.
Locking a File with a Password
Perhaps you want to submit your file to others for critical review but don’t want just any Tom, Dick, or Harriet to look at your file. In that case, lock your file with a password and give out the password only to people whose opinions you trust. These pages explain how to password-protect a file, open a file that is locked with a password, and remove the password from a file.
Password-protecting a file
Follow these steps to clamp a password on a file, such that others need a password to open and perhaps also edit it:
- Go to the File tab and choose Info.
In the Info window, click the Protect Document (or Workbook or Presentation) button, and choose Encrypt with Password on the drop-down list.
The Encrypt dialog box appears, as shown in Figure 1-10.
Enter a password in the Password text box and click OK.
Others will need the password you enter to open the file. No ifs, ands, or buts. They have to enter the password.
Passwords are case-sensitive. In other words, you have to enter the correct combination of upper- and lowercase letters to successfully enter the password. If the password is Valparaiso (with an uppercase V), entering valparaiso (with a lowercase v) is deemed the wrong password and doesn’t open the file.In the Confirm Password dialog box, enter the password again.
Refer to Figure 1-10 for the Confirm Password dialog box.
Click OK.
The Info window informs you that a password is required to open the file.

FIGURE 1-10: Enter passwords for the file in this dialog box.
Removing a password from a file
Follow these steps to remove a password from a file:
- Open the file that needs its password removed.
- Go to the File tab and choose Info to open the Info window.
Click the Protect Document (or Workbook or Presentation) button, and choose Encrypt with Password.
The Encrypt dialog box appears (refer to Figure 1-10).
- Delete the password and click OK.
Trusting (or not Trusting) Microsoft with Your “Content”
In the interest of serving you better, Microsoft wants to see your content. Content (Microsoft’s word, not mine) refers to the words, numbers, and other data in Office files. If Microsoft’s artificial intelligence (AI) software can read your content, the thinking goes, Microsoft can improve your Office experience. Microsoft can deduce from your history with Office what you like and want to do next.
Some Office features run only if you trust Microsoft with your content:
- Tell Me: In all Office applications, completes a task or suggests how to complete a task. Click in the “Tell Me” search box to the right of the first tab on the Ribbon.
- Editor: In Word, identifies words that might be misunderstood and presents alternative words — like a high-powered spell checker.
- Smart Lookup: In Word, opens a task pane with word definitions and links you can click to conduct research online. On the References tab, click the Smart Lookup button.
- Translator: In Word, translates words and documents into English. On the Review tab, click the Translate button.
- Dictate: In Word, PowerPoint, and Outlook, takes dictation. Click the Dictate button.
- Insights: In Excel, analyzes data on the fly. On the Insert tab, click the Insights button.
- PowerPoint Designer: In PowerPoint, suggests designs that are appropriate for you based on your history with slide designs. On the Design tab, click the Design Ideas button.
Microsoft calls these features “intelligent services.” If you don’t trust Microsoft with your content and you try to use an intelligent service, you see the dialog box shown on the left side of Figure 1-11. Click the Turn On button in this dialog box to trust Microsoft with your content.

FIGURE 1-11: To trust or not to trust Microsoft, that is the question.
And what if you don’t trust Microsoft? Some people get squeamish when an artificial-intelligence robot peers over their shoulder. Some people get the willies knowing that their private data is available to a faceless corporate behemoth.
Follow these steps to trust or not trust Microsoft with your content:
On the File tab in any Office application, choose Options.
The Options dialog box opens.
- Select Trust Center on the left side of the dialog box.
- Click the Trust Center Settings button.
Select Privacy Options on the left side of the dialog box.
As you can see on the right side of Figure 1-11, shown previously, a list of privacy options appears. The first option is the one that matters where your content is concerned.
Select the first option (Get Designs, Information…) if you want Microsoft to be able to read data in your Office files.
In other words, choose this option if you trust Microsoft.
Select the second option (Let Office connect…) if you want Microsoft to be able to connect your files to Microsoft websites such as Bing and Bing Maps, and third-party websites such as Wikipedia.
While you’re in the Trust Center, you can click the Read Our Privacy Statement link to open a web page that describes how Microsoft collects personal data and what the company does with this data. It makes for very dry reading. It was written by lawyers, I wager.
- Click OK in the Trust Center dialog box.
- Click OK in the Options dialog box.