
Admittedly, this chapter covers a number of unrelated components in the Eclipse Platform. They have in common the fact that each is designed as an independent plug-in that can be added to any Eclipse-based application. Although they are at home mostly in IDE applications, these plug-ins can also be inserted into RCP applications when help, search, or compare facilities are needed.
Help is added to Eclipse in the form of help books that appear in the online help system. Each help book is laid out in table-of-contents files (toc.xml) that specify the structure of each help book. These table-of-contents files are then registered with the platform, using the org.eclipse.help.toc extension point. The help content must be in the form of standard HTML files. Each major topic should be in a separate file so it can be referenced in the table of contents. Not surprisingly, excellent help content that describes how to integrate help into your plug-in is available, so we don’t need to go into further detail here.
When the user presses F1, context-sensitive help is displayed that briefly describes the action or widget that is currently in focus and provides links to related help topics. You can implement this form of help for your plug-in by associating a help context ID with the actions, menus, and controls in your plug-in. Help is designed in such a way that disruption in the code is kept to an absolute minimum. The help text and links are provided via an extension point and don’t even need to reside in the same plug-in as the code that the help text refers to. This makes it easy to make help an optional part of your plug-in or to provide help in various languages.
The only code required to associate help with your UI component is to link a help context ID to it. This is accomplished by using the various setHelp methods on the WorkbenchHelp class. For example, adding help to a view can be done in the view’s createPartControl method:
public void createPartControl(Composite parent) {
   ...
   WorkbenchHelp.setHelp(parent,
      "org.eclipse.faq.examples.books_view");
}
The setHelp methods can be used to add help contexts to actions, menus, and arbitrary controls. Because context-sensitive help operates on the control that is in focus, it makes sense to associate help contexts only with controls that are able to take focus. See the help documentation for more details.
For actions that are contributed declaratively, help contexts are contributed in the XML action definition. For example, for an action in an actionSet, the context is specified using the helpContextId attribute:
<action
   ...
   helpContextId="org.eclipse.faq.examples.console_action"
</action>
Help contexts are specified declaratively for the following extension points in the Eclipse SDK:
org.eclipse.ui.actionSetsorg.eclipse.ui.editorActionsorg.eclipse.ui.popupMenusorg.eclipse.ui.viewActionsorg.eclipse.ui.ide.markerHelporg.eclipse.search.searchPagesorg.eclipse.debug.ui.launchShortcutsorg.eclipse.debug.ui.launchConfigurationTabGroups
Help contexts are added by using the org.eclipse.help.contexts extension point. Contexts are usually specified by using a separate help plug-in, making it easier to switch help content for various languages. The context extension specifies the path of a separate XML file where the data is stored:
<extension point="org.eclipse.help.contexts">
   <contexts
      file="help_contexts.xml"
      plugin="org.eclipse.faq.examples">
   </contexts>
</extension>
The contexts file includes a description for each context and can, optionally, add links to HTML help content files in the plug-in. See the help documentation for more details on the format of help context files.
Note
FAQ 275 How do I provide F1 help?
Go to Platform Plug-in Developer Guide > Programmer’s Guide > Plugging in help
You can write the HTML files and the corresponding toc.xml file by hand, which is painful. An alternative is to use DocBook for those who swear by XML, style sheets, and XSLT. Perhaps the simplest way is to use the toc.xml Explorer and HTML editor included as samples with this book.
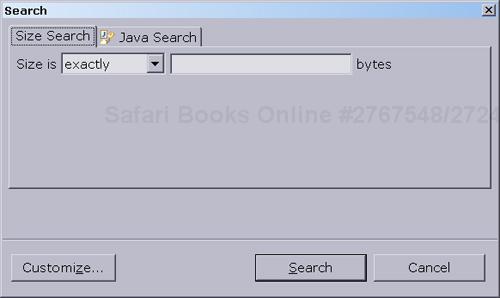
You can add custom search pages to the Eclipse Search dialog by adding an extension to the org.eclipse.search.searchPages extension point. This page, which must implement the ISearchPage interface, should have input fields for whatever search criteria you want to allow. Figure 16.1 shows an example search page that allows the user to search for files based on their size.
The code for creating the dialog page is much the same as for any other group of SWT widgets. The one caveat is that your createControl method must call setControl after your widget is created to let the dialog know what your top-level control is. Complete source code for the dialog is included in the FAQ Examples plug-in.
When the Search button is clicked, the performAction method is called on your search page. This method should perform the search and return true if the search was successful. If the user enters invalid search parameters, you should present a dialog explaining the error, and return false from the performAction method. Returning false causes the dialog to remain open so the user can fix the search parameters.
Your query page can, optionally, include a standard area allowing the user to specify a search scope. This scope can be the entire workspace, the selected resources, the selected projects, or a user-defined working set. If you want this scope area to appear in your page, include the attribute showScopeSection = “true” in your search page extension declaration. If you do include this, you should consult the chosen scope via the ISearchPageContainer instance that is passed to your page and make sure that your search operation honors the value of the scope.
Note that you are not restricted to creating queries based on files. The search dialog has pages for finding plug-ins and help contents as well. Other plug-ins are available on the Web for performing Bugzilla queries, news queries, and more. However, the infrastructure for presenting results in the Search Results view is limited to file-based searches. If your search is not operating on files, you will need to create your own view or dialog for presenting search results.
A search operation is initiated from the performAction method on a search page. The search can run either in a blocking manner, thus preventing the user from doing further work until the search is done, or in the background. To run the search in a blocking manner, use the IRunnableContext available from the ISearchPageContainer instance:
class SearchSizePage extends DialogPage
 implements ISearchPage {
   private ISearchPageContainer container;
   public boolean performAction() {
      // ... validate input ...
      IRunnableWithProgress query = ...;//the query object
      container.getRunnableContext().run(true, true, query);
      return true;
   }
   public void setContainer(ISearchPageContainer spc) {
      this.container = spc;
   }
}
To run your query in the background, create and schedule a subclass of Job. Regardless of whether the search is run in the foreground or the background, the mechanics of the search operation itself will usually be the same.
If your search is operating on files in the workspace, you should ensure that changes are batched to prevent autobuilds every time a search result is created. Do this by making your operation subclass WorkspaceModifyOperation in the blocking case or WorkspaceJob in the nonblocking case. For the rest of this FAQ, we’ll assume that you’re writing a search on the workspace.
The purpose of your search operation is to locate the files that match the search parameters and to generate search result markers for each match. One common method of doing this is to use a resource visitor. Here is the general structure of a simple search operation:
class SearchOperation extends WorkspaceModifyOperation
   implements IResourceProxyVisitor {
   public void execute(IProgressMonitor monitor) {
      ResourcesPlugin.getWorkspace().getRoot().accept(
         this, IResource.DEPTH_INFINITE);
   }
   protected boolean isMatch(IFile file) {
      ... test match criteria ...
   }
   public boolean visit(IResourceProxy proxy) {
      if (proxy.getType() == IResource.FILE) {
         IFile file = (IFile) proxy.requestResource();
         if (isMatch(file))
            file.createMarker(SearchUI.SEARCH_MARKER);
      }
      return true;
   }
}
If your search is located within a specific portion of the file, you should fill in the appropriate attributes on the search result marker (LINE_NUMBER, CHAR_START, and CHAR_END from IMarker). None of these attributes is required; in some cases, a search can simply identify an entire file.
Marker-based search results can be displayed in the Search Results view provided by the org.eclipse.search plug-in. To do this, you first need to make sure that the Search Results view is created and then obtain a reference via the SearchUI class:
SearchUI.activateSearchResultView();
ISearchResultView resultView = SearchUI.getSearchResultView();
Before you begin adding search results to the view, you need to call ISearchResultView.searchStarted. This method lets the view know that the series of matches about to be added belong to a single search query. This method takes the following:
IActionGroupFactory, a factory object for creating the actions that will appear in the context menu when a search result is selected.String, the label to use in the view title bar when there is exactly one search result. This label should describe the search thoroughly because it will also appear in the search history list that allows the user to add old searches back to the view.String, the same label as the preceding, but for multiple search results. The string should contain the pattern {0}, which will be replaced with the exact number of occurrences.ImageDescriptor, the image to use for this group of results. This will also appear in the search history drop-down list. If you don’t provide one, a default icon will be used.String, the ID of the Search dialog page that generated this set of search results. This is the ID attribute from the search page extension declaration.ILabelProvider, the label provider to use for displaying each search result. If not provided, a reasonable default will be used.IAction, the action that will cause your search result to be opened in an editor.IGroupByKeyComputer(described in the next paragraph).IRunnableWithProgress, a runnable that will execute the search query over again. This can be the exact runnable executed from the Search dialog.
The Search Results view shows results in groups, where each line in the view is a single group. A group typically corresponds to a logical unit, such as a file or a Java method, where the match was found. This serves to reduce clutter in the view so that a large number of results can be aggregated into a smaller space. The IGroupByKeyComputer object provided in the searchStarted method is used to map from search results to the group that corresponds to each result. If you don’t want to group your search results, you don’t need to provide this object.
Once the search has been started, each search result is added to the view by using the addMatch method. This method takes a description string, a resource handle, the search result marker, and an object that represents the group that the result belongs to. A typical grouping is to use the file as the group identifier. That way, all search results for a given file will be aggregated together in the Search Results view. If you don’t want to group search results at all, use the marker itself as the group marker.
Finally, when you have finished adding search results, call the method searchFinished on the Search Results view. This method must be called in all circumstances, including failure and cancellation, so it is a good idea to put it in a finally block at the end of your search operation.
The org.eclipse.compare plug-in includes infrastructure for computing the differences between groups of files and the content of individual files. The plug-in also contains UI components that allow a user to browse and manipulate comparisons in editors and dialogs. Eclipse components typically interact with the compare plug-in in two ways. First, they may be compare clients, using the comparison engine to compute differences between various inputs and to display the result of those comparisons. For example, the Team plug-ins use the compare support to compute differences between local and remote resources, and to display those comparisons in a comparison editor.
The second way to use the compare plug-in is as a provider. Your plug-in can contribute viewers for displaying the structure of files and for illustrating the differences between two files of a particular type. Structure merge viewers are contributed when you have a file with a particular semantic structure that is useful to display to the user. For example, JDT supplies a structure merge viewer that shows the differences between the methods and fields of the files being displayed. Structure viewers are contributed by using the structureMergeViewers extension point.
The platform includes compare viewers for text content and for GIF and JPG image files. If you have unique files that need a more specialized compare viewer, you can contribute one via an extension point. All plug-ins that use compare will then be able to make use of those compare viewers for displaying your content type. To contribute a content viewer that does not support merge, use the contentViewers extension point. To contribute a viewer that supports the merging of files, use the contentMergeViewers extension point.
The Eclipse SDK includes actions for comparing and replacing files in the workspace with one another and with editions in the local history. The same mechanisms can be used for comparing any kind of text content, regardless of its source. EditionSelectionDialog is used to ask the user to select from an array of input elements. The inputs must implement several interfaces. First, they must implement ITypedElement to provide the name, image, and content type of the object to be compared. Second, they must implement IModificationDate to provide a timestamp of the object’s creation or modification date. The timestamp is used to sort the input elements chronologically. Finally, they must implement IStreamContentAccessor to supply the content to be compared. Here is an example of a class that implements all these interfaces for string-based content:
class CompareItem implements IStreamContentAccessor,
         ITypedElement, IModificationDate {
   private String contents, name;
   private long time;
   StringItem(String name, String contents, long time) {
      this.name = name;
      this.contents = contents;
      this.time = time;
   }
   public InputStream getContents() throws CoreException {
      return new ByteArrayInputStream(contents.getBytes());
   }
   public Image getImage() {return null;}
   public long getModificationDate() {return time;}
   public String getName() {return name;}
   public String getString() {return contents;}
   public String getType() {return ITypedElement.TEXT_TYPE;}
}
The most interesting method here is the getType method, which should return the file extension of the input element. The file extension is used to determine the viewer for displaying the contents of the object.
The method EditionSelectionDialog.selectEdition accepts an array of objects that implement all the interfaces mentioned earlier. It will open a dialog, allow the user to select one of the available editions, and return the chosen result. The EditionSelectionDialog instance is initialized in a somewhat unorthodox manner by requiring a ResourceBundle object in the constructor. This bundle must supply all the text messages that appear in the dialog, in addition to such parameters as the dialog’s default width and height. See the EditionSelectionDialog constructor comment for more details. In the FAQ Examples plug-in, see the CompareStringsAction example for a complete illustration of how this dialog is used.
Compare dialogs are typically used in simple contexts that ask the user to select from a list of available editions. For richer comparisons, a compare editor is typically used. The advantage of using an editor is that the user can take as long as needed to browse, modify, and merge the contents.
Compare editors display a tree of DiffNode elements, where each node represents a logical entity, such as a file or programming-language element. These nodes represent either a two-way or a three-way comparison, where the optional third element is the common ancestor of the two elements being compared. Each DiffNode references a left- and right-side element and, possibly, a third element representing the common ancestor. As with compare dialogs, these compare elements should implement ITypedElement and IStreamContentAccessor. You can construct these node trees manually or use the supplied Differencer class to help you construct it.
The DiffNode tree is computed by a CompareEditorInput subclass that is passed as an input to the editor. The subclass must implement the prepareInput method to return the tree represented by the DiffNode. The following example illustrates a compare editor input that uses the CompareItem class described in FAQ 282:
class CompareInput extends CompareEditorInput {
   public CompareInput() {
      super(new CompareConfiguration());
   }
   protected Object prepareInput(IProgressMonitor pm) {
      CompareItem ancestor =
         new CompareItem("Common", "contents");
      CompareItem left =
         new CompareItem("Left", "new contents");
      CompareItem right =
         new CompareItem("Right", "old contents");
      return new DiffNode(null, Differencer.CONFLICTING,
         ancestor, left, right);
   }
}
Once you have a compare editor input, opening a compare editor on that input is trivial. Here is an example action that opens a compare editor, using the preceding input:
public class CompareEditorAction implements
 IWorkbenchWindowActionDelegate {
   public void run(IAction action) {
      CompareUI.openCompareEditor(new CompareInput());
   }
}
If you want to support merging as well as comparing, two extra steps are involved. First, you need to specify which of the elements is editable. This is done by the CompareConfiguration object that is passed to the CompareEditorInput constructor. Use the setLeftEditable and setRightEditable methods to specify which of the comparison panes should support modification. Second, your editor input class should override the save method to perform the save of the editor contents.