
Through its JDT project, Eclipse has strong support for Java development, such as editing, refactoring, building, launching, and debugging. Likewise, the C development tools (CDT) project aims for similar support for writing C/C++ code. This chapter discusses some of the issues to address when you have your own language and want to host it in Eclipse for writing programs and plug-ins. We look at the various ways of integrating with Eclipse: from no integration to a fully integrated language development environment. To structure our discussion, we take a closer look at eScript, an experimental script language developed especially for this book. As is the case for all examples described in this book, you can find eScript on this book’s CD-ROM or Web site (http://eclipsefaq.org). For more details on eScript, see FAQ 319.
Many questions have been addressed in other FAQs in this book and may be somewhat repetitive. However, if you are planning to implement support for your own programming language, this chapter might serve well as a comprehensive overview of how to approach this big task.
Any classification of integration of a new programming language with Eclipse is somewhat arbitrary. We have identified the following degrees of integration of a new programming language, such as eScript, with Eclipse:
Phase 1—Compiling code and building projects. To obtain full integration with Eclipse in the area of compilation of programs and build processes for your own language, follow the various steps outlined in FAQ 320.
Phase 2—Implementing a DOM. The DOM is an in-memory structural representation of the source code of a program written in your language. Using the structural information contained in the DOM, all kinds of analysis and refactoring tools can be built. For more details, see FAQ 331.
Phase 3—Editing programs. After writing a compiler, a builder, and a DOM, you are ready to consider all the individual steps to build the ultimate Eclipse editor for your language. The steps are outlined in FAQ 334.
Phase 4—Adding the finishing touches. To give your language IDE a professional look, follow the steps outlined in FAQ 342.
If you carefully observe these four phases, you will find that the visual aspects of your language IDE happen late in the process. You will have to do some legwork before you are able to get to the pretty parts. We recommend patience and restraint. Time spent in phases 1 and 2 will be well spent, and once you get to phase 3 and 4, you will be grateful that you followed all the steps we outlined.
We designed and implemented eScript to describe the various steps in adding support for a new programming language to Eclipse. Our eScript is not an official product but simply serves as an experiment for this book.
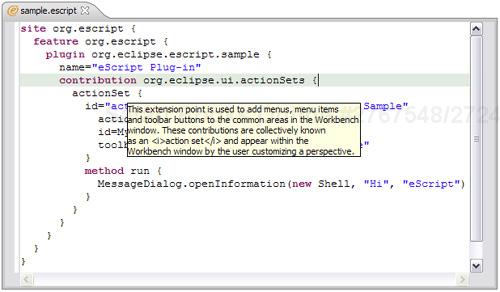
The idea behind eScript is that someone can implement an Eclipse plug-in by using a simple script language instead of using a sometimes complicated and confusing combination of XML and Java. Figure 19.1 is a sample eScript that declares an update site containing a feature that contains a plug-in that contributes to the org.eclipse.ui.actionSets extension point.

The eScript language uses as much inferencing as possible. It does not need import statements, type declarations, or even the declaration of a required interface (the example in Figure 19.1 implements IActionDelegate, but nowhere is this specified in the script). Whenever possible, types and identities are inferred from the environment.
Files containing eScript scripts are compiled into Java bytecodes with the eScript compiler. The compiler generates a plugin.xml file and a JAR containing autogenerated Java class files.
Phase 1 of language integration with Eclipse focuses on compilation of source files and building projects. We can distinguish the following individual steps/approaches to obtain complete integration:
Use no integration. Edit and compile source code externally and load it into Eclipse. This makes it difficult for the eScript compiler to use such facilities as the PDE plug-in model, which is needed to discover all kinds of attributes about plug-ins to be written. In fact, using an external builder is impractical for any kind of serious integration. For more details, see FAQ 321.
Use external builders. Edit your files with Eclipse, and use an Ant script to compile the source files. A problem is that information exchange between Eclipse and the external builder is severely limited; hence, the name external builder, of course. However, using an Ant script allows for some experimentation without the need to write a plug-in. For more details, see FAQ 322.
Implement a compiler that runs inside Eclipse. In other words, write the compiler in Java and run it in the same JVM as Eclipse runs in. One approach could be to add a
PopupMenucommand to eScript files in the Resource Navigator. Running the compiler in this fashion puts Eclipse in control. Files are built when Eclipse wants them and Eclipse does not need to react to changes from outside. For more details, see FAQ 323.React to workspace changes. Edit files by using Eclipse editors. Whenever the user saves a source file, you can be notified so that the file can be compiled. Integration is definitely improving but still is cumbersome as it does not integrate well with how Eclipse thinks about the way projects are built. For more details, see FAQ 324.
Implement an Eclipse builder. Builders are invoked on a project when any of its resources are changed or when the user manually requests a project to be rebuilt. Multiple builders can be registered on a project, and integration of a compiler into a build process is worth considering owing to its many benefits. For more details, see FAQ 325.
After following these steps, you are almost ready to focus on writing an editor. First, you have to look at FAQ 331.
You can achieve a minimal level of Eclipse integration without writing a single line of Eclipse-specific tooling code. Add resource files to a project in your workspace. Edit and compile the source files outside Eclipse or by using the Eclipse text editor. Make sure that the files get copied into the project’s output directory, usually the bin directory. Intermittently refresh your Eclipse Navigator so that you can access the generated bytecode files. The only integration is the sharing of class files through the file system. But at least it allows for preliminary and rudimentary experimentation without writing any Eclipse plug-ins.
Use the default Eclipse text editor to edit the eScript source files, and use an Ant script to compile the eScript source into Java bytecodes. Ant scripts are XML-based scripts that can be used to automate certain build processes. You could view them as a much more flexible incarnation of Make.
A simple Ant script (build.xml) may look like this:
<?xml version="1.0" encoding="UTF-8"?>
<project name="eScript" default="compile" basedir=".">
   <target name="compile">
      <exec executable="eScriptc.exe" dir="src">
         <arg value="-cp"/>
         <arg value="... long classpath specifier ..."/>
         <arg value="EscriptPlugin/SampleAction.eScript"/>
      </exec>
      <copy file="src/EscriptPlugin/SampleAction.class"
         todir="bin/EscriptPlugin/actions/"/>
      <eclipse.convertPath
                   fileSystemPath="c:faqEscript Plugin"
         property="resourcePath"/>
      <eclipse.refreshLocal resource="${resourcePath}"
         depth="infinite"/>
    </target>
</project>
Of course, this script can be made more elegant, but it serves to highlight the main problems with the approach. First, we have to compute the project’s classpath, which can be quite complex for a plug-in, and pass it to the eScript compiler. Second, we have to explicitly pass in the name of the source file. Third, we need to replicate the JDT’s behavior by copying the resulting class file to the project’s bin directory. Finally, we have to refresh the workspace so that Eclipse gets notified of the changes in the class files and can rebuild dependant components in the workspace.
It is not easy to discover structure about Eclipse’s installed plug-ins from outside Eclipse, so compilation of eScript source files becomes a real challenge when done outside Eclipse. Perhaps most troublesome is that each time the source changes, the user has to manually run Ant on the build.xml file. This spins off a new compiler, which has to load the entire classpath to do name and symbol resolution, and the compilation process becomes quite noticeable and annoying after a while.
But even with these limitations, this approach is viable for developers who do not want to write a new plug-in to support their language. Using the Eclipse support for launching external tools and Ant scripts, eScript files can be edited and compiled without having to leave the IDE.
First, a compiler like the eScript compiler should, of course, be written as a plug-in. In other words, the compiler will have dependent plug-ins, such as the core.resources plug-in to read source files and class files and to write resulting Java class files. The compiler has preferences, so it declares a preference page. Furthermore, to discover all kinds of structural information about the target platform, the compiler leans heavily on PDE to help out.
More important the compiler can itself be a publisher of API and can contribute a set of extension points to which other plug-ins can define extension points.
By making the compiler a plug-in, it automatically runs inside Eclipse, and it can keep information cached for later compilation runs. For instance, it can be quite expensive to compute the full list of classes available for class-name resolution if the compiler sees the word Shell and needs to determine that a reference is made to org.eclipse.swt.widgets.Shell. Such metainformation has to be recomputed each time the compiler is executed in an external process, such as when run from a command-line compiler. Keeping the metadata in memory allows for incremental compilation strategies, greatly improving the user experience and reinforcing the feeling of integration with the platform. Later, we discuss how to implement a compiler in Eclipse.
Register a workspace resource change listener. Inside our eScript plug-in class, we call
IResourceChangeListener rcl = new IResourceChangeListener() {
   public void resourceChanged(IResourceChangeEvent event) {
      IResource resource = event.getResource();
      if (resource.getFileExtension().equals("escript" )) {
         // run the compiler
      }
   }
};
ResourcesPlugin.getWorkspace().addResourceChangeListener(rcl);
We will be notified whenever the file is changed in the workspace under Eclipse’s control. Changes made to the files outside Eclipse will not be detected unless the workspace is being explicitly refreshed. Alternatively, a separate worker thread could be used to monitor the file system and inform Eclipse of any files having changed.
If the source files are edited with an Eclipse text editor, this scenario will work, and files can be compiled as soon as saved. We certainly are on the right path for our language integration because all editing and compilation are done inside Eclipse on the same Java VM.
Even though we are more integrated than when running an external builder, reacting to workspace changes remains cumbersome, and a much better approach is to use an integrated builder.
To understand how Eclipse builds projects, you need to
If you follow these instructions, but your builder does not seem to be called, consult FAQ 329.
Note
FAQ 326 Where are project build specifications stored?
Go to Platform Plug-in Developer Guide > Programmer’s Guide > Resources overview > Incremental project builders
A project is built according to the specifications defined in its .project file. To see the .project file for a given project, click on the Menu toggle in the Package Explorer’s toolbar, select Filters..., and deselect .* files. Open the .project file. The .project file for a plug-in should look similar to this:
<?xml version="1.0"  encoding="UTF-8" ?>
<projectDescription>
    <name>org.eclipse.escript.builder</name>
    <projects>
        ...
    </projects>
    <buildSpec>
        <buildCommand>
            <name>org.eclipse.jdt.core.javabuilder</name>
            <arguments> </arguments>
        </buildCommand>
        <buildCommand>
            <name>org.eclipse.pde.ManifestBuilder</name>
            <arguments> </arguments>
        </buildCommand>
        <buildCommand>
            <name>org.eclipse.pde.SchemaBuilder</name>
            <arguments> </arguments>
        </buildCommand>
    </buildSpec>
    <natures>
        <nature>org.eclipse.pde.PluginNature</nature>
        <nature>org.eclipse.jdt.core.javanature</nature>
    </natures>
</projectDescription>
To register the eScript builder for a given project, add the builder to the project’s build specification as follows:
private void addBuilder(IProject project, String id) {
   IProjectDescription desc = project.getDescription();
   ICommand[] commands = desc.getBuildSpec();
   for (int i = 0; i < commands.length; ++i)
      if (commands[i].getBuilderName().equals(id))
         return;
   //add builder to project
   ICommand command = desc.newCommand();
   command.setBuilderName(id);
   ICommand[] nc = new ICommand[commands.length + 1];
   // Add it before other builders.
   System.arraycopy(commands, 0, nc, 1, commands.length);
   nc[0] = command;
   desc.setBuildSpec(nc);
   project.setDescription(desc, null);
}
Alternatively, you could edit the project description directly on disk by modifying the .project file:
<buildCommand>
   <name>org.eclipse.escript.builder.Builder</name>
   <arguments> </arguments>
</buildCommand>
A builder is normally added to a project in the project creation wizard but can be added later on.
To implement an incremental project builder, you first have to create an extension for org.eclipse.core.resources.builders:
<extension
      id="Builder"
      name="eScript Builder"
      point="org.eclipse.core.resources.builders" >
   <builder>
      <run class="org.eclipse.escript.builder.Builder" >
         <parameter name="optimize"  value="true" />
         <parameter name="comment"  value="escript Builder" />
      </run>
   </builder>
</extension>
The second step is to create a builder class that must extend the abstract IncrementalProjectBuilder superclass:
public class Builder extends IncrementalProjectBuilder {
   protected IProject[] build(int kind, Map args,
    IProgressMonitor monitor) {
      if (kind == IncrementalProjectBuilder.FULL_BUILD) {
         fullBuild(monitor);
      } else {
         IResourceDelta delta = getDelta(getProject());
         if (delta == null) {
            fullBuild(monitor);
         } else {
            incrementalBuild(delta, monitor);
         }
      }
      return null;
  }
   private void incrementalBuild(IResourceDelta delta,
    IProgressMonitor monitor) {
      System.out.println("incremental build on " +delta);
        try {
           delta.accept(new IResourceDeltaVisitor() {
              public boolean visit(IResourceDelta delta) {
                 System.out.println("changed: "+
                    delta.getResource().getRawLocation());
                 return true; // visit children too
              }
           });
        } catch (CoreException e) {
           e.printStackTrace();
        }
   }
   private void fullBuild(IProgressMonitor monitor) {
      System.out.println("full build");
   }
}
It is important to return true in the visit method for those folders that contain the resources of interest. If you return false, the children of the resource delta are not visited.
When running a build in a runtime workbench, you might get the following message:
!MESSAGE Skipping builder com.xyz.builder for project P.
Either the builder is missing from the install, or it
belongs to a project nature that is missing or disabled.
This message means that something is wrong with the builder plug-in or with the attribution of the builder specification in the .project file. The builder plug-in might load fine but still be broken, perhaps because it is missing an ID in the extension point declaration.
If everything else seems right to you, double-check the ID specified in the builder extension point. The ID should not be the plug-in ID of your builder, but rather the concatenation of the plug-in ID and the builder ID. In other words, if the plug-ins ID is org.eclipse.escript.builder, and the ID of the builder is Builder, the builder ID reference in the .project file should be org.eclipse.escript.builder.Builder.
The Eclipse Platform distinguishes between full and incremental builds. Incremental builds are much faster than a complete rebuild of a project because only the resources that have changed since the last build need to be considered for compilation.
Incremental builders are invoked each time a file is saved. To prevent a bad user experience, take special care to make the incremental builder as fast as possible. To make a compiler fast, it helps to understand that in most compilers little time is spent in compilation at all. Most time is spent resolving the context of the program, such as the build classpath.
In the case of eScript, two kinds of information need to be discovered from the target environment:
Starting with the Java classpath and the list of plug-ins referenced by a given script, the eScript compiler needs to find all possible external class types, as well as their methods and fields. This information is needed to determine whether a given input string refers to a class, an interface, a method, a field, or a local variable.
To facilitate the easy creation of the underlying Java class files for a given script, the eScript compiler, when it reads the contribution to a certain extension point, needs to interrogate the PDE to find out the class to extend or interface to implement.
The overhead of building the context is surprisingly constant for eScript and dwarfs the memory consumption needed for compiling a script. The scripts tend to be small, but the universe of plug-ins is large. The eScript compiler easily loads about 14,000 classes, simply to bind strings to type names. Rebuilding this contexts adds about three to four seconds to a compilation. The compilation of the script itself is less than a second, and is hardly noticeable.
By not discarding the context information after a compilation, performance of the next compilation run is greatly improved. The first compilation will be slow, but the next ones will be non-interruptive. However, note that optimization is always a time/space trade-off. The price we pay for faster compilation is about 15 MB of state that needs to be cached. JDT suffers from the same dilemma. Load a big Java project and close all perspectives, including the Java perspective, and the entire Java model with its thousands of classes is being held onto by the JDT.
Incremental builders that are run sporadically may be wise to run a timer and clean up their cache after a certain expiration time to free up heap memory used by the platform.
In phase 1 of our language integration, we focused on the compilation of source code and the build process of programs written in our new language. Our experience is that it is smart to follow this bottom-up approach. It may be tempting to start with the visual components, such as the editor, but developing an IDE is like building a home. Excavation and foundation pouring is a useful step and should not be skipped too hastily.
Therefore, before we can implement an editor, we need to follow phase 2. Even though phase 2 has only one step, it is a very important one and should be given plenty of attention. Namely, by carefully designing a Document Object Model (DOM) first, many of the following steps will be a lot easier to implement. After doing phase 1—implementing a compiler and a builder—and finishing phase 2—implementing a DOM—you are ready to move to FAQ 334.
A DOM represents the structure of your programming language. Its design and implementation are dependent of the target language and follow a few simple guidelines:
The DOM is hierarchical in nature and directly represents concrete elements in the program it represents (such as the program itself and its functions, declarations, and statements).
A DOM is used for defining context for Content Assist (see FAQ 336).
A DOM is useful for generating text hovers (see FAQ 337).
Creating outline views without a DOM is difficult (see FAQ 341).
A DOM is essential in architecting and implementing support for refactoring (see FAQ 340).
A program may be represented with various DOMs. In the case of eScript we have a DOM for describing the program structure and a second DOM for the method bodies.
A DOM is implemented as a data structure with access API. In the case of eScript, we move Content Assist and text-hover support into the DOM nodes. This makes handling those in the editor very easy.
A DOM can be generated in two modes:
The same compiler that also compiles source code can save its abstract syntax tree (AST) and expose it for use by the editor. Using an AST is a pretty standard way to implement a computer language, and piggybacking on that infrastructure makes life a lot easier when writing your editor. This is the way the eScript editor works.
If the underlying AST is not accessible or is to too fine-grained for use in an editor, you may decide to implement a lightweight parser and generate a DOM more efficiently. This is the way the JDT implements its Java model.
Figure 19.2 shows the inheritance hierarchy for the DOM that was develloped for the eScript’s language. As you can see, each node in the DOM extends Element. It defines the following fields:
int startOffset, endOffset; // source positions
Hashtable attributes;       // things like ID, label, ...
ArrayList children;         // children of this element
Element parent;             // the owner of this element
String hoverHelp;           // cached value of hover help
...more fields....
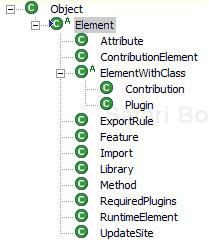
The subclasses of Element implement useful methods:
public String getAttributeValue(String name)
public String getHoverHelp()
public void getContentProposals(...., ArrayList result)
For instance, the getHoverHelp method easily allows us to use the DOM to find the element at a given offset and then ask it for what hover help is appropriate.
Because eScript programs are assumed to be small, we did not put too much care into the optimization of the memory usage of our DOM. However, for languages in which programs tend to get much larger, such as C, Pascal, or C#, the definition of each individual field has to be carefully weighed. To represent <windows.h>, the number of DOM elements easily runs into hundreds of thousands or even millions.
When writing a model that needs to scale to large systems, you must pay careful attention to the memory your model uses. Traditional performance optimization techniques apply here, but lazy loading and most recently used (MRU) caching are particularly effective. The JDT’s Java model, for example, is populated lazily as the elements are accessed. Java element handles do not exist in memory at any one time for every Java project in your workspace. Most Java elements implement the Openable interface, indicating that they are lazily populated when you invoke methods on them that require access to underlying structures. Although all Openable elements can be explicitly closed when no longer needed, the model automatically closes the MRU elements by storing references to all open elements in a least recently used (LRU) cache. The abstraction layer of thin Java element handles allows expensive data structures to be flushed even if clients maintain references to those Java elements indefinitely. Abstract syntax trees are also generated lazily as they are needed and are quickly discarded when no longer referenced.
Although some of these performance enhancements can be added retroactively to your model implementation, it is important to think about scalability right from the start. Performance aspects of your model and of the tools built on top of it, need to be considered early in architectural planning. In particular, an architecture that does not let clients of your API maintain references to large internal data structures is essential to the scalability of your model.
After creating a compiler, a builder, and a DOM, writing an editor is a snap. To write an editor for a particular programming language, a few steps can be distinguished, all relying heavily on the existence of a DOM.
Implement an language-specific editor. The JDT places the bar high for any subsequent language implementers. No matter how fast the compiler is and how well the build process is integrated, if your language has to be edited in the default text editor, you fail to even get close to being worthy of comparison to JDT. Writing an editor is not difficult. Many examples exist. The platform wizard has one for an XML editor. The examples shipped with Eclipse show a simplified Java editor. This book has a sample that shows how to write an HTML editor. For more details, see FAQ 335
Add Content Assist. (see FAQ 336). The DOM, developed in phase 2, allows us to navigate the source code, analyze it, present it in multiple modes, and manipulate its structure, a process also known as refactoring. Content Assist uses the DOM to figure out all the possible context-sensitive continuations for a given input. Quick Fixes know how to solve a given compilation error. Refactoring relies on the DOM to find all call sites for a given method before we can change its name. An Outline view uses the DOM to show the structure of the code in a hierarchical summary format.
Add Quick Fixes (see FAQ 339). After compilation errors have been detected, suggest how to fix the problem. How would you reason about code without an underlying model?
Add refactoring (see FAQ 340). Implement operations on source code to restructure program constructs, following the semantics of your language. Again, without a model of the underlying language, this is a daunting, error-prone task.
Add an Outline view (see FAQ 341). The Outline view presents a summary of the structure of a particular program. Using the same compiler and/or DOM saves a lot of time developing your language IDE. After completing your editor, you are ready to enter the Holy Grail of language IDEs; see FAQ 342.
An editor contributes to the org.eclipse.ui.editors extension point, and, in practice, the class implementing the editor is typically a subclass of org.eclipse.ui.editors.text.TextEditor. The simplest way to familiarize yourself with the Eclipse editor framework is by creating a new plug-in with a sample XML editor (use New > Plug-in Development > Plug-in Project > ... > ... > Plug-in with an editor). This will provide you with an editor supporting syntax color highlighting, Content Assist, hover help, and more. Also be sure to check out Chapter 11 of this book, which describes an HTML editor framework. Both the XML and HTML editors show how to design and arrange your code in manageable packages.
If you want to see what the minimalist editor looks like, we did the experiment of reducing our eScript editor to a single source file with the bare minimum code required to make the smallest possible Eclipse editor ever (see Figure 19.3). We don’t suggest that you organize your code this way, but it will show you the basic information you will have to provide to give your editor have a professional look and feel with syntax highlighting and hover help.
Here is the structure of our minimalist eScript editor:
public class Editor extends TextEditor {
   ...
   public Editor() {
      super();
      setSourceViewerConfiguration(new Configuration());
   }
   protected void createActions() {
      ...
   }
   ...
}
In the constructor, we set up a source viewer configuration, handling such issues as Content Assist, hover help, and instructing the editor what to do while the user types text. In the inherited createActions method the editor creates its Content Assist action, used when Ctrl+Space is pressed in the editor.
Our configuration looks like this:
class Configuration extends SourceViewerConfiguration {
   public IPresentationReconciler getPresentationReconciler(
      ISourceViewer sourceViewer) {
      PresentationReconciler pr =
         new PresentationReconciler();
      DefaultDamagerRepairer ddr =
         new DefaultDamagerRepairer(new Scanner());
      pr.setRepairer(ddr, IDocument.DEFAULT_CONTENT_TYPE);
      pr.setDamager(ddr, IDocument.DEFAULT_CONTENT_TYPE);
      return pr;
   }
   IContentAssistant getContentAssistant(ISourceViewer sv) {
      ContentAssistant ca = new ContentAssistant();
      IContentAssistProcessor cap = new CompletionProcessor();
      ca.setContentAssistProcessor(cap,
         IDocument.DEFAULT_CONTENT_TYPE);
      ca.setInformationControlCreator(
         getInformationControlCreator(sv));
      return ca;
   }
   public ITextHover getTextHover(ISourceViewer sv,
      String contentType) {
         return new TextHover();
   }
}
We use the default presentation reconciler, and we do not distinguish between sections in our documents. In other words, reconciliation of layout will be the same all over the document, whether we are inside a feature, a plug-in, or a method. We declare a scanner, implemented by us, and rely on the text editor framework to parse the document using our parser when it suits it.
Next, we enable Content Assist by creating a default Content Assistant and defining our own Content Assist processor. When Content Assist is activated, our processor will map the current cursor position to a node in the abstract syntax tree for the underlying document and present relevant continuations based on the currently entered string. See FAQ 336 for the implementation of our completion processor.
Finally, we create a text-hover that will return a relevant string to be shown in a hover window when we move over a given node in our abstract syntax tree. See FAQ 337 for the implementation of our ITextHover implementation.
For scanning the underlying document to draw it using different colors and fonts, we deploy RuleBasedScanner, one of the simplest scanners offered by the editor framework:
class Scanner extends RuleBasedScanner {
   public Scanner() {
      WordRule rule = new WordRule(new IWordDetector() {
         public boolean isWordStart(char c) {
            return Character.isJavaIdentifierStart(c);
         }
         public boolean isWordPart(char c) {
            return Character.isJavaIdentifierPart(c);
         }
      });
      Token keyword = new Token(new TextAttribute(
         Editor.KEYWORD, null, SWT.BOLD));
      Token comment = new Token(
         new TextAttribute(Editor.COMMENT));
      Token string = new Token(
         new TextAttribute(Editor.STRING));
      //add tokens for each reserved word
      for (int n = 0; n < Parser.KEYWORDS.length; n++)
         rule.addWord(Parser.KEYWORDS[n], keyword);
      setRules(new IRule[] {
         rule,
         new SingleLineRule("#", null, comment),
         new SingleLineRule(""", """, string, ''),
         new SingleLineRule("'", "'", string, ''),
         new WhitespaceRule(new IWhitespaceDetector() {
         public boolean isWhitespace(char c) {
            return Character.isWhitespace(c);
         }
      }),
   });
  }
}
For each of the keywords in our little language, we define a word entry in our WordRule. We pass our keyword detector, together with rules for recognizing comments, strings, and white spaces to the scanner. With this simple set of rules, the scanner can segment a stream of bytes into sections and then use the underlying rules to color the sections.
In FAQ 335 we describe how Content Assist is installed through our configuration class, as follows:
class Configuration extends SourceViewerConfiguration {
   ...
   public IContentAssistant getContentAssistant(ISourceViewer
    sourceViewer) {
      ContentAssistant ca = new ContentAssistant();
      IContentAssistProcessor cap =
                          new CompletionProcessor();
      ca.setContentAssistProcessor(cap,
         IDocument.DEFAULT_CONTENT_TYPE);
      ca.setInformationControlCreator(
         getInformationControlCreator(sourceViewer));
      return ca;
   }
   ...
}
A completion processor takes the current insertion point in the editor and figures out a list of continuation proposals for the user to choose from. Our completion processor looks something like this:
class CompletionProcessor implements
                                  IContentAssistProcessor {
   private final IContextInformation[] NO_CONTEXTS =
      new IContextInformation[0];
   private final char[] PROPOSAL_ACTIVATION_CHARS =
      new char[] { 's','f','p','n','m', };
   private ICompletionProposal[] NO_COMPLETIONS =
      new ICompletionProposal[0];

   public ICompletionProposal[] computeCompletionProposals(
      ITextViewer viewer, int offset) {
      try {
         IDocument document = viewer.getDocument();
         ArrayList result = new ArrayList();
         String prefix = lastWord(document, offset);
         String indent = lastIndent(document, offset);
         EscriptModel model =
                     EscriptModel.getModel(document, null);
         model.getContentProposals(prefix, indent,
                                          offset, result);
         return (ICompletionProposal[]) result.toArray(
            new ICompletionProposal[result.size()]);
      } catch (Exception e) {
         // ... log the exception ...
         return NO_COMPLETIONS;
      }
   }
   private String lastWord(IDocument doc, int offset) {
      try {
         for (int n = offset-1; n >= 0; n--) {
           char c = doc.getChar(n);
           if (!Character.isJavaIdentifierPart(c))
             return doc.get(n + 1, offset-n-1);
         }
      } catch (BadLocationException e) {
         // ... log the exception ...
      }
      return "";
   }
   private String lastIndent(IDocument doc, int offset) {
      try {
         int start = offset-1;
         while (start >= 0 &&
            doc.getChar(start)!= '
')  start--;
         int end = start;
         while (end < offset &&
            Character.isSpaceChar(doc.getChar(end))) end++;
         return doc.get(start+1, end-start-1);
      } catch (BadLocationException e) {
         e.printStackTrace();
      }
      return "";
   }
   public IContextInformation[] computeContextInformation(
      ITextViewer viewer, int offset) {
      return NO_CONTEXTS;
   }
   char[] getCompletionProposalAutoActivationCharacters() {
      return PROPOSAL_ACTIVATION_CHARS;
   }
   // ... remaining methods are optional ...
}
Basically, Content Assist completion has three steps. First, we have to figure out what string has already been started by the user (see lastWord). Second, we have to find appropriate completions. Third, we have to return strings so that when they are inserted, they lay out acceptably (see the use of lastIndent).
In FAQ 335 we describe how text hover is enabled for our editor through our configuration class:
class Configuration extends SourceViewerConfiguration {
   ...
   public ITextHover getTextHover(ISourceViewer sv,
    String contentType) {
      return new TextHover();
    }
    ...
}
When the user moves the mouse over an area that corresponds to a given node in our AST, it is easy for us to provide a symbolic description of the node. Namely, the editor framework helps out by registering for the mouse events, setting timers, calling us at the right time, and drawing the box that will show the text hover. All that we need to do is match a certain location in the editor to a symbolic string. We do this by providing our own implementation of org.eclipse.jface.text.ITextHover as follows:
public class TextHover implements ITextHover {
   public IRegion getHoverRegion(ITextViewer tv, int off) {
      return new Region(off, 0);
   }
   public String getHoverInfo(ITextViewer tv, IRegion r) {
      try {
         IDocument doc = tv.getDocument();
         EscriptModel em = EscriptModel.getModel(doc, null);
         return em.getElementAt(r.getOffset()).
            getHoverHelp();
      }
      catch (Exception e) {
         return "";
      }
   }
}
The first method we implement is meant for optimizing the drawing of the text hover. We answer the question, If I am going to show a hover for character x in the text viewer, for what region should the hover be the same? We don’t try to be too smart here. We simply return an empty region.
The next method implements the real logic of the text hover. We convert the current cursor location to an AST element in the document and ask it to return a string relevant to the current context. Note that we assume that the EscriptModel implements a cache and that the getModel method is inexpensive as we will call it many times during editing.
Adding problem markers for eScript compilation happens in two simple steps.
Right before we compile the resource, we remove all problem markers from the resource:
void compileResource(IResource resource) {
   resource.deleteMarkers(IMarker.PROBLEM,
      true, IResource.DEPTH_INFINITE);
   doCompileResource(resource);
}
During compilation, errors are attached to the resource as follows:
void reportError(IResource res, int line, String msg) {
   IMarker m = res.createMarker(IMarker.PROBLEM);
   m.setAttribute(IMarker.LINE_NUMBER, line);
   m.setAttribute(IMarker.MESSAGE, msg);
   m.setAttribute(IMarker.PRIORITY,IMarker.PRIORITY_HIGH);
   m.setAttribute(IMarker.SEVERITY,IMarker.SEVERITY_ERROR);
}
To simplify matters, we use the existing problem-marker type. See the online Eclipse article “Mark My Words” for an explanation on how to declare your own marker types.
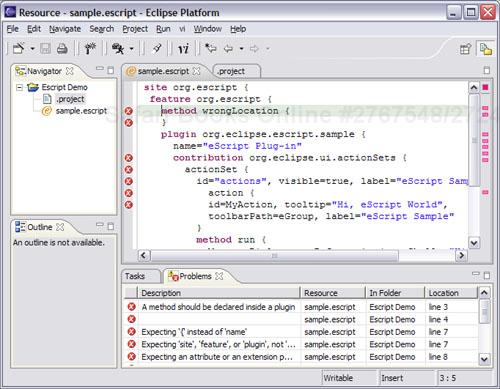
Simply by attaching a marker to a resource, the IDE will take care of placing visual indicators at the two indicator bars in the editor. The IDE will also add entries to the Problems view. If we indicated additional information in the marker for IMarker.CHAR_START and IMarker.CHAR_END, the editor will also draw a red squiggly line under the offending problem. Figure 19.4 shows the result of a compilation of a problematic eScript file.
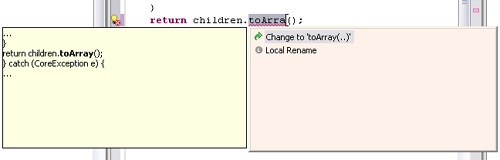
The JDT has support for so-called Quick Fixes. Whenever a marker is generated, a set of resolutions is associated with it for users to click on and choose an automatic fix of the problem as shown in Figure 19.5. Quick Fixes are implemented through the org.eclipse.ui.ide.markerResolution extension point:
<extension point="org.eclipse.ui.ide.markerResolution">
   <markerResolutionGenerator
      markerType="org.eclipse.core.resources.problemmarker"
      class="org.eclipse.escript.quickfix.QuickFixer"/>
</extension>
The implementation class implements the IMarkerResolutionGenerator interface. Use the IMarkerResolutionGenerator2 when resolutions are expensive to implement. See the javadoc for the interface for an explanation. Here is what the implementation class may look like:
class QuickFixer implements IMarkerResolutionGenerator {
   public IMarkerResolution[] getResolutions(IMarker mk) {
      try {
         Object problem = mk.getAttribute("WhatsUp");
         return new IMarkerResolution[] {
            new QuickFix("Fix #1 for "+problem),
            new QuickFix("Fix #2 for "+problem),
         };
      }
      catch (CoreException e) {
         return new IMarkerResolution[0];
      }
   }
}
An array of Quick Fixes has to be returned for the problem associated with the current marker.
Each marker resolution, or Quick Fix, implements IMarkerResolution or, when a description and an image are available, IMarkerResolution2. Here is what the implementation may look like:
public class QuickFix implements IMarkerResolution {
   String label;
   QuickFix(String label) {
      this.label = label;
   }
   public String getLabel() {
      return label;
   }
   public void run(IMarker marker) {
      MessageDialog.openInformation(null, "QuickFix Demo",
         "This quick-fix is not yet implemented");
   }
}
The problem indicator—in our sample, the WhatsUp attribute—is associated with the marker by the parser. Typically, the Quick Fix handler that resolves the problem, as shown in this example, lives somewhere in the UI. Following this paradigm is advisable as it separates the problem detection in the compiler/parser from how it is presented to the user.
Quick Fixes can be inspected and executed by using the context menu on a given problem in the Problems view. Note how the JDT uses a context menu and the double-click action on a marker to active Quick Fix.
Refactoring is the process of restructuring code for the purpose of readability, performance improvements, reuse, or simply for the regular evolutionary quest for elegance. The kind of refactoring your language will support is heavily dependent on the nature of your language. Almost all languages provide support for expressing abstraction. Therefore, it makes most sense to focus on the processes of encapsulating certain expressions into a more abstract form, such as extracting a method, and the reverse, such as in-lining a method.
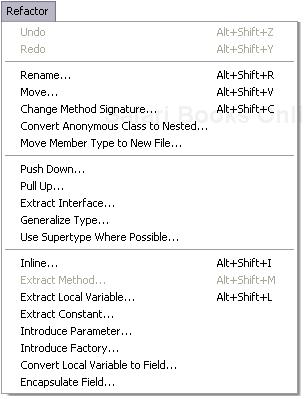
To implement refactorings, you need the UI mechanisms for implementing them. Implement a new menu with your refactoring options; use the JDT for inspiration. See the org.eclipse.jdt.ui plug-in’s manifest file and open the Refactor menu. Note how all possible refactorings are exhaustively listed here. Each refactoring can be fired by the user, and Java code will have to determine whether the refactoring is appropriate for the given selection and context. Figure 19.6 shows the refactoring menu for the Java perspective.
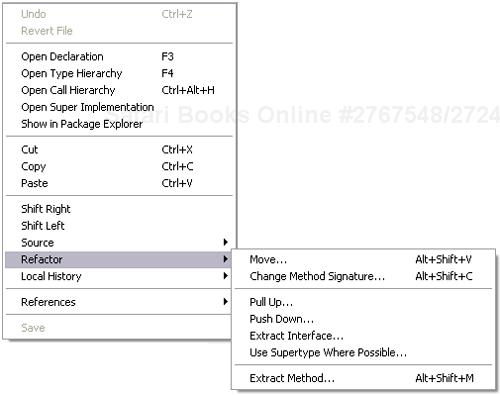
In addition to having a menu in the global menu bar, you will want to add a pop-up menu to your editor to activate a given refactoring from the current selection. Here you can be more creative and restrict the choices given to the user to relate directly to a given selection. Figure 19.7 shows the context menu for the JDT showing the refactoring options for a few selected statements.
Now that we have decided what UI support to provide, how do we actually implement the refactorings? As we said earlier, refactorings can be expressed as a restructuring of code. Let us think. What do we have that describes the structure of our program? Right, the DOM. In the case of JDT, all refactoring is directly expressed as operations on the Java model. The fact that an editor is open and will redraw the changes as a result is just a side-effect. Many refactorings go beyond the current text file. Imagine renaming a given method name. You will have to visit all the places where the original method is called and rename each instance accordingly. Without a model, this is very difficult to implement.
In Eclipse 3.0, the generic portions of the JDT refactoring infrastructure were pushed down into a generic IDE layer called the Eclipse Language Toolkit (LTK). The LTK projects provide a model for refactoring operations, a mechanism to allow third parties to participate in your refactorings, and some basic UI components for refactoring wizards. This infrastructure is a logical starting point for writing refactoring support for your own language.
The price of success is adoption. When you release your language plug-ins, you have to assume the worst: that people may like them. You may end up with many programmers who use them. However, these programmers are very much like you and will probably want to enhance your tools.
One of the first things people will want to do is obtain access to your DOM to do code generation, extraction, and analysis. The second thing they will want to do is provide their own refactorings and easily tie them to your existing refactorings. Prepare for this to happen and define your own extension point schema before starting to implement any refactorings. If you define all your refactorings using your own extension point schema, you will iron out the bugs, and people will be grateful once they start using your language IDE.
The Outline view is not generated by the editor framework. In fact, this view is offered by the org.eclipse.ui.views plug-in. When the user changes editors, your editor will be asked to provide an IContentOutlinePage adapter for an Outline view. This is how you could implement your outline viewer:
public Object getAdapter(Class required) {
   if (IContentOutlinePage.class.equals(required)) {
      if (myOutlinePage == null) {
         myOutlinePage = new CoolLanguageContentOutlinePage(
                        getDocumentProvider(), this);
         myOutlinePage.setInput(getEditorInput());
      }
      return myOutlinePage;
   }
   return super.getAdapter(required);
}
Most programming languages are inherently hierarchical. Therefore, to show the content outline of a certain program file, most editors deploy a tree. If you think that a tree is the most appropriate way to show the outline of your programs, you should consider subclassing from class ContentOutlinePage in the org.eclipse.ui.views.contentoutline package. This class already sets you up with a TreeViewer, and all you need to provide are a content provider, a label provider, and the input:
public void createControl(Composite parent) {
   super.createControl(parent);
   TreeViewer viewer= getTreeViewer();
   viewer.setContentProvider(new MyContentProvider());
   viewer.setLabelProvider(new MyLabelProvider());
   viewer.addSelectionChangedListener(this);
   viewer.setInput(myInput);
}
You will want to update the selection in your Outline view when the cursor is moved in the editor. Similarly, if the structure of the program changed—code added or removed—the outline has to be updated. This is typically performed with a JFace text model reconciler.
When the user selects a node in the Outline view, the editor should change selection to the selected element and make it visible.
After following the steps in phases 1 to 3, you have successfully written a compiler, a builder, a DOM, and an integrated editor. What remains are a few finishing touches:
Add a project wizard. Your language may benefit from similar wizards as provided by JDT to create projects, classes, and interfaces. See FAQ 343.
Declare a project nature. Natures can be used to facilitate the enablement of builders on certain projects. See FAQ 344.
Declare a perspective. Perspectives can be used to organize views and editors into a cohesive, collaborative set of tools. See FAQ 345.
Add documentation. Traditionally this is done as one of the last steps in any agile software project. Eclipse has support for adding documentation to a set of plug-ins through its help system, accessed with Help > Help Contents.... Context-sensitive help can be activated by using F1. For more information about how to add documentation and help for your language, see FAQ 346.
Add source-level debugging support. Implementing support for source-level debugging is arguably the most difficult to implement, even in the highly configurable Eclipse. See FAQ 347 for a discussion.
Congratulations. You followed all steps outlined in the four phases of language integration and are to be commended for getting this far. Writing an IDE in Eclipse is the most elaborate and wide-ranging exercise to perform on top of Eclipse.
This depends on your language. For instance, the PDE offers wizards for creating plug-ins, features, plug-in fragments, and update sites. In addition, the PDE provides support for converting something existing into a form it can work with, such as converting a regular project to a plug-in project.
In the case of Java, the JDT offers wizards for the obvious things—Java projects, packages, classes, and interfaces—as well as for less obvious ones such as a wizard for creating a scrapbook page and a source folder. The CDT offers wizards for generating a C++ class and for creating either a standard make file project or a managed make project for C or C++. Furthermore, the CDT has a wizard for converting a normal project to a C/C++ project.
If we look at eScript, the only appropriate wizard type seems to be the creation of an eScript file, where the user would choose whether the generated code should include the definition of a feature and an update site. An extra wizard page could be added to generate code to implement plug-ins that contribute a view, editor, and so on.
When certain wizards are used frequently, consider showing them in the toolbar by contributing an action set.
For instructions on writing wizards, look at Help > Platform Plug-in Developer Guide > Programmer’s Guide > Dialogs and Wizards > Wizards.
This topic is explained in FAQ 291.
Your language needs its own perspective only when you have a certain collection of views and editors that work together and would be cumbersome to open individually. Adding a new perspective should be done with reservation, though. If you add a new perspective and bring users there to do programming in your language, you have made many hidden assumptions about how programs are developed and in what sequence. Ask yourself, What if people want to develop programs written in my language and at the same time in Java and/or C? Will my perspective be a help or hindrance?
Think of perspectives as one of the windows in a virtual desktop manager. When you start using a virtual desktop, you like the separation of function. You use one of the windows for editing, one for reading mail, one for browsing, one for programming. This is great. You can switch between tasks with a clever keyboard shortcut or a simple mouse click. Inevitably though, you get sloppy, separation rules are broken, and all applications end up in one window. The virtual desktop ends up as a useful tool for demos, but that’s about it. The same issues apply to perspectives. People like them for their separation of context and their memory of what views are chosen with their layout. However, people can manage only a limited number of perspectives and are particularly annoyed when an application rudely jumps to another perspective. Be sure to ask permission from the user, as the Debug perspective does.
Perspectives are created by using the org.eclipse.ui.perspectives extension point:
<extension
        point="org.eclipse.ui.perspectives">
    <perspective
            name="Cool Perspective"
            icon="icons/cool.gif"
            class="org.eclipse.faq.sample.CoolPerspective"
            id="org.eclipse.faq.sample.coolPerspective">
    </perspective>
</extension>
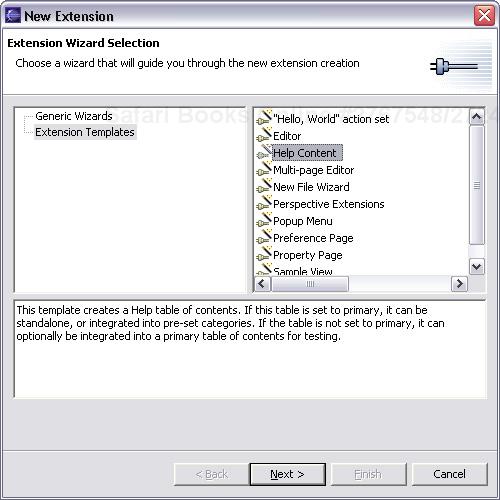
Documentation for plug-ins, including those that implement a programming language is done by contributing to the extension point. Open the plug-in Manifest Editor on your plug-in and switch to the Extensions page. Click on Add... and choose Extension Templates > Help Contents (see Figure 19.8).
Click Next and provide details. Click OK. Voila, your plug-in now has documentation exported in the standard Eclipse Help format, provided through Help > Help Contents....
Writing an integrated source debugger for a language is a highly specialized topic requiring major study and a lot of work, and many subtleties are involved. To do the topic justice, we can only refer you to the platform documentation and to JDT debugging as a reference implementation. Start by looking in the Platform Plug-in Developer Guide under Programmer’s Guide > Program debug and launch support.