
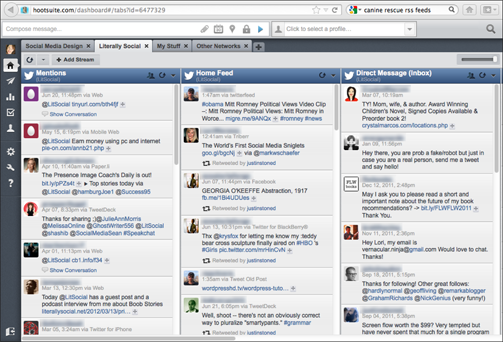
Figure 7-4: HootSuite dashboard layout.
Saying Hello to HootSuite
At the expense of sounding like a dork, I have to say that I absolutely love the social media aggregator called HootSuite (https://hootsuite.com
). If you’re reading this book on an as needed basis, please refer to Chapter 5 for a lot more information on what HootSuite is and what it has to offer. Nobody pays me to say that, and there are a lot of great services, like TweetDeck, that are comparable. As you go through this guide, remember that lots of the same capabilities exist on other aggregators. I just happen to think HootSuite is the easiest to use and the most comprehensive for the price.
Most relatively large companies run their entire social media strategies via something like HootSuite and Google Alerts.
Really large companies, such as Fortune 100 companies, desperately need something a good deal more comprehensive in order to catch and properly analyze all the information being said about them and their industries every day. If you are responsible for running the day-to-day, new-media strategy for you or your brand, you can go really far with these free (or really affordable) tools.
In a nutshell (or should I say owl’s nest?), HootSuite offers
![]() Unlimited management of social networks and profiles under one interface
Unlimited management of social networks and profiles under one interface
![]() Scheduling of Facebook posts and Twitter messages
Scheduling of Facebook posts and Twitter messages
![]() Integrated social analytics so you can measure engagement and campaign success
Integrated social analytics so you can measure engagement and campaign success
![]() Collaboration with team members to enhance social communication and improve efficiencies
Collaboration with team members to enhance social communication and improve efficiencies
Taking a closer look at HootSuite
HootSuite runs from your web browser, mobile device, or tablet. It is pretty much available from wherever you are if you have Internet access. Figure 7-4 shows you what a HootSuite dashboard looks like from the inside. It is made up of different streams of information that you pull together and customize.
The regular version is free, but once you really get into the swing of things or start working with a team, you may want to consider upgrading your account to Pro for $5.99 a month. The Pro version provides the following benefits and more:
![]() Unlimited social profiles
Unlimited social profiles
![]() One free team number
One free team number
![]() Google Analytics integration (now that you’ve set up your Google Analytics account via the tutorial in the section just before this!)
Google Analytics integration (now that you’ve set up your Google Analytics account via the tutorial in the section just before this!)
![]() Analytics report
Analytics report
![]() Opting out of advertisements
Opting out of advertisements
![]() Opting out of promoted tweets
Opting out of promoted tweets
![]() Capability to archive your tweets
Capability to archive your tweets
HootSuite offers an enterprise option, as well, a scalable solution for businesses to streamline all their social media efforts from one secure dashboard. The HootSuite website doesn’t tell how much this exclusive service costs; it is priced by request.
Finally, HootSuite’s Pro version offers great functionality for teams of people working on the same brand account. You can invite clients and colleagues alike to participate in your social media management. Assign messages for follow-up and share streams, helping you to increase your efficiency.
 I think my favorite part about using HootSuite Pro to manage accounts as a team is that you can share access with team members without compromising your security. The team permission levels and advanced sharing options ensure you remain in control of your valuable social profiles and accounts.
Setting up your dashboard
For the sake of this tutorial, I’m going to assume that you’ve either chosen the free or the $5.99-a-month version of HootSuite. I use the latter version and am very pleased with it.
Signing up is simple, so I’m launching straight into setting up your dashboard. This is where you will enter all your social profiles that you want to monitor more closely. I begin with Twitter; after you see how it works, you will be able to add your other social networks very easily. It’s designed to be extremely user-friendly.
Tabs and streams
One of the nicest things you can do for yourself and streamlining your productivity is to arrange your dashboard. Dashboard is the thing that you see on your very first tab of HootSuite when you log in.
Even though I’ve been using HootSuite for years, after reviewing all the bells and whistles for this section in the book, I am astonished by how much information you can now view and use via streams. Not many people are talking about it, so these goodies may pass you by unless you take a quick look at what’s available to you.
Simply put, a stream is a flow of information given in real time that can fit into one of a few general categories, such as Facebook Profile “News Feed — Most Recent,” or Twitter “Retweets by me.”
 You can schedule messages on Facebook via HootSuite, but you get much better exposure to search algorithms if you post directly via Facebook.
Organizing your streams
Organize your streams within HootSuite so that you can have a context for each collection. Here’s how:
1. Create tabs for your personal and business social media accounts.
You can customize yours by clicking on the tab and entering your own term.
2. Group related streams of information under each related tab.
For instance, my Social Media Design tab has all the accounts I want to look at every day, organized under that tab heading. It includes
• Twitter mentions
• Facebook Page
• LinkedIn profile
• Twitter search for the term Online Reputation
3. Create new streams with a search or keywords.
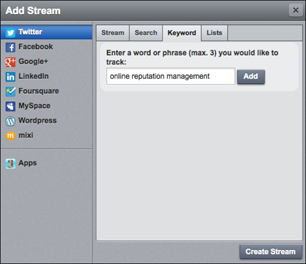
For instance, if you want to create a new stream that continuously searches for “online reputation management” tweets you can accomplish this by the following steps:
a. Click the +Add Stream button at the upper-left corner of the HootSuite dashboard.
b. The default network is Twitter, so you won’t have to click on it, but click on any of the other networks that you have linked to via your HootSuite account.
c. Click the Keyword tab at the top of the window that appears. (See Figure 7-5.)
d. Enter online reputation management (in this case) and click Add.
Congratulations! You now have a continuously running keyword search for the keyword “online reputation management” on Twitter!
Figure 7-5: Creating a keyword search in HootSuite.
You can add a search query in almost the same way, except that you click open the Search tab instead of the Keyword tab, before you enter your search term.
You may want to organize lesser-used, social media networks under a tab called “Other Networks” that you only check in on every week or so.
Deciding on your preferences
The preferences section has some pretty powerful stuff that you should know about. If you are working with the team or manage social media for a company other than your own, I highly recommend that you turn off the new social network selector. Check off all the accounts that you don’t want to share messages on accidentally. Reputations have been damaged by tweets that never should have made it out the door.
Another important option is to look at retweeting options. I prefer the old-style retweets because they allow me to edit a tweet or add my take on it before I share. That’s what makes things personal or more interesting. Sometimes you just re-tweet something without adding your two cents and that’s okay, but I really suggest adding your unique “take” on the tweet and why you feel it’s worth sharing.
Attaching goodies
As with Twitter and most other aggregators, HootSuite gives you the option of attaching images and files to your tweets. Its interface is really easy to use. There are different posting options available to you as you click on the message box in order to send a tweet. Please note the icon that looks like a calendar. Clicking this allows you to open your scheduling options.
When you schedule tweets, try to mix things up to keep it interesting. Sending the same message over and over again makes your message feel like spam instead of something important.
..................Content has been hidden....................
You can't read the all page of ebook, please click here login for view all page.