8
OpenShift Security
Throughout this book, you have been able to follow some important aspects that involve processes, people, and all the technology involved to maintain a powerful, resilient, and fault-tolerant platform. A product of this magnitude with a vast structure, from its creation to customizations that will keep it fully functional, also requires a great division of responsibilities and skills for each step taken.
Security has always been and will always be a top concern in any enterprise, even more so now with the advent of things such as ransomware, malicious crypto-mining, malware, and other types of attacks. According to a Gartner study, by 2025, 90% of organizations that don’t control public cloud usage properly will inadvertently share sensitive data. When it comes to Kubernetes security, we also have seen a number of vulnerabilities and attacks recently. In the Further reading section of this chapter, you can check out some vulnerabilities and security incidents related to Kubernetes that happened in the last few years.
For this reason, we decided to dedicate an entire chapter to security-related aspects involving OpenShift. The main focus of this chapter is not to be a complete security guide, though, but rather a minimal collection of topics you should consider and review to have a secure container strategy.
In this chapter, you will find the following topics:
- Container security
- AuthN and AuthZ
- Certificates in OpenShift
- etcd encryption
- Container isolation
- Network isolation
- Red Hat Container Catalog
Let’s get started!
Container security
Container adoption grows exponentially, and with that also the number of vulnerabilities and potential attacks against all the container ecosystem. That being said, security is an important aspect you need to consider in your container strategy. Red Hat is well known for the high level of security of its products, which is one of the characteristics that has always been a differentiator for them in the industry, since the robust Red Hat Enterprise Linux (RHEL), which was (and still is!) the foundation of the company up to emerging technologies, such as Red Hat OpenShift. They have been named leaders in the container security space due to a number of security features that Red Hat defined as default (and required) with OpenShift that are optional in many other Kubernetes-based platforms, which also makes OpenShift more secure than other options. One example of it is Security-Enhanced Linux (SELinux), which is always enabled in any OpenShift worker nodes and prevents a number of vulnerabilities and exploits.
Did you know?
Did you know that there are now probably somewhere about 380,000 Kubernetes application programming interfaces (APIs) open on the internet for some form of access that are probably exposed to some sort of attack or data leak? That is what The Shadowserver Foundation found in this research: https://www.shadowserver.org/news/over-380-000-open-kubernetes-api-servers/.
Interested in seeing more? In this Container Security report, you will find some great research related to security on Kubernetes: https://www.kuppingercole.com/reprints/b1e948f62d5394353f996e43a89cde4a#heading8.1.
Here, you can view the State of Kubernetes security report: https://www.redhat.com/en/resources/kubernetes-adoption-security-market-trends-overview.
You can also consult the Is the Cloud Secure? Gartner study at the following link: https://www.gartner.com/smarterwithgartner/is-the-cloud-secure.
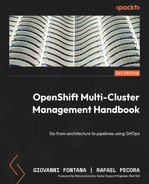
The key to having a secure environment and applications resides in the ability that a company has to do the following:
- Control: Secure the application life cycle management (ALM) to detect and fix vulnerabilities before it goes live
- Protect: Ability to assess and protect the platform and infrastructure to avoid vulnerabilities being exploited
- Detect and respond: Detect and mitigate vulnerabilities by limiting their impact on systems and environments
In the following diagram, you will see some aspects of these three factors we mentioned:
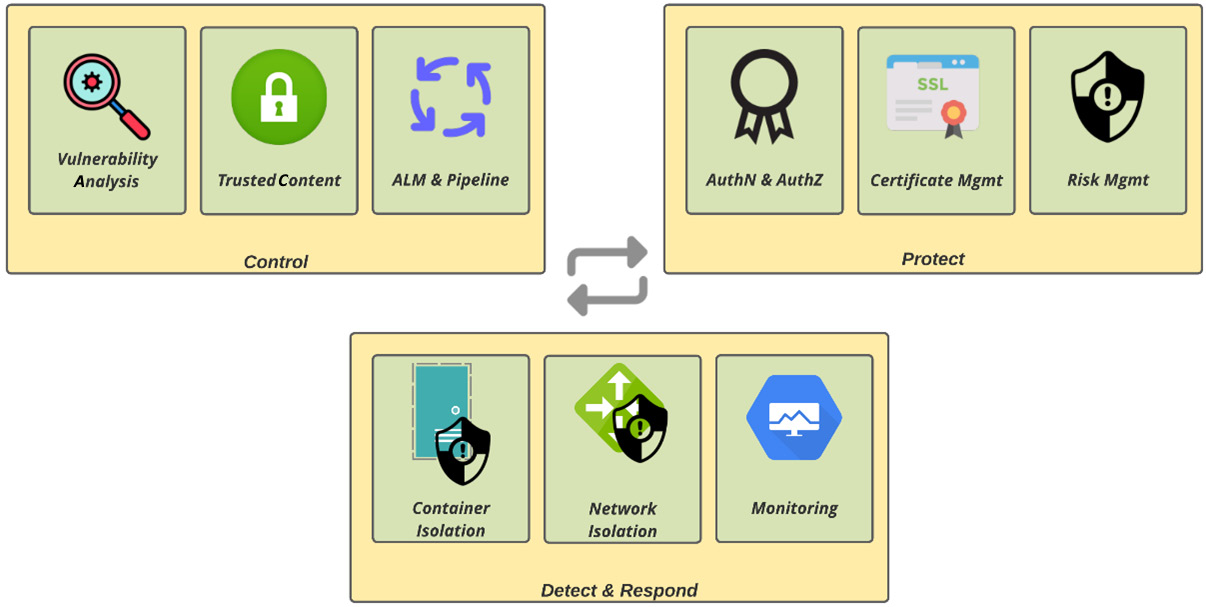
Figure 8.1 – Container security strategy
In this chapter, we will walk through some important things to consider about each of these factors.
Control
To secure the container software supply chain, a few common steps can be performed, as follows:
- Vulnerability analysis: Scan the container images to find known vulnerabilities. This topic will be covered in detail in Chapter 12, OpenShift Multi-Cluster Security.
- Trusted images and contents: Do you know everything that is running inside your containers and applications? Every application these days uses many dependencies from different projects, many of them open source. It is crucial to use trusted sources to avoid running compromised base packages and images. Red Hat provides the Red Hat Universal Base Image (UBI), which is the robust, secure, and stable version of RHEL that you can use as a base for your container images. Red Hat also provides a comprehensive list of certified container images through its Red Hat Container Catalog that are safe to use and maintains a Container Health Index that helps to assess the security risk of a container image.
- ALM and continuous integration/continuous deployment (CI/CD) pipeline: Security should be an integral part of your development workflow. A modern development life cycle requires that security be a shared responsibility among all teams, from end to end. Development-security-operations (DevSecOps) is the new norm, and that means automating security gates to integrate security into the development-operations (DevOps) processes. Things such as integrated development environment (IDE) plugins and CI/CD pipeline security tasks are must-haves to achieve this.
Of course, these are only a few items among a much bigger set. It is not the main focus of this book to cover a comprehensive list of security-related aspects, but we will highlight what we consider are some important factors you should take care of with your container strategy.
Protect
To protect your platform and infrastructure, it is important to have policies in place for authentication and authorization, deployment, certificate management, compliance assessment, and policy enforcement. Later in this chapter, we will cover in depth the authentication and authorization aspects of an OpenShift cluster.
Detect and respond
Even with all actions taken to control and protect the infrastructure, you need to be able to detect and mitigate security risks. It is important, then, to have monitoring practices in place, but also other policies that may limit the impact of any vulnerabilities or breaches such as container and network isolation. In this chapter, you will also see some more information about container and network isolation.
Let’s start by looking at authentication and authorization in more detail. Continue reading to learn more about them.
AuthN and AuthZ
AuthN and AuthZ are related concepts but with different goals. AuthN is an abbreviation of authentication and is related to the process to confirm who a user is and validate their credentials to grant access to the platform. In this process, we deal with identity providers (IdPs) on OpenShift to configure the authentication provider that will check the user credentials, which we will cover shortly.
In turn, AuthZ stands for authorization and is directly linked to giving the user only what they really should have access to, after the authentication process.
These two concepts are seen as confusing or similar from the point of view of just logging in to OpenShift. To clarify the concepts, we will now discuss the different objects and processes related to authentication and authorization.
Authentication
OpenShift works with the following set of objects as part of the authentication process:

These are the objects used in OpenShift that, combined, authenticate a user in the platform. In order to understand how authentication works, you need to define IdPs on OpenShift—see more information about them next.
IdPs
IdPs are entities that integrate OpenShift with authentication providers, with the purpose of creating a chain of custody over who can log on to the platform. To avoid the privilege of one product over another when it comes to managing users, OpenShift creates a very flexible option that allows multiple IdPs to integrate with OpenShift at the same time.
The following table contains a list of supported IdPs allowed for OpenShift integration:

In the OpenShift documentation, you will find detailed information about how to configure each of these providers: https://docs.openshift.com/container-platform/latest/authentication/index.html.
OpenShift uses a role-based access control (RBAC) model to perform the authorization process and give a user the appropriate set of permissions they should have, as you will see now.
Authorization – RBAC
In an RBAC system, you will have a set of permissions represented as a role that users and groups will use to have those permissions granted. On OpenShift, we have the following objects to configure RBAC permissions:
A role can be either cluster- or local-scoped, which means that it can be applied for all projects or only for a specific project. In the following example, you can see a command to create a local role that will allow a user to get and update a pod in the namespace test:
$ oc create role podmgmt --verb=get,update --resource=pod -n test
You can check the role created by running the following command:
$ oc describe role.rbac.authorization.k8s.io/podmgmt -n test
Name:         podmgmt
Labels:       <none>
Annotations:  <none>
PolicyRule:
  Resources  Non-Resource URLs  Resource Names  Verbs
  ---------  -----------------  --------------  -----
  pods       []                 []              [get update]
Similarly, to create a cluster role, you need to use the oc create role command, like so:
$ oc create role clusterpodmgmt --verb=get,update --resource=pod
To create a role binding to add this role to a user or group, the following commands can be used:
# For local role bindings
$ oc adm policy add-role-to-user <role> <username> -n <project>
$ oc adm policy add-role-to-group <role> <group> -n <project>
# For cluster role bindings
$ oc adm policy add-cluster-role-to-user <role> <username>
$ oc adm policy add-cluster-role-to-group <role> <group>
You can also remove a role from a user or group using the following commands:
# For local role bindings
$ oc adm policy remove-role-to-user <role> <username> -n <project>
$ oc adm policy remove-role-to-group <role> <group> -n <project>
# For cluster role bindings
$ oc adm policy remove-cluster-role-to-user <role> <username>
$ oc adm policy remove-cluster-role-to-group <role> <group>
Continue reading for hints to troubleshoot issues you may have related to the access-control feature.
Access-control troubleshooting
It is important you notice that after you change the cluster OAuth custom resource, the authentication operator will apply the change; due to that, you may observe temporary unavailability of the OpenShift authentication. Allow some minutes for the operator to finish applying the changes.
Even if you face issues with OpenShift authentication, we recommend you check out this helpful article: https://access.redhat.com/articles/5900841.
Certificates in OpenShift
OpenShift uses several different certificates to make the platform secure. In this section, we will walk through the main certificate chains OpenShift uses. These are presented here:
- API server: Certificate used with the OpenShift API, usually accessible at https://api. <cluster-name>.<domain>:6443/.
- Ingress: Certificate valid for application’s domain. It is usually a wildcard certificate for *.apps.<cluster-name>.<domain>.
- Node certificates: Managed automatically by the cluster and don’t require any user intervention. Automatically rotated.
- etcd certificates: Used to encrypt communication between etcd cluster members. Automatically managed and rotated by the cluster itself.
OpenShift creates self-signed certificates with the platform installation. Most enterprises require those certificates to be replaced by custom certificates. To do so, refer to the OpenShift documentation, as follows:
- To replace the ingress certificate: https://docs.openshift.com/container-platform/latest/security/certificates/replacing-default-ingress-certificate.html
- To replace the API server: https://docs.openshift.com/container-platform/4.10/security/certificates/api-server.html
If you replace the certificates, you may also need to add a trusted certificate authority (CA), if you use a private CA. The next section describes how to do this.
Trusted CA
You may need to add a custom CA that you use within your organization, to make API calls possible between OpenShift components and other external systems. To do so, you need to create a config map with the certificate chain on the openshift-config namespace, like so:
$ oc create configmap custom-ca
     --from-file=ca-bundle.crt=</path/to/example-ca.crt>
     -n openshift-config
Then, update the cluster-wide proxy to use the config map just created, as follows:
$ oc patch proxy/cluster
     --type=merge
     --patch='{"spec":{"trustedCA":{"name":"custom-ca"}}}'
One important piece of any Kubernetes cluster is the etcd database. You may decide to encrypt it to keep secrets and other objects encrypted in the database. Check out next how to do this.
etcd encryption
The etcd database, by default, is not encrypted. However, you can easily enable etcd encryption to have an extra layer of data security in your cluster. When etcd encryption is enabled, things such as secrets and config maps are stored encrypted, which makes your cluster even more secure.
To enable etcd encryption, proceed as follows:
- Edit the apiserver object, like so:
$ oc edit apiserver
- Set the encryption field, as follows:
spec:
encryption:
type: aescbc
- Save the file to apply the changes.
Note that it may take up to 15 minutes or so to enable the encryption after you have applied the changes.
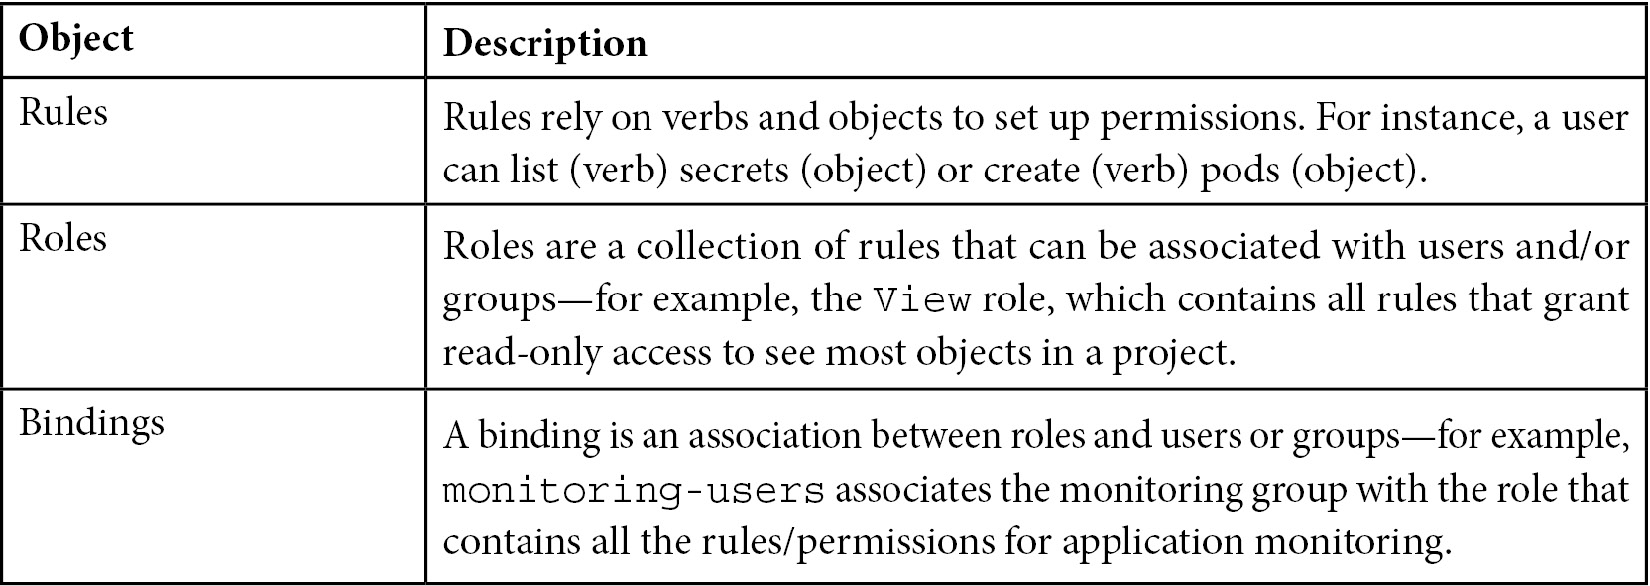
Container isolation
We already discussed aspects such as user authentication and permissions, as well as certificates, but how do you make sure your containers can only do what they are supposed to do and nothing more, and as such, cannot escalate privileges on the host?
We are going to discuss in this section some of the concepts implemented as part of the operating system (OS) to securely run containers and also some aspects implemented on OpenShift related to this.
In the following table, you see some concepts related to containers:

In the following diagram, you can see a graphical representation of these concepts:
Figure 8.2 – Container isolation
While it is important to understand these concepts, you don’t really need to work directly with any of them, as OpenShift abstracts those configurations for you. Instead, you need to understand what security context constraints (SCCs) are—these are the objects you will need to use to give broader permissions to containers when needed. Read on to find out what SCCs are and how to configure them.
SCCs
SCCs are OpenShift objects that control the actions that a pod or container can do with the host resources. By default, any pod uses the restricted SCC, which is the most restricted permission that prevents it from running as root and escalating privileges on the host. Besides the restricted SCC, the most usual ones are noted here:
- anyuid: This has the same permissions as the restricted SCC, allowing a container to run as any unique identifier (UID) and group ID (GID), though that means the container can also use the 0 UID—the root user.
- hostaccess: Gives permissions for a container to access all host namespaces. It should be used only with trusted sources as it gives very broad permissions within a worker node—use only if really necessary.
- hostnetwork: Allows a container to access the worker node underlying the network directly. Use with caution to decrease the risk of a network breach.
- privileged: Most relaxed SCC and gives all privileges to the host. Should be avoided at all costs and used only if really necessary.
Besides all the security-related features we already covered so far, we cannot miss a very important topic: network policies. A network policy is a great feature to make sure your pods and projects can only communicate with what they are supposed to. In the following section, you will see what you can do with network policies and why they are so important when it comes to network security.
Network isolation
Firewalls are well known and have been used for a long time in any kind of infrastructure. When it comes to OpenShift, we need to have in mind that we are now working with a software-defined platform and, as such, we have software features to implement some of the same concepts we have had for a long time in a data center—it is no different with a firewall. As we have seen in the previous chapter, Network Policies are nothing more than rules you define to allow or block network communication between pods and projects on OpenShift, similar to what a firewall provides in a physical network.
By default, all pods in a project are accessible from other pods and network endpoints from any project. To isolate pods and projects, you need to create network policies, such as the following:
kind: NetworkPolicy
apiVersion: networking.k8s.io/v1
metadata:
  name: deny-by-default
spec:
  podSelector: {}
  ingress: []
The previous network policy denies all traffic for pods in a project. In order for a project to be accessed from outside the cluster using the OpenShift ingress, you will need to allow connections from the ingress project, as you can see in the following snippet:
apiVersion: networking.k8s.io/v1
kind: NetworkPolicy
metadata:
  name: allow-from-openshift-ingress
spec:
  ingress:
  - from:
    - namespaceSelector:
        matchLabels:
          network.openshift.io/policy-group: ingress
  podSelector: {}
  policyTypes:
  - Ingress
You may also create custom network policies using labels for specific pods. For instance, the following YAML Ain’t Markup Language (YAML) could be used to limit pods with an app=web label to be accessed on the accessed on the HTTPS port (443) only port only:
kind: NetworkPolicy
apiVersion: networking.k8s.io/v1
metadata:
  name: allow-https
spec:
  podSelector:
    matchLabels:
      app: web
  ingress:
  - ports:
    - protocol: TCP
      port: 443
There is a world of possibilities for using network policies to set your projects and pods with proper network access. A common and recommended practice is to create a set of standard network policies and configure the OpenShift template so that those network policies will be automatically applied to any new projects created. You can find out how to customize the OpenShift template to add those network policies in the OpenShift documentation: https://docs.openshift.com/container-platform/latest/networking/network_policy/default-network-policy.html.
Another important thing you may consider in your security strategy is about using safe container base images. The following section covers what the Red Hat Container Catalog is and how it can help you with this important topic.
Red Hat Container Catalog
Most enterprises, at some point, need to use containers from different sources, either as off-the-shelf products or only as dependencies for workloads. Red Hat has an interesting tool that aims to help you to make sure you use secure containers. The Red Hat Container Catalog is a repository of container images that have been tested and certified by Red Hat and partners, and therefore are trusted images.
As part of the Container Catalog, Red Hat provides the Container Health Index. The Container Health Index is a rating system for container images available in the Red Hat Container Catalog, which goes from Grade A to F, in which Grade A is the most up-to-date image in terms of critical errata. You can find all the grades available and how they are defined at this link: https://access.redhat.com/articles/2803031. This feature helps a lot to assess the security risk you are associated with when using a certain image version.
In the Red Hat Container Catalog, you can find the Red Hat UBI, which may comprise an important aspect of your container strategy. You'll find out more about this next.
Red Hat UBI
Defining a base image for your containers is an important step that you need to consider to have a portable and secure container delivery process. Depending on the decision you make, you may see yourself locked in some specific Linux versions and distributions that the container base image supports. The base image is also critical to keep your workloads secure—many vulnerabilities are found every week on Linux, but they are usually fixed really fast, using a mature and robust base image such as RHEL which is fundamental in keeping your workloads more secure.
Red Hat UBI is based on RHEL, available at no additional cost, and has a minimal footprint (something between 10 megabytes (MB) and 100 MB, depending on the image type). There are four image types you can choose from, depending on your needs, as outlined here:

Besides the options mentioned, Red Hat also provides some UBIs with language runtimes included, such as Node.js, .NET, and Java. All the base images are available for download from the Red Hat Container Catalog.
Once you have a list of trusted sources that contain secure container images, we recommend you limit OpenShift to only running images from these trusted sources. You'll see next how to do this.
Limiting image registry sources
You can easily block or allow image registries that OpenShift can use with the following procedure:
- Run the following command to edit the image.config.openshift.io/cluster object:
$ oc edit image.config.openshift.io/cluster
- In the object’s YAML, set the allowedRegistriesForImport and registrySources fields with the desired image registries. AllowedRegistriesForImport defines the image registries to which a user can import images using image streams (the oc import-image command). In the registrySources block, you can define allowed registries (allowedRegistries) or blocked registries (blockedRegistries), but not both. Have a look at the following example:
spec:
allowedRegistriesForImport:
- domainName: quay.io
insecure: false
additionalTrustedCA:
name: myconfigmap
registrySources:
allowedRegistries:
- quay.io
- registry.redhat.io
- image-registry.openshift-image-registry.svc:5000
insecureRegistries:
- insecure-reg.com
This concludes the main security aspects that we believe any company needs to think about. We encourage you to carefully review the topics we covered in this chapter and define/implement policies to keep all your clusters secure.
Summary
We have seen in this chapter some of the things you may consider to have secure OpenShift clusters. While OpenShift is considered a secure platform based on Kubernetes, how you manage it, of course, matters a lot. Consider establishing policies for access control, certificates, container and network isolation, development, and CI/CD pipelines.
A secure platform starts with proper planning to define and implement efficient policies to control what is being developed and deployed into the platform, protect it against unnecessary risks, and—finally—isolate workloads and networks as much as possible to mitigate the impacts that a breach could have on the environment. In Chapter 11, OpenShift Multi-Cluster GitOps and Management, you will see how to use Advanced Cluster Management to apply policies at scale to several clusters and make sure that all of them are compliant and safe, no matter where they are running.
In the next chapter, we will explore how to work with Kubernetes native pipelines on OpenShift using the Tekton project, which you can use to not only have a cloud-native CI/CD process to build and deploy your application but also add an extra layer of security in your application supply chain.
Further reading
If you want more information related to the concepts we covered in this chapter, check out the following references:
- Is the Cloud Secure?—Gartner study: https://www.gartner.com/smarterwithgartner/is-the-cloud-secure
- Kubernetes vulnerabilities and attacks reported:
- Most Common Kubernetes Security Issues and Concerns to Address (blog post): https://cloud.redhat.com/blog/most-common-kubernetes-security-issues-and-concerns-to-address
- Container Security report: https://www.kuppingercole.com/reprints/b1e948f62d5394353f996e43a89cde4a#heading8.1
- State of Kubernetes security report: https://www.redhat.com/en/resources/kubernetes-adoption-security-market-trends-overview
- OpenShift authentication guide: https://docs.openshift.com/container-platform/latest/authentication/index.html
- Troubleshooting OpenShift authentication: https://access.redhat.com/articles/5900841
- Defining default network policies: https://docs.openshift.com/container-platform/4.10/networking/network_policy/default-network-policy.html
- Red Hat Universal Base Images: https://developers.redhat.com/products/rhel/ubi
- Container Health Index grades: https://access.redhat.com/articles/2803031
- Detailed information about htpasswd (Apache project): https://httpd.apache.org/docs/2.4/programs/htpasswd.html
- OpenID Connect: https://developers.google.com/identity/protocols/oauth2/openid-connect
- Container isolation: https://www.nginx.com/blog/what-are-namespaces-cgroups-how-do-they-work/