9
OpenShift Pipelines – Tekton
So far in this book, we’ve already discussed the challenges related to the current hybrid cloud world and covered aspects regarding the OpenShift architecture and deployment. Now, we are going to shift gears and bring you an exciting DevOps-related feature: OpenShift Pipelines!
OpenShift Pipelines is a Kubernetes-native continuous integration and continuous delivery (CI/CD) tool based on the Tekton open source project, which is included at no additional cost with Red Hat’s OpenShift subscription. In this chapter, we will walk you through it and learn how to install and use it. By doing this, you will understand how it can be helpful in your DevOps pipelines and automation.
After Chapter 5, OpenShift Deployment, you should have an OpenShift cluster working in your environment. We will use that cluster in this chapter to implement some exercises. If you don’t have an OpenShift cluster available, then you can use CodeReady Containers (CRC) as a lab. Here, you can run an OpenShift cluster locally and quickly using an all-in-one VM.
In this chapter, we will cover the following topics:
- What is OpenShift Pipelines?
- Installing OpenShift Pipelines
- Creating a Tekton pipeline from scratch
- Using triggers with GitHub webhooks
- Fixing the failed PipelineRun due to YAML issues
Technical requirements
As we mentioned previously, OpenShift Pipelines is a Kubernetes native application and, as such, is a lightweight tool that uses Custom Resource Definitions (CRDs) to extend the OpenShift API’s functionalities. In the upcoming sections, you will see that the installation is fairly simple and only involves installing an operator – a “Next, Next, Finish” sort of experience. To be able to install it and run the exercises in this chapter, you only need an OpenShift cluster with the following available resources:
- 2 vCPUs
- 2 GB of RAM
If you don’t have an OpenShift cluster available to use, we recommend that you try CRC to spin up a cluster locally on your machine. To use CRC, you need to have the following system requirements on your workstation:
- 4 physical CPU cores (AMD64 or Intel 64)
- 9 GB of free memory
- 35 GB of storage space
- One of the following operating systems:
- Windows (Windows 10 Fall Creators Update or later)
- macOS (10.14 Mojave or later)
- Linux (Red Hat Enterprise Linux/CentOS 7.5 or later and on the latest two stable Fedora releases)
- Linux (Ubuntu 18.04 LTS or newer and Debian 10 or newer are not officially supported and may require you to manually set up the host machine
The source code used in this chapter is available at https://github.com/PacktPublishing/OpenShift-Multi-Cluster-Management-Handbook/tree/main/chapter09.
In this section, we will demonstrate how to install and use CRC using a Linux (Fedora) workstation. Please refer to the following site to find out more about the installation process on Windows or macOS: https://crc.dev/crc/.
What Is a CRD?
A CRD is a Kubernetes resource that allows you to expand the Kubernetes APIs by defining custom entities. A CRD is composed of a name and a schema that specify the API’s properties.
Installing and using CRC
The CRC installation process is simple – you need to have the following packages installed in your box:
$ sudo yum install NetworkManager libvirt –y
To install CRC, follow these steps:
- Download the latest release of CRC for your platform at https://console.redhat.com/openshift/create/local.
- Extract the contents of the archive.
- In a terminal, go to the path where you extracted the archive.
- Run the following command to set up CRC:
$ ./crc setup
- If you want to set up parameters, such as the amount of CPU and memory that’s available for CRC, run the following code:
$ ./crc config set cpus 4
$ ./crc config set memory 20480
- Start CRC by running the following command:
$ ./crc start
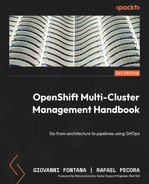
It is going to take up to 20 minutes to completely start the cluster. At the end of the process, you will see a screen similar to the following:
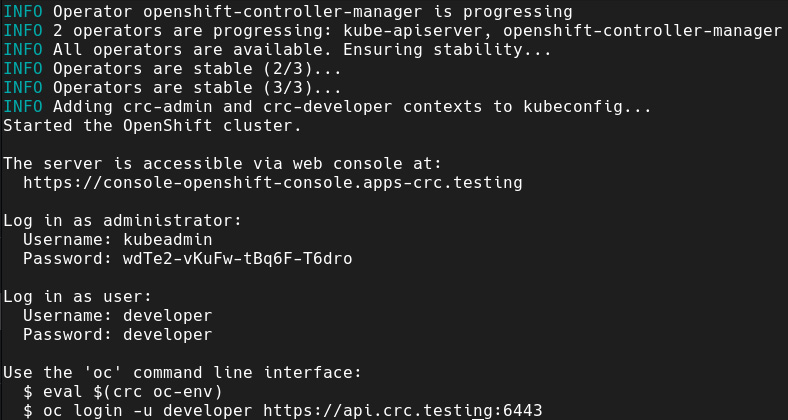
Figure 9.1 – CRC startup
Now that you have CRC or any other OpenShift cluster up and running, we are ready to introduce OpenShift Pipelines and learn what you can do with it.
What is OpenShift Pipelines?
Now that you already have a lab environment, let’s start our engines and drive through OpenShift Pipelines! As we mentioned previously, OpenShift Pipelines is Red Hat’s implementation of the Tekton open source project. Let’s learn what Tekton is and how it differs from other CI/CD pipeline tools on the market.
What is Tekton?
Tekton provides a framework for creating Kubernetes native CI/CD pipelines quickly and easily. It uses CRDs to extend the Kubernetes APIs functionalities and add some custom objects that are used to implement CI/CD pipelines. You can also integrate Tekton with industry-standard CI/CD pipeline tools such as Jenkins, GitLab CI, and any others to use the best technology for each case.
Tekton is a part of the Continuous Delivery Foundation, which is sponsored by huge companies such as AWS, Red Hat, Google, Netflix, and many others. This is usually a good indication that a project will have a long life and stability – an important factor for an enterprise’s investment decisions.
Main benefits
Using Tekton can bring you many benefits, such as the following:
- Tekton can be considered as a serverless CI/CD pipeline system that consumes resources on demand using isolated containers, which likely reduce the infrastructure or cloud costs associated with the CI/CD tool.
- It is tightly integrated with Kubernetes, working as an extension of it using CRDs. This means that you don’t need to spend time and resources with complex integrations between the CI/CD tools and OpenShift.
- Both the aforementioned aspects also mean that you will not need additional human resources to deploy, support, and maintain the CI/CD tool.
- As a Kubernetes native tool, you can define and run pipelines by applying a simple YAML file to Kubernetes (the same way you would do to create a Pod, Service, Or Deployment). This makes Tekton easy to use and integrate with other tools for complex pipelines that are composed of several components (legacy VMs, containers, microservices, and so on).
- By integrating Tekton with Argo CD, you can have a really powerful stack in which Tekton resides on the continuous integration side while Argo CD is responsible for the continuous delivery side. We will look at Argo CD in detail in Chapter 10, OpenShift GitOps – Argo CD.
- It is a true open source solution that’s backed by a strong foundation, which is good evidence that it will be supported and evolve for years to come.
Tekton components
In this section, we will walk through each of the Tekton components. In a nutshell, the main Tekton components are as follows:
- Tekton Pipelines: It is composed of several CRDs, which are the building blocks for developing and running CI/CD pipelines.
- Tekton Triggers: These are objects that listen to events and trigger a pipeline or task. They are often used to run a pipeline after a pull or push request in a GitHub repository.
- Tekton CLI: The command-line interface (CLI) (tkn) to interact with Tekton.
- Tekton Catalog: A community-driven repository of tasks ready to be used in your pipelines.
- Tekton Operator: This is used to easily install, manage, and remove Tekton from a Kubernetes cluster.
Concepts
To learn Tekton, you need to understand some concepts first:
- Step: An action that has a set of inputs and produces a set of outputs.
- Task: A set of structured steps required to run a specific task, such as cloning a GitHub repository or building source code.
- Pipeline: A set of structured tasks that composes a CI/CD pipeline.
- TaskRun: This object represents the instantiation of a task. While the task is the generic definition of it, a TaskRun defines the input parameters and the other components that are needed to run it.
- PipelineRun: This is similar to a TaskRun, but for pipelines.
To dive into these concepts, we will cover an example where we will build and run a meaningful pipeline.
Installing OpenShift Pipelines
The installation process is really simple, as you will see in the following steps.
Prerequisites
Installation
- Access the OpenShift Web Console from the administrator’s perspective.
- Navigate to Operators | OperatorHub:
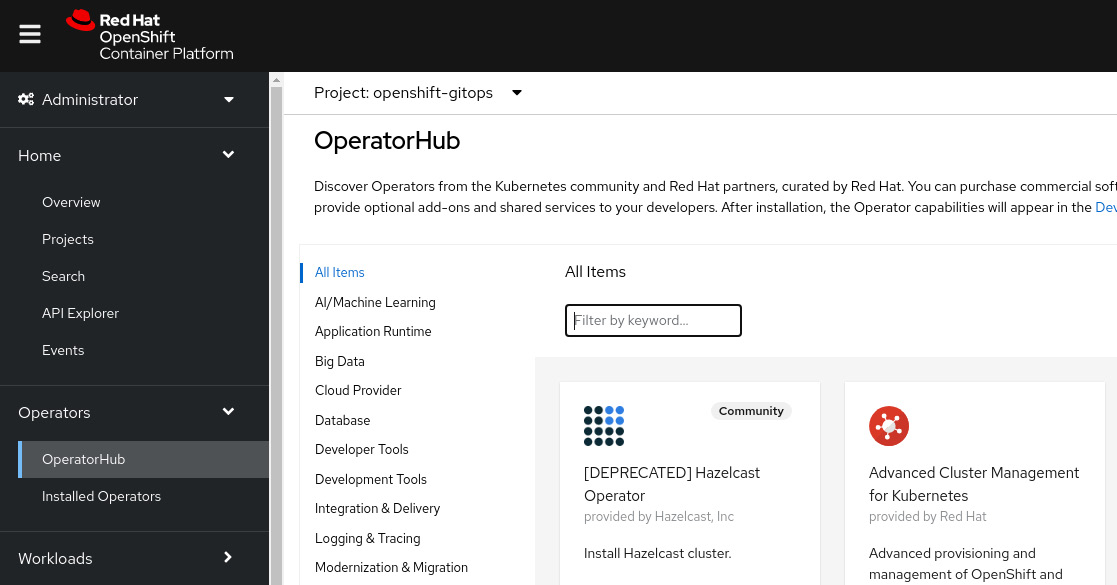
Figure 9.2 – OperatorHub
- Search for OpenShift Pipelines using the Filter by keyword box:
Figure 9.3 – Red Hat OpenShift Pipelines on OperatorHub
- Click on the Red Hat OpenShift Pipelines tile and then the Install button to see the Install Operator screen:
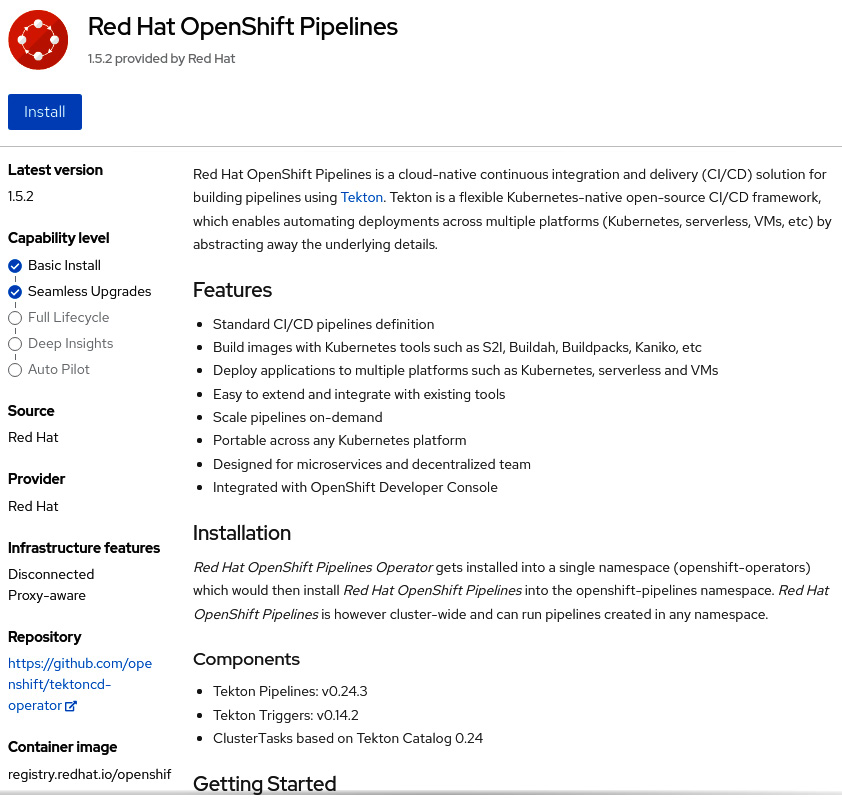
Figure 9.4 – Installing OpenShift Pipelines
- Now, select All namespaces on the cluster (default) for Installation mode. As such, the operator will be installed in the openshift-operators namespace and permits the operator to install OpenShift Pipelines instances in any target namespace.
- Select Automatic or Manual for the upgrade’s Approval Strategy. If you go for Automatic, upgrades will be performed automatically by the Operator Lifecycle Manager (OLM) as soon as they are released by Red Hat, while if you go for Manual, you need to approve it before it’s applied.
- Select an Update channel option. The stable channel is recommended as it contains the latest stable and supported version of the operator.
- Click the Install button:
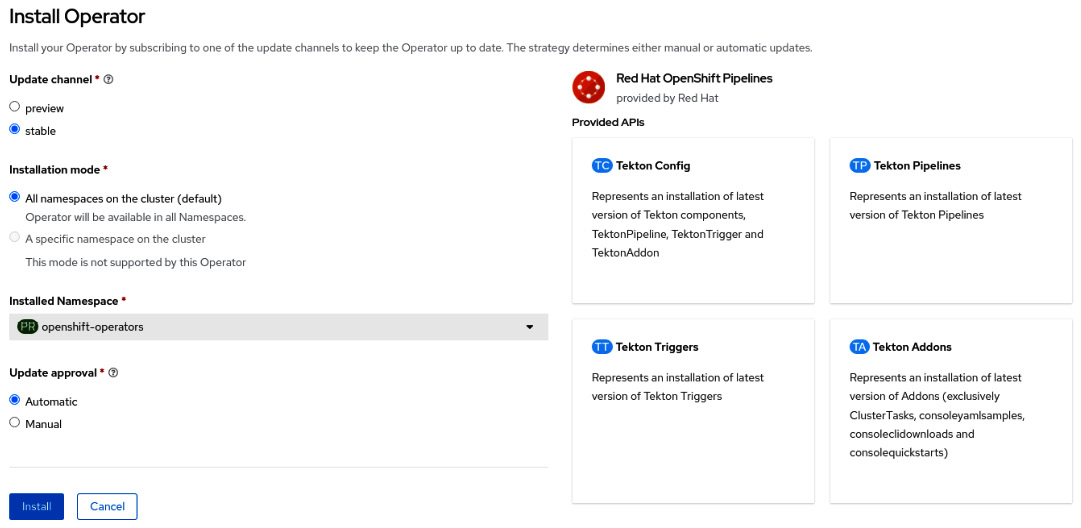
Figure 9.5 – Installing the operator
- Wait up to 5 minutes until you see the following message:
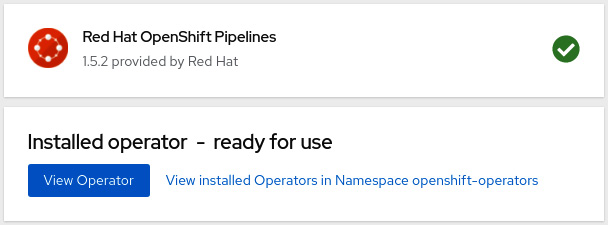
Figure 9.6 – Operator installed
Once you have installed OpenShift Pipelines, we recommend that you install the tkn CLI to help with ordinary tasks. Let’s learn how to install the tkn CLI.
Installing the tkn CLI
tkn is a CLI that makes it easier to work with Tekton. Through it, you can manage (list, delete, describe, get logs, and so on) tasks, pipelines, triggers, and all the available Tekton objects.
To install the tkn CLI, follow these steps:
- Download tkn from the URL link provided after you click the question mark icon of your OpenShift Web Console, as shown here:
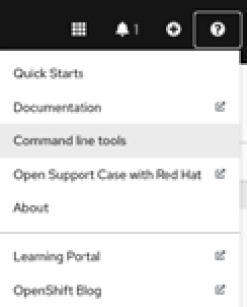
Figure 9.7 – Help menu | Command line tools
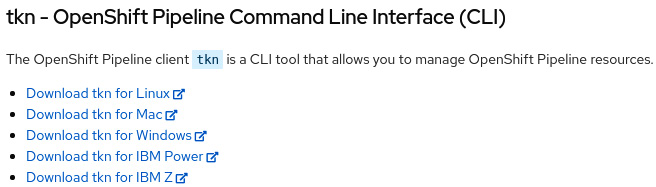
Figure 9.8 – tkn download links
- After downloading it to your machine, you need to decompress it and add it to your path:
$ tar -xvzf tkn-linux-amd64-0.17.2.tar.gz
$ sudo cp tkn /usr/local/bin
- If everything went well, you will see the output below by running tkn version. Ignore the warning message you will see that specifies the pipeline version; it is an expected message as we haven’t logged any OpenShift clusters yet:
$ tkn version
Client version: 0.17.2
Pipeline version: unknown, pipeline controller may be installed in another namespace please use tkn version -n {namespace}
Now that you have installed OpenShift Pipelines and tkn, let’s use them to create a pipeline from scratch. In the next section, we will learn about Tekton’s main concepts while taking a practical approach.
Creating a Tekton pipeline from scratch
In this section, we will create a Tekton pipeline from scratch so that we can learn from it. We are going to use a sample from our GitHub repository: https://github.com/PacktPublishing/OpenShift-Multi-Cluster-Management-Handbook. To practice the concepts we will cover here, fork this repository to your GitHub account and follow the instructions provided in this chapter.
The pipeline that we will work on is simple but helpful. It will consist of the following tasks:
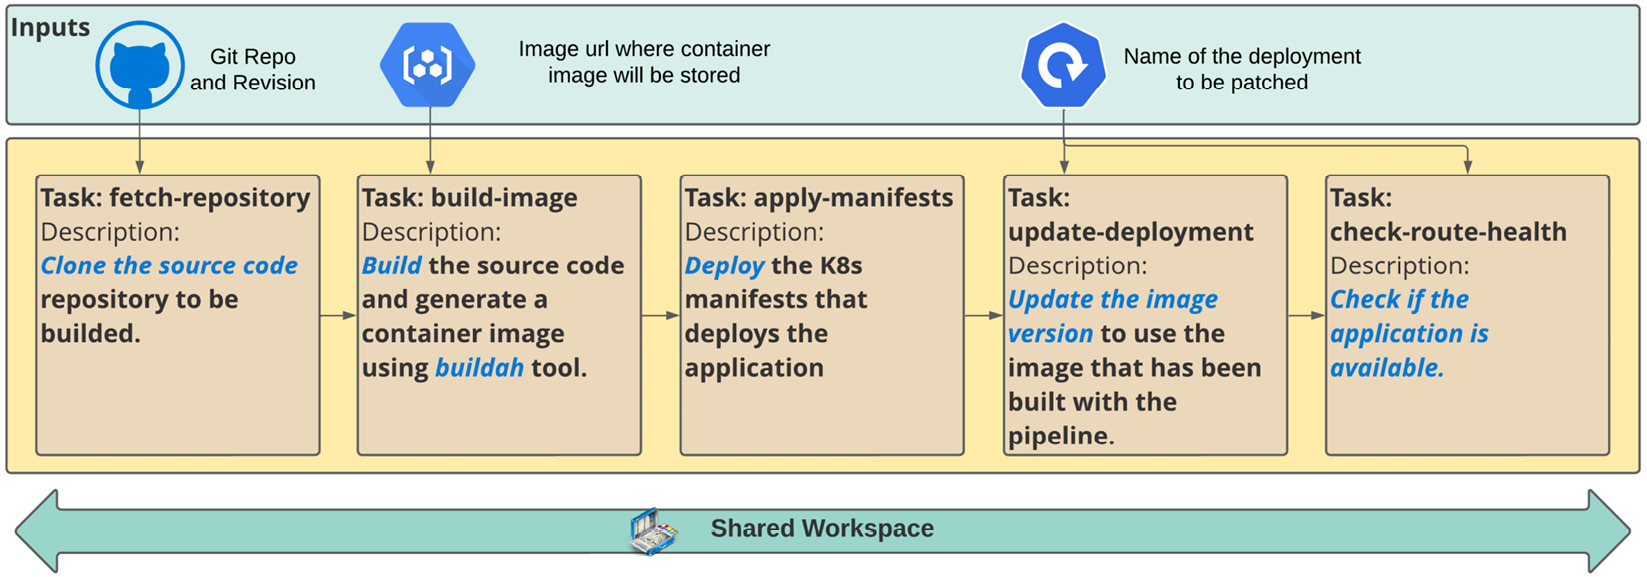
Figure 9.9 – Build and deploy pipeline
In the next few sections, you will learn how to use Tasks, TaksRuns, Pipelines, and PipelineRuns, which are Tekton’s main objects.
Tasks
To create this pipeline, you need to understand the foundational concept of a task. As we mentioned previously, a task provides a set of structured steps for performing a certain action, such as cloning a GitHub repository or building source code. Now, let’s go deeper and learn about some important aspects of it. The first important aspect that you need to understand is the task scope, which defines whether you need to use a Task or a ClusterTask:
- Task: A task is only available within a specific namespace. You will usually use tasks for actions that apply specifically to a certain application.
- ClusterTask: This is identical to a task but can be used in any namespace. They are usually used with generic actions that can be applied to any application.
In our example, we will use Tasks and ClusterTasks to understand how they work and the differences between them. A Task has the following elements. We will use these in our example:
- Parameters: The parameters that are required to run the task.
- Resources: This includes the input or output resources that are supplied by PipelineResources objects. We recommend that you use workspaces instead of PipelineResources since they are more difficult to troubleshoot, making tasks less reusable and more limited than workspaces. Due to that, we won’t be using PipelineResources in our example.
- Steps: This is where you define the actions that will be performed in a task. You need to use a container image to run the actions.
- Workspaces: This is an artifact that’s used to define a commonly shared storage volume between different tasks in a pipeline. Workspaces can be used for different purposes, such as sharing data between different tasks, a mount point for configurations (using ConfigMaps), credentials, and sensitive data (with secrets), and also to store reusable artifacts that have been shared between different tasks and pipelines. Workspaces are also helpful for caching artifacts to speed up builds and other jobs.
- Results: These are string result variables that can be passed to other tasks in a pipeline.
In our sample pipeline, we are going to reuse our existing tasks for the GitHub clone and build the source code. The last two tasks we will look at will be custom ones that we will create specifically for our pipeline.
Reusing tasks
First, let’s learn how to search for and reuse tasks to build a pipeline.
The first place where you can look for existing tasks is your local OpenShift cluster. When you install OpenShift Pipelines, several ClusterTasks are installed with it. To check those ClusterTasks, you can use the tkn CLI or the OpenShift UI.
The following code shows how to use tkn:
# You need to login at the cluster first using "oc login"
$ oc login -u <user> https://<ocp-api-url>:6443
$ tkn clustertasks ls
The following is some example output:
$ oc login -u kubeadmin https://api.crc.testing:6443
(.. omitted ..)
$ tkn clustertasks ls
NAME               DESCRIPTION              AGE
buildah            Buildah task builds...   2 days ago
buildah-1-5-0      Buildah task builds...   2 days ago
git-cli            This task can be us...   2 days ago
git-clone          These Tasks are Git...   2 days ago
(.. omitted ..)
To do the same using the OpenShift UI, go to Pipelines | Tasks using the Administrator Web Console and click on the ClusterTasks tab. You will see the same list that we found previously using the tkn CLI:
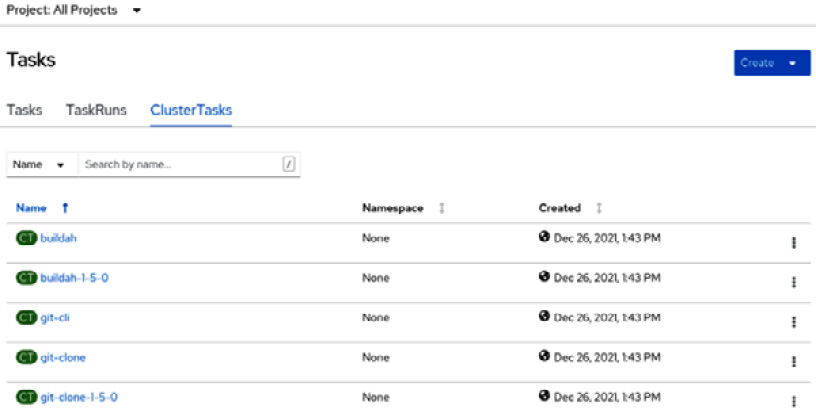
Figure 9.10 – ClusterTasks for reuse
Another great tool to look for and reuse existing tasks is Tekton Hub. We will use it shortly to extend our sample and validate our YAML files using the YAML Lint tool.
Notes
Tekton Hub is a web portal where you can get reusable assets from Tekton Catalog. It can be accessed at https://hub.tekton.dev/.
YAML Lint is a tool that validates YAML file syntax, checking indentation, trailing spaces, and many other possible issues. Go to https://yamllint.readthedocs.io/en/stable/ to learn more.
Using the ClusterTasks, we have decided to reuse the following:
- git-clone: To clone the source code from the GitHub repository
- buildah: To build the source code and generate a container image as a result
Now, let’s learn how to create a custom task for when you need something specific.
Creating a new (custom) task
Defining a new task is as simple as creating a pod or deployment. For our example, we need to create three new tasks:
- apply-manifests: This task will be responsible for applying some K8s manifest files that will deploy the application.
- update-deployment: This task will update the deployment, replacing the container image with the one that has been built in the previous tasks.
- check-app-health: This task checks the application pod’s status and the URL to validate whether the application is accessible.
Let’s create these tasks, explore their content, and learn from them:
apiVersion: tekton.dev/v1beta1
kind: Task #[1]
metadata:
  name: apply-manifests #[2]
spec:
  workspaces: #[3]
  - name: source
  params: #[4]
  - name: manifest_dir
    description: The directory in the source that contains yaml manifests
    type: string
    default: "k8s"
  steps: #[5]
    - name: apply
      image: image-registry.openshift-image-registry.svc:5000/openshift/cli:latest #[6]
      workingDir: /workspace/source
#[7]
      command: ["/bin/bash", "-c"]
      args:
        - |-
          echo Applying manifests in $(inputs.params.manifest_dir) directory
          oc apply -f $(inputs.params.manifest_dir)
          echo -----------------------------------
In the preceding code, we have highlighted some parts with numbers. Let’s take a look:
- [1]: An object of this kind defines a new Tekton task.
- [2]: The task’s name.
- [3]: The workspace containing the k8s manifest source files. This is the shared workspace that was populated with the git-clone task (the first task).
- [4]: The parameters that are required for the task to run.
- [5]: The steps that are performed with the task.
- [6]: The image that will run the step commands.
- [7]: The commands that will perform the desired action – in this case, applying the k8s manifests.
Now that we have looked at the task’s structure, let’s create it in our sample environment and run it using another object – TestRun:
- Create a new project for our example:
$ oc new-project pipelines-sample
- Now, check if the pipeline’s service account has been created automatically:
$ oc get serviceaccount pipeline
NAME SECRETS AGE
pipeline 2 33s
- Create the apply-manifest task in the pipelines-sample namespace:
$ oc apply -f https://github.com/PacktPublishing/OpenShift-Multi-Cluster-Management-Handbook/blob/main/chapter09/Tasks/apply-manifests.yaml
task.tekton.dev/apply-manifests created
- Using tkn confirm that the task has been created:
$ tkn tasks ls
NAME DESCRIPTION AGE
apply-manifests 17 seconds ago
- Now, let’s create other custom tasks (update-image-version and check-route-health):
$ oc apply -f https://github.com/PacktPublishing/OpenShift-Multi-Cluster-Management-Handbook/blob/main/chapter09/Tasks/update-image-version.yaml
$ oc apply -f https://github.com/PacktPublishing/OpenShift-Multi-Cluster-Management-Handbook/blob/main/chapter09/Tasks/check-route-health.yaml
$ tkn tasks ls
NAME DESCRIPTION AGE
apply-manifests 17 seconds ago
heck-app-health 10 seconds ago
update-deployment 8 seconds ago
Now that we have created our custom tasks, let’s learn how to run and test them using a TaskRun object.
TaskRun
Our task needs a persistent volume to store the source code from GitHub. As such, before we run TaskRun, we need to create a PersistentVolumeClaim. Note that you need to have a StorageClass to provision a PersistentVolume automatically for you. If you don’t have one, the PersistentVolumeClaim will be Pending, waiting for the PersistentVolume to be created manually.
Run the following command to create the PersistentVolumeClaim:
$ oc apply -f https://github.com/PacktPublishing/OpenShift-Multi-Cluster-Management-Handbook/blob/main/chapter09/PipelineRun/pvc.yaml
Now, we must create two TaskRuns. In the first, we will use the git-clone ClusterTask to clone the GitHub repository and store it in the workspace that uses a PersistentVolume. In the second, we will use the custom task that we created previously, which deploys the application by applying some manifests (the apply-manifests task).
The following code shows the structure of a TaskRun:
apiVersion: tekton.dev/v1beta1
kind: TaskRun
metadata:
  name: git-clone #[1]
spec:
  taskRef:
    name: git-clone #[2]
    kind: ClusterTask #[3]
  params: #[4]
  - name: url
    value: "https://github.com/PacktPublishing/OpenShift-Multi-Cluster-Management-Handbook"
  - name: subdirectory
    value: ""
  - name: deleteExisting
    value: "true"
  - name: revision
    value: "main"
  workspaces: #[5]
  - name: output
    persistentVolumeClaim:
      claimName: source-pvc
Let’s look at this code in more detail:
- [1]: The name of the TaskRun object
- [2]: The name of the task that will be run
- [3]: This is required for ClusterTask but can be omitted for regular tasks
- [4]: Parameter values to be used during the task’s execution
- [5]: Workspaces to be used
Run the following command to apply the TaskRun object:
$ oc apply -f https://github.com/PacktPublishing/OpenShift-Multi-Cluster-Management-Handbook/blob/main/chapter09/Tasks/git-clone-taskrun.yaml
Once you have created the git-clone object, you can look at the logs using the following tkn command:
$ tkn taskrun logs git-clone -f
[clone] + '[' false = true ']'
[clone] + '[' false = true ']'
[clone] + CHECKOUT_DIR=/workspace/output/
[clone] + '[' true = true ']'
[clone] + cleandir
[clone] + '[' -d /workspace/output/ ']'
(.. ommited ..)
Finally, run apply-manifests using the following TaskRun:
$ oc apply -f https://github.com/PacktPublishing/OpenShift-Multi-Cluster-Management-Handbook/blob/main/chapter09/Tasks/apply-manifests-taskrun.yaml
Check the logs, as follows:
$ tkn taskrun logs run-apply-manifests -f
[apply] Applying manifests in ./sample-go-app/articles-api/k8s directory
[apply] deployment.apps/clouds-api created
[apply] service/clouds-api created
[apply] route/clouds-api created
With that, you have learned how to run a particular task using a TaskRun object. You also know how to reuse and create a custom task. We will use this knowledge to create our first pipeline.
Pipelines
In this section, we will create our first meaningful pipeline! I like to compare a pipeline’s design to a LEGO® set, in which you need to have all the pieces at hand before assembling it. If the LEGO set is too big to assemble at once, you need to break it into smaller blocks of meaningful parts. In our pipeline, the LEGO pieces are the tasks that we have already built and the ones we will reuse. We have all we need, so let’s assemble our LEGO set.
We will use our example to understand how to define a pipeline object. The first part of any pipeline is its metadata:
apiVersion: tekton.dev/v1beta1
kind: Pipeline
metadata:
  name: build-and-deploy
The next part is its specification (spec), which is composed of the following items:
- Workspaces: This is a shared workspace that’s required to store the source code and any other pipeline artifacts that need to be passed between the tasks:
spec:
workspaces:
- name: shared-workspace
- Parameters: These are the input parameters that are required to run the pipeline:
params:
- name: deployment-name
type: string
description: name of the deployment to be patched
- name: git-url
type: string
description: url of the git repo for the code of deployment
- name: git-revision
type: string
description: revision to be used from repo of the code for deployment
default: "master"
- name: IMAGE
type: string
description: image to be built from the code
- Tasks: These are the tasks to be run. Each task must have a valid name and a taskRef (the reference to the task that will be used), as follows:
- name: apply-manifests
taskRef:
name: apply-manifests
workspaces:
- name: source
workspace: shared-workspace
runAfter:
- build-image
- For ClusterTasks, you need to explicitly set the kind attribute within the taskRef group, like so:
- name: fetch-repository
taskRef:
name: git-clone
kind: ClusterTask
workspaces:
- name: output
workspace: shared-workspace
params:
- name: url
value: $(params.git-url)
- name: subdirectory
value: ""
- name: deleteExisting
value: "true"
- name: revision
value: $(params.git-revision)
You can find the complete pipeline at https://github.com/PacktPublishing/OpenShift-Multi-Cluster-Management-Handbook/blob/main/chapter06.
Now, we are ready to create our pipeline. To do so, run the following command:
$ oc apply -f https://github.com/PacktPublishing/OpenShift-Multi-Cluster-Management-Handbook/blob/main/chapter09/Pipeline/build-deploy.yaml
$ tkn pipelines ls
NAME               AGE            LAST RUN   STARTED   DURATION   STATUS
build-and-deploy   1 minute ago   ---        ---
Now that we have defined our pipeline, let’s run it!
PipelineRun
There are multiple ways to run the pipeline: through the OpenShift Console UI, using tkn, or by creating and applying a PipelineRun object manually. At the end of the day, no matter how you run it, a PipelineRun will always be created (the only difference is that the PipelineRun is created automatically for you when you use tkn or the web UI). For didactic reasons, we will do this using a PipelineRun object to learn about and understand it.
The following code shows our PipelineRun object:
apiVersion: tekton.dev/v1beta1
kind: PipelineRun
metadata:
  name: build-deploy-api-pipelinerun #[1]
spec:
  pipelineRef:
    name: build-and-deploy #[2]
  params: #[3]
  - name: deployment-name
    value: clouds-api
  - name: git-url
    value: https://github.com/PacktPublishing/OpenShift-Multi-Cluster-Management-Handbook.git
  - name: IMAGE
    value:  image-registry.openshift-image-registry.svc:5000/pipelines-sample/clouds-api
  workspaces: #[4]
  - name: shared-workspace
    volumeClaimTemplate:
      spec:
        accessModes:
          - ReadWriteOnce
        resources:
          requests:
            storage: 500Mi
Let’s look at this code in more detail:
- [1]: The name of the PipelineRun object
- [2]: The pipeline to be run
- [3]: The parameter values to be used with the pipeline
- [4]: The workspace’s definition
Apply the PipelineRun object and check the logs to see the pipeline’s execution:
$ oc apply -f https://github.com/PacktPublishing/OpenShift-Multi-Cluster-Management-Handbook/blob/main/chapter09/PipelineRun/clouds-api-build-deploy.yaml
$ tkn pipelinerun logs build-deploy-api-pipelinerun -f
[fetch-repository : clone] + '[' false = true ']'
[fetch-repository : clone] + '[' false = true ']'
[fetch-repository : clone] + CHECKOUT_DIR=/workspace/output/
(.. omitted ..)
[check-app-health : apply] Waiting for application articles-api to be ready.
[check-app-health : apply] Checking if application is available at the route endpoint
[check-app-health : apply] Application is available at http://articles-api-pipelines-sample.apps.cluster-gf.gf.sandbox1171.opentlc.com/cloud
[check-app-health : apply] ----------------------------------
With that, you have custom tasks and a pipeline that has been tested and is working already. Now, let’s make it even better by using a trigger to run this pipeline automatically when a Git push occurs in the repository.
Using triggers with GitHub webhooks
In a CI/CD workflow, it is typical to use an event, such as a pull or push request on Git, to trigger a new pipeline run. With Tekton, you use EventListeners to listen for events and run one or more triggers. There are some out-of-the-box event processors, named Interceptors, for the following platforms:
- GitHub: This allows you to validate and filter GitHub webhooks.
- GitLab: The same as the previous point but for GitLab.
- Bitbucket: The same as the previous points for Bitbucket.
- CEL: This allows you to use Common Expression Language (CEL) to filter and modify payloads.
- Webhook: This allows you to process any webhook payload and apply any business logic to it.
In our example, we will use a GitHub interceptor to process a webhook, filter push events, and trigger the pipeline we created previously. You can also implement your custom interceptors by implementing an object named ClusterInterceptors. Check out the links in the Further reading section if you need to create a ClusterInterceptor or use any interceptor other than the GitHub one that we will use in our example.
Note that the GitHub webhook requires a publicly accessible URL to send the HTTP webhook posts. Due to that, you will need an OpenShift cluster with a public IP and domain that can be accessed from the internet. That said, in this case, you will not be able to use CRC to test Tekton triggers using GitHub webhooks unless you make your CRC URL routes public on the internet.
What is CEL?
CEL is a simple but fast and portable language for expression evaluation. Created and maintained by some Google engineers, it is an open source project that was released under the Apache License and used with many Google projects and services. For more information, go to https://opensource.google/projects/cel.
Besides the EventListener, a Tekton trigger is composed of several other objects:
- Trigger: This defines which action will be performed after the EventListener detects a new event.
- TriggerTemplate: This specifies a blueprint of objects that will be applied as a result of the trigger, usually using a PipelineRun object, which, in turn, will run a pipeline.
- TriggerBinding: This defines the field data that will be extracted from the event payload to be used with the associated PipelineRun.
- ClusterTriggerBinding: This is the same as the TriggerBinding but cluster-scoped. It can be reused among different namespaces.
The following objects will be used in our example:
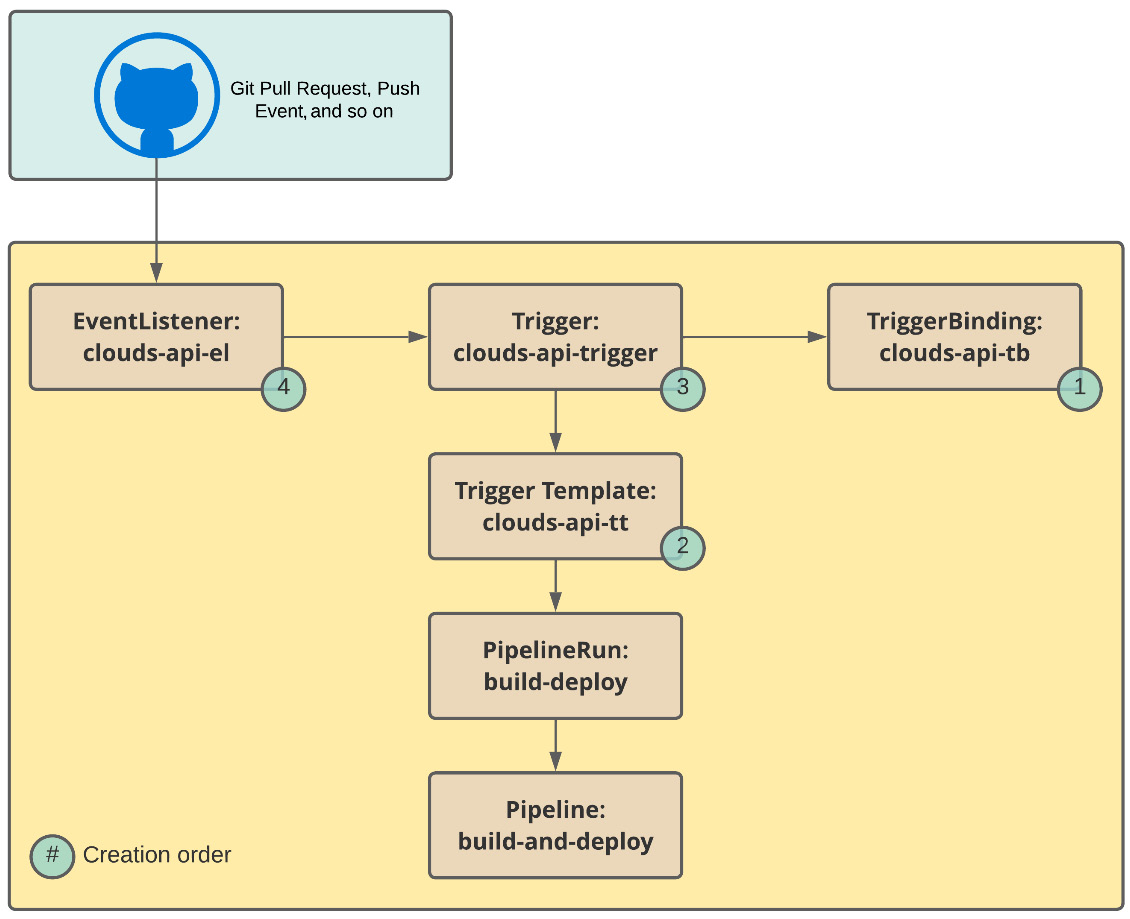
Figure 9.11 – Tekton Trigger objects
Now, let’s put this into practice! You have already created the tasks and pipeline in your lab, so let’s create the trigger objects that will use the existing pipeline.
TriggerBinding
TriggerBinding will parse the data that’s been extracted from the GitHub payload, as follows:
apiVersion: triggers.tekton.dev/v1beta1
kind: TriggerBinding
metadata:
  name: clouds-api-tb #[1]
spec:
  params: #[2]
  - name: git-repo-url
    value: $(body.repository.url)
  - name: git-repo-name
    value: $(body.repository.name)
  - name: git-revision
    value: $(body.head_commit.id)
Let’s look at this code in more detail:
- [1]: The name of the TriggerBinding object
- [2]: The parameters that will be assigned according to the payload data fields
Use the following command to create the TriggerBinding:
$ oc apply -f https://raw.githubusercontent.com/
The next object we need to create is TriggerTemplate. Let’s take a look.
TriggerTemplate
TriggerTemplate will create a PipelineRun that executes our sample pipeline:
apiVersion: triggers.tekton.dev/v1beta1
kind: TriggerTemplate
metadata:
  name: clouds-api-tt #[1]
spec:
  params: #[2]
  - name: git-repo-url
    description: The git repository url
  - name: git-revision
    description: The git revision
    default: master
  - name: git-repo-name
    description: The name of the deployment to be created / patched
  resourcetemplates: #[3]
  - apiVersion: tekton.dev/v1beta1
    kind: PipelineRun
    metadata:
      generateName: build-deploy-
    spec:
      serviceAccountName: pipeline
      pipelineRef:
        name: build-and-deploy
      params:
      - name: deployment-name
        value: clouds-api
      - name: git-url
        value: $(tt.params.git-repo-url)
      - name: git-revision
        value: $(tt.params.git-revision)
      - name: IMAGE
        value: image-registry.openshift-image-registry.svc:5000/pipelines-sample/clouds-api
      workspaces:
      - name: shared-workspace
        volumeClaimTemplate:
          spec:
            accessModes:
              - ReadWriteOnce
            resources:
              requests:
                storage: 500Mi
Let’s look at this code in more detail:
- [1]: The name of the TriggerTemplate object
- [2]: The input parameters that are populated by the TriggerBinding object
- [3]: The objects that will be created as a result of the trigger
Use the following command to create the TriggerTemplate object:
$ oc apply -f https://github.com/PacktPublishing/OpenShift-Multi-Cluster-Management-Handbook/blob/main/chapter09/Trigger/clouds-api-tt.yaml
Finally, we can create the Trigger object, which uses all the objects we have created.
Trigger
The Trigger object will be the glue between the GitHub interceptor, TriggerBinding, and TriggerTemplate:
apiVersion: triggers.tekton.dev/v1beta1
kind: Trigger
metadata:
  name: clouds-api-trigger #[1]
spec:
  serviceAccountName: pipeline
  interceptors: #[2]
    - ref:
        name: "github" #[3]
      params:
        - name: "secretRef" #[4]
          value:
            secretName: github-secret
            secretKey: secretToken
        - name: "eventTypes"
          value: ["push"] #[5]
  bindings:
    - ref: clouds-api-tb #[6]
  template:
    ref: clouds-api-tt #[7]
Let’s look at this code in more detail:
- [1]: The name of the Trigger object.
- [2]: The list of event interceptors to be used to trigger the actions.
- [3]: The interceptor from GitHub.
- [4]: The secret that’s been configured in the GitHub webhook.
- [5]: The trigger event types that Tekton will react to. In this case, it will be GitHub “push” events.
- [6]: The TriggerBinding object that will be used with this trigger.
- [7]: The TriggerTemplate object that will be used with this trigger.
The following code shows an example of the GitHub secret ([4]):
apiVersion: v1
kind: Secret
metadata:
  name: github-secret
type: Opaque
stringData:
  secretToken: "tekton"
Use the following command to create the secret and trigger:
$ oc apply -f https://github.com/PacktPublishing/OpenShift-Multi-Cluster-Management-Handbook/blob/main/chapter09/Trigger/clouds-api-trigger.yaml
The last object we need to create to put the trigger into practice is EventListener. Let’s take a look.
EventListener
Finally, we need to create an EventListener object that will listen for HTTP requests and be used with the GitHub webhook configuration. We will learn how to configure the GitHub webhook soon:
apiVersion: triggers.tekton.dev/v1beta1
kind: EventListener
metadata:
  name: clouds-api-el #[1]
spec:
  serviceAccountName: pipeline
  triggers:
    - triggerRef: vote-trigger #[2]
Let’s look at this code in more detail:
- [1]: The name of the EventListener object
- [2]: The trigger that will be invoked when the EventListener object is sensitized
Run the following command to create the EventListener object:
$ oc apply -f https://github.com/PacktPublishing/OpenShift-Multi-Cluster-Management-Handbook/blob/main/chapter09/Trigger/clouds-api-el.yaml
EventListener will create a service on OpenShift that you need to expose externally. The route URL that’s generated will be used during the GitHub webhook configuration:
$ oc expose svc el-clouds-api-el
Now, we are ready to configure a new GitHub webhook that will use the EventListener object we just created to fire Tekton’s trigger.
Creating a GitHub webhook
To create a webhook, you need to fork our GitHub repository. If you haven’t forked it yet, do so now in your personal GitHub account: https://github.com/PacktPublishing/OpenShift-Multi-Cluster-Management-Handbook.
Open the GitHub forked repository and go to Settings | Webhook. On the following page, click on the Add webhook button:
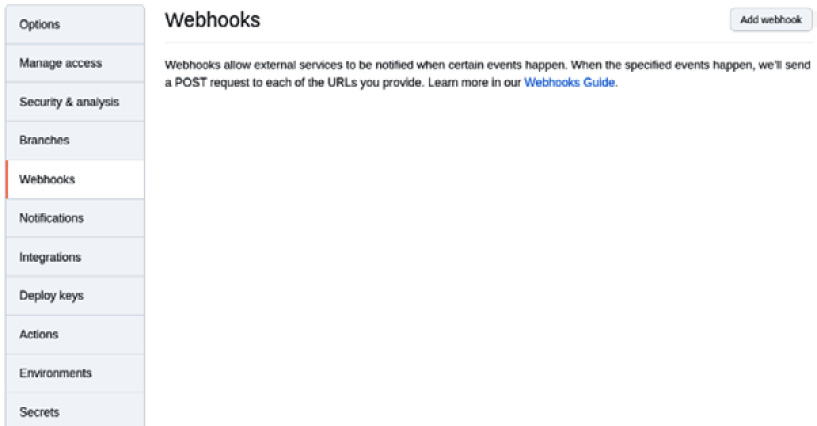
Figure 9.12 – Adding a webhook on GitHub
Fill out the form by providing the following information:
- Payload URL: The route URL we created in the previous section. You can get this URL by running the following command:
$ echo "$(oc get route el-clouds-api-el --template='http://{{.spec.host}}')" - Content type: application/json.
- Secret: The same value you used with the Tekton trigger’s secret (in our case, this is tekton):
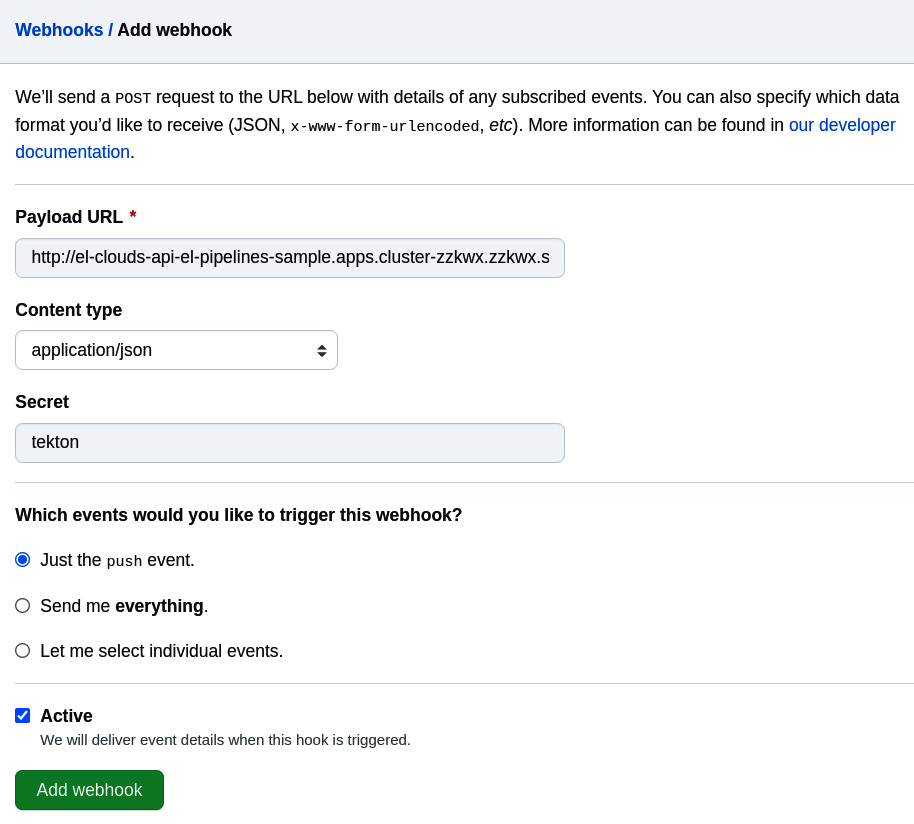
Figure 9.13 – Adding a webhook on GitHub
After a few seconds, you should see a green check mark next to the webhook we created:
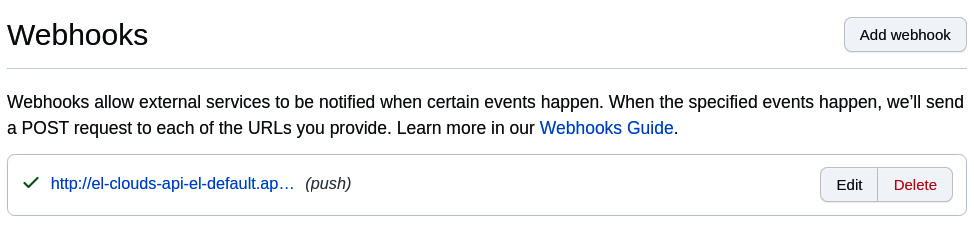
Figure 9.14 – Webhook added
Now that we have our Trigger objects from the Tekton side and the webhook configured on GitHub, let’s test it!
Testing the Tekton trigger
Run a commit and push the trigger to the webhook event, like so:
$ git commit -m "empty-commit" --allow-empty && git push origin main
Access the Pipelines menu. You should see a new PipelineRun start after the Git push command has been run:
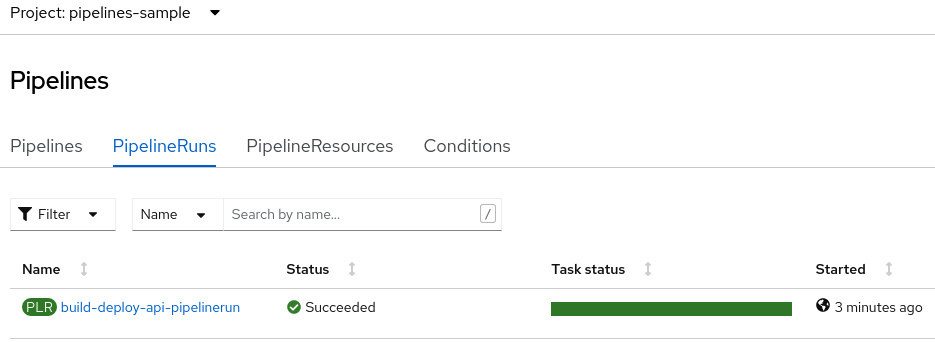
Figure 9.15 – PipelineRun on Red Hat
Congratulations – you have successfully created a CI/CD pipeline on Tekton and ran it automatically after a Git push event using a trigger! To wrap up this chapter, we will enhance our pipeline by adding a validation task for YAML files using the YAML linter tool.
To do so, let’s use Tekton Hub to find a reusable task. Go to https://hub.tekton.dev/ and search for YAML using the search box at the top right of the screen:
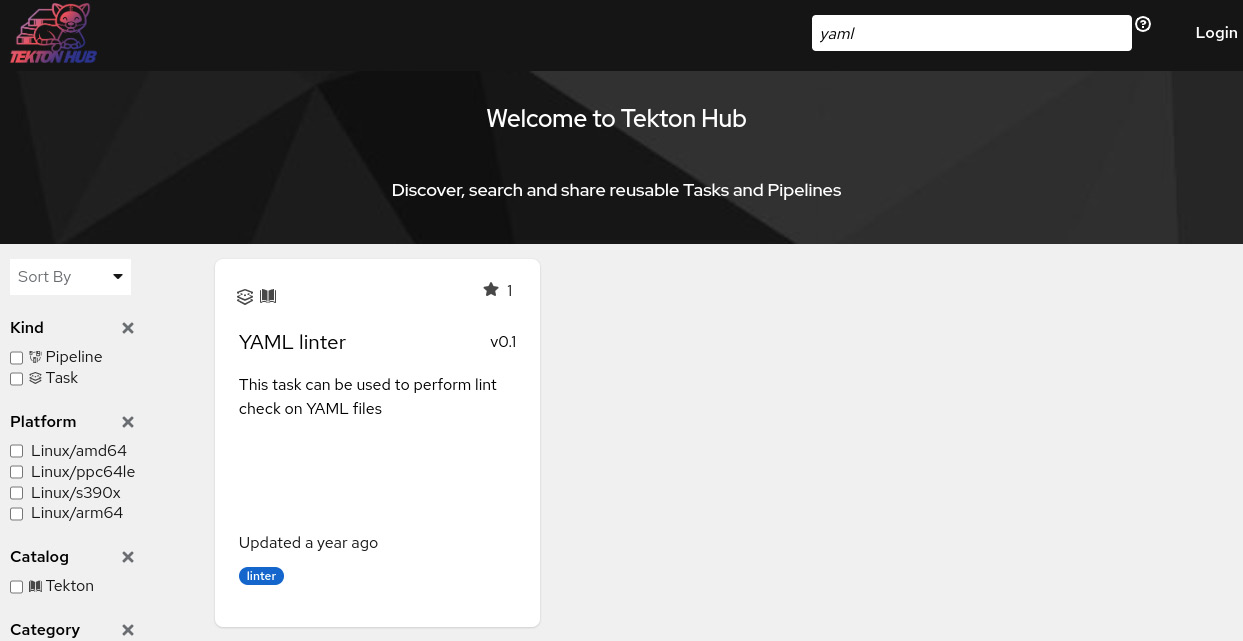
Figure 9.16 – Tekton Hub
Click the YAML linter task to find the instructions on how to install and use it:
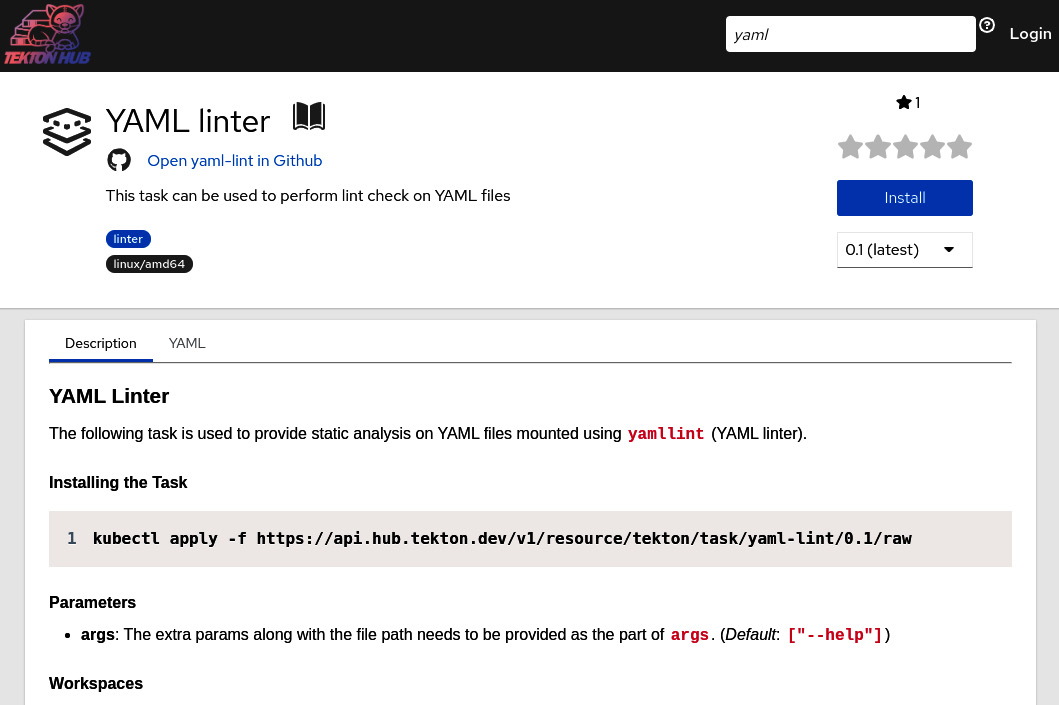
Figure 9.17 – YAML linter
This time, we will use the Pipeline Builder page to add the YAML linter task. To do so, access the OpenShift UI and select the Developer console:
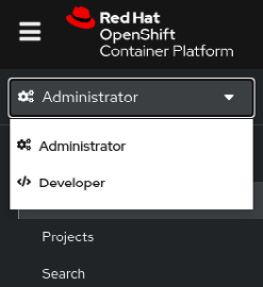
Figure 9.18 – Developer console
Now, perform the following steps:
- Access the Pipelines menu and click on the build-and-deploy pipeline:
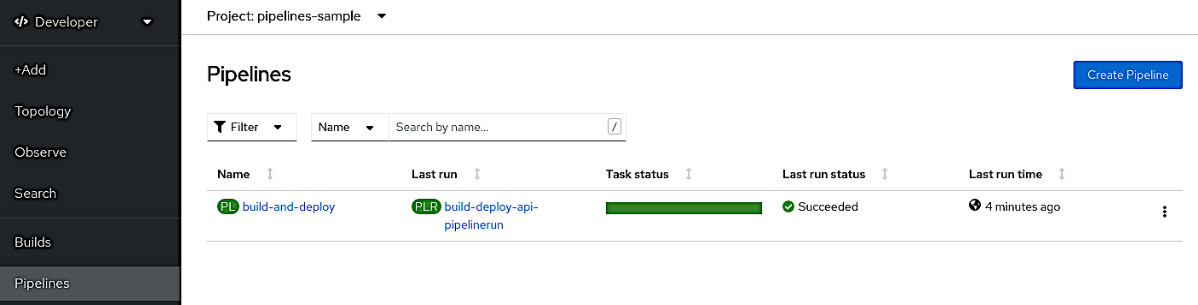
Figure 9.19 – The Pipelines menu
- Now, click the Actions button and then Edit Pipeline:
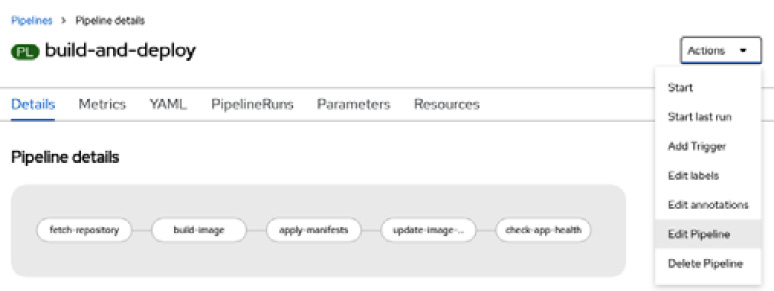
Figure 9.20 – The build-and-deploy pipeline
- On the following screen, click on the fetch-repository box and then the + sign next to it:
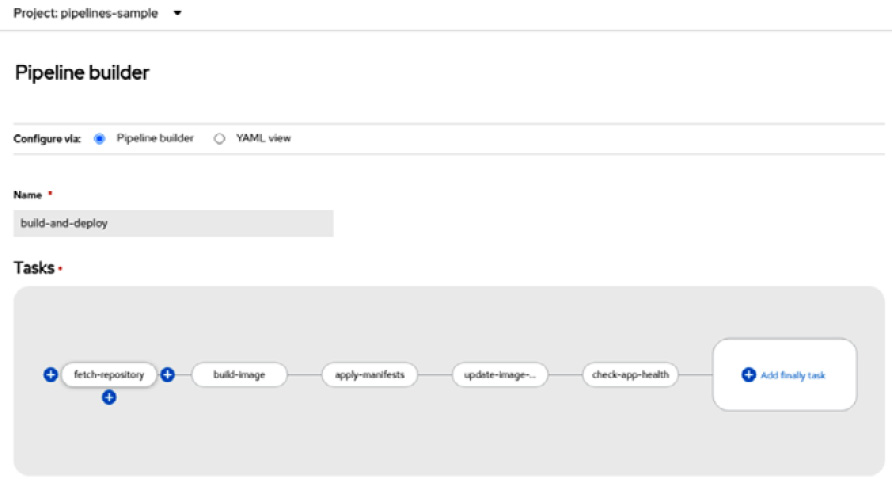
Figure 9.21 – The Pipeline builder feature
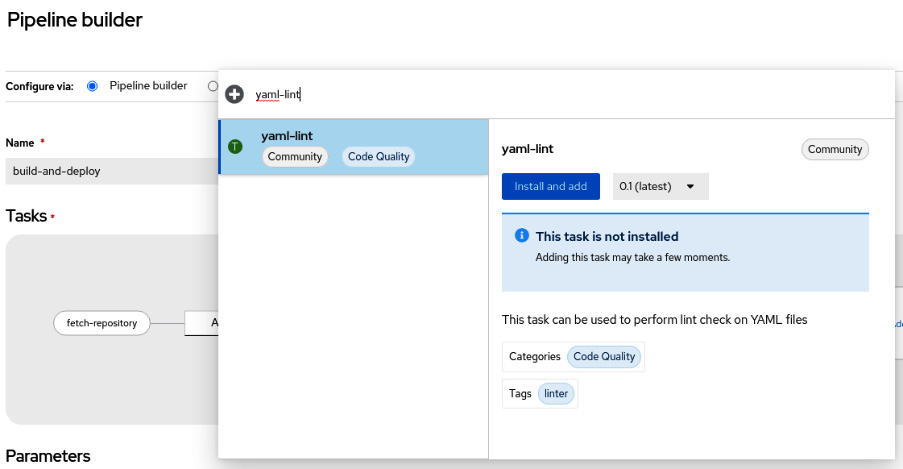
Figure 9.22 – Adding a new task using the Pipeline builder feature
- The new task should have been added. You should see an exclamation mark next to it:
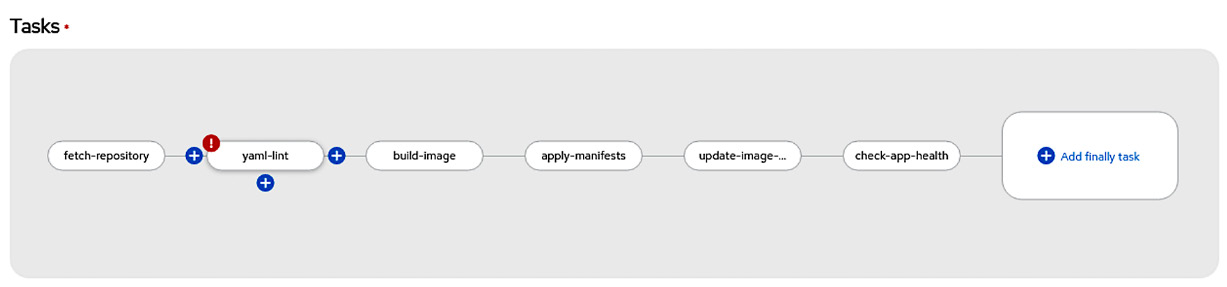
Figure 9.23 – Adding a new task using the Pipeline builder feature
- Now, click it and input ./sample-go-app/clouds-api/k8s as the args parameter and shared-workspace as the Workspaces group:
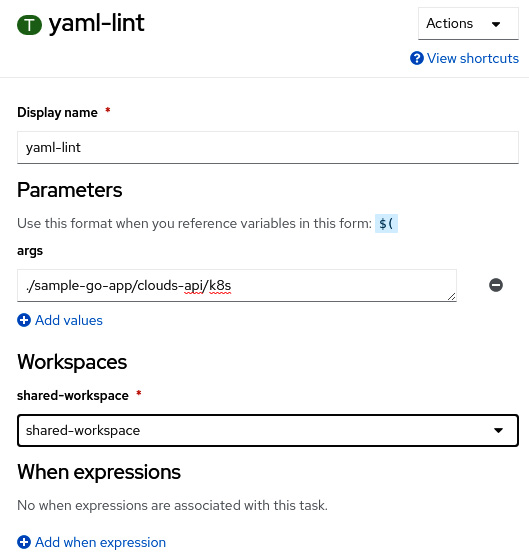
Figure 9.24 – Setting the yaml-lint task’s parameters
- Now, click on Save.
- At this point, our pipeline has a new step that validates the YAML content of our Kubernetes manifest files. To test our previous change, let’s run it from the same web UI. To do so, click the Actions menu from the Pipeline details screen and select the Start action:
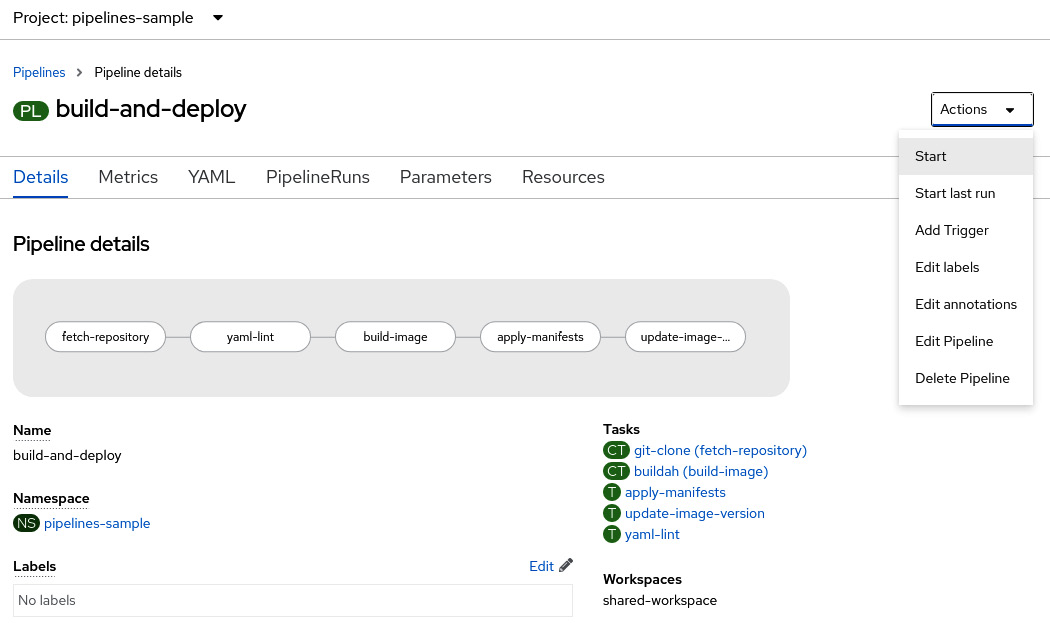
Figure 9.25 – Running the pipeline from the Developer console
- Fill out the form by using the following values and click Start:
- deployment-name: clouds-api
- git-url: <Your forked repository>
- git-revision: main
- IMAGE: image-registry.openshift-image-registry.svc:5000/pipelines-sample/clouds-api
- CONTEXT: ./sample-go-app/clouds-api/
- shared-workspace: VolumeClaimTemplate:
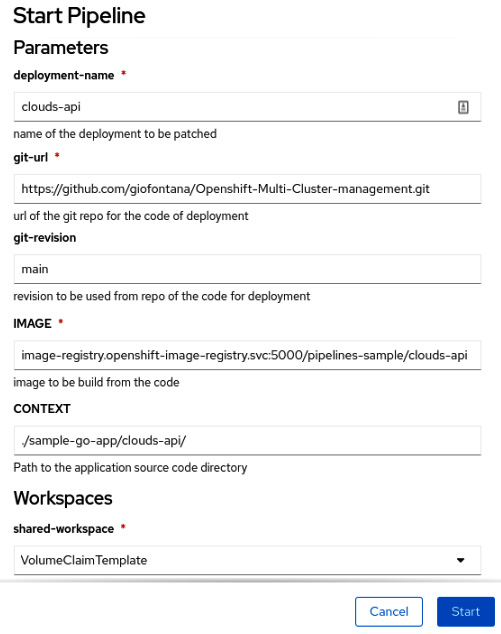
Figure 9.26 – PipelineRun parameters
- Check the PipelineRun object on the following screen. You will get an error regarding the new yaml-lint task we added:
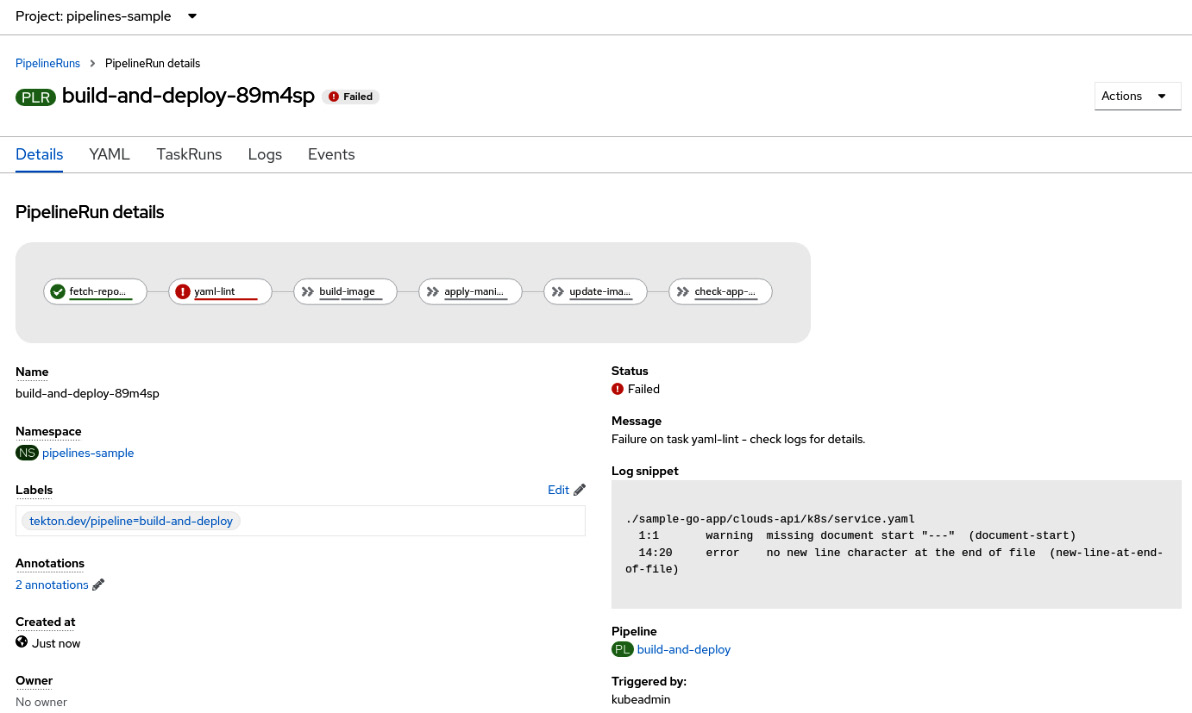
Figure 9.27 – PipelineRun failed due to YAML linter validations
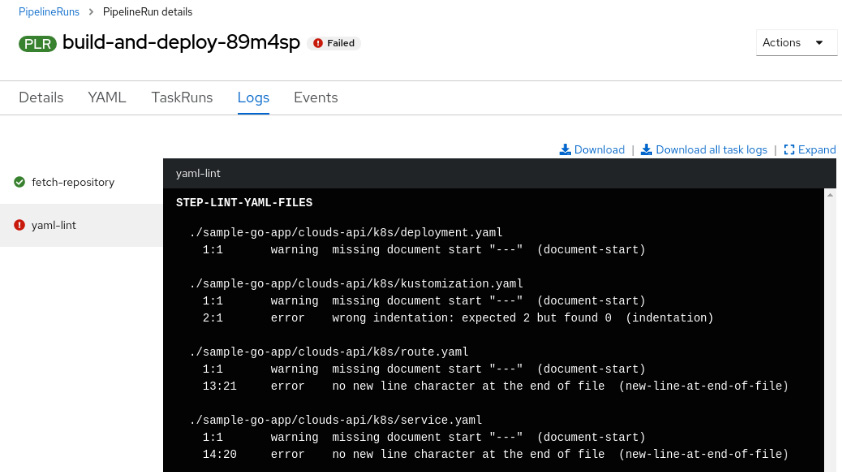
Figure 9.28 – PipelineRun failed due to YAML linter validations
As you can see, the YAML linter detected errors in some YAML files. Those errors are expected and have been prepared especially for you to simulate what a real CI/CD pipeline looks like. Now, practice the skills you’ve just acquired to fix those errors and get the pipeline working again (or look at the solution in the next section)!
Fixing the failed PipelineRun due to YAML issues
To get your pipeline working again, follow these steps:
- Add --- to the first line of all the YAML files in the./sample-go-app/clouds-api/k8s folder.
- Fix the indentation of the kustomization.yaml file by adding two spaces at the beginning of all the lines after resources, like so:
---
resources:
- deployment.yaml #add two spaces at the begging of the line
- service.yaml #add two spaces at the begging of the line
- route.yaml #add two spaces at the begging of the line
- Add a new line at the end of the service.yaml file.
- Commit and push the changes:
$ git add *
$ git commit -m "fixed yaml files"
$ git push
A new PipelineRun should be triggered automatically and complete.
Summary
In this chapter, we dived into Tekton, from installing it on OpenShift to using it. You learned how to create custom tasks, reuse existing ones, build a pipeline, and then run it. You also learned how to set a trigger to run the pipeline when a push event occurs in your GitHub repository. The objects you have seen in this chapter are the main ones you will use to create most Tekton pipelines.
In the next chapter, we will bring more power to your CI/CD process by adding Argo CD and GitOps to your pipelines. We will also start looking at ways to deploy applications into multiple clusters at once. Let’s get started and take a deeper dive into OpenShift GitOps!
Further reading
If you want to learn more about what we covered in this chapter, check out the following references:
- OpenShift Pipelines official documentation: https://docs.openshift.com/container-platform/4.9/cicd/pipelines/understanding-openshift-pipelines.html
- Tekton official documentation: https://tekton.dev/docs/
- How to create custom interceptors using ClusterInterceptor: https://tekton.dev/docs/triggers/clusterinterceptors/
- Tekton Hub (a collection of reusable tasks): https://hub.tekton.dev/