

CHAPTER
10
Oracle Database Resource Manager
Up until now we have focused on creating and configuring a multitenant database environment, including key aspects of the day-to-day administration tasks. In this part of the book we move toward some of the more advanced configuration options. We will begin with a look at Oracle Database Resource Manager, before moving on to disaster recovery (DR) implementations using Oracle Data Guard, followed by a focus on the movement and sharing of data in the final two chapters.
In this chapter, the focus is Resource Manager, which may be familiar territory for some, albeit with new considerations to factor in with Oracle 12c. One of the key advantages of multitenant is consolidation, but it also introduces new questions in relation to Resource Manager, such as these:
![]() How do you manage resources such as CPU, memory, and I/O available to your database?
How do you manage resources such as CPU, memory, and I/O available to your database?
![]() Can resource management be micromanaged in a way, enabling distribution of resources to pluggable databases (PDBs) depending on priorities or even time schedules?
Can resource management be micromanaged in a way, enabling distribution of resources to pluggable databases (PDBs) depending on priorities or even time schedules?
![]() What about resource allocations inside a PDB itself?
What about resource allocations inside a PDB itself?
![]() Can resources be managed at a more fine-grained level in a PDB?
Can resources be managed at a more fine-grained level in a PDB?
In this chapter, we will address these questions and show how you can easily get started with Resource Manager in a multitenant database environment.
Resource Manager Basics
We have already spoken about some of the key advantages of multitenant, such as the ability to consolidate many databases easily into one, as well as the flexibility to provision new databases quickly. In conjunction with these advantages, one core area of the database functionality needs consideration, and that is database resource allocation. Imagine having a server with an abundance of resources such as CPU, memory, and fast storage, such that you would expect everything to be well-equipped for general operational purposes, only to realize later that one of the PDBs consumes virtually all of these resources during busy periods. The flow-on effect is that other PDBs are starved of resources during these times, with the end result being non-optimal performance and disgruntled end users.
By default, operating systems will attempt to distribute resources as requested and do not prioritize among different processes, because they are not aware of which processes should have higher priorities than others. There are some exceptions, but these operating systems require manual configuration or the use of additional software to effect resource allocation and prioritization in some shape or form.
Oracle Resource Manager, which resides within the database itself, has full access to all the runtime information and performance statistics. All the information that describes what is happening inside the database is available, and if Resource Manager is configured correctly, the database can draw upon this information to make decisions on resource distribution; we can ensure, then, that if one area of the database is busy, other PDBs are not starved of resources.
In using Resource Manager in a multitenant environment, the following options are available to you:
![]() Distribute resources among PDBs based on their priority, ensuring that PDBs requiring higher priority and more resources have the appropriate amount of resources allocated
Distribute resources among PDBs based on their priority, ensuring that PDBs requiring higher priority and more resources have the appropriate amount of resources allocated
![]() Limiting CPU usage of PDBs
Limiting CPU usage of PDBs
![]() Limiting number of parallel execution servers of PDBs
Limiting number of parallel execution servers of PDBs
![]() Limiting memory usage of PDBs, including ensuring that the minimum memory requirements of a PDB are met
Limiting memory usage of PDBs, including ensuring that the minimum memory requirements of a PDB are met
![]() Limiting resource usage within a PDB for particular sessions
Limiting resource usage within a PDB for particular sessions
![]() Limiting PDB I/O generation
Limiting PDB I/O generation
Key Resource Manager Terminologies
Before diving into the details of Resource Manager, let’s review some key terminology.
Resource consumer group
Resource Manager will allocate resources to resource consumer groups, not to individual sessions or processes. Resource consumer groups can be thought of as sessions, grouped together, based on specific resource usage requirements. Sessions are mapped to a consumer group based on rules configured by the DBA and can be switched between different groups automatically or manually.
Resource plan directive
Resource plan directives are used to associate resource consumer groups with particular resource plans and to specify how resources are to be allocated to the associated resource consumer group. A plan directive in a current active resource plan may be associated with only one consumer group.
Resource plan
The resource plan is the top-level container for the directives. It is the resource plan itself that is activated, which then enables the underlying resource plan directives that specify how resources are allocated to the individual consumer groups. There can be only one active resource plan at any time in the database, but you can create many different resource plans and switch between them as needed. This can be done via the scheduler or manually using the ALTER SYSTEM commands.
This hierarchy of components is depicted in Figure 10-1.
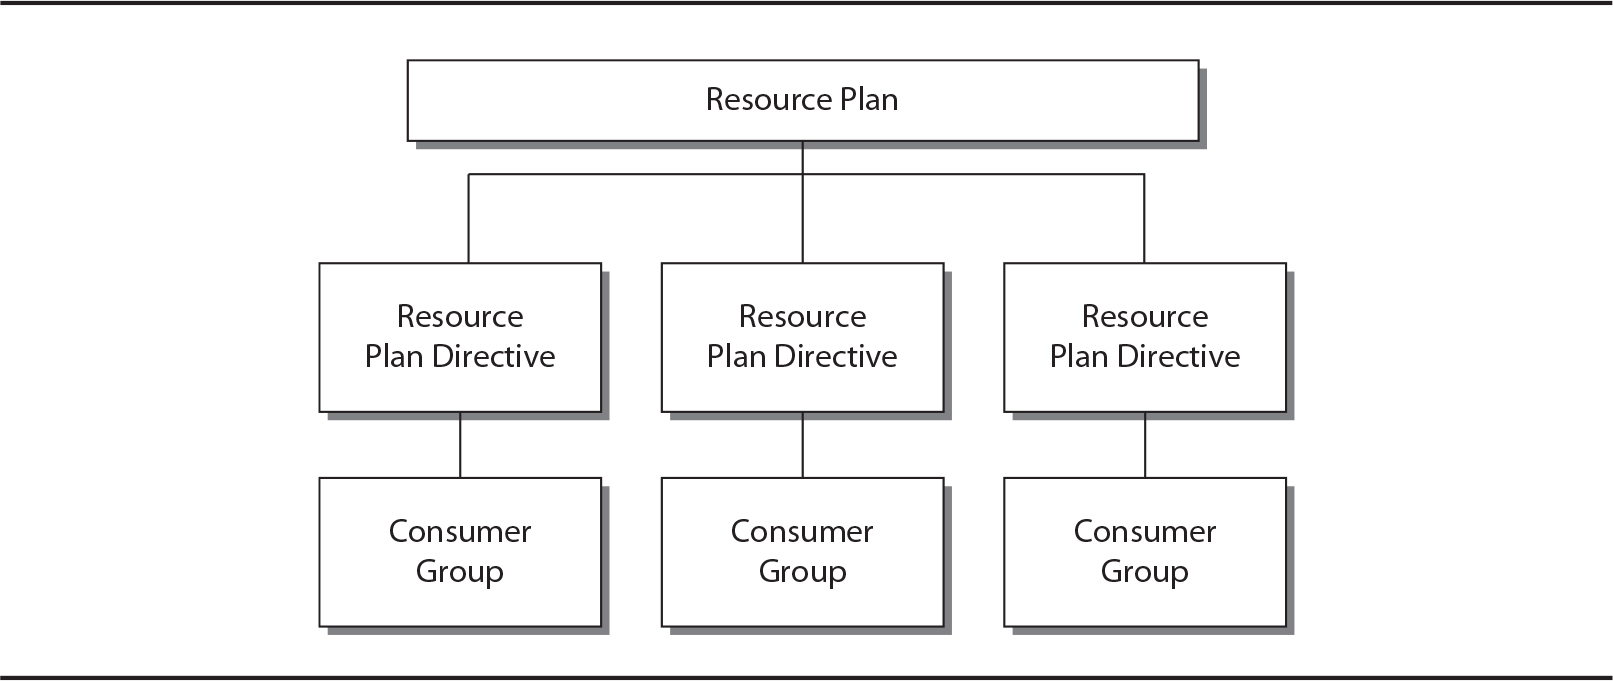
FIGURE 10-1. A basic Resource Manager plan, directives, and consumer groups
CDB resource plan
Think of this as the master or top-level plan created at the container database (CDB) level, which specifies how resources (via the use of resource plan directives) are allocated among PDBs within the CDB. A CDB resource plan can have many directives, but each directive in an active plan may reference only one PDB or PDB profile. Note also that two directives cannot both reference the same PDB or PDB profile.
PDB resource plan
A PDB resource plan is the next step in terms of granularity, taking the resources allocated by the CDB resource plan (to specific PDBs) and determining how these resources are then distributed within the PDB among its configured consumer groups.
Figure 10-2 provides a high-level representation of the relationship between a CDB resource plan and PDB resource plans. It also indicates the plan directives and consumer groups, which will be discussed in more detail in the next section.

FIGURE 10-2. A CDB and PDB resource plan relationship
Subplan
A resource plan directive may reference another resource plan instead of a resource consumer group, and this “stacked” component, or subplan, provides additional flexibility to outwork fine-grained resource management as required.
Shares
Resources on a system can be allocated proportionately using shares. For example, a CDB containing four PDBs can allocate one share to each of three PDBs and allocate two shares for the remaining PDB, denoting it has higher priority.
PDB profiles
When working with large numbers of PDBs, you can also make use of PDB profiles, which determine the share of system resources allocated to the PDBs to which the profile applies. This includes CPU, memory, and total parallel execution server allocations.
Resource Manager Requirements
Before Resource Manager can be used in a CDB, the CDB must have at least one PDB. Resource Manager is configured via the DBMS_RESOURCE_MANAGER package, and the system privilege ADMINISTER_RESOURCE_MANAGER is required to administer it. The ADMINISTER_RESOURCE_MANAGER system privilege is granted by default to the DBA role with the ADMIN option.
This system privilege cannot be granted via regular SQL grant or revoke statements, but must be done via the DBMS_RESOURCE_MANAGER_PRIVS package using the following two procedures:
![]()
GRANT_SYSTEM_PRIVILEGE
![]()
REVOKE_SYSTEM_PRIVILEGE
So, for example, if you want to grant user C##XADMIN this system privilege, you would run the following command:
![]()

In this example, the parameter PRIVILEGE_NAME is specified even though this is not strictly required, because the default value is ADMINISTER_RESOURCE_MANAGER.
Resource Manager is configured and managed via the DBMS_RESOURCE_MANAGER package, but to allow users to switch consumer groups, they must be granted a specific system privilege using procedures available in the DBMS_RESOURCE_MANAGER_PRIVS package:
![]()
GRANT_SWITCH_CONSUMER_GROUP
![]()
REVOKE_SWITCH_CONSUMER_GROUP
Resource Manager Levels
Resource management in a CDB can quickly ramp up in complexity when compared to managing a non-CDB. In a CDB, you have to take into account multiple PDBs that may have differing workloads, and competition for resources both within a PDB, as well as at the CDB level. When running Resource Manager in a multitenant environment, resources can be managed at two levels:
![]() CDB level You can manage resources within the CDB, catering for the different PDB workloads and specifying how resources are distributed among them. PDBs may have different priorities, and resultant use limits can be imposed to distribute the total resources available to the CDB accordingly. In most cases in which a CDB contains multiple PDBs, it would be reasonable to assume that some PDBs will have a higher priority than others. Resource Manager at a CDB level helps to enforce and manage these priorities and limitations.
CDB level You can manage resources within the CDB, catering for the different PDB workloads and specifying how resources are distributed among them. PDBs may have different priorities, and resultant use limits can be imposed to distribute the total resources available to the CDB accordingly. In most cases in which a CDB contains multiple PDBs, it would be reasonable to assume that some PDBs will have a higher priority than others. Resource Manager at a CDB level helps to enforce and manage these priorities and limitations.
![]() PDB level Drilling down, we can manage workloads and resource usage within a given PDB. For example, let’s assume from a high-level point of view that 50 percent of the CDB resources are allocated to PDB1. Within PDB1, this 50 percent portion of the total CDB resources can then be further divided up and portioned out between the different consumer groups.
PDB level Drilling down, we can manage workloads and resource usage within a given PDB. For example, let’s assume from a high-level point of view that 50 percent of the CDB resources are allocated to PDB1. Within PDB1, this 50 percent portion of the total CDB resources can then be further divided up and portioned out between the different consumer groups.
In the following sections, we will focus on CDB and PDB resource plans in more detail, with examples of how these can be configured.
The CDB Resource Plan
A CDB resource plan is the top-level resource plan, configured for the CDB itself. It directs the management of resources within the CDB, catering to different PDB workloads and resource distribution between the PDBs. When running a CDB with multiple PDBs, it is very likely that you will have to allocate more resources to a specific PDB or PDB group. Or you may need to distribute the system and CDB resources evenly to ensure that all PDBs get sufficient resources, and that no PDBs are being starved of resources. In either case, the CDB resource plan is used to map such allocations appropriately.
Resource Allocation and Utilization Limits
Using Resource Manager, you can prioritize resource usage among PDBs with share values. The higher the share value allocated, the higher the priority, which means there is a greater likelihood of obtaining resources when resource contention is encountered. In the same way that resource share values are implemented for individual PDBs, PDB profiles can be applied to a set of PDBs. Figure 10-3 illustrates the basic concept of using shares. In this example, we have a CDB resource plan with two resource plan directives specified, with a total of four shares; one share is assigned to PDB1 and three shares to PDB2. In the event of resource contention, PDB1 will be guaranteed at least one quarter of the resources available, and PDB2 will get three quarters.
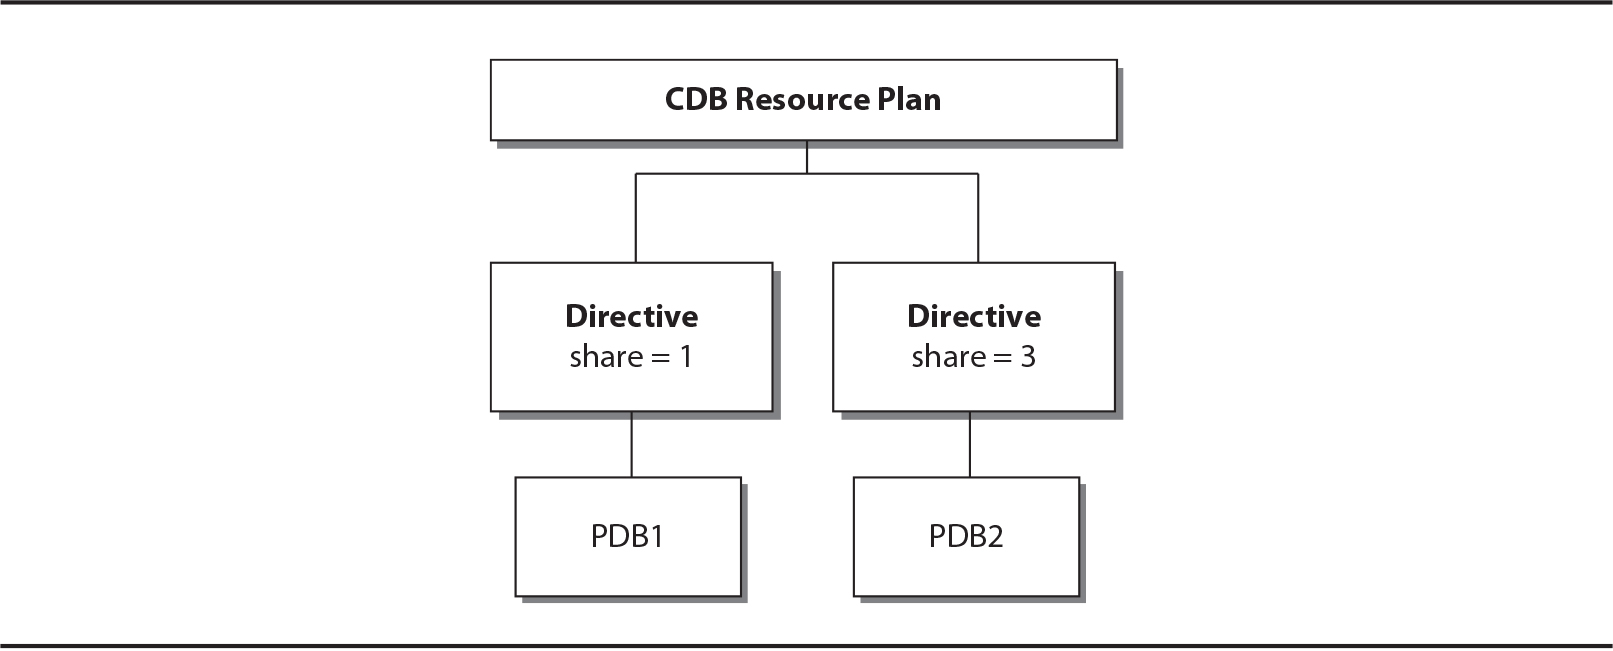
FIGURE 10-3. Using shares in a CDB resource plan directive

NOTE
If there is no current resource contention, either PDB1 or PDB2 can have a larger share of the resources than what they have been assigned in the plan directive.
In addition to using shares as a method of prioritizing resources, you can also set utilization limits for PDBs and PDB profiles, which are specified as a percentage. If not specified, the value is 100, which indicates that the associated PDB or PDBs included in a PDB profile can potentially use 100 percent of the CPU resources available in a CDB. The utilization limits can be specified for CPU, memory, and parallel execution servers. The following parameters can be set in a resource plan directive with respect to CPU and parallel execution servers:
![]()
utilization_limit
![]()
parallel_server_limit
The utilization_limit parameter differs from using shares, because it is specific to how much of the CPU resource may be used. For example, if the utilization_limit for a particular PDB is specified as 100, it indicates that the PDB may use up to 100 percent of the system CPU resources. If the value is set to 50, it indicates that the PDB, if the system is under load, can use up to 50 percent of the CPU resource. Shares are used to indicate which PDBs have higher priority with regard to all resources, not just CPU resource. Specifying a combination of options, such as shares, utilization_limit, and parallel_server_limit, provides you with more fine-grained control over how system resources are distributed.
In addition to utilization_limit and parallel_server_limit, two new memory limits are introduced in Oracle Database 12c Release 2. Their values are expressed as percentages in relation to the Program Global Area (PGA), buffer cache, and shared pool sizes. Even though these two parameters may be set, remember that shares are also considered to maintain the fairness of resource allocation. The following two parameters can be specified with regard to memory limits:
![]()
memory_min The memory_min limit takes a default value of 0 if not set explicitly. The goal is that each PDB should be allocated at least this minimum if requested, for the PGA, buffer cache, and the shared pool. If a PDB has reached the minimum, it will be prioritized for releasing memory if needed. If it has not yet reached its minimum, it will be preferred when requesting memory.
![]()
memory_limit The memory_limit default value is 100. This is a hard limit on the maximum memory a PDB can consume. If a PDB reaches the maximum, it can allocate only memory that it has released itself, while other PDBs that have not yet reached their limit (maximum) may allocate memory that was freed from any PDB.
Figure 10-4 shows a high-level overview of how resource utilization limits can be specified as part of the resource plan directives. In the example, PDB2 does not have any utilization limits imposed (limits are specified as 100), but PDB1 limitations are specified up to only 40 percent of resources (CPU, parallel execution servers, and memory).

FIGURE 10-4. High-level CDB resource plan directives with utilization limits
Memory- and I/O-related parameters can also be set at the PDB level. For more information, see the section “Manage PDB Memory and I/O via Initialization Parameters” later in the chapter.
But what happens to PDBs that are not specified in any of the created resource plan directives? The answer brings us to our next topic: default directives.
Default and Autotask Directives
Up to this point, we have discussed CDB resource plans and the resource plan directives that have been applied to specific PDBs. But what if you create a new PDB, plug a new PDB into the CDB, or have already configured PDBs that were not explicitly defined when creating directives? Default resource plan directives are used for such scenarios, and they will have one share assigned and resource limit parameters set to default values. Alternatively, you can generate new directives for freshly created PDBs or adjust the default PDB directives if you prefer.
The directive for a PDB will be retained if the PDB is unplugged from a CDB. If a directive is no longer needed, you will need to drop the directive manually.
Should it be required, you can adjust the default directive using a procedure inside the DMBS_RESOURCE_MANAGER package called UPDATE_CDB_DEFAULT_DIRECTIVE. The following code block illustrates how the default directive may be updated:
![]()

From this code block, we can see that the default directive for PDBs was updated to two shares and a new utilization limit of 50 percent was specified.
Notice in the preceding code block that a pending area is created and validated before being submitted. The pending area is a staging area where a resource plan is created, updated, or deleted, without affecting currently running applications. After changes are made to a pending area, it is validated using the VALIDATE_PENDING_AREA procedure. Once the pending area is validated, the SUBMIT_PENDING_AREA procedure is used to apply all pending changes to the data dictionary. Once the submission is complete, the pending area will be cleared.
The second default directive, the autotask directive, applies to automatic maintenance tasks during the maintenance windows. The default allocation is no shares (actually, –1), which means that the automated maintenance tasks gets 20 percent of the system resources. The utilization limit is set to 90 percent and the parallel server limit is set to 100 percent. As with the default directive for PDBs, you may also update the autotask directive, by using the UPDATE_CDB_AUTOTASK_DIRECTIVE procedure in the DBMS_RESOURCE_MANAGER package. In the following example, we update the autotask directive‘s share value to 2:
![]()

Creating a CDB Resource Plan
Now that you understand CDB resource plans and their elements, we can launch into a few examples to show you how to create these plans. There are multiple ways to achieve this, but the most common method is to use SQL commands via SQL*Plus and execute the required DBMS_RESOURCE_MANAGER procedures. It is also possible to perform some of these tasks via Enterprise Manager Cloud Control, Enterprise Manager Database Express, or Oracle SQL Developer. In this section, we will show you how to outwork these tasks using SQL*Plus and the DBMS_RESOURCE_MANAGER package.
Example: Creating a CDB Resource Plan for Individual PDBs
Before jumping into the commands, we first need to plan out what we want to implement. A simple way of doing this is to create a table with all the allocation options listed, or perhaps even a basic flow diagram. In the first example, we will make use of the former to illustrate the CDB resource plan, which will focus specifically on individual PDBs, without the use of PDB profiles.
In this example, we will create a CDB resource plan and directives based on the information listed in the following table. This example also includes the Default and Autotask directives, and they will be modified from the default values to those specified in the table.

The goal of this example is to show the commands needed to execute the CDB resource plan, as per the values in the table. The steps follow:
1. Create the pending area:
![]()
2. Create the resource plan:

At this stage, even though we are going to perform the rest of the configuration using SQL commands, it is also possible to do this via a graphical interface. For example, Figure 10-5 illustrates how this can be done using EM Database Express 12.2 when the CDB resource plan is created. (Note also that the default directive can be updated at the CDB resource plan creation time.)

FIGURE 10-5. Using EM Database Express 12.2 to create a CDB resource plan
Now, returning to our command line example, the following steps will be performed using SQL commands.
3. Create two plan directives for PDB1 and PDB2:

4. Update the default PDB directive:

5. Update the default autotask directive:

6. Validate the pending area:
![]()
7. Submit the pending area:
![]()
At this stage, the CDB resource plan and its directives have been created, but we must keep in mind that it has not yet been enabled. We can review the CDB resource plan directives by listing the information in DBA_CDB_RSRC_PLAN_DIRECTIVES, as shown in Figure 10-6.

FIGURE 10-6. Review CDB resource plan directives
8. Enable the CDB resource plan:
Now that we have created a CDB resource plan called CDB_RPLAN, we can enable it for use. This is achieved by executing the following command:
![]()
Reviewing the database alert log and initialization parameters, we can see that the change has taken effect. When reviewing EM Cloud Control, as shown in Figure 10-7, the CDB resource plan displays with the status of Active. (Note that EM Cloud Control 13c [13.1] does not show the memory limit parameters.)

FIGURE 10-7. EM Cloud Control showing current active CDB resource plan
NOTE
As mentioned, it is also possible to configure the Resource Manager from Oracle SQL Developer.
In the preceding example, the different commands to be executed were listed as discrete steps. However, instead of running each of these individually, you can group them together in one code block and execute it as a single unit. The following code block shows this, grouping all the commands described in steps 1–7; once executed, you will have created the CDB resource plan, ready to be activated when needed.
![]()

Modifying a CDB Resource Plan
The CDB resource plan can be updated using the following DBMS_RESOURCE_MANAGER procedures:
![]()
UPDATE_CDB_PLAN
![]()
UPDATE_CDB_PLAN_DIRECTIVE
The UPDATE_CDB_PLAN enables the update only of the comments associated with the plan.
Updating a plan directive is similar to creating a new one, in that you have to specify PLAN and PLUGGABLE_DATABASE (directive) values to indicate which directive you would like to update. To modify the shares, comments, or limits, your parameters are all prefixed with NEW. As such, there is no need to specify the old and new values—only the new need to be specified. For example, to update the directive for PDB1 in the previously created CDB resource plan (CDB_RPLAN) and increase the utilization_limit from 70 to 80 percent, we can execute the following:
![]()
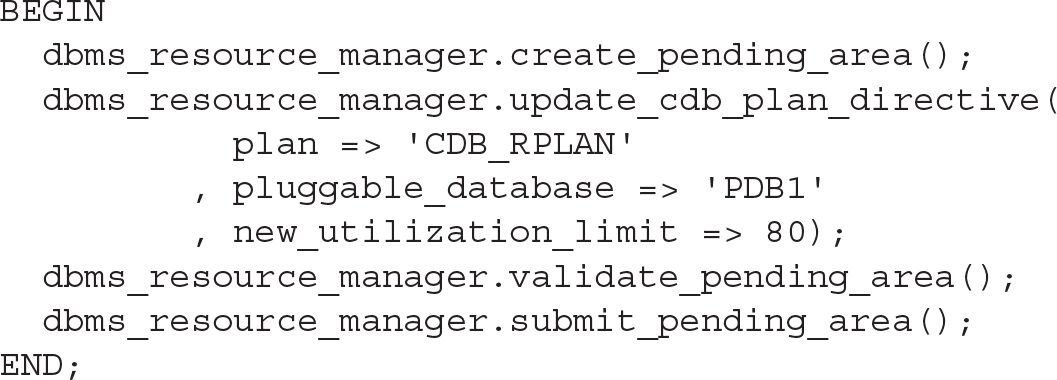
Executing this update will take effect immediately, even on an active plan. It is also possible to add CDB resource plan directives at any time for a PDB using the CREATE_CDB_PLAN_DIRECTIVE procedure.
Enabling or Removing a CDB Resource Plan
It is possible to have more than one CDB resource plan in a container database, but only one can be active at any given point in time. The following commands can be used to enable or, when no longer required, remove a CDB resource plan.
Enable a CDB Resource Plan To enable a CDB resource plan, use the following:
![]()
![]()
Or set resource_manager_plan to an empty value to disable it:
![]()
![]()
It is also possible to enable the CDB resource plan using a scheduler window, because it is commonplace for the resource usage profile of an environment to differ between day and night. The following example demonstrates how to enable a resource plan based on a scheduler window. The CDB resource plan name in this instance is DAYTIME_RPLAN:
![]()

Remove a CDB Resource Plan To remove a CDB resource plan, use the following:
![]()

Removing a CDB Resource Plan Directive
When performing plug-in/unplug operations on PDBs, you may encounter a requirement to remove CDB resource plan directives, although in some cases you will want to keep directives, particularly when you know you are going to plug in the PDB again. To remove a directive, the DELETE_CDB_PLAN_DIRECTIVE procedure can be used. Following is a basic example of this, in which we remove the CDB resource plan directive for the PDB1 database:
![]()

Creating a CDB Resource Plan Using PDB Profiles
We’ve covered how to create CDB resource plans and directives associated with individual PDBs, but what if you have a group of PDBs?
The steps to create a CDB resource plan using PDB profiles are very similar to those that we have already detailed. In short, this method is appropriate when you want to set specific directives for a resource plan that applies to a number of PDBs—in this case, you can think of the PDBs as being grouped together. One key step is required when following this method: you have to set the PDB initialization parameter DB_PERFORMANCE_PROFILE, which requires you to close and reopen the PDB once it has been set. The following commands illustrate how this can be done:
![]()

You can create a CDB resource plan using a PDB profile using the CREATE_CDB_PROFILE_DIRECTIVE procedure of the DBMS_RESOURCE_MANAGER package. The principles are the same as in the earlier example, but instead of specifying the PLUGGABLE_DATABASES parameter, you specify the PROFILE. Working from the earlier example, instead of using the individual PDB1 and PDB2 when the directives are created, we create two profiles: IMPORTANT_PDBS and LOWPRIORITY_PDBS. Note that in this example, the default and autotask directives are left as-is, using the default values, although you may update them if required.
![]()

Once the CDB resource plan using PDB profiles has been created, you can review the directive details by selecting from DBA_CDB_RSRC_PLAN_DIRECTIVES. The following SQL query can be used for this purpose; make sure you include the pluggable_database and profile columns:
![]()

Removing a CDB Resource Plan Directive for a PDB Profile The same procedure, DELETE_CDB_PLAN_DIRECTIVE, is used to remove a directive for a specific PDB or a PDB profile. But instead of specifying the pluggable_database parameter, the profile parameter should be used, with the profile name being the assigned value. In this example we remove the LOWPRIORITY_PDBS directive:
![]()

The PDB Resource Plan
When a CDB resource plan allocates resources to a PDB, the PDB resource plan then goes one step further and distributes them based on its own directives. Using this method gives you a more fine-grained level of resource management control and flexibility.
Creating a PDB resource plan is similar to the method used for Resource Manager with non-CDB configurations. The DBMS_RESOURCE_MANAGER package is invoked for this purpose, and a requirement for the following high-level steps to be performed:
![]() Creation of consumer groups (using
Creation of consumer groups (using CREATE_CONSUMER_GROUP)
![]() Setting the consumer group mapping (using
Setting the consumer group mapping (using SET_CONSUMER_GROUP_MAPPING)
![]() Creation of a PDB resource plan (using
Creation of a PDB resource plan (using CREATE_PLAN)
![]() Creation of a PDB resource plan directives (using
Creation of a PDB resource plan directives (using CREATE_PLAN_DIRECTIVE)
When performing these tasks, you must be connected to the PDB for which you are creating the PDB resource plan. To be clear, a PDB resource plan will manage the workload and resource allocations within a single PDB only.
You should be aware of a number of PDB resource plan restrictions, including these:
![]() It cannot contain subplans.
It cannot contain subplans.
![]() It can include a maximum of eight consumer groups.
It can include a maximum of eight consumer groups.
![]() It cannot have a multiple-level scheduling policy.
It cannot have a multiple-level scheduling policy.
In the next section, we will show you the steps to create a PDB resource plan. The concepts are the same as for non-CDB environments, but for more detail on consumer groups, plan directives, and mappings refer to the Oracle Database 12c documentation.
Creating a PDB Resource Plan
To bring it all together, we’ll now work through how we can create a PDB resource plan. Extending the CDB resource plan, CDB_RPLAN, created earlier, in this example we will focus on a PDB called PDB2 and create a basic PDB resource plan called PDB_RPLAN. A high-level view of this configuration is shown in Figure 10-8.

FIGURE 10-8. Resource Manager: CDB and PDB resource plan overview
We can now map out the guaranteed and estimated resource allocations:
![]() For consumer group GROUP_A:
For consumer group GROUP_A:
![]() Will be guaranteed 16 percent of the total resources: (4/5 shares) 80% × (1/5 shares) 20%
Will be guaranteed 16 percent of the total resources: (4/5 shares) 80% × (1/5 shares) 20%
![]() Limited to 20 percent of the total resources: (80% × 20%)
Limited to 20 percent of the total resources: (80% × 20%)
![]() For consumer group GROUP_B:
For consumer group GROUP_B:
![]() Will be guaranteed 48 percent of the total resources: (4/5 shares) 80% × (3/5 shares) 60%
Will be guaranteed 48 percent of the total resources: (4/5 shares) 80% × (3/5 shares) 60%
![]() Limited to 80 percent of the total resources: (80% × 100%)
Limited to 80 percent of the total resources: (80% × 100%)
![]() For consumer group OTHER (OTHER_GROUPS):
For consumer group OTHER (OTHER_GROUPS):
![]() Will be guaranteed 16 percent of the total resources: (4/5 shares) 80% × (1/5 shares) 20%
Will be guaranteed 16 percent of the total resources: (4/5 shares) 80% × (1/5 shares) 20%
![]() Limited to 32 percent of the total resources: (80% × 40%)
Limited to 32 percent of the total resources: (80% × 40%)
The code example that follows documents how this PDB resource plan can be created. Note that it does not show how users are assigned to the consumer groups; that is achieved with the DBMS_RESOURCE_MANAGER_PRIVS package, and specifically the GRANT_SWITCH_CONSUMER_GROUP procedure.
![]()

If a non-CDB is plugged into a CDB as a PDB, it will function the same as before, as long as there are no subplans, all resource allocations are at one level (level 1), and the consumer groups total does not exceed eight. If there are any violations, or any of these three mentioned restrictions exist, the plan will be converted and its status will be updated to LEGACY. It is recommended that converted plans with the status of LEGACY be reviewed thoroughly, because they may behave differently than expected.
Enable or Disable a PDB Resource Plan
To enable or disable a PDB resource plan, you update the initialization parameter RESOURCE_MANAGER_PLAN for the specified PDB. This can be done by executing the alter system command while the current container is set to the PDB whose plan you want to update (enable or disable). As with the CDB resource plan, to disable the PDB resource plan, you set the RESOURCE_MANAGER_PLAN parameter to an empty value. To enable or disable the PDB resource plan—PDB_RPLAN for PDB1 in the following example—you use the following commands:
![]()

Use this to disable the plan:
![]()
![]()
Removing a PDB Resource Plan
To remove a PDB resource plan, use the DELETE_PLAN procedure in the DBMS_RESOURCE_MANAGER package. So, to remove the PDB resource plan created in the preceding example, PDB_RPLAN, execute the following from PDB1:
![]()

Manage PDB Memory and I/O via Initialization Parameters
You might have noticed that in Oracle Database 12c, Automatic Shared Memory Management (ASMM) is preferred over the use of Automatic Memory Management (AMM). There are a number of reasons for this, which are beyond the scope of this book, but it is recommended that you review the method you are using. If you are unfamiliar with HugePages, consult Oracle Support Note 361468.1. This functionality can have a significant impact on an environment and may assist in more effective memory management and usage.
As mentioned earlier in the chapter, one of the new features introduced in Oracle Database 12c Release 2 is the option to specify memory limits as part of the CDB resource plan directives. The two parameters mentioned previously are MEMORY_MIN and MEMORY_LIMIT, but it does not stop there; you can also control memory allocations for PDBs by using initialization parameters.
PDB Memory Allocations
You can set a number of initialization parameters at the PDB level, including some specifically related to memory. Do take caution when setting these values, however, because you need to ensure that you have sufficient memory allocated for the CDB and the rest of the PDBs contained within it. The following parameters can be configured:
![]()
DB_CACHE_SIZE Minimum guaranteed buffer cache for the PDB.
![]()
SHARED_POOL_SIZE Minimum shared pool size for the PDB. If not set at the PDB level, there is no limit to the amount of shared pool it can use (though it is limited to the CDB’s shared pool size).
![]()
PGA_AGGREGATE_TARGET Maximum PGA size for the PDB.
![]()
SGA_MIN_SIZE Minimum SGA size for the PDB. This new parameter introduced in 12.2 applies to PDBs only. If this is set on a CDB level it will be ignored for the CDB but will be inherited by all PDBs in the CDB. It is not recommended to set the total sum of SGA_MIN_SIZE for all PDBs higher than 50 percent of the CDB SGA size.
![]()
SGA_TARGET Maximum SGA size for the PDB.
These parameters can be set for a specific PDB by having that PDB set as the current container, prior to running the following ALTER SYSTEM commands:
![]()

Limit PDB I/O
I/O can also be limited for PDBs in a similar way to how memory is controlled—at the PDB level using initialization parameters. There are two key parameters to be aware of. Both have a value of 0 by default, which actually disables any I/O limits being imposed on the PDB, and they are specific to PDBs, meaning they cannot be set in a CDB:
![]()
MAX_IOPS Specifies a limit of I/O operations per second in the PDB
![]()
MAX_MBPS Limits the megabytes per second operations in a PDB
The memory and I/O limit parameters can be set using the ALTER SYSTEM command while connected to a PDB as the current container.
Instance Caging
Resource Manager can be configured only for one instance on a server, because it is not aware of what other instances on the same machine are doing. To overcome this limitation, instance caging was introduced in Oracle Database 11g (11.2). Prior to Oracle Database 12c, when multiple databases (non-CDB) were consolidated onto one server, instance caging was used to manage and distribute CPU resources among database instances. However, with the introduction of multitenant, consolidation can be taken a step further, in that these non-CDBs can be converted to PDBs. This opens the possibility of administering CPU resource allocation inside the database instance using Resource Manager.
Instance caging, together with Resource Manager, is an effective way to manage multiple database instances on a single server.
Instance Caging to Resource Manager
As mentioned earlier in the chapter, prior to 12c, instance caging could be used when consolidating non-CDB environments. With multitenant, this can be further enhanced by converting the non-CDBs to PDBs and making use of Resource Manager to distribute the resource between the PDBs. In this example, we will show you how this can be done.
In the next example, two non-CDB databases are located on the same server. They are CRMDEV and CRMREP. These databases use instance caging, where CPU_COUNT is set to 3 on the CRMREP reporting database and 1 on the CRMDEV development. The two databases are converted from non-CDB to PDBs (see Chapter 9 for more detail on how to convert a non-CDB to a PDB) in a new container database called CDB3. In this example, we will distribute the resource as shown in the following table. Notice that the default directive is also listed for completeness: the default SHARE is 1 and the UTILIZATION_LIMIT is 100.
![]()

We use a total of four shares, and we distribute this in the same way that the CPU_COUNT was distributed. Using the UTILIZATION_LIMIT is not strictly necessary (it enforces a hard limit). Figure 10-9 shows the resource plan to be implemented.

FIGURE 10-9. Non-CDB instance caging to CDB resource plan
The following code example can be used to create a resource plan called CRM_RPLAN for container database CDB3 running two PDBs. The code block is executed while connected to the CDB$ROOT:
![]()

Monitoring Resource Manager
Monitoring Resource Manager can be challenging. Luckily, there are a number of ways to extract information with regard to how resources are used and distributed in the database. The following options are available to help you in this area:
![]() Oracle Enterprise Manager – Database Express 12c (EM Database Express 12c)
Oracle Enterprise Manager – Database Express 12c (EM Database Express 12c)
![]() Oracle Enterprise Manager Cloud Control (EM Cloud Control)
Oracle Enterprise Manager Cloud Control (EM Cloud Control)
![]() SQL commands via SQL*Plus
SQL commands via SQL*Plus
Yes, SQL commands via SQL*Plus is included. At the end of the day, the other tools are running SQL statements to extract the required information required and then display it in a nicely formatted manner. Running SQL scripts might be a bit daunting for some, but once you build up a number of monitoring scripts to review your implementation of Resource Manager, you will find it is a quick and easy way to get an overview of the current status.
Viewing the Resource Plan and Plan Directives
The fastest ways to get information about the CDB resource plan and plan directives are to use the following views while connected to the CDB$ROOT:
![]()
DBA_CDB_RSRC_PLANS
![]()
DBA_CDB_RSRC_PLAN_DIRECTIVES
It is possible to view the information from EM Cloud Control or even EM Database Express, as shown in Figure 10-10, for example.

FIGURE 10-10. Monitoring using Oracle EM Database Express
Monitoring PDBs Managed by Resource Manager
For monitoring, nothing beats a good graphical representation of statistics. Using EM Cloud Control or EM Database Express is highly recommended. Figure 10-11 is a perfect example of how EM Database Express can be used to get an overview of resource usage quickly.

FIGURE 10-11. Monitoring using Oracle EM Database Express 12.1
It is also possible to make use of the dynamic performance views to monitor the results of a Resource Manager implementation. The following views can be used:
V$RSRCPDBMETRIC Current statistics for the last minute are shown per PDB. One record is displayed per PDB, including one row for the CDB$ROOT. Note that this view is available only from Oracle Database 12c Release 2.
V$RSRCPDBMETRIC_HISTORY Statistics for the last 60 minutes are displayed per PDB (including the CDB$ROOT).
Summary
At the core of multitenant are consolidation, easy provisioning, and more effective use of resources. Without Resource Manager, we might end up with an implementation where resources are not distributed evenly or available where needed, where certain applications experience bad performance because of resource starvation. It might sound easy, but careful planning and ongoing monitoring is highly recommended. Workloads change, and it is the job of the DBA to ensure Resource Manager is configured and updated when and as needed. It is recommended to start with a less complex configuration, monitor it over a period of time, and adjust it as needed. Having multiple resource plans on a CDB and PDB level is acceptable, and with the use of scheduled windows, you can enable and disable these plans as required.
This brings us to other interesting subjects: Data Guard, the sharing of data between PDBs, and then, last but not least, moving of data using logical replication. These might seem unrelated to resource management, but if you look a bit closer, you will realize that a standby database can be used to offload certain application operations, especially when Active Data Guard is in play. The end result may free up valuable resources on your primary system and help you get more value out of your disaster recovery site.
