![]()
Active Duplication
The previous chapter discussed duplicating from an RMAN backup. This chapter walks you through duplicating directly from an open target database. This is referred to as active duplication because the source is a live database. You don’t need an RMAN backup when using active duplication. Rather, RMAN uses the live data files and control files as the source when copying the target (source) to the auxiliary (destination). When actively duplicating, RMAN copies the files over the network in either:
- RMAN backup set format
- Image copy format
When using the backup set format, RMAN creates the equivalent of a backup set in memory and transfers the backup set across the network to the auxiliary database, where it restores and recovers the data files. When using image copies, RMAN copies byte for byte the live data files across the network to the auxiliary database.
In Oracle 12c the default format for transferring the data files is the backup set format (more on this shortly). In Oracle 11g, RMAN can only use the image copy format to transfer the data files. This process is depicted in Figure 4-1.
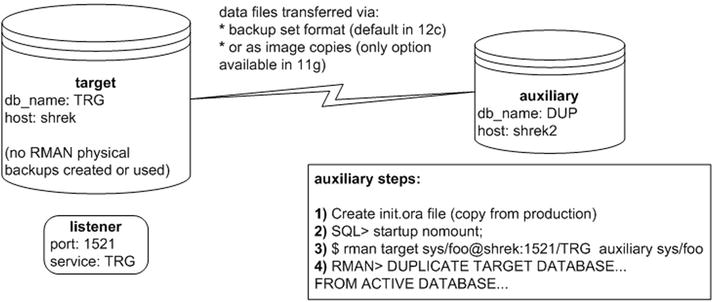
Figure 4-1. RMAN active duplication
Active database duplication using the backup set format is a feature of RMAN in Oracle 12c and higher. Using RMAN backup sets is usually the preferable format for performing active duplication. The backup set method doesn’t copy a byte for byte copy of the data file, rather it copies the minimal amount of information in the data file that would be required to recreate the data file on the auxiliary database. This feature is referred to as unused block compression. This means if you have a large data file that is mostly empty, RMAN won’t transfer the blocks that have never been used; only the blocks that have been used in the data file will be copied. This can greatly speed up the time and reduce the resources required to actively duplicate a database.
Additionally, the backup set format provides access to standard RMAN features such as compression, encryption, and parallel multisection transfer of large data files. For example, if your network bandwidth is constrained, you may want to consider having RMAN compress the backup set contents before copying them to the auxiliary database. This will use more CPU on the target and auxiliary databases as the compression and decompression take place, but the load on the network will be greatly reduced.
Oracle Net Configuration
Active duplication requires an RMAN connection to both the target and the auxiliary database. If you don’t have network connectivity between the target and the auxiliary then active duplication is not possible. For instance, sometimes due to security reasons there is no network connectivity allowed between production and test environments. In those scenarios you’ll have to use another approach like targetless duplication based on an RMAN backup (see Chapter 3 for details).
With active duplication the RMAN connection can be initiated from either the target or the auxiliary server. Recall the following points highlighted in Chapter 3 regarding where RMAN consumes the most resources when performing active duplication:
- When performing active duplication with the backup set format (default format in Oracle 12c and higher), most of the work is done by the auxiliary database channels.
- When performing active duplication when image copies are specified (only option available in Oracle 11g), the work is done by the target database channels.
Since a connection is required to both the target and the auxiliary, this means you have to connect to one of the databases over an Oracle Net connection. Oracle Net connectivity requires:
- A listener running on the database that you’re connecting to over Oracle Net.
- A password file; any time you connect over Oracle Net to a database as a SYSDBA privileged user (such as SYS) or as a user with SYSBACKUP privileges you must have a password file in place. Active duplication requires that a password file exist for both the target and auxiliary servers.
In other words, whenever you run the RMAN client and need to connect over Oracle Net to either the target or the auxiliary database as a SYS (or SYSBACKUP) privileged user you must have Oracle Net set up and password files created.
Setting Up the Listener
This section describes the basics of setting up the listener. If you’re not familiar with Oracle Net concepts then then refer to Chapter 6, which covers basic Oracle Net components and configuration.
For simple test environments you can start a default listener via:
$ lsnrctl start
If no listener.ora file has been configured for the listener, you’ll initially see a message similar to this in the output:
The listener supports no services
If you haven’t configured your listener to listen on a specific port then by default the listener will listen for incoming connections on port 1521. If listening on port 1521, by default the LREG process will register an actively running instance service with the listener (PMON will register an instance with the listener in Oracle 11g and before). The LREG process periodically (every 60 seconds) checks to see if any new instances are running on the server, and if so it will attempt to register an instance service with the listener. You can verify the registration of the service with the listener via:
$ lsnrctl services
After 60 seconds you should see each Oracle instance service registered with the listener in the output; for example:
Listening Endpoints Summary...
  (DESCRIPTION=(ADDRESS=(PROTOCOL=tcp)(HOST=shrek)(PORT=1521)))
Service "TRG" has 1 instance(s).
  Instance "TRG", status READY, has 1 handler(s) for this service...
If you have configured the listener to listen on a port other than 1521, then you can instruct LREG (or PMON in Oracle 11g and before) to dynamically register a service with a listener by setting the LOCAL_LISTENER initialization parameter. For example, if you’ve configured the listener to listen on port 1522, then you can enable dynamic registration by setting the LOCAL_LISTENER initialization parameter as follows:
SQL> alter system set
local_listener='(ADDRESS=(PROTOCOL=TCP)(HOST=shrek)(PORT=1522))';
If your listener is listening on port 1521, ensure that the LOCAL_LISTENER parameter isn’t set:
SQL> alter system set local_listener='';
Setting Up the Password File
In addition to Oracle Net being implemented, active duplication requires password files for both the target and auxiliary databases. To create a password file, do as follows:
$ cd $ORACLE_HOME/dbs
$ orapwd file=<filename> password=<password>
For example, for my database named TRG I created the password file as follows:
$ cd $ORACLE_HOME/dbs
$ orapwd file=orapwTRG password=foo
After the listener is started and a password file is in place, you can use the easy connect naming method to connect over Oracle Net to a remote database as a SYSDBA privileged user (such as SYS). For example, assuming the target database service name is TRG, host name is shrek, and port is 1521, here’s what the connection looks like when initiating the RMAN client from the auxiliary server over Oracle Net to the target database:
$ rman target sys/foo@shrek:1521/TRG auxiliary sys/foo
If initiating the connection from the target database, and assuming the auxiliary database service name is DUP, host name is shrek2, and port is 1521, the easy connection looks like this:
$ rman target sys/foo auxiliary sys/foo@shrek2:1521/DUP
If you were initiating the RMAN connection from a client that doesn’t reside on either the target server or the auxiliary server, you would then have to specify the Oracle Net connection information for both the target and the auxiliary. Also, a listener would need to be running on both the target server and the auxiliary server. Here’s an example RMAN connection string for my environment:
$ rman target sys/foo@shrek:1521/TRG auxiliary sys/foo@shrek2:1521/DUP
Another common method for specifying Oracle Net information is to use a tnansames.ora file on the client. This file is usually located in the ORACLE_HOME/network/admin directory and contains an alias for each service that is associated with network connection details, such as the host name, port number, and service name. For example:
TRG =
  (DESCRIPTION =
    (ADDRESS = (PROTOCOL = TCP)(HOST = shrek)(PORT = 1521))
    (CONNECT_DATA = (SERVER = DEDICATED) (SERVICE_NAME = TRG)))

DUP =
  (DESCRIPTION =
    (ADDRESS = (PROTOCOL = TCP)(HOST = shrek2)(PORT = 1521))
    (CONNECT_DATA = (SERVER = DEDICATED) (SERVICE_NAME = DUP)))
Once specified in the tnsnames.ora file, then the RMAN connection looks like this:
$ rman target sys/foo@TRG auxiliary sys/foo@DUP
Again, if you need a primer on Oracle Net concepts then refer to Chapter 6. For full details on how to configure Oracle Net, refer to Oracle’s documentation, which is freely available on the Oracle Technology Network website. My intention in this chapter is to provide you with just enough information to get started with active duplication.
Same Directory Structure and Database Name
This scenario duplicates the auxiliary database using the active (open) target database’s data files and control files. Here are some points to be aware of with active duplication:
- No RMAN backup is required.
- If the target database is open then it is required to be in archivelog mode. When actively duplicating an open database, if it’s not in archivelog mode, you’ll receive this message:
ORA-19602: cannot backup or copy active file in NOARCHIVELOG mode
- Does require Oracle Net connectivity between the target and auxiliary.
- Does require a password file for target and auxiliary database. If there’s no password file in place, you’ll receive this message:
ORA-17627: ORA-01017: invalid username/password; logon denied
The required steps can be performed from either the target (source) server or the auxiliary (destination) server. Figure 4-2 depicts the scenario in which all of the steps are performed on the auxiliary server. This example uses an Oracle 12c database, therefore the default format for the data file transfer is the backup set format. If this were an Oracle 11g database the image copy format would be used for the data file transfer. In this example the directory structure and database name remain the same from target to auxiliary.
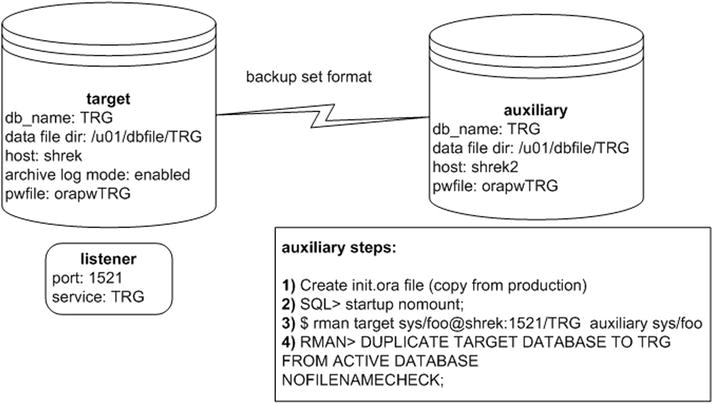
Figure 4-2. Active duplication with same database name and directory structure
The steps for duplication for this scenario are described in detail next.
- Copy the initialization file from the target to the auxiliary. You can use either an SPFILE or a text-based init.ora file. Here’s an example of using the Linux/UNIX scp command for my environment. This command is initiated from the auxiliary server:
$ cd $ORACLE_HOME/dbs
$ scp oracle@shrek:$ORACLE_HOME/dbs/initTRG.ora. - Start up the auxiliary database in nomount mode:
$ sqlplus / as sysdba
SQL> startup nomount;
SQL> exit; - When connecting to RMAN you can initiate the connection from the target, the auxiliary, or a remote client. This shows an example of connecting to target and auxiliary initiated from the auxiliary server:
$ rman target sys/foo@shrek:1521/TRG auxiliary sys/fooIf you were issuing the RMAN connection from the target, it would look like this (assuming there’s a listener on the auxiliary host listening on port 1521):
$ rman target sys/foo auxiliary sys/foo@shrek2:1521/TRGFor active duplication you must specify a username and password for both the target and the auxiliary connection. Otherwise, when issuing the DUPLICATE command RMAN will throw an RMAN-05609 or an RMAN-05610 error specifying that the username and password are required.
- Now execute the DUPLICATE command:
RMAN> DUPLICATE TARGET DATABASE TO TRG
FROM ACTIVE DATABASE
NOFILENAMECHECK;
You should now see a great deal of output. Here’s a small snippet:
Starting Duplicate Db at ...
using target database control file instead of recovery catalog
...
channel ORA_AUX_DISK_1: using network backup set from service shrek:1521/TRG
...
Cannot remove created server parameter file
Finished Duplicate Db at ...
After it successfully completes, on the auxiliary server you should have an identical copy of the database from the target database. Don’t worry about the Cannot remove create server parameter file message. RMAN is just telling you that it created an SPFILE as part of the duplication process and did not remove it (which is fine).
Different Directory Structure and Database Name Using SPFILE Clause
In this example active duplication is performed where the directory structures and database names are different from the target to the auxiliary. This type of operation is best achieved by using the SPFILE clause of the DUPLCIATION command. This approach requires the target (source) database be started using an SPFILE; if you don’t start the target database with an SPFILE, you’ll receive the following error when duplicating:
RMAN-05557: Target instance not started with server parameter file
This approach also requires that the auxiliary (destination) database not be started with an SPFILE; if you start your auxiliary instance with an SPFILE, you’ll receive this error when duplicating:
RMAN-05537: DUPLICATE without TARGET connection when auxiliary
instance is started with spfile cannot use SPFILE clause
This error message states that you can’t duplicate without a target connection. In this scenario you will be connected to the target, so don’t let that confuse you. The point here is that you must start the auxiliary with a text-based init.ora file and not an SPFILE.
The required steps can be performed from either the target server or the auxiliary server. Figure 4-3 graphically displays this method.
Figure 4-3. Active duplication with different database name and directory structure
The steps required for this scenario are described in detail next. This example assumes the target database is using an SPFILE. You can verify this on the target as follows:
SQL> show parameter spfile;
NAME       TYPE        VALUE
---------  ----------- ------------------------
spfile     string      /orahome/app/oracle/product
/12.1.0.2/db_1/dbs/spfileTRG.ora
- On the target database, create a text-based initialization file:
SQL> create pfile from spfile; - Copy the initialization file from the target to the auxiliary. Here’s an example of using the Linux/UNIX scp command for my environment initiated from the auxiliary server:
$ cd $ORACLE_HOME/dbs
$ scp oracle@shrek:$ORACLE_HOME/dbs/initTRG.ora. - Start up the auxiliary database in nomount mode:
$ sqlplus / as sysdba
SQL> startup nomount;
SQL> exit; - Connect to RMAN and to target and auxiliary databases. This shows the connection originating from the auxiliary (destination) server:
$ rman target sys/foo@shrek:1521/TRG auxiliary sys/fooIf you were issuing the RMAN connection from the target, it would look like this:
$ rman target sys/foo auxiliary sys/foo@shrek2:1521/TRG - Now execute the DUPLICATE command. This example assumes that the target database is using an SPFILE, and therefore the SPFILE clause of the DUPLICATE command can be used to specify the new directory path names for the control files (PARAMETER_VALUE_CONVERT), data files (DB_FILE_NAME_CONVERT), and online redo log files (LOG_FILE_NAME_CONVERT):
RMAN> DUPLICATE TARGET DATABASE TO DUP
FROM ACTIVE DATABASE
SPFILE
  PARAMETER_VALUE_CONVERT
'/u01/dbfile/TRG', '/u01/dbfile/DUP'
  SET DB_FILE_NAME_CONVERT
'/u01/dbfile/TRG', '/u01/dbfile/DUP'
  SET LOG_FILE_NAME_CONVERT
'/u01/oraredo/TRG', '/u01/oraredo/DUP'
NOFILENAMECHECK;
You’ll see a great volume of output. Here is a small portion for this example:
Starting Duplicate Db at ...
using target database control file instead of recovery catalog
allocated channel: ORA_AUX_DISK_1
...
executing Memory Script
database opened
Finished Duplicate Db at ...
After RMAN successfully completes the database duplication, on the auxiliary server you should have a complete copy of the target with a different name and files located in a different directory structure.
Note that NOFILENAMECHECK was also used. Why is that required when the directory structures are different from the target to the auxiliary? You need the NOFILENAMECHECK any time you experience the RMAN-05001 error. That error may be thrown in this scenario because RMAN detects that the archive redo log location is the same on the target as on the auxiliary. This is not an issue, you just need to include NOFILENAMECHECK to prevent RMAN from throwing the error.
Also keep in mind that if you have multiple directories that you need to transform, you need to add them where appropriate; for example:
RMAN> DUPLICATE TARGET DATABASE TO DUP
FROM ACTIVE DATABASE
SPFILE
  PARAMETER_VALUE_CONVERT
'/u01/dbfile/TRG', '/u01/dbfile/DUP',
'/u02/dbfile/TRG', '/u02/dbfile/DUP'
  SET DB_FILE_NAME_CONVERT
'/u01/dbfile/TRG', '/u01/dbfile/DUP',
'/u02/dbfile/TRG', '/u02/dbfile/DUP'
  SET LOG_FILE_NAME_CONVERT
'/u01/oraredo/TRG', '/u01/oraredo/DUP',
'/u02/oraredo/TRG', '/u02/oraredo/DUP'
NOFILENAMECHECK; - To start your database with the new name of DUP, exit from RMAN, then get into SQL*Plus and shut down the database, rename the SPFILE, and export your ORACLE_SID to reflect the new instance name and restart your database:
RMAN> exit;
$ sqlplus / as sysdba
SQL> shutdown immediate;
SQL> exit;
$ cd $ORACLE_HOME/dbs
$ mv spfileTRG.ora spfileDUP.ora
$ export ORACLE_SID=DUP
$ sqlplus / as sysdba
SQL> startup
In the prior code, you may be asking, “Why not issue the SHUTDOWN command from within RMAN?” If you issue a SHUTDOWN while connected to the target database, RMAN will stop the target database (and not the auxiliary database), which is probably not the behavior that you want.
You might also wonder if prior to issuing the DUPLICATE command is it possible to first set the ORACLE_SID to the duplicated database name (DUP in this example), and use an initialization file named initDUP.ora to start the auxiliary in nomount mode? The answer is yes, in that scenario you need to ensure a password file has been created with the name of orapwDUP before duplicating.
![]() Note With active duplication RMAN doesn’t allow you to restore to a point in time in the past. If you attempt a point–in-time duplication operation, RMAN will throw an RMAN-05600 error indicating you cannot specify UNTIL clause when duplicating from active database.
Note With active duplication RMAN doesn’t allow you to restore to a point in time in the past. If you attempt a point–in-time duplication operation, RMAN will throw an RMAN-05600 error indicating you cannot specify UNTIL clause when duplicating from active database.
Replicating from a Noarchivelog Mode Target
My manager pings me every once in a while and asks me to replicate a database from one server to another. The target database is usually some sort of a test database and is not in archivelog mode. One might wonder if it’s possible to use the RMAN duplication functionality in this scenario. To test this, first connect to the target and the auxiliary:
$ rman target sys/foo@TRG auxiliary sys/foo
Next, attempt to run the DUPLICATE command:
RMAN> DUPLICATE TARGET DATABASE TO DUP...
If the target (active) database is in noarchivelog mode and open, the RMAN throws this error:
ORA-19602: cannot backup or copy active file in NOARCHIVELOG mode
One solution to this situation is to place the target database in mount mode while the duplication is taking place. Figure 4-4 depicts the steps involved in this situation.
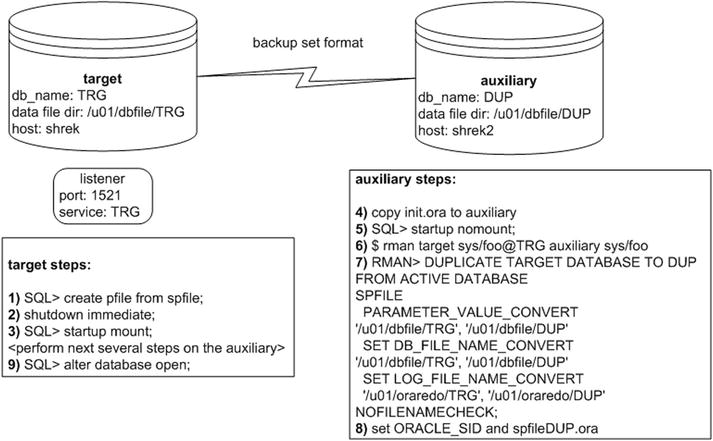
Figure 4-4. Duplicating an active noarchivelog mode database
The steps required for this scenario are described in detail next. This example assumes the target database is using an SPFILE. You can verify this on the target as follows:
SQL> show parameter spfile;
NAME       TYPE        VALUE
---------  ----------- ------------------------
spfile     string      /orahome/app/oracle/product
                       /12.1.0.2/db_1/dbs/spfileTRG.ora
- On the target database, create a text-based initialization file:
SQL> create pfile from spfile; - On the target database, shut it down with the IMMEDIATE option:
SQL> shutdown immediate; - Now start the target database up in mount mode:
SQL> startup mount;
SQL> exit; - Copy the initialization file from the target to the auxiliary. Here’s an example of using the Linux/UNIX scp command for my environment. This command is initiated from the auxiliary server:
$ cd $ORACLE_HOME/dbs
$ scp oracle@shrek:$ORACLE_HOME/dbs/initTRG.ora.
You must use a text-based initialization file to start the auxiliary database in this scenario. If you use an SPFILE to start the auxiliary database you’ll receive this error when duplicating:
RMAN-05537: DUPLICATE without TARGET connection when auxiliary instance
is started with spfile cannot use SPFILE clause - Now start the auxiliary in nomount mode:
$ sqlplus / as sysdba
SQL> startup nomount;
SQL> exit; - Next, connect to target and auxiliary databases. This shows the connection originating from the auxiliary database server:
$ rman target sys/foo@shrek:1521/TRG auxiliary sys/foo - Now execute the RMAN DUPLICATE command. This example assumes that the target database is using an SPFILE, and therefore the SPFILE clause of the DUPLICATE command can be used to specify the new directory path names for the control files (PARAMETER_VALUE_CONVERT), data files (DB_FILE_NAME_CONVERT), and online redo log files (LOG_FILE_NAME_CONVERT):
RMAN> DUPLICATE TARGET DATABASE TO DUP
FROM ACTIVE DATABASE
SPFILE
  PARAMETER_VALUE_CONVERT
'/u01/dbfile/TRG', '/u01/dbfile/DUP'
  SET DB_FILE_NAME_CONVERT
'/u01/dbfile/TRG', '/u01/dbfile/DUP'
  SET LOG_FILE_NAME_CONVERT
  '/u01/oraredo/TRG', '/u01/oraredo/DUP'
NOFILENAMECHECK;
At this point you’ll see a great deal of messaging. Here is a small bit of the output:
Starting Duplicate Db at ...
using target database control file instead of recovery catalog
...
executing Memory Script
database opened
Finished Duplicate Db at ...
After it successfully completes, on the auxiliary server you should have a copy of the target with a different name and in a different directory structure.
- To start your database with the new instance name of DUP, exit from RMAN, then get into SQL*Plus and shut down the database, rename the SPFILE, and export the ORACLE_SID operating system variable to reflect the new instance name and restart your database:
$ sqlplus / as sysdba
SQL> shutdown immediate;
SQL> exit;
$ cd $ORACLE_HOME/dbs
$ mv spfileTRG.ora spfileDUP.ora
$ export ORACLE_SID=DUP
$ sqlplus / as sysdba
SQL> startup - As the last step, don’t forget to open the target database for use again. On the target server, issue the following SQL command:
SQL> alter database open;
Same-Host Replication
You may have the requirement to replicate a database where the target and the auxiliary are on the same server. Figure 4-5 depicts this concept.
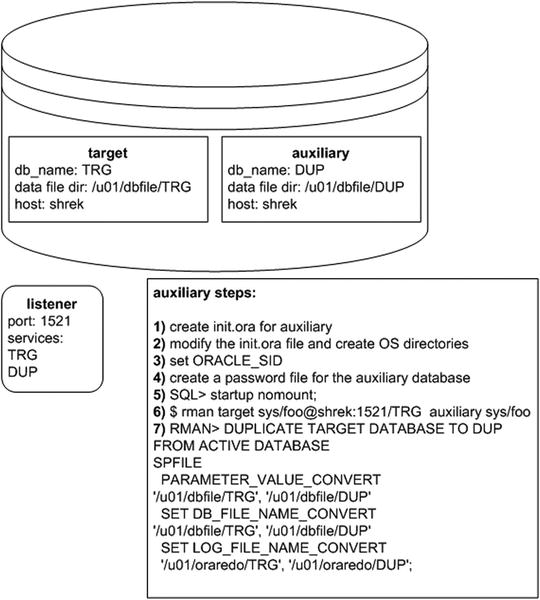
Figure 4-5. Same-host active database duplication
The steps required for this scenario are described in detail next. This example assumes the target database is using an SPFILE. You can verify this on the target as follows:
SQL> show parameter spfile;
NAME       TYPE        VALUE
---------  ----------- ------------------------
spfile     string      /orahome/app/oracle/product
                       /12.1.0.2/db_1/dbs/spfileTRG.ora
- First create an init.ora file for the auxiliary database. The easiest way to create a text-based parameter file from the SPFILE and then rename it:
$ sqlplus / as sysdba
SQL> create pfile from spfile;
SQL> exit;
$ cd $ORACLE_HOME/dbs
$ cp initTRG.ora initDUP.ora - Edit the initDUP.ora with an operating system utility (such as vi or notepad) and modify the DB_NAME parameter and any parameters that contain directory structures (like CONTROL_FILES, LOG_ARCHIVE_DEST_1, and so on). Here are what the lines look like for this example:
db_name='DUP'
control_files='/u01/dbfile/DUP/control01.ctl','/u01/dbfile/DUP/control02.ctl'
log_archive_dest_1='LOCATION=/u01/arch/DUP'
Ensure that the directories being referenced are not the target database directories. If this is the first time you’re performing the duplication on the server then you’ll have to create the new directories with an operating system utility (like mkdir):
$ mkdir /u01/dbfile/DUP
$ mkdir /u01/oraredo/DUP
$ mkdir /u01/arch/DUP - Set your ORACLE_SID variable to point to the auxiliary instance:
$ export ORACLE_SID=DUP
- Create a password file for the auxiliary database:
$ cd $ORACLE_HOME/dbs
$ orapwd file=orapwDUP password=foo - Start up the auxiliary database in nomount mode:
$ sqlplus / as sysdba
SQL> startup nomount;
SQL> exit;
If you get an error like the following snippet, then ensure that you don’t have any parameters defined incorrectly in the auxiliary init.ora file:
ORA-01078: failure in processing system parameters - Connect to the target and the auxiliary instances:
$ rman target sys/foo@shrek:1521/TRG auxiliary sys/foo - Issue the DUPLICATE command:
RMAN> DUPLICATE TARGET DATABASE TO DUP
FROM ACTIVE DATABASE
SPFILE
  PARAMETER_VALUE_CONVERT
'/u01/dbfile/TRG', '/u01/dbfile/DUP'
  SET DB_FILE_NAME_CONVERT
'/u01/dbfile/TRG', '/u01/dbfile/DUP'
  SET LOG_FILE_NAME_CONVERT
  '/u01/oraredo/TRG', '/u01/oraredo/DUP';
At this point you’ll see a large amount of output; here’s a tiny snip:
Starting Duplicate Db at ...
using target database control file instead of recovery catalog
...
database opened
Finished Duplicate Db at ...
If you receive an error like the following:
RMAN-05520: database name mismatch, auxiliary instance has TRG,
command specified DUP
In this situation ensure that your ORACLE_SID is set to DUP and that the DB_NAME parameter in the init.ora file is set to DUP:
You may also receive a memory error such as the following:
ORA-27125: unable to create shared memory segment
This indicates you don’t have enough physical memory on the host to start two instances. You’ll need to start any existing instances with less memory or add physical memory to the server.
You must also ensure that the auxiliary database is started with a text-based init.ora file, otherwise you’ll receive this error:
RMAN-05537: DUPLICATE without TARGET connection when auxiliary instance
is started with spfile cannot use SPFILE clause
You may receive an RMAN-05001 error like the following:
RMAN-05001: auxiliary file name ... conflicts with a file
used by the target database
If this happens ensure that in the DUPLICATE command you’ve correctly mapped the target directories to new auxiliary directories.
If you continue to receive the RMAN-05001 error, and are sure that you’ve correctly mapped the target directories to the new auxiliary directories then consider adding the NOFILENAMECHECK clause. Keep in mind this can be dangerous when performing same server replication as it instructs RMAN not to check if the file exists before writing it to disk:
RMAN> DUPLICATE TARGET DATABASE TO DUP
FROM ACTIVE DATABASE
SPFILE
  PARAMETER_VALUE_CONVERT
'/u01/dbfile/TRG', '/u01/dbfile/DUP'
  SET DB_FILE_NAME_CONVERT
'/u01/dbfile/TRG', '/u01/dbfile/DUP'
  SET LOG_FILE_NAME_CONVERT
  '/u01/oraredo/TRG', '/u01/oraredo/DUP'
NOFILENAMECHECK;
After the duplication process has finished, check the alert.log and ensure there have been no errors. You may see an error such as this:
ORA-01110: data file 201: '/u01/dbfile/DUP/temp01.dbf'
To resolve prior error either move or remove the existing temporary tablespace temp file using operating system commands, for example:
$ mv /u01/dbfile/DUP/temp01.dbf /u01/dbfile/DUP/tempo01.old.dbf
Then stop and start the database. When starting Oracle will detect the temporary tablespace temp file is missing and recreate it.When complete, you should have a fully functioning copy of the target database named DUP that resides on the target server.
Image Copies
In Oracle 12c and above, when using active database duplication RMAN will by default use the backup set format to copy data files from the target database to the source database. If you want to ensure that image copies be used, then you need to explicitly instruct RMAN to do this with the USING COPY clause. Figure 4-6 illustrates the steps involved with this type of duplication.
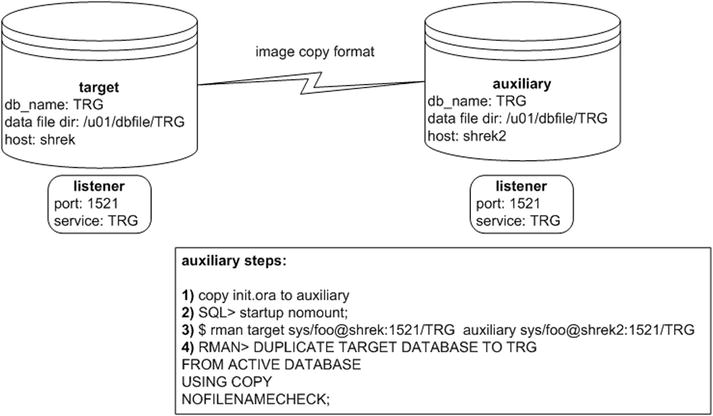
Figure 4-6. Active database duplication with image copies
- Copy the initialization file from the target to the auxiliary. You can use either an SPFILE or a text-based init.ora file. Here’s an example of using the Linux/UNIX scp command for my environment. This command is initiated from the auxiliary server:
$ cd $ORACLE_HOME/dbs
$ scp oracle@shrek:$ORACLE_HOME/dbs/initTRG.ora. - Start up the auxiliary database in nomount mode:
$ sqlplus / as sysdba
SQL> startup nomount;
SQL> exit; - Connect to both the target and the auxiliary using an Oracle Net connection; for example:
$ rman target sys/foo@shrek:1521/TRG auxiliary sys/foo@shrek2:1521/TRGIn this scenario, you must specify an Oracle Net connection for both the target database and the auxiliary database, otherwise you’ll receive this error when you attempt to run the DUPLICATE command:
RMAN-06217: not connected to auxiliary database with a net service nameYou may also receive this error when connecting to the auxiliary instance:
RMAN-04006: error from auxiliary database:
ORA-12528: TNS:listener: all appropriate instances are
blocking new connections
In this situation statically register the auxiliary instance service with the listener. For details on static service registration see Chapter 6.
- Now issue the DUPLICATE command with the USING COPY clause:
RMAN> DUPLICATE TARGET DATABASE TO TRG
FROM ACTIVE DATABASE
USING COPY
NOFILENAMECHECK;
The output of this command verifies that image copies are being created; for instance:
channel ORA_DISK_1: starting datafile copy
input datafile file number=00001 name=/u01/dbfile/TRG/system01.dbf
Recall that an image copy is a byte-for-byte copy of the data file. Therefore, you may find that this method takes longer than it would have had you used the backup set format. I recommend that you use the default backup set format, as this is more efficient (typically uses fewer resources because RMAN is not copying the data files block for block). However, if you’re using an older version of Oracle, then the image copy format is the only one available for active database duplication over the network.
![]() Note In Oracle 11g, image copies are the only format available with active duplication.
Note In Oracle 11g, image copies are the only format available with active duplication.
Compression
When using active duplication with the backup set format, you have the option of using compression. If you have limited bandwidth on the network connection between the target and the auxiliary, you may want to consider using compression. The compression option will transfer the data files across the network in a compressed backup set format. This will minimize the impact on the network. Figure 4-7 illustrates this concept.
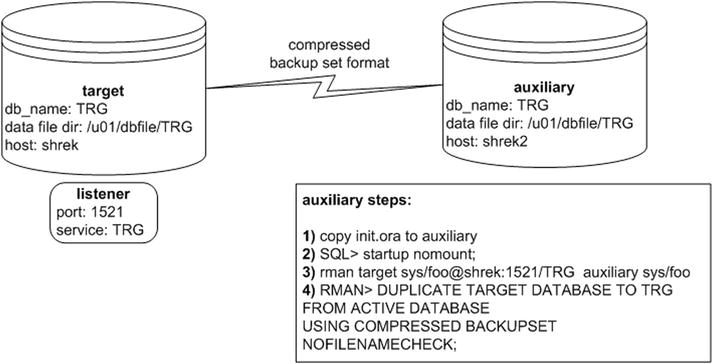
Figure 4-7. Active duplication using compressed backup set format
Keep in mind that the backup set format for transferring data files is only available in Oracle 12c and higher. The detailed steps for the scenario are described next.
- First copy the initialization file from the target to the auxiliary. You can use either an SPFILE or a text-based init.ora file. Here’s an example of using the Linux/UNIX scp command for my environment. This command is initiated from the auxiliary server:
$ cd $ORACLE_HOME/dbs
$ scp oracle@shrek:$ORACLE_HOME/dbs/initTRG.ora. - Start up the auxiliary in nomount mode:
$ sqlplus / as sysdba
SQL> startup nomount;
SQL> exit; - Next, connect to the target and the auxiliary:
$ rman target sys/foo@shrek:1521/TRG auxiliary sys/foo - Then issue the DUPLICATE command, specifying compression:
RMAN> DUPLICATE TARGET DATABASE TO TRG
FROM ACTIVE DATABASE
USING COMPRESSED BACKUPSET
NOFILENAMECHECK;
In the lengthy output, you should see that the compressed backup set format is used to transfer the data:
channel ORA_AUX_DISK_1: using compressed network backup set from service trg
There are several levels of compression available. When you specify USING COMPRESSED BACKUPSET, if no compression has been configured, then by default RMAN uses the BASIC compression. You can verify the compression algorithm in use via:
RMAN> show compression algorithm;
Here is some output verifying that the BASIC compression algorithm is in use:
RMAN configuration parameters for database with db_unique_name TRG are:
CONFIGURE COMPRESSION ALGORITHM 'BASIC' AS OF RELEASE 'DEFAULT' OPTIMIZE
FOR LOAD TRUE ; # default
The other compression options are LOW, MEDIUM, and HIGH. Here’s an example of configuring RMAN to use the MEDIUM compression algorithm:
RMAN> CONFIGURE COMPRESSION ALGORITHM 'MEDIUM';
You can set the compression algorithm back to the default (of BASIC) via:
RMAN> configure compression algorithm clear;
In summary, compression is a good choice when you know your network bandwidth is the bottleneck. Compression will reduce the number of bytes transferred from the target to the auxiliary. The downside is that compression requires more CPU resources on the target server to compress the backup set data and then more CPU again to uncompress the data on the auxiliary server.
![]() Note The BASIC encryption is freely available. If you want to use the LOW, MEDIUM, and HIGH compression options you need a license for the Oracle Advanced Compression option. The Advanced Compression option is only available with the Enterprise Edition of Oracle.
Note The BASIC encryption is freely available. If you want to use the LOW, MEDIUM, and HIGH compression options you need a license for the Oracle Advanced Compression option. The Advanced Compression option is only available with the Enterprise Edition of Oracle.
Encryption
Starting with Oracle 12c, you have the option of using encryption when using active duplication with the backup set format. This provides additional security when duplicating a database from the target server to the auxiliary server.
When using transparent encryption, you must copy the keystore that contains the encryption key to the auxiliary server (placed in the default location or in the location specified in the sqlnet.ora file). The keystore must also be an automatic login keystore.
Once the keystore has been copied from the target server to the auxiliary server, on the auxiliary connect to the target and the auxiliary databases:
$ rman target sys/foo@shrek:1521/TRG auxiliary sys/foo
Next, issue the DUPLICATE command:
RMAN> DUPLICATE TARGET DATABASE TO TRG
FROM ACTIVE DATABASE
NOFILENAMECHECK;
This command uses the backup set format to transfer the data files from the target to the auxiliary in an encrypted manner.
![]() Tip See the Oracle Database Advanced Security Guide for details on using encryption. The Advanced Security option requires an additional license from Oracle. The Advanced Security option is only available with the Enterprise Edition of Oracle.
Tip See the Oracle Database Advanced Security Guide for details on using encryption. The Advanced Security option requires an additional license from Oracle. The Advanced Security option is only available with the Enterprise Edition of Oracle.
Summary
This chapter has focused on active database duplication. In this mode there’s no requirement to have an RMAN backup available. Rather, RMAN uses the live (active target) database data files and control files for the source. RMAN can transfer the data files across the network in either an RMAN backup set format or in an image copy format. Using the RMAN backup set format has many advantages over image copies:
- It allows you to use advanced features such as compression, encryption, and parallel multisection transfer of large data files.
- It only copies blocks that have ever been used within the data file. Depending on the used space in the data file, this can be more efficient than full image copies.
There were many active duplication examples shown in this chapter. The simplest example is where the database name and directory structure are identical on both the target and the auxiliary servers. More advanced examples detailed how to use active database replication in environments where it’s required to have a different auxiliary database name (from the target) and where the auxiliary server has a different directory structure. You should be able to modify these examples to fit the requirements of your environment.