
Let's begin to understand the core concepts and usage of ESS functions through a series of real-life examples. For an Oracle SOA Suite 12c environment to be performant, the dehydration data store needs to be optimized by ensuring that it is cleaned up periodically. Thus, imagine that as an Oracle SOA Suite 12c administrator you want to create a schedule to perform a very important administration activity: purging completed instances.
Conceptualize the illustration depicted in the following figure. Here, we have a simple composite that invokes the delete_instances_auto procedure in the SOA package under the soa_infra schema. This package expects a set of parameters that determine the purging behavior, such as minimum and maximum date ranges for instances to be deleted, their states, and retention period, to name a few. The composite exposes a one-way service endpoint that accepts these purging parameters as arguments, which would allow the auto purge package to be executed as a service:

Figure 11.5: Job scheduling using Oracle Enterprise Service
However, instead of invoking the composite as a service, we can use ESS to create a schedule that periodically executes the purge. Scheduling jobs in ESS is based on three basic components:
- Job definitions
- Schedules
- Job requests
The following instructions will guide you through the steps required to create a job definition using the ESSAPP module through Oracle Enterprise Manager Fusion Middleware Control:
- Log in to Oracle Enterprise Manager Fusion Middleware Control.
- Navigate to Scheduling Services | ESSAPP | ESSAPP | Scheduling Service Group and then click on Job Metadata | Job Definitions.
- If there are existing job definitions created on the server, they will be listed under the Results pane as shown:

Figure 11.6: Creating Job Definitions in ESS
- Click on the Create icon to create a new Job Definition.
- A Create Job Definition dialog will prompt you to specify the metadata in order to create a new job definition. Currently, only the following Job Types are supported in Oracle SOA Suite 12c:
- JavaJobType
- PlsqlJobType
- ProcessJobType
- SyncEjbJobType
- AsyncEjbJobType
- SyncWebserviceJobType
- AyncWebserviceJobType
- OnewayWebserviceJobType
- In order to create a new job definition, a unique name and display name have to be mandatorily entered. This is how the job definition will be listed in the ESS console. Optionally, you can also enter a brief description and place it into a self-defined package.
- From the Job Type drop-down list, select OnewayWebserviceJobType (refer to Figure 11.7).

Figure 11.7: Selecting Job Types when creating a Job Definition
- Enter the endpoint of the composite WSDL and select the Web Service Type as SOA from the drop-down menu.
- Clicking on the Go button will allow the wizard to resolve the web service endpoint, provide a dynamic interface to select the operations defined in the web service, and enter an XML payload as shown in Figure 11.8.
- Once these details have been entered, click on OK to save the job definition.

Figure 11.8: Invoking a one-way synchronous web service job in ESS
This newly created job definition will now appear under the Results tab of the Job Definitions dashboard and can be used to submit a scheduled job.
A job definition is essentially a reusable component. It can potentially be used across multiple job requests, as you will learn in the Submitting Job Requests section later in this chapter.
Any input parameters in a job definition payload can be parameterized using the ESS_REQ token, which is used to access request arguments. In the previous example, let's assume that the one-way web service requires the number of days to retain composite instances to be passed as an integer. In the argument, this can be tokenized as ${ESS_REQ:PURGE_RETENTION_DAYS}.
The value for this token can either be stored statically in the job definition or passed dynamically when this job definition is referred. Edit the job definition and click on the ![]() icon in the Application Defined Properties panel. In the pop-up window, create a property with the same name as defined in the payload argument,
icon in the Application Defined Properties panel. In the pop-up window, create a property with the same name as defined in the payload argument, PURGE_RETENTION_DAYS. Then, choose its Type as Integer and enter an Initial Value of 7, as depicted in the following screenshot:

Figure 11.9: Configuring application-defined properties for a Job Request
The next step after creating a job definition is to define a job schedule. A Schedule describes when and how often a job is run. It allows you to define a precise point in time as well as intervals with predefined start/end points. A schedule can be associated with one or many Job Definitions to describe when those jobs should be executed.
To create a schedule, login to Oracle Enterprise Manager Fusion Middleware Control and select Scheduling Services | ESSAPP. Then, from the Scheduling Service drop-down list at the top of the page, select Job Requests | Define Schedules, as shown in the following screenshot:
Figure 11.10: Defining a schedule in ESS
Click on the Create button on the landing page to create a new schedule. A schedule can be created by specifying some metadata including a name, display name, description, package name, start and end times, and most importantly, a frequency, as depicted in Figure 11.11. A frequency determines how often a schedule is executed; its periodicity can range from daily, hourly, monthly, and daily to just once. The frequency can also be selected as Custom, wherein multiple start times can be defined. Click on OK to save this schedule. A wide range of sophisticated recurrence schedules can be created through either the Java API exposed by ESS or through JDeveloper. These options cannot be set through the Oracle Enterprise Manager Fusion Middleware Control console in the current version (12.1.3).

Figure 11.11: Creating a schedule
Once a schedule is created, click OK to save it.
With the introduction of ESS as a first-class component of Oracle SOA Suite 12c, schedules are widely used in a number of other features in the platform, a few of the more important ones being:
- Auto purge:
- Oracle SOA Suite 12c implicitly uses ESS as a mechanism to set an auto purge job. This can be defined by navigating to SOA | soa_infra | SOA Infrastructure | SOA Administration | Auto Purge on Oracle Enterprise Manager Fusion Middleware Control. Chapter 8, Managing the Database, discusses this in more detail.
- Error notification rules:
- Another feature introduced in 12c that uses schedules is the Error Notification Rules. Error notification rules can be configured to trigger alerts when specific fault criteria are met.
- Activating and deactivating Inbound Adapter Endpoints
- Bulk Fault Recover or Error Hospital
Once a Job Definition and a Job Schedule are defined, submitting a job request is straightforward. It can be done by navigating to Scheduling Services | ESSAPP | Scheduling Service | Job Requests | Submit Job Request, as shown:
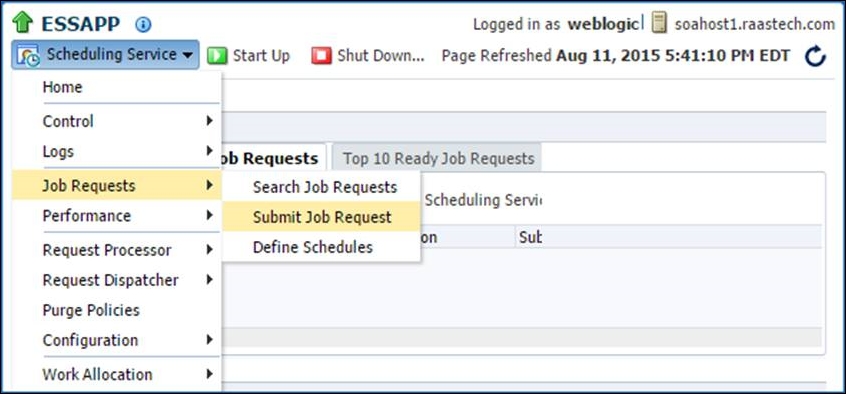
Figure 11.12: Navigating to the Submit Job Request page of ESS
In the next landing page, you can submit an ad hoc job by selecting a previously defined job definition and a schedule. Alternatively, a schedule can also be created from here and associated with the job request.
If a job definition was created with Application Defined Properties that were parameterized in the XML input, their values can be dynamically passed while submitting the Job Request. Figure 11.13 shows an example of how to create a Job Request:

Figure 11.13: Example configuration form for an ESS Job Request
Once job requests are submitted, the ESSAPP module deployed to Oracle Enterprise Manager Fusion Middleware Control provides the capability to perform simple and advanced searches on them. Navigate to Scheduling Services | ESSAPP and then, from the Scheduling Service drop-down menu, click on Job Requests | Search Job Requests to open the Request Search page. This dashboard provides the ability to search on a range of filters. Selecting the All Scheduling Services sharing the ESS repository radio button lets you look at all the current and past instances of job requests, as shown in Figure 11.14. For example, the following can be performed:
- You can conduct a simple search that returns a list of job request details, including the job request ID, the executing application, the job request status, and so on
- You can conduct an advanced search that returns the same information as the simple search, plus the date and time of execution, the runtime or wait time of the job request, the number of retries, and any error type that may have occurred during execution

Figure 11.14: Searching and monitoring completed and in-progress Job Requests
Clicking on a completed job Request ID will drill down to the details of the execution status. The Execution Trail status bar provides a bar chart to show the progress of the job request statuses over a timeline (refer to Figure 11.15). As the submitted job in this example invoked a one-way composite, its flow trace can also be viewed from this page by navigating to Action | SOA Composite Flow trace.
At the bottom of the Request Detail page is the Log and Output job output panel. Expand this panel to see the XML input of the web service response:

Figure 11.15: An Execution Trail of a completed Job Request
It may often be necessary to alter a submitted job when it is in a Wait state, waiting to be executed at the defined schedule. The Action button, as shown in the previous screenshot, provides options via a drop-down menu to Cancel, Hold, and Resume a Job Request, along with changing its priority and schedule.
An Oracle SOA Suite 12c platform is most likely shared by multiple tenants that may have deployed many composites, each of which may have different scheduling requirements. As an administrator managing this infrastructure, you may start to encounter race conditions between different ESS job requests, slow response times, and possibly data corruption when these requests run concurrently. For instance, you may accidently submit the same job request (based on the same job definition and schedule) twice, or submit different requests using the same schedule. This should be avoided, as it can potentially choke the platform of resources. Ideal scenarios to run job requests are as follows:
- Only a single instance of a job definition should run at particular time
- Some jobs should not be run during the execution of other jobs irrespective of their parameters
- Some jobs should not be run during the execution of other jobs when acting on the same object (that is, having the same value for a particular parameter)
In ESS, all of these requirements can be addressed using an Incompatibility definition.
Incompatibility defines which Job and Job Set definitions, referred to as entities, are incompatible with other entities in the system and should not be allowed to run together. Incompatibility can be defined for a given resource or globally. A resource is identified by a property name available in the entities being marked for incompatibility. Such a resource can be referred to by the same or a different property name.
At runtime, the system will check whether the given entities access the same resource (identified as the values of the properties defined in the incompatibility definition) and prevent them from running concurrently.
In the scenarios discussed previously, the first requirement is addressed using the Self Incompatible option. The second and third requirements can be met using the Global and Domain type incompatibility definitions.
To create an Incompatibility definition, follow the given steps, using Figure 11.16 as a reference:
- Log in to Oracle Enterprise Manager Fusion Middleware Control.
- Navigate to Scheduling Services | ESSAPP | ESSAPP | Scheduling Service Group and click on Job Metadata | Incompatibilities.
- Click on the Create button.
- Enter the Name, Display Name, and optionally Package and Description for the new incompatibility, and set its type in the Type field to Global.
-
Under the Entities panel, click on the
 icon and perform a default search.
- This will display all the job definitions created on the server. Choose AutoPurgeJob that was created as part of this example.
- Click on OK to save the Incompatibility definition.
- Now, go back to the Incompatibility dashboard and edit the newly created AutoPurgeSelfIncompatibility option by selecting it.
-
Click on the
 icon under the Entities panel. This will open a popup, allowing you to check the Self Incompatible flag.
- Click on OK to save it. Refer following screenshot:

Figure 11.16: Creating an incompatibility in ESS
This Incompatibility definition will direct the Oracle SOA Suite 12c platform to only run one instance of this job at any given time. You may also have a similar requirement where, when an AutoPurgeJob is run, any other submitted Job Request should not run. An incompatibility for this scenario can also be created by adding these two job definitions under the Entities panel. The Self Incompatible flag should not be set in this case.
Another powerful feature of ESS in Oracle SOA Suite 12c is the ability to create collections of job definitions that can be grouped together to run as a single unit called a job set. Each job definition or job set included within a job set is referred to as a Job Set Step.
A job set is defined as either a serial job set or a parallel job set. At runtime, ESS runs parallel Job Set Steps concurrently. In a serial job set, the steps are run one after another in a specific sequence. Using a serial job set, ESS also supports conditional branching between steps based on the execution status of a previous step.
Furthermore, a job set may be nested, which means that it may contain a collection of job definitions or one or more child job sets.
A job set can be defined by navigating to Scheduling Services | ESSAPP | ESSAPP | Scheduling Service Group | Job Metadata | Job Sets in Oracle Enterprise Manager Fusion Middleware Control.
While an Incompatibility definition prevents two jobs from running at the same time, a dependency can be created to execute multiple jobs in a custom sequence. For instance, let's assume that as an administrator, you want to set up a nightly error notification rule to send out an e-mail about faulted instances. However, before executing this job, you want the fault bulk recovery to be completed. This scenario can be implemented by creating a Job Set with two dependent steps in a serial configuration, as follows:
- On the Job Sets landing page, click on Create to define a new job set.
- Enter the mandatory metadata information about the job set, such as its Name, Display Name, Description, and Package.
-
Under the Job Sets panel, click on the icon to include the first step in the job set.
- An Add Step pop-up window appear, allowing you to select an existing job. Figure 11.17 shows how BulkRecoveryJob has been added as a step with Step ID as performErrorHospital.
- If a job requires any parameters to be passed, use Application Defined Properties and map it to the parameters.

Figure 11.17: Creating a Job Set with dependent steps
- In a similar way, add another step by selecting the job created for Error Notification Rule.
- Check the Serial radio button to direct the ESS engine that these jobs should run one after another.
- A job set definition always allows you to specify jobs that need to be executed in case the main steps (Job Definitions) error out or go into a warning state. Figure 11.18 shows a fully defined Job Set with a serial pipeline of two Job Definitions.
-
The
 icon indicates that the sequence will execute the next step when the current step is successfully executed. Additional steps can be configured on error and warning conditions as indicated by the icons
  and
and  , respectively.

Figure 11.18: A serial Job Set showing a linear dependency in ESS
In addition to the use case explained here, there may be other scenarios where certain types of job need to run in parallel. This can be done by creating a job set pipeline and setting the step execution mode to Parallel.
All the metadata of ESS job components discussed so far are stored in the [PREFIX]_ESS schema in the database. Once a job has finished its execution, its metadata-related and execution-related audit trail remains in the database. Over a period of time, it will be necessary for you as an administrator to purge the completed job requests. Completed job requests can be purged either through the Oracle Enterprise Manager Fusion Middleware Control console from the ESS module or by directly executing a purge package in the database.
The ESS module deployed to Oracle Enterprise Manager Fusion Middleware Control provides a flexible way to purge completed jobs. You can purge requests by job type, job definition, product, and application, or for jobs submitted by a specific user. A purge policy configuration also allows you to set up retention parameters, and can be scheduled to run at defined intervals. Follow the given steps to schedule a purge policy:
- Log in to Oracle Enterprise Manager Fusion Middleware Control.
- Navigate to Scheduling Services | ESSAPP | ESSAPP | Scheduling Service Group and click on Purge Policies.
- Click on the Set up New icon to create a new purge policy. Figure 11.19 shows a user-defined purge policy to delete any completed AutoPurgeJobs created earlier.
In this example, any job data that is completed and past 7 days is purged, but it is restricted to a maximum of 100 jobs in one instance of the purge execution. Completed jobs exceeding the first 100 jobs will not be deleted, even though they are older than the retention period.
Figure 11.19: Creating a Purge Policy for completed Job Requests
In the previous example, a purge policy executed through Oracle Enterprise Manager Fusion Middleware Control may create the impression that this instance data beyond the retention period is deleted from the database, but this is not the case. The data is still persisted in the backend tables. The purged jobs simply will no longer show up in the job history dashboard using the Search Job Requests report. This purging is logical as the rows corresponding to the purged job in the [PREFIX]_ESS schema continue to exist. The purge policy updates the deleted column in the REQUEST_HISTORY table without physically deleting them.
Over time, the tablespace continues to grow with records that are completed but not removed. To completely delete the job's history, the ESSPURGE.PURGE_REQUESTS procedure needs to be executed. This procedure will physically remove all the instance data for jobs that have completed and have been marked as logically deleted. The procedure is executed as follows:
EXECUTE esspurge.purge_requests(<older_than_days>, <max_count>, <max_runtime> );
Troubleshooting the ESS components is an important administrative function that you would additionally be expected to perform. There are multiple ways to troubleshoot ESS issues, such as changing log levels, setting up tracing, viewing database logs, and so on. This section covers some common problems you may encounter with ESS components and how to effectively manage them. For instance, if a job remains in the WAIT or RUNNING state when it was scheduled to run in the past, there may be a number of reasons for this. The first step is to perform a sanity check of the infrastructure and ensure that all the components are in an active state:
- Ensure that the ESS cluster and the managed servers are up and running.
- Check whether the ESS application module is in a started state.
- Make sure that the Request Dispatcher and the Request Processor processes are up and running. They can be checked by navigating to Scheduling Services | ESSAPP | ESSAPP | Scheduling Service Group and then clicking on each of their links, respectively.
- Check the Thread Count allocation (maximum number of threads used to process job requests) under the Advanced Configuration option in the Request Processor dashboard to ensure that an adequate number is set based on the number of jobs running in the environment.
- Sometimes, a job may run for a long time and would be seen consuming a large number of CPU cycles and memory. Check the free heap sizes of the ESS managed server and the database nodes to check whether there is sufficient free memory available.
The Oracle Diagnostic Log files can also reveal important information regarding the state of the ESS application for troubleshooting purposes. The default log level can be changed to FINEST to ensure that ESS request logs are saved to the server log file. ESS inherits the logging level and log handlers configured for the parent logger, typically the Oracle logger or the root logger. To change the log level of the server diagnostic file for the ESS components, perform the following steps:
- Log in to Oracle Enterprise Manager Fusion Middleware Control.
- Navigate to ESS_Cluster | [ess_server].
- Click on the WebLogic Server menu and select Logs, and then select Log Configuration.
- In the Log Configuration pane, expand Root Logger.
- The scheduler loggers can be accessed by further expanding oracle | oracle.as | oracle.as.scheduler[*], as shown in Figure 11.20.
- Depending on which component you want to troubleshoot, set its corresponding log level to Trace:32 (FINEST) and then click on Apply.
- Run a diagnostic test, and the diagnostic logs will be written under the
<DOMAIN_HOME>/servers/<SERVER_HOME>/logs/<ess_server>directory.
Figure 11.20: Configuring the log levels for the ESS loggers
Another mechanism to quickly check for a problem with an ESS Job Request is to directly query the REQUEST_HISTORY table in the [PREFIX]_ESS schema. The following query will list the current state of any request based on its request ID, along with any error or warning during its execution:
SELECT requestid, name, username, submitter, listener, state, error_warning_message, error_warning_detail, definition, logworkdirectory, outputworkdirectory
FROM [PREFIX]_ESS.REQUEST_HISTORY
WHERE requested = ?
Performance and scalability of an Oracle SOA Suite 12c platform, which is extended with ESS, is affected by a number of factors, such as a concurrent job execution, shared databases, availability of CPU resources, and overloading of the platform, to name a few. As such, it is inevitable that you may have to apply a few optimizations and tweaks and tune the environment for better performance.
As a bare minimum, administrators can configure a job incompatibility not only to prevent two incompatible jobs from running, but also to prevent both intensive jobs from heavily loading the same resource. In order to maintain good performance, you can define an incompatibility for such jobs so that they never run at the same time. In addition to this, a number of other parameters and settings can be altered to enhance the health of the platform, some of which are summarized in the following sections.
The request dispatcher manages requests that are awaiting their scheduled execution. The request processor handles job requests once they have been executed. The request dispatcher has a configurable parameter called Maximum Poll Interval that specifies the maximum frequency, in seconds, at which a check is performed to dispatch job requests. The default value of this parameter is 15 seconds. Consider increasing the value of this parameter to either 60 seconds or 3,600 seconds (1 hour), depending upon the types of jobs scheduled.
The request processor manages those job requests for which the scheduled execution time has arrived and that are ready to execute. The request processor leverages the Maximum Processor Threads property that specifies the maximum number of threads used to process job requests. This represents the total number of worker threads that might run concurrently for all active work assignments for the ESS server. By default, this parameter is set to 25. If there is potential for a large number of jobs to run concurrently on the server, consider increasing this value so that the count of these jobs is less than the configured threads.
The connection pool size for the ESS JDBC data source should be based on the request processor tuning values configured for the Maximum Processor Threads and Starvation Threshold parameters. The recommended pool size should be the number of maximum processor threads plus 20.
Oracle ESS spawned jobs connect to the database using SQL*Net. If the spawned jobs are cancelled, ESS kills these processes at the operating system level. It is possible, however, that the database connections used by these processes will still exist in the database. To reduce dead connections in the database, update the SQLNET.EXPIRE_TIME setting to a desired value.
So far in this chapter, you have seen how the ESS module deployed on the ESS managed server allows the creation of scheduling components from within Oracle Enterprise Manager Fusion Middleware Control. However, many administrators prefer to automate these activities so that repetitive steps can be scripted to save time and ensure consistency across environments. ESS provides an exhaustive list of custom WLST scripts for all the administrative functions that you have learned in this chapter.
The scripts shown in the following section will recreate the components covered in the earlier part of this chapter, such as Job Definitions, Schedules, Job Submissions, and Purge Policies.
The WLST shell script wlst.sh is located in the $ORACLE_HOME/soa/common/bin folder, where $ORACLE_HOME is the environment variable set that points to the SOA Suite 12c installation directory.
The ESS WLST commands are only available when the base script classpath is modified in such a way that it can add a few JAR files. Modify the setWlstEnv.sh file as highlighted in the following code:
CLASSPATH="${CLASSPATH}:${ORACLE_HOME}/oracle_common/modules/jmxframework.jar:${ORACLE_HOME}/wlserver/server/lib/weblogic.jar:${ORACLE_HOME}/oracle_common/ess/lib/ess-admin.jar"Once the required JAR files have been added to the classpath, connect to the WebLogic administration server to execute the rest of the WLST scripts that we discussed earlier:
./$ORACLE_HOME/soa/common/bin/wlst.sh
connect('weblogic', 'welcome1', 't3://adminhost:7001')
The enableESSPrint()and help('OracleScheduler') commands can be issued to enable the print output and get usage information for the ESS native commands, respectively.
The ESS WLST function to manage job definitions can be used to either create, update, or delete a job definition. The syntax of the function is as follows:
manageSchedulerJobDefn(operation,appName,[jobName],[jobType], [desc],[props])
The parameters of this function are self-explanatory. Do you recollect the Auto Purge job that was created through the ESS web module in the console? The same job can be created using the following WLST code:
#
# Create a Job Definition that invokes a Web Service
#
manageSchedulerJobDefn('CREATE','EssNativeHostingApp',jobName='WLST_PURGE',jobType='OnewayWebserviceJobType',desc='WLST Auto Purge Job', props={'SYS_EXT_wsWsdlUrl':'/soa-infra/services/default/ESSDemoApp/essbpel_client_ep?WSDL','SYS_EXT_wsServiceName':'essbpel_client_ep','SYS_EXT_wsPortName':'ESSBPEL_pt','SYS_EXT_wsOperationName':'process', 'SYS_EXT_wsWsdlBaseUrl':'http://soahost1.raastech.com:8001','SYS_EXT_invokeMessage':'<ns1:process xmlns:ns1="http://xmlns.oracle.com/ScheduledPurgeDemo/ESSDemoApp/ESSBPEL"> <ns1:input>A</ns1:input> </ns1:process>','SYS_externalJobType':'SOA'})
Note that the script can accept any number of properties that are used to completely configure a job definition. Additionally, the following scripts can be used to update or delete the job definition:
#
# Update a Job Definition
#
manageSchedulerJobDefn('UPDATE','EssNativeHostingApp',jobName='WLST_PURGE',desc='Updating description of WLST Auto Purge Job')

#
# Delete a Job Definition
#
manageSchedulerJobDefn('DELETE','EssNativeHostingApp',jobName='WLST_PURGE')
All existing job definitions can be turned into queries by passing SHOW as a value for the operation parameter in the script:
manageSchedulerJobDefn('SHOW','EssNativeHostingApp')The queryWorkSchedules() command prints out all the currently defined schedules on the WLST console. Other commands to manage a schedule have the following syntax:
manageSchedulerSchedule(operation,appName,[schName],[schDesc],[begin_time],[frequency],[interval],[count],[end_time],[month],[week],[day],[date])
As you can see from the syntax, the command accepts an Operation parameter that can have a value of either CREATE, UPDATE, or DELETE. The schName parameter is used to specify the name of the schedule definition. A number of other parameters can be used to comprehensively define a time-based schedule, such as a frequency, an interval, a start time, end time, and count, to name a few. The following commands are an example of how to create a schedule as well as how to update and delete a schedule, using the preceding syntax:
#
# Create an ESS Schedule that runs every day for 30 days at 1:00 A.M midnight from the point of creation.
#
manageSchedulerSchedule('CREATE','EssNativeHostingApp',schName='soa/WLST_NightlyPurgeSchedule',schDesc='Schedule created for a Nightly Purge Job',frequency='DAY',interval=1,count=30, begin_time='01:00:00:10:08:15')

#
# Update an ESS Schedule to modify the schedule start time.
#
manageSchedulerSchedule('UPDATE','EssNativeHostingApp',schName='soa/WLST_NightlyPurgeSchedule',schDesc=' Updating the Schedule created for a Nightly Purge job', begin_time='03:00:00:10:00:00')

#
# Delete a schedule
#
manageSchedulerSchedule('DELETE','EssNativeHostingApp',schName='soa/WLST_NightlyPurgeSchedule')ESS also provides an extensive set of WLST functions to manage the lifecycle of job requests. A simple querySchedulerRequests() command displays a list of existing job requests configured on the ESS server along with their metadata. Job requests can also be queried based on their state by simply providing an overloaded state parameter to the same function, namely querySchedulerRequests(state="RUNNING").
The syntax of the WLST method to submit a Job Request in ESS is provided in the following code:
submitSchedulerRequest(appName,[jobName],[schMeth],[note],[schName],[RschName],[schDesc],[o_time],[begin_time],[frequency],[freqNum],[count],[end_time],[month],[week],[day],[date],[reqParams])
A job request command can be issued by simply passing a job definition name along with a schedule. While a job definition must be predefined, the schedule can be defined in an ad hoc manner using this command. If the job definition input is parameterized using application-defined properties, then they can be passed using the reqParams argument in the function. The following example demonstrates how a Job Request for a pre-existing job AutoPurgeJob can be submitted in various ways:
#
# Submit a request for immediate job execution (one-time only)
#
submitSchedulerRequest('EssNativeHostingApp','AutoPurgeJob')

#
# Submit a job request using a predefined schedule
#
submitSchedulerRequest('EssNativeHostingApp',jobName='AutoPurgeJob',schName='NightlyPurgeSchedule')
A few other WLST functions that are useful to manage a lifecycle of a Job Request, along with their descriptions, is provided here in case you need them:
#
# Cancel a currently running job request based on its Id
#
manageSchedulerRequest(<jobId>, "CANCEL")

#
# Recover a failed job request based on its Id
#
manageSchedulerRequest(<jobId>, "RECOVER")

#
# View the request log for a job request based on its Id
#
getSchedulerRequestContent(<jobId>, "LOG")

#
# Get all the output of a job request
#
getSchedulerRequestContent(<jobId>, "OUTPUT")
In addition to using Oracle Enterprise Manager Fusion Middleware Control to delete completed ESS job requests, ESS also provides scripts that an administrator can use to define a set of delete criteria and thus submit a batch delete request. The delete criteria for the batch job is specified in the form of application request parameters:
batchDeleteSchedulerRequests([desc],[schId],[start],[end],[params])
The simplest way to purge completed instances is to execute the ESS WLST batch delete batchDeleteSchedulerRequests() function that is executed once to delete all the purgeable job requests without any other parameters. You can also choose to run the delete job using an existing schedule:
#
# Submit batch delete job request using the schedule /oracle/as/ess/essapp/custom/NightlyPurgeSchedule:
#
batchDeleteSchedulerRequests(desc='Batch Purge using Nightly Schedule',schId='NightlyPurgeSchedule')