
Many business processes require an element of human activity; common tasks include approving an expense item or purchase order. But even fully automated processes can require human involvement especially when things go wrong.
In this chapter we will introduce you to the various parts of the Human Workflow component of the Oracle SOA Suite, and take you through a practical example to create and run your first simple workflow. Once we've done that, we will examine how to carry out other basic workflow activities, such as how to:
Dynamically assign a task to a user or group based on the content of the task
How to cancel or change a workflow task while it's still in process
How to enable the workflow user to request additional detail about a task
How to reassign, delegate or escalate a task, either manually or through the use of user-defined business rules
The following diagram illustrates the three core participants in any workflow:
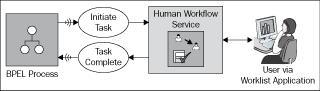
On the left hand side we have the BPEL Process that creates the task and submits it to the Human Workflow Service. Once it's initiated the task, the process itself will pause until the completed task is returned.
On the right hand side we have the user who carries out the task. Tasks can either be directly assigned to a user, or to a group to which the user belongs; in which case they need to claim the task before they can work on it. When working on a task, a user typically does this via the Worklist Application, a web-based application that is included as part of the SOA Suite.
Sitting between the BPEL process and the Worklist Application is the Human Workflow Service; this is responsible for routing the task to the appropriate user or group, managing the lifecycle of a task until it completes and returning the result to the initiator (that is the BPEL process in the previous diagram).
For our first workflow, we will create a very simple BPEL process which takes a leave request, creates a simple approval task for the individual's manager who can then either approve or reject the request.
Note, during installation of the SOA Suite, a sample user community is installed for use with the identity service, which we will use for the workflow examples within this book (see the BPEL Process Managers Administrators Guide for details of the sample user community). In a production deployment you would typically configure the identity service to use an LDAP Repository such as Oracle Internet Directory or Active Directory.
The first step is to create a simple asynchronous leave approval BPEL process. The input and output schema elements for the process are defined in LeaveRequest.xsd, as shown (note the schema is also provided in the sample folder for Chapter 6).
<?xml version="1.0" encoding="windows-1252"?>
<xsd:schema xmlns:xsd="http://www.w3.org/2001/XMLSchema"
xmlns="http://schemas.packtpub.com/LeaveRequest"
targetNamespace="http://schemas.packtpub.com/LeaveRequest"
elementFormDefault="qualified" >

<xsd:element name="leaveRequest" type="tLeaveRequest"/>
<xsd:complexType name="tLeaveRequest">
<xsd:sequence>
<xsd:element name="employeeId" type="xsd:string"/>
<xsd:element name="fullName" type="xsd:string" />
<xsd:element name="startDate" type="xsd:date" />
<xsd:element name="endDate" type="xsd:date" />
<xsd:element name="leaveType" type="xsd:string" />
<xsd:element name="leaveReason" type="xsd:string"/>
<xsd:element name="requestStatus" type="xsd:string"/>
</xsd:sequence>
</xsd:complexType>

</xsd:schema>
Make sure you import this file as part of the process of creating the BPEL process and set the input and output schema elements to leaveRequest.
Once you've created your outline process, drag a Human Task from the Process Activities palette into your BPEL process, as shown in the following diagram:
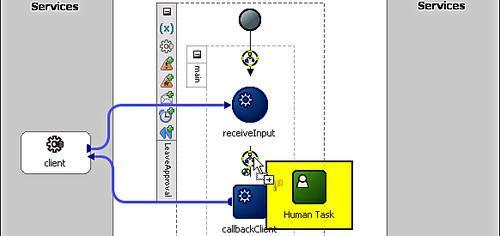
This will pop up the following screen:

Press the Magic Wand button (circled in the previous screenshot) to create a new task (if coming back to edit a previously created workflow, then press the pencil button to edit the task details).
This will bring up Add Human Task Wizard. Give the task a meaningful name (for example LeaveRequest) and click OK.
This will open up the task definition form as a new tab within JDeveloper (shown in the following figure) where you can configure the task.
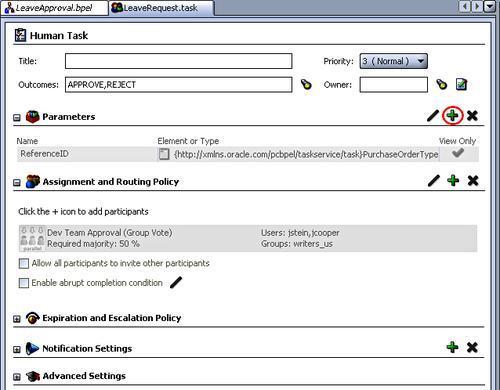
At first glance it may look quite complicated; however, for what we want to do it's pretty straightforward.
The key things we need to define for the task are its title, what its possible outcomes are (that is Leave Request Approved or Rejected), the parameters (or payload) of the task, and who to route or assign it to.
So let's give the task a Title, such as Approval required for Leave Request. Note, this is what a user will see in their work queue if they are allocated the task. For the time being we can leave the other values (Priority, Outcomes, and Owner) with their default values.
Next we need to define the task parameters; that is the content of the task that we want the approver to base their decision upon. For our purposes we simply want to pass in the leave request received by the BPEL Process. To do this click on the + symbol (circled in the previous screenshot) to add a parameter. This will pop up the following window:
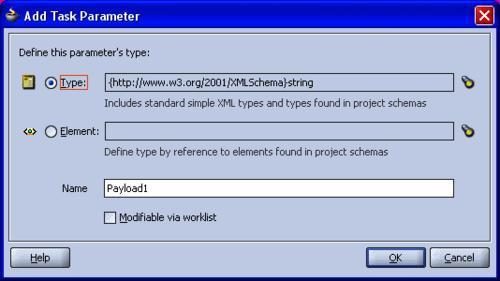
Here we can specify any standard XML type, such as string, integer, and so on as well as any types defined in any of our imported XML Schemas. Alternatively we can use any elements defined in any of our imported XML Schemas.
We want to use the same leaveRequest element specified in the schema we imported at the start, so select Element as the parameter type and then click on the corresponding flashlight to bring up the standard type chooser. From here just browse the LeaveRequest schema file that we imported at the start and select the leaveRequest element.
If we check Modifiable via worklist anyone who works on the task will be able to update the content of that parameter. In our case we will leave it unchecked.
Click OK and we now should have defined a LeaveRequest Parameter for your task.
Finally we need to specify who is going to approve the task; we do this by creating an Assignment and Routing Policy. In the Human Task Definition window, shown previously (see the section Defining the workflow task), click on the + symbol to the right of the Assignment and Routing Policy section. This should bring up the following window:
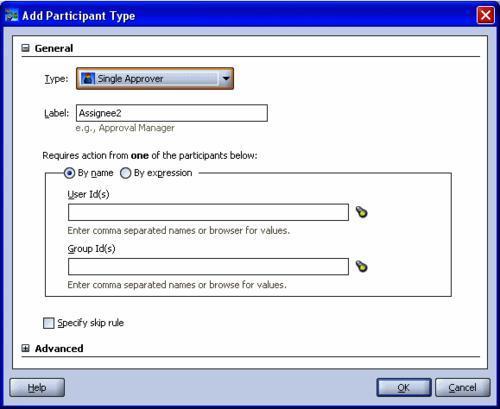
By default Single Approver is selected as the default routing type which is fine for our purpose (we will examine the other types in more detail in Chapter 15). Labels are used to provide a meaningful description of the routing rules, and are also useful if we specify multiple participants for a task. So for our purpose, just enter a meaningful value (for example Manager Approval).
We now need to specify who the task is going to be assigned to. We can either assign a task to a specific user or a group. For our purpose we are going to assume that the CEO of the company is required to approve every holiday, so we will always assign it to cdickens. Probably not ideal! But we will re-visit this later in the chapter to look at how we can make it more realistic.
You can type this value in directly to the userID's field or press the flash light to bring up the identity look-up dialog. This allows you to search and browse the users and groups defined to the identity service.
Once you've specified the assignment, the task definition should have been updated to contain a routing policy. Select Save on JDeveloper to make sure you save the task definition, as they are not saved as part of your BPEL Process.
If you look at your project structure, you will see a new folder has been added to it, in our case LeaveRequest (ringed in the following screenshot). This folder contains the task metadata file which we've just defined and the schema for the task payload which is based on the parameters we specified for the task.
Anytime we want to edit the task definition, just double click on the LeaveRequest.task file to open it in JDeveloper.

So far we have defined our task and integrated it into our BPEL process; however we still need to specify the actual content of the workflow parameter. To do this, go back to the BPEL process and double click on the Human Task. This will re-open the BPEL Human Task configuration window (shown in screenshot) which is where we bind the task definition that we've defined to the BPEL process.
You will notice now that we have a Task Parameter defined for the Human Task which we need to map to a BPEL variable. Click on the spotlight for the LeaveRequest parameter and this will bring up the Task Parameters window, which allows you to browse the variables defined to the BPEL process; select the LeaveRequest element passed in as part of the inputVariable for the BPEL process.
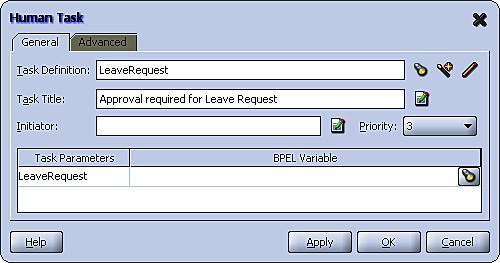
You may also have noticed that the Task Title has defaulted to the value we specified earlier as part of the task definition. We want to make the task title a bit friendlier, first type in (without the quotes):
'Leave Request for '
Then click on the icon to the right of the Task Title field. This will launch the now familiar expression builder. Here, from the inputVariable just select the element:
/ns1:LeaveRequest/ns1:fullName
This expression will be appended to the end of our title text embedded between <% and %>, to give the following:
Leave Request for <%bpws:getVariableData('inputVariable', 'payload', '/ns1:LeaveRequest/ns1:fullName')%>
At run time the BPEL process will evaluate the expression between <% and %>, substituting the result. For now we won't specify a task initiator as this is optional, and we will leave the priority set to three.
So far we have defined the task that needs to be carried out and plugged it into a simple BPEL process. What we need to do next is implement the part of the user interface that allows someone to view the details of our specific task and then either approve or reject the leave request.
Out of the box the SOA Suite provides the worklist application, which provides all the main workflow user interface screens and provides a framework in which to plug your task specific interface component. This can be developed from scratch if you want, but the simplest way is to get JDeveloper to generate it automatically for you based on the schema definition of the payload.
To do this go back to the Application navigator in JDeveloper to browse the content of your project, and locate the new LeaveRequest folder that was added when we defined the task, right-click on it and select Auto Generate Simple Task Form.
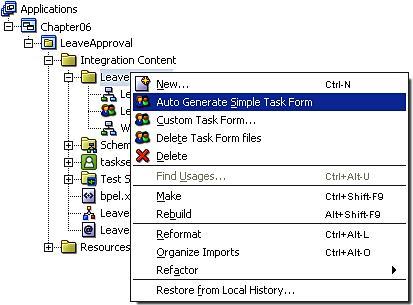
This will generate a web-based form, which JDeveloper will place in the Web Content folder of the LeaveApproval project, just below the Resources folder. The web-based form is generated as a JSP (Java Server Page), which we can customize in JDeveloper as required to give a better look and feel.
Your process is now complete, so deploy it to the server in the normal way.
Log into the BPEL Console and launch the process; ensure you specify a valid employee ID (such as jcooper). This will launch the BPEL process, which in turn will create the Leave Request task.
If you browse the audit trail for the process, you will see the process is paused at the LeaveRequest activity, as shown in the following screenshot:
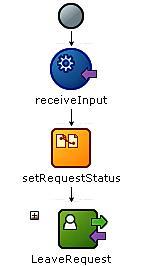
If click on the LeaveRequest activity this bring up the Activity Audit Trail for the workflow task showing that it is assigned to cdickens as shown in the following screenshot:
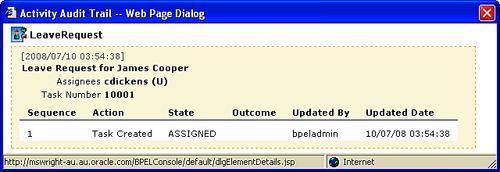
At the moment the process will wait forever, until the task is either approved or rejected; to do that we need to log in to the worklist application to process the task.
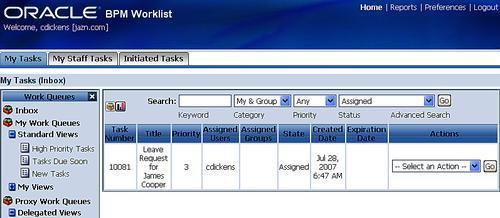
Launch the worklist application ( Oracle BPEL Process Manager | WorkList Application) and login as cdickens(password welcome1). This will bring you into the My Tasks tab, which provides access to your various work queues. By default it displays our inbox, which lists all the tasks currently allocated to us (or any groups that we belong to). We can then filter this based on keywords, task status, and priority.
The application also provides a number of other views, known as work queues, onto our tasks, which enable us to quickly identify high priority tasks, tasks due soon, or new tasks. In addition, we can also define our own views.
Here you should see the leave request task created by our process; click on the task number and it will open up a Task Details page, like the one shown in the following screenshot:
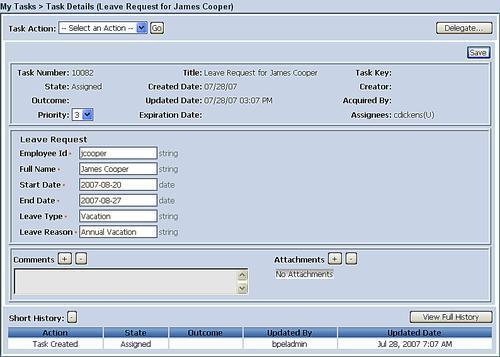
If we study this, we can see it is made up of the following five areas:
Task Action: Contains the actions that can be performed on a task. This is split into two sets. The first contains the outcomes that we defined in the task definition (that is approve or reject). The second defines standard actions available for tasks such as escalate and delegate, which we will examine later.
Task Header: Contains the standard header information about the task, a summary of which was in our work queue.
Task Payload: This contains the task specific payload, in our case details of the leave request. This may be editable, depending on how we configure the task.
Task Comments: Here we can add comments or attach documents to the task. This can be useful especially when a task is exchanged between multiple participants.
Task History: Provides a history of when the task was created, who it's been assigned to and so on. This is useful as it provides a complete audit trail of the task. Note, this is also available in the BPEL Console.
For our purpose, we just want to approve or reject the task, so select the appropriate action from the drop down and select Go. This will action the task and take you back to the Worklist application homepage. You will see the task has now disappeared from your work queue.
However, change the search filter at the top to show tasks with a completed status and you will see that the task is still there. If you select the task it will take you back into the task pane, where you can view the task details but no longer perform any actions as the task is now complete.
If you go back to the BPEL Console and look at the audit trail for the process, you will see that it has now completed. The other thing to note is that within the BPEL process a switch statement has been automatically added, so that the process will take a different path depending on the outcome of the task. For the purpose of this example we don't need to do anything, but in a real system we might update the HR system with details of the leave if it was approved.
At this point we have a simple workflow up and running. However, we have the following issues with it:
At the moment all requests go to the CEO, it would be better if requests went to the applicant's manager.
Also what happens if the requester makes a mistake with his/her request, or changes their mind? How do we let the original requester amend or cancel their request?
What if the approver needs additional information about a task, is there a simple way to enable that?
There are two approaches here. One is to assign the task to a specific group which may contain one or more individuals, a classic example would be to assign a support request to the customer support group.
The other is to dynamically specify the user to assign to a task at run-time, based on the value of some parameter; which is roughly what we want to do. Actually we want to look up the manager of the employee requesting the task and assign it to them.
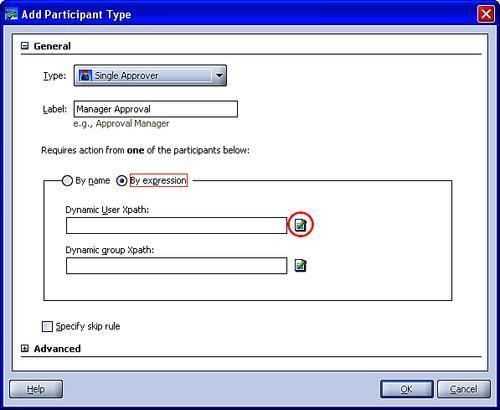
If we go back to the Human Task Definition form (see the section Defining the workflow task), and double-click on the routing policy we defined, this will re-open the edit participant type form. Specify that you want to select the participant By expression and the click on the icon to the right of Dynamic User XPath field (circled in the following screenshot).
This will open up the expression builder introduced in Chapter 5. However the key thing to notice here is that we only have access to the content of the task we are working on (not the full content of the BPEL Process).
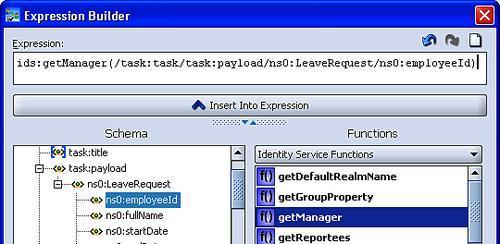
We need to create an expression that evaluates to the userID of the employee's manager. Fortunately one of the services that come with workflow is the identity service, which provides us with a simple way of querying the underlying identity layer to find out details about a user. In our case we can use the getManager function to get the ID of the manager.
So within the Expression builder select the Identity Services Functions and from within here select the getManager function and insert it into the expression. We now need to pass it the employee ID of whoever is requesting the leave. Expand the task payload; you will find it contains the content of the leave request. Select the employeeId and insert that as the parameter as shown in the following screenshot:
You can now save the task, redeploy it and run the process. Assuming you specify that the request is for jcooper, you will need to log in as jstein to approve the task.
So far we have only looked at scenarios where we assign a task to a single user. However workflow enables you to either assign a task to multiple users or to one or more groups (or a combination of the two).
In this case, every user who is a member of the group or has the task assigned to them will be able to see the task on their queue. However, before anyone can work on the task, they must first claim it. Once claimed, other users will still be able to see the task, but only the user who has claimed the task will be able to perform any operations on it.
Another common requirement is to cancel or modify a task before it has completed the workflow. If we take our example, suppose that having submitted the leave request we changed our mind, ideally we would like to be able to withdraw the task or modify it before someone goes to the effort of approving it.
You may remember when we first added the task to the BPEL process, we had a field where we could specify a task initiator, that at the time we left blank. Well if you specify a task initiator, they are effectively the creator of the task and have the ability to withdraw the task.
To specify the task initiator, go back to your BPEL process and double-click on the Human Task. This will re-open the Human Task configuration window (see the section Initializing the workflow parameter), click the icon to the right of the initiator field and this will launch the Expression Builder. Use this to specify the employeeId as the task initiator.
Now save the process, redeploy it and run the process. Again specify that the request is for jcooper, then log into the Worklist Application as jstein. You should notice that the task creator is jcooper. Don't approve the task, rather log out and log back into the Worklist application as jcooper.
This will take you into the My Tasks tab which is probably empty, but if you click the Initiated Tasks tab, then this will list all the tasks that you have initiated. If you look at the task you will see that you can perform a single action on the task, which is to withdraw it.
When we defined the task parameters on the task definition form we had the option to specify if the parameters are Modifiable via Worklist; at the time we didn't select this option. If this option is selected, then anyone who works on the task has the ability to modify the task payload, including the task initiator.
Now you may have noticed while specifying the various task details that as well as being able to specify the task initiator we can also specify the task owner. At this point you may be asking what the difference is between these two roles.
The simple answer is the task owner has more administrative privileges when it comes to a task. The task initiator is the person who creates a particular instance of a task, for example in our case jcooper and jstein may both request leave. In this case they are both initiators and can each withdraw the task they requested (but not each other's).
On the other hand the task owner may be the holiday administrator. They are responsible for administering all leave requests. This enables them to perform operations on behalf of any of the assigned task participants, additionally they can also reassign or escalate tasks.
The task owner can either be specified as part of the task definition, or on the Advanced tab of the BPEL Human Task configuration window.
When the task owner logs into the worklist application, they will see an additional tab, Administration Tasks, which will list all the tasks for which they are the task owner.
Once assigned a task, sometimes you need additional information about it before you can complete it. In our example, the manager may need more information about the reason for the leave request.
If a task initiator has been specified, then on the task details form we have the option of selecting Request Info. If we select this option, we are presented with the Request More Information form, where we can select who we want more information from and enter details of the information required which will be added as a comment to the task.
This will then assign the task to the initiator. The task will then appear on the task creators work queue, with a state of Info Requested. The task creator can either update the details of the task (if allowed) or add their own comment to provide the additional information. Once done, they can choose the action Submit Info and the task will be reassigned back to whoever requested the additional information.
This feature is automatically enabled when the task is opened. You can disable this feature if you want by overriding the default system actions in the Advance Settings section of the Task Configuration.
Often there is a requirement to reassign tasks. Maybe the task approver is about to go on leave themselves and before they go they may want to reassign all uncompleted tasks so they can be dealt with by someone else while they are away.
Alternatively, the individual may have already gone on leave (or be indisposed for some other reason) with a series of tasks already in their queue, which their manager may need to reassign to someone else.
Depending on a user's privileges and whether they are a manager, the worklist application provides a number of methods for either reassigning, delegating or escalating tasks. We will examine these in detail below.
If a user has any direct reports, then the worklist application will treat them as a manager. This will give them additional privileges to work on tasks that are either assigned to any of their direct reports or groups that they own.
Within the work list application, managers have the additional tab, My Staff Tasks. If they select this it will list all tasks currently assigned to any of their reports.
The list can be further filtered by selecting Advanced Search and specifying an appropriate query. For example you could just show tasks assigned to a particular user or high priority tasks about to expire.
The manager has two basic options when it comes to staff tasks, they can either work on the task directly themselves, where they can carry out the same sets of actions as the assignee. Alternatively, they can choose to reassign the task to another of their direct reports or to any of the groups that they own.
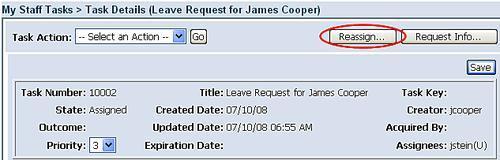
To see how we do this, log in as wfaulk (jstein's manager) and click on My Staff Tasks. Then open one of the listed tasks; this will open up the familiar task form. In the task action area of the form there will be a Reassign button, circled in the following screenshot:
Click this and the worklist application will open Assignees form under the Task Details as shown:
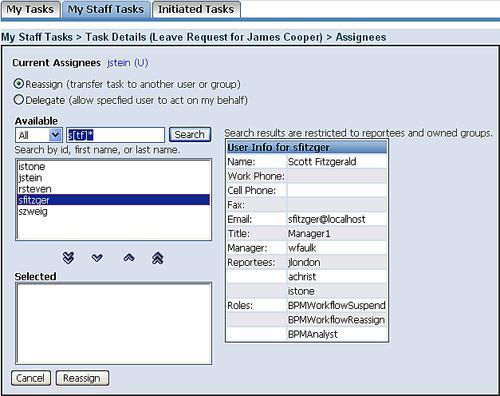
You will see you have the option to either Reassign or Delegate the task. Stick with the Reassign option for the time being as we will look at delegation shortly.
The remainder of the screen allows us to search for the users and or groups that we want to reassign the task to. You can choose to search just Users, Groups, or All. In addition you can further filter the list on the ID of the user or group, as well as the first name or last name of the user.
When specifying the search criteria you can use the following pattern matching characters:
. Matches any single character
* Matches any sequence of zero or more character
[] Matches any of the single characters specifi ed between the square brackets
For example, the pattern s[tf]* will bring back the list of users whose userID, first or last name begins with either st or sf.
You will also notice that if you select a user, the panel to the right will display basic information about the user, including their Manager, Reportees, and any roles they have.
Use the arrows to move users/groups that you wish to reassign the task to from the search results box to the Selected box and then click the Reassign button.
In addition to reassigning staff tasks, any user can also reassign their own tasks. To do this they simply open the task from their task list as normal and click the Reassign button (note if the user is not a manager, that is, they have no direct reports, they must click the Delegate button). This will bring up the task details assignees form that we just looked at.
An important point here is that the same restrictions on who a user can assign a task to apply regardless of whether it's the users own task or a task belonging to one of their reportees.
Thus users who have no direct reports will not be able to reassign their task to any other user. However, if they are a group owner they will still have the ability to reassign the task to the group.
The other option we have when reassigning a task is to delegate it. This is very similar to reassigning a task but with a number of key differences:
You can only delegate a task to a single user
You cannot delegate a task to a group
You can delegate a task to anyone regardless of where they are in the organizational hierarchy
When you delegate a task it's assigned to a new user, but it also remains on your work queue; so that either you or the delegated user can work on the task.
There will often be cases where a user needs to reassign a task to their manager, which a user typically can't do (remember you can only reassign tasks to direct reports). To do this, a user may choose to escalate a task; this is similar to reassigning a task. The key difference being is that it is assigned to a reportee's manager.
Even though it's possible to manually reassign tasks, this can be inefficient and time consuming; an alternative approach is to automate this using workflow rules.
You can either define a rule to be applied to a particular task type (for example our Leave Request) or to all tasks. Optionally you can specify a time period for which the rule is active; otherwise it will be active all the time.
You can specify various filter criteria which are applied to the task attributes (e.g. priority, initiator, acquired by) to further restrict which tasks the rule applies to.
Once you've specified the matching criteria for a rule, you can then specify whether you want to reassign or delegate the task. Essentially the same criteria applies to who you are allowed to reassign a task to if you were to do it manually as covered in the previous section, with the added caveat that you can only reassign a task to a single user or group.
For rules defined for a particular task type, we have the option of being able to automatically set the task outcome. In the case of our Leave Request task, we can write a rule to automatically approve all leave requests that are 1 day in duration.
The final option is to take no action, which may seem a bit strange. However, this serves a couple of useful purposes. Often you only want a rule to be active at certain periods of time; one way to do this is to just specify a date range, the alternative is to use this to turn the rule on and off as required over time.
The other use comes in when you define multiple rules. Rules are evaluated in order against a task until a rule is found that matches a particular task.
For example, to create a rule that reassigned all tasks, except say an expense approval task, then we could define two rules, a generic rule to reassign any task and a specific rule that matched the expense approval task that did nothing. We would then order the rules so that the expense approval rule triggered first. This way the generic rule to reassign task would be triggered for all tasks except the expense approval task.
For example, let's say Robert Stevenson (userID rsteven) is John Steinbeck's deputy, and we want to create a rule that reassigns all leave requests assigned to jstein, to rsteven except for any leave request made by rsteven.
To do this log onto the worklist application as jstein and click on the Preferences link in the top right hand corner of the Worklist title bar. This will take you to the preferences homepage.
In the preferences frame (on the left hand side), select My Rules. This will show you a list of all rules the user currently has defined (which is probably empty at the moment). Click on the Create button, this will bring up the Create new rule screen shown as follows:
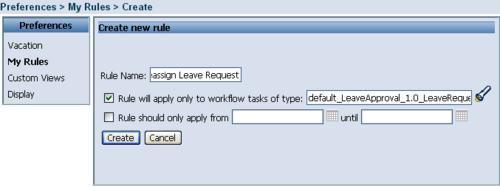
Enter a suitable name for the rule, and select the check box to specify that the rule will only apply to workflow tasks of a specific type. Then click on the torch icon to the right and this will pop up a window listing all specified task types. Select the LeaveRequest for the LeaveApproval process.
We will not specify a time period for the rule as we want it to be active all the time. So click on the Create button and this will bring up the Rule Detail window, as shown:
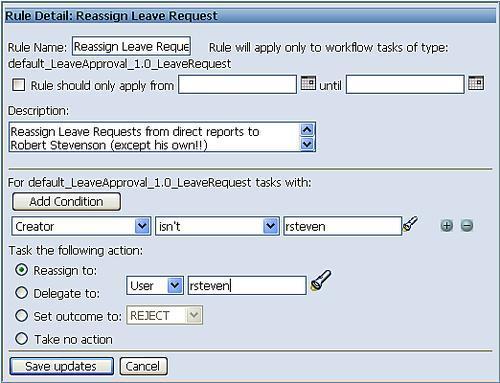
Here you specify the conditions that apply to the rule and the appropriate action to take.
First let's add the condition to prevent the rule reassigning leave request made by rsteven. Then click on the Add Condition button and this will insert a condition line into the rule.
From the first drop down select the task attribute to which we want to apply the rule, which is in our case the Creator (that is the task initiator). In the second drop down select the test to be applied to the attribute, so in our case isn't and finally specify the user (rsteven). You can either type the userID straight in or click the flash light to search for the user, using the user search facility we introduced earlier.
Then specify the task action which is to reassign the task to rsteven. Your rule description should now look like the one shown in the previous figure.
Finally click Save Updates to create the rule. This will return you to the rule list window, as shown in the following screenshot, which should now list the rule you've just defined.
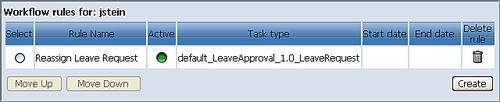
The traffic light under the Active column should be green to indicate that the rule is active. If you've specified a date period for the rule, then this may well be gray indicating that the rule isn't currently active.
Once you've created the rule, try creating two leave requests, one for jcooper and the other for rsteven. You should see that only the request created for jcooper is reassigned to rsteven.
Log in as rsteven, and select the leave request that has been reassigned to that user. If you examine the full task history you will see that it shows which rule was triggered to cause the task to be reassigned.
Note
A user can also specify rule conditions against the content of the task payload through the use of flex fields, as well as being able to define rules for any groups that they own. We examine flex fields in Chapter 15 — Workflow Patterns.
Human workflow is a key requirement for many projects; in this chapter we saw how easy it is to insert a human task in to a BPEL process, as well as implement the corresponding user interface to process the task.
We also looked at how business users can use the Worklist Application to process their tasks as well as manage the routing of them, including reassigning, delegating, and escalating tasks. We also looked at how business users could automate much of the management of tasks by defining business rules to automatically delegate, reassign, or complete a task.