
At run time there may be many potential paths through a BPEL process, controlled by conditional statements such as switch or while activities. Typically the business rules that govern which path to take at any given point are written as XPath expressions embedded within the appropriate activity.
Although this in an acceptable approach, we often find that while the process itself may be relatively static, the business rules embedded within the activities may change on a more frequent basis. This will require us to update the BPEL process and redeploy it even though the process flow itself hasn't changed.
In addition, by embedding the rule directly within the decision point, we often end up having to re-implement the same rule every time it is used, either within the same process or across multiple processes. Apart from being inefficient, this can lead to inconsistent implementations of the rules as well as requiring us to update the rule in multiple places every time it changes.
In this chapter we will look at how we can use the Business Rules engine to externalize rules from a BPEL process into a separate decision service, and then once we've done this, we will know how to invoke the rule from a BPEL process.
The advantage of separating out decision points as external rules is that we not only ensure that each rule is used in a consistent fashion, but in addition make it simpler and quicker to modify; that is we only have to modify a rule once and can do this with almost immediate effect, thus increasing the agility of our solution.
Before we implement our first rule, let's briefly introduce the key components which make up a Business Rule. These are:
Facts: Represent the data or business objects that rules are applied to.
Rules: A rule consists of two parts, an
IFpart which consists of one or more tests to be applied to fact(s), and aTHENpart, which lists the actions to be carried out should the test to evaluate totrue.Rule Set: As the name implies, it is just a set of one or more related rules that are designed to work together.
Dictionary: A dictionary is the container of all components that make up a business rule, it holds all the facts, rule sets, and rules for a business rule.
In addition, a dictionary may also contain functions, variables, and constraints. We will introduce these in more detail later in this chapter.
To execute a business rule, you submit one or more facts to the rules engine. It will apply the rules to the facts, that is each fact will be tested against the IF part of the rule and if it evaluates to true, then it will perform the specified actions for that fact. This may result in the creation of new facts or the modification of existing facts (which may result in further rule evaluation).
For our first rule we are going to build on our leave request example from the previous chapter. If you remember we implemented a simple process requiring every leave request to go to an individual's manager for approval. However, what we would like is a rule that automatically approves a request as long as it meets certain company guidelines.
To begin with we will write a simple rule to automatically approve a leave request that is of type Vacation and only for 1 day's duration. A pretty trivial example, but once we've done this we will look at how to extend this rule to handle more complex examples.
In SOA Suite 10.1.3 you use the Rule Author, which is a browser based interface for defining your business rules. To launch the Rule Author within your browser go to the following URL:
http://<host name>:<port number>/ruleauthor/
This will bring up the Rule Author Log In screen. Here you need to log in as user that belongs to the rule-administrators role. You can either log in as the user oc4jadmin (default password Welcome1), which automatically belongs to this group, or define your own user.
Within Oracle Business Rules, all of our definitions (that is facts, constraints, variables, and functions) and rule sets are defined within a dictionary. A dictionary is held within a Repository.
A repository can contain multiple dictionaries and can also contain multiple versions of a dictionary. So, before we can write any rules, we need to either connect to an existing repository, or create a new one.
Oracle Business Rules supports two types of repository — File based and WebDAV. For simplicity we will use a File based repository, though typically in production you want to use a WebDAV based repository as this makes it simpler to share rules between multiple BPEL Processes.
Note
WebDAV is short for Web-based Distributed Authoring and Versioning. It is an extension to HTTP that allows users to collaboratively edit and manage files (that is business rules in our case) over the Web.
To create a File based repository click on the Repository tab within the Rule Author, this will display the Repository Connect screen as shown in the following screenshot:
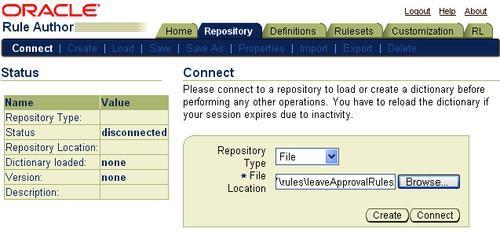
From here we can either connect to an existing repository (WebDAV or File based) or create and connect to a new file-based repository. For our purposes, select a Repository Type of File, and specify the full path name of where you want to create the repository and then click Create.
Note
To use a WebDAV repository, you will first need to create this externally from the Rule Author. Details on how to do this can be found in Appendix B of the Oracle Business Rules User Guide (http://download.oracle.com/docs/cd/B25221_04/web.1013/b15986/toc.htm).
From a development perspective it can often be more convenient to develop your initial business rules in a file repository. Once complete, you can then export the rules from the file repository and import them into a WebDAV repository.
Once we have connected to a repository, the next step is to create a dictionary. Click on the Create tab, circled in the following screenshot, and this will bring up the Create Dictionary screen. Enter a New Dictionary Name (for example LeaveApproval) and click Create.
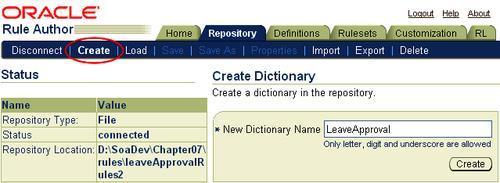
This will create and load the dictionary so it's ready to use. Once you have created a dictionary, then next time you connect to the repository you will select the Load tab (next to the Create tab) to load it.
Before we can define any rules, we first need to define the facts that the rules will be applied to. Click on the Definitions tab, this will bring up the page which summarizes all the facts defined within the current dictionary.
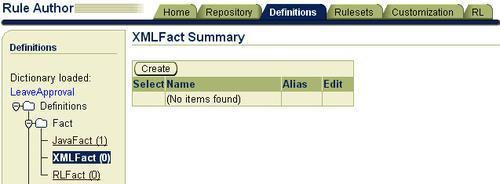
You will see from this that the rule engine supports three types of facts: Java Facts, XML Facts, and RL Facts. The type of fact that you want to use really depends on the context in which you will be using the rules engine.
For example, if you are calling the rule engine from Java, then you would work with Java Facts as this provides a more integrated way of combining the two components. As we are using the rule engine with BPEL then it makes sense to use XML Facts.
The Rule Author uses XML Schemas to generate JAXB 1.0 classes, which are then imported to generate the corresponding XML Facts. For our example we will use the same Leave Request schema that we used in Chapter 6, shown as follows for convenience:
<?xml version="1.0" encoding="windows-1252"?>
<xsd:schema xmlns:xsd="http://www.w3.org/2001/XMLSchema"
xmlns="http://schemas.packtpub.com/LeaveRequest"
targetNamespace="http://schemas.packtpub.com/LeaveRequest"
elementFormDefault="qualified" >

<xsd:element name="leaveRequest" type="tLeaveRequest"/>
<xsd:complexType name="tLeaveRequest">
<xsd:sequence>
<xsd:element name="employeeId" type="xsd:string"/>
<xsd:element name="fullName" type="xsd:string" />
<xsd:element name="startDate" type="xsd:date" />
<xsd:element name="endDate" type="xsd:date" />
<xsd:element name="leaveType" type="xsd:string" />
<xsd:element name="leaveReason" type="xsd:string"/>
<xsd:element name="requestStatus" type="xsd:string"/>
</xsd:sequence>

</xsd:complexType>
</xsd:schema>
Using JAXB, particularly when used in conjunction with BPEL, places a number of constraints on how we define our XML Schemas, including:
When defining rules, the Rule Author can only work with globally defined types. This is because it's unable to introspect the properties (i.e. attributes and elements) of global elements.
Within BPEL you can only define variables based on globally defined elements.
The net result is that any facts we want to pass from BPEL to the rules engine (or vice versa) must be defined as global elements for BPEL and have a corresponding global type definition so that we can define rules against it.
The simplest way to achieve this is to define a global type (for example tLeaveRequest in the above schema) and then define a corresponding global element based on that type (for example leaveRequest in the above schema).
Even though it is perfectly acceptable with XML Schemas to use the same name for both elements and types, it presents problems for JAXB, hence the approach taken above where we have prefixed every type definition with t as in tLeaveRequest.
Fortunately this approach corresponds to best practice for XML Schema design, something we cover in more detail in Chapter 10 — Designing the Service Contract.
The final point you need to be aware of is that when creating XML facts the JAXB processor maps the type xsd:decimal to java.lang.BigDecimal and xsd: integer to java.lang.BigInteger. This means you can't use the standard operators (for example >, >=, <=, and <) within your rules to compare properties of these types. To simplify your rules, within your XML Schemas use xsd:double in place of xsd:decimal and xsd:int in place of xsd:integer.
To generate XML facts, from the XML Fact Summary screen (shown previously), click Create, this will display the XML Schema Selector page as shown:
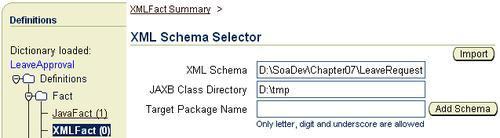
Here we need to specify the location of the XML Schema, this can either be an absolute path to an xsd file containing the schema or can be a URL.
Next we need to specify a temporary JAXB Class Directory in which the generated JAXB classes are to be created.
Finally for the Target Package Name we can optionally specify a unique name that will be used as the Java package name for the generated classes. If we leave this blank, the package name will be automatically generated based on the target namespace of the XML Schema using the JAXB XML-to-Java mapping rules. For example, our leave request schema has a target namespace of http://schemas.packtpub.com/LeaveRequest; this will result in a package name of com.packtpub.schemas.leaverequest.
Next click on Add Schema; this will cause the Rule Author to generate the JAXB classes for our schema in the specified directory. This will update the XML Fact Summary screen to show details of the generated classes; expand the class navigation tree until you can see the list of all the generated classes, as shown in the following screenshot:
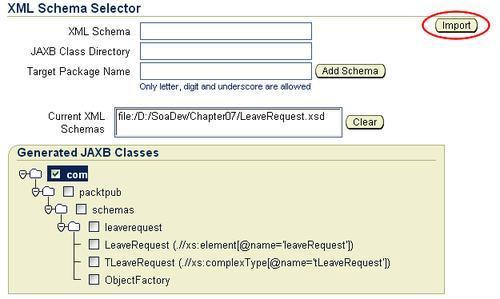
Select the top level node (that is com) to specify that we want to import all the generated classes. We need to import the TLeaveRequest class as this is the one we will use to implement rules and the LeaveRequest class as we need this to pass this in as a fact from BPEL to the rules engine.
The ObjectFactory class is optional, but we will need this if we need to generate new LeaveRequest facts within our rule sets. Although we don't need to do this at the moment it makes sense to import it now in case we do need it in the future.
Once we have selected the classes to be imported, click Import (circled in previous screenshot) to load them into the dictionary. The Rule Author will display a message to confirm that the classes have been successfully imported. If you check the list of generated JAXB classes, you will see that the imported classes are shown in bold.
In the process of importing your facts, the Rule Author will assign default aliases to each fact and a default alias to all properties that make up a fact, where a property corresponds to either an element or an attribute in the XML Schema.
Oracle Business Rules allows you to specify your own aliases for facts and properties in order to define more business friendly names which can then be used when writing rules.
For XML facts if you have followed standard naming conventions when defining your XML Schemas, we typically find that the default aliases are clear enough and that if you start defining aliases it can actually cause more confusion unless applied consistently across all facts.
The Rule Author lets you hide facts and properties so that they don't appear in the drop downs within the Rule Author. For facts which have a large number of properties, hiding some of these can be worth while as it can simplify the creation of rules.
Another obvious use of this might be to hide all the facts based on elements, since we won't be implementing any rules directly against these. However any facts you hide will also be hidden from BPEL, so you won't be able to pass facts of these types from BPEL to the rules engine (or vice versa).
In reality, the only fact you will typically want to hide will be the ObjectFactory (as you will have one of these per XML Schema that you import).
As you define your business rules, it makes sense to save your work at regular intervals. To save the dictionary, click on the Save Dictionary link in the top right hand corner of the Rule Author page.
This will bring up the Save Dictionary page. Here either click on the Save button to update the current version of the dictionary with your changes or, if you want to save the dictionary as a new version or under a new dictionary name, then click on the Save As link and amend the dictionary name and version as appropriate.
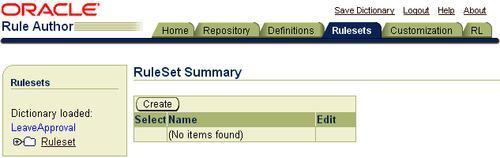
Once we have defined our facts, we are ready to implement our first rule set. Click on the Rulesets tab within the Rule Author, which will bring up the RuleSet Summary page. This will initially be empty, as shown in the following screenshot:
Click on Create and this will bring up the Ruleset page, as shown in the following screenshot:

Enter a name, for example LeaveApprovalRules, and an optional description and then click Apply.
This will update the RuleSet Summary page (shown in the following screenshot), showing you details of the newly created rule set, plus a list of its rules which is currently empty.

To create a rule, click on the Create button (circled in the previous screenshot); this will bring up the Rule page where we can give the rule a meaningful name (for example OneDayVacation) and optionally provide a Description for the rule as well.
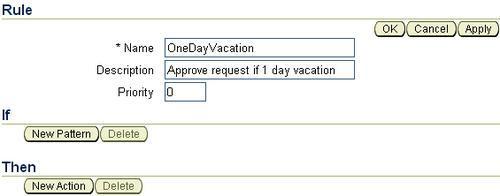
From this we can see a rule consists of two parts, an If part which consists of one or more tests (or patterns) to be applied to a fact or facts, and a Then part, which specifies the actions to be carried out should the test to evaluate to true.
To create the If clause we need to define one or more patterns to be applied. To define a pattern click on New Pattern, this will open the Pattern Definition window, as shown in the following screenshot:
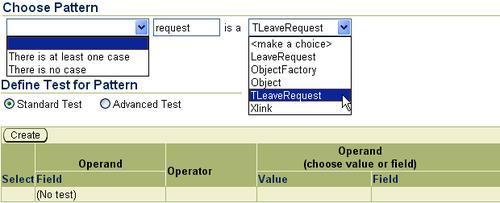
A Pattern consists of two parts, the first is the type of pattern that we wish to test for, and the second is the tests we want to apply to the pattern.
The first drop down is used to specify the type of pattern that we want to test for; this can take one of the following three values:
Blank: This is the default pattern, and is used to specify that the rule should be applied to each fact, where the test evaluates to
true. So, for example, if we submitted multiple leave requests in one go, we would the trigger the rule for each leave request that is of typeVacationand only 1 day in duration.There is at least one case: With this option, the rules will only be triggered once, as long as there is at least one match.
There is no case: With this option, the rule will be fired once if there are no matches.
With the second drop down we specify the type of fact that we wish to apply the rule to. In our case we want to test facts of type TLeaveRequest. The text area before this is used to assign a temporary alias to the fact being tested, i.e. request in our case. This alias is useful when testing multiple facts of the same type (we will cover this in more detail in Chapter 16 — Using Business Rules to Implement Services).
For our leave approval rule we need to define two tests, one to check that the request is only for 1 day in duration, which we can do by checking that the start date equals the end date, the second to check that the request is of type Vacation.
To define the first test, click the Create button; this will add a row to our Define Test for Pattern table where we can define the test conditions (as shown in the following screenshot).
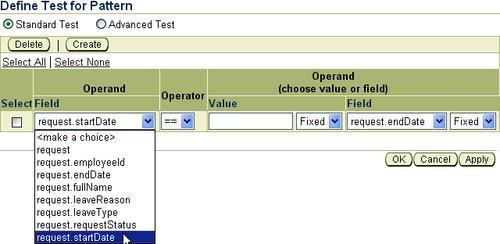
In the first Operand drop down, select the value to be tested, for example request.StartDate in our case. Next from the Operator drop down select the test to be applied to the first operand (== in our case). Next we can either choose to compare it to a specified value or a second Operand. For our purpose we want to check that the request.startDate equals the request.endDate.
To create our second test, we follow pretty much the same process. This time we want to test the operand leaveRequest.leaveType is equal to the value Vacation.
You may have noticed when specifying the second operand for each test that there is another drop down containing the values Fixed (as selected in the previous screenshot) or Any. Oracle Rules refers to these values as constraints. If an operand is set to Any, this specifies that non-technical users of the Rule Author can use the customization tab to modify the value of the operand.
Once we've defined both our tests, then click OK; this will take us back to the Rule page, which will now be updated with details of the If clause, as shown in the following screenshot:

Now that we have defined our test, we need to define the action to take if the test evaluates to true. Click on New Action. This will pop up the Add Action window where you need to specify the Action Type you wish to carry out.
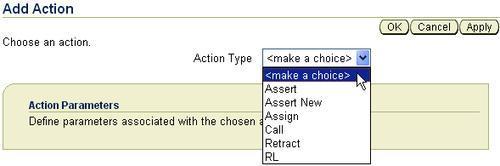
The Rule Engine supports the action types listed below:
Assert: Used to reassert any facts matched in a pattern (for example request). When a fact is altered, if we want the rule engine to be aware of the change and re-evaluate the modified fact against the rule set, we must assert it.
Assert New: If we create a new fact, for example a new LeaveRequest, then we must assert the new fact to make the rule engine aware of it, so that it can evaluate the new fact against the rule set.
Assign: We can use this to either assign a value to a variable or a fact property; in our case we want to assign a status of Approved to the request.requestStatus property.
Call: This allows you to call a function to perform one or more actions.
Retract: This enables you to retract any of the facts matched in the pattern (for example request) so that it will no longer be evaluated as part of the rule set.
RL: Allows you to enter RL text directly to perform one or more actions.
The actions Assert, Assert New, and Retract, are important when we are dealing with rule sets which deal with multiple interdependent facts, as this allows us to control which facts are being evaluated by the rule engine at any one time. Here, we only are dealing with a single fact, so don't examine these constructs in this chapter, leaving them for Chapter 16 — Using Business Rules to Implement Services.
For our purpose we want to update the status of leave request to approved, so select Assign as the Action Type. This will update the Add Action screen shown as follows:
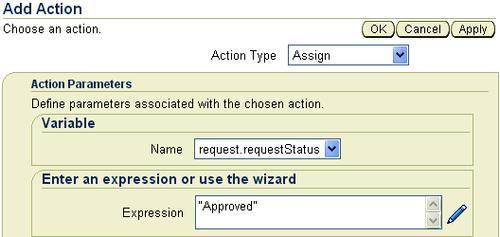
From the drop down select request.requestStatus as the variable that we wish to assign a value to. Then in the Expression field enter the value of Approved.
To calculate the value based on a more complicated formula, we can use the Expression Wizard to build this; the wizard is launched by clicking on the pencil icon.
Once we have completed our assign action, then click OK, this will take us back to the Rule page, which will now be updated with details of the Then clause, as shown in the following screenshot:
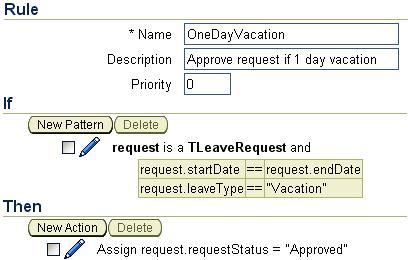
At this point make sure you save the dictionary. This completes the definition of our LeaveApproval rule set. The next step is to wire it into our BPEL process.
To invoke a rule we need to go through a number of steps. First we must create a session with the rules engine, then we can assert one or more facts, before executing the rule set and finally we can retrieve the results.
We do this in BPEL via a Decision Service; this is essentially a web service wrapper around a rules dictionary, which takes cares of managing the session with the rules engine as well as governing which rule set we wish to apply.
The wrapper allows a BPEL process to assert one or more facts, execute a rule set against the asserted facts, retrieve the results and then reset the session. This can be done within a single invocation of an operation, or over multiple operations.
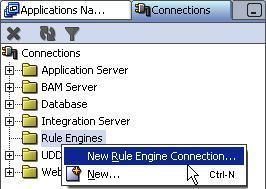
Before you can create a Decision Service you need to create a connection to the repository in which the required rule set is stored. In the Connections panel within JDeveloper, right-click on the Rule Engines folder and select New Rule Engine Connection... as shown in the following screenshot:
This will launch the Create Rule Engine Connection dialogue; first you need to specify whether the connection is for a file repository or WebDAV repository.
If you are using a file repository, all we need to specify is the location of the actual file. Once the connection has been created, we can use this to create a decision service for any of the rule sets contained within that repository.
However it is important to realize that when you create a decision service based on this connection, JDeveloper will take a copy of the repository and copy this into the BPEL project.
When you deploy the BPEL process, then the copy of this repository will be deployed with the BPEL process. This has a number of implications; first if you want to modify the rule set used by the BPEL Process you need to modify the copy of the repository deployed with the BPEL Process.
To modify the rule set deployed with a BPEL Process, log onto the BPEL console, from here click on the BPEL Processes tab, and then select the process that uses the decision service. Next click on the Descriptor tab; this will list all the Partner Links for that process, including the Decision Service (for example LeaveApprovalDecisionServicePL) as shown in the following screenshot:
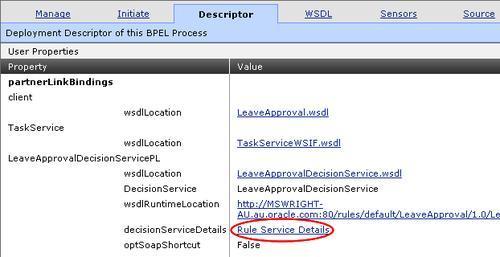
This PartnerLink will have the property decisionServiceDetails, with the link Rule Service Details (circled in the previous screenshot); click on this and the console will display details of the decision service. From here click on the link Open Rule Author; this will open the Rule Author complete with a connection to the file based rule repository.
The second implication is that if you use the same rule set within multiple BPEL Processes, each process will have its own copy of the rule set. You can work round this by either wrapping each rule set with a single BPEL process, which is then invoked by any other process wishing to use that rule set. Or once you have deployed the rule set for one process, then you can access it directly via the WSDL for the deployed rule set, for example LeaveApprovalDecisionService.wsdl in the above screenshot.
For the reasons mentioned above, it often makes sense to use a WebDAV based repository to hold your rules. This makes it far simpler to share a rule set between multiple clients, such as BPEL and Java.
Before you can create a Rule Engine Connection to a WebDAV repository, you must first define a WebDAV connection to JDeveloper, which is also created from the Connections palette.
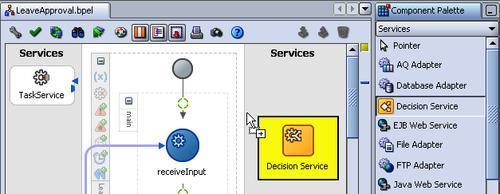
To create a decision service within our BPEL process, select the Services page from the Component Palette and drag a Decision Service onto your process, as shown in the following screenshot:
This will launch the Decision Service Wizard dialogue, as shown:
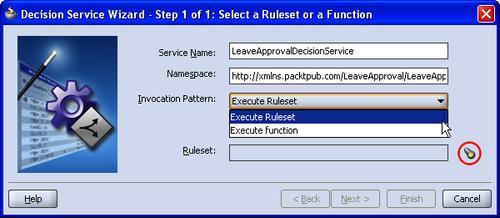
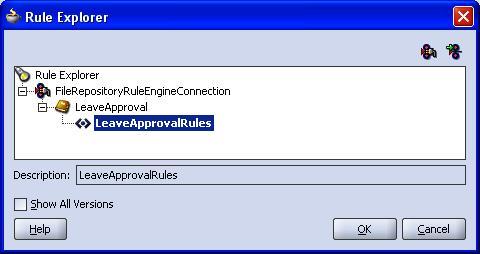
Give the service a name, and then select Execute Ruleset as the invocation pattern. Next click on the flashlight next to Ruleset to launch the Rule Explorer. This allows us to browse any previously defined rule engine connection and select the rule set we wish to invoke via the decision service.
For our purposes, select the LeaveApprovalRules as shown below, and click OK.
This will bring us back to the Decision Service Wizard which will be updated to list the facts that we can exchange with the Rule Engine, as shown in the following screenshot:
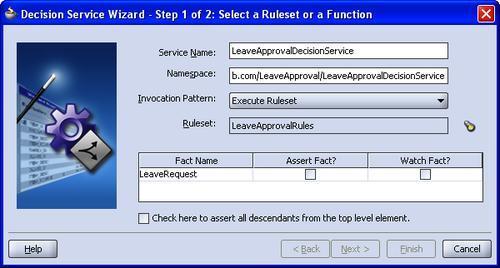
This dialogue will only list XML Facts that map to global elements in the XML Schema. Here we need to define which facts we want to assert, that is which facts we pass as inputs to the rule engine from BPEL, and which facts we want to watch, that is which facts we want to return in the output from the rules engine back to our BPEL process.
For our example we will pass in a single leave request. The rule engine will then apply the rule set we defined earlier and update the status of the request to Approved if appropriate. So we need to specify that Assert and Watch facts of type LeaveRequest.
Finally, you will notice the checkbox Check here to assert all descendants from the top level element; this is important when an element contains nested elements (or facts) to ensure that nested facts are also evaluated by the rules engine. For example if we had a fact of type LeaveRequestList which contained a list of multiple LeaveRequests, if we wanted to ensure the rules engine evaluated these nested facts, then we would need to check this checkbox.
Once you have specified the facts to Assert and Watch, click Next and complete the dialogue; this will then create a decision service partner link within your BPEL process.
We are now ready to invoke our rule set from within our BPEL process. From the Component Palette, drag a Decide activity onto our BPEL process (at the point before we execute the LeaveRequest Human Task).
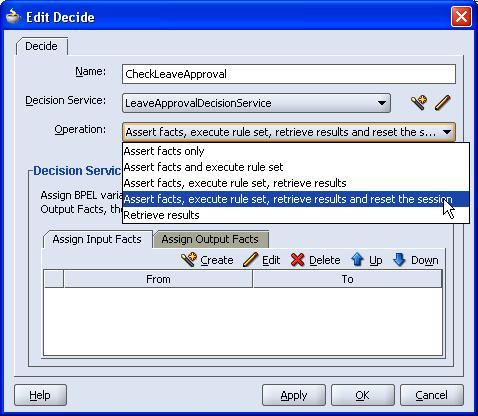
This will open up the Edit Decide window (shown in the following screenshot). Here we need to specify a Name for the activity, and select the Decision Service we want to invoke (that is the LeaveApprovalDecisionService that we just created).
Once we've specified the service, we need to specify how we want to interact with it. For example, whether we want to incrementally assert a number of facts over a period of time, before executing the rule set and retrieving the result or whether we want to assert all the facts, execute the rule set and get the result within a single invocation.
We specify this through the Operation attribute. For our purpose we just need to assert a single fact and run the rule set, so select the value of Assert facts, execute rule set, retrieve results (we look at other modes of operation in more detail in Chapter 16 — Using Business Rules to Implement Services).
Once we have selected the operation to invoke on the decision service, the Decsion Service Facts will be updated to allow you to assign input and output facts as appropriate.
The final step to invoke our business rules is to assign BPEL variables to the input and output facts. Click on Create, which will launch the Decision Fact Map window, as shown in the following screenshot:
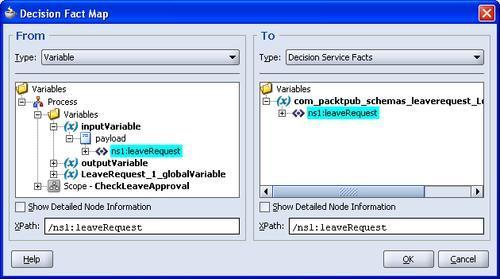
At first glance this will look like the standard Create Copy Operation window that we use when carrying out assigns within BPEL (which in reality is exactly what it is).
The key difference is that we are using this to assign values to the input facts to be submitted to the rules engines, so the Type on the To side of the copy operation is a Decision Service Facts.
The reverse is true for an output fact, where we use this dialog to map the output from the decision service back into a corresponding BPEL variable.
For our purpose we just want to map the initial leaveRequest in the process inputVariable into the corresponding fact as shown in the above screenshot, and then map the output fact which will contain our updated leaveRequest back into our inputVariable.
We have now wired the invocation of the rule into our BPEL process. Before finally running our process we need to modify our process to only invoke the workflow if the leave request hasn't been automatically approved.
To do this just drag a switch activity onto your process, then drag your workflow task into the first branch in the switch and define a test to check that the leaveRequest hasn't been approved. You are now ready to deploy and run your modified process.
Our current rule only approves vacations of 1 day in duration, requiring all other leave requests to be manually approved. Ideally we would like to approve holidays, of varying duration, as long as sufficient notice has been given, for example:
Approve vacations if 1 day in duration and its start date is two weeks or more in the future
Approve if for 2-3 days and more than 30 days in the future
Approve if 5 days or less and more than 60 days in the future
Approve if 10 days or less and more than 120 days in the future
To write these rules, we will need to calculate the duration of the leave period as well as calculate how long it is before the start date. Out of the box the rule engine doesn't provide functionality for this, but the Rule Author allows us to write our own functions to do exactly this. For our purpose we want to create two functions:
leaveDuration:It returns the number of days between the start and end date, excluding weekendsstartsIn:It returns the number of days before the specifiedstartDate
These functions are very similar in nature, so we will actually write a base function, durationInDays, which takes 3 parameters. The startDate and endDate of the period to be calculated, as well a Boolean includeWeekends, to control whether weekends are to be counted.
Each of the functions will take arguments which hold dates, if you examine the TLeaveRequest fact that the Rule Author created when we imported out XML Schema, you will see that those elements of type xsd:Date are mapped to properties of type java.util.Calendar. So our functions should take arguments of this type.
Rules Author allows you to create facts based on Java objects; however before you can do this you need to import them as Java Facts. The process for this is similar to the one we followed earlier to import XML Facts.
Select the Definitions tab within Rule Author and then under the Fact folder click on the JavaFact branch. This will list all Java facts currently defined. If you click on Create, it will take you to the class selector page, listing the top level hierarchy of all the classes on the class path, as shown in the following screenshot:
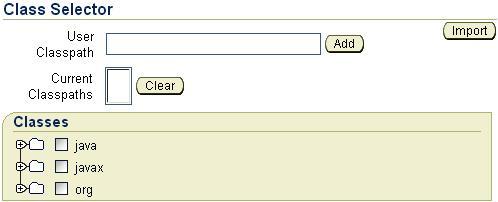
Click on the + symbol to expand the relevant nodes; for our example, expand the java node, then the util node and then select the Calendar class. Once selected, click Import and this class will be added to your list of Java facts. Once imported, the classes and their methods will be available to the Rule Author as facts.
By default the Rule Author has visibility of classes in the java, javax, and org packages; if you need a class that is not included within those packages then enter the classpath for the required classes in the User Classpath field and click Add.
We are now ready to create our first function, durationInDays. Within the Definitions tab, select the RLFunctions folder, as highlighted in the following screenshot. This will bring up the RLFunction Summary which lists all the functions currently defined.
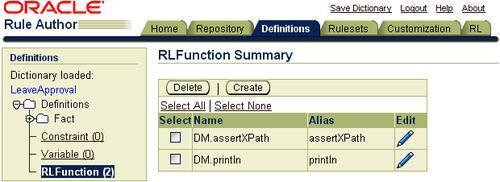
Click Create to bring up the RLFunction editor page as shown:
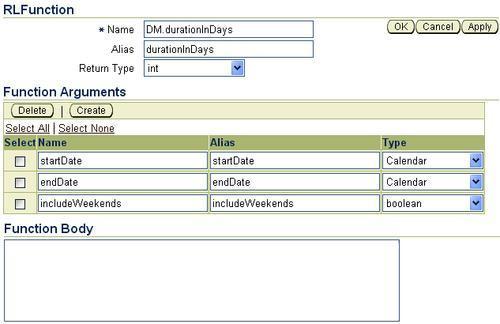
First give the function a name, for example DM.durationInDays, plus a corresponding alias and from the drop-down list select the Return Type of the function, which is int in our case.
Next we need to specify the arguments we wish to pass to our function; select Create and this will add an argument to our list. Here we can specify the argument name (for example startDate), a corresponding alias for it and from the drop down the argument type. At the top of this list will be the Calendar fact that we just imported.
We can then add parameters for endDate, and includeWeekends as shown in the previous screenshot.
The final step is to implement the business logic of our function; we enter this in the Function Body text box. Defining the function here is painful, since the Rule Author doesn't validate the body of the function. A consequence of this is you won't know if the function is valid until you try to execute it at run time, which if it contains an error will typically result in the rule engine throwing an exception, which is not always easy to debug.
However when implementing a function you are effectively writing a static Java method. Therefore it is more effective to write this using JDeveloper, where we can then use the development tools to compile, run, and test our function. Once we are satisfied that the function performs as expected we can cut and paste the function body from JDeveloper into the Rule Author.
When using this approach you need to allow for the restriction that you can't use the Java import statement within an RLFunction (in the same way you can't import within the body of a Java method). This means whenever you reference a Java Class you need to prefix it with its package name, for example when we use the Calendar class within our function we always have to specify java.util.Calendar.
So the durationInDays function implemented in Java looks as follows:

We can then just cut and paste this straight from JDeveloper into the Rule Author and click OK to create our function.
To implement the other two functions leaveDuration and startsIn we follow the same approach.
The final step is to invoke the functions as required from our rule set. Before writing the additional rules for vacation of less than 3, 5, and 10 days respectively, we will update our first rule OneDayVacation to use these new functions.
Go back to the Rulesets tab and click on the OneDayVacation branch within the LeaveApprovalRules and then click on the pencil icon for the If part of the rule. This will bring us back to the Pattern Definition window for the rule.
Previously, when we defined our test for a pattern we defined a Standard Test. With this approach the Rule Author lets us define one or more simple tests. Each simple test allows us to compare one variable with either another variable or a fixed value, and for the pattern to evaluate to true all simple tests must evaluate to true.
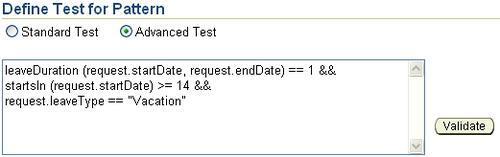
However, if we want to define more complex expressions or use functions, then we need to define this as an Advanced Test. When Advanced Test is selected, rather than enter every test as a single row within the pattern, Rule Author presents a single free format text entry box where we can directly enter the test pattern.
If when selecting Advanced Test we already have a simple test defined, Rule Author will automatically convert its free format equivalent, as shown in the following screenshot:
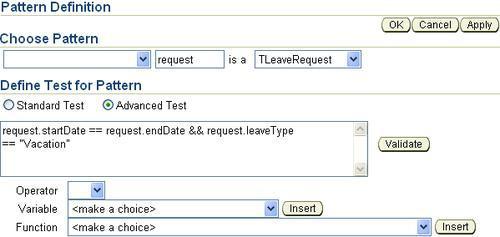
Below the Advanced Test text entry box are three drop downs: Operator, Variable, and Function, which we can use to help build the expression. For example, to modify our test, first of all delete the comparison request.startDate == request.endDate. Next from the Function drop select the leaveDuration function and click Insert, as shown in the following screenshot:
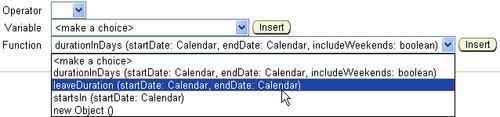
This will insert leaveDuration (startDate: Calendar, endDate: Calendar) at the current cursor location within the test text box. We then need to modify the parameters to pass in the actual request.startDate and request.endDate.
We can either enter this manually, or use the Variable drop down to insert the required variables in a similar fashion to the Function drop down.
We can then repeat these steps to apply the startsIn function to test that the start date for the leave request is two or more weeks away. Once completed our test pattern for approving a 1 day vacation should look as follows:
Once we have completed our test pattern, we can click Validate just to check that its syntax is correct.
Having completed this test, we can define similar approval rules for vacations of less than 3, 5, and 10 days respectively.
When completed, save your dictionary and rerun the leave approval process; you should now see that vacations which match our leave approval rules are automatically approved.
Business rules are a key component of any application. Traditionally these rules are buried deep within the code of an application, making them very difficult to change.
Yet in a typical application it is the business rules which change most frequently; by separating these out as a specialized service it allows us to change these rules without having to modify the overall application.
In this chapter we have looked at how we can use the Oracle Business Rules engine to implement such rules, and how we can invoke these from within BPEL as a decision service.
It's worth noting that you are not restricted to calling these rules from just BPEL, the rules engine comes with a Java API that allows it to be easily invoked from any Java application or alternatively you can expose the rules as web services which can then be invoked from any web service client.
Finally, while in this chapter we have only looked at very simple rules, the Oracle Business Rules Engine implements the industry standard Rete Algorithm, making it ideal for evaluating a large number of interdependent rules and facts. We will examine some of these capabilities in more detail in Chapter 16 — Using Business Rules to Implement Services.