
In every business process, messages are exchanged between participants. So far we have only looked at simple interactions, that is a single request followed by a reply, whether synchronous or asynchronous.
Asynchronous messaging adds additional complexities around the routing and correlation of replies. In this chapter, we will look at how BPEL PM uses WS-Addressing to manage this and in situations where this can't be used, examine how we can use correlation sets in BPEL to achieve the same result.
As part of this we look at some common, but more complex, messaging patterns and requirements; such as:
How we can handle multiple exchanges of messages, either synchronous or asynchronous between two participants.
How BPEL can be used to aggregate messages from multiple sources.
And though not strictly a message interaction pattern, examine one technique for process scheduling.
Finally, as we explore these patterns, we take the opportunity to cover some of BPEL's more advanced features, including FlowN, Pick, and Dynamic Partner Links.
A key requirement in any message exchange is to ensure that messages are routed to the appropriate service endpoint. Initial web service implementations were built using SOAP over HTTP, primarily because HTTP is well understood and is able to leverage the existing Internet infrastructure.
However, one of the limitations of HTTP is that it is stateless in nature, and thus provides no support for conversations requiring the exchange of multiple messages. With synchronous interactions this is not an issue, because the response message for a particular request can be returned in the HTTP response.
However, with asynchronous interactions this is a more serious limitation. To understand why, look at the diagram below. The diagram shows a simple asynchronous interaction between two processes, A and B. In this case the interaction is started by process A initiating process B, which does some work before sending a response back to process A.
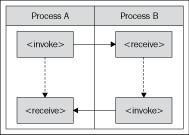
This all looks pretty straightforward, until you consider how it actually works. The first thing to note is that this consists of two operations, one for the initial invocation, the other for the response. Each operation (or message) is sent as separate HTTP POST (with the HTTP response being empty).
When we invoke an operation on a BPEL process, the BPEL engine will either invoke a new process to handle it, as with the initial request, or route it through to the appropriate instance of an already running process.
This is where the complexity comes in. While this example shows Process A invoking Process B, it could potentially be invoked from multiple clients, for example another process or an external client, so how does Process B know the service endpoint it needs to invoke for the call back?
Secondly, assuming we have multiple instances of Process A and B running at the same time; once we have routed the message to the correct service endpoint, how does the BPEL engine know which instance of the Process A to route the response from Process B to?
To solve these issues, the BPEL engine makes use of WS-Addressing, which provides a standardized way of including all the addressing specific information as SOAP headers within a SOAP message.
To demonstrate how WS-Addressing achieves this, let us look at the WS-Addressing headers BPEL PM inserts into our request and response messages in the previous example.
The initial request sent by BPEL PM with WS-Addressing headers inserted looks something like the following:
<env:Envelope xmlns:env="http://www.w3.org/2003/05/soap-envelope"
xmlns:wsa="http://schemas.xmlsoap.org/ws/2003/03/addressing"
xmlns:ptns="http://xmlns.oracle.com/ProcessA">
<env:Header>

<wsa:ReplyTo>
<wsa:Address>http://hostname:80/orabpel/default/ProcessA/1.0/
ProcessB/ProcessBRequester</wsa:Address>
<PortType>ptns:ProcessBCallback</PortType>
<ServiceName>ptns:ProcessBCallbackService</ServiceName>
</wsa:ReplyTo>
<wsa:MessageID>uuid://hostname/ProcessA/aaaaaaaa</wsa:MessageID>

</env:Header>
<env:Body>
...
</env:Body>
</env:Envelope>
From this we can see that we have two additional elements present in the SOAP header. The first element, wsa:ReplyTo contains the wsa:Address element which specifies the endpoint that Process B should send its asynchronous response to. Secondly, it contains the property wsa:MessageId which uniquely identifies the conversation, which as we will see in a moment is used to correlate the response message to the original requestor.
When sending our response message, the response will be sent to the address specified in the wsa:ReplyTo endpoint reference. In addition, if we look at the message below, we can see that it contains the property <wsa:RelatesTo> which contains the message ID specified in the original message.
It's this value that enables the endpoint to correlate the response back to the original request. In our case this enables the BPEL engine to route the response from Process B back to the instance of Process A which sent the original request.
In the above example, it's quite feasible for Process A and Process B to send multiple messages to each other; any further exchange of messages between the two process instances will just contain the same <wsa:RelatesTo> property within the SOAP header.
For example, after receiving a response from Process B, Process A sends a second request to process B. Instead of re-sending the wsa:ReplyTo element and a new wsa:MessageId, it will just include the <wsa:RelatesTo> element containing the original message ID.
This provides sufficient information for BPEL PM to route the request through to the correct instance of Process B; if Process B then needs to send a second response to Process A it will just use the address specified in the wsa:ReplyTo element contained in the first request message and embed the <wsa:RelatesTo> property as before.
For situations where WS-Addressing isn't appropriate or available, BPEL provides the concept of correlation sets. Essentially correlation sets allow you to use one or more fields present in the body of all correlated messages (for example, orderId) to act as a pseudo-conversation ID (equivalent to the <wsa:MessageID> and <wsa:RelatesTo> properties in WS-Addressing).
A correlation set consists of one more properties; these properties are then mapped using property aliases to the corresponding field in each of the messages that are being exchanged. The combined value of these properties at run time should result in a unique value (as least unique across all instances of the same process), that allows the BPEL engine to route the message to the appropriate instance of a process.
A common requirement is for a client to make multiple invocations against the same instance of a process. The first is pretty much the same as a standard synchronous or asynchronous request, but all subsequent requests are subtly different as we now need to route the request through to the appropriate instance of an already running process rather than initiate a new instance.
Take the UserRegistration process; this is a long running process which needs to handle multiple synchronous requests during its lifecycle. The first operation submitUserRegistration is called by the client to initiate the process, which validates all the provided user information and returns a confirmation of success or otherwise.
The only information that is not validated at this stage is the email address; for this the process sends an email to the provided address containing a unique token which the user can use to confirm their address.
Once they have received the email they can launch their browser and submit the token. The web client will then invoke the confirmEmailAddress operation. It's at this point we need to use correlation sets to route this request to the appropriate instance of the UserRegistration process.
The first step is to choose a unique field that could act as a property. One such approach would be to use the userId specified by the user. However, for our purposes we want to use a value that the user will only have access to once they have received their confirmation email, so will use the token contained in the email.
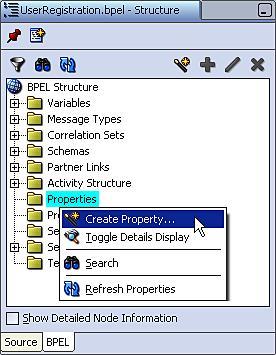
To create a property, within the Structure view for the BPEL process, right-click on the Properties folder and select Create Property... as shown in the following screenshot:
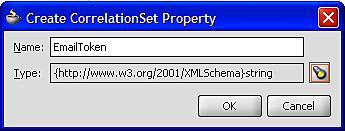
This will launch the Create CorrelationSet Property window. Give the property a meaningful name, such as EmailToken and then click the flashlight to launch the Type Chooser and select the appropriate schema type (for example, xsd:string) as shown in the following screenshot:
Once we've defined our Correlation Set Property(s), the next step is to define the Correlation Set itself.
Correlation Sets can be defined either at the process level or for a particular scope. In most cases the process level will suffice, but if you need to have multiple correlated conversations within the same process instance, for example, iterations through a while loop, then define the Correlation Set at scope level.
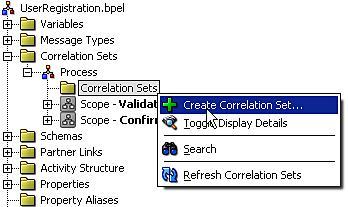
Within the BPEL Structure view expand the Correlation Sets folder, and then the Process folder, and right-click on the Correlation Sets folder and from the menu select Create Correlation Set... as shown in the following screenshot:
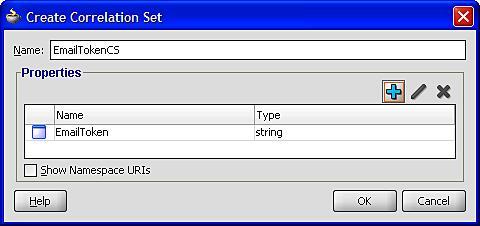
This will launch the Create Correlation Set window displayed in the following screenshot. Give the correlation set a meaningful name, such as EmailTokenCS in our case, and then select the + symbol to add one or more properties to the correlation set. This will bring up the Property Chooser where you can select any previously defined properties.
Next we need to specify which messages we wish to route with our correlation set. For our purposes we want to use the Correlation Set to route the inbound message for the operation confirmEmailAddress to the appropriate process instance.
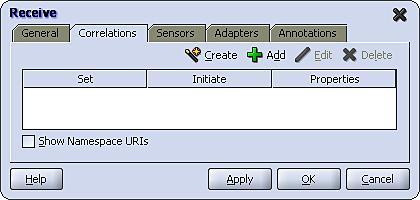
To configure this, double-click the receive activity for this operation to open the Receive activity window and select the Correlations tab as shown:
Next select the + symbol; this will launch the Correlation Set Chooser as shown in the following screenshot:

From here we can select the EmailTokenCS we defined previously. Click OK and this will return us to the Correlations tab, showing the newly added correlation.
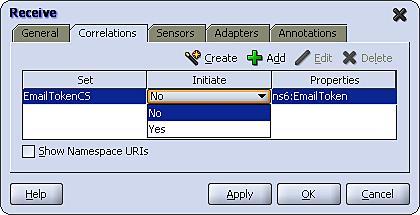
We can see here that we have to specify one additional property Initiate. This is used to specify which message should be used to initiate the correlation set.
As you would expect, the value of the property(s) contained in the first message exchanged in any sequence of correlated messages must be used to initiate the value of each property contained within the correlation set.
However, rather than implicitly initialize the correlation set based on the first message exchange, BPEL expects you to explicitly define which message activity should be the first in the sequence by setting the Initiate property to Yes.
Note
If we try to initialize an already initialized correlation set, or try to use a correlation set that isn't initialized, then a run-time exception will be thrown by the BPEL engine. Likewise, once initialized, the value of these properties must be identical in all subsequent messages sent as part of the sequence of correlated messages, or again the BPEL engine will throw an exception.
When initializing a correlation set, any outbound message can be used to achieve this. However, there are practical restrictions on which inbound messages can be used to initiate a correlation set, since the process must first receive the inbound message before it can use it to initialize a correlation set.
Essentially, if an inbound message is used to create a new instance of a process, or is routed through to the process by another mechanism (for example, a different correlation set) then it can be used for the purpose of initiating our correlation set.
In our case, we are using the correlation set to route the inbound message for the confirmEmailAddress operation through to an already running process instance, so we need to initialize the correlation set in an earlier message. We can do this within the invoke activity for the sub-processs validateEmailAddress.
We define a correlation set for an Invoke activity as we would for any message based activity, that is, we open its properties window and select the Correlations tab as shown in the following screenshot:
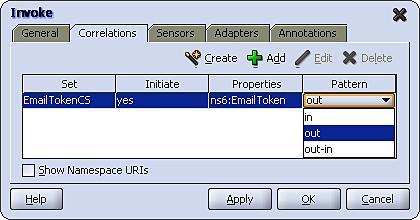
However, you may notice that when creating a correlation for an Invoke activity, we are required to set the additional attribute Pattern. This is because, unlike any other message activity, Invoke can consist of two messages, the initial outbound request, and an optional corresponding inbound response. The pattern attribute is used to specify to which message the Correlation Set should be applied; that is, out for the outbound request, in for the inbound response and out-in for both.
Since validateEmailAddress is a one-way operation, we need to set the Pattern attribute to out.
Note that if you choose to initiate the correlation with an out-in pattern, then the outbound request is used to initiate the Correlation Set.
Once the messages to be exchanged as part of our Correlation Set have been defined, the final step is to map the properties used by the Correlation Set, to the corresponding fields in each of the messages exchanged.
To do this, we need to create a property alias for every Message Type exchanged that is, i.e. validateEmailAddress and confirmEmailAddress in our User Registration example.
To create an alias, within the Structure view for the BPEL process, right-click on the Property Aliases folder and select Create Property, this will launch the Create Property Alias window, as shown:
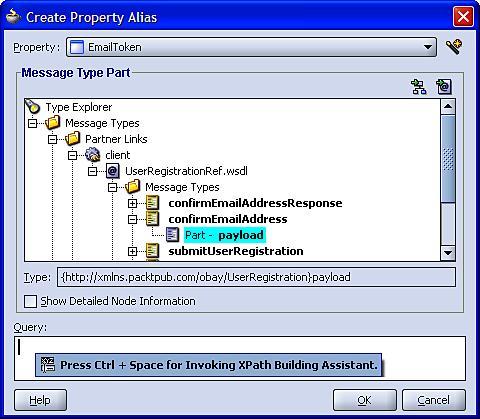
In the Property drop down, select the property that you wish to define the alias for and then using the Type Explorer navigate through the Message Types, Partner Links down to the relevant Message Type and Part that you want to map the property to.
This will activate the Query field, where we specify the XPath for the field containing the property in the specified message type. Rather than type it all by hand, press Ctrl + Space to use the XPath Building Assistant.
Once we have defined an alias for each of the messages exchanged within our correlation set, we can view them within the Structure view of the BPEL process as shown in the following screenshot:
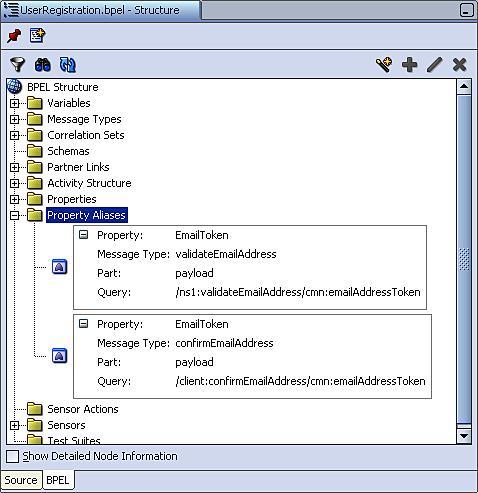
This completes the definition of our Correlation Set.
Note
A BPEL process can define multiple Correlation Sets, and messages exchanged within a BPEL process can be exchanged in zero, one, or more correlation sets. When a message is involved in multiple Correlation Sets, it can be the same or different fields that are mapped to a corresponding property. You will of course require a separate property alias for each correlation set.
A typical messaging requirement is to aggregate multiple related messages for processing within a single BPEL process instance. Messages are aggregated using a common correlation Id, in much the same way as we covered above.
The other challenge is to determine when we have all the messages that belong to the aggregation. Typically, most use cases fall into two broad patterns:
Fixed Duration: In this scenario we don't know how many messages we expect to receive, so will process all those received within a specified period of time.
Wait For All: In this scenario we know how many messages we expect to receive; once they have been received we can then process them as an aggregated message. It's usual to combine this with a timeout in case some messages aren't received so that the process doesn't wait forever.
An example of the first pattern is the oBay auction process. Here, during the period for which the auction is in progress, we need to route zero or more bids from various sources to the appropriate instance of the auction. Then once the auction has finished, select the highest bid as the winner. The outline of the process is shown on the next page.
From this, we can see that the process supports two asynchronous operations, each with a corresponding callback, namely:
initateAuction:This operation is used to instantiate the auction process. Once started, the auction will run for a preset period until completing and then invoke the callbackreturnAuctionResult, to return the result of the auction to the client which initiated the auction.submitBid:This operation is used to submit a bid to the auction. The operation is responsible for checking each bid to see if we have a new highest bid, and if so updates the current bid price appropriately, before returning the result of the bid to the client. The process then loops back round to process the next bid.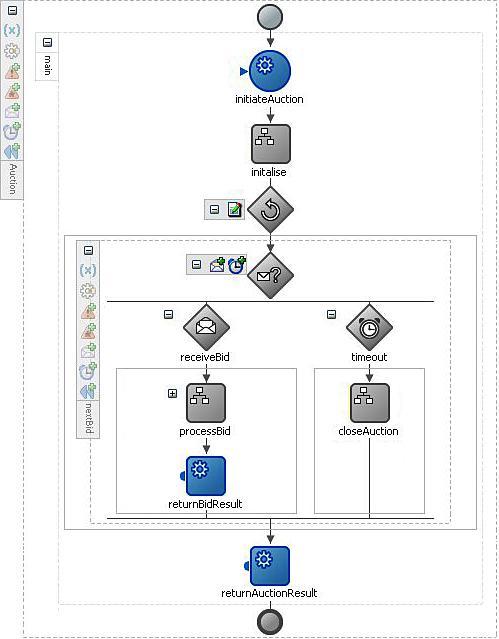
The first task for the aggregator is to route bids through to the appropriate instance of the auction process. As with our earlier UserRegistration example, we can use a correlation set to route messages to the appropriate instance. In this example, we will create a correlation set based on the element auctionId, which is included in the message payload for initateAuction and submitBid.
At first glance this looks pretty straightforward, as we can use correlation sets for aggregation in much the same way as we have already covered. However, this scenario presents us with an additional complexity, which is that a single instance of a BPEL process may receive multiple messages of the same type at approximately the same time.
To manage this we need to implement a queuing mechanism, so that we can process each bid in turn before moving onto the next. This is achieved by implementing the interaction between the client submitting the bid and the auction process as asynchronous.
Note
With asynchronous operations, BPEL saves received messages to the BPEL delivery queue. The delivery service then handles the processing of these messages, either instantiating a new process or correlating the message to a waiting, receive, or onMessage activity in an already running process instance.
If a process is not ready to receive a message, then the message will remain in the queue until the process is ready.
This introduces a number of complexities over our previous correlation example. This is because a BPEL process can only support one inbound Partner Link (for example, client), for which the BPEL engine generates a corresponding concrete WSDL which defines all operations that can be invoked against that BPEL process (as well as any corresponding callbacks).
When BPEL generates the WSDL it includes the appropriate WS-Addressing header definitions for each of the operations. However, only operations which are used to instantiate a process, that is, initiateAuction in the case of the auction process, include WS-Addressing headers to hold the reply to address and message ID.
The first complexity this causes is that whenever a client submits a request to the auction process via the submitBid operation, it doesn't include a message ID, so we can't use WS-Addressing to correlate the response of the auction process back to the client.
At first, the obvious answer might appear to be just to use the auctionId to correlate the result of the bid back to the client. However, while the auctionId allows us to uniquely identify a single instance of an auction, it doesn't allow us to uniquely identify a bidder. This at first may seem strange, but recall we may have several clients calling the auction process at the same time, and thus all waiting for a response. We need to ensure that each response is returned to the appropriate instance.
Thus the calling client will need to pass a unique key in the submitBid request message (for example, bidId) that the auction process can include in the response. Assuming we are using BPEL to implement the client, we then need to implement a correlation set based on this property in the calling process, so that the BPEL engine can route the response to the appropriate instance of the client process.
The second complexity is that whenever a client submits a request to the auction process via the submitBid operation, it doesn't include a replyToAddress within the SOAP header.
As a result the BPEL engine doesn't know which address to send the reply to; or rather it will attempt to send the reply to the process which initiated the auction. It was this request which contained the wsa:ReplyTo header specifying the callback endpoint for the client Partner Link.
This highlights the other issue, namely our auction process supports two callbacks, one to return the auction result and the other to return the bid result. Yet the replyToAddress on the Partner Link is being fixed with the initial invocation of the process, forcing both callbacks to be routed to the same endpoint, which is not what we want.
At this point, you may be thinking that this all may be too complex. However, the solution is rather straightforward and that is to use a proxy process, which supports the same operations as the auction process.
With this approach the client invokes either the initateAuction or submitBid operation on the proxy, which then forwards the request to the auction process. The auction process then returns the result to the proxy, which then returns it to the original client.
This not only solves the problem of having a fixed reply to address, but has the additional benefit of shielding the client from having to use Correlation Sets, as it can use WS-Addressing to communicate with the proxy.
Our proxy process needs to support both operations, initateAuction and submitBid, that is, either operation can be used to initiate an instance of the proxy process. To achieve this, we will use the <pick> activity at the start of our process, in place of a <receive> activity.
A pick activity is similar to a receive activity; the difference being that with a pick activity you can specify the process waits for one of a set of events, events can either be the receipt of a message or an alarm event (which we look at later in this chapter).
Each message is specified in a separate <onMessage> branch, each branch containing one or more activities to be executed on receipt of the corresponding message. To use a pick activity, drag a <pick> activity from the Process Activities list of the Component Pallet on to your process.
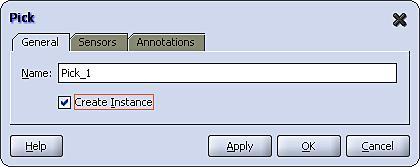
As the pick activity is used to receive the initial message which starts the process, we need to set the createInstance attribute on the activity. To do this, double-click the pick activity to open the Pick activity window as shown below, and select the Create Instance checkbox.
Next, within the process diagram, click on the + symbol to expand the <pick> activity. By default it will have two branches illustrated as follows:
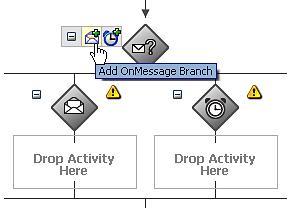
The first branch contains an <onMessage> component, with a corresponding area where you can drop a sequence of one or more activities that will be executed if the corresponding message is received.
The second branch contains an <onAlarm> sub-activity, with a corresponding area for activities. It doesn't make sense to have this as part of the initial activity in a process, so right-click on the onAlarm sub-activity and select delete to remove it
We require two OnMessage branches, one for each operation that the process supports. For this, click on the Add OnMessage Branch icon (highlighted in the previous diagram) to add another <onMessage> branch.
The next step is to configure the onMessage branch. Double-click on the first branch to open the OnMessage Branch activity window as shown in the following screenshot:
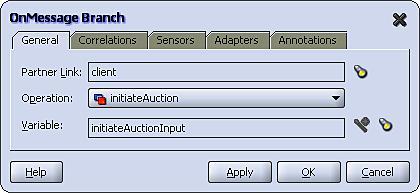
As we can see an OnMessage Branch is configured in a similar fashion to a Receive activity. For the purpose of our proxy, we will configure the first onMessage branch to support the initateAuction operation (as shown in the previous screenshot) and the second onMessage branch to support the submitBid operation.
Each branch will just contain an invoke and receive activity to call the corresponding operation provided by the auction process, and a final invoke activity to return the result of the operation to the caller of the process.
For our proxy process we need to define a Correlation Set for the submitBid operation, to ensure that replies from the Auction process are routed through to the correct instance of the AuctionProxy process.
As mentioned earlier, this requires us to include a unique bidId within the submitBid message. To generate this we can use the XPath function generateGUID, which is available under the category BPEL XPath Extension Function within the expression builder.
Note, we don't need to define a correlation set for the initateAuction operation, as the corresponding operation on the auction process is still using WS-Addressing.
All that remains is to add in the logic that enables the process to determine when the aggregation is complete. For a scenario where we know how many messages we expect, every time we receive a message we just need to check whether there are any outstanding messages and proceed accordingly.
However, for scenarios where we are waiting for a fixed duration, as is the case with our auction process, it's slightly trickier. The challenge is that for the period over which the auction is running, the process will spend most of its time in a paused state, waiting for the receive activity to return details of the next bid.
So the only opportunity we have within the logic of our process to check whether the duration has expired is after the receipt of a bid, which may arrive long after the auction has completed or not at all (since the auction has theoretically finished).
Ideally what we want to do is place a timeout on the Receive activity, so that it either receives the next bid or times out on completion of the auction, whichever occurs first.
Fortunately, this can be easily accomplished by replacing the Receive activity for the submitBid operation with a Pick activity. The Pick would contain two branches: an onMessage branch configured in an identical fashion to the Receive activity and an onAlarm branch configured to trigger once the finish time for the auction has been reached.
To configure the onAlarm branch, double-click on it to open the OnAlarm Branch activity window as shown in the following screenshot:
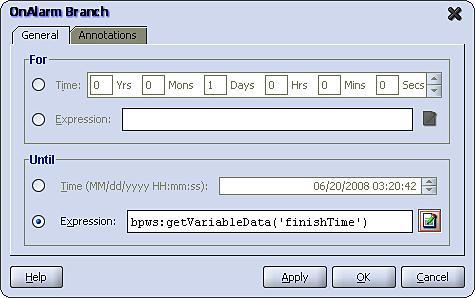
We can see that an OnAlarm branch is configured in a similar fashion to a Wait activity in that we can specify the Pick waits For a specified duration of time or Until a specified deadline. In either case you specify a fixed value or specify an XPath expression to calculate the value at run time.
For our purposes we have pre-calculated the finish time for the auction based on its start time and duration, and have configured the Pick activity to wait until this time.
When triggered, the process will execute the activities contained in the OnAlarm branch and will then move onto the activity following the Pick. In the case of our auction process, the branch contains just a single activity which sets the flag auctionComplete to true, causing the process to exit the while loop containing the Pick activity. Upon exiting the loop, the process calculates and returns the auction result before completing.
A common requirement is to schedule a process or service to run at regular intervals. For example, the oBay accountBilling process is required to be run once every night. One approach would be to use a scheduling tool; there are a number of tools available for this, including:
Quartz: This is an open-source, Java-based scheduler. The advantage of Quartz is that it is already used internally by the BPEL engine for scheduling, so is available to use as part of the SOA Suite platform. However, this approach requires knowledge of the API as well as Java.
Oracle Database Job Scheduler: Provided as part of the Oracle Database, such as Quartz. It is available regardless of which platform you are running the SOA Suite on (assuming you are using Oracle as the backend database). However, it requires knowledge of PL/SQL.
While these are all perfectly valid approaches, they all require knowledge of components outside the SOA suite; an alternate approach is to use BPEL to implement the scheduler.
One approach is to implement a BPEL process which continuously loops, with the sole purpose of launching other scheduled BPEL processes. However, as the process never dies, this will result in an ever increasing audit trail, causing the objects persisted in the database as well as the in-memory size of the process to grow over time, which eventually will have a negative impact on the performance of the engine.
A better approach is to have an XML file that specifies a series of one or more services (or jobs) to be scheduled. We can then use the file adapter to read this file and trigger a scheduling process which can invoke each of the scheduled jobs. Once all jobs have been triggered then the scheduling process can be allowed to complete.
The trick with this approach is to re-cycle the scheduling file; that is, in the process of reading the file, the file adapter will move it to an archive directory. To ensure the scheduling process is re-run every day, we need to move the file back into the directory being polled by the adapter. We can do this using the scheduling process.
For our oBay example, we are simply going to create a scheduling process that is run once at the start of the day; the schedule file will then contain details of each job to be run, and at what time during the day. The schema for our scheduling file is as follows:
<?xml version="1.0" encoding="utf-8"?>
<xsd:schema xmlns:xsd="http://www.w3.org/2001/XMLSchema"
xmlns="http://xmlns.packtpub.com/obay/xsd/sch"
targetNamespace="http://xmlns.packtpub.com/obay/xsd/sch"
elementFormDefault="qualified" >
<xsd:element name="schedule" type="tSchedule"/>
<xsd:element name="job" type="tJob"/>
<xsd:complexType name="tSchedule">
<xsd:sequence>
<xsd:element name="startTime" type="xsd:time"/>
<xsd:element ref="job" minOccurs="1"
maxOccurs="unbounded"/>
</xsd:sequence>
</xsd:complexType>

<xsd:complexType name="tJob">
<xsd:sequence>
<xsd:element name="endpoint" type="xsd:string" />
<xsd:element name="startTime" type="xsd:time"/>
<xsd:element name="jobDetail" type="xsd:anyType"/>
</xsd:sequence>
</xsd:complexType>

</xsd:schema>
The bulk of the schedule file is made up by the Job element; with each schedule file containing one or more jobs. The job elements contains three elements:
endpoint:Defines the endpoint of the service to invoke.startTime:Defines the time that the service should be invoked.jobDetail:Defined asxsd:anyType; is used to hold details specific to the service being invoked.
For the purpose of our accountBilling process our schedule file looks as follows:
<?xml version="1.0" encoding="UTF-8" ?>
<schedule xmlns="http://xmlns.packtpub.com/obay/xsd/sch">
<startTime>0:2:55.125</startTime>
<job>
<endpoint>
http://localhost:80/orabpel/obay/accountBilling/1.0/
</endpoint>
<startTime>T02:00:00</startTime>
<jobDetail>
</jobDetail>
</job>
</schedule>
To ensure that our schedule process supports the concurrent execution of jobs, we need to process them in parallel. If the number of branches/jobs was fixed at design time, we could use the <flow> activity to achieve this.
For our scenario, the number of branches will be determined by the number of jobs defined in our scheduling file. For cases such as these we can use the <flowN> activity; this will create N branches, where N is calculated at run time.
Each branch performs the same activities and has access to the same global data, but is assigned an index number from 1 to N to allow it to look up the data specific to that branch.
To use a FlowN activity, drag a <flowN> activity from the Process Activities list of the Component Pallet on to your process. Double-click on it to open the FlowN activity window as shown in the following figure:
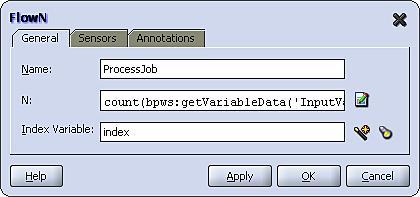
In addition to the activity Name, it takes two parameters. The first parameter is N which contains an XPath expression used at run time to calculate the number of parallel branches required. This typically uses the count function to count the number of nodes in a variable. In our case, we need to calculate the number of job elements, so our expression is defined as follows:
count(bpws:getVariableData('InputVariable','schedule', '/sch:schedule/sch:job'))
The second parameter, Index Variable, is used to specify the variable into which the index value will be placed at run time. While we have defined this as a global variable, each branch will be given its own local copy of the variable containing its assigned index number.
The first step within the flowN branch is to get a local copy of the data that is to be processed by that specific branch, that is, the Job in our case.
Before we do this we need to ensure that we are working with local variables, otherwise each branch in the flowN will update the same process variables. The simplest way to achieve this is to drop a scope (which we've named ProcessJob) as the activity within the flowN branch, and to then define any branch specific variables at the scope level and perform all branch specific activities within the scope.
In this case, we have created a single variable JobInputVariable of type Job, which we need to populate with the job element to be processed by the flowN branch. To do this, we need to create an XPath expression that contains a predicate to select the required job based on its position with the node set, in effect doing the equivalent of an array lookup in a language such as Java.
The simplest way to achieve this is to create a standard copy operation, as shown in the following screenshot:
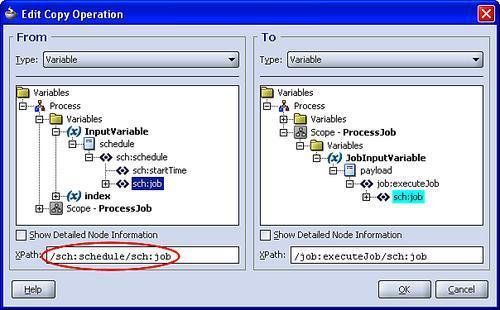
Next we need to modify the From XPath expression (circled in the previous screenshot) so that we only select the required job based on the value of the index. To do this, modify the XPath to add a position based predicate based on the index, to obtain an expression that looks something like the following:
/sch:schedule/sch:job [bpws:getVariableData('index')]
The next step within our branch is to use a Wait activity to pause the branch until the startTime for the specified job.
The final step within our branch is to call the service as defined by the endpoint in the Job element. Up to now we've only dealt in BPEL with static Partner Links, where the endpoint of a service is defined as design time.
However, BPEL also provides support for dynamic Partner Links, where we can override the endpoint specified at design time, with a value specified at run time.
While we can override the endpoint for a partner link, all other attributes of our service definition remain fixed. So to use this approach we must define a common interface that all of our Job services will implement. For our purpose we've defined the following abstract WSDL:
<?xml version="1.0" encoding="UTF-8"?>
<definitions name="Job">
<types>
<schema>
<import namespace="http://xmlns.packtpub.com/obay/xsd/sch"
schemaLocation="../schedule.xsd"/>
<element name="executeJob" type="client:tExecuteJob"/>
 <complexType name="tExecuteJob">
<sequence>
<element ref="sch:Job"/>
</sequence>
</complexType>

</schema>
</types>
<message name="executeJob">
<part name="payload" element="tns:executeJob"/>
</message>
<portType name="Job">
<operation name="executeJob">
<input message="tns:executeJob"/>
</operation>
</portType>
<plnk:partnerLinkType name="Job_PL">
<plnk:role name="Job_Role">
<plnk:portType name="tns:Job"/>
</plnk:role>
</plnk:partnerLinkType>
</definitions>
Examining this, we can see that we've defined a simple one-way operation ( executeJob) that our scheduling process will invoke to initiate our job. For simplicity, we have defined the content of the input message to be that of the job element that we used in our scheduling file.
Before we can define a Job Partner Link within our Schedule process, we need a WSDL file complete with bindings. The simplest way to do this is to deploy a default process that implements our abstract WSDL. To do this, create a BPEL process (such as JobService) based on our predefined WSDL contract (as described in Chapter 10). The process just needs to contain a simple Receive activity as it should never be called.
Note that for any other service that we wish to invoke as a job, we will need to create a process based on our abstract WSDL, and then once created implement the process as required to carry out the job.
Once we've deployed our default JobService process we can create a Partner Link and invoke it within our scheduler process just as would any other service.
To dynamically invoke the appropriate endpoint at run time we need to update the endpoint reference before invoking the service. To do this, we need to create variable of type EndPointReference (as defined by WS-Addressing) containing just the
<Address>
element and populate this with the endpoint of the Job service that we want to invoke.
This is important, because if we create an EndpointReference containing any of the other optional elements, then if we try to invoke the Partner Link, the BPEL engine will throw a fault.
Note
To create a variable of type EndpointReference, you will need to import the WS-Addressing schema (located at http://<host>:<port>/orabpel/xmllib/ws-addressing.xsd).
To populate the address element, use a transformation activity rather than an assign activity, as shown in the following screenshot:
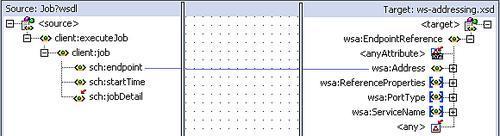
If we use an assign too directly to populate the <Address> element, then BPEL by default would create an initialized <EndpointReference> element containing all the other optional elements (each with an empty value).
Finally, we use another copy rule to dynamically set the partner link. The key difference here is that the target of the copy rule is the JobService PartnerLink, as shown in the following screenshot:
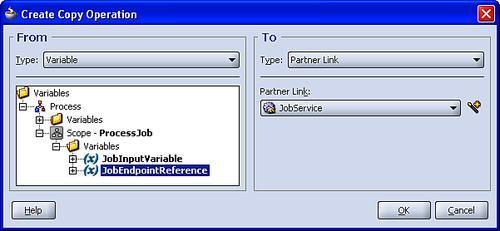
Now when we invoke the JobService via the Partner Link it will dynamically route the request to the updated endpoint.
As we've already covered, the scheduling process is triggered by the file adapter reading in the schedule.xml file. As part of this activity, the file adapter will move it to an archive directory, to ensure that the file is processed just once.
However, in our case we actually want the file adapter to process the scheduling file on a daily basis. To do this we need to move the file back into the directory being polled by the adapter.
For the purpose of this we have defined the following two directories:
<SOA_HOME>/scheduler/config
<SOA_HOME>/scheduler/execute
When creating our scheduling process, we have configured the file adapter to poll the execute directory on a regular basis (for example, every five minutes), and archive processed files to the config directory.
When the schedule.xml file is placed into the execute directory for the first time, this will trigger file adapter to pick up the file and launch the scheduler process, and at the same time move the schedule file into the config directory.
Within the scheduler process, we then invoke the file adapter to move the schedule.xml file from the config directory back to the execute directory (see Chapter 3 — Service Enabling Existing Systems for details on how to do this). However, rather than invoke the moveFile operation immediately, we have placed a wait activity in front of it that waits until the startTime defined at the head of the schedule file, as shown:
<?xml version="1.0" encoding="UTF-8" ?>
<schedule xmlns="http://xmlns.packtpub.com/obay/xsd/sch">
<startTime>0:2:55.125</startTime>
<job>
...
</job>
</schedule>
This has a couple of advantages, the first is we use the schedule.xml file to control when the scheduling process is run, as opposed to configuring the file adapter to poll the execute directory once every 24 hours and then deploy the process at the right time to start the clock counting.
The other advantage is that most of the time the schedule.xml file resides in the config directory. Thus, while the file is in this directory we can go in and modify the schedule to add new jobs or update and delete existing jobs, which will then be picked up the next time the scheduler is executed.
In this chapter, we have looked at the more advanced messaging constructs supported by the Oracle BPEL PM. We have also seen how we can use this to support some of the more complex but relatively common message interaction patterns used in a typical SOA deployment.
We have also used this as an opportunity to introduce some of the more advanced BPEL activities and features such as the Pick and FlowN activity as well as Dynamic Partner Links.
We have not covered every possible pattern. Yet, hopefully you should now have a good understanding of how BPEL PM utilizes WS-Addressing and Correlation Sets to support message interactions that go beyond a single synchronous or asynchronous request and reply. You should now be able to apply this understanding to support your particular requirements.