
In this section, we will look at how to package a set of SOA Suite components for deployment in different environments. We will also look at some of the deployment topologies that may be used at run time to provide scalability. We will focus principally on the BPEL Process Manager as this has some of the more complex requirements for mapping of services.
When developing software, we generally use a local development environment to create our SOA artefacts. In some cases this may be entirely on the developers' machine, at other times the developer will have access to a shared development server. In either case there will usually be the need to move the artefacts from the development environment into a test environment and eventually into a production environment.
Within our SOA artefacts we will have references to other artefacts such as service endpoint locations and rule repository locations. In addition the configuration for some components, particularly adapter services will probably be different between environments, for example, database locations and file locations may be different between different locations. We need to have a means of modifying these various environment dependant properties.
Within the development environment we will build many of the artefacts in a thick client design tool such as JDeveloper or Workshop and then deploy directly into the development run-time environment. As we move into test and/or production we do not want our operators to have JDeveloper or other design time environments, we would prefer that they had a set of command line tools and/or web interfaces to deploy components. Often they will be unable to use JDeveloper to deploy because of firewall restrictions.
Web interfaces are handy for rapid deployment of components into a new environment, and they generally make it easy to configure any changes that are required. Web interfaces, however, are not easy to automate and so are not ideal for deployment that must be repeated across multiple stages, such as test, pre-production, and production environments.
Command line interfaces are often a little harder to work with, but have the huge advantage that they are easy to script, making it possible to have a repeatable deployment process. This is important enough for the move from test to production, but becomes even more important when we consider that we may wish to set up a data recovery environment or other multiple environments.
In a well-managed environment the use of deployment scripts is essential to ensuring a consistent way of deploying SOA Suite artefacts across different environments.
Unfortunately the current release of SOA Suite is not consistent in the way in which it packages the different components. Each SOA Suite component such as BPEL or service bus has a different way of packaging its artefacts for deployment. In this section, we will examine each component to see how it is packaged and how best to manage deployment across multiple environments.
An Oracle Service Bus project may be deployed from the Workshop IDE or imported from the service bus console by selecting the System Administration tab and then selecting the Import Resources link. In a similar fashion it is possible to export resources from the service bus console by selecting the Export Resources link.
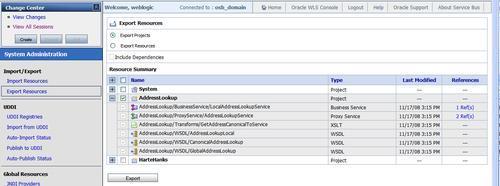
When exporting a project or group of projects from the service bus by clicking on the Export button, the project is exported in a JAR file package called sbconfig.jar by default that may be saved from the browser.
The JAR file generated may be deployed to another service bus domain by importing it, and then editing the project settings to have the correct configuration.
Unlike BPEL there is no concept of versioning in the service bus and so once deployed it is generally easier to maintain the existing deployment rather than replace it completely; however complete projects may be replaced if necessary. Chapter 10 talks about how versioning may be applied in the service bus.
Individual service endpoint locations can be edited directly from within the service bus console. Potentially, every business service may need modifying for the correct environment.
It is also possible to use the WebLogic Scripting Tool(WLST) to migrate projects between environments.
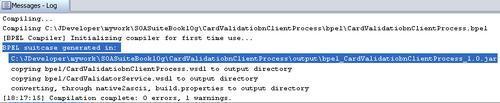
The deployment unit of a BPEL process is the BPEL suitcase. The BPEL suitcase may be deployed to a BPEL Process Manager using the web interface accessed from the Processes tab of the BPEL console. A BPEL suitcase is generated when a BPEL process is compiled, either in JDeveloper or using an Ant task generated by JDeveloper. The location of the BPEL suitcase is displayed in the message log during BPEL compilation; it is usually generated in the $PROJECT_HOME/output directory. When deploying from JDeveloper into BPEL Process Manager the BPEL suitcase is used to transfer all the information required by the process. The same is true whether deploying the suitcase manually through the web interface or through an ant task.
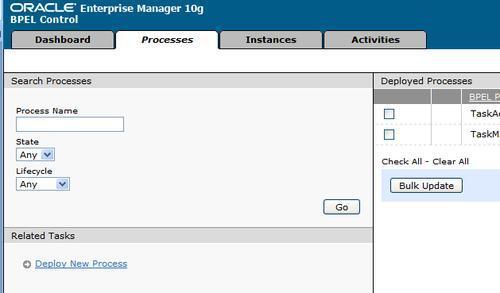
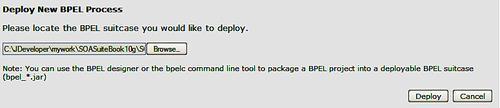
Clicking the Deploy New Process link on the Processes tab of the BPEL Console provides access to the Deploy New BPEL Process screen. Here we can browse for the BPEL suitcase and then deploy it.
Note that some browsers may not properly close the BPEL suitcase after uploading it to the BPEL Process Manager. If this occurs then it will not be possible to regenerate the suitcase with the same version number. To work around this either close and reopen the browser or regenerate to a new version number
After deploying the process we receive a confirmation screen confirming that the process was successfully deployed.

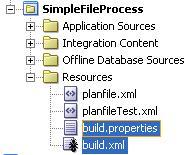
JDeveloper automatically generates an ant script that may be used to deploy BPEL processes from the command line or from within JDeveloper. The script is called build.xml and is found in the Resources section of the JDeveloper project and is located in the top level project folder. This contains all the ant targets required to build and deploy BPEL processes from the command line. Associated with it is a properties file called build.properties that contains property definitions referenced by the build.xml file.
The following ant tasks relating to build and deployment are available:
These three top level tasks are supplemented by a number of lower level tasks. For example:
pre-buildallows additional tasks to be associated with the deploy step; these execute before the process-deploy step. This may be used to check source code out of a source code repository.process-deployvalidates, builds, and deploys the BPEL process and any associated human workflow or rules. It does this by using a number of tasks, all of which are self-explanatory:validateTaskcompiledeployProcessdeployTaskFormdeployDecisionServices
post-buildallows additional tasks to be associated with deploy step; these execute after the process-deploy step.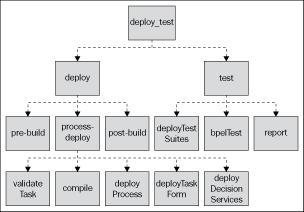
The ant script uses some key properties that may be configured through the build.properties file. Properties that may require changing include:
http.hostnameandhttp.portshould point to the hostname and port number of the BPEL Process Manager server that you wish to deploy to.domainwhich refers to the BPEL domain.revwhich refers to the BPEL process version number.admin.userandadmin.passwordwhich are the credentials used when connecting to the BPEL server.
The ant scripts can be used from the command line, providing a way to automate the process of deployment and so ensuring a consistent way of deploying processes to servers. In the following sections, we will look at how the configuration of the BPEL process can be modified for different deployment environments.
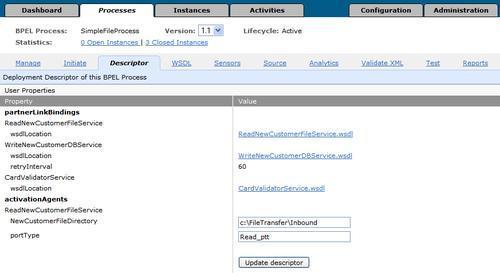
When deploying between environments we typically want to modify the endpoint details to reflect the new environment which will have different hostnames for its services. This can be done by adding a location property to the partner links in bpel.xml, as shown in the example below, which changes a partner link to point to a service located on a web services manager gateway.
<BPELSuitcase>
<BPELProcess id="SimpleFileProcess" src="SimpleFileProcess.bpel">
<partnerLinkBindings>
...
<partnerLinkBinding name="CardValidatorService">
 <property name="wsdlLocation">
CardValidatorService.wsdl
</property>
<property name="location">
http://w2k3/gateway/services/SID0003001
</property>
</partnerLinkBinding>
</partnerLinkBindings>
...
</BPELProcess>
</BPELSuitcase><partnerLinkBinding name="CardValidatorService">
It is not currently possible to modify the location via the BPEL Console.
By specifying the partnerlink property, wsdlRuntimeLocation, it is possible to point to a different WSDL at runtime. Care must be taken with this property. However, as often the BPEL designer will generate a wrapper around published WSDL to provide partner role information, and hence the generated WSDL would need modifying to point to the run-time WSDL.
In summary, endpoint location changes can be handled by the location property in the partner link in the bpel.xml. WSDL location changes may be handled in a similar way with the wsdlRuntimeLocation property if the WSDL already has partner roles. If the WSDL does not have partner roles then the import statement in the generated WSDL will need to be modified to point to the correct WSDL location.
In addition to web service endpoints changing in different environments, we often want to modify the configuration of adapters. Many adapters make use of JEE resources, and so the JEE container just needs to be correctly configured with the resource names. For example, the database adapter uses a JNDI lookup to find its data source. Similarly the JMS adapter uses a JNDI lookup to find its queues. Some adapters however, such as the file adapter, do not have a JNDI lookup.
The file and FTP adapters provide the concept of a logical location for the directory in which they search for input for example. Creating a logical location in the file adapter wizard causes a logical location element with the name of the logical location to be added to the activation agent element in the bpel.xml file as shown:
<BPELSuitcase>
<BPELProcess id="SimpleFileProcess" src="SimpleFileProcess.bpel">
<partnerLinkBindings>
<partnerLinkBinding name="ReadNewCustomerFileService">
<property name="wsdlLocation">
ReadNewCustomerFileService.wsdl
</property>
</partnerLinkBinding>
...
</partnerLinkBindings>
<activationAgents>
<activationAgent
className="oracle.tip.adapter.fw.agent.jca.JCAActivationAgent"
partnerLink="ReadNewCustomerFileService">
 <property name="NewCustomerFileDirectory"
type="LogicalDirectory">c:FileTransferInbound
</property>

<property name="portType">Read_ptt</property>
</activationAgent>
</activationAgents>
</BPELProcess>
</BPELSuitcase>
This location must be specified before deployment but may then be edited at run time by selecting the process in the BPEL Console from the dashboard or the Processes tab and then selecting the Descriptor tab for the process. The logical name may be updated to point to the correct file location on the BPEL Process Manager server and the process updated by clicking Update Descriptor.
XML Schemas are often referenced through relative links from a WSDL file. In which case updating the WSDL location will make the XML Schema files available. However, sometimes the XML Schema files are stored separately with their own URLs. In this case the URLs will usually be embedded in the WSDL file referencing them and each reference will need to be updated before redeploying the process to the correct environment.
Modifying the bpel.xml file or altering descriptors through the console provide a degree of customisation for different environments, but it is all done using a single property at a time and requires a lot of work for each environment, especially when it is considered that individual WSDL files may also need to be updated. In earlier versions of SOA Suite it was possible to use ant scripts to automate a lot of this substitution, but it was a resource intensive process to set up. There is a better way in SOA Suite 10.1.3.4 and later versions — the deployment framework.
The deployment framework combines the BPEL suitcase with a deployment plan that updates multiple files in the BPEL suitcase with the correct values for the deployment environment. Different deployment plans can be created and maintained for each deployment plan.
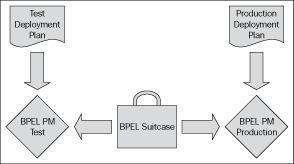
It is possible to generate a template BPEL deployment plan from a BPEL suitcase which can be customized and used with the base BPEL suitcase at deployment time to update the various URLs and properties.
The steps to customize the BPEL suitcase for each environment are as follows:
Create a deployment template from the BPEL project or suitcase that will be used as the basis for the deployment plans.
Create a deployment plan based on the template for each target environment.
Attach the appropriate deployment plan to the BPEL suitcase or project prior to deploying in the target environment.
Deploy the BPEL process into the target environment.

To create a deployment template we need to add the following commands to the build.xml ant file that is built by JDeveloper and found in the Resources folder of our BPEL project.
<target name="generate_plan_from_project">
<generateplan planfile="${process.dir}/planfile.xml"
verbose="true"
overwrite="true"
descfile="${process.dir}/bpel/bpel.xml"/>
</target>
<target name="generate_plan_from_suitcase">
<generateplan planfile="${process.dir}/planfile.xml"
verbose="true"
overwrite="true"
suitecase="${process.dir}/output/bpel_${BPELSuitcase.BPELProcess(id)}_${rev}.jar"/>
</target>
This creates two new ant targets: generate_plan_from_project and generate_plan_from_suitcase. These both create a template deployment plan, either directly from the project files, or from a generated suitcase. A BPEL suitcase is only generated when a BPEL project is deployed or when the project is "made", so if using the option to generate from a suitcase it is necessary to ensure that the suitcase has previously been created. If the suitcase generated is a revision other than 1.0 then it is necessary to set the revision property in the build.properties file that is found in the Resources folder of the BPEL project in JDeveloper.
# Change below if deploying with process revision other than 1.0
rev = 1.1
The generateplan command in ant uses four attributes:
A sample deployment plan template is shown as follows. Note the use of two elements:
<replace>is used to replace the value of a property within a specific part of thebpel.xml<searchReplace>is used to<search>for a string in WSDL and XSD files and<replace>it with another string
<?xml version="1.0" encoding="UTF-8"?>
<BPELDeploymentPlan xmlns="http://schemas.oracle.com/bpel/deployplan">
<BPELProcess id="SimpleFileProcess">
<configurations/>
<partnerLinkBindings>
<partnerLinkBinding name="ReadNewCustomerFileService">
<property name="wsdlLocation">
 <replace>ReadNewCustomerFileService.wsdl</replace>

</property>
</partnerLinkBinding>
<partnerLinkBinding name="WriteNewCustomerDBService">
<property name="retryInterval">
 <replace>60</replace>

</property>
<property name="wsdlLocation">
 <replace>WriteNewCustomerDBService.wsdl</replace>

</property>
</partnerLinkBinding>
<partnerLinkBinding name="CardValidatorService">
<property name="wsdlLocation">
 <replace>CardValidatorService.wsdl</replace>

</property>
<property name="location">
 <replace>http://w2k3/chapter18/CardValidatorServiceSoapHttpPort </replace>

</property>
</partnerLinkBinding>
</partnerLinkBindings>
</BPELProcess>
<wsdlAndSchema
name="CardValidatorService.wsdl|DBAdapterOutboundHeader.
wsdl|fileAdapterInboundHeader.wsdl|NewCustomerFile.
xsd|ReadNewCustomerFileService.wsdl|WriteNewCustomerDBService.
wsdl|WriteNewCustomerDBService_table.xsd">
 <searchReplace>
<search/>
<replace/>
</searchReplace>

</wsdlAndSchema>
</BPELDeploymentPlan>
Having created a template, we can use this to create deployment plans for each specific environment. We do this by creating a copy of the deployment plan by selecting Save As from the file menu in JDeveloper and then editing the <search> and <searchReplace> tags to match our target environment.
We will search and replace all instances of our local development machine hostname — w2k3, with the name of our test server — testserver, across WSDL, and XSD files. To do this we modify the search and replace elements shown as follows:
<wsdlAndSchema name="*">
<searchReplace>
 <search>w2k3</search>
<replace>testserver</replace>

</searchReplace>
</wsdlAndSchema>
This will cause the BPEL Process Manager to search all WSDL and schema files "*" in the suitcase at deployment time and replace the string w2k3 with the string testserver. Note that it is possible to have multiple <searchReplace> elements.
Having created and saved a deployment plan specific for one or more environments we will want to deploy our process into an environment. Before doing this we must first attach the specific deployment plan to the BPEL suitcase. We do this using the following ant command.
<target name="attach_plan">
<attachplan planfile="${planfile}" verbose="true"
overwrite="true"
suitecase="${process.dir}/output/bpel_${BPELSuitcase.BPELProcess(id)}_${rev}.jar"/>
</target>
This will create a file bpeldeployplan.xml in the BPEL suitcase. This is the deployment plan that will be used at deployment time by the BPEL Process Manager. Note that the name of the deployment plan to use is encoded as an Ant property planfile that must be set in the build.xml. Once attached the deployment plan will be executed when the BPEL suitcase is deployed. The planfile property can be set from the ant command line, allowing a different plan to be attached in each environment.
In addition to adding the two tasks above to the build.xml file, it is possible to add the attachment of the plan file as part of the regular deploy process. This is done by modifying the dependencies of the process-deploy task by adding the attach_plan dependency after the compile dependency.
<target name="process-deploy"
depends="validateTask, compile,  attach_plan, deployProcess,
deployTaskForm, deployDecisionServices" />
When building and deploying with ant, the deployment plan will be attached to the suitcase before the suitcase is deployed to the target environment. This allows us to provide a different deployment plan for each environment. After attaching the named plan to the suitcase, the suitcase can be deployed from the command line.
Note that use of command line properties allows us to script the whole deployment process, making it easy to reproduce in different environments.
A different deployment plan file may be specified by having a separate build.properties file for each environment, which is needed anyway because the build.properties will specify the target machine name, port number, and administrator credentials. The deployment file may also be specified by setting the ant property planfile on the command line.
OWSM provides a command line interface to export components and properties from an OWSM configuration and then import them into a different configuration. The components to be exported are selected through the use of an export instructions file called LMTInstructions.xml. This file specifies which components and also which, if any, custom steps are to be exported. The export command uses this file to create a representation of the OWSM configuration in an export directory which can then be moved to the target environment. The components to be imported into an environment are specified in an import instructions file. This import instructions file, also called LMTInstructions.xml, is then used by the import command to import the components and their associated policies into the target environment.
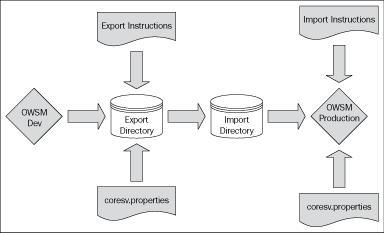
The export and import directories are specified in the coresv.properties file found in the $SOA_HOME/owsm/bin directory. The following properties are used:
The export file, LMTInstructions.xml, lists the components to be exported. If a component is a gateway then individual services must also be specified.
<?xml version="1.0"?>
<lmt-instructions>
<transferable-objects>
<component id="C0003001">
<service id="SID0003001">
</service>
</component>
<component id="C0003003">
</component>
</transferable-objects>
</lmt-instructions>
In the example above, a gateway component (C0003001) is exported together with a single service (SID0003001) associated with that gateway. An agent component (C0003003) is also exported. Objects are exported by running the exportTransferableObjects command from the $SOA_HOME/owsm/bin directory.
owsmin> wsmadmin exportTransferableObjects

Buildfile: C:oracleSOA10.1.3owsmin..scriptsexportDBData.xml
validate.DBPassword:
[input] Database Password:
exportTransferableObjects:
[java] Directory c:FileTransferOWSM18Nov2008-09-10-39AM has been created
successfully. Please check export logs in this directory
BUILD SUCCESSFUL
Total time: 5 minutes 7 seconds
This will create a sub-directory named with the current time in the export directory. This directory will consist of a number of sub-directories. To import the configuration into another OWSM environment it is necessary to copy the complete directory sub-tree to the target environment.
An import instructions file is created to select which components to import. Note that not all components must be imported.
<?xml version="1.0"?>
<lmt-instructions>
<transferable-objects>
 <component id="C0003001"

import-name="ImportedGateway"
url="http://w2k3:80/gateway"
monitor-rmi-host="localhost"
monitor-rmi-port="3118"
monitor-soap="http://localhost:80/coreman/services/ CoremanMeasurementClient"
monitor-type="rmi"
create-new="true"
type="Gateway"
mapped-to-component-id="">
 <service id="SID0003001"

import-name="ImportedService"
version="1.0"/>
</component>
 <component id="C0003002"

import-name="ImportedServerAgent"
url=""
monitor-rmi-host="localhost"
monitor-rmi-port="3118"
monitor-soap="http://localhost:80/coreman/services/ CoremanMeasurementClient"
monitor-type="rmi"
create-new="true"
type="ServerAgent"
mapped-to-component-id="">
</component>
</transferable-objects>
</lmt-instructions>
The import instructions have a number of properties which allow the import to be customized to the new environment.
Important component properties are listed below:
idis the component ID in the source system and hence in the export directoryimport-nameis the name of the component when imported into the new environmentmonitor-*properties are the location of the monitor and should match the target topologytypeis the type of component — Gateway, Server-Agent, or Client-Agentcreate-newindicates if this should be a new component (true) or if it should replace an existing component (false)mapped-to-component-idis a component ID to be replaced in the target environment if create-new isfalse
An initial deployment will usually have create-new set to true. Subsequent deployments will usually have create-new set to false so that updates are applied rather than new components created.
Service component properties are very similar to the component properties in that they specify a service ID and import-name. The service component also has useful properties, as outlined below, to enable the service definition to be customized for the target environment.
wsdlis the location of the WSDL for this service in the target environment.urlis the endpoint of the service in the target environment.
It is also possible to override step properties within a pipeline to customize those for the target environment by using the pipeline-property element and specifying the step and property to be modified.
Objects are imported by running the importTransferableObjects command from the $SOA_HOME/owsm/bin directory.
owsmin> wsmadmin importTransferableObjects

Buildfile: C:oracleSOA10.1.3owsmin..scriptsimportDBData.xml
validate.DBPassword:
[input] Database Password:
BUILD SUCCESSFUL
Total time: 8 seconds
This will read the sub-directory identified in the coresv.properties file and apply any substitutions specified in the LMTInstructions.xml file. This provides us with the same policies as existed in the source system.
Rules will generally not change between environments and can be deployed as a complete repository.
BAM provides a command line tool called iCommand to assist in exporting and importing BAM components such as data object definitions and reports as well as data objects themselves. It is possible to select subsets of components, making it easy to move just the updated components from a development to a test and/or production environment.
ICommand allows a number of different operations through the cmd parameter which can take the following values:
There are other commands related to Enterprise Link, an ETL component used by BAM.
Items are identified using a file like syntax such as /Samples/Employees. There are a number of parameters that may be used to select items in different ways:
The queries above may be combined with the following parameters to further restrict the items selected:
type:Restricts the items exported by type such astype=Folderortype=DataObject.dependencies:Includes dependent objects in the selection.contents:Includes (value 1 or unspecified) or excludes (value 0) the contents of a data object, for example,contents=0.layout:Includes (value 1 or unspecified) or excludes (value 0) the data object type definition for examplelayout=0.
When migrating items between environments we will generally not want to move the actual contents of the data. We would like to move only the layouts. For example, to export the layouts but not the contents for all the Sales data objects we issue the following command:
 C:BAMin>icommand cmd=export regex="[a-zA-Z]* Sales" file=SalesDataObjects.xml contents=0

Oracle BAM Command Utility
10g Release 3 (10.1.3.3.0) [Build 3 5 6008 0, ADC Version 1004.0]
Copyright (c) 2002, 2008 Oracle.
All rights reserved.
Exporting Data Object "/Samples/Film Sales"...
Data Object "/Samples/Film Sales" exported successfully (0 rows).
Exporting Data Object "/Samples/Media Sales"...
Data Object "/Samples/Media Sales" exported successfully (0 rows).
Exporting Data Object "/Samples/Product Sales"...
Data Object "/Samples/Product Sales" exported successfully (0 rows).
3 items exported successfully.
Items were exported to 1 files.
This generates a file that can be used to import the definitions into another BAM instance. The generated file SalesDataObjects.xml is in the format shown as follows:
<?xml version="1.0" encoding="utf-8"?>
<OracleBAMExport Version="1004.0" Build="3.5.6008.0">
<DataObject Version="14" Name="Film Sales" ID="_Film_Sales" Path="/Samples" External="0">
<Layout>
<Column Name="Region" ID="_Region" Type="string" MaxSize="100"
Nullable="1" Public="1" />
...
<Indexes />
</Layout>
</DataObject>
<DataObject Version="14" Name="Media Sales" ID="_Media_Sales" Path="/Samples" External="0">
...
</DataObject>
</OracleBAMExport>
Note that it is possible to edit the contents of the exported data files and this can provide a means to batch load reference data from another system into BAM.
To import from a file employees.xml we issue the command:
 C:BAMin> icommand cmd=import file=Employees.xml

Oracle BAM Command Utility
10g Release 3 (10.1.3.3.0) [Build 3 5 6008 0, ADC Version 1004.0]
Copyright (c) 2002, 2008 Oracle.
All rights reserved.
Data Object "/Samples/Employees" already exists, ID ignored.
Data Object "/Samples/Employees" already exists, "Layout" section ignored.
Importing contents of Data Object "/Samples/Employees"...
Data Object "/Samples/Employees" imported successfully (3 rows).
1 items imported.
The import command will always import the full contents of the file into the target BAM instance.
During development, generally all SOA Suite components will be deployed on a single server, sometimes using a database on the same machine, sometimes on a separate machine. When moving into a production environment there will often be a requirement to run multiple instances of SOA Suite. In this section, we will consider some of the consequences of this requirement and other configurations.
Running multiple instances of SOA Suite gives us two advantages: resilience and scalability. Resilience means that the loss of a single instance of SOA Suite will not impact the running of the system. Scalability means that as additional instances are added the capacity of the system will increase. Generally, SOA Suite scales almost linearly with additional instances. The bottleneck for scalability usually becomes the database used as a dehydration store in BPEL.
The database used by the SOA Suite can be scaled by using Oracle Real Application Clusters which provides multiple instances of a single database to provide scalability as well as resilience.
The smallest deployments will usually have the SOA suite on one server and connect to the database on a separate server. This configuration is simple to install and there are no particular requirements to consider when deploying SOA Suite components.
A variation on the simple deployment adds a front-end web server machine for additional security when providing or consuming services outside the corporate firewall. This machine will usually sit in a DMZ with a firewall on either side of it.
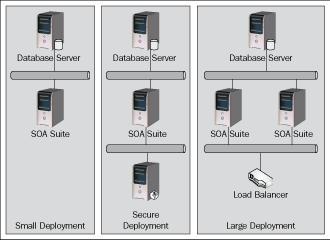
Larger deployments will usually consist of multiple instances of SOA Suite installed on multiple machines. In this case an external load balancer will usually be required to load balance incoming requests across the multiple instances.
In the current release it is likely that Oracle Service Bus will be deployed on a different application server instance to the rest of the SOA Suite. These instances may be on the same or separate machines.
When using an external web server or load balancer then the hostname that receives requests is not the same as the hostname that will process the request. For example clients will need the address of the web server or load balancer, not the SOA Suite address. Hence when the SOA Suite advertises services externally then it must use the web server or load balancer hostname, not the hostname of the SOA Suite instance providing the information. Furthermore, when multiple instances of SOA Suite are involved, it is necessary to provide additional information to enable the multiple instances to operate as a single cluster.
Apart from the BPEL Process Manager the components of the SOA Suite generally need little additional configuration to operate with multiple instances. However, there are few extra tasks to perform around the BPEL Process Manager.
Within the BPEL Process Manager we configure this external address and other cluster settings in the collaxa-config.xml file found in the $SOA_SUITE_HOME/bpel/system/config directory. These settings can also be modified from the Configuration tab of the BPEL admin console at http://hostname:port/BPELAdmin.
soapServerUrlis the endpoint published in the WSDL files and should point to the name of the front-end web server or load balancer.soapCallbackUrlis the address used when providing a callback address through WS-Addressing.enableClusteris the property that tells a BPEL instance that it is part of a cluster of instances executing processes in the same domain and using the same dehydration store.clusterNameis the arbitary name of the cluster. All nodes in the same cluster should have the same cluster name as well as the same multi-cast orjgroupspecification.
 <property id="soapServerUrl">
<name>BPEL soap server URL</name>
<value>http://w2k3:80</value>

<comment>
<!
[CDATA[
This URL is published as part of the SOAP address of a process
in the WSDL file.<p/>
The hostname and port for this URL should be customized to
match the hostname of your system and the port of your HTTP
gateway.
]]>
</comment>
</property>
 <property id="soapCallbackUrl">
<name>BPEL soap callback URL</name>
<value>http://w2k3:80</value>

<comment>
<!
[CDATA[
This URL is sent by the server as part of the asynchronous
callback address to the invoker. <p/>
The hostname and port for this URL should be customized to
match the hostname of your system and the port of your HTTP
gateway.
]]>
</comment>
</property>
 <property id="enableCluster">
<name>Cluster enable flag</name>
<value>true</value>

<comment>
<!
[CDATA[
Specify the value to true if you want to enable clustering. By
default the clustering service is disabled.
]]>
</comment>
SOA Suite deployment architecturesBPEL process manager settings, modifying</property>
 <property id="clusterName">
<name>Cluster Id</name>
<value>w2k3:80</value>

<comment>
<!
[CDATA[
clusterName specifies the name of the bpel cluster.<p/>
The cluster is defined by the clusterName, multi-cast address
and multi-cast port.Changing any one of those parameter puts
the bpel server instance in a different cluster.
Value for clusterName property needs to be the same for all
bpel nodes in a cluster in order for them to find each
other.<p/>
In addition to having distinct cluster names for each cluster,
you should use a different multicast address or port for each
cluster.<p/>
You can change the multicast address or port in the
bpel/system/config/jgroups-protocol.xml
]]>
</comment>
</property>
Configuration and implications of running multiple instances impact the BPEL Process Manager more than other SOA Suite components because this is the component that deals with long running processes that exist beyond the life of a single interaction. It is important that the configuration of the process manager is set up correctly to enable processes to be executed on any node in the instance, allowing for a single process instance to execute on different nodes at different times.
For multiple SOA Suite instance in a single subnet, it is possible to use network multi-cast to find other instances. If there are nodes on other subnets then it is necessary to configure the explicit hostnames on every node. In either case the configuration resides in the jgroups-protocol.xml file found in the $SOA_SUITE_HOME/bpel/system/config directory.
Note that these configuration settings must be applied to each individual BPEL Process Manager instance.
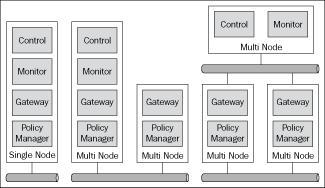
Although OWSM will run across multiple instances of SOA Suite, some components must be disabled. Only one machine can run the OWSM monitor and only one machine can run the OWSM console, although there may be multiple policy managers and gateways.
After installing SOA Suite on multiple nodes it is necessary to first set up the node that will run the console. We do this by configuring OWSM for the load balancer or front-end web server by setting the following properties in the $SOA_HOME/owsm/config/ccore/ui-config-installer.properties file:
ui.pm.server.httpHostspecifies the name of the load balancer or front-end front-end web serverui.pm.server.httpPortspecifies the port of the load balancer or front-end web server
We then redeploy the console by using the command:
wsmadmin deploy console
If necessary we can undeploy the policy manager by the following command:
wsmadmin undeploy policymanager
We then un-deploy the OWSM console and monitor from all nodes that do not require it. This is done by issuing the following commands on all nodes that will not be hosting the monitor or console:
wsmadmin undeploy monitor
wsmadmin undeploy control
Gateways and agents are deployed as outlined in Chapter 20.
The Oracle Service Bus will take advantage of an underlying WebLogic cluster to provide a clustered environment.
BAM deployment is different to the rest of the SOA Suite deployment because in 10.1.3 and earlier releases it is a Windows application and can only be deployed on a Windows platform. In release 11g this will change as BAM has been ported to run as a Java application within an application server.
BAM is made of several components:
Active Data Cache: Holds the data in memory and updates aggregates in response to new data arriving.
Event Engine: Monitors information in active data cache for certain conditions and performs associated actions defined in rules.
Report Cache: Maintains shared views in memory for better performance.
In addition it uses Microsoft Internet Information Server (IIS) as a web-server platform and requires a database to act as a repository.
Only a single instance of Active Data Cache may be active at any one time; however, the other components may all be replicated to improve scalability and availability. High availability of the Active Data Cache may be achieved by using a cold failover configuration.
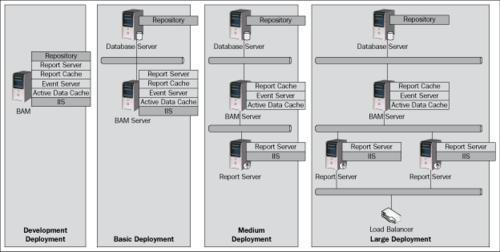
Moving the report server to a separate machine allows BAM to scale to support a larger client population. Multiple report servers may be run to allow even larger user populations.
Generally when running clustered environments it is a good idea to have the front-end hostname in the hosts file of each machine. However, instead of pointing to the IP address of the load balancer or the web front end, it could point to the loopback address ( 127.0.0.1) on the host in question to ensure that, where possible, communication occurs on the same host, reducing latency and network traffic. This approach works well when components are co-hosted in the same container because generally they will all be available at the same time. There are problems with using the loopback address if it is possible for some components on a box to be available and others to be down. If a component is down on the local box then instances on other machines will be ignored, losing the benefit of a high availability architecture.
The SOA Suite provides facilities for moving configurations between different environments using either web-based tools or command-line tools. Generally, the use of command-line tools allows deployment to be more repeatable through scripting. Some properties must be modified during the move from one environment to another and there are some facilities in the SOA Suite to make this easier.
When deploying installations of more than one instance, either for throughput or resilience, care must be taken with the deployment, particularly with the use of hostnames.