
CHAPTER
9
Installing the
Oracle VM Server
Installing a VM server is a straightforward process, mostly because Oracle VM Server for x86 only supports the bare-metal installation method, which means Oracle VM is installed directly onto the hardware, just like you would install Linux or Windows. Unlike Oracle VM 2.x, Oracle VM 3.x is managed by both a command-line interface (CLI) and a web interface that runs on the Oracle VM Manager. Most of the initial configuration is performed using the web interface, which helps to simplify the configuration process. An additional advantage of the web interface is that it significantly reduces the learning curve for Oracle VM 3.x. This simplicity includes the discovery and configuration of Oracle VM Server (OVS). The idea is to install the Oracle VM Server system without very many options or customizations and then configure it later, with any customizations being performed and stored in the OVMM database. This architecture makes recovering from an OVS failure a simple task. In this chapter, we walk through the process of installing Oracle VM Server.
Hardware Prerequisites for Oracle VM Server
The hardware requirements for Oracle are minimal, although this will change rapidly as you size the system for your workloads. Oracle recommends that you have at least one dual-core, 64-bit, i686-class CPU and at least 2GB of RAM. In addition, 2GB of swap space and 4GB of disk space are required. As with most software vendors, the minimum requirements don’t allow for any functionality, such as running actual virtual machines.
Because sizing was covered in a previous chapter, it won’t be repeated here, except to remind you that it is important to perform a sizing exercise. The CPUs, RAM, and disk space must provide enough resources to support the virtual environment you want to create.
Oracle VM Server RAM Requirements
With the drop in disk storage costs, the primary constraint on modern servers becomes RAM. As such, you need a lot of RAM to support the applications on virtual machines. Table 9-1 lists a few examples of virtual machine sizes.

TABLE 9-1. Virtual Machine RAM Requirements
Oracle VM Server Local Disk Requirements
Although many installations of Oracle VM will use SAN or NAS storage, in some small configurations, local disks are used to host the virtual machines. If you are using local disks, a single virtual disk that is a mirrored boot disk is recommended, with a second virtual disk using RAID 5 or RAID 1+0 for the data. The Oracle VM installer will slice up the boot disk for you during the installation. All you need is sufficient space to perform the installation. Adding resources later is not difficult, and that process will be covered later in this book.
The requirements shown in Table 9-1 are for a single virtual machine. A typical Oracle VM Server will support many virtual machines. To determine the total amount of disk space needed, multiply the requirements listed by the number of virtual machines of that type. You might create a worksheet similar to the one shown in Table 9-2.

TABLE 9-2. Sample Sizing Worksheet
Network Requirements
As networking becomes more complex, the requirements also require more planning prior to building an Oracle VM Server. OVS requires at least one static IPv4 address that does not change between server reboots. Although you can do static reservations with DHCP, it is recommended that you use static IP addresses. You will also need the network mask and the default gateway information, at a minimum, for installation.
Many actions performed within Oracle VM Manager (OVMM) require that OVS hostnames are properly resolved. It is highly recommended that you have at least one DNS server configured on your network and that the hostnames for each OVS can be resolved by all the systems within your Oracle VM environment. If you cannot set up a DNS infrastructure, you need to manually add host entries to the /etc/hosts file on each OVS and the OVMM server after you have finished your installation. Make sure you have your DNS server IPs and domain search information handy before installing the OVS.
Accurate time is also an important network function, and it is recommended that you also have a Network Time Protocol (NTP) infrastructure configured before installing any OVS. Using NTP will keep the time on all your hosts synchronized, which will help with troubleshooting and is considered a best practice for operational stability.
The number of network ports also can be a challenge. Although it is technically possible to run an OVS with a single network interface, you should plan to use more interfaces (usually at least two physical interfaces) connected to different switches for redundancy. You do not want your environment to stop working if one network interface fails, and a simple way to protect against that failure is to aggregate two interfaces in a bond interface. A bond port, as it is called in Oracle VM, can work in active-backup mode with no changes required on the network switch. Optionally, you can configure the network switch to enable an active-active aggregate, which will increase performance because it doubles the bandwidth. During the installation of each OVS, the management interface is configured. During discovery by OVMM, the server management interfaces are set as the default network for all functions. Because the management network is capable of providing all network functions in Oracle VM, including storage and virtual machine traffic, there is no functional need for additional networks. In a small production environment with basic network redundancy, a pair of interfaces is enough: the management network can be run on a VLAN and additional network connections can be made via VLAN interfaces configured on top of the single physical network interface. In larger environments, though, it is often ideal to physically separate the traffic across additional pairs of network interfaces.
The main reasons to opt for having multiple physical network interfaces are security and performance:
![]() Security In many environments, there is a requirement to physically separate internal and inter-server traffic onto different physical networks. Alternatively, you might need to guarantee that network traffic from different virtual environments, or different types of network traffic, are physically separated.
Security In many environments, there is a requirement to physically separate internal and inter-server traffic onto different physical networks. Alternatively, you might need to guarantee that network traffic from different virtual environments, or different types of network traffic, are physically separated.
![]() Performance If you have multiple physical network interfaces, link aggregation is a good way to add bandwidth for a given network function. In addition, or as an alternative, you can create multiple physical networks and use them for dedicated functions (for example, a separate storage network or a network for virtual machine traffic only).
Performance If you have multiple physical network interfaces, link aggregation is a good way to add bandwidth for a given network function. In addition, or as an alternative, you can create multiple physical networks and use them for dedicated functions (for example, a separate storage network or a network for virtual machine traffic only).
Installation Methods
You have several installation methods to choose from. The Oracle VM Server can be installed from a CD-ROM, hard drive, or network. The network option involves installing from a KickStart system. The CD-ROM option is the most common and perhaps easiest to perform because no additional configuration steps are required.
Basic Installation of the OVS from CD-ROM or ISO
With modern servers, the most common method of installing OVS is booting from an ISO image virtually mounted via the Lights Out Management interface. On Oracle X86 servers, the Lights Out Management interface is called the Integrated Lights Out Manager (ILOM). You still have the option of installing OVS from physical media on servers with optical drives. In either case, make sure that the ISO or CD-ROM image is mounted and that the BIOS is set to boot from the media. Next, power on the server. After POST (Power-On Self Test), the Oracle VM Server installer will appear. As mentioned before, the VM Server installer will install the hypervisor and dom0. Later, when you configure the VM Server, you’ll decide whether it is a server pool master, utility server, or virtual machine server.

NOTE
Because of the large number of screens involved in installing the VM Server, only screenshots where action is required will be shown. Other screens will be described but not shown.
The POST screen is controlled by the hardware and performs operations such as testing memory and discovering and enabling devices at the hardware level. POST is an important part of the system boot process. The POST process performs operations that are crucial to the configuration and setup of devices. In addition, depending on the hardware installed, POST provides options for configuring devices by pressing a specific ctrl key series during device initialization. For example, during POST, the Fibre Channel host bus adapter (HBA) card might launch a configuration program when you press ctrl-z or some other key combination. If necessary, configure any devices that require configuration at this stage. It is better to configure the hardware devices before any software is installed.
Once POST has completed, the OS installation process begins by booting the Oracle VM installer. During the startup of the Oracle VM installer, you will see additional device configuration steps. This process ends with the Oracle VM boot screen.
When OVS boots the first time, you can select to use the ISO to perform a physical-to-virtual conversion, or you can just install OVS, as shown here. Press enter to install OVS.

This kicks off the installation process, as shown next.

Once the installer boots, you will be prompted to verify the boot media, as shown here. Normally, you will select Skip and proceed to the next step.

The ISO will now boot into the OVS installation mode, as shown here, and will present dialog boxes that ask you a few configuration questions, such as language, IP, name, and so on.

First, you will select the language, as shown here.

The reference install uses English, and here, a US keyboard is selected.

Next, you should read the OVS license agreement and accept the terms. You cannot continue without accepting Oracle’s terms.

After you accept the EULA, the installer will run for a few seconds and probe for storage. If you have drives that are not initialized for OVM, the installer will prompt you to initialize the drives, as shown here. Note that if you select “Re-initialize all,” any data on the drives will be lost. This includes LUNs and virtual drives that might have critical data you may not want destroyed.

Once the drive is initialized, it is possible to create a custom partition table for the drive, or you can accept the default layout, as shown next.

For this example, a custom partition is being created. As shown next, we have a 200GB drive available, and we will partition the drive as follows:
![]() 50GB for /
50GB for /
![]() 1GB for /boot
1GB for /boot
![]() 6GB for swap space
6GB for swap space
![]() 147GB unused
147GB unused

It is not required that you create a custom partition table, and the default installation will work well for most installations. Also, it is currently not possible to create a custom partition layout if you are installing in UEFI mode. If a partition is unused, it can later be used as a local repository for storing VM virtual disks, ISO images, templates etc.
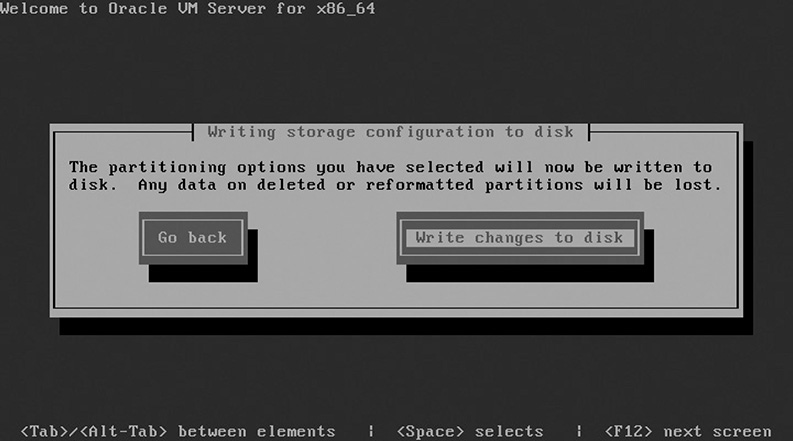
Once the partitioning is finalized, do not forget to write the changes to disk, after selecting OK.
The installer will now create the filesystems and configure the boot loader. In this example, the Master Boot Record is selected.

Next is the option to enable a kernel crash dump. Kdump is a feature of the Linux kernel that will create a crash dump in the event of a kernel crash. When triggered, Kdump exports a memory image (also known as vmcore) that can be analyzed by support personnel for the purposes of debugging and determining the cause of the crash. Although helpful, Kdump does consume a little bit of RAM and is not supported on OVS when the server is using Non-Volatile Memory Express (NVME) or Fibre Channel over Ethernet (FCoE). As shown, Kdump will not be enabled in this example.

Next is the initial network configuration. In the reference OVS, no VLANs will be used, so eth0 is used as the primary management interface. After installation, VLANs and aggregates can be configured.

Once the network interface is selected, the static IP address and netmask will be assigned, as shown here. In newer versions of OVS, the netmask can be expressed in CIDR notation.

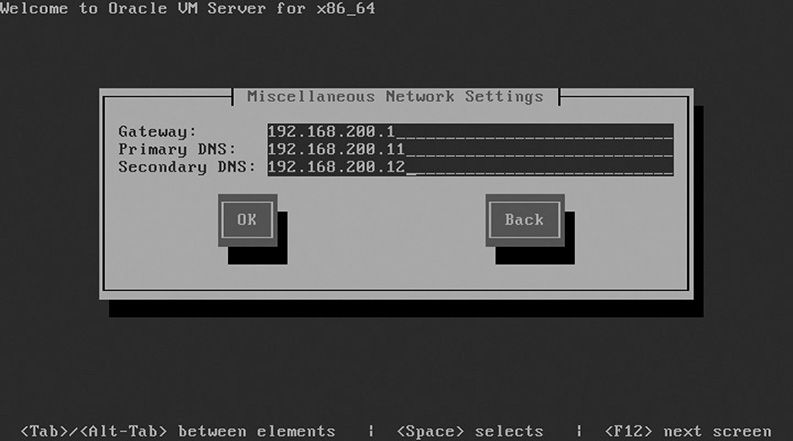
Installation of the OVS is almost complete. Next, the network settings for DNS and the IP default gateway are set.
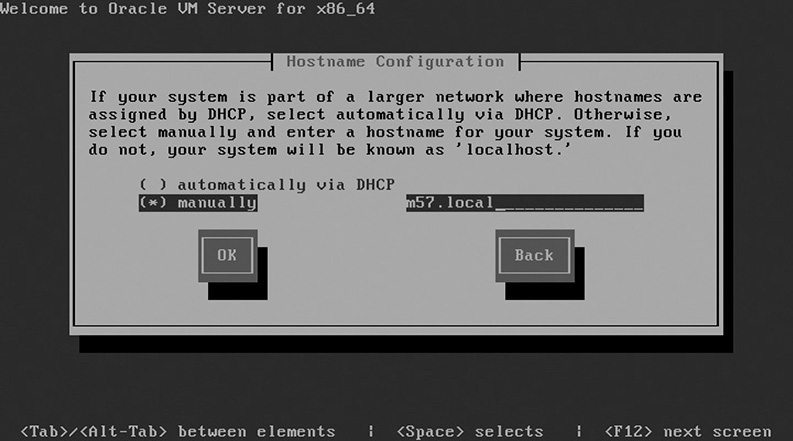
The next screen allows the DNS domain to be set. This is useful because, once set, the FQDN is not required to correctly resolve names in DNS.
The correct time on the system clock is important to a properly functioning installation. Verify that the system clock uses UTC, and select the operational time zone used for the server.

Although many sites will use the local time zone, it is not uncommon in larger geographically diverse organizations for GMT to be used instead; this way, the timestamps in all log files will reflect the same time zone. The NTP settings are made via the OVMM interface later.
Setting the passwords is an important step that should not be done hastily. In OVS, two passwords are set during installation, the first being the OVM Agent password, as shown here. This is the password that OVMM uses to authenticate to OVS servers.

The second password is the root password for the OVS server, which is set in the screen shown here.

Next, the OVS system is installed, as shown here. This will take only a few minutes.

Once the installation is complete, the system will reboot. It is important to remove the media from the server before rebooting. If you’re using ILOM, do not forget to “unpresent” the ISO file. If you’re using physical media, be sure to remove the media from the optical drive.
Once the system is back up and running, you should see the OVS login screen, shown next. Unlike in older versions of OVS, you will not need to do anything else from the OVS server. All remaining configuration is performed from the OVMM.

Summary
This chapter provided instructions on how to install the Oracle VM Server. There really isn’t much work to installing the Oracle VM Server. Although you have several ways to do it, the installation process simply formats the disks and adds the software, including the VM Agent. Once the Oracle VM Server has been installed, you need to configure it as a server pool master, utility server, virtual machine server, or all of the above. Configuring the Oracle VM Server is where the real work begins, as discussed in the next few chapters.