
CHAPTER
15
Configuring Guest Resources
One of the major features of Oracle VM that distinguishes it from other virtualization products is the use of templates. Templates are used for creating “golden images” of a complete software stack. The Oracle VM templates are considered part of the guest resources. Oracle VM guest resources include the virtual appliances (formerly assemblies), ISOs, templates, virtual disks, and configuration files (vm.cfg files). Server resources include the use of the Oracle VM utilities to manage CPU partitioning, report on VM storage details, and gather Oracle VM Server (OVS) performance data for reporting to a VM.
This chapter covers managing Oracle VM Server resources. As you learned in the previous chapter, there are three different ways to configure guest resources: via the Oracle VM Manager, the OEM Grid Control, and the Oracle VM CLI. This chapter focuses on using Oracle VM Manager, with subsequent chapters covering Oracle Enterprise Manager 13c and the Oracle VM CLI.
Guest Resources
The guest resources are key features that give Oracle VM its functionality and ease of use. The guest resources consist of virtual machine templates, virtual appliances, and shared virtual disks. Virtual machine templates are used to install virtual machines. Shared virtual disks are used in clusters, such as Oracle Real Application Clusters, for shared disk usage. Configuring and administering these guest resources using the Oracle VM Manager are covered in this chapter.
Templates
Virtual machine templates are a core feature of Oracle VM. Virtual machine templates allow you to create virtual machines quickly and efficiently with less chance of making mistakes than if you had to build them from scratch. Here are some of the advantages of using VM templates:
![]() Ease of use By using a template, you can quickly and easily deploy virtual machines. Because templates are preconfigured, you can use them to deploy many consistent copies of the same virtual machine, with each one customized for your environment.
Ease of use By using a template, you can quickly and easily deploy virtual machines. Because templates are preconfigured, you can use them to deploy many consistent copies of the same virtual machine, with each one customized for your environment.
![]() Consistency Because creating a virtual machine from a template does not require extensive configuration changes, the virtual machines are very consistent. If the VM template is configured ready to install the Oracle Database, then all virtual machines created from this template will be able to install the Oracle Database consistently. If the VM template is configured with the Oracle Database preconfigured, then all virtual machines created from this template will include a consistently installed Oracle Database ready to go.
Consistency Because creating a virtual machine from a template does not require extensive configuration changes, the virtual machines are very consistent. If the VM template is configured ready to install the Oracle Database, then all virtual machines created from this template will be able to install the Oracle Database consistently. If the VM template is configured with the Oracle Database preconfigured, then all virtual machines created from this template will include a consistently installed Oracle Database ready to go.
![]() Provisioning efficiency Because templates are preconfigured and can be created or obtained with applications preinstalled, the time it takes to deploy these applications can be greatly reduced.
Provisioning efficiency Because templates are preconfigured and can be created or obtained with applications preinstalled, the time it takes to deploy these applications can be greatly reduced.
Using templates is the preferred method of configuring virtual machines. By using templates, you are guaranteed consistently configured virtual machines. In addition, Oracle offers a wide number of templates, not only for the basic operating systems, but also for applications such as E-Business Suite, Enterprise Manager 13c, JD Edwards, and more. These can be downloaded from the Oracle Technology Network.
In addition, you can create your own custom templates, preconfigured to fit the specific requirements in your data center. You can create a template from scratch, or you can create a template using any Oracle VM guest in your environment. This means you don’t have to depend on just templates offered for download by Oracle; you can build your own custom templates that can include applications, databases, and other tools unique to your environment. This topic is covered in more detail in Chapter 18.
VM templates are stored in the repositories, under the VM Templates folder (see Figure 15-1 for an example). You can click a template to expand the selection to see the details, including the operating system, processors, memory, and more.

FIGURE 15-1. Template details
Virtual Appliances
Imagine the power of templates expanded to the entire application. Virtual appliances provide this by enabling entire application stacks to be consolidated into a single object. This enables the administrator to deploy complex systems, including multiple virtual machines to support each tier of the application, from the RAC cluster supporting the database to tomcat clusters supporting the middle tier. This technology is very helpful when deploying complex applications like Oracle E-Business Suite and SAP. Virtual appliances can also include virtual machines using third-party formats such as Open Virtualization Format (OVF) from VMware. This makes migration from VMware to OVM as simple as exporting the virtual machine from VMware to an OVF file and then importing it into Oracle VM. As with templates, Oracle VM stores the virtual appliances in the repositories, in a folder named “Virtual Appliances.” Just click a virtual appliance to view what virtual machines are contained within it (see Figure 15-2).

FIGURE 15-2. Virtual Appliances
Shared Virtual Disks
Shared virtual disks are disks that are available to one or more virtual machines. These virtual disks are managed outside of the virtual machine because they are not tied to any specific virtual machine. The shared virtual disks are stored in the repositories, in the “Virtual Disks” folder, and if a disk is shareable, it is identified as such in the Shareable column (see Figure 15-3). Any disk can be flagged as shareable, which becomes a useful feature when you’re migrating a local ASM group into a RAC cluster.

FIGURE 15-3. Shareable virtual disks
The next sections cover configuring and managing guest resources using the Oracle VM Manager. You can also use the Oracle VM CLI or Oracle Enterprise Manager 13c. Which method you use depends on your individual configuration and needs.
Configuring Guest Resources Using the Oracle VM Manager
The Oracle VM Manager is the most common tool for managing small to medium Oracle VM Server farms. It is easy to install and use. Larger installations that already have Oracle Enterprise Manager (OEM) Cloud Control often use this tool to manage the VM Server farm because it enables features such as user self-provisioning and chargeback of resources. Included with the installation of Oracle VM Manager is the Oracle VM CLI. This chapter covers the use of Oracle VM Manager, with EM13c usages being covered in Chapter 23 through Chapter 25 and the CLI being covered in Chapter 11.
Managing the guest resources via the Oracle VM Manager is done in a web browser, with the URL being https://$HOST:7002/ovm/console. From here, you can manage all of the guest resources, with the exception of hard partitions, which are also covered in this chapter.
Configuring Templates with the Oracle VM Manager
The process of creating custom templates is covered in Chapter 18. The steps covered here are used to modify the template once it has been created. The most common changes made to a template are the CPU and memory allocations. The process of editing template parameters is similar to how a virtual machine is edited, but instead of selecting a virtual machine, you navigate to the VM Templates folder in the repository and click the Edit button (highlighted in Figure 15-4) while the template is selected.

FIGURE 15-4. Editing the template
The two most common areas to be edited are the network configuration and the core configuration of the template. The core configuration, shown in Figure 15-5, is where the amount of CPU, RAM, and other parameters related to the system performance are set.

FIGURE 15-5. Configuring the template
These are the exact same parameters used when creating a virtual machine. An example of a change you might make after the template is created is adjusting the behavior of future virtual machines when they crash. Administration might not want to have them restart automatically, for example, but instead to stop.
More common is changing the network configuration after the template is created (see Figure 15-6). A template could be built in a non-production network segment, but copied to a new template and updated to use the production network.

FIGURE 15-6. Changing the network configuration
Modifying templates after their creation is a powerful capability, but be careful to always test a template after making any changes to it.
Importing Templates and Virtual Appliances
As previously stated, importing templates and virtual appliances is a powerful capability. The importing process is easy but requires that the source file be copied to either a web server or an anonymous FTP site that can be accessed by the Oracle VM Manager. It is common for the yum path repository server to also serve as an HTTP server for importing templates and virtual appliances. When you’re collocating other functions on the Oracle VM Manager, be careful not to place too much load on the server. Having the Oracle VM Manager also act as the HTTP server for importing templates is fine, but in larger environments, having the Oracle VM Manager server also act as a yum repository for hundreds of Linux servers will likely cause performance issues when you’re managing the Oracle VM environment.

NOTE
If you find yourself confusing templates and virtual appliances, keep in mind that a virtual appliance should have the extension .ova, whereas a template will often use .tgz or .ovf as its extension. If a template fails with the error “No VM configure file found,” try importing it as a virtual appliance.
Follow these steps to import an existing template into the VM Manager:
1. Templates are managed from the repository in which they reside. Navigate to the repository and select the VM Templates folder. From there, you’ll see a list of all templates currently imported. From the VM Templates screen, click the Import button, highlighted in Figure 15-7.

FIGURE 15-7. Importing a template
2. Clicking the Import button begins the template import process. On the first screen that appears, you define the source for the template import, as shown in Figure 15-8.

FIGURE 15-8. Template import parameters
3. Select a method from the following two options:
![]() VM Template URLs This is the URL that points to the template. It can be an HTTP, HTTPS, or FTP URL. The URL used in this example is http://repo.m57.local/ol7_master.tgz, which is based on a local patch repository server. The filename will be specific to the template being imported.
VM Template URLs This is the URL that points to the template. It can be an HTTP, HTTPS, or FTP URL. The URL used in this example is http://repo.m57.local/ol7_master.tgz, which is based on a local patch repository server. The filename will be specific to the template being imported.
![]() Proxy This is an optional field, but it is required if a proxy needs to access the VM template URL.
Proxy This is an optional field, but it is required if a proxy needs to access the VM template URL.
Once you’ve selected the import method, a job will be created that you can track in the Job Summary window in the Oracle VM Manager.
Follow these steps to import an existing virtual appliance into the VM Manager:
1. Virtual appliances are managed from the repository in which they reside. Navigate to the repository and select the Virtual Appliances folder. From there, you can see a list of all virtual appliances currently imported. From the Virtual Appliances screen, click the Import button, highlighted in Figure 15-9.

FIGURE 15-9. Importing a virtual appliance
2. Clicking the Import button begins the virtual appliance import process. On the first screen that appears, you define the source for the virtual appliance import, as shown in Figure 15-10.

FIGURE 15-10. Virtual appliance import parameters
3. Select a method from the following four options:
![]() Virtual appliance download location This is the URL that points to the virtual appliance. It can be an HTTP, HTTPS, or FTP URL. Our example uses http://repo.m57.local/sol-11_3-ovm-x86.ova, which is the local patch repo. The filename will be specific to the virtual appliance being imported.
Virtual appliance download location This is the URL that points to the virtual appliance. It can be an HTTP, HTTPS, or FTP URL. Our example uses http://repo.m57.local/sol-11_3-ovm-x86.ova, which is the local patch repo. The filename will be specific to the virtual appliance being imported.
![]() Proxy This is an optional field, but it’s required if a proxy needs to access the virtual appliance URL.
Proxy This is an optional field, but it’s required if a proxy needs to access the virtual appliance URL.
![]() Create VM This option creates a virtual appliance once the file is successfully imported.
Create VM This option creates a virtual appliance once the file is successfully imported.
![]() Server Pool If the Create VM box is checked, this drop-down is used to select the server pool where the VM(s) will be created. If multiple VMs are in the imported appliance, all of them will be created if this is checked.
Server Pool If the Create VM box is checked, this drop-down is used to select the server pool where the VM(s) will be created. If multiple VMs are in the imported appliance, all of them will be created if this is checked.
Once you’ve selected the import method, a job will be created that you can track in the Job Summary window in the Oracle VM Manager, as shown in Figure 15-11.

FIGURE 15-11. Completed import job
Manually Exporting a Template or Virtual Appliance
It is not uncommon for Oracle VM administrations to need to export a VM template to another system. Follow these steps to export an existing template into the VM Manager:
1. Templates consist of at least two files—one being vm.cfg, which contains all the configuration data for the VM, and the second being at least one disk .img file. In order to export the template, you will need to locate these two files and then combine them into a compressed .tar file. From the initial Oracle VM Manager screen, click the Resources tab. From the Resources tab, you can import a template by clicking the Import button.
2. To locate the vm.cfg file for the template, navigate to the VM Templates folder in the repository where the template is stored. As shown in Figure 15-12, the location of the vm.cfg file will be shown when the selection is expanded.

FIGURE 15-12. Location of vm.cfg file
3. To identify the location of the disk file for the template, select the Disks tab in the details area for the VM template. This shows each of the disks used by the template (see Figure 15-13).

FIGURE 15-13. Disk location
Several columns are visible, but what is needed is the “mounted path” for the disk image, which, for our example, is
![]()
4. The last step is actually fairly simple—if there is enough scratch space on one of the OVS systems. A single compressed .tar file will be created that contains both files. Use SSH to access the OVS, and then use tar to create the file. The format is tar -cvfz $TEMPLATE_NAME.tzg $CFG_PATH $DISK_PATH, as seen in the example:

The file /var/template.tgz can now be copied to an HTTP server and then imported into a repository.
CPU Pinning and the Oracle VM Utilities
Although the resource scheduler often works well in keeping one VM from impacting the performance of another VM, a problem often arises called noisy neighbor. A noisy neighbor is a common problem in virtualized environments and is caused when one VM monopolizes resources like CPU, network, and I/O bandwidth. This can cause performance issues for systems that use the same shared infrastructure. At times, more direct control is required, and Oracle VM has the ability to isolate a VM to a single group of cores on the physical OVS, essentially dedicating a physical CPU resource to a particular virtual CPU or a set of virtual CPUs. CPU pinning is also used to restrict a VM to a subset of physical cores for licensing needs. The optional Oracle VM Utilities package includes a program called ovm_vmcontrol that makes pinning a simple task. The Oracle VM Utilities package also includes several other advanced commands:
![]() ovm_vmcontrol This command lets the administrator configure CPU pinning, also known as hard partitioning, on virtual machines.
ovm_vmcontrol This command lets the administrator configure CPU pinning, also known as hard partitioning, on virtual machines.
![]() ovm_vmdisks This script retrieves details about virtual disks. It includes the device path for physical disks as well as the NFS server name, mount point, and the filename and location for NFS-based disks.
ovm_vmdisks This script retrieves details about virtual disks. It includes the device path for physical disks as well as the NFS server name, mount point, and the filename and location for NFS-based disks.
![]() ovm_vmhostd This command collects metrics about the Oracle VM Server host on which a virtual machine is running.
ovm_vmhostd This command collects metrics about the Oracle VM Server host on which a virtual machine is running.
![]() vm-dump-metrics This SAP-specific script gathers metrics about the Oracle VM Server host in XML format, which can be imported into an SAP application.
vm-dump-metrics This SAP-specific script gathers metrics about the Oracle VM Server host in XML format, which can be imported into an SAP application.
Installing the scripts is simple: after downloading the file from Oracle’s Support site, you need to identify the version required, which is based on the version of Oracle VM Manager running in your environment, and then extract the scripts into a folder. The scripts do not need to be extracted or run from the Oracle VM management server. Oracle Support currently provides three ZIP files:
![]() ovm_utils_1.0.2.zip For Oracle VM versions 3.0, 3.1, and 3.2
ovm_utils_1.0.2.zip For Oracle VM versions 3.0, 3.1, and 3.2
![]() ovm_utils_2.0.1.zip For Oracle VM version 3.3
ovm_utils_2.0.1.zip For Oracle VM version 3.3
![]() ovm_utils_2.1.0.zip For Oracle VM version 3.4
ovm_utils_2.1.0.zip For Oracle VM version 3.4
To pin cores on a VM, first check the current configuration. In this example, the OVMM server is ovmm.m57.local and the VM being managed is repo. The -c options are setvcpu, getvcpu, and rmvcpu.

Once configured, getvcpu will now show the cores that are pinned:

The password is required each time the command is run. It can be set as an environmental variable, which enables scripting and simplifies access to the scripts when they are being used heavily. To set the password, run the command export OVMUTIL_PASS=$PASSWORD, where PASSWORD is the password being used. When the OVMUTIL_PASS environmental variable is set, add the option -E to the scripts, as shown in the following example:

The pinned CPUs can be removed using the rmvcpu option, but the VM will need to be shut down before this option can be run against the VM. Once the VM is offline, run the command, as shown here:

The ovm_vmdisks script allows you to retrieve information about disks assigned to virtual machines. The script also identifies the name and location of the vm.cfg file. This is the same information required to manually export a template of a VM from one Oracle VM system.
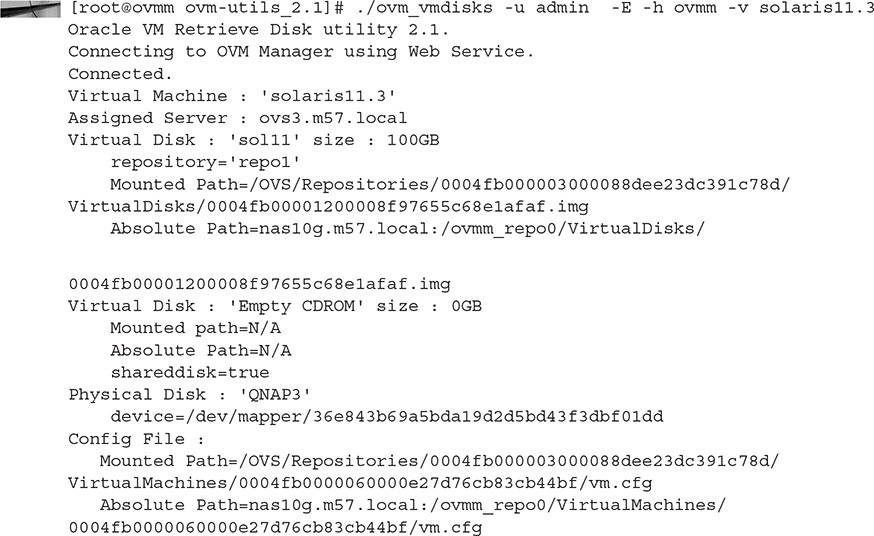
In this example, not only is a disk served from NFS (Virtual Disk : 'sol11'), but also a physical LUN is assigned to the VM:
![]()
The command ovm_vmhostd collects metrics from the OVS and sends them to the VM specified in the options. The OVS will then send metrics about itself to the VM. These metrics can be recovered using the vm-dump-metrics script from the guest VM. The utility will run every 60 seconds until stopped with ctrl-c.

While the ovm_vmhostd script is running, on the VM named in the script, run the vm-dump_metrics command to collect the data. The output can be redirected to a text file for use by SAP or to custom-written processing scripts.
![]()
An example of this file is as follows:


Configuring Shared Virtual Disks with the VM Manager
Shared disks are used to support applications that require a disk to be available (read and write simultaneously) from multiple Oracle VM guests, not Oracle VM servers. These applications include Oracle Real Application Clusters, Microsoft Cluster Services, and others. Because a shared virtual disk does not belong to any particular virtual system alone, it is part of the guest resources. You can convert any existing virtual disk to a shared disk by selecting the Shareable check box when editing the virtual disk. To edit a virtual disk, go to the “Virtual Disks” folder in the repository that holds the virtual disk, highlight the disk to be edited, and then click the Edit icon (see Figure 15-14).

FIGURE 15-14. Selecting a virtual disk to edit
This will bring up the Edit dialog for the virtual disk. To make the Virtual Disk shareable, simply check the Shareable box (shown in Figure 15-15). The virtual disk can now be allocated to multiple VMs.
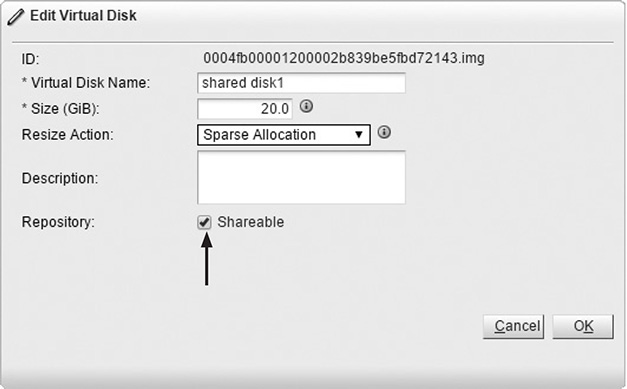
FIGURE 15-15. Making a virtual disk shareable
Configuring Shared Physical Devices
In addition to using file-based virtual disks as shared disks for Oracle RAC (or any application that requires a shared disk), Oracle VM allows the virtual machine to use physical devices as well. Physical devices offer performance advantages over virtual disks, but they do not have the flexibility that virtual disks offer. Physical devices can be shared by all devices in the server pool. Sharing a physical disk is similar to sharing virtual disks, but the process is managed from the Storage tab. To share a physical disk, select the disk by accessing it from the Storage tab and then select the array the disk is being served from (see Figure 15-16).

FIGURE 15-16. Editing a physical disk
This will bring up the Edit dialog for the virtual disk. To make the virtual disk shareable, simply check the Shareable box (see Figure 15-17). The virtual disk can now be allocated to multiple VMs.
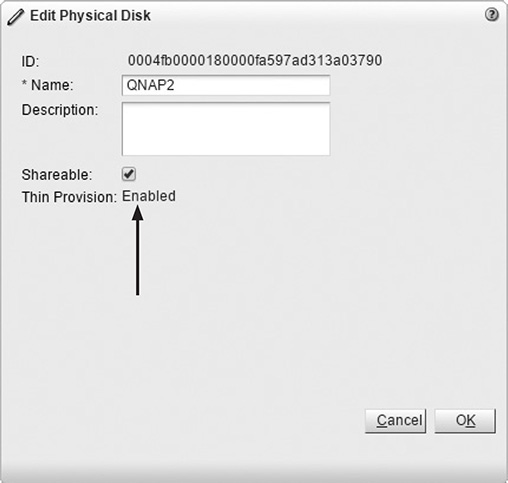
FIGURE 15-17. Making a physical disk shareable
Once you’ve completed these steps, you can use the physical device as a shared device.
Summary
This chapter covered several server resource management tasks and how to administer them via the Oracle VM Manager and Oracle VM Utilities. Both tools are easy to install and easy to use, and they work together (for example, Oracle VM Utilities requires and uses the OVM CLI installed on the Oracle VM Manager). The VM Utilities can be readily downloaded from Oracle and can be quickly installed and configured.
In the next chapter, you will learn how to monitor and tune an Oracle VM server. A poorly tuned or overloaded server will lead to virtual machine performance issues. By monitoring the load on your VM servers, you can often head off problems before they occur.