
CHAPTER
11
Installing and Configuring
the Oracle VM CLI
One of the best features of Oracle VM is the ability to script management operations using the Oracle VM CLI (command-line interface). The OVM CLI allows you to run Oracle VM commands directly from the command line without having to access the graphical user interface (GUI). The biggest advantage of this is the ability to script repetitive operations—that is, operations that should be run over and over again. Scripts can be developed in any number of scripting languages, including shell, Perl, and Python.
Introduction to OVM CLI
The OVM CLI provides a command-line interface to the OVM Manager. The function of the OVM CLI is similar to that of the OVM Manager, but it does not require the graphical interface and therefore does not need to be run from a browser. This means you can use the OVM CLI where you might not have browser access. This also allows you to manage the OVM via scripts, which means repetitive tasks can be done easily and with greater consistency. For example, you can create and automate reports.
The CLI does not include all the checks that are provided within the GUI, which allows you to perform some tasks that cannot be done via the CLI, but also requires more care and more understanding of the relationships between objects. The CLI is very powerful and can provide great benefits for your OVM installation. In this chapter, we discuss the uses of the CLI and provide many examples of beneficial uses.
Managing the OVM CLI
The CLI is installed as part of the OVM Manager and exists by default on the OVM Manager system. This does not mean that all of your maintenance tasks have to be run on the OVM Manager system. As you will see, the CLI is run through an SSH interface, thus allowing connectivity from other systems within the network. I often create shell, Perl, and Python scripts that run CLI commands via SSH in order to run maintenance tasks on a system separate from the OVM Manager. The CLI is maintained on the OVM management server.
Starting and Stopping the CLI
The CLI is managed as a Linux service on the OVM Manager system. As a Linux service, it is started, stopped, and queried via the service command or directly by the /sbin/service command. The commands to manage the CLI are shown in the following table:

Again, you can use either the /sbin/service command or the service command. An example is shown here:

Starting and stopping the CLI is done on the OVM Manager itself. As you will see in the next section, running CLI commands can be done from anywhere.
Using OVM CLI
The OVM CLI works by connecting to the OVM Manager through the core API. The interface that is used to connect to the CLI from your system is SSH. In the next few sections, you will learn how to connect to the CLI, how to use the CLI, and how to connect to the CLI via scripts.
Connecting to the CLI
The CLI is accessed via an SSH interface on port 10000. You can access it directly using ssh by specifying the port and user ID. SSH takes various options for specifying the user ID:
![]()
If you are performing multiple commands, you can use the SSH keepalive option, as shown here:
![]()
Alternatively, you can set the keepalive in the ~/.ssh/config file. The ~/.ssh/config file can be useful for many different parameters, including the hostname, port, and user commands. A sample ~/.ssh/config file is shown here:

In this file, I have configured the ovmcli entry as an alias for my ovmmanager system and included the port and username for the OVM Manager user. I also included the keepalive. The ~/.ssh/config file is a very useful option. Here is an example of one:

In order to enable password-less connectivity to the OVM Manager, you can use SSH keys for connectivity. This creates a connection without using a password, and it takes advantage of the keepalive feature.

NOTE
Whenever the CLI or Manager is restarted, you must pass in the OVM Manager password again. Therefore, you cannot rely on this for connectivity every time.
In order to set up key-based connections, follow these steps:
1. Set up the ~/.ssh/config file as shown previously.
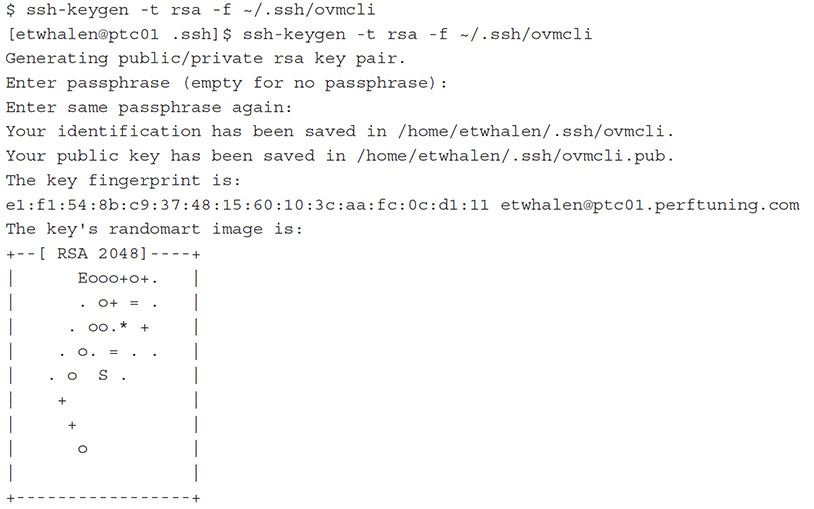
2. Using ssh-keygen, create an SSH key, like so:
3. Add the private key to the authentication agent:

4. Copy the public key to the ovmmanager system:

5. Add the ovmcli.pub contents to authorized_keys on the OVM Manager server:

6. Test your setup:

Once you have set up the SSH keys correctly, you can make connections without the use of a password:
![]()
or
![]()
You can also use the config file:
![]()
Once you have connected to the CLI, you can begin running commands. Commands can be included with the ssh command itself. An example of running list vm via the CLI is shown here:

Exiting the VM CLI is done via the exit command:
![]()
In the next sections, you will see how to run basic commands via the CLI and how to script commands to run in the CLI.
Basic Commands
A number of commands can be used with the CLI that allow you to perform almost all the functions you can do within the OVM Manager—and in some cases, the CLI allows for much more flexibility and functionality. In addition to the functions these commands provide, they also allow you to get help with the CLI. Let’s look at the help functions of the CLI before we discuss the informational commands and functional commands.
Help Commands
You have a few ways to get help and information about the commands available within the CLI. For example, the help command provides information about the commands themselves:
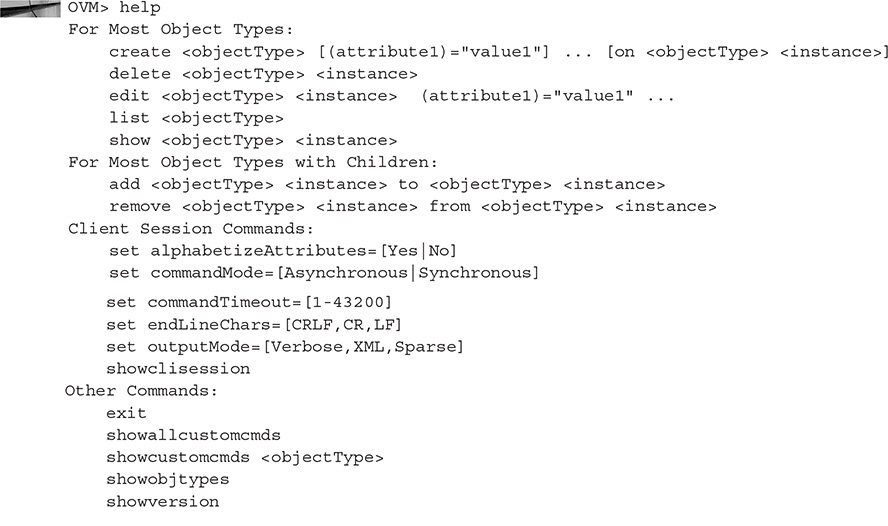
This gives you an idea of the commands available. In order to get detailed information about these commands, you can use the ? command. An example is shown here:

Using the ? command, you can get detailed information about the commands listed. For example, to get additional information on the list command, use list ?, as shown next. (Note that because of the number of options, the complete list is not shown.)

In the next section, you will see how to use some of these commands to get information about the OVM system. The two most important CLI commands you need to know are help and ?.
Informational Commands
The informational commands are list and show. The list command is used to display a list of all of the objects of a particular type. The show command provides detailed information on a specific object. For example, list server lists all of the servers:

To get detailed information on a particular server, use show server name=<name> or show server id=<id>, as shown here (note that only the first 25 lines are provided):

The list and show commands can be run followed by the ? qualifier in order to see all of the objects they can operate on. These and a few other commands provide information on the state and configuration of Oracle VM. The other commands are used to actually configure Oracle VM.
Functional Commands
The functional commands let you perform tasks in OVM such as shut down, start up, create, and so on. The basic functional commands include add, create, delete, edit, set and remove. These commands allow you to perform functions on the OVM Manager that affect objects in the OVM server pool. Let’s look at some of these commands.
Add The add command is used to add resources to an object. For example, the following can be used to add an NFS filesystem to a server:
![]()
The difference between add and create is that the add command takes an object that already exists and assigns it to another entity, whereas the create command is used to create an object from scratch.
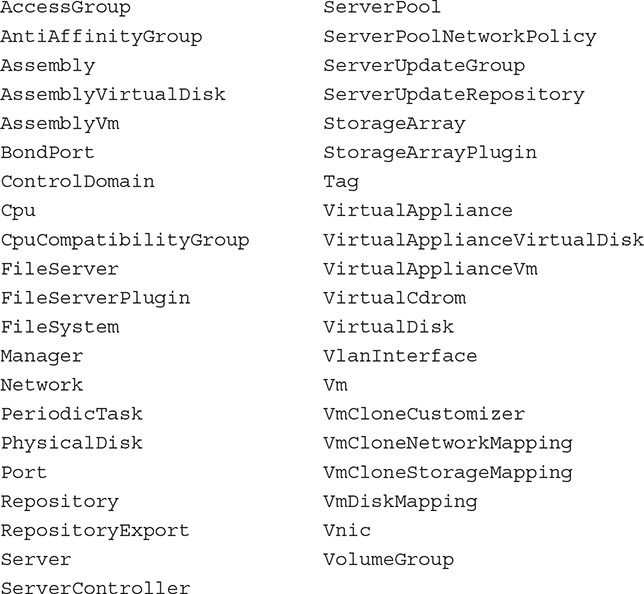
Objects that can be added include the following:

For help on these objects, use the command add <item> ?. For further information on the available options, continue to use the commands provided from the previous command using ?. Here’s an example:

In addition, you can find very good documentation on the OVM CLI.
Create The create command is used to create new objects in OVM. The create command can take a few or many options, depending on what you are trying to create. For example, create vm takes (but is not limited to) the following parameters:

* denotes a required parameter.
Therefore, creating a VM using the CLI would look something like this:

NOTE
This command should appear all on one line. If you need to use multiple lines, use as the line-continuation character.
Here are the objects that can be created:

For help on these objects, use the command add <object> ?.
Delete The delete command is used to delete existing objects in OVM. The delete command varies based on the object that is being deleted. Here’s an example:

This example deletes the virtual machine created in the previous example.
The following are the objects that can be deleted:

For help on these objects, use the command delete <object> ?.
Edit The edit command is used to modify existing objects in OVM. More objects can be operated on with the edit command than with create or delete. The edit command takes a variety of options, depending on the type of object being edited. Here is an example using edit vm:

The edit commands provide many different options for configuring and using OVM. The preceding example shows how to change the memory allocated to the VM.
Here’s a list of the objects that can be edited:
For help with these objects, use the command edit <object> ?.
Remove The remove command corresponds to the add command. It removes an object from another object, whereas the delete command actually destroys the object. The remove command takes a variety of options, depending on the type of object being removed. Here is an example using remove filesystem:
![]()
The remove command provides many different options for configuring and using OVM. Here’s a list of the objects that can be removed:

For help with these objects, use the command remove <object> ?.
Migrate The migrate command is used to migrate a virtual machine to a new server or server pool. Here is the syntax of the migrate vm command:
![]()
This command migrates the named virtual machine to the server or server pool you specify.
Clone The clone parameter is used to clone a virtual machine. Here is the syntax of the clone vm command:

An example of the clone vm command is shown here:

This command clones the named virtual machine to the server or server pool you specify.
Scripting with OVMCLI
The OVM CLI is useful for running commands that can provide information about the OVM environment as well as commands to create, modify, and delete objects in OVM. These commands are very useful, but the real power comes when they are put together into programs used to provide useful functions. Programs can be written using a number of different languages, including the following:
![]() Shell Bash, ksh, and sh can be used to create useful scripts.
Shell Bash, ksh, and sh can be used to create useful scripts.
![]() Perl The Perl language is very popular for developing OVM CLI scripts.
Perl The Perl language is very popular for developing OVM CLI scripts.
![]() Python Python is one of the most popular languages used with OVM. It also works with ovmwsh (not covered here).
Python Python is one of the most popular languages used with OVM. It also works with ovmwsh (not covered here).
![]() Other Java and other languages can also be used for OVM scripting.
Other Java and other languages can also be used for OVM scripting.
Scripts enable you to use variables, conditionals, and looping in order to automate repetitive tasks. In order to use a script, it is often best to contain the CLI within a single-line command. This is done by appending the cli command to the end of the connection screen. Here’s an example:
![]()
This has the effect of listing the VMs.
NOTE
ssh ovmcli uses the definition in the .ssh/config file. It is the equivalent of ssh -l etwhalen ovmmanager with a slightly shorter syntax.
You can add onto this by passing the output of the ovmcli command to filters in order to pass this to other commands:

You are probably getting the idea now of how to start using the OVM CLI in scripts.
NOTE
Whitespace and special characters can sometimes be a problem when scripting in bash or shell. The character can be used to delimit a special character. Here is an example:
![]()
With the single quotes, the spaces are maintained and processed as part of the name.
CLI Useful Examples
The uses of OVM’s command-line interface are unlimited. You can use it to create VMs, delete VMs, and manage and monitor VMs. Here are two examples of the same function using different languages.
Status of VMs Using Shell
The first is a script to display the status of the VMs in the server pool using standard shell scripting:

Here is the abbreviated output of this script:

NOTE
I am using the same shortcut from my .ssh/config file. The ssh ovmcli command is equivalent to ssh etwhalen@ovmmanager -p 10000. SSH keys are used in lieu of passwords.
Scripting with shell is easy and very standard.
Status of VMs Using Python
Performing the same function in Python is a little more complicated and involves more coding, but it offers more flexibility:


NOTE
I am using the same shortcut from my .ssh/config file. The ssh ovmcli command is equivalent to ssh etwhalen@ovmmanager -p 10000. SSH keys are used in lieu of passwords.
The output of the Python script is essentially the same, with some cosmetic differences:

Cloning VMs
Cloning one or more VMs is easy with the OVM CLI. Simply put the new VM names in a loop, as shown here:

You can see how straightforward it is to clone with the CLI.
Other Scripts
In addition to the scripts we have covered thus far, you can create other scripts for stopping, starting, listing, and cloning VMs as well as specific components. You can even write scripts for creating RAC clusters by adding shared disks to newly cloned VMs. What you do with CLI scripting is totally up to your imagination.
Summary
In this chapter, you have seen how to use the OVM CLI and some basic commands to create scripts that serve useful functions. We looked at examples for scripts written in shell as well as scripts written in more sophisticated languages such as Python. The chapter not only provided examples but also illustrated the power of command-line processing in OVM.