
CHAPTER
20
Managing the VM Environment and Virtual Machines
Throughout this book, you have seen how to configure the Oracle VM Server farm and Oracle VM guests. This chapter focuses on some of the day-to-day operations that the VM administrator will perform, including state management and configuring options that might change regularly, such as memory, network, and disks. As with most operations, you have several ways to perform these tasks: the Oracle VM Manager, OEM Cloud Control, Oracle VM CLI, and Xen xm commands.
Whereas day-to-day one-off operations such as monitoring and viewing the VM farm work great with the Oracle VM Manager and OEM, anything that is repetitious and complicated will benefit from using the Oracle VM CLI.

NOTE
The OEM Cloud Control 13c method of managing virtual machines is not covered in this chapter because it is covered in detail later in the book in Chapters 23–25. This chapter covers managing virtual machines via OVM Manager, OVM CLI, and xm commands.
Managing the State of Virtual Machines
As you learned in Chapter 4, the virtual machine can exist in many states. The current state of the virtual machine determines what states the virtual machine can transition into. This section covers the available state transition commands. Some of these commands were covered in earlier chapters, but are provided here for the sake of completeness. Almost every task can be done in the Oracle VM Manager, OEM Cloud Control 13c, the OVM CLI, and via Xen xm commands.
Determining the Status of Virtual Machines
Knowing the status of virtual machines is very useful to the VM administrator and can be accomplished through several methods. In order to demonstrate the different methods, the first part of this chapter uses tables to show the same task performed in the Oracle VM Manager, in the OVM CLI, and via xm commands. How to get the current status of virtual machines is shown here:

Listing the status of the virtual machines is an excellent example of when to use a shell script with the OVM CLI, as shown here:
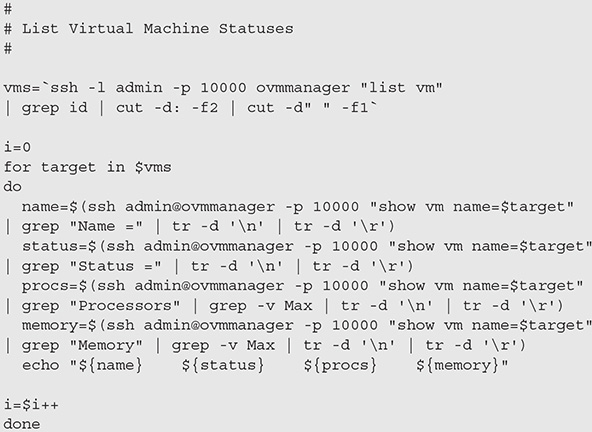
Here is the output:


Getting info on virtual machines is a critical part of managing the virtual environment.
Starting Virtual Machines
The most basic of the virtual machine commands is to start the virtual machine. How to perform this function is detailed in the following table:

You can determine the status of the virtual machine in a number of ways, including xm list (on the VM Server), ovm list vm, and, of course, using the GUI tools.
Stopping Virtual Machines
Stopping the virtual machine is another important command. How to perform this function is detailed in the following table:

Again, you can determine the status of the virtual machine in a number of ways, including xm list (on the VM server), ovm list vm, and, of course, using the GUI tools.
Suspending/Resuming Virtual Machines
Suspending a virtual machine causes the virtual machine to stop executing, and the state is written out to disk and removed from memory. If the VM Server is rebooted, the virtual machine is still available and can be restored to its previous state. A suspended virtual machine can be resumed to restart execution. How to perform this function is explained in the following table:

Migrating Virtual Machines
Migrating a virtual machine can be done live, with only a very small interruption in service. This interruption in service is rarely even noticed by users. Migrating virtual machines can be performed via several different methods, including using the GUI tools as well as the command-line tools detailed in the following table:

Changing the Configuration of Virtual Machines
From time to time, it is necessary to make changes to both the environment and the virtual machines themselves. Oracle VM is very adaptable and can be configured as needed. You can add hardware and make changes to storage and the network as necessary. Changes fall into two categories: changes to the virtual machines and changes to the VM servers.
Modifying Virtual Machines
On occasion you must modify a virtual machine. A number of different commands can be used to change the configuration and/or attributes of the virtual machines, as detailed in the following table:

Modifying the virtual machines should be done with care because changing the configuration might also require changes within the virtual machines themselves.
Configuring Virtual Machine Networks
Virtual machines networks are easy to modify. They can be configured graphically via the Oracle VM Manager or the OEM Cloud Control. Networks can also be modified via the Oracle VM CLI. Once you have added the virtual network adapter to the virtual machine, you will need to configure the adapter in the virtual machine itself. The first step is to add the network adapter to the virtual machine. The second step is to reboot the virtual machine and configure the network during the startup process as normal. Configuring the network is covered in detail in Chapter 12.
Configuring Storage on Virtual Machines
Multiple methods are available for configuring storage on the virtual machines. Several methods can be used to add storage to a virtual machine. The primary storage method is a virtual disk, which is created by Oracle VM and assigned to the virtual machine, but other methods exist as well. Storage is covered in detail in Chapter 13.
Using Virtual Storage
The primary method of adding storage to an Oracle VM is as a virtual disk. You can easily add a virtual disk to a virtual machine via the Oracle VM Manager, the OEM Cloud Control, or the Oracle VM CLI. Depending on the underlying operating system, a reboot of the virtual machine may or may not be required.
Using iSCSI Storage
Because the virtual machine has a network, any network storage that is supported on the guest OS is supported on the virtual machine. If the guest OS supports iSCSI, then this is a good choice for network storage. No additional configuration steps are needed because it is a virtual machine. You simply follow the normal iSCSI setup steps.
Using NFS Storage
Just as with iSCSI, because the virtual machine has a network, any network storage that is supported on the guest OS is supported on the virtual machine. NFS is a good choice for network storage because of its ease of use and built-in support. As with iSCSI, no additional configuration steps are needed because it is a virtual machine.
NOTE
The network on a paravirtualized guest is faster than the network on an HVM guest. If the intent is to use network storage, keep this in mind. The HVM accelerations speed up memory access, so it is a trade-off among I/O, network (paravirtualized), and memory (HVM).
Changing the Configuration of VM Servers
From time to time, it is necessary to make changes to both the environment and the virtual machines themselves. Oracle VM is very adaptable and can be configured as needed. You can add hardware and make changes to storage and the network as necessary. Changes fall into two categories: changes to the virtual machines and changes to the Oracle VM servers. Making changes to the Oracle VM servers is covered in Chapter 9 and throughout Part II of the book.
Creating and Cloning Virtual Machines
Creating and cloning virtual machines gives you the ability to create a new virtual machine and copy virtual machines. Creating a virtual machine allows you construct a new virtual machine. Cloning a virtual machine allows you to create one or more copies of a virtual machine. Creating and cloning are very similar; in fact, cloning has really made the deploying process obsolete because you can start with an already configured virtual machine.
Creating a Virtual Machine
The deployment process allows you to create a new virtual machine, either from scratch or using a template. Using a template you have created from another virtual machine allows you to preconfigure the virtual machine and then deploy it at will. As with other tasks, there are several ways to deploy a virtual machine.
Creating Virtual Machines with the Oracle VM Manager
You can create virtual machines in the Oracle VM Manager by selecting the server pool and then clicking the Create Virtual Machine icon or selecting Create Virtual Machine from the drop-down menu. Both methods result in the Create Virtual Machine window shown in Figure 20-1.

FIGURE 20-1. The Create Virtual Machine window
From the Create Virtual Machine window, you can select to create a virtual machine from an Oracle VM template or a Virtual Appliance, or you can create an entirely new VM from scratch using installation media such as Kickstart, Jumpstart, or any other network-installation method supported by the guest OS. If you select to create a new VM, you will see the Create Virtual Machine window shown in Figure 20-2.

FIGURE 20-2. Options for creating a VM
Here, you have many options for creating the virtual machine, including the number of CPUs, amount of RAM, and using HVM versus paravirtual. Some of the choices such as RAM, Processors, and Priority, can be changed dynamically. Other choices such as the Domain Type and Operating System cannot be changed while the VM is running.
NOTE
Newer versions of Linux will dynamically pick up some changes while the VM is active.
Once you have filled out the main screen, you have several other tabs of options you can configure, including Networks, Disks, Boot Order, and Tags. Once you have filled out all the screens and have appropriately set up an ISO image and boot order, you can start the VM and install from the installation ISO.
Creating Virtual Machines with the OVM CLI
Virtual machines can be created in the Oracle VM Manager via the OVM CLI create vm command. The create vm command can be used to create a new virtual machine on a specific repository. In order to view the options for additional parameters, you can use the CLI help function. Here is an example:

Once you have chosen all the options you want to use, you can create the VM. Here is a complete example:

Deleting Virtual Machines
When a VM comes to the end of its lifecycle, you’ll need to perform some cleanup. Deleting a VM can be done via the OVM Manager, the OVM CLI, and the xm commands.
Deleting Virtual Machines with the Oracle VM Manager
In order to delete a virtual machine using the Oracle VM Manager or OVM CLI, you must first stop the virtual machine, as detailed earlier in this chapter. In the Oracle VM Manager, navigate to the Servers and VMS tab in the Management pane and highlight the virtual machine you want to delete. Highlight the stopped virtual machine and click the Delete icon or select Delete from the context menu.
Once you have clicked Delete, you will be prompted to verify the deletion and select the virtual disks to be deleted that are assigned to this virtual machine. If you do not delete all of the disks, they will remain in the repository unassigned. This is shown in Figure 20-3.

FIGURE 20-3. Select the virtual disks to delete.
Once you verify the delete operation, the virtual machine and selected disks will be deleted.
Deleting Virtual Machines with the OVM CLI
Virtual machines can be deleted via the OVM CLI delete vm command. The delete vm command can be used to delete a virtual machine using either the VM’s name or ID. Unfortunately, the delete vm command does not remove the associated virtual disks. That must be done manually or via a script. Here is an example:
![]()
If you are deleting more than one VM, the CLI is a great way to do it.
Cloning Virtual Machines
The cloning process is only slightly different from the deployment process. Cloning allows you to create several copies of the same virtual machine. These copies are then placed in the same or a different storage repository.
Cloning Virtual Machines with the Oracle VM Manager
With the Oracle VM Manager, cloning begins with selecting the virtual machine to be cloned by highlighting it in the Oracle VM Manager and then selecting Clone… from the context menu or clicking the Clone button in the toolbar. You will be provided with a pop-up where you can fill in the details of the clone, as shown in Figure 20-4.
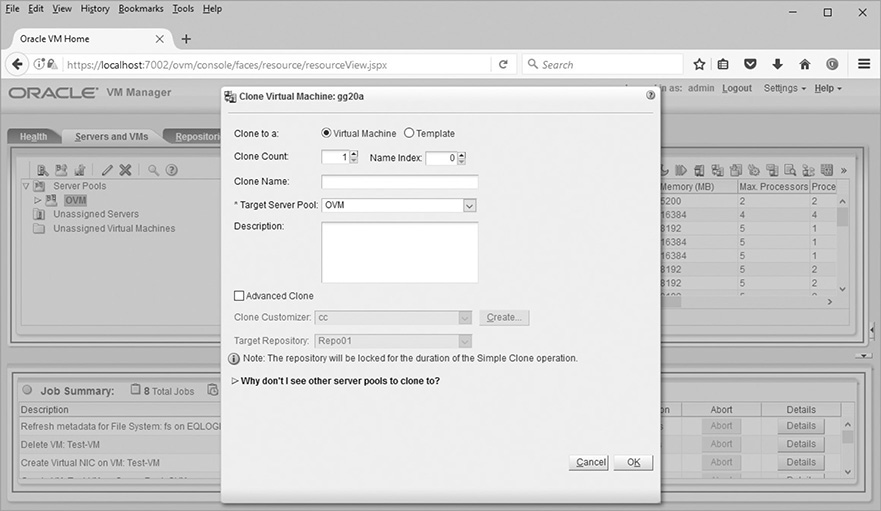
FIGURE 20-4. The Clone Virtual Machine pop-up
You can select to clone to a VM or template. Input the virtual machine name index and number of copies and then select the server pool name from the drop-down list. Once you are satisfied with your selections, click OK to start the cloning process. There is no confirmation screen for this task. Once you have clicked OK, cloning begins and control returns to the Virtual Machines screen, where you can watch the progress of the cloning operation.
Cloning Virtual Machines with the Oracle VM CLI
To clone a virtual machine from within the Oracle VM CLI, use the OVM CLI clone vm command. This command takes the options listed here:
![]() destName
destName
![]() destType
destType
![]() serverPool
serverPool
![]() cloneCustomizer
cloneCustomizer
![]() targetRepository
targetRepository
Here is an example of cloning a virtual machine via the Oracle VM CLI:

Once the cloning process has completed, the new systems are ready for use, as shown here:


The cloning process addresses the MAC address issue we used to have with creating templates in earlier versions of Oracle VM. When you create a new VM from this template, a new MAC address will be assigned.
Summary
This chapter covered some of the different options for managing the state of Oracle VM virtual machines, including the starting and stopping of virtual machines, the suspending and resuming of virtual machines, as well as the older deployment process and the cloning process. Managing the state of the virtual machines is really the most important task an administrator has to take on—in addition to making sure everything is properly backed up.
Chapter 21 covers physical to virtual migration.