
CHAPTER
21
Physical-to-Virtual Migration and Virtual-to-Virtual Migration
In previous chapters, you learned how to create virtual machines by hand and via templates and assemblies. In addition to these methods, it is also possible to create a virtual machine in Oracle VM from an existing physical machine. This opens up many possibilities for both testing and upgrading without putting your production system at risk. It also provides the ability to quickly move a legacy system on old hardware to a more stable and robust virtual machine. Uses of the physical-to-virtual migration include the following:
![]() Migration Migrating physical servers on old hardware to a newer, faster virtual machine.
Migration Migrating physical servers on old hardware to a newer, faster virtual machine.
![]() Upgrade testing It is unwise to upgrade the operating system on a production server to a newer version without testing. Here, you can convert the physical machine to a virtual machine and test the upgrade process several times until you are comfortable with the outcome.
Upgrade testing It is unwise to upgrade the operating system on a production server to a newer version without testing. Here, you can convert the physical machine to a virtual machine and test the upgrade process several times until you are comfortable with the outcome.
![]() Application upgrades You can easily take a copy of the production server and create a virtual machine for application upgrade testing.
Application upgrades You can easily take a copy of the production server and create a virtual machine for application upgrade testing.
![]() Problem resolution If you are experiencing a production issue, a virtual machine can be created in order to perform testing in order to determine what the problem is without affecting production users.
Problem resolution If you are experiencing a production issue, a virtual machine can be created in order to perform testing in order to determine what the problem is without affecting production users.
As you can see, there are multiple reasons why performing a physical-to-virtual (P2V) migration is useful. In addition, if hardware virtualization is being used, there is no reason why this technique cannot be used to migrate from another vendor’s virtualization product to OVM.
Migrating a Physical Server to OVM
The migration process of moving a physical server to OVM is fairly straightforward. In order to migrate a physical machine to a virtual machine, the physical machine must be shut down. Therefore, some downtime is required.
In order to convert a physical machine to a virtual machine, you must boot the OVM 3 Server CD-ROM. The boot screen will appear. Click Enter to install OVM on this system (you don’t want to do that for this example) or type p2v at the boot prompt and press enter. This is shown in Figure 21-1.

FIGURE 21-1. The OVM Server boot screen
From here, the system will boot into the OVM installer by booting the Linux operating system (OS). Once it has completed the boot process, you will see the Disk Found screen. Here, you can choose to test the CD-ROM or press tab to move the focus to Skip and then press enter, as shown in Figure 21-2.

FIGURE 21-2. The Disk Found dialog
The installation process will begin to discover the hard disk of the physical system and will eventually end up at the “Select the disks to include in the image” dialog. From here, you should select all the disks you intend to migrate. The sample system in the figures has only one disk associated with it. Highlight all the disks to be included by using the arrow keys and spacebar to select the disks. Once you have selected all the disks you want to include, tab to OK and proceed by pressing enter. This screen is shown in Figure 21-3.

FIGURE 21-3. The “Select the disks to include in the image” dialog
At this point, you will be prompted to provide some additional information about the virtual machine to be created. The information requested includes the name of the VM, the memory to be allocated, the number of virtual CPUs, and the console password. This is shown in Figure 21-4. When you have filled in all of the blanks, tab to OK and press enter.

FIGURE 21-4. The “Other parameters for VM” dialog
Once you click enter, you will see a message at the bottom of the screen informing you of a web server that has been started. The URL of the web server is the IP address that has been provided here, as shown in Figure 21-5. You will use this URL in the next stage.

FIGURE 21-5. The web server URL
Open the URL (IP address) in a browser using HTTPS. This will open a web page showing you a list of files that are available for download. This is shown in Figure 21-6.

FIGURE 21-6. The web server URL page
Take note of the files that have been displayed. You will need the vm.cfg and virtual disk image System-sda.img in the next step.
Now that you have the URL of the images, you will import them into OVM via the OVM Manager. In the OVM Manager repositories screen, select the repository to be used and navigate to templates. Once you are in the templates screen, you can select Import Template. Fill in the URL for the virtual disks and vm.cfg file that you noted in the previous screen. The Import VM Templates dialog is shown in Figure 21-7.
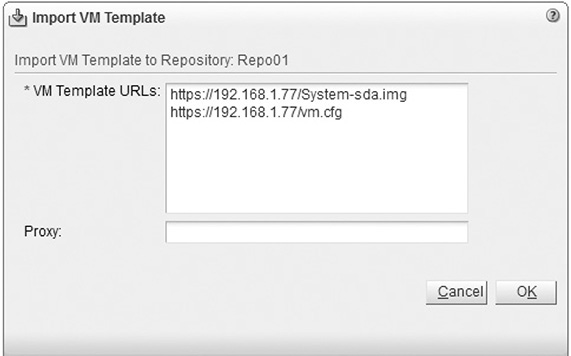
FIGURE 21-7. The Import VM Template dialog
Once the template has been imported, you will create a virtual machine using the methods described in this book to create a virtual machine from a template.
Migrating Another Vendor’s VM to OVM
It is often necessary to move a virtual machine from another vendor to OVM. This other vendor might be VMware or Microsoft Hyper-V. In this section we will take a look at moving a VMware virtual machine to OVM. In earlier versions of OVM you would use the same P2V process that you used in the previous section. This does not work with the current version of OVM. In order to migrate from VMware to OVM you must take the VMware images and convert them directly into an OVM virtual appliance.
Migrating from VMware
In order to migrate a virtual machine from VMware to OVM, you must first export the VM in VMware and then import it into OVM. In order to export a virtual machine in VMware, the virtual machine must be stopped. Highlight the virtual machine in the VMware vSphere client. From the File menu, select Export | Export OVF Template. This will invoke the Export OVF Template dialog shown in Figure 21-8.

FIGURE 21-8. The Export OVF Template dialog
Fill in the path to the local directory where you want the OVF template to be exported to. This will be a directory on the system from which you are running, not on the Oracle VM server. Once you have completed this, you will see the progress in the Exporting dialog, as shown in Figure 21-9.

FIGURE 21-9. The Exporting dialog
Depending on the size of the virtual machine, this could take a while. Once it has completed, you will see the Export Complete dialog (not shown). The next step moves from the VMware vSphere client to the Oracle VM Manager.
In order to import an OVA image into Oracle VM, you must use a web server to download the file. However you decide to do this, you must move the OVA file that you just created to a web server that is accessible from OVM. Once you have uploaded the file to a web server, you will be able to import using the Oracle VM Manager.
From the Oracle VM Manager, select the repository into which you want to import the OVA image. Select the Virtual Appliances folder within the repository that you want to use and then choose the Import Virtual Appliance icon from the toolbar in the management pane. This will bring up the Import Virtual Appliance dialog, as shown in Figure 21-10. Fill in the URL and click OK in order to import the virtual appliance.

FIGURE 21-10. The Import Virtual Appliance dialog
Once you have imported the virtual appliance, you are then ready to use it. Select Create Virtual Machine (available from several menus) and select Clone from an Existing Virtual Appliance, as shown in Figure 21-11.

FIGURE 21-11. The Create Virtual Machine dialog
Once you have selected to create from a virtual appliance, you will be asked what the repository is, what the virtual appliance is, and which server pool to install it in. This is shown in Figure 21-12.

FIGURE 21-12. Select the repository, virtual appliance, and server pool.
Once you have clicked Finish, the virtual machine will be created. This will complete the conversion from VMware to Oracle VM.
Before starting the virtual machine, you should edit it and make sure the network and disk are set up correctly. Once you have completed this step, you can start the VM.
Summary
As you can see from this chapter, it isn’t very difficult to create a virtual machine from either a physical system or from a VMware virtual machine. Each process is different, but both are very straightforward and easy to do. Both also require the virtual or physical machine to be down during the process.
