
CHAPTER
25
Configuring Advanced Cloud Control and User Self-Provisioning
When you’re building a private cloud, it all comes down to one simple feature: enabling the users to self-provision VMs on their own. In the previous chapters, all the perquisite components have been configured. The Oracle VM infrastructure, network, storage, and integration into Enterprise Manager Cloud Control 13c have all been covered. Although these components combined provide unique value, and the goal is for the users to be able to access a portal and provision their own VMs. This chapter covers the tasks of configuring and using the self-provisioning portal built into Enterprise Manager Could Control 13c.
Configuring IaaS Self Service
Enabling Enterprise Manager to provide the IaaS self-provisioning portal can be done in six steps (see Figure 25-1). The first five of these steps were completed in the previous chapters, when you learned how to configure an Oracle VM system. Once the final step is complete and the zone is created, the final task is to customize your IaaS cloud. Here’s a review of the steps for configuring IaaS Self Service:

FIGURE 25-1. IaaS enablement workflow
1. Register Oracle VM Manager. This step was covered in Chapter 23, when you registered Oracle VM Manager with Enterprise Manager. This enables Enterprise Manager to control the Oracle VM Manager system. This registration is a requirement for the common administrative tasks covered in Chapter 24. The administrator can also create and manage storage, the network, server pools, virtual servers, and guest virtual machines.
2. Discover Oracle VM servers. This step was also covered in Chapter 23. It automatically discovers any existing OVS systems, pools, storage servers and repositories, network configurations, and existing virtual machines. When new OVS machines are added, they can be discovered using Enterprise Manager or the OVMM system.
3. Set up storage infrastructure. In Chapter 13, we covered creating and managing storage servers, file systems, and logical unit numbers (LUNs). An external storage element is created on dedicated storage hardware such as a server configured for NAS offering NFS shares. We created a repository, which is where templates and assemblies are stored for deployment as VMs in a cloud. We also covered how custom templates can be created in Chapter 17.
4. Configure networks and VLAN groups. Chapter 12 covered the creation and configuration of networks in Oracle VM Manager. This included the configuration of the OVS physical NIC ports as well as expanded into how virtual network interfaces (vNICs) are used to carry network traffic across a VLAN—a mechanism used to virtualize network interfaces across subnets and physical locations so that they appear to be on a single confined LAN.
5. Create a virtual server pool. Chapter 14 covered the creation and management of a server pool, which groups one or more Oracle VM servers. The pool allows for a physical grouping of similar servers. As a reminder, a VM can only be “live migrated” within a pool.
6. Create a zone. A zone is an Enterprise Manager concept that’s used to group related cloud resources together. Zones can be created based on location, software lifecycle status, and so on, to group resources belonging to a cost center or for metering and chargeback purposes. Typically, a zone can cover a department, project, or possibly even a data center. The cloud environment can be composed of one or more zones. Each zone has a set of metrics that show the aggregate utilization of the zone. A zone can contain multiple OVM server pools, but a OVMM pool can only be a member of a single zone. We cover the creation of zones in this chapter.
Once the initial configuration is complete, you need to configure the cloud environment itself, which you can do from the Infrastructure Cloud Setup menu. This includes configuring the following items:
![]() Storage QoS Storage QoS refers to the type or quality of storage used by a VM. This is defined at the storage server level. Setting up the storage QoS involves defining various storage properties. Before deploying a VM, you can define the storage QoS, map this QoS to a storage server, and then specify this QoS while deploying a guest virtual machine. Examples might include all flash storage for databases and low-cost archive storage for backups.
Storage QoS Storage QoS refers to the type or quality of storage used by a VM. This is defined at the storage server level. Setting up the storage QoS involves defining various storage properties. Before deploying a VM, you can define the storage QoS, map this QoS to a storage server, and then specify this QoS while deploying a guest virtual machine. Examples might include all flash storage for databases and low-cost archive storage for backups.
![]() Network Types You can define network types used by VMs. This can be defined to match your environment and may be something like Internet DMZ, RAC Interconnect, or Internally Routable. After the network type has been defined, you can map this to any network that is being created and assigned to a VM.
Network Types You can define network types used by VMs. This can be defined to match your environment and may be something like Internet DMZ, RAC Interconnect, or Internally Routable. After the network type has been defined, you can map this to any network that is being created and assigned to a VM.
![]() Machine Sizes You can define the machine sizes that will be available to the self-service users when they deploy a VM. By default, three sizes are created: small, medium, and large.
Machine Sizes You can define the machine sizes that will be available to the self-service users when they deploy a VM. By default, three sizes are created: small, medium, and large.
![]() Software Library User Configuration With the storage repository, you can import VM templates, virtual appliances, and other software components into the storage repository. This makes it easier to share templates and virtual appliances across OVMM deployments.
Software Library User Configuration With the storage repository, you can import VM templates, virtual appliances, and other software components into the storage repository. This makes it easier to share templates and virtual appliances across OVMM deployments.
![]() Request Purging Policy All deployment requests can be retained for review for a certain period of time and then purged. This section sets the number of days requests are archived in Enterprise Manager.
Request Purging Policy All deployment requests can be retained for review for a certain period of time and then purged. This section sets the number of days requests are archived in Enterprise Manager.
Creating a Zone
A zone is an Enterprise Manager concept used by database, Java, and infrastructure cloud management systems. It is used to group related cloud-delivery resources together. Zones can be created based on location, software lifecycle status, and so on, to group resources belonging to a cost center or for metering and chargeback purposes. Typically, a zone can cover a department, project, or possibly even a data center. The cloud environment can be composed of one or more zones. Each zone has a set of metrics that show its aggregate utilization. For an infrastructure zone, the members will be OVS pools previously defined in the OVMM. A zone can contain multiple OVM server pools, but a OVMM pool can only be a member of a single zone.
To create a zone, navigate to the Infrastructure Cloud home screen and expand the Target Navigation option, as shown in Figure 25-2.
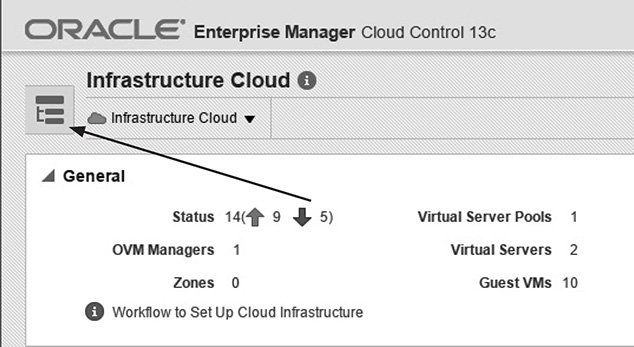
FIGURE 25-2. Infrastructure Cloud target navigation
Next, right-click the OVMM server; this will present you with a variety of options for the OVMM server. To create a new zone, select Create Zone, as shown in Figure 25-3. The other options are described here:
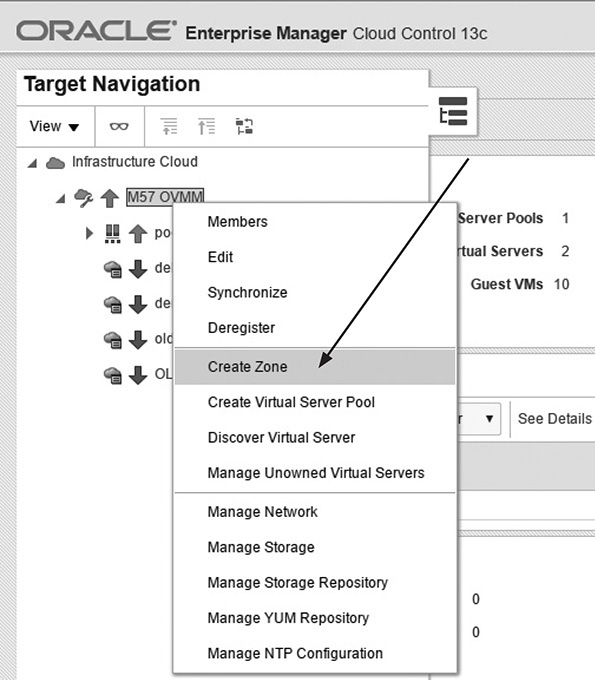
FIGURE 25-3. Creating a new zone
![]() Members This option shows all members associated with the OVM Manager.
Members This option shows all members associated with the OVM Manager.
![]() Edit This option edits the connection registration information for the OVM Manager.
Edit This option edits the connection registration information for the OVM Manager.
![]() Synchronize This option forces Enterprise Manager to synchronize its database with the configuration in the OVM Manager. This is useful when changes are made in the OVM Manager, and Enterprise Manager does not yet show them.
Synchronize This option forces Enterprise Manager to synchronize its database with the configuration in the OVM Manager. This is useful when changes are made in the OVM Manager, and Enterprise Manager does not yet show them.
![]() Deregister This option deregisters the Oracle VM Manager from Enterprise Manager and removes all related targets from Enterprise Manager.
Deregister This option deregisters the Oracle VM Manager from Enterprise Manager and removes all related targets from Enterprise Manager.
![]() Create Zone This option creates a new zone for IaaS.
Create Zone This option creates a new zone for IaaS.
![]() Create Virtual Server Pool This option creates an OVM server pool using Enterprise Manager instead of OVMM.
Create Virtual Server Pool This option creates an OVM server pool using Enterprise Manager instead of OVMM.
![]() Discover Virtual Server This option discovers a new OVS using Enterprise Manager instead of OVMM.
Discover Virtual Server This option discovers a new OVS using Enterprise Manager instead of OVMM.
![]() Manage Unowned Virtual Servers This option allows OVMM to take control of unowned Oracle VM servers.
Manage Unowned Virtual Servers This option allows OVMM to take control of unowned Oracle VM servers.
![]() Manage Network This option allows the Enterprise Manager admin to control the network configuration of the Oracle VM system, similar to how the same task can be performed using OVMM.
Manage Network This option allows the Enterprise Manager admin to control the network configuration of the Oracle VM system, similar to how the same task can be performed using OVMM.
![]() Manage Storage This option allows the Enterprise Manager admin to control the storage configuration of the Oracle VM system, similar to how the same task can be performed using OVMM.
Manage Storage This option allows the Enterprise Manager admin to control the storage configuration of the Oracle VM system, similar to how the same task can be performed using OVMM.
![]() Manage Storage Repository This option allows the Enterprise Manager admin to control the storage repositories used by OVMM, similar to how the same task can be performed using OVMM.
Manage Storage Repository This option allows the Enterprise Manager admin to control the storage repositories used by OVMM, similar to how the same task can be performed using OVMM.
![]() Manage YUM Repository This option sets the YUM repository used for OVS patching.
Manage YUM Repository This option sets the YUM repository used for OVS patching.
![]() Manage NTP Configuration This option allows the configuration of the NTP servers used by all OVS systems.
Manage NTP Configuration This option allows the configuration of the NTP servers used by all OVS systems.
The next step is to name the zone, provide a description, and indicate whether the zone can be used by IaaS Self Service users. Use the Add button to select the server pools used by the zone. Although multiple pools can be place into a single zone, a pool can only be in one zone at a time.
The final configuration should look similar to Figure 25-4. As a note, if the Infrastructure Cloud Self Service Zone option is not checked, the zone will not be available for Self Service users.

FIGURE 25-4. IaaS zone configuration
When the zone is created, an Enterprise Manager job will be created. When the job finishes, the zone should appear in the Target Navigation view, with the OVS pool and all its members showing underneath the zone, as shown in Figure 25-5.

FIGURE 25-5. Zone hierarchy
It is worth noting that virtual machines not assigned to a pool will not show up in the hierarchy of the zone but instead will show as being peers of the pool. This is the case with the virtual machines delme, demo3.0, old_base_v1.0_vm, and OLGI in the example.
Once the zone is created, the next step is to customize the cloud for IaaS.
Configuring the Cloud for IaaS
Many of the settings in this phase will be unique to your specific environment. This step allows you to define the networks, storage types, and machine sizes available to Self Service users.
These common settings are defined for the entire IaaS cloud. To start the setup process, from the Target Navigation menu, right-click Infrastructure Cloud and select Setup, as shown here.

From this screen, the global IaaS cloud settings can be defined and configured.
Storage QoS
The first setting defines the storage QoS available to Self Service users. Storage QoS refers to the type or quality of storage used by a VM. This is defined at the storage server level. Setting up the storage QoS involves defining various storage properties. Before deploying a VM, you can define the storage QoS, map this QoS to a storage server, and then specify this QoS while deploying a guest virtual machine. An example might be all flash storage for databases or low-cost archive storage for backups. These are basically tags, defined by the administrator, that can later be added to each storage repository. Follow these steps to add a new tag:
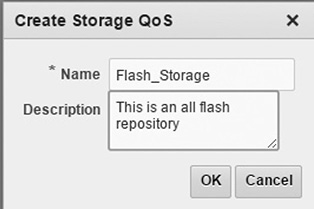
1. Select Storage QoS and click the Create button, as shown here.

2. Enter a name and description for the new tag. The name cannot contain any whitespace and should be descriptive, such as flash_storage, ebs_storage, and so on. An example is shown next.
When this is complete, the new Storage QoS option should show up in the list, as shown next.

3. You can now assign the storage QoS to the repositories previously created. To do this, navigate to the OVMM server using the Target Navigation menu and then right-click the OVM Manager and select Manage Storage, as shown here.

4. Select the file server that contains the share you want to assign the Storage tag to. In this example, Generic NAS will have a storage QoS assigned. Select Generic NAS, as shown here.

5. Scroll down until you see Storage QoS Mapping and click the Edit button, as shown here.

6. Click the Add button to assign a storage QoS to the array. Note that you can assign multiple storage QoS mappings to the same array.

7. Choose the storage QoS selector that is to be added to the array.

8. You should now see the new mapping, at which point you are ready to click the OK button to start the Enterprise Manager job that will assign the storage QoS mapping to the array.

An Enterprise Manager job will now run, assigning the Storage QoS tag to the array.
Network Types
Just as with storage QoS, you can tag the networks used by Self Service users when they provision a VM. This can be defined to match your environment—perhaps something like Internet DMZ, RAC Interconnect, or Internally Routable. After the network type has been defined, you can map it to any network that is being created and assigned to a VM.
Although this may work for your cloud, it is easy to add additional network types. Start from the Infrastructure Cloud Setup screen used in Storage QoS and select the Network Types tab on the left. This will take you to the default configuration shown here.

Initially, three network types are created when Enterprise Manager is installed:
![]() Internet Routable This type indicates the network is Internet routable.
Internet Routable This type indicates the network is Internet routable.
![]() Non Internet Routable This type indicates the network is not Internet routable.
Non Internet Routable This type indicates the network is not Internet routable.
![]() RFC1918 This type determines that the network is not Internet routable and supports a predefined range of IP addresses.
RFC1918 This type determines that the network is not Internet routable and supports a predefined range of IP addresses.
Although these network types may work for your cloud, it is easy to add additional ones. To do so,click the Create button. You will be prompted to provide the name for the new custom network type, as shown here.

In this example, a new type named “Storage Network” is being defined so that the storage VLAN can be tagged as such. The network for use by self-provisioning users will then be tagged as well. To tag a network with a network type, navigate the OVM Manager using the Target Navigation menu, right-click the OVM Manager, and click the Manage Network option, as shown here.

This takes you to the Network Management screen, which provides the same management capabilities as available using the Oracle VM Manager. To assign the network type to a network, make sure the Networks tab is selected and then click the space to the left of the network name to highlight the row you want to edit, as shown next. In this example, we assign a network type to the 192.168.200.0 network. Once the row is highlighted, click the Edit button.

This takes you to a four-step process, shown next, where the network roles can be edited, the ports and VLAN interfaces changed, and the network profile updated. The last step is to review the changes before making them official.

Click the Next button to get to the third step, where you can assign a network type by selecting the Target Search button to the left of the Select Network Type field and then selecting the type to tag this network with, as shown here.

Continue to the review step and then click Finish to submit the Enterprise Manager job.
Machine Sizes
You can define the machine sizes that will be available to the Self Service users when they deploy a VM. By default, three sizes are created by default: small, medium and large. Additional sizes, also known as shapes, can be defined. To do this, navigate to the Infrastructure Cloud Setup screen, shown here, and click the Machine Sizes tab along the left side of the screen.

To create a new shape, click the Create button. From here, a dialog is presented where you can set the name of the shape and its parameters. In this example, a new size called Micro will be assigned.

NOTE
When hyperthreading is enabled on the server, a vCPU represents a single thread, not a whole core. To consume a full core, two vCPUs need to be assigned.

Software Library User Configuration
On the Software Library User Configuration screen, shown here, you can import VM templates, virtual appliances, and other software components and keep them in the storage repository. This makes it easier to share templates and virtual appliances across OVMM deployments. The user must have full access to the software library so that new templates can be imported, clones made, and so on. To set the password for the library, navigate to the Infrastructure Cloud Setup screen and click the Software Library User Configuration tab on the left side. This password must be specified when the user accesses the software library and downloads the required components.

Enter the password and click Apply.
Request Purging Policy
All deployment requests can be retained for a certain period for review and then purged. This section sets the number of days requests are archived in Enterprise Manager. By default, Enterprise Manager will store the records for 30 days before purging them. If need be, you can adjust this time by setting the numbers of days and clicking Apply. If you do not want records purged, uncheck the Enable Purging box.

Configuring the Request Settings
The request settings establish the global settings that limit what users can request, in terms of networks, future provisioning, and so on. The settings are made in the Request Settings tab, under Infrastructure Cloud Self Service Setup (see Figure 25-6):

FIGURE 25-6. Request settings
![]() Future Reservation Indicates how far in advance you can make a request. Although enabling the ability for a user to provision systems during idle periods can be helpful, enabling users to provision systems years in advance can cause issues.
Future Reservation Indicates how far in advance you can make a request. Although enabling the ability for a user to provision systems during idle periods can be helpful, enabling users to provision systems years in advance can cause issues.
![]() Request Duration The maximum duration for which requests should be made. This sets how long a VM will run before being automatically deprovisioned. This is very useful in environments where developers are requesting systems and have a habit of forgetting to manually deprovision them.
Request Duration The maximum duration for which requests should be made. This sets how long a VM will run before being automatically deprovisioned. This is very useful in environments where developers are requesting systems and have a habit of forgetting to manually deprovision them.
![]() Network Restriction Allows you to restrict the physical networks for each EM_SSA_USER role. If this feature is enabled, you can navigate to the Roles page and assign networks for each EM_SSA_USER role. This is useful if you need to isolate a team to a specific network.
Network Restriction Allows you to restrict the physical networks for each EM_SSA_USER role. If this feature is enabled, you can navigate to the Roles page and assign networks for each EM_SSA_USER role. This is useful if you need to isolate a team to a specific network.
![]() Configure EM Agent Check the Enable EM Agent Configuration box to configure the management agent on servers while the Self Service user’s request is being processed.
Configure EM Agent Check the Enable EM Agent Configuration box to configure the management agent on servers while the Self Service user’s request is being processed.
![]() Allow Partial Deployment Select this option to enable partial deployment. By default, when a deployment fails, the assembly instance, tier instance, and the guest VMs that have been created are automatically deleted. However, if partial deployment is enabled, this cleanup activity is disabled.
Allow Partial Deployment Select this option to enable partial deployment. By default, when a deployment fails, the assembly instance, tier instance, and the guest VMs that have been created are automatically deleted. However, if partial deployment is enabled, this cleanup activity is disabled.
![]() Software Library Top Level Folder Select the top-level folder in the software library in which user-specific folders need to be created. This folder is used by the SSA users to store their assemblies, templates, and deployment plans. By default, this is not set but is required.
Software Library Top Level Folder Select the top-level folder in the software library in which user-specific folders need to be created. This folder is used by the SSA users to store their assemblies, templates, and deployment plans. By default, this is not set but is required.
It is helpful to create a folder in the software library before assigning it. To do this, go to Navigate Setup | Provisioning and Patching | Software Library, as shown here.

You will then see the available locations for the software library. Initially, only a single location exists; highlight the location and click the text “Software Library” in the line just under the heading “Software Library: Administration,” as shown here.

This shows all the folders in the software library. To add a folder, right-click Software Library and select Create Folder, as shown here.

You will now be able to enter a folder (in this case, IaaS Self-Provisioning).

Click OK, and you will be returned to the list of software library folders. Scroll down to verify your new folder has been created. Now go back to the Request Settings screen and click the search icon next to Folder Name at the bottom of the page. Select the folder you just created and then click Apply.

Optionally, you can set the other parameters.
Configuring Roles
Roles are used in Enterprise Manager to enable specific features for users. The overall cloud administrator should have the EM_CLOUD_ADMINISTRATOR role assigned, as that role is required to set up the core components, such as storage and networking. In addition, the EM_SSA_ADMIN role can be used to isolate access to certain zones and for quota control. In Chapter 23, we created the Enterprise Manager user pellipoix. Any user who will be able to use the self-provisioning portal needs to be assigned the EM_SSA_USER role. In addition, if the user is to have access to manage the Self Service system, he or she should have the EM_SSA_ADMINISTRATOR role assigned. Users are managed under Setup | Security | Roles, as shown next.

To edit the user, select the user and then click the Edit button, as shown next.

Click Roles and add the EM_SSA_USER role for end users and add the EM_SSA_ADMINISTRATOR role, shown here, for self-service administrators.

Once this has been reviewed, click Finish. You can now assign a quota to any user with that role. In addition, if you want to assign a quota to a group of users, you can clone the EM_SSA_USER role using a new name and then assign it to the user. Cloned roles can be assigned custom quotas in the next step. A new role, called “SSA_USER_DEFAULT,” was cloned from the EM_SSA_USER roles and assigned to the pellipoix user.
To assign a quota to this custom role, access the Infrastructure Cloud Self Service Setup screen and click the Roles tab on the left. When you’re performing the initial configuration, no roles are defined, as shown here.

To create a new role, click the Assign Quota to Role button, which will open the dialog shown here for the quota settings.

![]() Select Role Click the search icon to select a role for which the mapping is to be defined. The list of all the roles with Self Service access will appear. If no roles appear, double-check that you have a user with one of the SSA* roles assigned.
Select Role Click the search icon to select a role for which the mapping is to be defined. The list of all the roles with Self Service access will appear. If no roles appear, double-check that you have a user with one of the SSA* roles assigned.
![]() Select Zones Click the search icon. All zones defined under Infrastructure Cloud will be listed. Select a zone from the list and click OK.
Select Zones Click the search icon. All zones defined under Infrastructure Cloud will be listed. Select a zone from the list and click OK.
![]() Number of Servers This is the maximum number of VMs that can be reserved at any time across all zones.
Number of Servers This is the maximum number of VMs that can be reserved at any time across all zones.
![]() Number of VCPUs This is the maximum number of VCPUs that can be allocated.
Number of VCPUs This is the maximum number of VCPUs that can be allocated.
![]() Memory This is the maximum amount of memory that can be allocated.
Memory This is the maximum amount of memory that can be allocated.
![]() Local Disk This is the maximum amount of storage that can be allocated.
Local Disk This is the maximum amount of storage that can be allocated.
![]() Allow Archiving to Software Library If this option is enabled, users can save machine images to the software library.
Allow Archiving to Software Library If this option is enabled, users can save machine images to the software library.
![]() Select Networks This field is displayed only if Network Restriction has been enabled. This enables the admin to limit this group to specific networks.
Select Networks This field is displayed only if Network Restriction has been enabled. This enables the admin to limit this group to specific networks.
![]() Select Network Profiles Use the search icon to select any network profile to assign to the role. This will limit VMs to this network profile.
Select Network Profiles Use the search icon to select any network profile to assign to the role. This will limit VMs to this network profile.
![]() Override Global Request Settings Select this option to override the request settings for the role. You can modify the future reservation, the request duration, and configure the management agent.
Override Global Request Settings Select this option to override the request settings for the role. You can modify the future reservation, the request duration, and configure the management agent.
Once these settings are complete, click the Save button.
Software Components
The Software Components tab is where access to predefined VM templates and virtual assemblies is granted. Before access can be granted, an image first needs to be uploaded to the software library.
This can be done by a Self Service administrator using the Self Service Portal. To access the Self Service Portal, go to Enterprise | Cloud | Self Service Portal, as shown next.

The initial view of the Self Service Portal reveals the Oracle Public Cloud features first, and under the list of additional service you will find the Infrastructure – Oracle VM Cloud Services option, shown next.

Click the Infrastructure – Oracle VM Cloud Services link to enter the Oracle VM IaaS Cloud screen.

On this screen, you can see all resources assigned to your user. A navigation bar, shown here, appears along the left side.

To upload an image to the software library, as an SSA admin, click the Library option and then the Upload button. Using the Choose File option, find the template exported in Chapter 15 and upload it to the library. Wait for the upload to report “Done” in the user interface, as shown here, before clicking the Upload button.

Once the file shows in the library, return to the Software Components screen. Click Add Components and then under Select Software Components click the Add button. From here, you can select the template from the library and then click Select. Make sure you select the correct type because an incorrect type will cause an issue importing the software into the zone in a future step. Some templates are actually virtual assemblies; you will need to read the documentation that comes with the template.
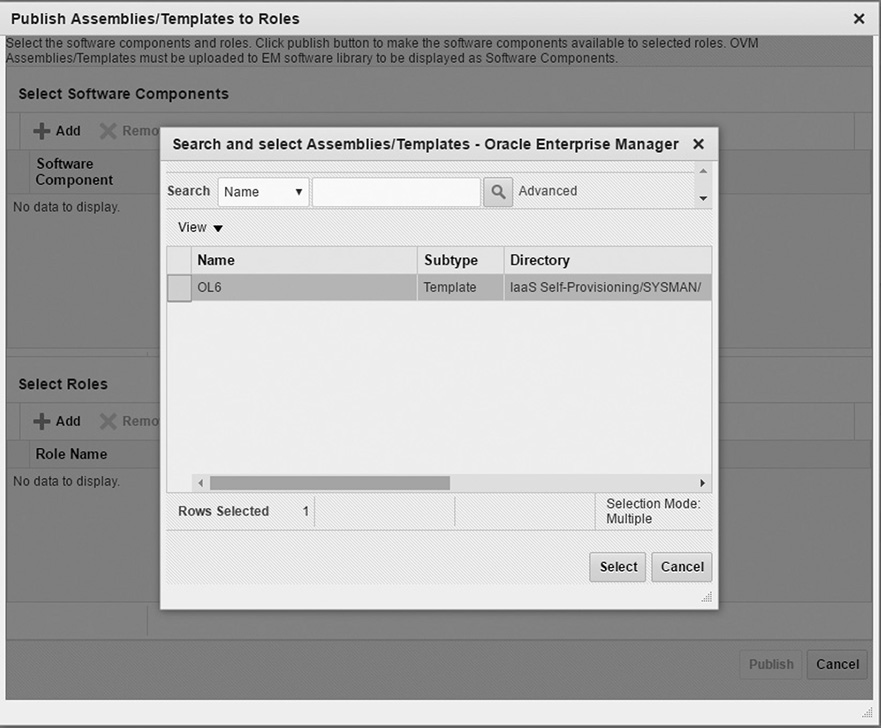
The same task is done for the role that will have access to the templates and assemblies in the list shown next. In this example, the OL6 template will be accessible to users with the SSA_USER_DEFAULT role.

Once the template is published, you will see it in the list; however, the template is not yet available for any VMs. In the next step, it needs to be imported into each zone that will be using it.

Click the Import button and select the zone to import the template to, as shown here.

This starts a job in Enterprise Manager that imports the template or virtual appliance into the zone. Once this is complete, the imported field should have a green checkmark. At this point, the software is ready to be deployed via a Self Service user.
Using IaaS
The final task is deploying a VM through the self-provisioning portal. In this example, log in as the pellipox user previously created.
NOTE
In the user’s profile, a default root password for new VMs and the source template/assembly can be selected, but this example will assume these have not been set.
Once you are logged into Cloud Control, navigate to the self-provisioning portal. Because pellipox is a normal user, the screen (shown in Figure 25-7) will look slightly different.

FIGURE 25-7. IaaS user portal
The Usage section will now show how many resources are consumed and how many resources are available to be consumed. Because this user cannot provision any VMs yet, there is zero consumption, but the maximum resources match the quota settings previously configured. To provision a new server, click the Request Servers button.
The first screen, shown in Figure 25-8, allows the user to select the zone and source image to be used for the provisioning process. For this example, OL6 was selected as the image, and IaaS_Zone_1 for the zone.

FIGURE 25-8. The New Server Request: General screen
The next screen is the Deployment Configuration screen, shown in Figure 25-9. This is where the server size and the initial root password are set, and additional networks and storage can be assigned. To add additional storage or network ports, simply click the Add button in the respective category. In addition, multiple VMs can be provisioned by simply increasing the Initial field under Number of Servers. Up to 64 VMs can be provisioned at once.

FIGURE 25-9. The New Server Request: Deployment Configuration screen
Next, the provisioning process can be deployed in the future using the New Server Request: Schedule screen, shown in Figure 25-10. The end date of the VM can also be set on this screen.

FIGURE 25-10. The New Server Request: Schedule screen
Finally, go to the Review screen and click Finish to start the Enterprise Manager request. With the self-provisioning portal, the request can be tracked using the Request icon in the navigation bar. This will show the status of the most recent requests (see Figure 25-11).

FIGURE 25-11. Self Service requests
Summary
This chapter covered how to configure the Self Service Portal for IaaS, as well as configuring quotas, importing templates and virtual assemblies, and the other tasks required to enable Self Service provisioning of VMs. This chapter builds on the previous chapters, bringing everything together to build and manage a private IaaS cloud based on Oracle VM. The last section of the book covers disaster recovery options, leveraging Site Guard for Oracle VM, performing system maintenance, and common troubleshooting tasks and features.