9. Using PHP with MySQL
Now that you have a sufficient amount of PHP, SQL, and MySQL experience under your belt, it’s time to put all of the technologies together. PHP’s strong integration with MySQL is just one reason so many programmers have embraced it; it’s impressive how easily you can use the two together.
This chapter will use the existing sitename database—created in Chapter 5, “Introduction to SQL”—to build a PHP interface for interacting with the users table. The knowledge taught and the examples used here will be the basis for all of your PHP-MySQL Web applications, as the principles involved are the same for any PHP-MySQL interaction.
Before heading into this chapter, you should be comfortable with everything covered in the first eight chapters, including the error debugging and handling techniques just taught in the previous chapter. Finally, remember that you need a PHP-enabled Web server and access to a running MySQL server in order to execute the following examples.
Modifying the Template
Since all of the pages in this chapter and the next will be part of the same Web application, it’ll be worthwhile to use a common template system. Instead of creating a new template from scratch, the layout from Chapter 3, “Creating Dynamic Web Sites,” will be used again, with only a minor modification to the header file’s navigation links.
To make the header file
1. Open header.html (Script 3.2) in your text editor or IDE.
2. Change the list of links to read (Script 9.1):
<li><a href="index.php">Home Page</a></li>
<li><a href="register.php">Register</a></li>
<li><a href="view_users.php">View Users</a></li>
<li><a href="password.php">Change Password</a></li>
<li><a href="#">link five</a></li>
All of the examples in this chapter will involve the registration, view users, and change password pages. The date form and calculator links from Chapter 3 can be deleted.
3. Save the file as header.html.
4. Place the new header file in your Web directory, within the includes folder along with footer.html (Script 3.3) and style.css (available for download from the book’s supporting Web site, www.LarryUllman.com).
Script 9.1. The site’s header file, used for the pages’ template, modified with new navigation links.
1 <!DOCTYPE html PUBLIC "-//W3C//DTD XHTML 1.0 Strict//EN" "http://www.w3.org/TR/xhtml1/DTD/
xhtml1-strict.dtd">
2 <html xmlns="http://www.w3.org/1999/xhtml">
3 <head>
4 <title><?php echo $page_title; ?></title>
5 <link rel="stylesheet" href="includes/style.css" type="text/css" media="screen" />
6 <meta http-equiv="content-type" content="text/html; charset=utf-8" />
7 </head>
8 <body>
9 <div id="header">
10 <h1>Your Website</h1>
11 <h2>catchy slogan...</h2>
12 </div>
13 <div id="navigation">
14 <ul>
15 <li><a href="index.php">Home Page</a></li>
16 <li><a href="register.php">Register</a></li>
17 <li><a href="view_users.php">View Users</a></li>
18 <li><a href="password.php">Change Password</a></li>
19 <li><a href="#">link five</a></li>
20 </ul>
21 </div>
22 <div id="content"><!-- Start of the page-specific content. -->
23 <!-- Script 9.1 - header.html -->
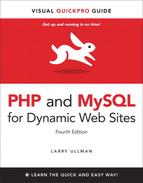
5. Test the new header file by running index.php in your Web browser ![]() .
.
![]() The dynamically generated home page with new navigation links.
The dynamically generated home page with new navigation links.
For a preview of this site’s structure, see the sidebar “Organizing Your Documents” in the next section.
Connecting to MySQL
The first step for interacting with MySQL—connecting to the server—requires the appropriately named mysqli_connect( ) function:
$dbc = mysqli_connect (hostname, username, password, db_name);
The first three arguments sent to the function (hostname, username, and password) are based upon the users and privileges established within MySQL (see Appendix A, “Installation,” for more information). Commonly (but not always), the host value will be localhost.
The fourth argument is the name of the database to use. This is the equivalent of saying USE databasename within the mysql client.
If the connection was made, the $dbc variable, short for database connection (but you can use any name you want, of course), will become a reference point for all of your subsequent database interactions. Most of the PHP functions for working with MySQL will take this variable as its first argument.
If a connection problem occurred, you can call mysqli_connect_error( ), which returns the connection error message. It takes no arguments, so would be called using just
mysqli_connect_error( );
Once you’ve connected to the database, you should set the encoding for the interaction. You can do so (as of PHP 5.0.5) with the mysqli_set_charset( ) function:
mysqli_set_charset($dbc, 'utf8'),
The value used as the encoding—the second argument—should match that of your PHP scripts and the collation of your database (see Chapter 6, “Database Design,” for more on MySQL collations). If you fail to do this, all data will be transferred using the default character set, which could cause problems.
To start using PHP with MySQL, let’s create a special script that makes the connection. Other PHP scripts that require a MySQL connection can then include this file.
To connect to and select a database
1. Create a new PHP document in your text editor or IDE, to be named mysqli_connect.php (Script 9.2):
<?php # Script 9.2 - mysqli_connect.php
This file will be included by other PHP scripts, so it doesn’t need to contain any HTML.
2. Set the MySQL host, username, password, and database name as constants:
DEFINE ('DB_USER', 'username'),
DEFINE ('DB_PASSWORD', 'password'),
DEFINE ('DB_HOST', 'localhost'),
DEFINE ('DB_NAME', 'sitename'),
I prefer to establish these values as constants for security reasons (they cannot be changed this way), but that isn’t required. In general, setting these values as some sort of variable or constant makes sense so that you can separate the configuration parameters from the functions that use them, but again, this is not obligatory.
When writing your script, change these values to ones that will work on your setup. If you have been provided with a MySQL username/password combination and a database (like for a hosted site), use that information here. Or, if possible, follow the steps in Appendix A to create a user that has access to the sitename database, and insert those values here. Whatever you do, don’t just use the values written in this book’s code unless you know for certain they will work on your server.
3. Connect to MySQL:
$dbc = @mysqli_connect (DB_HOST, DB_USER, DB_PASSWORD, DB_NAME) OR die ('Could not connect to MySQL: ' . mysqli_connect_error( ) );
The mysqli_connect( ) function, if it successfully connects to MySQL, will return a resource link that corresponds to the open connection. This link will be assigned to the $dbc variable, so that other functions can make use of this connection.
The function call is preceded by the error suppression operator (@). This prevents the PHP error from being displayed in the Web browser. This is preferable, as the error will be handled by the OR die( ) clause.
Script 9.2. The mysqli_connect.php script will be used by every other script in this chapter. It establishes a connection to MySQL, selects the database, and sets the encoding.
1 <?php # Script 9.2 - mysqli_connect.php
2
3 // This file contains the database access information.
4 // This file also establishes a connection to MySQL,
5 // selects the database, and sets the encoding.
6
7 // Set the database access information as constants:
8 DEFINE ('DB_USER', 'username'),
9 DEFINE ('DB_PASSWORD', 'password'),
10 DEFINE ('DB_HOST', 'localhost'),
11 DEFINE ('DB_NAME', 'sitename'),
12
13 // Make the connection:
14 $dbc = @mysqli_connect (DB_HOST, DB_USER, DB_PASSWORD, DB_NAME) OR die ('Could not connect to
MySQL: ' . mysqli_connect_error( ) );
15
16 // Set the encoding...
17 mysqli_set_charset($dbc, 'utf8'),
If the mysqli_connect( ) function cannot return a valid resource link, then the OR die( ) part of the statement is executed (because the first part of the OR will be false, so the second part must be true). As discussed in the preceding chapter, the die( ) function terminates the execution of the script. The function can also take as an argument a string that will be printed to the Web browser. In this case, the string is a combination of Could not connect to MySQL: and the specific MySQL error ![]() . Using this blunt error management system makes debugging much easier as you develop your sites.
. Using this blunt error management system makes debugging much easier as you develop your sites.
![]() If there were problems connecting to MySQL, an informative message is displayed and the script is halted.
If there were problems connecting to MySQL, an informative message is displayed and the script is halted.
4. Save the file as mysqli_connect.php.
Since this file contains information—the database access data—that must be kept private, it will use a .php extension. With a .php extension, even if malicious users ran this script in their Web browser, they would not see the page’s actual content.
You may also note that I did not include a terminating PHP tag: ?>. This is allowed in PHP (when the script ends with PHP code), and has a benefit to be explained in subsequent chapters.
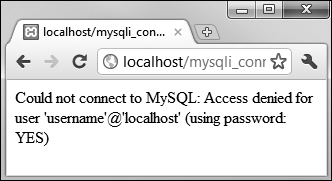
5. Ideally, place the file outside of the Web document directory ![]() .
.
![]() A visual representation of a server’s Web documents, where
A visual representation of a server’s Web documents, where mysqli_connect.php is not stored within the main directory (htdocs).
Because the file contains sensitive MySQL access information, it ought to be stored securely. If you can, place it in the directory immediately above or otherwise outside of the Web directory. This way the file will not be accessible from a Web browser. See the “Organizing Your Documents” sidebar for more.
6. Temporarily place a copy of the script within the Web directory and run it in your Web browser ![]() .
.
![]() If the MySQL connection script works properly, the end result will be a blank page (no HTML is generated by the script).
If the MySQL connection script works properly, the end result will be a blank page (no HTML is generated by the script).
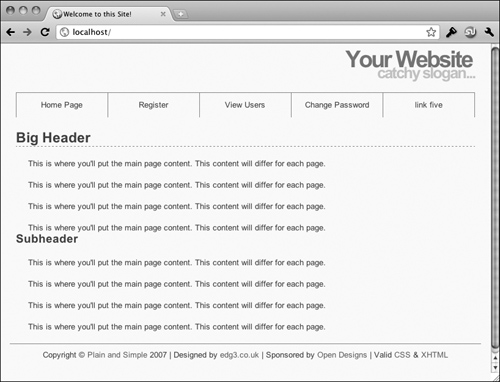
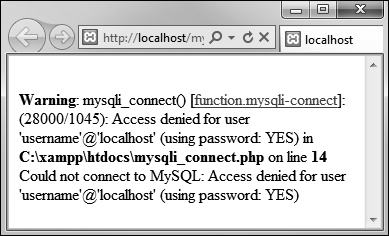
In order to test the script, you’ll want to place a copy on the server so that it’s accessible from the Web browser (which means it must be in the Web directory). If the script works properly, the result should be a blank page ![]() . If you see an Access denied... or similar message
. If you see an Access denied... or similar message ![]() , it means that the combination of username, password, and host does not have permission to access the particular database.
, it means that the combination of username, password, and host does not have permission to access the particular database.
The best recommendation for securing such a file is to store it outside of the Web documents directory. If, for example, the htdocs folder in ![]() is the root of the Web directory (in other words, the URL www.example.com leads there), then not storing
is the root of the Web directory (in other words, the URL www.example.com leads there), then not storing mysqli_connect.php anywhere within the htdocs directory means it will never be accessible via the Web browser. Granted, the source code of PHP scripts is not viewable from the Web browser (only the data sent to the browser by the script is), but you can never be too careful. If you aren’t allowed to place documents outside of the Web directory, placing mysqli_connect.php in the Web directory is less secure, but not the end of the world.
7. Remove the temporary copy from the Web directory.
If you’re using a version of PHP that does not support the mysqli_set_charset( ) function, you’ll need to execute a SET NAMES encoding query instead:
mysqli_query($dbc, 'SET NAMES utf8'),
If you receive an error that claims mysqli_connect( ) is an “undefined function”, it means that PHP has not been compiled with support for the Improved MySQL Extension. See the appendix for installation information.
If you see a Could not connect... error message when running the script ![]() , it likely means that MySQL isn’t running.
, it likely means that MySQL isn’t running.
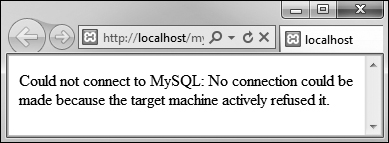
![]() Another reason why PHP might not be able to connect to MySQL (besides using invalid username/password/hostname/database information) is if MySQL isn’t currently running.
Another reason why PHP might not be able to connect to MySQL (besides using invalid username/password/hostname/database information) is if MySQL isn’t currently running.
In case you are curious, ![]() shows what would happen if you didn’t use
shows what would happen if you didn’t use @ before mysqli_connect( ) and an error occurred.
![]() If you don’t use the error suppression operator (
If you don’t use the error suppression operator (@), you’ll see both the PHP error and the custom OR die( ) error.
If you don’t need to select the database when establishing a connection to MySQL, omit that argument from the mysqli_connect( ) function:
$dbc = mysqli_connect (hostname, username, password);
Then, when appropriate, you can select the database using:
mysqli_select_db($dbc, db_name);
Executing Simple Queries
Once you have successfully connected to and selected a database, you can start executing queries. The queries can be as basic as inserts, updates, and deletions or as involved as complex joins returning numerous rows. Regardless of the SQL command type, the PHP function for executing a query is mysqli_query( ):
result = mysqli_query(dbc, query);
The function takes the database connection as its first argument and the query itself as the second. Within the context of a complete PHP script, I normally assign the query to another variable, called $query or just $q, so running a query might look like
$r = mysqli_query($dbc, $q);
For simple queries like INSERT, UPDATE, DELETE, etc. (which do not return records), the $r variable—short for result—will be either TRUE or FALSE, depending upon whether the query executed successfully.
Keep in mind that “executed successfully” means that it ran without error; it doesn’t mean that the query’s execution necessarily had the desired result; you’ll need to test for that.
For complex queries that return records (SELECT being the most important of these), $r will be a resource link to the results of the query if it worked or be FALSE if it did not. Thus, you can use this line of code in a conditional to test if the query successfully ran:
$r = mysqli_query ($dbc, $q);
if ($r) { // Worked!
If the query did not successfully run, some sort of MySQL error must have occurred. To find out what that error was, call the mysqli_error( ) function:
echo mysqli_error($dbc);
The function’s lone argument is the database connection.
One final, albeit optional, step in your script would be to close the existing MySQL connection once you’re finished with it:
mysqli_close($dbc);
This function call is not required, because PHP will automatically close the connection at the end of a script, but it does make for good programming form to incorporate it.
To demonstrate this process, let’s create a registration script. It will show the form when first accessed ![]() , handle the form submission, and, after validating all the data, insert the registration information into the users table of the sitename database.
, handle the form submission, and, after validating all the data, insert the registration information into the users table of the sitename database.
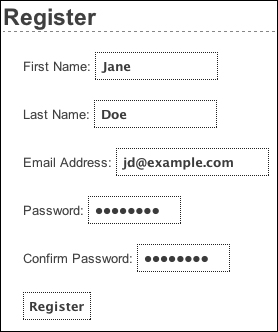
![]() The registration form.
The registration form.
As a forewarning, this script knowingly has a security hole in it (depending upon the version of PHP in use, and its settings), to be remedied later in the chapter.
To execute simple queries
1. Begin a new PHP script in your text editor or IDE, to be named register.php (Script 9.3):
<?php # Script 9.3 - register.php
$page_title = 'Register';
include ('includes/header.html'),
The fundamentals of this script—using included files, having the same page both display and handle a form, and creating a sticky form—come from Chapter 3. See that chapter if you’re confused about any of these concepts.
2. Create the submission conditional and initialize the $errors array:
if ($_SERVER['REQUEST_METHOD'] = = 'POST') {
$errors = array( );
This script will both display and handle the HTML form. This first conditional will check for how the script is being requested, in order to know when to process the form (again, this comes from Chapter 3). The $errors variable will be used to store every error message (one for each form input not properly filled out).
3. Validate the first name:
if (empty($_POST['first_name'])) {
$errors[ ] = 'You forgot to enter your first name.';
} else {
$fn = trim($_POST['first_name']);
}
As discussed in Chapter 3, the empty( ) function provides a minimal way of ensuring that a text field was filled out. If the first name field was not filled out, an error message is added to the $errors array. Otherwise, $fn is set to the submitted value, after trimming off any extraneous spaces. By using this new variable—which is obviously short for first_name—it will be syntactically easier to write the query later.
4. Validate the last name and email address:
if (empty($_POST['last_name'])) {
$errors[ ] = 'You forgot to enter your last name.';
} else {
$ln = trim($_POST['last_name']);
}
if (empty($_POST['email'])) {
$errors[ ] = 'You forgot to enter your email address.';
} else {
$e = trim($_POST['email']);
}
These lines are essentially the same as those validating the first name field. In both cases a new variable will be created, assuming that the minimal validation was passed.
5. Validate the passwords:
if (!empty($_POST['pass1'])) {
if ($_POST['pass1'] != $_POST['pass2']) {
$errors[ ] = 'Your password did not match the confirmed password.';
} else {
$p = trim($_POST['pass1']);
}
} else {
$errors[ ] = 'You forgot to enter your password.';
}
Script 9.3. The registration script adds a record to the database by running an INSERT query.
1 <?php # Script 9.3 - register.php
2 // This script performs an INSERT query to add a record to the users table.
3
4 $page_title = 'Register';
5 include ('includes/header.html'),
6
7 // Check for form submission:
8 if ($_SERVER['REQUEST_METHOD'] = = 'POST') {
9
10 $errors = array( ); // Initialize an error array.
11
12 // Check for a first name:
13 if (empty($_POST['first_name'])) {
14 $errors[ ] = 'You forgot to enter your first name.';
15 } else {
16 $fn = trim($_POST['first_name']);
17 }
18
19 // Check for a last name:
20 if (empty($_POST['last_name'])) {
21 $errors[ ] = 'You forgot to enter your last name.';
22 } else {
23 $ln = trim($_POST['last_name']);
24 }
25
26 // Check for an email address:
27 if (empty($_POST['email'])) {
28 $errors[ ] = 'You forgot to enter your email address.';
29 } else {
30 $e = trim($_POST['email']);
31 }
32
33 // Check for a password and match against the confirmed password:
34 if (!empty($_POST['pass1'])) {
35 if ($_POST['pass1'] != $_POST['pass2']) {
36 $errors[ ] = 'Your password did not match the confirmed password.';
37 } else {
38 $p = trim($_POST['pass1']);
39 }
40 } else {
41 $errors[ ] = 'You forgot to enter your password.';
42 }
43
44 if (empty($errors)) { // If everything's OK.
45
46 // Register the user in the database...
47
48 require ('../mysqli_connect.php'), // Connect to the db.
49
50 // Make the query:
51 $q = "INSERT INTO users (first_name, last_name, email, pass, registration_date) VALUES
('$fn', '$ln', '$e', SHA1('$p'), NOW( ) )";
52 $r = @mysqli_query ($dbc, $q); // Run the query.
53 if ($r) { // If it ran OK.
54
55 // Print a message:
56 echo '<h1>Thank you!</h1>
57 <p>You are now registered. In Chapter 12 you will actually be able to log in!</p><p>
<br /></p>';
58
59 } else { // If it did not run OK.
60
61 // Public message:
62 echo '<h1>System Error</h1>
63 <p class="error">You could not be registered due to a system error. We apologize for
any inconvenience.</p>';
64
65 // Debugging message:
66 echo '<p>' . mysqli_error($dbc) . '<br /><br />Query: ' . $q . '</p>';
67
68 } // End of if ($r) IF.
69
70 mysqli_close($dbc); // Close the database connection.
71
72 // Include the footer and quit the script:
73 include ('includes/footer.html'),
74 exit( );
75
76 } else { // Report the errors.
77
78 echo '<h1>Error!</h1>
79 <p class="error">The following error(s) occurred:<br />';
80 foreach ($errors as $msg) { // Print each error.
81 echo " - $msg<br />
";
82 }
83 echo '</p><p>Please try again.</p><p><br /></p>';
84
85 } // End of if (empty($errors)) IF.
86
87 } // End of the main Submit conditional.
88 ?>
89 <h1>Register</h1>
90 <form action="register.php" method="post">
91 <p>First Name: <input type="text" name="first_name" size="15" maxlength="20" value="<?php if
(isset($_POST['first_name'])) echo $_POST['first_name']; ?>" /></p>
92 <p>Last Name: <input type="text" name="last_name" size="15" maxlength="40" value="<?php if
(isset($_POST['last_name'])) echo $_POST['last_name']; ?>" /></p>
93 <p>Email Address: <input type="text" name="email" size="20" maxlength="60" value="<?php if
(isset($_POST['email'])) echo $_POST['email']; ?>" /> </p>
94 <p>Password: <input type="password" name="pass1" size="10" maxlength="20" value="<?php if
(isset($_POST['pass1'])) echo $_POST['pass1']; ?>" /></p>
95 <p>Confirm Password: <input type="password" name="pass2" size="10" maxlength="20"
value="<?php if (isset($_POST['pass2'])) echo $_POST['pass2']; ?>" /></p>
96 <p><input type="submit" name="submit" value="Register" /></p>
97 </form>
98 <?php include ('includes/footer.html'), ?>
To validate the password, the script needs to check the pass1 input for a value and then confirm that the pass1 value matches the pass2 value (meaning the password and confirmed password are the same).
6. Check if it’s OK to register the user:
if (empty($errors)) {
If the submitted data passed all of the conditions, the $errors array will have no values in it (it will be empty), so this condition will be true and it’s safe to add the record to the database. If the $errors array is not empty, then the appropriate error messages should be printed (see Step 11) and the user given another opportunity to register.
7. Include the database connection:
require ('../mysqli_connect.php'),
This line of code will insert the contents of the mysqli_connect.php file into this script, thereby creating a connection to MySQL and selecting the database. You may need to change the reference to the location of the file as it is on your server (as written, this line assumes that mysqli_connect.php is in the parent folder of the current folder).
8. Add the user to the database:
$q = "INSERT INTO users (first_name, last_name, email, pass, registration_date) VALUES ('$fn', '$ln', '$e', SHA1('$p'), NOW( ) );
$r = @mysqli_query ($dbc, $q);
The query itself is similar to those demonstrated in Chapter 5. The SHA1( ) function is used to encrypt the password, and NOW( ) is used to set the registration date as this moment.
After assigning the query to a variable, it is run through the mysqli_query( ) function, which sends the SQL command to the MySQL database. As in the mysqli_connect.php script, the mysqli_query( ) call is preceded by @ in order to suppress any ugly errors. If a problem occurs, the error will be handled more directly in the next step.
9. Report on the success of the registration:
if ($r) {
echo '<h1>Thank you!</h1>
<p>You are now registered. In Chapter 12 you will actually be able to log in!</p><p><br /></p>';
} else {
echo '<h1>System Error</h1>
<p class="error">You could not be registered due to a system error. We apologize for any inconvenience.</p>';
echo '<p>' . mysqli_error($dbc) . '<br /><br />Query: ' . $q . '</p>';
} // End of if ($r) IF.
The $r variable, which is assigned the value returned by mysqli_query( ), can be used in a conditional to test for the successful operation of the query.
If $r has a TRUE value, then a Thank you! message is displayed ![]() . If
. If $r has a FALSE value, error messages are printed. For debugging purposes, the error messages will include both the error spit out by MySQL (thanks to the mysqli_error( ) function) and the query that was run ![]() . This information is critical to debugging the problem. You would not want to display this kind of information on a live site, however.
. This information is critical to debugging the problem. You would not want to display this kind of information on a live site, however.

![]() If the user could be registered in the database, this message is displayed.
If the user could be registered in the database, this message is displayed.
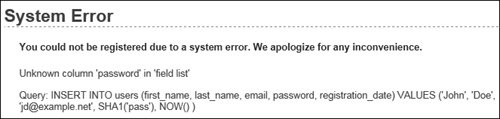
![]() Any MySQL errors caused by the query will be printed, as will the query that was being run.
Any MySQL errors caused by the query will be printed, as will the query that was being run.
10. Close the database connection and complete the HTML template:
mysqli_close($dbc);
include ('includes/footer.html'),
exit( );
Closing the connection isn’t required but is a good policy. Then the footer is included and the script terminated (thanks to the exit( ) function). If those two lines weren’t here, the registration form would be displayed again (which isn’t necessary after a successful registration).
11. Print out any error messages and close the submit conditional:
} else { // Report the errors.
echo '<h1>Error!</h1>
<p class="error">The following error(s) occurred:<br />';
foreach ($errors as $msg) { // Print each error.
echo " - $msg<br />
";
}
echo '</p><p>Please try again.</p><p><br /></p>';
} // End of if (empty($errors)) IF.
} // End of the main Submit conditional.
The else clause is invoked if there were any errors. In that case, all of the errors are displayed using a foreach loop ![]() .
.
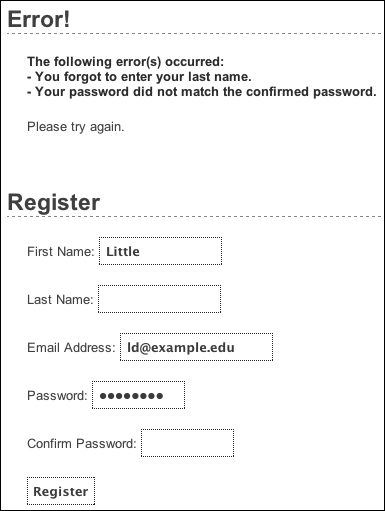
![]() Each form validation error is reported to the user so that they may try registering again.
Each form validation error is reported to the user so that they may try registering again.
The final closing curly brace closes the main submit conditional. The main conditional is a simple if, not an if-else, so that the form can be made sticky (again, see Chapter 3).
12. Close the PHP section and begin the HTML form:
?>
<h1>Register</h1>
<form action="register.php" method="post">
<p>First Name: <input type="text" name="first_name" size="15" maxlength="20" value="<?php if (isset($_POST['first_name'])) echo $_POST['first_name']; ?>" /></p>
<p>Last Name: <input type="text" name="last_name" size="15" maxlength="40" value="<?php if (isset($_POST['last_name'])) echo $_POST['last_name'];?>" /></p>
The form is really simple, with one text input for each field in the users table (except for the user_id and registration_date columns, which will automatically be populated). Each input is made sticky, using code like
value="<?php if (isset($_POST['var'])) echo $_POST['var']; ?>"
Also, I would strongly recommend that you use the same name for your form inputs as the corresponding column in the database where that value will be stored. Further, you should set the maximum input length in the form equal to the maximum column length in the database. Both of these habits help to minimize errors.
13. Complete the HTML form:
<p>Email Address: <input type="text" name="email" size="20" maxlength="60" value="<?php if (isset($_POST['email'])) echo $_POST['email']; ?>" /> </p>
<p>Password: <input type="password" name="pass1" size="10" maxlength="20" value="<?php if (isset($_POST['pass1'])) echo $_POST['pass1']; ?>" /></p>
<p>Confirm Password: <input type="password" name="pass2" size="10" maxlength="20" value="<?php if (isset($_POST['pass2'])) echo $_POST['pass2']; ?>" /></p>
<p><input type="submit" name="submit" value="Register" /></p>
</form>
This is all much like that in Step 12, with the addition of a submit button.
As a side note, I don’t need to follow my maxlength recommendation (from Step 12) with the password inputs, because they will be encrypted with SHA1( ), which always creates a string 40 characters long. And since there are two of them, they can’t both use the same name as the column in the database.
14. Complete the template:
<?php include ('includes/footer.html'), ?>
15. Save the file as register.php, place it in your Web directory, and test it in your Web browser.
Note that if you use an apostrophe in one of the form values, it will likely break the query ![]() . The section “Ensuring Secure SQL” later in this chapter will show how to protect against this.
. The section “Ensuring Secure SQL” later in this chapter will show how to protect against this.
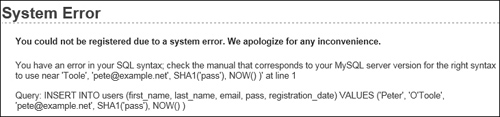
![]() Apostrophes in form values (like the last name here) will conflict with the apostrophes used to delineate values in the query.
Apostrophes in form values (like the last name here) will conflict with the apostrophes used to delineate values in the query.
After running the script, you can always ensure that it worked by using the mysql client or phpMyAdmin to view the records in the users table.
You should not end your queries with a semicolon in PHP, as you do when using the mysql client. When working with MySQL, this is a common, albeit harmless, mistake to make. When working with other database applications (Oracle, for one), doing so will make your queries unusable.
As a reminder, the mysqli_query( ) function returns a TRUE value if the query could be executed on the database without error. This does not necessarily mean that the result of the query is what you were expecting. Later scripts will demonstrate how to more accurately gauge the success of a query.
You are not obligated to create a $q variable as I tend to do (you could directly insert your query text into mysqli_query( )). However, as the construction of your queries becomes more complex, using a variable will be the only option.
Practically any query you would run in the mysql client can also be executed using mysqli_query( ).
Another benefit of the Improved MySQL Extension over the standard extension is that the mysqli_multi_query( ) function lets you execute multiple queries at one time. The syntax for doing so, particularly if the queries return results, is a bit more complicated, so see the PHP manual if you have this need.
Retrieving Query Results
The preceding section of this chapter demonstrates how to execute simple queries on a MySQL database. A simple query, as I’m calling it, could be defined as one that begins with INSERT, UPDATE, DELETE, or ALTER. What all four of these have in common is that they return no data, just an indication of their success. Conversely, a SELECT query generates information (i.e., it will return rows of records) that has to be handled by other PHP functions.
The primary tool for handling SELECT query results is mysqli_fetch_array( ), which uses the query result variable (that I’ve been calling $r) and returns one row of data at a time, in an array format. You’ll want to use this function within a loop that will continue to access every returned row as long as there are more to be read. The basic construction for reading every record from a query is
while ($row = mysqli_fetch_array($r))
{
// Do something with $row.
}
You will almost always want to use a while loop to fetch the results from a SELECT query.
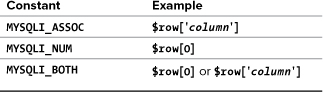
The mysqli_fetch_array( ) function takes an optional second parameter specifying what type of array is returned: associative, indexed, or both. An associative array allows you to refer to column values by name, whereas an indexed array requires you to use only numbers (starting at 0 for the first column returned). Each parameter is defined by a constant listed in Table 9.1, with MYSQLI_BOTH being the default. The MYSQLI_NUM setting is marginally faster (and uses less memory) than the other options. Conversely, MYSQLI_ASSOC is more overt ($row['column'] rather than $row[3]) and may continue to work even if the query changes.
Table 9.1. mysqli_fetch_array( ) Constants
An optional step you can take when using mysqli_fetch_array( ) would be to free up the query result resources once you are done using them:
mysqli_free_result ($r);
This line removes the overhead (memory) taken by $r. It’s an optional step, since PHP will automatically free up the resources at the end of a script, but—like using mysqli_close( )—it does make for good programming form.
To demonstrate how to handle results returned by a query, let’s create a script for viewing all of the currently registered users.
To retrieve query results
1. Begin a new PHP document in your text editor or IDE, to be named view_users.php (Script 9.4):
<?php # Script 9.4 - view_users.php
$page_title = 'View the Current Users';
include ('includes/header.html'),
echo '<h1>Registered Users</h1>';
2. Connect to and query the database:
require ('../mysqli_connect.php'),
$q = "SELECT CONCAT(last_name, ', ', first_name) AS name, DATE_FORMAT(registration_date, '%M %d, %Y') AS dr FROM users ORDER BY registration_date ASC";
$r = @mysqli_query ($dbc, $q);
The query here will return two columns ![]() : the users’ names (formatted as Last Name, First Name) and the date they registered (formatted as Month DD, YYYY). Because both columns are formatted using MySQL functions, aliases are given to the returned results (name and dr, accordingly). See Chapter 5 if you are confused by any of this syntax.
: the users’ names (formatted as Last Name, First Name) and the date they registered (formatted as Month DD, YYYY). Because both columns are formatted using MySQL functions, aliases are given to the returned results (name and dr, accordingly). See Chapter 5 if you are confused by any of this syntax.
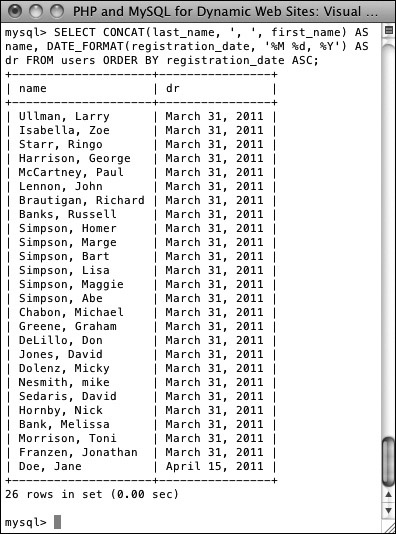
![]() The query results as run within the mysql client.
The query results as run within the mysql client.
3. Create an HTML table for displaying the query results:
if ($r) {
echo '<table align="center" cellspacing="3" cellpadding="3"
width="75%">
<tr><td align="left"><b>Name</b></td><td align="left"><b>Date Registered</b></td></tr>
';
If the $r variable has a TRUE value, then the query ran without error and the results can be displayed. To do that, start by making a table and a header row in HTML.
4. Fetch and print each returned record:
while ($row = mysqli_fetch_array($r, MYSQLI_ASSOC)) {
echo '<tr><td align="left">' . $row['name'] . '</td><td align="left">' . $row['dr'] . '</td></tr>
';
}
Next, loop through the results using mysqli_fetch_array( ) and print each fetched row. Notice that within the while loop, the code refers to each returned value using the proper alias: $row['name'] and $row['dr']. The script could not refer to $row['first_name'] or $row['date_registered'] because no such field name was returned ![]() .
.
Script 9.4. The view_users.php script runs a static query on the database and prints all of the returned rows.
1 <?php # Script 9.4 - view_users.php
2 // This script retrieves all the records from the users table.
3
4 $page_title = 'View the Current Users';
5 include ('includes/header.html'),
6
7 // Page header:
8 echo '<h1>Registered Users</h1>';
9
10 require ('../mysqli_connect.php'), // Connect to the db.
11
12 // Make the query:
13 $q = "SELECT CONCAT(last_name, ', ', first_name) AS name, DATE_FORMAT(registration_date, '%M %d,
%Y') AS dr FROM users ORDER BY registration_date ASC";
14 $r = @mysqli_query ($dbc, $q); // Run the query.
15
16 if ($r) { // If it ran OK, display the records.
17
18 // Table header.
19 echo '<table align="center" cellspacing="3" cellpadding="3" width="75%">
20 <tr><td align="left"><b>Name</b></td><td align="left"><b>Date Registered</b></td></tr>
21 ';
22
23 // Fetch and print all the records:
24 while ($row = mysqli_fetch_array($r, MYSQLI_ASSOC)) {
25 echo '<tr><td align="left">' . $row['name'] . '</td><td align="left">' . $row['dr'] .
'</td></tr>
26 ';
27 }
28
29 echo '</table>'; // Close the table.
30
31 mysqli_free_result ($r); // Free up the resources.
32
33 } else { // If it did not run OK.
34
35 // Public message:
36 echo '<p class="error">The current users could not be retrieved. We apologize for any
inconvenience.</p>';
37
38 // Debugging message:
39 echo '<p>' . mysqli_error($dbc) . '<br /><br />Query: ' . $q . '</p>';
40
41 } // End of if ($r) IF.
42
43 mysqli_close($dbc); // Close the database connection.
44
45 include ('includes/footer.html'),
46 ?>
5. Close the HTML table and free up the query resources:
echo '</table>';
mysqli_free_result ($r);
Again, this is an optional step but a good one to take.
6. Complete the main conditional:
} else {
echo '<p class="error">The current users could not be retrieved. We apologize for any inconvenience.</p>';
echo '<p>' . mysqli_error($dbc) . '<br /><br />Query: ' . $q . '</p>';
} // End of if ($r) IF.
As in the register.php example, there are two kinds of error messages here. The first is a generic message, the type you’d show in a live site. The second is much more detailed, printing both the MySQL error and the query, both being critical for debugging purposes.
7. Close the database connection and finish the page:
mysqli_close($dbc);
include ('includes/footer.html'),
?>
8. Save the file as view_users.php, place it in your Web directory, and test it in your browser ![]() .
.
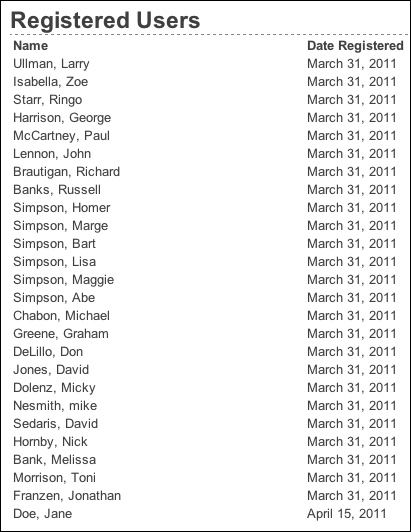
![]() All of the user records are retrieved from the database and displayed in the Web browser.
All of the user records are retrieved from the database and displayed in the Web browser.
As with any associative array, when you retrieve records from the database, you must refer to the selected columns or aliases exactly as they are in the database or query. This is to say that the keys are case-sensitive.
If you are in a situation where you need to run a second query inside of your while loop, be certain to use different variable names for that query. For example, the inner query would use $r2 and $row2 instead of $r and $row. If you don’t do this, you’ll encounter logical errors.
I sometimes see beginning PHP developers muddle the process of fetching query results. Remember that you must execute the query using mysqli_query( ), and then use mysqli_fetch_array( ) to retrieve a single row of information. If you have multiple rows to retrieve, use a while loop.
Ensuring Secure SQL
Database security with respect to PHP comes down to three broad issues:
1. Protecting the MySQL access information
2. Not revealing too much about the database
3. Being cautious when running queries, particularly those involving user-submitted data
You can accomplish the first objective by securing the MySQL connection script outside of the Web directory so that it is never viewable through a Web browser (see ![]() in “Connecting to MySQL”). I discuss this in some detail earlier in the chapter. The second objective is attained by not letting the user see PHP’s error messages or your queries (in these scripts, that information is printed out for your debugging purposes; you’d never want to do that on a live site).
in “Connecting to MySQL”). I discuss this in some detail earlier in the chapter. The second objective is attained by not letting the user see PHP’s error messages or your queries (in these scripts, that information is printed out for your debugging purposes; you’d never want to do that on a live site).
For the third objective, there are numerous steps you can and should take, all based upon the premise of never trusting user-supplied data. First, validate that some value has been submitted, or that it is of the proper type (number, string, etc.). Second, use regular expressions to make sure that submitted data matches what you would expect it to be (this topic is covered in Chapter 14, “Perl-Compatible Regular Expressions”). Third, you can typecast some values to guarantee that they’re numbers (discussed in Chapter 13, “Security Methods”). A fourth recommendation is to run user-submitted data through the mysqli_real_escape_string( ) function. This function makes data safe to use in a query by escaping what could be problematic characters. It’s used like so:
$safe = mysqli_real_escape_string ($dbc, data);
To understand why this is necessary, see ![]() in “Executing Simple Queries.” The use of the apostrophe in the user’s last name made the query syntactically invalid:
in “Executing Simple Queries.” The use of the apostrophe in the user’s last name made the query syntactically invalid:
INSERT INTO users (first_name, last_name, email, pass, registration_date) VALUES ('Peter', 'O'Toole', '[email protected]', SHA1('aPass8'), NOW( ) )
In that particular example, valid user data broke the query, which is not good. But if your PHP script allows for this possibility, a malicious user can purposefully submit problematic characters (the apostrophe being one example) in order to hack into, or damage, your database. For security purposes, mysqli_real_escape_string( ) should be used on every text input in a form. To demonstrate this, let’s revamp register.php (Script 9.3).
To use mysqli_real_escape_string()
1. Open register.php (Script 9.3) in your text editor or IDE, if it is not already.
2. Move the inclusion of the mysqli_connect.php file (line 48 in Script 9.3) to just after the main conditional (Script 9.5).
Because the mysqli_real_escape_string( ) function requires a database connection, the mysqli_connect.php script must be required earlier in the script.
Script 9.5. The register.php script now uses the mysqli_real_escape_string( ) function to make submitted data safe to use in a query.
1 <?php # Script 9.5 - register.php #2
2 // This script performs an INSERT query to add a record to the users table.
3
4 $page_title = 'Register';
5 include ('includes/header.html'),
6
7 // Check for form submission:
8 if ($_SERVER['REQUEST_METHOD'] = = 'POST') {
9
10 require ('../mysqli_connect.php'), // Connect to the db.
11
12 $errors = array( ); // Initialize an error array.
13
14 // Check for a first name:
15 if (empty($_POST['first_name'])) {
16 $errors[ ] = 'You forgot to enter your first name.';
17 } else {
18 $fn = mysqli_real_escape_string($dbc, trim($_POST['first_name']));
19 }
20
21 // Check for a last name:
22 if (empty($_POST['last_name'])) {
23 $errors[ ] = 'You forgot to enter your last name.';
24 } else {
25 $ln = mysqli_real_escape_string($dbc, trim($_POST['last_name']));
26 }
27
28 // Check for an email address:
29 if (empty($_POST['email'])) {
30 $errors[ ] = 'You forgot to enter your email address.';
31 } else {
32 $e = mysqli_real_escape_string($dbc, trim($_POST['email']));
33 }
34
35 // Check for a password and match against the confirmed password:
36 if (!empty($_POST['pass1'])) {
37 if ($_POST['pass1'] != $_POST['pass2']) {
38 $errors[ ] = 'Your password did not match the confirmed password.';
39 } else {
40 $p = mysqli_real_escape_string($dbc, trim($_POST['pass1']));
41 }
42 } else {
43 $errors[ ] = 'You forgot to enter your password.';
44 }
45
46 if (empty($errors)) { // If everything's OK.
47
48 // Register the user in the database...
49
50 // Make the query:
51 $q = "INSERT INTO users (first_name, last_name, email, pass, registration_date) VALUES
('$fn', '$ln', '$e', SHA1('$p'), NOW( ) )";
52 $r = @mysqli_query ($dbc, $q); // Run the query.
53 if ($r) { // If it ran OK.
54
55 // Print a message:
56 echo '<h1>Thank you!</h1>
57 <p>You are now registered. In Chapter 12 you will actually be able to log in!</p><p>
<br /></p>';
58
59 } else { // If it did not run OK.
60
61 // Public message:
62 echo '<h1>System Error</h1>
63 <p class="error">You could not be registered due to a system error. We apologize for
any inconvenience.</p>';
64
65 // Debugging message:
66 echo '<p>' . mysqli_error($dbc) . '<br /><br />Query: ' . $q . '</p>';
67
68 } // End of if ($r) IF.
69
70 mysqli_close($dbc); // Close the database connection.
71
72 // Include the footer and quit the script:
73 include ('includes/footer.html'),
74 exit( );
75
76 } else { // Report the errors.
77
78 echo '<h1>Error!</h1>
79 <p class="error">The following error(s) occurred:<br />';
80 foreach ($errors as $msg) { // Print each error.
81 echo " - $msg<br />
";
82 }
83 echo '</p><p>Please try again.</p><p><br /></p>';
84
85 } // End of if (empty($errors)) IF.
86
87 mysqli_close($dbc); // Close the database connection.
88
89 } // End of the main Submit conditional.
90 ?>
91 <h1>Register</h1>
92 <form action="register.php" method="post">
93 <p>First Name: <input type="text" name="first_name" size="15" maxlength="20" value="<?php if
(isset($_POST['first_name'])) echo $_POST['first_name']; ?>" /></p>
94 <p>Last Name: <input type="text" name="last_name" size="15" maxlength="40" value="<?php if
(isset($_POST['last_name'])) echo $_POST['last_name']; ?>" /></p>
95 <p>Email Address: <input type="text" name="email" size="20" maxlength="60" value="<?php if
(isset($_POST['email'])) echo $_POST['email']; ?>" /> </p>
96 <p>Password: <input type="password" name="pass1" size="10" maxlength="20" value="<?php if
(isset($_POST['pass1'])) echo $_POST['pass1']; ?>" /></p>
97 <p>Confirm Password: <input type="password" name="pass2" size="10" maxlength="20"
value="<?php if (isset($_POST['pass2'])) echo $_POST['pass2']; ?>" /></p>
98 <p><input type="submit" name="submit" value="Register" /></p>
99 </form>
100 <?php include ('includes/footer.html'), ?>
3. Change the validation routines to use the mysqli_real_escape_string( ) function, replacing each occurrence of $var = trim($_POST['var']) with $var = mysqli_real_escape_string($dbc, trim($_POST['var'])):
$fn = mysqli_real_escape_string($dbc, trim($_POST['first_name']));
$ln = mysqli_real_escape_string($dbc, trim($_POST['last_name']));
$e = mysqli_real_escape_string($dbc, trim($_POST['email']));
$p = mysqli_real_escape_string($dbc, trim($_POST['pass1']));
Instead of just assigning the submitted value to each variable ($fn, $ln, etc.), the values will be run through the mysqli_real_escape_string( ) function first. The trim( ) function is still used to get rid of any unnecessary spaces.
4. Add a second call to mysqli_close( ) before the end of the main conditional:
mysqli_close($dbc);
To be consistent, since the database connection is opened as the first step of the main conditional, it should be closed as the last step of this same conditional. It still needs to be closed before including the footer and terminating the script (lines 73 and 74), though.
5. Save the file as register.php, place it in your Web directory, and test it in your Web browser ![]() and
and ![]() .
.

![]() Values with apostrophes in them, like a person’s last name, will no longer break the
Values with apostrophes in them, like a person’s last name, will no longer break the INSERT query, thanks to the mysqli_real_escape_string( ) function.

![]() Now the registration process will handle problematic characters and be more secure.
Now the registration process will handle problematic characters and be more secure.
The mysqli_real_escape_string( ) function escapes a string in accordance with the language being used (i.e., the collation), which is an advantage using this function has over alternative solutions.
If you see results like those in ![]() , it means that the
, it means that the mysqli_real_escape_string( ) function cannot access the database (because it has no connection, like $dbc).
![]()
![]() Since the
Since the mysqli_real_escape_string( ) requires a database connection, using it without that connection (e.g., before including the connection script) can lead to other errors.
If Magic Quotes is enabled on your server, you’ll need to remove any slashes added by Magic Quotes, prior to using the mysqli_real_escape_string( ) function. The code (cumbersome as it is) would look like:
$fn = mysqli_real_escape_string($dbc, trim(stripslashes($_POST['first_name'])));
If you don’t use stripslashes( ) and Magic Quotes is enabled, the form values will be doubly escaped.
If you look at the values stored in the database (using the mysql client, phpMyAdmin, or the like), you will not see the apostrophes and other problematic characters stored with preceding backslashes. This is correct. The backslashes keep the problematic characters from breaking the query but the backslashes are not themselves stored.
Counting Returned Records
The next logical function to discuss is mysqli_num_rows( ). This function returns the number of rows retrieved by a SELECT query. It takes one argument, the query result variable:
$num = mysqli_num_rows($r);
Although simple in purpose, this function is very useful. It’s necessary if you want to paginate your query results (an example of this can be found in the next chapter). It’s also a good idea to use this function before you attempt to fetch any results using a while loop (because there’s no need to fetch the results if there aren’t any, and attempting to do so may cause errors). In this next sequence of steps, let’s modify view_users.php to list the total number of registered users.
To modify view_users.php
1. Open view_users.php (refer to Script 9.4) in your text editor or IDE, if it is not already.
2. Before the if ($r) conditional, add this line (Script 9.6):
$num = mysqli_num_rows ($r);
This line will assign the number of rows returned by the query to the $num variable.
3. Change the original $r conditional to:
if ($num > 0) {
The conditional as it was written before was based upon whether the query did or did not successfully run, not whether or not any records were returned. Now it will be more accurate.
Script 9.6. Now the view_users.php script will display the total number of registered users, thanks to the mysqli_num_rows( ) function.
1 <?php # Script 9.6 - view_users.php #2
2 // This script retrieves all the records
from the users table.
3
4 $page_title = 'View the Current Users';
5 include ('includes/header.html'),
6
7 // Page header:
8 echo '<h1>Registered Users</h1>';
9
10 require ('../mysqli_connect.php'),
// Connect to the db.
11
12 // Make the query:
13 $q = "SELECT CONCAT(last_name, ', ',
first_name) AS name, DATE_FORMAT
(registration_date, '%M %d, %Y') AS dr
FROM users ORDER BY registration_date ASC";
14 $r = @mysqli_query ($dbc, $q); // Run
the query.
15
16 // Count the number of returned rows:
17 $num = mysqli_num_rows($r);
18
19 if ($num > 0) { // If it ran OK,
display the records.
20
21 // Print how many users there are:
22 echo "<p>There are currently $num
registered users.</p>
";
23
24 // Table header.
25 echo '<table align="center"
cellspacing="3" cellpadding="3"
width="75%">
26 <tr><td align="left"><b>Name</
b></td><td align="left"><b>Date
Registered</b></td></tr>
27 ';
28
29 // Fetch and print all the records:
30 while ($row = mysqli_fetch_array($r,
MYSQLI_ASSOC)) {
31 echo '<tr><td align="left">' .
$row['name'] . '</td><td align=
"left">' . $row['dr'] . '</td></tr>
32 ';
33 }
34
35 echo '</table>'; // Close the table.
36
37 mysqli_free_result ($r); // Free up
the resources.
38
39 } else { // If no records were returned.
40
41 echo '<p class="error">There are
currently no registered users.</p>';
42
43 }
44
45 mysqli_close($dbc); // Close the database
connection.
46
47 include ('includes/footer.html'),
48 ?>
4. Before creating the HTML table, print the number of registered users:
echo "<p>There are currently $num registered users.</p> ";
5. Change the else part of the main conditional to read:
echo '<p class="error">There are currently no registered users.</p>';
The original conditional was based upon whether or not the query worked. Hopefully, you’ve successfully debugged the query so that it is working and the original error messages are no longer needed. Now the error message just indicates if no records were returned.
6. Save the file as view_users.php, place it in your Web directory, and test it in your Web browser ![]() .
.
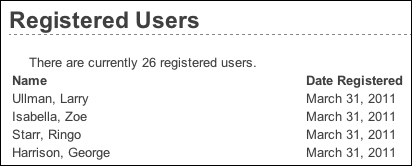
![]() The number of registered users is now displayed at the top of the page.
The number of registered users is now displayed at the top of the page.
Updating Records with PHP
The last technique in this chapter shows how to update database records through a PHP script. Doing so requires an UPDATE query, and its successful execution can be verified with PHP’s mysqli_affected_rows( ) function.
While the mysqli_num_rows( ) function will return the number of rows generated by a SELECT query, mysqli_affected_rows( ) returns the number of rows affected by an INSERT, UPDATE, or DELETE query. It’s used like so:
$num = mysqli_affected_rows($dbc);
Unlike mysqli_num_rows( ), the one argument the function takes is the database connection ($dbc), not the results of the previous query ($r).
The following example will be a script that allows registered users to change their password. It demonstrates two important ideas:
• Checking a submitted username and password against registered values (the key to a login system as well)
• Updating database records using the primary key as a reference
As with the registration example, this one PHP script will both display the form ![]() and handle it.
and handle it.
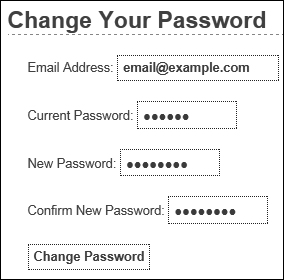
![]() The form for changing a user’s password.
The form for changing a user’s password.
To update records with PHP
1. Begin a new PHP script in your text editor or IDE, to be named password.php (Script 9.7):
<?php # Script 9.7 - password.php
$page_title = 'Change Your Password';
include ('includes/header.html'),
Script 9.7. The password.php script runs an UPDATE query on the database and uses the mysqli_affected_rows( ) function to confirm the change.
1 <?php # Script 9.7 - password.php
2 // This page lets a user change their
password.
3
4 $page_title = 'Change Your Password';
5 include ('includes/header.html'),
6
7 // Check for form submission:
8 if ($_SERVER['REQUEST_METHOD'] = = 'POST') {
9
10 require ('../mysqli_connect.php'),
// Connect to the db.
11
12 $errors = array( ); // Initialize an
error array.
13
14 // Check for an email address:
15 if (empty($_POST['email'])) {
16 $errors[ ] = 'You forgot to enter
your email address.';
17 } else {
18 $e = mysqli_real_escape_string
($dbc, trim($_POST['email']));
19 }
20
21 // Check for the current password:
22 if (empty($_POST['pass'])) {
23 $errors[ ] = 'You forgot to enter
your current password.';
24 } else {
25 $p = mysqli_real_escape_string
($dbc, trim($_POST['pass']));
26 }
27
28 // Check for a new password and match
29 // against the confirmed password:
30 if (!empty($_POST['pass1'])) {
31 if ($_POST['pass1'] != $_POST['pass2']) {
32 $errors[ ] = 'Your new password did not match the confirmed password.';
33 } else {
34 $np = mysqli_real_escape_string($dbc, trim($_POST['pass1']));
35 }
36 } else {
37 $errors[ ] = 'You forgot to enter your new password.';
38 }
39
40 if (empty($errors)) { // If everything's OK.
41
42 // Check that they've entered the right email address/password combination:
43 $q = "SELECT user_id FROM users WHERE (email='$e' AND pass=SHA1('$p') )";
44 $r = @mysqli_query($dbc, $q);
45 $num = @mysqli_num_rows($r);
46 if ($num = = 1) { // Match was made.
47
48 // Get the user_id:
49 $row = mysqli_fetch_array($r, MYSQLI_NUM);
50
51 // Make the UPDATE query:
52 $q = "UPDATE users SET pass=SHA1('$np') WHERE user_id=$row[0]";
53 $r = @mysqli_query($dbc, $q);
54
55 if (mysqli_affected_rows($dbc) = = 1) { // If it ran OK.
56
57 // Print a message.
58 echo '<h1>Thank you!</h1>
59 <p>Your password has been updated. In Chapter 12 you will actually be able to log
in!</p><p><br /></p>';
60
61 } else { // If it did not run OK.
62
63 // Public message:
64 echo '<h1>System Error</h1>
65 <p class="error">Your password could not be changed due to a system error. We
apologize for any inconvenience.</p>';
66
67 // Debugging message:
68 echo '<p>' . mysqli_error($dbc) . '<br /><br />Query: ' . $q . '</p>';
69
70 }
71
72 mysqli_close($dbc); // Close the database connection.
73
74 // Include the footer and quit the script (to not show the form).
75 include ('includes/footer.html'),
76 exit( );
77
78 } else { // Invalid email address/password combination.
79 echo '<h1>Error!</h1>
80 <p class="error">The email
address and password do not
match those on file.</p>';
81 }
82
83 } else { // Report the errors.
84
85 echo '<h1>Error!</h1>
86 <p class="error">The following
error(s) occurred:<br />';
87 foreach ($errors as $msg) { //
Print each error.
88 echo " - $msg<br />
";
89 }
90 echo '</p><p>Please try again.</
p><p><br /></p>';
91
92 } // End of if (empty($errors)) IF.
93
94 mysqli_close($dbc); // Close the
database connection.
95
96 } // End of the main Submit conditional.
97 ?>
98 <h1>Change Your Password</h1>
99 <form action="password.php"
method="post">
100 <p>Email Address: <input type="text"
name="email" size="20" maxlength="60"
value="<?php if (isset($_POST['email']))
echo $_POST['email']; ?>" /> </p>
101 <p>Current Password: <input
type="password" name="pass" size="10"
maxlength="20" value="<?php if
(isset($_POST['pass'])) echo $_
POST['pass']; ?>" /></p>
102 <p>New Password: <input
type="password" name="pass1"
size="10" maxlength="20" value="<?php
if (isset($_POST['pass1'])) echo $_
POST['pass1']; ?>" /></p>
103 <p>Confirm New Password: <input
type="password" name="pass2"
size="10" maxlength="20" value="<?php
if (isset($_POST['pass2'])) echo $_
POST['pass2']; ?>" /></p>
104 <p><input type="submit" name="submit"
value="Change Password" /></p>
105 </form>
106 <?php include ('includes/footer.html'),
?>
2. Start the main conditional:
if ($_SERVER['REQUEST_METHOD'] = = 'POST') {
Since this page both displays and handles the form, it’ll use the standard conditional to check for the form’s submission.
3. Include the database connection and create an array for storing errors:
require ('../mysqli_connect.php'),
$errors = array( );
The initial part of this script mimics the registration form.
4. Validate the email address and current password fields:
if (empty($_POST['email'])) {
$errors[ ] = 'You forgot to enter your email address.';
} else {
$e = mysqli_real_escape_string($dbc, trim($_POST['email']));
}
if (empty($_POST['pass'])) {
$errors[ ] = 'You forgot to enter your current password.';
} else {
$p = mysqli_real_escape_string($dbc, trim($_POST['pass']));
}
The form ![]() has four inputs: the email address, the current password, and two for the new password. The process for validating each of these is the same as it is in
has four inputs: the email address, the current password, and two for the new password. The process for validating each of these is the same as it is in register.php. Any data that passes the validation test will be trimmed and run through the mysqli_real_escape_string( ) function, so that it is safe to use in a query.
if (!empty($_POST['pass1'])) {
if ($_POST['pass1'] != $_POST['pass2']) {
$errors[ ] = 'Your new password did not match the confirmed password.';
} else {
$np = mysqli_real_escape_string($dbc, trim($_POST['pass1']));
}
} else {
$errors[ ] = 'You forgot to enter your new password.';
}
This code is also exactly like that in the registration script, except that a valid new password is assigned to a variable called $np (because $p represents the current password).
6. If all the tests are passed, retrieve the user’s ID:
if (empty($errors)) {
$q = "SELECT user_id FROM users WHERE (email='$e' AND pass=SHA1('$p') )";
$r = @mysqli_query($dbc, $q);
$num = @mysqli_num_rows($r);
if ($num = = 1) {
$row = mysqli_fetch_array($r, MYSQLI_NUM);
This first query will return just the user_id field for the record that matches the submitted email address and password ![]() . To compare the submitted password against the stored one, encrypt it again with the
. To compare the submitted password against the stored one, encrypt it again with the SHA1( ) function. If the user is registered and has correctly entered both the email address and password, exactly one column from one row will be selected (since the email value must be unique across all rows). Finally, this one record is assigned as an array (of one element) to the $row variable.
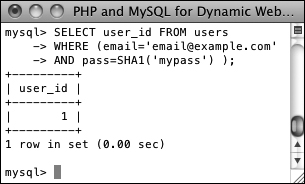
![]() The result when running the
The result when running the SELECT query from the script (the first of two queries it has) within the mysql client.
If this part of the script doesn’t work for you, apply the standard debugging methods: remove the error suppression operators (@) so that you can see what errors, if any, occur; use the mysqli_error( ) function to report any MySQL errors; and print, then run the query using another interface ![]() .
.
7. Update the database for the new password:
$q = "UPDATE users SET pass=SHA1('$np') WHERE user_id=$row[0]";
$r = @mysqli_query($dbc, $q);
This query will change the password—using the new submitted value—where the user_id column is equal to the number retrieved from the previous query.
8. Check the results of the query:
if (mysqli_affected_rows($dbc) = = 1) {
echo '<h1>Thank you!</h1>
<p>Your password has been updated. In Chapter 12 you will actually be able to log in!</p><p><br /></p>';
} else {
echo '<h1>System Error</h1>
<p class="error">Your password could not be changed due to a system error. We apologize
for any inconvenience.</p>';
echo '<p>' . mysqli_error($dbc) . '<br /><br />Query: ' . $q . '</p>';
}
This part of the script again works similar to register.php. In this case, if mysqli_affected_rows( ) returns the number 1, the record has been updated, and a success message will be printed. If not, both a public, generic message and a more useful debugging message will be printed.
9. Close the database connection, include the footer, and terminate the script:
mysqli_close($dbc);
include ('includes/footer.html'),
exit( );
At this point in the script, the UPDATE query has been run. It either worked or it did not (because of a system error). In both cases, there’s no need to show the form again, so the footer is included (to complete the page) and the script is terminated, using the exit( ) function. Prior to that, just to be thorough, the database connection is closed.
10. Complete the if ($num = = 1) conditional:
} else {
echo '<h1>Error!</h1>
<p class="error">The email address and password do not match those on file.</p>';
}
If mysqli_num_rows( ) does not return a value of 1, then the submitted email address and password do not match those in the database and this error is printed. In this case, the form will be displayed again so that the user can enter the correct information.
11. Print any validation error messages:
} else {
echo '<h1>Error!</h1>
<p class="error">The following error(s) occurred:<br />';
foreach ($errors as $msg) { // Print each error.
echo " - $msg<br />
";
}
echo '</p><p>Please try again.</p><p><br /></p>';
}
This else clause applies if the $errors array is not empty (which means that the form data did not pass all the validation tests). As in the registration page, the errors will be printed.
12. Close the database connection and complete the PHP code:
mysqli_close($dbc);
}
?>
13. Display the form:
<h1>Change Your Password</h1>
<form action="password.php" method="post">
<p>Email Address: <input type="text" name="email" size="20" maxlength="60" value="<?php if (isset($_POST['email'])) echo $_POST['email']; ?>" /> </p>
<p>Current Password: <input type="password" name="pass" size="10" maxlength="20" value="<?php if (isset($_POST['pass'])) echo $_POST['pass'];?>" /></p>
<p>New Password: <input type="password" name="pass1" size="10" maxlength="20" value="<?php if (isset($_POST['pass1'])) echo $_POST['pass1'];?>" /></p>
<p>Confirm New Password: <input type="password" name="pass2" size="10" maxlength="20" value="<?php if (isset($_POST['pass2'])) echo $_POST['pass2']; ?>" /></p>
<p><input type="submit" name="submit" value="Change Password" /></p>
</form>
The form takes three different inputs of type password—the current password, the new one, and a confirmation of the new password—and one text input for the email address. Every input is sticky, too.
14. Include the footer file:
<?php include ('includes/footer.html'), ?>
15. Save the file as password.php, place it in your Web directory, and test it in your Web browser ![]() and
and ![]() .
.

![]() The password was changed in the database.
The password was changed in the database.

![]() If the entered email address and password don’t match those on file, the password will not be updated.
If the entered email address and password don’t match those on file, the password will not be updated.
If you delete every record from a table using the command TRUNCATE tablename, mysqli_affected_rows( ) will return 0, even if the query was successful and every row was removed. This is just a quirk.
If an UPDATE query runs but does not actually change the value of any column (for example, a password is replaced with the same password), mysqli_affected_rows( ) will return 0.
The mysqli_affected_rows( ) conditional used here could (and maybe should) also be applied to the register.php script to confirm that one record was added. That would be a more exacting condition to check than if ($r).
Review and Pursue
If you have any problems with the review questions or the pursue prompts, turn to the book’s supporting forum (www.LarryUllman.com/forums/).
Review
• What version of PHP are you using? What version of MySQL? Does your PHP-MySQL combination support the MySQL Improved extension?
• What is the most important sequence of steps for debugging PHP-MySQL problems (explicitly covered at the end of Chapter 8, “Error Handling and Debugging”?
• What hostname, username, and password combination do you, specifically, use to connect to MySQL?
• What PHP code is used to connect to a MySQL server, select the database, and establish the encoding?
• What encoding are you using? Why is it necessary for the PHP scripts to use the same encoding that is used to interact with MySQL that is used for storing the text in the database?
• Why is it preferable to store the mysqli_connect.php script outside of the Web root directory? And what is the Web root directory?
• Why shouldn’t live sites show MySQL errors and the queries being run?
• What syntax will you almost always use to handle the results of a SELECT query? What syntax could you use if the SELECT query returns only a single row?
• Why is it important to use the mysqli_real_escape_string( ) function?
• After what kind of queries would you use the mysqli_num_rows( ) function?
• After what types of queries would you use the mysqli_affected_rows( ) function?
Pursue
• If you don’t remember how the template system works, or how to use the include( ) function, revisit Chapter 3.
• Use the information covered in Chapter 8 to apply your own custom error handler to this site’s examples.
• Change the use of mysqli_num_rows( ) in view_users.php so that it’s only called if the query had a TRUE result.
• Apply the mysqli_num_rows( ) function to register.php, as suggested in an earlier sidebar.
• Apply the mysqli_affected_rows( ) function to register.php to confirm that the INSERT worked.
• If you want, create scripts that interact with the banking database. Easy projects to begin with include: viewing all customers, viewing all accounts (do a JOIN to also show the customer’s name), and adding to or subtracting from an account’s balance.