![]()
Working with Databases
Modern web sites are incredibly powerful, and much of this power derives from their ability to store information. Storing information allows developers to create highly customizable interactions between their software and its users, ranging from entry-based blogs and commenting systems to high-powered banking applications that handle sensitive transactions securely.
This chapter covers the basics of MySQL, a powerful, open source database. I also demonstrate an object-oriented approach to using MySQL in your PHP projects. Subjects covered include the following:
- The basics of MySQL data storage
- Manipulating data in MySQL tables
- Database table structure
- Using PHP for interacting with MySQL databases
- Organizing PHP scripts with a model-view-controller approach
- Why coding is like playing the blues
There is a lot to learn in this chapter, and some of it might make your head spin, initially. But rest assured that all topics covered will be repeated and elaborated upon in subsequent chapters. You will be presented with ample opportunities to learn.
The Basics of MySQL Data Storage
MySQL is a relational database management system that lets you store data in multiple tables. Each table contains a set of named columns, and each row consists of a data entry into the table. Tables will often contain information about other table entries. That way, one fact can be stored in one table yet be used in other tables. For example, take a look at how you might store information about musical artists (see Tables 6-1 and 6-2).
Table 6-1. The Artist Table
artist_id |
artist_name |
|---|---|
| 1 | Bon Iver |
| 2 | Feist |
Table 6-2. The Album Table
album_id |
artist_id |
album_name |
|---|---|---|
| 1 | 1 | For Emma, Forever Ago |
| 2 | 1 | Blood Bank - EP3 |
| 3 | 2 | Let It Die |
| 4 | 2 | The Reminder |
The first table, artist, includes two columns. The first column, artist_id, stores a unique numerical identifier for each artist. The second column, artist_name, stores the artist’s name.
The second table, album, stores a unique identifier for each album in the album_id column and the album name in—you guessed it—the album_name column. The album table includes a third column, artist_id, that relates the artist and album tables. This column stores the unique artist identifier that corresponds to the artist who recorded the album.
At first glance, it might seem a silly way of storing data. Why keep an abstract, incomprehensible number, instead of simply writing the artist name for every album? Table 6-3 imagines you did that.
Table 6-3. The Badly Designed Album Table
album_id |
artist |
album_name |
|---|---|---|
| 1 | Bon Iver | For Emma, Forever Ago |
| 2 | Bon Iver | Blood Bank - EP3 |
| 3 | Feist | Let It Die |
| 4 | fiest | The Reminder |
Please note the spelling error for album_id 4. Because the artist name is spelled out separately for every album, it is possible to store different names for the same artist. In a tiny table with four entries, like the one preceding, it is easy to spot and correct errors. But tables are rarely that small in the real world. Imagine you were building a database for a music store. You would have to keep track of thousands of albums.
If you were lucky, you would catch the error—and then you would have to go through every album by Feist to check whether the artist name was spelled correctly. It is possible, but it would be an insane waste of time.
Do the same thought experiment with the other table structure (listed in Table 6-2). If you misspelled Feist as fiest, you would be more likely to catch the error, because every album by Feist would be listed under fiest. Also, correcting the error would not have you trudging through thousands of entries. You would simply go to the single place where the artist name is declared and write Feist instead of fiest, and every album would now be listed correctly.
By designing tables that store one piece of data once, and only once, you design a robust database with data integrity. Joe Celko, a prominent figure in the SQL community, has aptly coined the slogan “one simple fact, in one place, one time.” Memorize that slogan, and let your database tables follow this one rule.
Manipulating Data with SQL
You can manipulate the data in a MySQL table via the Structured Query Language (SQL). SQL is a small language, and most of it is very easy to read and understand. In this section, you will learn the SQL statements that perform the following actions:
- Create a database
- Create a table in the database
- Insert data into the table
- Retrieve data from the table
- Update data in the table
You’ll test these commands using the phpMyAdmin control panel provided by XAMPP. To use XAMPP, you must start it first. Open the XAMPP control panel (see Figure 6-1) and start your MySQL Database and your Apache Web Server.
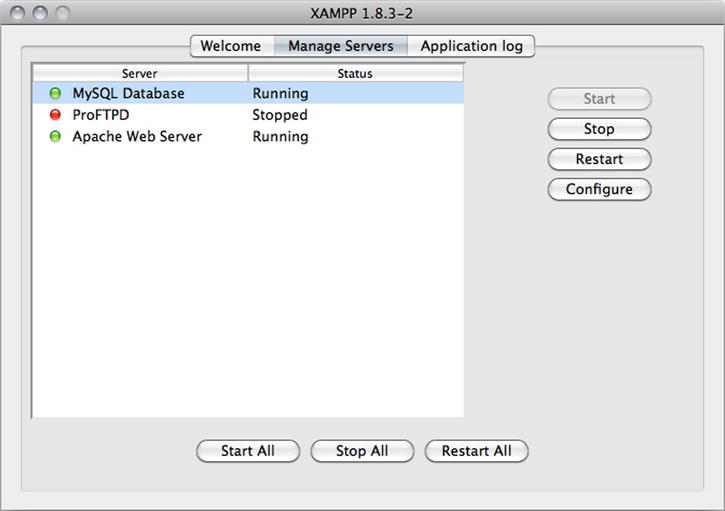
Figure 6-1. The XAMPP control panel
With MySQL and Apache running, you can open a browser and navigate to http://localhost/phpMyAdmin to access the phpMyAdmin control panel (Figure 6-2).
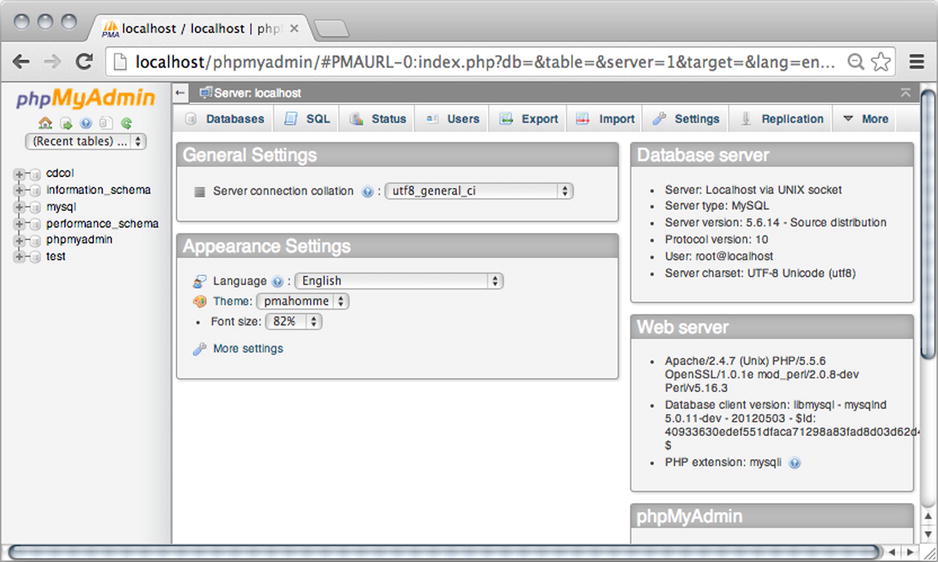
Figure 6-2. The phpMyAdmin control panel
Developing a Database for the Poll
The best way to get a feel for database-driven web pages is to create one for testing. Over the next pages, you will create a database-driven site poll. It is a simple example of database-driven development, but it is quite sufficient to demonstrate the essential principles. The simplest possible site poll will present one question to which site visitors can reply yes or no. All replies from users will be displayed, so every site user can see how other site visitors replied.
As simple as the example is, it will sum up everything you have seen in the book so far, and it will require you to learn how to integrate database-driven data in your PHP projects.
It is a perfect project for learning because it is so simple. It will require relatively few lines of code, which means you can focus on the principles involved, rather than drown in verbose syntax. It will be perfect preparation for the personal blog system you’ll get started on in the next chapter.
The site poll relies on a database table to store the poll question and the poll replies. PHP will have to connect to MySQL and retrieve the relevant data, so it can be displayed in a browser as HTML. From PHP, you will also output an HTML form allowing site visitors to interact with the site poll. Whenever a visitor submits the form, PHP should get the submitted answer and update the MySQL database table accordingly. Begin by creating a database with a table and some poll data.
Creating a Database Using CREATE
SQL uses the word CREATE to indicate that a table or database is being created. After you start the CREATE clause, you must indicate whether you’re creating a database or a table. In your case, you use the keyword DATABASE to indicate that you are, in fact, creating a database. Finally, you have to indicate the name to use for the new database.
MySQL was originally developed in Sweden. So, the default character set used in MySQL is Swedish. Maybe you don’t want to use Swedish in your solutions. I like to use utf-8 in my solutions. It is easy to create a database that uses utf-8; you simply have to indicate utf-8 as the character set to use. Your complete command should look like the following:
CREATE DATABASE playground CHARSET utf8
To execute an SQL statement, you must select the SQL tab in the phpMyAdmin control panel (Figure 6-3). This should bring up a text field that you can use to enter SQL statements. To actually execute the SQL, you have to click the Go button beneath the text field.
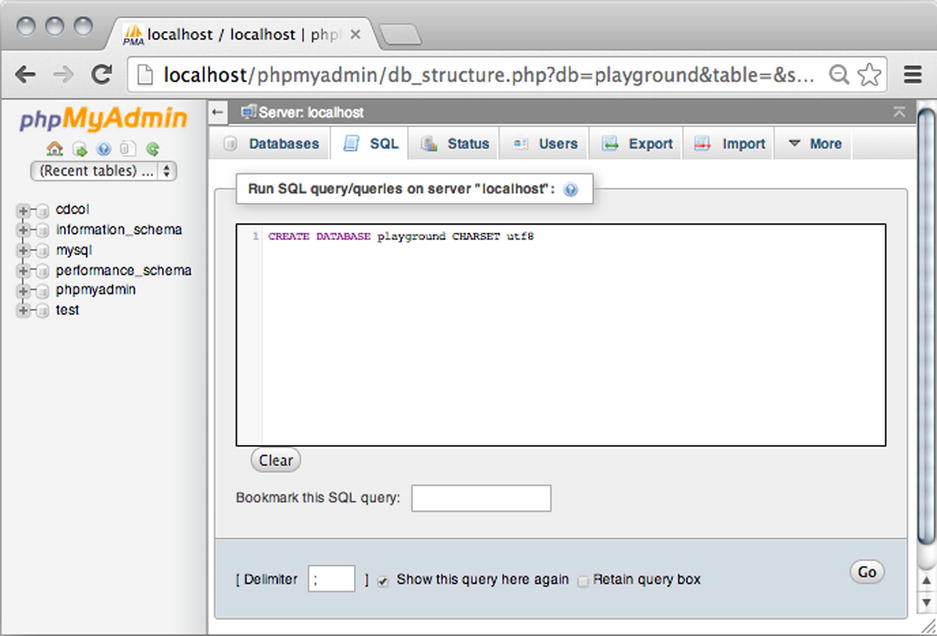
Figure 6-3. The SQL tab in phpMyAdmin
The CREATE TABLE Statement
MySQL stores data in tables. Naturally, the first thing you have to do to start working with MySQL is to create your first table. You have to know a little more SQL to do that. Luckily, SQL syntax is very simple to read and understand. The general syntax for creating a table is as follows:
CREATE TABLE table_name (
    column_name datatype [any constraints or default values],
    column_name datatype [any constraints or default values]
)
As you can see, an SQL CREATE statement must declare a table name. It should also declare names and data type of every table column or attribute. The SQL statement may declare constraints or default values for the created attributes.
Access the playground database by clicking its name in the left column of the phpMyAdmin control panel. Click the SQL tab at the top of the screen, and you’re ready to create your first table. Here’s the SQL you require:
CREATE TABLE poll (
    poll_id INT NOT NULL AUTO_INCREMENT,
    poll_question TEXT,
    yes INT DEFAULT 0,
    no INT DEFAULT 0,
    PRIMARY KEY (poll_id)
)
Once you have entered the SQL into phpMyAdmin’s SQL tab, you can click Go to execute the SQL (Figure 6-4). This will create the new table.
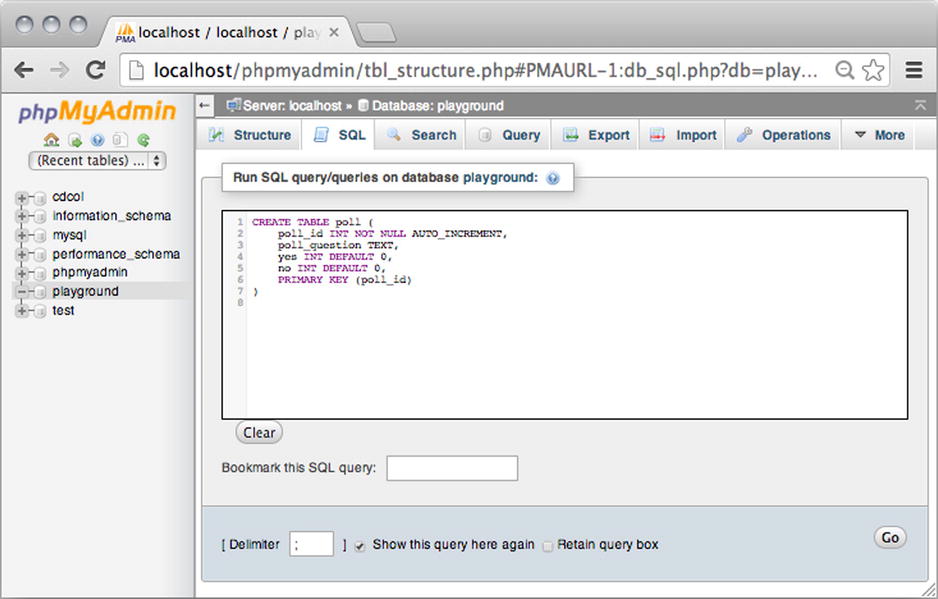
Figure 6-4. Create a new table in the playground database
You can explore the new table you have just created by selecting the poll table from the panel at the left side of phpMyAdmin. Next, you select the Structure tab, which you can find next to the SQL tab (Figure 6-5).
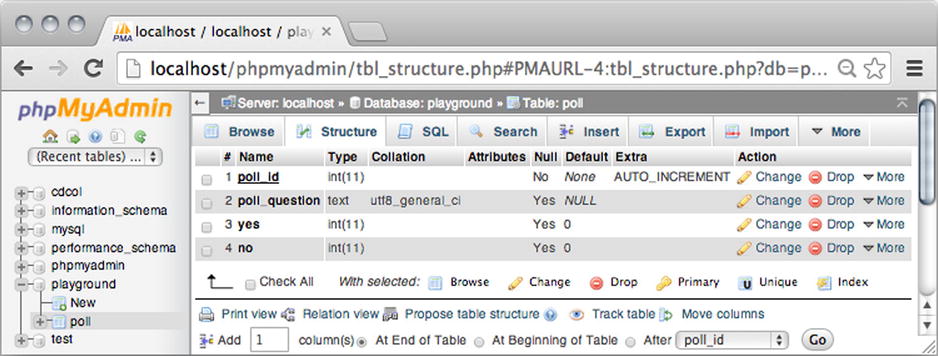
Figure 6-5. Poll table structure
There is a lot of information for you to think about here. You can see that the poll table has four attributes, or columns: poll_id, poll_question, yes, and no.
You can see that each attribute has a type. The fields of a table can only hold data of the correct type. For example, you can only store integers in poll_id, yes, and no. You can see that in the preceding figure, because the type is int(11). You can feel free to disregard the number 11. It is there because 11 happens to be the default display width of MySQL integers.
![]() Note An integer is a non-decimal number, i.e., what you might call a whole number.
Note An integer is a non-decimal number, i.e., what you might call a whole number.
You can also see that you can only store text in poll_question. Looking more into poll_question, you can also see that the collation is utf8.
![]() Note A collation is a set of rules that specify which characters in the character set come first. It is obvious that a comes before b, but how about the character 7? Should that come before or after alphabetical characters? And what about special characters such as #”#€%&? A collation explicitly states how characters should be ordered.
Note A collation is a set of rules that specify which characters in the character set come first. It is obvious that a comes before b, but how about the character 7? Should that come before or after alphabetical characters? And what about special characters such as #”#€%&? A collation explicitly states how characters should be ordered.
Finally, you can see that the yes and no attributes are created with a default value of 0. None of the other attributes has default values.
Understanding PRIMARY KEY
You can see that the poll_id attribute is underlined. It is a visual indication that poll_id is set to be the primary key of poll entities. When an attribute is declared as primary key, it must hold a unique value. So, however many rows of data the poll table will eventually contain, there can be no two identical poll_id values.
Imagine you have a row of data with a poll_id of 1. If you were to try to insert another row of data also with a poll_id of 1, MySQL would reject the new row and give an error message. A primary key is used to unambiguously identify one row of data. You can actually create tables in MySQL without a primary key, but such tables are special cases. Most of the time, you will want to create tables with a primary key, because data isn’t really useful if you can’t identify entries uniquely.
You can see that the poll table is created in such a way that a primary key poll_id must have a value. The poll_id attribute is declared as NOT NULL, meaning that a null value will not be accepted for poll_id. The poll_id attribute must invariably hold an INTeger value. The poll_id attribute cannot be left empty or undeclared.
Understanding AUTO_INCREMENT
The poll table has an auto-incrementing primary key. It is a simple but powerful idea: the first row of data in the poll table will get a poll_id of 1. The next row will automatically get a poll_id of 2. The next row will get a poll_id of 3, and so forth. The value of poll_id will automatically increment.
MySQL will keep track of the values that have already been used as poll_id. That way, every new row of data in poll will get a unique poll_id. In a sense, an auto-incrementing primary key is quite similar to the social security numbers used in many countries across the world to uniquely identify one citizen: it is an arbitrary number used to uniquely identify one thing.
The INSERT Statement
With your table created, you’re ready to start storing data. Every new entry into the poll table will be stored as a separate row. For the sake of simplicity, you can start with inserting a single row of data. Here’s an SQL statement to that end:
INSERT INTO poll (
    poll_question
) VALUES (
    "Is it hard fun to learn PHP?"
)
This SQL statement will insert a new row of data into the table, called poll. It will declare a value for the poll_question column, or attribute. More specifically, the poll_question column will get a value of Is PHP hard fun? Remember how the poll table has a total of four attributes or columns? The remaining columns, poll_id, yes, and no will simply be created with default values. So poll_id will get a value of 1, while yes and no will both get a value of 0.
To have your MySQL program execute the SQL statement, you must first select the playground database in the phpMyAdmin control panel. Next, you click the SQL tab and enter the preceding SQL statement. Finally, you click Go, to actually execute the entered SQL statement.
I assume you can deduct some of the general syntax for INSERT statements. I’d like you to learn the following general syntax, so you can start to formulate your own INSERT statements soon:
INSERT INTO table_name (
    column_name, other_column_name
) VALUES (
    [data for column], [data for other column]
)
When you write an INSERT statement, you must first indicate which table you want to insert data into. Then, you indicate which columns of that table you will be inserting data into. If there are more columns in the table, they will get default values.
Once you have indicated the table and columns to which you will be adding insertions, you must list the actual data to insert. If you indicate one column in your INSERT statement, you must list one value. If you indicate two columns, you must list two values. In other words, the number of columns must match the number of values indicated in your INSERT statement.
The SELECT Statement
Once you have inserted a row of data into the poll table, you would probably like to see the new row. You probably want some visual confirmation that the row was in fact inserted, so you know you have a database table with a bit of data stored inside. To retrieve data from your database tables, you will have to use an SQL SELECT statement. The general syntax for SELECT statements is quite simple.
SELECT column_name, column_name FROM table_name
The main keyword to notice is SELECT. It is used to retrieve data specified properties FROM a specified table in a database. A SELECT statement always returns a temporary table populated with any retrieved data. The temporary table will have exactly the properties indicated immediately after the SELECT keyword. You could retrieve data from the poll table with the following SQL statement:
SELECT poll_id, poll_question, yes, no FROM poll
Please go to the SQL tab in your phpMyAdmin control panel, enter the above SELECT statement, and see the returned table (see Figure 6-6).
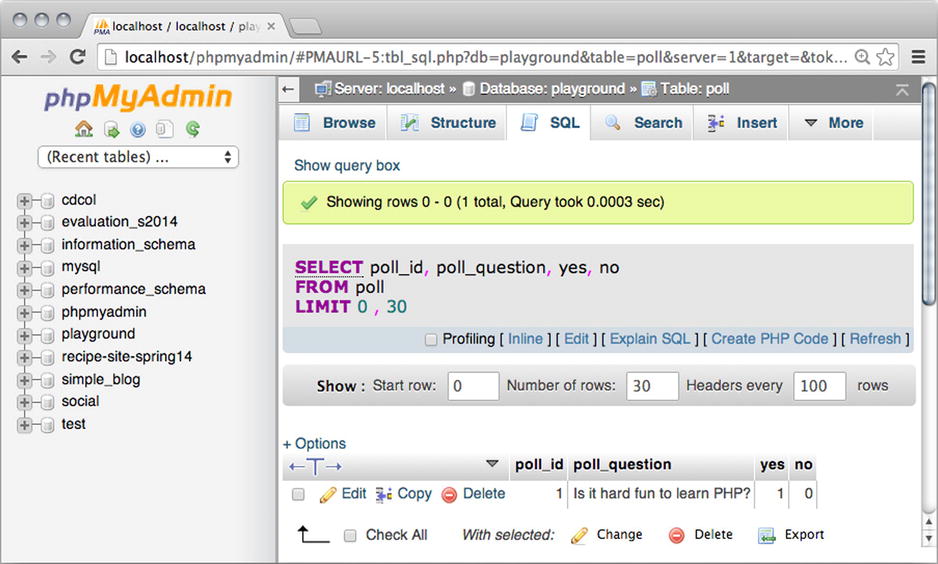
Figure 6-6. Poll table with one row inserted
You can see in Figure 6-6 that the SELECT statement returns a temporary, unnamed table with four columns, one for each column indicated in the SELECT statement. You can see that there is one row of data in the table. It has a poll_id of 1 and a poll_question. The yes and no columns are 1 and 0, respectively.
It is not much to look at in its present state, but perhaps you can appreciate that this is all the data you will require to have a site poll displayed on your web site. Your web site would display the poll question. Site visitors could post their responses through an HTML form. Possible options would be yes or no. All responses from site visitors would be stored in the yes or no fields. So, with a tiny bit of math, you could calculate the relative responses and display a message such as the following: 79% of all site visitors think PHP is hard and fun to learn.
The UPDATE Statement
As you can probably work out, you will have to change the yes or no values in the poll table every time a site visitor submits a response. You must know one more SQL statement to do that. You can pretend a site user just agreed that PHP is hard to learn. You would need an SQL statement to increase the stored value for the yes property with a value of 1, as follows:
UPDATE poll SET yes = yes + 1
WHERE poll_id = 1
If you want, you can run the UPDATE statement by entering it into phpMyAdmin’s SQL tab and clicking Go. If you do so, you can see that the yes property of the first row of data in poll gets a value of 1. If you run the same SQL statement again, yes will get a value of 2.
Note how the WHERE clause limits which rows will be affected by the update. Only the row with a poll_id of 1 will be affected. Any other rows in the table will not be updated, because of the WHERE clause.
An UPDATE statement without a WHERE clause would update the yes attribute of all rows in the poll table. In your case, there is just one row, so the WHERE clause isn’t absolutely necessary. But most tables you will work with will have much more than just one row, so it’s a good habit to explicitly indicate which row to update.
In the preceding WHERE clause, you can be certain that only one row will be updated, because the WHERE clause identifies a row of data by its primary key. You can always trust a primary key to uniquely identify a single row (unless your tables are really badly designed).
Coding a Database-Driven Site Poll
Let’s code a database-driven site poll in the interest of learning how to work with MySQL databases from PHP. Let’s use the playground database and the poll table for data storage. You will learn to use a so-called PDO object to connect your PHP application to a MySQL database. Stepping up from basic, dynamic PHP sites to database-driven, dynamic PHP sites has some consequences.
Obviously, you will have to connect to a database from PHP, and your PHP scripts will have to communicate with database tables, to get the content you need for your site. PHP is a very forgiving language, and you can approach this task in many ways. But some of these ways are more scalable than others. Some ways that seem easy at first can transform your code into a completely disorganized, tangled, spaghetti mess, once you start to tackle larger projects, such as a blogging system. Let’s take a tried-and-tested approach to code architecture that can be scaled to accommodate complex projects, even if this site poll is a simple project.
Separating Concerns with MVC
The model-view-controller (MVC) design pattern is a common approach to organizing scripts consistently. Using a consistent approach to organizing your scripts can help you develop and debug faster and more efficiently.
Learning to understand the basic principles behind MVC can also prepare you for learning an MVC framework. Eventually, you are likely to come across CodeIgnitor, cakePHP, yii, or some other PHP MVC framework. Such frameworks will aid you in designing and developing more complex web applications.
At its most basic, MVC separates coding concerns into three categories: models, views and controllers. A model is a piece of code that represents data. Your models should also hold most logic involved in the system you’re building. A view is a piece of code that shows information visually. The information to be displayed by the view is received from a model. A controller is a piece of code that retrieves input from users and sends commands to relevant model(s). In short, MVC separates user interactions from visual representation from system logic and data.
![]() Note You can read much more about MVC at http://en.wikipedia.org/wiki/Model-view-controller.
Note You can read much more about MVC at http://en.wikipedia.org/wiki/Model-view-controller.
You have already seen examples of separating model, view, and controller. Remember how you made a template for HTML pages? You have worked with a view that holds a bare-bones HTML page skeleton. You can find it in the gallery you started building in Chapter 4. The view is in ch4/templates/page.php.
In the same project, you created a model related to that view: the ch4/classes/Page_Data.class.php, which declares a number of methods and properties related to the content of your HTML pages.
The model and view were hooked up through a controller. In ch4/index.php, you assigned values to the model and made the model available to the view, so a well-formed HTML5 page with content could be created and displayed in browsers. So, index.php was your controller.
In this book, I aim to use a simple implementation of MVC. Most other MVC implementations you will come across are likely to be much more elaborate. You can easily find many MVC examples that are not meant for beginning programmers. Once you understand the basic MVC principles and have gained some experience working with those principles in a simple context, you will find it much easier to understand the more elaborate implementations.
Planning the PHP Scripts
Let’s keep the poll simple. Create an index.php to output a valid HTML5 page that will show the poll. The index will be a front controller.
A front controller is a design pattern very often seen in MVC web applications. A front controller is a single “entrance door” to a web application. You have used a front controller already in the projects you have made so far. Remember how index.php has been the only script loaded directly in your browser? That’s the front controller idea for you.
![]() Note The front controller design pattern is well-documented online. You could start your own research at
Note The front controller design pattern is well-documented online. You could start your own research at
http://en.wikipedia.org/wiki/Front_Controller_pattern.
As in the previous projects, index.php will output a valid HTML5 page, and it will load the poll controller. The poll controller should return the poll as HTML, so it can be displayed on index.php. Note how every one view has its own model and its own controller (Figure 6-7).
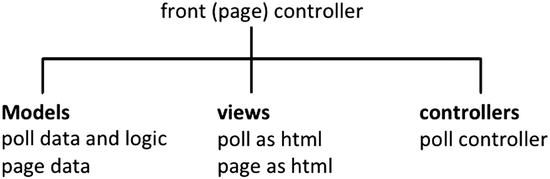
Figure 6-7. Distribution of responsibilities
See how there is a poll model, the poll controller, and the poll view. Those three should work together to display a functional poll. You can also see that the page has its own model, view, and controller. The front controller is the page controller.
Creating the Poll Project
You can create a site structure to mimic code responsibilities. Create a new folder in XAMPP/htdocs. Call the new folder poll. Inside the poll folder, you can create three other folders: models, views, and controllers (Figure 6-8).
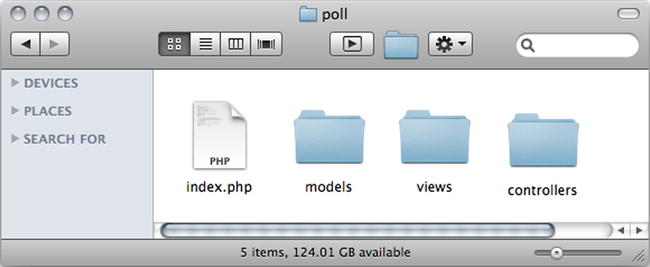
Figure 6-8. Folder structure for the poll project
You can copy the ch4/templates/page.php file from the gallery project. Save a copy of page.php as poll/views/page.php.
Likewise, copy ch4/classes/Page_Data.class.php from the gallery project and save a copy in poll/models/Page_Data.class.php.
Now it is time to create poll/index.php and write a little code to check that everything is working nicely together so far:
<?php
//complete code for htdocs/poll/index.php
error_reporting( E_ALL );
ini_set( "display_errors", 1 );
//load model
include_once "models/Page_Data.class.php";
$pageData = new Page_Data();
$pageData->title = "PHP/MySQL site poll example";
$pageData->content .= "<h1>Everything works so far!</h1>";
//load view so model data will be merged with the page template
$page = include_once "views/page.php";
//output generated page
echo $page;
There should be no surprises for you in this code. It is nearly identical to the code you have used in the other projects in this book. Only folder names have changed!
I would like to think that your perspective has changed too. You are now looking at this code with a model-view-controller perspective. You can test the code by pointing your browser to http://localhost/poll/index.php. You can see how the created HTML page is a combination of a view merged with a model. You can see how the front controller hooks up the model and the view and outputs a well-formed HTML5 page to the browser for the user to see.
Making a Poll Controller
With a nearly blank page created with its own model and view, and a front controller set up, you can prepare a file for displaying your poll example in the browser. Sticking to the MVC approach, you will eventually need a poll model, a poll view, and a poll controller. The smallest possible step is to create a bare-bones poll controller and load that from the front controller, from index.php. Create a new file, poll.php, in the controllers folder:
<?php
//complete code listing for controllers/poll.php
return "Poll will show here soon";
Next, you should load the poll controller from index.php. You should load the controller somewhere after the $pageData object was created and before the page template is included, as follows:
//partial code listing for index.php
//comment out or delete this line
$pageData->content .= "<h1>Everything works so far!</h1>";

//new line of code to load poll controller
$pageData->content = include_once "controllers/poll.php";
//no changes below

$page = include_once "views/page.php";
echo $page;
If you save your files and load http://localhost/poll/index.php in your browser, you should see Poll will show here. If you don’t, something went wrong when you typed in the code.
Making a Poll Model
With a preliminary poll controller in place, you can go on to develop a preliminary poll model. Make a poll class definition with just one method. Create a new file in models/Poll.class.php, as follows:
 <?php
//complete code for models/Poll.class.php
//beginning of class definition
class Poll {

    public function getPollData() {
        $pollData = new stdClass();
        $pollData->poll_question = "just testing...";
        $pollData->yes = 0;
        $pollData->no = 0;
        return $pollData;
    }
}
//end of class definition
Notice how the keyword class is used to declare a class name. This class is called Poll, and the code inside the class definition defines a blueprint for all Poll objects. The Poll class has just one method. It will create a hard-coded StdClass object called $pollData and return it to the caller.
See how the $pollData object has properties for poll_question, yes, and no. The $pollData object represents all the content required to show a poll. In other words, the $pollData models poll data.
Making a Poll View
A data object is not much to look at. You can create a simple poll view, so you can get a poll to look at. Create a new file in views/poll-html.php, as follows:
<?php
//complete code for views/poll-html.php
return "
<aside id='poll'>
    <h1>Poll results</h1>
    <ul>
        <li>$pollData->yes said yes</li>
        <li>$pollData->no said no</li>
    </ul>
</aside>
";
Hooking Up Poll View with Poll Model
With a preliminary poll model and poll view created, you can open the poll controller to hook up model and view and, finally, show something in the browser. Open controllers/poll.php in your editor and make the following necessary changes:
<?php
//complete code listing for controllers/poll.php
include_once "models/Poll.class.php";
$poll = new Poll();
$pollData = $poll->getPollData();
$pollView = include_once "views/poll-html.php";
return $pollView;
That’s it! You have an MVC poll. If you save the files and load http://localhost/poll/index.php in your browser, you should see a well-formed HTML5 page with a simple <ul> element displaying some of your preliminary, hard-coded poll data. You can see what it should look like in Figure 6-9.
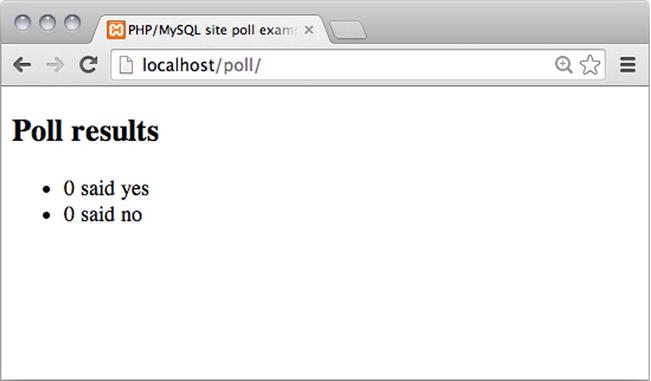
Figure 6-9. The initial poll, seen in Chrome
Perhaps you’re dying to ask a question such as Why should I create three different files to show a simple <ul> element? It would be a completely justified question to ask. If all you wanted was to show a <ul> element with a few hard-coded values, the MVC approach would be complete overkill. The best approach would probably be to write a short HTML file by hand.
The point here is to introduce the MVC design pattern with a very simple example, so there is no overly complex code hiding the basic principles of MVC from your eyes. With the MVC approach, you are perfectly set up for creating a database-driven web application. The MVC architecture is hardly necessary for something this simple, but it can really solve some challenges you will come across with projects of greater complexity, such as the blogging system you’ll start making in the next chapter.
MVC encapsulates views from models from controllers. That means you can change a view without changing anything else. Imagine you didn’t want a <ul> element for your poll. You could simply change the HTML tags used in views/poll-html.php and trust the rest of your code to run correctly. You can easily change a view without changing anything else.
Similarly, you could change the content and still trust your code to run as expected. It would be a simple task to set the no property to 9. You would only need to change a tiny bit of code in models/Poll.class.php. Your poll application is built with self-contained, loosely coupled elements.
Coding Is Like Playing the Blues
Some creatively inclined readers might object to rigorous organization of code. You may feel that coding, especially if you try to implement a standardized approach such as MVC, is a prison for your creative sensibilities. You might conclude that it leaves no room for creativity.
I see where such objections could come from, but I strongly disagree. Coding is really a lot like playing the blues, and it is every bit as creative and calls as much for individual expressions of creativity.
Yes, implementing MVC requires that you separate your code into three categories. Yes, MVC will force you to write your code in specific, well-defined places. When you are learning, such restrictions can feel like a prison. But it is just like learning to play the blues.
Blues isn’t any kind of music: Blues is blues! To get that blues sound, you can’t just play any note on your instrument. In much blues music, you have three chords, and all blues improvisation stems from a pentatonic scale—giving the musician only five notes to choose from. Perhaps the strict limitations are not counterproductive for creative expression. Perhaps blues musicians are so good at creatively expressing themselves because blues is limited to three chords and five notes.
To be a great blues musician, you have to know the rules of blues music intimately. And then you start to bend them. You start to add transitional chords to lead the music between those three basic blues chords. You begin to bend those five notes of the pentatonic scale. You start to express yourself creatively within the constraints of blues.
Coding is exactly like that. There are rigorous, restricting rules, and there is much room for individual creative expression. In the process of learning, you will gradually find your own way, but it takes as much effort to become a great coder as it does to become a great musician. So start practicing!
Connecting to MySQL from PHP
Your MVC architecture will make it a fairly straightforward task to make a database connection and use database-driven data for the poll. Once you have established such a connection, you can retrieve data from your database and publish it as HTML using PHP. That is the essence of database-driven web sites.
There are several ways of connecting PHP to MySQL. You might come across a few different approaches, if you look for PHP code examples on the Internet or in other books. You are quite likely to come across the outdated MYSQL() and the updated MYSQLI().
PHP Data Objects (PDO)
In this book you will exclusively use PHP data objects (PDO). It is a very safe and efficient way of connecting to a database from PHP. PDO supports multiple databases and provides a uniform set of methods for handling most database interactions. This is a great advantage for applications that have to support multiple database types, such as PostgreSQL, Firebird, or Oracle.
With PDO, changing from one database type to another generally requires that you rewrite only a very small amount of code and continue with business as usual.
A potential downside of using PDO is that it relies on the OOP features of PHP5, which means that servers running PHP4 won’t be able to run scripts using PDO. This is not much of an issue anymore, as few servers lack access to PHP5; however, it’s still something you need to be aware of.
Opening a Connection
It is time to connect to your database. For the sake of simplicity, I propose that you write the code for connecting in index.php. When the database connection is available in the front controller, it will be very easy to pass it on to any other pieces of code that will need it.
A default XAMPP installation has a default username root and no password. You created a database called playground for this learning exercise. So you can connect to a MySQL database running on your localhost, using these credentials.
Your XAMPP may use different credentials. You will have to use valid credentials. You can create a new database connection by adding a few lines of code in index.php, as follows:
<?php
//complete code for index.php
error_reporting( E_ALL );
ini_set( "display_errors", 1 );
include_once "models/Page_Data.class.php";
$pageData = new Page_Data();
$pageData->title = "PHP/MySQL site poll example";
//new code starts here
//database credentials
$dbInfo = "mysql:host=localhost;dbname=playground";
$dbUser = "root";
$dbPassword = "";
try {
    //try to create a database connection with a PDO object
    $db = new PDO( $dbInfo, $dbUser, $dbPassword );
    $db->setAttribute( PDO::ATTR_ERRMODE, PDO::ERRMODE_EXCEPTION );
    $pageData->content = "<h1>We're connected</h1>";
}catch ( Exception $e ) {
    $pageData->content = "<h1>Connection failed!</h1><p>$e</p>";
}
//comment out loading poll controller
//$pageData->content = include_once "controllers/poll.php";
//end of code changes
$page = include_once "views/page.php";
echo $page;
The preceding code creates a PDO object and stores it in the $db variable. By default, PDO will hide any error messages. You want to see error messages to learn. The preceding code will display any PDO-related errors as so-called exceptions.
![]() Note There are other possible settings you might use for creating a PDO connection to a database. You can consult www.php.net/manual/en/book.pdo.php for complete and detailed coverage.
Note There are other possible settings you might use for creating a PDO connection to a database. You can consult www.php.net/manual/en/book.pdo.php for complete and detailed coverage.
Save the changes in index.php and load http://localhost/poll/index.php in your browser. If you did everything absolutely correctly, you should see an output in your browser, confirming that you connected successfully. Notice that the poll controller is no longer loaded. We’ll load it again shortly. This code only tests if database connection was successfully established.
Using a try-catch Statement
Many things can go wrong when you try to connect to a database. Perhaps your XAMPP MySQL Server isn’t running, or you supplied invalid credentials, such as a misspelled username or a misspelled database name. If your code attempts to connect to a database and fails, your entire script fails. This is because PDO will throw a so-called exception.
Exceptions are interesting, because your code can continue execution if you handle exceptions. That is what a try-catch statement can do. It will try to run a block of code that might cause an exception. If an exception is thrown, it will be caught and dealt with, so the remaining script can continue. One advantage is that you can formulate meaningful error messages for users. The general syntax for try-catch statements is as follows:
try{
    //try something that can fail
} catch ( Exception $e ) {
    //whoops! It did fail
}
You can see a try-catch statement in action, if you change one line of code in index.php. You could try to connect to your database with wrong credentials, as follows:
//partial code from index.php
//$dbUser = "root";
//use an invalid database user name for testing purposes
$dbUser = "bla bla";
Save and run index.php, and you will see the catch block doing its thing. It will handle the thrown exception and output an error message.
Please change back to valid database credentials. By now, you should have a connection to your database. Change your code to load the poll controller again:
//partial code listing for index.php
try {
    $db = new PDO( $dbInfo, $dbUser, $dbPassword );
    $db->setAttribute( PDO::ATTR_ERRMODE, PDO::ERRMODE_EXCEPTION );
    //delete or comment out the connection message
    //$pageData->content = "<h1>We're connected</h1>";
}catch ( Exception $e ) {
    $pageData->content = "<h1>Connection failed!</h1><p>$e</p>";
}
//loading poll controller again
$pageData->content = include_once "controllers/poll.php";
Your code is set up. You will soon be using database-driven content for the poll. But first, a little detour into an important topic in object-oriented programming: constructors.
Using Constructor Arguments
When programming with an object, you will often have to set a few initial values in new objects created. In PHP, you can do this by using a constructor method. A constructor is a method that runs only once during an object’s lifetime, when the object is first created.
It is an important topic to know about, and it is a powerful tool for your object-oriented toolbox. You can ease into it and begin with a simple example of a class definition without a constructor. I have created a PHP script in poll/test.php. You don’t have to; you can simply read the following code example:
<?php
class Greeter {
    private $greeting = "Hello";
    private $subject = "World";

    public function greet(){
        return "$this->greeting $this->subject";
    }

}
$greeter = new Greeter();
echo $greeter->greet();
If you were to run http://localhost/poll/test.php, you would see the following expected output:
Hello World
You can see how the properties $greeting and $subject are used to return a string from the method, greet(). You can also observe how the $this keyword is used to get access to object properties from inside the class definition.
Imagine you wanted a Greeter that could be used to say things apart from “Hello.” You would have to be able to change the $greeting property before calling greet(). One approach would be to use an argument when creating a Greeter object, as follows:
<?php
class Greeter {
    private $greeting = "Hello";
    private $subject = "World";

    //notice the two underscore characters in __construct()
    //declare a constructor method with an argument
    public function __construct( $g ) {
        $this->greeting = $g;
    }

    public function greet(){
        return "$this->greeting $this->subject";
    }

}
//call constructor with an argument
$greeter = new Greeter( "Good Morning" );
echo $greeter->greet();
If you were to reload http://localhost/poll/test.php in your browser, you would see the following:
Good Morning World
A constructor method is a method that runs when a new object is created. The process of creating a new object is often called instantiation in technical terminology. To declare a constructor for a class, you declare a new method that must be called __construct(). Note that there are two underscore characters.
If a class has a constructor method, the constructor method will run as a new object is instantiated. So, writing new Greeter() will call the constructor of Greeter. In the preceding test example, the constructor function takes an argument, so a value must be sent along when it is called. The received value is stored in a predefined property $greeting. That way, the received value will be remembered as long as the object lives.
![]() Note It can be tricky to understand arguments. You could reread the explanation about function arguments in Chapter 3, or you could search the Internet, perhaps for “understanding PHP functions with arguments” or “learn PHP methods and arguments.” You are bound to find many explanations using a wide variety of metaphors and code examples. I hope you will find an explanation that does the trick for you.
Note It can be tricky to understand arguments. You could reread the explanation about function arguments in Chapter 3, or you could search the Internet, perhaps for “understanding PHP functions with arguments” or “learn PHP methods and arguments.” You are bound to find many explanations using a wide variety of metaphors and code examples. I hope you will find an explanation that does the trick for you.
Sharing the Database Connection with the Poll Model
You have already created a database connection, a PDO object, in index.php. You can use the idea of constructors with arguments to share a database connection with the poll model. Update your code in models/Poll.class.php, as follows:
<?php
//complete code listing for  models/Poll.class.php
class Poll {
    //new code: declare a new property
    private $db;

    //new code: declare a constructor
    //method requires a database connection as argument
    public function __construct( $dbConnection ){
        //store the received conection in the $this->db property
        $this->db = $dbConnection;
    }

    //no code changes below – keep method getPollData() as it is
    public function getPollData(){
        $pollData = new stdClass();
        $pollData->poll_question = "just testing...";
        $pollData->yes = 0;
        $pollData->no = 0;
        return $pollData;
    }
}
The preceding changes have prepared the Poll class. It can now receive a PDO object. So now, you have to call the Poll class’s constructor and pass a PDO object as an argument. Take a pause to reflect. Where in your code would you load your poll model?
From your poll controller, from poll/controllers/poll.php, as follows:
<?php
//complete code listing for controllers/poll.php
include_once "models/Poll.class.php";
//Only change here: pass PDO object as argument
$poll = new Poll( $db );
$pollData = $poll->getPollData();
$pollView = include_once "views/poll-html.php";
return $pollView;
Now, you have passed the database connection to the poll model, to the new Poll object just created. You can save and test your work now. You should expect to see exactly the same poll as before. Your code shares a database connection, but it doesn’t use it for anything yet.
Perhaps you are wondering how the PHP code in controllers/poll.php can know the variable $db. After all, $db was declared in index.php, so how is it possible to use it in another file? It’s a good question, and the answer isn’t obvious at all—until you understand it.
The variable $db is declared in index.php. It is available in controllers/poll.php because controllers/poll.php is included from index.php. Including a file is a lot like copying all the code from one file and pasting it into another file. As a consequence, all variables declared in the including file can be available in the included file and vice versa.
Retrieving Data with a PDOStatement
You have established a connection from PHP to MySQL running on your local XAMPP. The PDO object is explicitly connected to the playground database you have already created with SQL through the phpMyAdmin control panel.
Inside the playground database, you have a poll table with a poll_question and values for its yes and no attributes. You are ready to retrieve data from the database, so you can use it in PHP. It will require a couple of steps in the PHP code.
Code dealing with the data for your poll belongs in the poll model. So, you should open models/Poll.class.php. You can change the existing method getPollData. At this point, the method returns hard-coded poll data. You want it to return database-driven poll data.
First, you must write an SQL statement and pass that to MySQL by using PDO. PDO can tell MySQL that it should execute the SQL statement and return a result: the poll data. Here’s how to express that in PHP:
//partial code listing for models/Poll.class.php
//udate existing method
public function getPollData () {
    //the actual SQL statement
    $sql = "SELECT poll_question, yes, no FROM poll WHERE poll_id = 1";
    //Use the PDO connection to create a PDOStatement object
    $statement = $this->db->prepare($sql);
    //tell MySQL to execute the statement
    $statement->execute();
    //retrieve the first row of data from the table
    $pollData = $statement->fetchObject();
    //make poll data available to the caller
    return $pollData;
}
The preceding code queries the database and retrieves the first row of data from the poll table. You already have a poll view and a poll controller that hooks up the poll model with the poll view.
Save your work and load http://localhost/poll/index.php in your browser, to see it in action. You should see data from the poll table represented and displayed as HTML. Just take a minute to marvel at what you see: a database-driven web page!
You might also appreciate the clean separation between HTML and data. If you don’t like the HTML elements I have used in the example, you can easily change them to something else. Changing the HTML elements will not influence the PHP script in any way.
Similarly, you will soon see that the data can change without your having to change the HTML elements. The content of the HTML elements will be updated dynamically, according to whatever values are retrieved from the database.
There is one dependency, though, and it is important you see it. In views/poll-html.php, you need a $pollData object, and it must have properties for yes and no. So, in views/poll.php, you must create such an object, or the poll will fail. The name and properties of that one object are critical.
PDO and PDOStatement Objects
I’d like to point out that the SQL string should be converted to a PDOStatement object before PDO can pass the SQL to MySQL, where it will then be executed. PDO has a method called prepare(), which converts a simple SQL string to a PDOStatement object.
PDOStatement objects have another method, called execute(), for getting MySQL to execute the SQL. PDOStatements also have a method, called fetchObject(), to retrieve one row of data from the queried database table.
![]() Note You can consult the official documentation for PDOStatement objects at
Note You can consult the official documentation for PDOStatement objects at
www.php.net/manual/en/class.pdostatement.php.
The PDOStatement’s fetchObject( ) Method
The fetchObject() method returns an StdClass object that represents one row of data from the queried table. In the preceding code, you have an SQL statement that selects poll_question, yes, and no from the poll table.
Consequently, the returned StdClass object will be created automatically with properties for poll_question, yes, and no. You can access data from the poll table through the StdClass object properties. In the following, you can see for yourself how these properties are used in views/poll-html.php to display data retrieved from the poll table on a web page:
<?php
//complete code for views/poll-html.php
//$pollData->no holds the current value of the no attribute
//$pollData->yes holds the current value of the yes attribute
return "
<aside id='poll'>
    <h1>Poll results</h1>
    <ul>
        <li>$pollData->yes said yes</li>
        <li>$pollData->no said no</li>
    </ul>
</aside>
";
You have already used an StdClass for $pollData. Initially, you hard-coded properties and values for a poll. The significant difference is that the fetchObject() will automatically create a new StdClass object and return it. Property names of the created StdClass object are identical to the table column names.
For example, $pollData has poll_question, yes, and no properties, because the SQL SELECT statement created a temporary table with poll_question, yes, and no columns. The temporary table was returned from MySQL to PHP. PDO converted the received data to an StdClass object, because you used the fetchObject() method.
It’s just brilliant that you have database-driven content displayed, but your example isn’t much of a site poll yet. Site visitors should be allowed to submit their opinions and, thus, contribute to the poll results. Somehow, you have to provide a graphical user interface to site visitors: an HTML form is the obvious choice. Take a few seconds to think. Where would the HTML for such a form belong? In the model, the view, or the controller? Come up with your best answer before you continue reading...
An HTML form is something users see, so it is a view. Update the poll view code in views/poll-html.php, as follows:
<?php
//complete code listing for views/poll-html.php
//new code below
$dataFound = isset( $pollData );
if( $dataFound === false ){
    trigger_error( 'views/poll-html.php needs an $pollData object' );
}

return "
<aside id='poll'>
    <form method='post' action='index.php'>
            <p>$pollData->poll_question</p>
            <select name='user-input'>
                <option value='yes'>Yes, it is!</option>
                <option value='no'>No, not really!</option>
            </select>
            <input type='submit' value='post' />
    </form>
    <h1>Poll results</h1>
    <ul>
        <li>$pollData->yes said yes</li>
        <li>$pollData->no said no</li>
    </ul>
</aside>
";
As you can probably figure out, this will show an HTML form very much like the one you created for the dynamic quiz in Chapter 3. You can refresh your browser to see what it looks like.
Triggering a Custom Error Message
Did you notice those initial lines of code to trigger an error message? Well, you have established that the $pollData object is critical for the scripts to collaborate meaningfully about outputting a poll.
If you—or a fellow developer working on the same project—forget to create a $pollData object or perhaps misspell it (e.g., $pillData), the site poll will not behave as it should. You can test if a $postData object is available. If it is not, you can trigger a custom error message. It is really a kind of self-help: should you or another developer incidentally make this mistake, you can trust the system to output a meaningful error message, so the error can be corrected easily and speedily.
When you are developing new projects on your own, you are likely to spend a significant part of your time fixing errors. With custom error messages, you can speed up your development time by testing for errors you predict are likely to occur.
Updating a Database Table According to Form Input
There is one final step required to complete the site poll example. You should retrieve any user input submitted through the form and update the poll table with the received input. If a site visitor submits a no, you should increment the value of the no attribute in the poll database table.
It will be much like what you did with the dynamic quiz: you need to detect if the form was submitted. If it was, you can retrieve the submitted input and update the poll table accordingly. You can see there are two concerns here: first, detect input; next, update database.
Updating the database is a task for a model. Dealing with user interactions is job for a controller. You can start by updating the poll model class with a method for updating the database table. Update models/Poll.class.php.
<?php
//declare a new method for the Poll class in models/Poll.class.php
//NB. Declare the method inside the Poll class code block
public function updatePoll ( $input ) {
    if ( $input === "yes" ) {
        $updateSQL = "UPDATE poll SET yes = yes+1 WHERE poll_id = 1";
    } else if ( $input === "no" ) {
        $updateSQL = "UPDATE poll SET no = no+1 WHERE poll_id = 1";
    }
    $updateStatement = $this->db->prepare($updateSQL);
    $updateStatement->execute();
}
//no other code changes in Poll class
The new method, updatePoll(), should be fairly straightforward to understand. If the user submitted a yes, you create an SQL string that can update the yes attribute in the poll table. If the user submitted a no, you create a different SQL string to update the no attribute. Notice that no matter if a yes or a no was submitted, the created SQL string will be stored in a variable called $updateSQL.
Once the $updateSQL string is created, you use the PDO method prepare() to convert the SQL string to a PDOStatement object, which is stored in the variable $updateStatement. Through the PDOStatement, you can execute() the query to actually update the poll table.
The updatePoll() method will not do anything until it is called. Calling model methods is a job for a controller...
Responding to User Input
Controllers are responsible for dealing with user interactions. So, the poll controller is the right place to intercept user input from the poll form. There are a couple of things to add to the script.
You have to check if the form was submitted at all. If the form was submitted, you should grab the submitted input received through the form. The received input should be passed on to the model, as you call the method to updatePoll(). Here’s how to formulate that with PHP in controllers/poll.php:
<?php
//complete code listing for controllers/poll.php
include_once "models/Poll.class.php";
$poll = new Poll( $db );
//check if form was submitted
$isPollSubmitted = isset( $_POST['user-input'] );
//if it was just submitted...
if ( $isPollSubmitted ) {
    //get input received from form
    $input = $_POST['user-input'];

    //...update model
    $poll->updatePoll( $input );
}
//no changes here
$pollData = $poll->getPollData();
$pollAsHTML = include_once "views/poll-html.php";
return $pollAsHTML;
If you enter this code, you will have a fully functional site poll, allowing site visitors to see what other site visitors thought about your poll question. Any site visitor can contribute an opinion through the form. The input will be saved in the database and displayed on index.php.
You can see that the preceding script checks if the poll form was submitted. It happens near the top of the script. The code looks for a URL variable named user-input. Such a URL variable will be declared when the poll form is submitted, because the poll form has a <select name='user-input'> element. The poll form uses the POST method, so your code should look for user input in the $_POST superglobal, as follows:
//check if form was submitted
$isPollSubmitted = isset( $_POST['user-input'] );
if ( $isPollSubmitted ) {
    $input = $_POST['user-input'];
    $poll->updatePoll( $input );
}
If the URL variable is set, you know that the poll form was submitted. In that case, you can retrieve the site visitor’s input. Next, the code calls the updatePoll() method in the Poll object and passes along the user input as an argument.
Summary
You have the full picture now—you are developing database-driven web applications with object-oriented PHP! There are probably certain parts of the picture that are still a bit unclear. Some of that will change as you work through the rest of this book. But the real change, the really significant learning, takes place when you start to create your own projects.
When you began reading this book, you probably knew a bit about static web sites, i.e., web sites created with handwritten HTML. With static HTML, you could have written an article about how hard/easy you think PHP is. Users would be able to read your opinion—the communication is one-directional from you to your users.
In the first few chapters, you learned about making dynamic solutions with PHP. You created the dynamic quiz that allowed your users to interact with your content. Because users might have different responses to the quiz question, different users would see different content. Your quiz is an engaging way of communicating your opinion about learning PHP. Users can read if their opinion is the same as yours, and you could write the quiz so it provides humorous responses—the communication is still one-directional, from you to your users.
Now, you are starting to learn about database-driven web sites. When you use a database for content, new possibilities open up. Users can contribute new content to a web site you authored. The new content submitted by users can be published, so that all site visitors can see what the other site visitors contributed. You have made a page that facilitates communication between site visitors. Notice how the communication is now multidirectional, and you are no longer the sole author of the content. These are some of the new possibilities that open up to you, as you progress from static to dynamic to database-driven solutions.
In this chapter, you’ve learned the basics of SQL statements, as well as how to interact with a database from your PHP scripts. In the next chapters, you’ll learn how to build a blog with a basic entry manager that will allow you to create, modify, and delete entries, as well as display them on a public page.