![]()
Adding Images to Blog Entries
The face of your blog is complete! Sure there’s room for improvement, but it is fully functional. The administration modulea can be used to create blog entries, but there are some serious flaws.
- It cannot delete blog entries if there are comments in the database related to the entry.
- It cannot add images to blog entries, and I am sure you will want to spice up your blog entries with images.
- Administrators have to know HTML in order to write blog entries, and not all great writers are equally great with HTML.
- Administrators can create an entry without a title, effectively making the blog entry inaccessible to users.
I am sure you can come up with other features that you would like to have added to the administration module. This chapter will implement the features just listed. In the process, you will learn about the following:
- Deleting entries and related comments
- Using a WYSIWYG editor for your entry editor
- Uploading images to the server
- Deleting image files from the server
Problem: Cannot Delete an Entry with Comments
I am sure you will agree that the commenting system is a great improvement. Unfortunately, the comments have also introduced unwanted system behavior in the administration module. It has become impossible to delete an entry with comments.
I want you to see the problem before fixing it. Go to http://localhost/blog/admin.php?page=editor and create a new blog entry. Now point your browser to http://localhost/blog/index.php and click to read the entry you just created. Add one or two comments to the new entry, through the comment form. Now you have a blog entry with comments.
Load http://localhost/blog/admin.php?page=entries in your browser and click the title of the blog entry you just wrote. The blog entry will be loaded into your blog entry editor. Click Delete, in an attempt to delete the post. Clicking Delete should give you an error message similar to what you see following.
Exception: exception 'PDOException' with message 'SQLSTATE[23000]: Integrity constraint violation: 1451 Cannot delete or update a parent row:a foreign key constraint fails
Understanding Foreign Key Constraints
It is always a bit annoying to come across errors, but this one is a friendly error. It is really preventing you from undermining the integrity of your database. Table 11-1 takes a look inside my tables to see a blog entry I created through the editor form.
Table 11-1. One Row from the blog_entry Table

I also created a comment related to that particular blog entry. Table 11-2 shows the corresponding row from the comment table.
Table 11-2. One Row from the Comment Table

Imagine you delete the blog_entry with entry_id = 17. You would have a comment related to a blog entry that no longer exists. Comments are only meaningful in the right context. The comment with comment_id = 4 would have lost its context; it would have lost its integrity. You can imagine what would happen if you inserted a new blog entry with entry_id = 17. That blog entry would be born with a completely irrelevant comment.
The purpose of a foreign key constraint is to maintain data integrity. So, when you try to delete a blog_entry that has a comment, MySQL will stop you, because the delete action would leave a renegade comment floating around in your system, without a meaningful context. Only blog entries without comments can be deleted without losing data integrity.
Deleting Comments Before Blog Entry
Once you see that only blog entries without comments can be deleted without losing data integrity, it is easy to see the solution: when deleting a blog entry, you should first delete any comments related to the entry. You already have a class that provides a single point of access to the comment table. You can add a new method to delete all comments related to a particular entry_id, as follows:
//partial code for models/Comment_Table.class.php

//declare new method
public function deleteByEntryId( $id ) {
    $sql = "DELETE FROM comment WHERE entry_id = ?";
    $data = array( $id );
    $statement = $this->makeStatement( $sql, $data );
}
This method should be called before a blog entry is deleted. Blog entries are deleted from the Blog_Entry_Table class. One solution would be to have the Blog_Entry_Table class use the Comment_Table class, as follows:
//partial code for models/Blog_Entry_Table.class.php

//edit existing method
public function deleteEntry ( $id ) {
    //new code: delete any comments before deleting entry
    $this->deleteCommentsByID( $id );
    $sql = "DELETE FROM blog_entry WHERE entry_id = ?";
    $data = array( $id );
    $statement = $this->makeStatement( $sql, $data );
}

//new code: declare a new private method inside Blog_Entry_Table.class.php
private function deleteCommentsByID( $id ) {
    include_once "models/Comment_Table.class.php";
    //create a Comment_Table object
    $comments = new Comment_Table( $this->db );
    //delete any comments before deleting entry
    $comments->deleteByEntryId( $id );
}
With the preceding code completed, you’re ready to test. You should be able to delete any blog entry through the editor. If there are any comments related to the blog_entry, those comments will be deleted first, to avoid violating foreign key constraints.
Improving Usability with WYSIWYG
WYSIWYG is an acronym for What You See Is What You Get. With a WYSIWYG HTML editor, an administrator with little or no understanding of HTML can write blog entries that are marked up programmatically as HTML. A WYSIWYG editor looks a lot like any other word processing software, but it can save texts as HTML, rather than as .doc or .odf files.
Integrating TinyMCE
TinyMCE is a popular open source WYSIWYG editor. It is integrated in many popular CMS systems, such as Drupal, Joomla, and WordPress. Soon, it will be integrated into your entry editor, and it will be a wonderful improvement.
It is quite easy to integrate TinyMCE. The first step is to download it from www.tinymce.com/download/download.php. Unzip the downloaded file and save a copy of the tinymce folder in your existing js folder. Take a look inside js/tinymce and check that you can find the main JavaScript file tinymce.min.js. That is the JavaScript file your admin.php should use.
The TinyMCE JavaScript and CSS files can turn your plain <textarea> element into a WYSIWYG editor. All you have to do is initialize TinyMCE and point it to your text area. You can do that from views/admin/editor-html.php, as follows:
//partial code for views/admin/editor-html.php
//notice the new <script> elements added at the end
return "
<form method='post' action='admin.php?page=editor' id='editor'>
    <input type='hidden' name='entry_id'
           value='$entryData->entry_id' />
    <fieldset>
        <legend>New Entry Submission</legend>
        <label>Title</label>
        <input type='text' name='title' maxlength='150'
               value='$entryData->title' />

        <label>Entry</label>
        <textarea name='entry'>$entryData->entry_text</textarea>

        <fieldset id='editor-buttons'>
            <input type='submit' name='action' value='save' />
            <input type='submit' name='action' value='delete' />
            <p id='editor-message'>$entryData->message</p>
        </fieldset>

    </fieldset>
</form>
<script type='text/javascript' src='js/tinymce/tinymce.min.js'> </script>
<script type='text/javascript'>
tinymce.init({
    selector: 'textarea',
    plugins: 'image'
 });
</script>";
Take a look at those two <script> elements. The first embeds the main TinyMCE JavaScript file. The second initializes TinyMCE and configures it with a couple of parameters.
The selector parameter indicates that TinyMCE should convert every <textarea> element on the page to fancy WYSIWYG editors. On this particular page, there is only one <textarea> element.
The plugins parameter indicates which TinyMCE plug-ins should be activated for the editor. The image plug-in will allow users to insert images in blog entries.
Most of the time, you shouldn’t scatter small <script> elements throughout your generated HTML. The more <script> elements you keep in your code, the harder it may be for you to track down JavaScript errors. But in this case, I’ll accept the discomfort, because I want the TinyMCE editor only on this particular page. I specifically do not want TinyMCE to take control over any other <textarea> elements in my blogging system. To see what TinyMCE looks like, see Figure 11-1. You can also navigate your browser to http://localhost/blog/admin.php?page=editor.
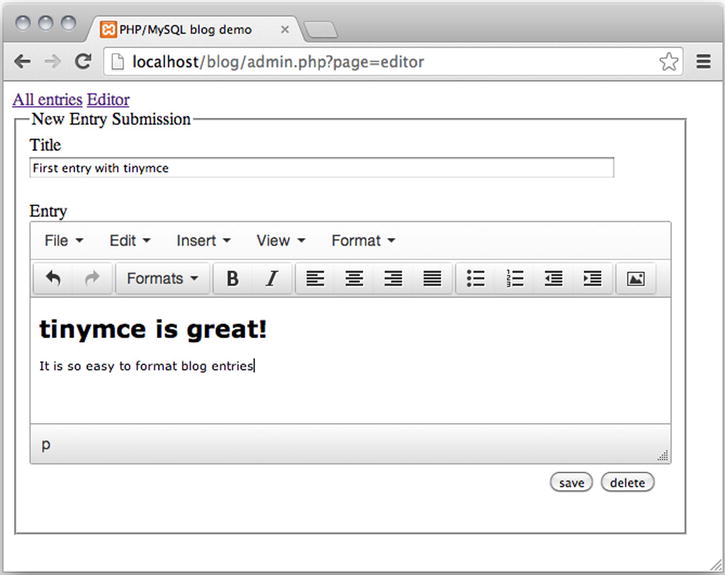
Figure 11-1. The TinyMCE WYSIWYG editor
In Figure 11-1, I have changed my CSS a little to make the editor <form> 625 pixels wide. I made the change in css/blog.css.
Creating an Image Manager
The admin module has two different page views at this point: the list of entries and the entry editor. You can create a third page for uploading and deleting the images that you’ll be using in your blog entries. You can start by creating the menu item for the image manager. Update the code in views/admin/admin-navigation.php, as follows:
<?php
//complete code for views/admin/admin-navigation.php

//notice item added for image manager
return "
<nav id='admin-navigation'>
    <a href='admin.php?page=entries'>All entries</a>
    <a href='admin.php?page=editor'>Editor</a>
    <a href='admin.php?page=images'>Image manager</a>
</nav>";
See the href for the Image manager menu item. Clicking the item will encode a URL variable named page and set its value to images. Because of the way you have coded your front controller in admin.php, you can probably guess the next step: you need a new controller script called images.php. Also, it is important that it be saved in controllers/admin. That way, the controller will be loaded automatically from admin.php whenever the menu item Image manager is clicked. As always, start with a tiny step to catch errors while they’re still easy to correct. Create a new file in controllers/admin/images.php.
<?php
//complete code for controllers/admin/images.php
$imageManagerHTML = "Image manager coming soon!";
return $imageManagerHTML;
Load http://localhost/blog/admin.php?page=images in your browser, and you should see the output that confirms your script is working as intended.
Image manager coming soon!
Showing a Form for Uploading Images
Now that you have the image manager controller script set up, you can move on to creating and outputting an image manager view. Let’s start with a basic HTML form, which you can eventually use to upload images. Create a new php file and save it as views/admin/images-html.php:
<?php
//complete code for views/admin/images-html.php
if ( isset( $uploadMessage ) === false ){
    $uploadMessage = "Upload a new image";
}

return "
<form method='post' action='admin.php?page=images'
      enctype='multipart/form-data'>
    <p>$uploadMessage</p>
    <input type='file' name='image-data' accept='image/jpeg' />
    <input type='submit' name='new-image' value='upload' />
</form>
";
You can see that the views code is prepared with a placeholder for displaying upload messages to users. The default upload message is Upload a new image. Soon, your system will let users know if an upload was successful or not. But before you get to that, I’d like to repeat the basics of uploading.
To allow users to upload files such as images, you need an HTML form. You must use the HTTP method POST, and the form’s encoding type must explicitly be declared, to allow for file upload. By default, HTML forms are set to application/x-www-form-urlencoded. However, this won’t work when you’re uploading files. Instead, you have to set the enctype of the form to multipart/form-data, which will accept files and ordinary URL encoded form data.
An <input> element with type=file will create a file chooser, allowing users to browse their local computers for a file to upload. This particular file chooser has an accept attribute limiting the kinds of file types that can be chosen. This file chooser will only accept JPEG images. Keep in mind that client-side validation can improve usability but not security. A malicious user can be trusted to be able to work around any kind of client-side validation. To protect your system from attacks, you must implement server-side validation. I’ll give you some hints later. First, update the image manager controller, so the upload form is displayed. Change the code in controllers/admin/images.php:
<?php
//complete code for controllers/admin/images.php

$imageManagerHTML = include_once "views/admin/images-html.php";
return $imageManagerHTML;
Save and point your browser to http://localhost/blog/admin.php?page=images, to confirm that the form is, in fact, displayed in your browser.
A Quick Refresher on the $_FILES Superglobal Array
You learned about the $_FILES superglobal in Chapter 4, but it might be helpful to review what it does, before moving on. Whenever a file is uploaded via an HTML form, that file is stored in temporary memory, and information about the file is passed in the $_FILES superglobal. You can see this in action by taking a look at what’s being passed to your images controller. Add this code at the top of controllers/admin/images.php, as follows:
<?php
//complete code for controllers/admin/images.php
$imageSubmitted = isset( $_POST['new-image'] );

if ( $imageSubmitted ) {
    $testOutput = "<pre>";
    $testOutput .=print_r($_FILES, true);
    $testOutput .= "</pre>";
    return $testOutput;
}

$imageManagerHTML = include_once "views/admin/images-html.php";
return $imageManagerHTML;
You can test your code by loading http://localhost/blog/admin.php?page=images in your browser. Use the form to select an image to upload. Your code will not save the uploaded file on your server, but you can see from the following output that PHP gets access to the file:
Array (
   [image-data] => Array (
       [name] => alberte-lea.jpg
       [type] => image/jpeg
       [tmp_name] => /Applications/XAMPP/xamppfiles/temp/phprDui5l
       [error] => 0
       [size] => 119090
   )
)
You can see that $_FILES is an Array. The first Array holds another Array under the named index image-data. $_FILES will provide information about file name, type, tmp_name, error, and size, by default. But an important question you have to ask yourself is, where did the name image-data come from?
The answer is that you provided it! The image-data is there because of the name attribute you wrote for the file chooser element. If you look in your code in views/admin/images-html.php, you can find the place where you set the name attribute of the file chooser:
//one line of code from views/admin/images-html.php
<input type='file' name='image-data'accept='image/jpeg' />
Because you set image-data as the name attribute of the file chooser, PHP can find the related file data in an array nested inside $_FILES, under the named index image-data.
The nested array holds information about the image you tried to upload with this particular file chooser. You can see the original image name and its mimetype. You can see that the image data is saved temporarily on your server, under a temporary name tmp_name. You can see the error code 0, which indicates that no errors occurred during upload. You can also see the size of the image file, measured in bytes.
If you see something similar in your browser, you are just one or two lines of code away from uploading the image. All you have to do is to save the file data on your server. The file data is already uploaded and saved temporarily under tmp_name, inside image-data array, inside $_FILES. To grab the file data, you would simply have to write something along the following lines:
//don't write this anywhere...yet
$fileData = $_FILES['image-data']['tmp_name'];
Note how your code accesses $_FILES to find the array image-data. Inside image-data, PHP finds tmp_name. To save the file data, you would simply move it from its temporary location and save it in a destination folder under a name.
But I propose you don’t do that in controllers/admin/images.php, mostly because you will want to write code to deal with some of the errors that might occur during upload. Someday in the future, you will need to upload files through a form again. So, instead of reinventing a solution every time you need one, you can write a reusable class for uploading. That way, you can reuse your upload code in many projects without changing it.
Come to think of it, you already wrote an Uploader class back in Chapter 4. You could use that as it is. Start by simply reusing the Uploader. In the process, I will point out ways to improve the Uploader further. Make a copy of the Uploader class in XAMPP/htdocs/ch4/classes/Uploader.class.php and save the copy in XAMPP/htdocs/blog/models/Uploader.class.php. Alternatively, you can get the Uploader class, if you download the source code for Chapter 4, from the book’s companion web site at www.apress.com.
Uploading an Image
You can try to upload an image using the Uploader class. Begin by creating a new folder for images. I have created a folder called img in the root of my project. I’ll be uploading images to the img folder.
When the image manager upload form is submitted, your code should try to upload the indicated file. Submitting a form is a user interaction, so the code belongs in a controller, in controllers/admin/images.php:
<?php
//complete code for controllers/admin/images.php
//new code: include Uploader class definition
include_once "models/Uploader.class.php";
$imageSubmitted = isset( $_POST['new-image'] );

//if the upload form was submitted
if ( $imageSubmitted ) {
    //new code below
    //create an Uploader object
    $uploader = new Uploader( 'image-data' );
    //indicate destination folder on server
    //please check that you have an img folder in your project folder
    $uploader->saveIn( "img" );
    $uploader->save();
    $uploadMessage = "file probably uploaded!";
    //end of new code
}
$imageManagerHTML = include_once "views/admin/images-html.php";
return $imageManagerHTML;
Everything is ready for uploading. You can test your code by pointing your browser to http://localhost/blog/admin.php?page=images. Now, try to upload an image through the form. Your code should be able to upload files now, so you should be able to find the image you upload in the img folder.
The single most common error to encounter at this point relates to folder permissions. This kind of problem is particularly common when you develop on a local web server like XAMPP. If your destination folder is write-protected, PHP cannot save the upload file. So, if you cannot upload a file, try to change the folder permissions of the img folder. Change permission settings to read & write.
What Could Possibly Go Wrong?
A few things may go wrong when you try to upload files through a form. There are eight possible error codes related to $_FILES, one of which is an error code representing No errors. Actually, there are more than seven potential problems lurking around the upload process. It would be a shame if your entire blog system breaks down temporarily when you encounter one of these errors. Systems can be built to deal with errors without breaking down. It is time for you to learn about writing code that fails gracefully.
Updating the Uploader Class
You can change the Uploader class, so that it will fail gracefully and provide meaningful error messages when it fails. To that end, you will need a property for storing error messages and another property for storing any standard PHP error codes encountered. Add a few properties in models/Uploader.class.php.
//partial code for models/Uploader.class.php
//edit existing Uploader class
class Uploader {
    private $filename;
    private $fileData;
    private $destination;
    //new code: add a property for an error message
    private $errorMessage;
    //new code: add a property for standard PHP error codes
    private $errorCode;
Look at the code and note that the new properties don’t have any values assigned. You have to assign actual values to those properties whenever your code prepares to attempt an upload. The $_FILES array will provide an error code immediately. It would be an obvious choice to grab the current error code in the Uploader’s constructor method, because you know the constructor will run only once, just as a new Uploader object is created:
//partial code for models/Uploader.class.php

//edit existing constructor method
public function __construct( $key ) {
    $this->filename = $_FILES[$key]['name'];
    $this->fileData = $_FILES[$key]['tmp_name'];
    //new code: remember the current upload error code
    $this->errorCode = ( $_FILES[$key]['error'] );
}
I suspect you read most of this code back in Chapter 4, as you typed it in. I also strongly suspect that you didn’t quite understand every little detail. If you are like most learners, you will have to allow your understanding of code to grow in small steps. With every small step, you will learn something, and there will always be something you haven’t learned. By repeating lessons already learned, you can gradually develop a more comprehensive understanding. You can take a closer look at the $key argument used in the Uploader class. Remember that to get to the file data, you could write something like the following:
$fileData = $_FILES['image-data']['tmp_name'];
The tmp_name is a default name provided by $_FILES, and the image-data is a name you provide when you set the name attribute of the HTML file chooser input element. You want your Uploader class to be able to upload files regardless of the name attribute of the file chooser. It would be a terrible design decision to always depend on image-data. So, the design decision I have made for you is that the Uploader class should be given the used name attribute as an argument to the constructor method. It is the $key argument. Here’s an example to give you the idea:
//Example: don't write any of this code anywhere
//this would upload from <input type='file' name='image-data' />
$imgUploader = new Uploader("image-data");
//this would upload from <input type='file' name='video-file' />
$vidUploader = new Uploader("video-file");
You can probably see that because the relevant name attribute is provided as an argument, the Uploader class is easier to reuse in different situations.
Error: Restrictive Folder Permissions
When you are developing on a local web server like XAMPP, it is very common to encounter folder permissions that are too restrictive. If a folder is read-only, PHP cannot write file data for an uploaded image to the folder. It is not among the standard errors reported through the $_FILES error codes. But it is quite simple to test whether a destination folder is writable or not. You already did it back in Chapter 4, but I’d like to change the code a little. You can begin by declaring a new method in Uploader to check for the problem, as follows:
//partial code for models/Uploader.class.php
//declare a new private method in the Uploader class
private function readyToUpload(){
    $folderIsWriteAble = is_writable( $this->destination );
    if( $folderIsWriteAble === false ){
        //provide a meaningful error message
        $this->errorMessage = "Error: destination folder is ";
        $this->errorMessage .= "not writable, change permissions";
        //indicate that code is NOT ready to upload file
        $canUpload = false;
    } else {
        //assume no other errors - indicate we're ready to upload
        $canUpload = true;
    }
    return $canUpload ;
}
As always, methods will not run until they are explicitly called. So, you should call this new method, just as the code tries to save the upload file. You should completely rewrite the existing method save() in models/Uploader.class.php, as follows:
//partial code for models/Uploader.class.php

// rewrite existing method save() completely
public function save () {
    //call the new method to look for upload errors
    //if it returns TRUE, save the uploaded file
    if ( $this->readyToUpload() ) {
        move_uploaded_file(
             $this->fileData,
            "$this->destination/$this->filename" );
    } else {
        //if not create an exception - pass error message as argument
        $exc = new Exception( $this->errorMessage );
        //throw the exception
        throw $exc;
    }
}
The native PHP function move_uploaded_file() saves the uploaded file data in a new destination on the server. It is a sensitive process, which your code should only attempt if there are no potential errors waiting to happen.
Remember how you already used a try-catch statement when you established a connection to a database with PDO? I suspect you found it a little abstract to try something that could go wrong and then catch any exceptions. What is an exception anyway? Well, an exception is a PHP object made from PHP’s native Exception class. PHP can throw an exception when something that can go wrong does go wrong.
Metaphorically, you can think of an exception as a letter with bad news. Throwing the exception is like the act of sending the letter on its way. To read the bad news, you have to receive the letter. Exceptions are like that, but they are caught, not delivered to a mailbox.
Throwing an exception is very similar to triggering an error, but there is a notable difference: exceptions can easily be caught, so your code can continue to run, and your code can work around the problem gracefully. When you call a method that may throw an exception, you can wrap the method call in a try-catch statement and, thus, code a system that fails gracefully.
![]() Note It is also possible to intercept ordinary PHP errors. Catching exceptions is the object-oriented way.
Note It is also possible to intercept ordinary PHP errors. Catching exceptions is the object-oriented way.
You’re nearly there. Your Uploader class checks whether an upload file is too big, and if it is, an exception is thrown. To create an image manager that fails gracefully, you have to write code to catch any exceptions that might be thrown. You can do this from controllers/admin/images.php, as follows:
//partial code for controllers/admin/images.php

//edit existing if-statement
if ( $imageSubmitted ) {
    $uploader = new Uploader( 'image-data' );
    $uploader->saveIn( "img" );
    //try to save the upload file
    try {
        $uploader->save();
        //create an upload message that confirms succesful upload
        $uploadMessage = "file uploaded!";
    //catch any exception thrown
    } catch ( Exception $exception ) {
        //use the exception to create an upload message
        $uploadMessage = $exception->getMessage();
    }
}
It’s time to test, but first, you should make sure there is a problem. You can change the folder permission for your img folder. Make the folder Read-only. Now, load http://localhost/blog/admin.php?page=images in your browser and try to upload an image file through your form.
The image should not be uploaded, and you should not see any standard PHP error message. You should see a message dispatched from your PHP script.
Error: destination folder is not writable, change permissionsOnce you have confirmed that your code spots the folder permission problem and provides an error message, you can change folder permissions back to Read & Write, so that you can upload images again.
Error: Upload File Too Big
You have managed to build an image manager that fails gracefully, but only if the destination folder is not writable. There are many other potential problems lurking around the file upload process. One is that PHP is configured with a maximum file upload size. Because there is a maximum file size for uploads, some users may try to upload a file that is too big. Users are bound to break anything that can be broken. You system should provide a meaningful error message for such users.
Testing for one upload error involved a fair bit of code changes in a few different files. Testing for one more upload error is very easy. Simply add an extra else-if block in the private readyToUpload method:
//partial code for models/Uploader.class.php

//edit existing method in the Uploader class
private function readyToUpload(){
    $folderIsWriteAble = is_writable( $this->destination );
    if( $folderIsWriteAble === false ){
        $this->errorMessage = "Error: destination folder is ";
        $this->errorMessage .= "not writable, change permissions";
        $canUpload = false;
    //new code: add an else-if code block to test for error code 1
    } else if ( $this->errorCode === 1 ) {
        $maxSize = ini_get( 'upload_max_filesize' );
        $this->errorMessage = "Error: File is too big. ";
        $this->errorMessage .= "Max file size is $maxSize";
        $canUpload  = false;
        //end of new code
    } else {
        //assume there are no other errors
        //indicate that we're ready to upload
        $canUpload = true;
    }
    return $canUpload ;
}
Now, your code is ready for testing. You should have a system that fails gracefully, if there is a problem uploading a file that is too big. To test your work, you should try to upload a file bigger than the maximum upload file size. Uhm, what is my maximum upload file size? I can almost hear your question. I am so glad you asked, because that will give me an excuse to write a little more about PHP configurations.
To see how your PHP is configured, you can create a new PHP file, for example, in your blog folder. Call it test.php:
<?
//complete source code for test.php
phpinfo();
Save the file and load http://localhost/blog/test.php in your browser. You can see a lot of information about your PHP installation—I mean, a lot!
I found that my installation has an upload_max_filesize of 128MB. This setting declares the upper limit for files to upload.
To test whether my Uploader class will provide an error message when a user tries to upload too big a file, I could try to upload a JPEG image bigger than 128MB! I don’t have JPEG images anywhere near that size. I will change the upload_max_filesize instead.
Configuring via ini.php or .htaccess
You have a couple of options when trying to configure PHP. If you host your own server, you can change the upload_max_filesize directly in the PHP configuration file. It is called ini.php, and the output from phpinfo() can tell you where that ini.php is saved on your computer, if you look under Loaded Configuration File. You can open ini.php with Komodo Edit, or any other text editor, and manually change the upload_max_filesize. Once you have saved your changes, you should restart your Apache server.
When you publish your PHP project on the Internet, you will often use a shared hosting solution. You will buy a domain through some web hosting service provider. It is cheap and convenient, but you probably won’t get access to the ini.php file. Most web hosts allow you to make some configurations through a so-called .htaccess file, and you might as well get acquainted with .htaccess right away. Luckily, changing the upload_max_filesize is a very simple task.
Create a new file with Komodo Edit, or whatever editor you use. Save the new file as .htaccess and save it in the blog folder. Note that the complete file name should not be .htaccess.txt or .htaccess.php. The file name must only be .htaccess. Here’s the complete contents of the .htaccess file:
php_value upload_max_filesize 1M
Once you have saved that, you can reload http://localhost/blog/test.php in your browser. You should see that the local values for upload_max_filesize is now 1M (meaning 1MB). The Master Values remain 128M, but for your blog folder and sub-folders, it is now changed to 1M.
![]() Note You can learn more about what you can do with .htaccess at http://htaccess-guide.com. It is quite common to use .htaccess to restrict access to folders. Another common task is to rewrite URLs dynamically, to provide search-engine friendly URLs.
Note You can learn more about what you can do with .htaccess at http://htaccess-guide.com. It is quite common to use .htaccess to restrict access to folders. Another common task is to rewrite URLs dynamically, to provide search-engine friendly URLs.
Now, it’ll be easier to test your image manager’s upload form. It shouldn’t be difficult to find a JPEG bigger than 1MB. Try to upload such a file through your form, and you will find that the file will not be uploaded. You should see an error message telling you that the upload file was too big. Now that you have tested your system and confirmed it fails gracefully, you can change the upload_max_filesize back to whatever you think is appropriate for your blog.
Detecting Other Errors
You know the $_FILES superglobal natively supports seven different errors. You’re only testing for one of those: the Upload file is too big.
![]() Note You can learn more about the error codes and what they mean at
Note You can learn more about the error codes and what they mean at
www.php.net/manual/en/features.file-upload.errors.php.
I’m not going to go into detail about the other kinds of errors you may experience when uploading files. But I will show you how you can provide a default error message, in case any of the remaining six errors should occur. It is as easy as you might think. You simply add an extra else-if code block in your readyToUpload() method, as follows:
//partial code for models/Uploader.class.php

//edit existing function
private function readyToUpload(){
    $folderIsWriteAble = is_writable( $this->destination );
    if( $folderIsWriteAble === false ){
        $this->errorMessage = "Error: destination folder is ";
        $this->errorMessage .= "not writable, change permissions";
        $canUpload = false;
    } else if ( $this->errorCode === 1 ) {
        $maxSize = ini_get( 'upload_max_filesize' );
        $this->errorMessage = "Error: File is too big. ";
        $this->errorMessage .= "Max file size is $maxSize";
        $canUpload = false;

    //new code: add code block for other errors
    //the error codes have values 1 to 8
    //we already check for code 1
    //if error code is greater than one, some other error occurred
    } else if ( $this->errorCode > 1 ) {
        $this->errorMessage = "Something went wrong! ";
        $this->errorMessage .= "Error code: $this->errorCode";
        $canUpload = false;
    //end of new code
    //if error code is none of the above
    //we can safely assume no error occurred
    } else {
        //indicate that we're ready to upload
        $canUpload = true;
    }
    return $canUpload;
}
Excellent! Your code now checks for two common problems and provides custom error messages for these issues. At this point, your system should even provide a default error message, in case any other error should occur. You can test if such errors are caught by forcing an error. Navigate your browser to http://localhost/blog/admin.php?page=images and click the Upload button without choosing a file to upload. Your code will try to upload nothing, and that will cause an error 4: no file uploaded.
If you see the error message, you have confirmed that your system provides a default error message when one of the typical file upload errors occurs.
Further Refinements
You should be able to improve the error messages further. You could simply check for the remaining error codes and provide custom error messages for them. It would be a wonderful learning exercise for you in several ways.
- You would have to learn the meaning of the remaining error codes.
- You would have to learn how to trigger these errors.
- You would consider how to communicate meaningful error messages to users.
I hope you will take the time to do it. There are also other improvements you could consider to implement on your own. You could look into an unfortunate feature of the image upload. Imagine you have uploaded an image test.jpg. Now try to upload a different image also named test.jpg. The result will be that the first image is overwritten by the next image.
It would be a significant improvement if you could check for name conflicts before upload. Perhaps your system should throw an exception and prompt the user to rename the image before upload? Or perhaps you could even change the upload form to allow users to rename the image through the form?
Another significant improvement could be to throw an exception if a user tries to upload a file that is not of type image/jpeg. You already have client-side validation, but a malicious user could easily work around this. How about implementing server-side validation for file type? You would need your code to compare the mimetype of the upload file with one or more accepted mimetypes. PHP can find the mimetype of the uploaded file in the $_FILES superglobal.
Displaying Images
You have an image manager that allows image upload, and you have integrated the TinyMCE rich text editor in your entry editor. It should be possible for a blog administrator to see all available images and use any one of those in a blog entry.
To embed an image in a blog entry with TinyMCE, you have to know the path to the image file. It is time to update the image manager, so it shows thumbnails for all uploaded images and also the path to each image. That way, a blog administrator could copy the path relatively easily to a given image and paste it into TinyMCE to use an image in a blog entry. Listing all images would be very, very similar to the code you wrote for the image gallery in Chapter 4.
You could create a <dl> element to list all images. You could use a DirectoryIterator object to iterate through the img folder and find all JPEG images. Each image should be displayed as an <img> element. Immediately below the image you should display the path to the image. It would be nice if images could be deleted again. So, you might as well provide a link for deleting each image. Update the code in views/admin/images-html.php, as follows:
<?php
//complete source code for views/admin/images-html.php
if ( isset( $uploadMessage ) === false ){
$uploadMessage = "Upload a new image";
}
//new code starts here
//declare a variable to hold HTML for all your images
$imagesAsHTML = "<h1>Images</h1>";
$imagesAsHTML .= "<dl id='images'>";
$folder = "img";
$filesInFolder = new DirectoryIterator( $folder);
//loop through all files in img folder
while ( $filesInFolder->valid() ) {
$file = $filesInFolder->current();
$filename = $file->getFilename();
$src = "$folder/$filename";
$fileInfo = new Finfo( FILEINFO_MIME_TYPE );
$mimeType = $fileInfo->file( $src );
//if file is a jpg...
if ( $mimeType === 'image/jpeg' ) {
//display image and its src
$href = "admin.php?page=images&delete-image=$src";
$imagesAsHTML .= "<dt><img src='$src' /></dt>
</dd>Source: $src <a href='$href'>delete</a></dd>";
}
$filesInFolder->next();
}
$imagesAsHTML .= "</dl>";
//notice that $imagesAsHTML is added at the end of the returned HTML
return "
<form method='post' action='admin.php?page=images' enctype='multipart/form-data'>
<p>$uploadMessage</p>
<input type='file' name='image-data' accept='image/jpeg' />
<input type='submit' name='new-image' value='upload' />
</form>
<div>
$imagesAsHTML
</div>";
//end of changes
Take a look at http://localhost/blog/admin.php?page=images to see how all images in the img folder are displayed with a path to each image and a delete link for each image.
Deleting Images
The image manager lists all images in their original size at this point. It is not very pretty, but it is good enough for you to use the image manager to browse images. You could easily write some CSS to improve the aesthetics. You could even reuse some of the JavaScript ideas from the image gallery in Chapter 5. Please consider doing that, when you’re done with this chapter. I have another few functional enhancements I’d like you to work on before you get started with the aesthetics. First of all: deleting images.
Clicking a link to delete a file is a user interaction. So, the code to respond to the click belongs in a controller. One might argue that the code for actually deleting a file belongs in a model script. But it is just one line of code, so I’ll keep it all in the controller, in controllers/admin/images.php:
<?php
//complete code for controllers/admin/images.php
include_once "models/Uploader.class.php";

$imageSubmitted = isset( $_POST['new-image'] );
if ( $imageSubmitted ) {
    $uploader = new Uploader( 'image-data' );
    $uploader->saveIn( "img" );
    try{
        $uploader->save();
        $uploadMessage = "file uploaded!";
    } catch ( Exception $exception )  {
        $uploadMessage = $exception->getMessage();
    }
}

//new code starts here: if a delete link was clicked...
$deleteImage = isset( $_GET['delete-image'] );
if ( $deleteImage ) {
    //grab the src of the image to delete
    $whichImage = $_GET['delete-image'];
    unlink($whichImage);
}
//end of new code

$imageManagerHTML = include_once "views/admin/images-html.php";
return $imageManagerHTML;
You should be able to delete images with your image manager now. Try it first, and then you can read on, to learn how it happens.
The native PHP function to delete a file is unlink. To delete a file, you pass the path and name of the file to unlink() as an argument. It is important for you to understand how PHP found the path and name of the image. If you look in the code, you can see that PHP grabs the source of the image to delete from a URL variable delete-image, which is retrieved with the $_GET method. The next question to ponder is, how did the source of the image get encoded as a URL variable?
You could view the HTML source code of the image manager in your browser. You would see that every delete link encodes a URL variable holding an image source. You can see it, if you take a closer look at the href attributes. They’ll be something like the following:
<a href='admin.php?page=images&delete-image=img/coffee.jpg'>
delete
</a>
See how a URL variable page is set to images, and another URL variable, delete-image, is set to img/coffee.jpg. So, clicking this delete link will load the images controller and delete the image found in img/coffee.jpg.
A last question to consider is, where in your PHP code did you create the delete links? You have a choice: either you think about the question and look through the code to find your own answer, or you continue reading to see my answer.
Delete links are created in views/admin/images-html.php. Inside the while loop, you can find the PHP that creates the HTML for showing one image, its source, and a delete link:
//partial code for views/admin/images-html.php
//make no changes to any code
$file = $filesInFolder->current();
$filename = $file->getFilename();
//$src holds the relative path to the file
$src = "$folder/$filename";
$fileInfo = new Finfo( FILEINFO_MIME_TYPE );
$mimeType = $fileInfo->file( $src );

if ( $mimeType === 'image/jpeg' ) {
    //href for delete link created below
    $href = "admin.php?page=images&delete-image=$src";
    $imagesAsHTML .= "<dt><img src='$src' /></dt>
                  </dd>Source: $src
                  <a href='$href'>delete</a>
                  </dd>";
There you have it. The variable $src holds the relative path to a file PHP, found by looping through a folder with a DirectoryIterator object. If the found file is a JPEG image, it will be displayed as HTML. Notice how the $src is used to create an href attribute for the delete link.
Using an Image in a Blog Entry
With all your images listed, it should be an uncomplicated task to embed an image in one of your blog entries. Find an image you would like use by looking though all your images, at http://localhost/blog/admin.php?page=images. Note how the Source of each image is displayed in your browser. Select and copy the Source of some image you would like to use in a blog post. Now, load an existing blog entry into your blog editor. Note how TinyMCE provides a button for inserting images. Click the Image button, to bring up TinyMCE’s image dialog pop-up, as shown in Figure 11-2. Embed the image by pasting the image src into the Source field.
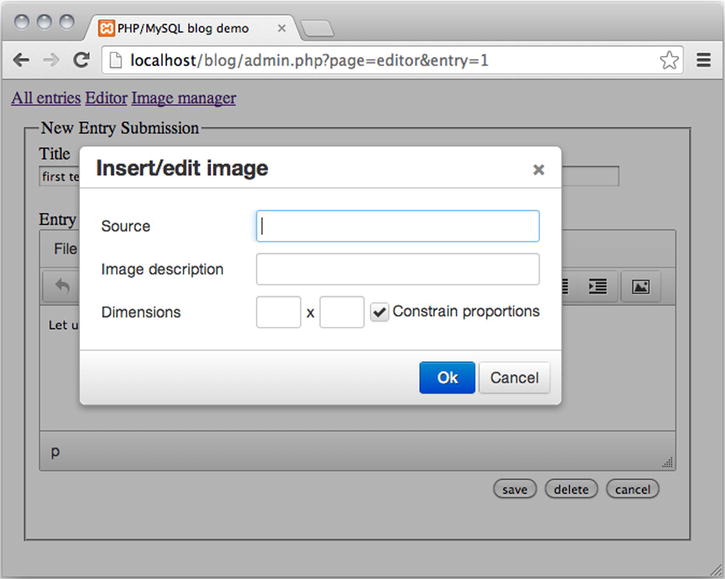
Figure 11-2. The image dialog pop-up in TinyMCE
Once you have embedded an image in a blog entry, you should save it and then load http://localhost/blog/index.php in your browser, to check that the image is, in fact, displayed in the blog entry.
Improving Editor Usability
You have a marvelous administration module for your blog now. Through the administration module, you can create, update, and delete blog entries. No more features will be added under my guidance.
The entry editor has a usability flaw I would like to point out and improve. Load an existing entry into the entry editor, change the entry a little, and save the changes. This should reload the saved changes in your entry editor, and you should see a little message indicating that Entry was saved, telling you clearly that what you see in the editor is saved in the database.
But if you change the entry a bit more, the message will still insist that Entry was saved, even though you and I know it is misleading. Changes are not saved until you click the Save button. That is bad usability! Misleading feedback from a system can be even worse than no feedback at all. How can you remedy the problem? Is this a task that calls for PHP or JavaScript? Take a minute to reflect before you read on.
It is a task that absolutely requires JavaScript! PHP is a server-side scripting language. It runs once every time a PHP script on the server is contacted. PHP runs once for every HTTP request, if the request looks for a PHP resource. Your entry editor is simply an HTML form with a <textarea> element enhanced with a bit of JavaScript and CSS. PHP will only run whenever you submit the form. Typing a few characters into the <textarea> will not submit the form.
JavaScript is a client-side scripting language. It runs perfectly well in the browser. You have already seen how JavaScript functions can be called when certain browser events occur. So far, you have learned how JavaScript functions can be called when the HTML DOM content is loaded into the browser, when a user clicks, and when a form is submitted. JavaScript can also respond whenever a user presses a key on the keyboard. You can use that event here. If a user presses a key while the <input name='title'> is in focus, you know that the title was changed. If the title was changed, and the form has not been submitted, you know that changes were not saved in the database yet. Open your editor.js JavaScript file and declare a new function for updating the update message. While you’re at it, add an event listener, to call the new function every time the user changes the title, as follows:
//partial code for js/editor.js

//new code: declare a new function
function updateEditorMessage () {
   console.log( "editor changes not saved yet!" );
}

//edit existing function
function init(){
    var editorForm = document.querySelector("form#editor");
    var title = document.querySelector("input[name='title']");
    title.required = false;

    //code changes start here
    title.addEventListener("keyup", updateEditorMessage, false);
    //end of changes

    editorForm.addEventListener("submit", checkTitle, false);
}
The updateEditorMessage() function doesn’t do anything meaningful yet. It simply outputs a message to the console. But you can use it, to test your progress. Open your browser and its JavaScript console. If you’re using Chrome, you can open the console with Cmd+Alt+J, if you are working on a Mac, or Ctrl+Alt+J, if you are using a Windows machine.
Once the browser’s JavaScript console is open, you can navigate your browser to http://localhost/blog/admin.php?page=entries. Click an entry to load it in your blog entry editor. Edit the entry a little and save changes. Note the usual Entry was saved message created by PHP. Now, make a little change in the entry title, and note the output in your console: JavaScript noticed that something happened. Note also that the Entry was saved message has now become misleading (see Figure 11-3): The most recent changes in the entry were not saved!
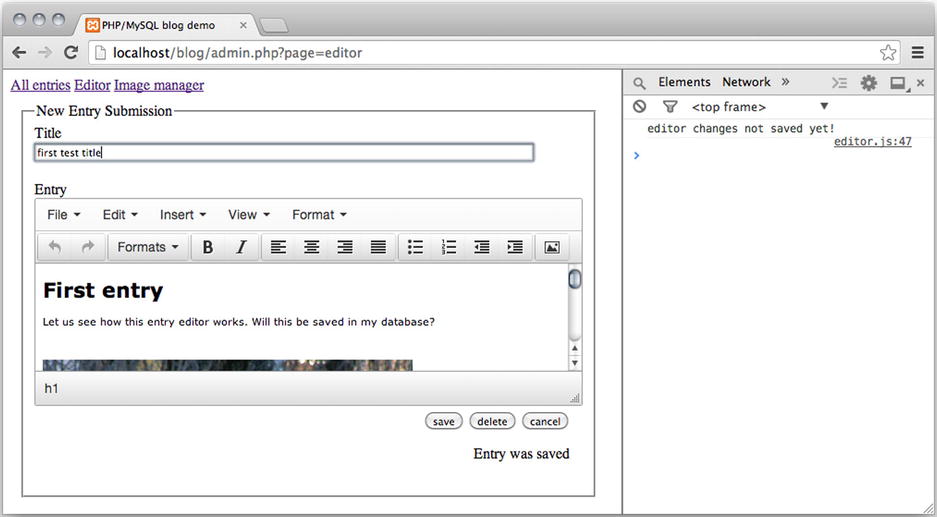
Figure 11-3. A message in Chrome’s console, and a misleading editor message
![]() Note If you don’t see the expected output in the console, it may be because Google Chrome keeps a cached version of your previous JavaScript file. In other words, Google Chrome hasn’t noticed that you have updated your JavaScript. You simply have to open the “Clear browsing data” dialog box (Mac: Cmd+Shift+Delete, Windows: Ctrl+Shift+Delete), to clear “Cached images and files.”
Note If you don’t see the expected output in the console, it may be because Google Chrome keeps a cached version of your previous JavaScript file. In other words, Google Chrome hasn’t noticed that you have updated your JavaScript. You simply have to open the “Clear browsing data” dialog box (Mac: Cmd+Shift+Delete, Windows: Ctrl+Shift+Delete), to clear “Cached images and files.”
It is great to see that JavaScript noticed something happened in the editor. JavaScript knows that the changes have not been saved in the database yet. JavaScript knows that the editor message Entry was saved is no longer valid, but actually misleading. Now that JavaScript has detected a change in the entry editor’s title field, it is time to change feedback for users. It takes another couple of lines of JavaScript in js/editor.js:
//partial code for js/editor.js

//edit existing function
function updateEditorMessage() {
    var p = document.querySelector("#editor-message");
    p.innerHTML = "Changes not saved!";
}
That’s it! Whenever there is an unsaved change in the <title>, users will be notified. It will be quite simple to add an event listener to call updateEditorMessage() whenever the <textarea> is changed also. You might think you could add an extra event listener in the init function—something like this:
//partial code for js/editor.js

//edit existing function
function init(){
    var editorForm = document.querySelector("form#editor");
    var title = document.querySelector("input[name='title']");
    title.required = false;

    //changes start here
    //sadly, this code will not solve the problem...
    var textarea = document.querySelector("form textarea");
    textarea.addEventListener("keyup", updateEditorMessage, false);
    //end of changes

    title.addEventListener("keyup", updateEditorMessage, false);
    editorForm.addEventListener("submit", checkTitle, false);
}
It may surprise you to see that the preceding code doesn’t update the editor message whenever there is a change in the <textarea>. The problem is that your JavaScript code conflicts with the TinyMCE JavaScript. It could seem you’re out of luck. Luckily, TinyMCE can be configured. The TinyMCE developers have even taken the effort to document configuration options. A bit of searching in the TinyMCE documentation told me that the TinyMCE JavaScript can be brought to call your updateEditorMessage() whenever the TinyMCE editor changes. Open views/admin/editor-html.php in Komodo Edit and change the code a little, as follows:
//partial code for views/admin/editor-html.php
<script type='text/javascript'>
//change the existing call to tinymce.init
//add the code to call your updateEditorMessage function...
//...whenever the tinymce editor changes

tinymce.init ({
    selector: 'textarea',
    plugins: 'image',
    setup: function (editor) {
        editor.on ('change', function (e) {
            updateEditorMessage();
        });
    }
});
</script>
That code will call the function updateEditorMessage() whenever the TinyMCE editor is changed in any way. That was exactly what you were after.
![]() Note Learn about configuring TinyMCE at www.tinymce.com/wiki.php/Configuration.
Note Learn about configuring TinyMCE at www.tinymce.com/wiki.php/Configuration.
It’s time for the final test. Load an existing entry into the entry editor, change it a little, and save it. Now, you should see an editor message stating that Entry was saved. Make another little change to the entry and see how the editor message immediately changes into Changes not saved! This is the work of your JavaScript function updateEditorMessage(), which was called by way of a TinyMCE change event, triggered by any change in the TinyMCE editor.
One thing to bear in mind is that TinyMCE relies on JavaScript. The entry editor isn’t very impressive without JavaScript enabled. Any blog administrators will have to accept that they need a modern browser with JavaScript enabled.
The next chapter shows you how to restrict access to the administration module. You will create a login form, so that only users with a correct username and password will be allowed to use the administration module.
Summary
This chapter has led to some great improvements to the administration module. In the process, you have had another opportunity to come to terms with PHP file uploads and how to delete files with PHP.
You have had a closer look at try-catch statements used with custom PHP exceptions. You have seen how you can use try-catch, so that your PHP code can fail gracefully. You have used exceptions to provide meaningful error messages to users. You should know that some developers would object to this use of exceptions. Some developers would say that any error you can predict isn’t really an exception. Exceptions should not be used for these cases. The final decision is yours: At least now, you have the choice.
I hope your work with TinyMCE has offered you an appetizer. There are many solid, well-documented JavaScripts to be found online, and integrating such JavaScripts into your projects can greatly improve the quality of your work. On the other hand, you should approach with care libraries and frameworks that you don’t fully understand. If you deliver a project to a client and subsequently identify a bug in the system, you may have a very hard time fixing the bug if you don’t understand the code used. As was the case with the exceptions, it all comes down to making an informed decision.