188 Broker Interactions for Intra- and Inter-enterprise
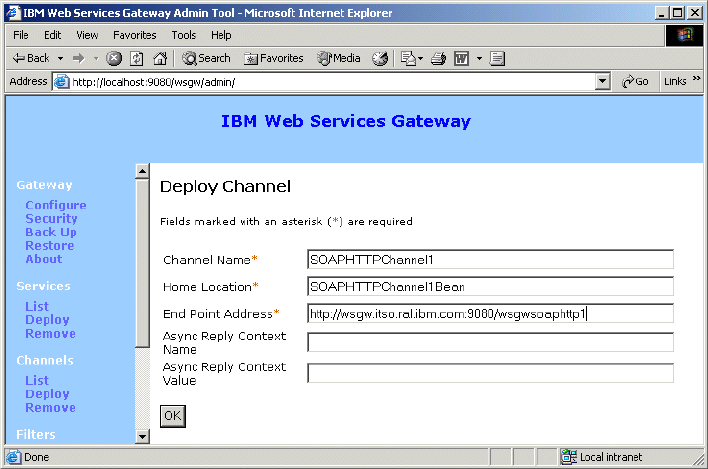
Figure 8-24 Add a channel
3. Click OK.
Add a UDDI reference
To deploy a UDDI Reference (Figure 8-25):
1. Select Deploy under the UDDI References menu option.
2. Enter the following values:
– Name: UDDIPrivateRegistry
– inquiryURL: http://uddi:9080/uddisoap/inquiryapi
– publishURL: http://uddi:9080/uddisoap/publishapi
– userName: authorized user ID
– password:

Chapter 8. Router solutions using Web Services Gateway 189
Figure 8-25 Add a UDDI reference
3. Click OK.
Deploy the Web services
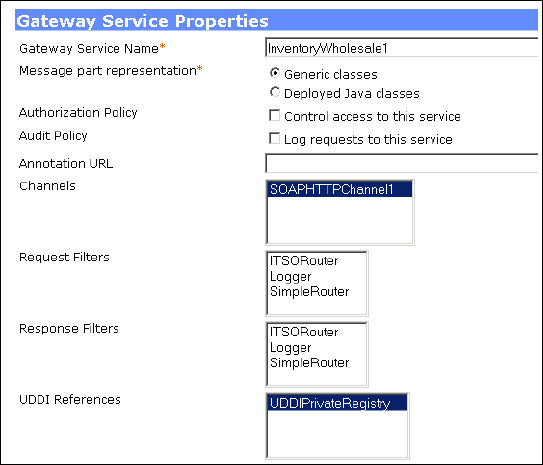
To deploy a Web service (Figure 8-26), follow these steps:
1. Select Deploy under the Services menu option.
2. Enter the appropriate values for the service. In this scenario, the values used
for the InventoryWholesale1 service were:
– Gateway Service Name: InventoryWholesale1
– Message part representation: Generic classes
– Channels: SOAPHTTPChannel1
– UDDI References: UDDIPrivateRegistry
190 Broker Interactions for Intra- and Inter-enterprise
Figure 8-26 Deploying a service - part 1
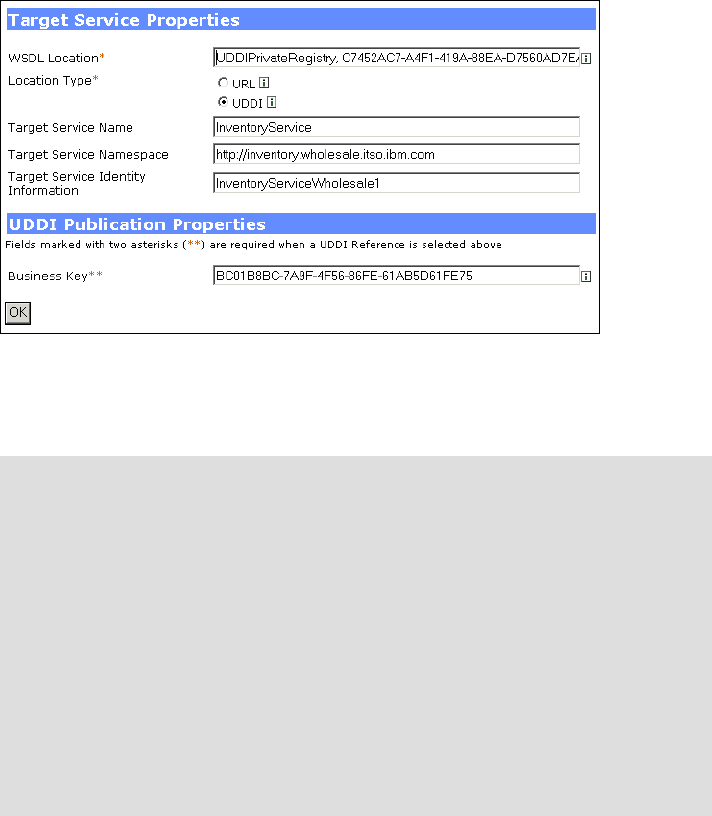
– WSDL Location: uddiReference,serviceKey
The service key can be obtained in the UDDI Registry by switching to the
Publish tab and selecting:
Show owned entities -> ITSO Electronics/Show services ->
InventoryWholesale1.
– Location Type: UDDI
– Target Service Name: InventoryService
– Target Service Namespace: http://inventory.wholesale.itso.ibm.com
– Target Service Identity Information: InventoryServiceWholesale1
– Business Key: Business Key (for example,
BC01B8BC-7A9F-4F56-86FE-61AB5D61FE75)
The business key can be obtained in the UDDI Registry by switching to
the Publish tab and selecting:
Show owned entities -> ITSO Electronics/Show services ->
InventoryWholesale1
Chapter 8. Router solutions using Web Services Gateway 191
Figure 8-27 Deploying a service - part 2
Note that the target service identity information matches the code in the filter
(see Example 8-5 on page 184).
Repeat the process to deploy each service. For our stage1 application, both
InventoryWholesale1 (Figure 8-28) and InventoryWholesale2 (Figure 8-29) need
to be deployed.
Note: If you are not using a UDDI Registry, you will need to make the WSDL
file available to the gateway. A simple way to do this is to create a new folder
for the WSDL files in the application folder for the Web Services Gateway
application. For example:
<WAS_HOME>/installedApps/<node_name>/wsgw.server1.<node_name>.ea
r/wsgw.war/wsdl
Then copy the WSDL file from the WebSphere Studio workspace to the new
folder.
When defining the service, simply select URL as the location type and enter
the URL for the wsdl file. In this case, the URL would look like:
http://<wsgw_node>:9080/wsgw/wsdl/<wsdl_file>.wsdl

192 Broker Interactions for Intra- and Inter-enterprise
In stage 2, only one service is deployed (InventoryWholesale) but has two target
services. To create a service with multiple target services, create a new service
using the method just described.
During the process you will add the first target service. To add two service targets
to the same service definition, you first create a service and specify one of the
services as the target (for example, Wholesale1). Once the service is created,
you can list the service and add a second target service (Wholesale2).
Figure 8-28 Service for Wholesale1
Then, after creating the service, add the second Web service target.
..................Content has been hidden....................
You can't read the all page of ebook, please click here login for view all page.