
198 Broker Interactions for Intra- and Inter-enterprise
Figure 8-34 Create a WSDL file in WebSphere Studio
3. Follow the same steps to save the external WSDL interface definition as
InventoryWholesale1WSGW-Interface.wsdl.
4. Repeat the process to create the InventoryWholesale2WSGW-Impl.wsdl and
the InventoryWholesale2WSGW-Interface.wsdl files.
8.6.7 Web service-enable the source application
Figure 8-35 shows the steps involved in Web services-enabling the source
(client) application.

Chapter 8. Router solutions using Web Services Gateway 199
Figure 8-35 Web service development for source application
Let’s walk through the process shown in Figure 8-35 for our source application.
When developing a Web services client, you must have access to a server
application. This could be developed by a separate department within your
organization, which will supply the WSDL file defining their server. In our
example, we use the target application described in 8.6.2, “Web service enable
the target application” on page 170.
Web service-enabling our source application is simply a matter of generating the
required deployment descriptors and proxy classes from the gateway-generated
WSDL files for the target application.
1. In the previous process, you exported the WSDL files from the Web Services
Gateway to your source application. Before proceeding it is a good idea to
test the operation of the Web service, both directly and through the gateway.
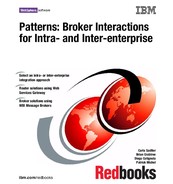
It is simple to do this using the Web Services Explorer in WebSphere Studio.
a. Right-click the -Impl WSDL file in the source application, and select Web
Services
→ Test with Web Services Explorer (Figure 8-36).
b. Select getDeliveryDate and enter a part number.
c. Click Go.
Application
Assembler
Deployer
Application
Component
Provider
develop package deploy
WebSphere
Studio
Web
JAR
WebSphere
Studio
WebSphere
Admin
Console
WebSphere
Admin
Command
Line Tool
WSDL2
Java
Command
Line Tool
Target
WSDL
WebSphere
Application
Server
Enterprise
Archive
Enterprise
Archive
Set of
Components
Deployment
Descriptors,
Proxy classes
Note: If you are connecting directly to the Web service without going through
the Web Services Gateway, the WSDL comes directly from the target system.
If you are using a Web Services Gateway, the WSDL is created and stored at
the Gateway.
200 Broker Interactions for Intra- and Inter-enterprise
Figure 8-36 Using the Web Service Explorer to test the Web service
Make sure the results are correct. If there are any problems, repeat the
process using the WSDL from the target application to see if the problem lies
with the gateway definitions or with the Web service itself.
Once you are sure the Web service is working, continue by creating the client
code.
2. Using WebSphere Studio, switch to the J2EE Perspective and click the
Project Navigator tab. Navigate to the WSRetailWeb
→ WebContent →
WEB-INF
→wsdl folder.
3. Select the WSDL file, right-click and select Web Services
→Generate
Client.
Note: The WSDL files determine how the Web service will be accessed. If
you are accessing the service directly, you will have a single WSDL file
generated by the target application. If you are using a Web Services
Gateway, you will select the implementation WSDL file generated at the
gateway. Our sample application allows the user to select whether to
access Wholesale1 or Wholesale2 directly, using the gateway, or via the
filter. The following process illustrates the client generation using the
WSDL for Wholesale1 generated at the gateway.

Chapter 8. Router solutions using Web Services Gateway 201
d. Select Java Proxy as the proxy type (default) and click Next.
e. Select Use Defaults for the client-side environment selection and click
Next.
f. Make sure the correct WSDL file is selected. If you are using WSDL files
generated at the Web Services Gateway, select the implementation
WSDL file. It has a reference to the interface WSDL file.
g. Take the defaults on the next panel (generate proxy) and click Finish.
The generated files are highlighted in Figure 8-37.
Figure 8-37 Generated client binding files and deployment descriptors
4. In our sample application, we will eventually offer several options to the user.
These options allow the user to select Wholesale1 or Wholesale2 either
directly or via the gateway. In order to do this, we repeated this process for
each option and as each client code portion was generated, we renamed the
classes to a unique name. To do this, we used the rename option for the class
and selected each option beneath. This ensured that every reference to the
class was changed, including those in the binding files (Figure 8-38).

202 Broker Interactions for Intra- and Inter-enterprise
Figure 8-38 Renaming the classes
5. Note that the webservicesclient.xml deployment descriptor defines the JNDI
name for accessing the Web service and the associated service endpoint
interface to be used. This descriptor is generated automatically be the Web
Services Client wizard (Figure 8-39).
..................Content has been hidden....................
You can't read the all page of ebook, please click here login for view all page.