
DEX files without a doubt are one of the most important parts of an Android app, which is often useful for an attacker or penetration tester. We will have to deal with DEX files a lot in the Reverse Engineering section of this book. So, let's see how these DEX files are created during the app building process. We are going to do it from the command line so that it is better understandable as we can have a close look at each step.
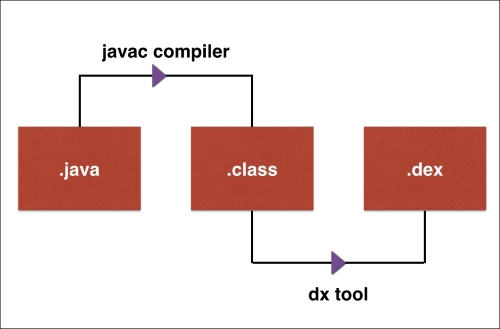
The following diagram shows the high level process of how .dex files are generated:
The first step is to write a simple Java program in order to start with the process. The following piece of Java code simply prints the word Hacking Android on the output console:
public class HackingAndroid{

  Public static void main(String[] args){

  System.out.println("Hacking Android");

}

}
Save this file as HackingAndroid.java.
Now we need to compile this Java file. The initial compilation process of Java code written for Android is similar to traditional Java files. We will use javac as the compiler.
Run the following command to compile the Java file:
javac [filename.java]

The preceding step produces a .class file. Typically, this class file contains standard JVM byte-codes. The following excerpt shows how the disassembly of the preceding class file looks like:
public class HackingAndroid extends java.lang.Object{
public HackingAndroid();
  Code:
   0:   aload_0
   1:   invokespecial   #1; //Method java/lang/Object."<init>":()V
   4:   return
public static void main(java.lang.String[]);
  Code:
   0:   getstatic       #2; //Field java/lang/System.out:Ljava/io/PrintStream;
   3:   ldc     #3; //String Hacking Android
   5:   invokevirtual   #4; //Method java/io/PrintStream.println:(Ljava/lang/String;)V
   8:   return
}
We can run these class files using the following command:
java [classname]

As we can see in the previous screenshot, we are able to see the output Hacking Android printed on the output console.
However, this class file cannot be directly run on an Android device as Android has its own byte-code format called Dalvik. These are the machine-code instructions for Android.
So, the next step is to convert this class file to a DEX file format. We can do it using the dx tool. Currently, the path for the dx tool is set in my machine. Usually it can be found under the build tools directory of your Android SDK path.
Run the following command to generate the DEX file from the preceding class file:
dx –dex –output=[file.dex] [file.class]

We should now have the DEX file generated. The following screenshot shows the DEX file opened in a hex editor:

Now we are all set to execute this file on the Android emulator. Let's push this file in to the /data/local/tmp/ directory and run it.
Run the following command to upload this file on to the emulator:
adb push HackingAndroid.dex /data/local/tmp

As we can see the file has been pushed onto the device.
This file can be run using dalvikvm from the command line. We can run the following command from your local machine to do that. Or, we can get a shell on the device, navigate to the directory where this file is uploaded and then run it:
adb shell dalvikvm –cp [path to dex file] [class name]
