The penetration test needs to be conducted in a limited timeframe and the reconnaissance phase is the one that gets the least amount of time. In a real-world penetration test, you share the information gathered during the reconnaissance phase with the client and try to reach a conclusion on the targets that should be included in the scanning phase.
At this stage, the client may also provide you with additional targets and domains that were not identified during the reconnaissance phase, but should be included in the actual testing and exploitation phase. This is done to gain maximum benefits from the test by including the methods of both black hat and white hat hackers, where you start the test as a malicious attacker would do and, as you move ahead, additional information is provided that gives an exact view of the target.
Once the target server hosting the website is determined, the next step involves gathering additional information such as the operating system and services available on that specific server. Besides hosting a website, some organizations also enable FTP service and other ports may also be opened as per their need. As the first step, we need to identify the additional ports open on the web server besides ports 80 and 443.
The scanning phase consists of the following stages:
- Port scanning
- Operating system fingerprinting
- Web server version identification
- Underlying infrastructure analysis
- Application identification
Network mapper, popularly known as Nmap, is the most widely known port scanner. It is used by penetration testers and ethical hackers to find open ports with great success and is an important software in their toolkit. Kali Linux comes with Nmap preinstalled. Nmap is regularly updated and maintained by an active group of developers contributing to the open source tool.
By default, Nmap does not send probes to all ports. Nmap checks only the top 1000 frequently used ports that are specified in the nmap-services file. Each port entry has a corresponding number indicating the likeliness of that port being open. This increases the speed of the scan drastically as the less important ports are left out of the scan. Depending on the response by the target, Nmap determines if the port is open, closed, or filtered.
The straightforward way of running a Nmap port scan is called the TCP connect scan. This option is used to scan for open TCP ports and is invoked using the –
sT option. The connect scan performs a three-way TCP handshake (Syn---Syn/Ack---Ack). It provides a more accurate state of the port but it is more likely to be logged at the target machine. A stealthier way of conducting a scan is by using the –
sS option, known as the SYN scan, which does not complete the handshake with the target and is therefore not logged on that target machine. However, the packets generated by the SYN scan can alert firewalls and IPS devices.
Nmap, when invoked with the –F flag, will scan for the top 100 ports instead of the top 1000. Additionally, it also provides you the option to customize your scan with the --top-ports [N] flag to scan for N most popular ports from the nmap-services file. Many organizations might have applications that will be listening on a port that is not part of the nmap-services file. For such instances, you can use the –p flag to define a port, port list, or a port range for Nmap to scan.
There are 65535 TCP and UDP ports and applications could use any of the ports. If you want, you can test all the ports using the –p 1-65535 option.
Following screenshot shows the output of the preceding commands:

In addition to the different scans for TCP, Nmap also provides various options that help in circumventing firewalls when scanning for targets from outside the organization's network as follows:
- ACK scan: This option is used to circumvent the rules on some routers that only allow SYN packets from the internal network, thus blocking the default connect scan. These routers will only allow internal clients to make connection through the router and will block all packets originating from the external network with a SYN bit set. When the
ACK scanoption is invoked with the–sAflag, Nmap generates the packet with only the ACK bit set fooling the router into believing that the packet was a response to a connection made by an internal client and allows the packet through it. TheACK scanoption cannot reliably tell whether a port at the end system is open or closed, as different systems respond to an unsolicited ACK in different ways. But it can be used to identify online systems behind the router. - Hardcoded source port in firewall rules: Many firewall administrators configure firewalls with rules allowing incoming traffic from the external network that originate from a specific source port such as
53,25, and80. Nmap by default randomly selects a source port, but it can be configured to shoot traffic from a specific source port in order to circumvent this rule: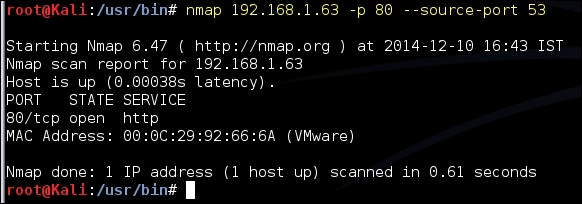
- Custom packet size: Nmap and other port scanners send packets in a specific size and firewalls now have rules defined to drop such packets. In order to circumvent this detection, Nmap can be configured to send packets with a different size using the
--data-lengthoption: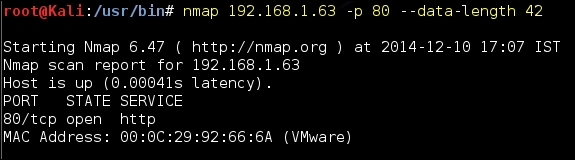
- Custom MTU: Nmap can also be configured to send packets with smaller MTU. The scan will be done with a
--mtuoption along with a value of the MTU. This can be used to circumvent some older firewalls and intrusion detection devices. New firewalls reassemble the traffic before sending it across to the target machine so it would be difficult to evade them. The MTU needs to be a multiple of 8. The default MTU for Ethernet LAN is of 1500 bytes: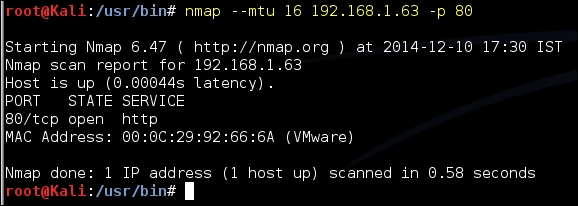
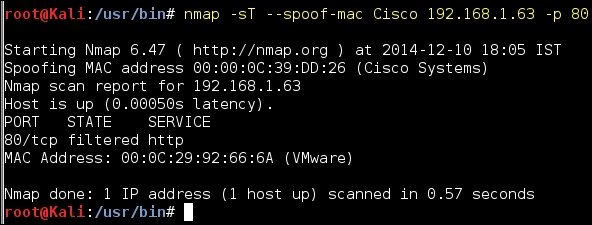
- MAC address spoofing: If there are rules configured in the target environment to only allow network packets from certain MAC addresses, you can configure Nmap to set a specific MAC address to conduct the port scan. The port scanning packets can also be configured with a MAC address of a specific vendor as shown in the following screenshot:
When you send a legitimate packet to a closed port with a correctly calculated checksum and you get a connection RESET packet, you cannot be sure whether this packet came from the firewall sitting in front of the target or the end host. A packet configured with an incorrect checksum can be used to determine whether there is indeed a firewall sitting between the target and your machine, as these (bad checksum) packets are silently dropped by endpoints of machines and any RESET or port unreachable packets are certainly coming from a device sitting in front of the target such as a firewall or an intrusion prevention device. Following screenshot shows such scenario:
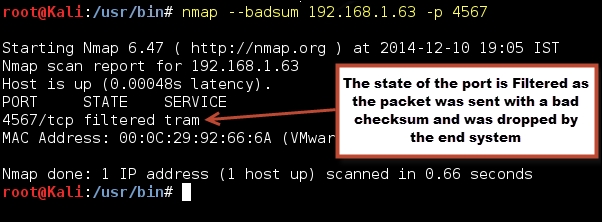
In the preceding example, the port 4567 is marked as filtered (although it is closed on the target) because Nmap is unsure of its state, as the packet was dropped silently by the target (due to bad checksum). Had there been a firewall in between and had port 4567 not allowed through it, the firewall would have send a RESET packet back because it does not verify the checksum. Routers and firewalls do not verify checksum because that would slow down the processing.
After identifying the open ports on the web server, we need to determine the underlying operating system. Nmap provides several options to do so. Over the last few versions and with the contribution from several people to the project, Nmap OS finger printing techniques have improved a lot and accurately determine the operating system of the target. The OS scan is performed using the -O option; you can add -v for verbose output to find out the underlying tests done to determine the operating system:

A skilled hacker does not rely on the results of a single tool. Therefore, Kali Linux comes with several fingerprinting tools; in addition to running your version scan with Nmap, you can have a second opinion using a tool such as Amap.
Once the underlying operating system has been determined, we need to identify the exact application running on the open ports on that system. When scanning web servers, we need to analyze the flavour and version of web service that is running on top of the operating system. Web servers basically process the HTTP requests from the application and distribute it to the web; Apache, IIS, and Nginx are the most widely used ones. Along with the version, we need to identify any additional software, features, and configurations enabled on the web server before moving ahead with the exploitation phase.
Website development relies heavily on frameworks such as PHP and .Net, and each web application will require a different technique depending on the framework used to design it.
In addition to version scanning of the web server, we also need to identify the additional components supporting the web application, such as the database application, encryption algorithms, and load balancers.
Now, multiple websites are deployed on the same physical server. We need to attack only the website that is in our scope and a proper understanding of the virtual host is required for this.
Services running on well-known ports such as port 25 and 80 can be identified easily, as they are used by widely known applications such as the mail server and the web server. The
Internet Assigned Numbers Authority (IANA) is responsible for maintaining the official assignments of port numbers and the mapping can be identified from the port mapping file in every operating system. However, many organizations run applications on ports that are more suitable to their infrastructure. You would often see the Intranet website running on port 8080 instead of 80.
The port mapping file is only a place holder and applications can run on any open port, as designed by the developer defying the mapping set by IANA. This is exactly why we need to do a version scan to determine whether the web server is indeed running on port 80 and further analyze the version of that service.
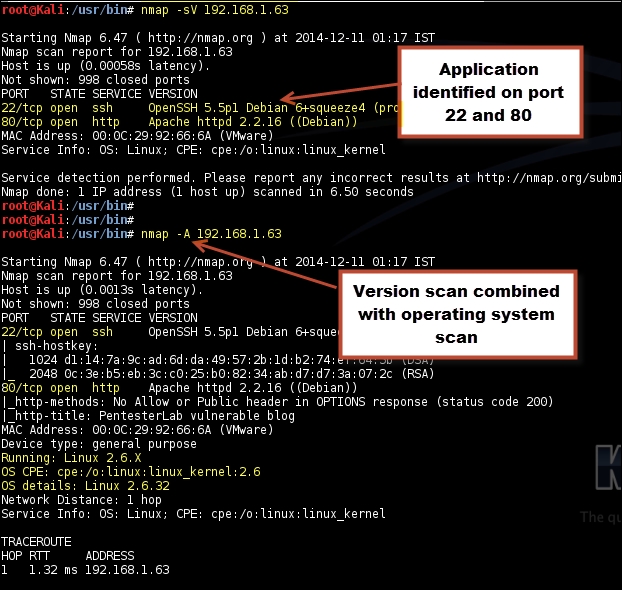
Nmap has couple of options to perform version scanning; the version scan can be combined along with the operating system scan or could be run separately. Nmap probes the target by sending a wide range of packets and then analyzes the response to determine the exact service and its version.
To start only the version scans, use the –sV option. The operating system scan and the version scan can be combined together using the –A option. If no ports are defined along with the scanning options, Nmap will first perform a port scan on the target using the default list of the top 1000 ports and identify the open ports from them. Next, it will send a probe to the open port and analyze the response to determine the application running on that specific port. The response received is matched against a huge database of signatures found in the nmap-service-probes file. It's similar to how an IPS signature works, where the network packet is matched against a database containing signatures of the malicious packets. The version scanning option is only as good as the quality of signatures in that file.
Following screenshot shows the output of the preceding commands:
You can report incorrect results and new signatures for unknown ports to the Nmap project. This would help improve the quality of the signature in the future releases.
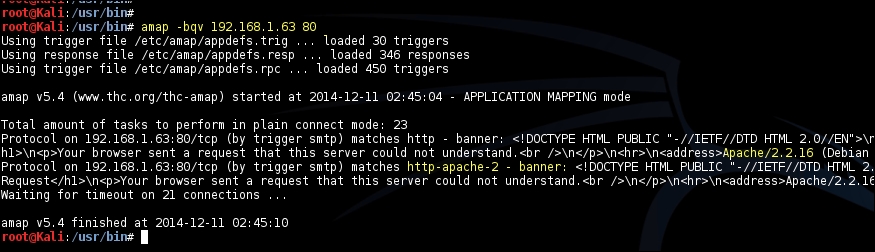
Kali Linux also comes with a tool called Amap, which was created by the The Hacker's Choice (THC) group and works like Nmap. It probes the open ports by sending a number of packets and then analyzes the response to determine the service listening on that port.
The probe to be sent to the target port is defined in a file called appdefs.trig and the response that is received is analyzed against the signatures in the appdefs.resp file.
During a penetration test, it is important to probe the port using multiple tools to rule out any false positives. Relying on the signatures of one tool could prove to be fatal during a test, as our future exploits would depend on the service and its version identified during this phase.
You can invoke Amap using the –bqv option, which will only report the open ports, print the response received in ASCII, and print some detailed information related to it:
Having knowledge about the framework that is used to develop the website gives you an advantage in identifying the vulnerabilities that may exist in the unpatched versions.
For example, if the website is developed on a Wordpress platform, traces of it can be found in the web pages of that website. Most of the web application frameworks have markers that can be used by an attacker to determine the framework used.
There are several places that can reveal details about the framework.
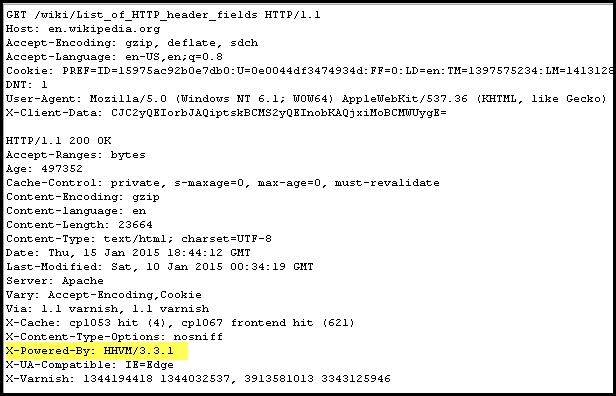
Along with defining the operating parameters of an HTTP transaction, the header may also include additional information that can be of use to an attacker.
From the X-Powered-By field, the attacker can determine that the
Hip Hop Virtual machine (HHVM), which is an alternative implementation of PHP, is most likely the framework. This approach may not always work, as the header filed can be disabled by proper configuration at the server end:
Application frameworks also create new cookie fields that can throw some light on the underlying framework used, so keep an eye on the cookie field too.
Comments in the HTML page source code can also indicate the framework used to develop the web application. Information in the page source can also help you identify additional web technologies used.
The aim of the Whatweb tool is to identify different web technologies used by the website. It is included in Kali Linux, and it is located at Applications | Web Application Analysis | Web Vulnerability scanners. It identifies the different content management systems, statistic/analytics packages, and JavaScript libraries used to design the web application. The tool claims to have over 900 plugins. It can be run in different aggression levels that balance between speed and reliability. The tool may get enough information on a single webpage to identify the website, or it may have to recursively query the website to identify the technologies used.
In the next example, we will use the tool against the Wikipedia site, with the –v verbose option that prints out some useful information related to the technologies identified:

Websites of many organizations are hosted by service providers using shared resources. Sharing of IP address is one of the most useful and cost-effective techniques used by them. You would often see a number of domain names returned when you do a reverse DNS query for a specific IP address. These websites use name-based virtual hosting, and are uniquely identified and differentiated from other websites hosted on the same IP address by the host header value.
This works similar to a multiplexing system. When the server receives the request, it identifies and routes the request to the specific host by consulting the Host field in the request header, which was discussed in Chapter 1, Introduction to Penetration Testing and Web Applications.
Note
When interacting and crafting an attack for the website, it becomes important to identify the type of hosting. If the IP address is hosting multiple websites, then you have to include the correct host header value in your attacks or you won't get the desired results. This could also affect the other websites hosted on that IP address. Directly attacking with the IP address will have undesirable results and will also affect the scope of the penetration test.
We can determine whether multiple websites are hosted on the IP address by analyzing the DNS records. If multiple names point to the same IP address, then the Host header value is used to uniquely identify the website. DNS tools such as dig and nslookup can be used to identify domains returning similar IP addresses.
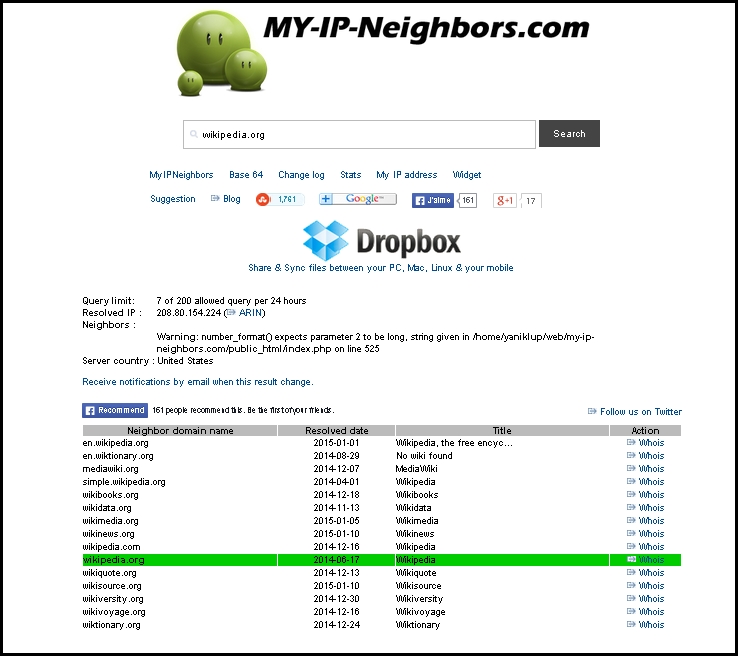
You can use the website www.my-ip-neighbors.com to identify whether other websites are hosted on the given web server. The following example shows several websites related to Wikipedia hosted on the same IP address:
Bing can also be used to search for additional websites hosted on the target. A query against the IP address of the target will reveal information about other websites hosted on it. The ip: directive along with the IP address of the target will return all websites indexed by the Bing search engine:
ip:<target IP address>
Following screenshot shows the websites returned by the 208.80.154.224 IP address:

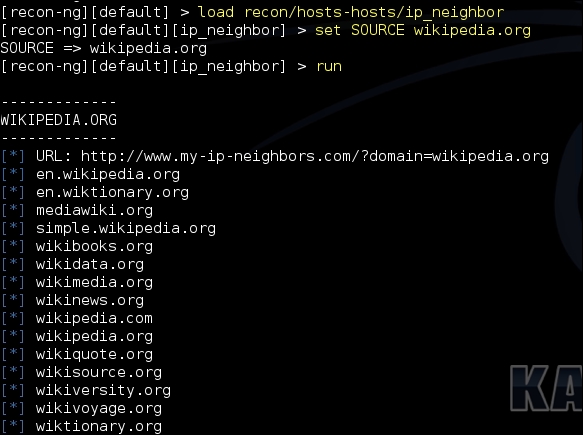
The Recon-ng tool that we had discussed earlier also includes a module to find out virtual hosts on the same server. The module uses the website my-ip-neighbors.com to locate virtual hosts. The output is stored in the hosts table and the data can be exported to all the formats earlier discussed.
First load the module using the following command:
load recon/hosts-hosts/ip_neighbor
Next, set the target to be tested. Here, we're looking for virtual hosts in the Wikipedia.org domain:
Set SOURCE Wikipedia.org
When done type run to execute the module which will populate all the domains sharing the same IP address as wikipedia.org as shown in the following image:
Most websites use some form of load balancing to distribute load across servers and maintain high availability. The interactive nature of websites makes it critical for the end users to access the same server for the entire duration of the session for best user experience. For example, on an e-commerce website, once a user adds items in the cart, it is expected that the user will again connect to the same server at the checkout page to complete the transaction. With the introduction of a middle man, such as a load balancer, it becomes very important that the subsequent requests from the user are sent to the same server by the load balancer.
There are several techniques that can be used to load balance user connections between servers. DNS is the easiest to configure, but it is unreliable and does not provides a true load balancing experience. Hardware load balancers are the ones that are used today to route traffic to websites maintaining load across multiple web server.
During a penetration test, it is necessary to identify the load balancing technique used in order to get a holistic view of the network infrastructure. Once identified, you would now have to test each server behind the load balancer for vulnerabilities. Collaborating with the client team would also be required, as different vendors of hardware load balancers use different techniques to maintain session affinity.
A popular method used by hardware load balancers is to insert a cookie in the browser of the end client that ties the user to a particular server. This cookie is set regardless of the IP address, as many users will be behind a proxy or a NAT configuration and most of them will be having the same source IP address.
Each load balancer will have its own cookie format and names. This information can be used to determine if a load balancer is being used and its provider. The cookie set by the load balancer can also reveal sensitive information related to the target that may be of use to the penetration tester.
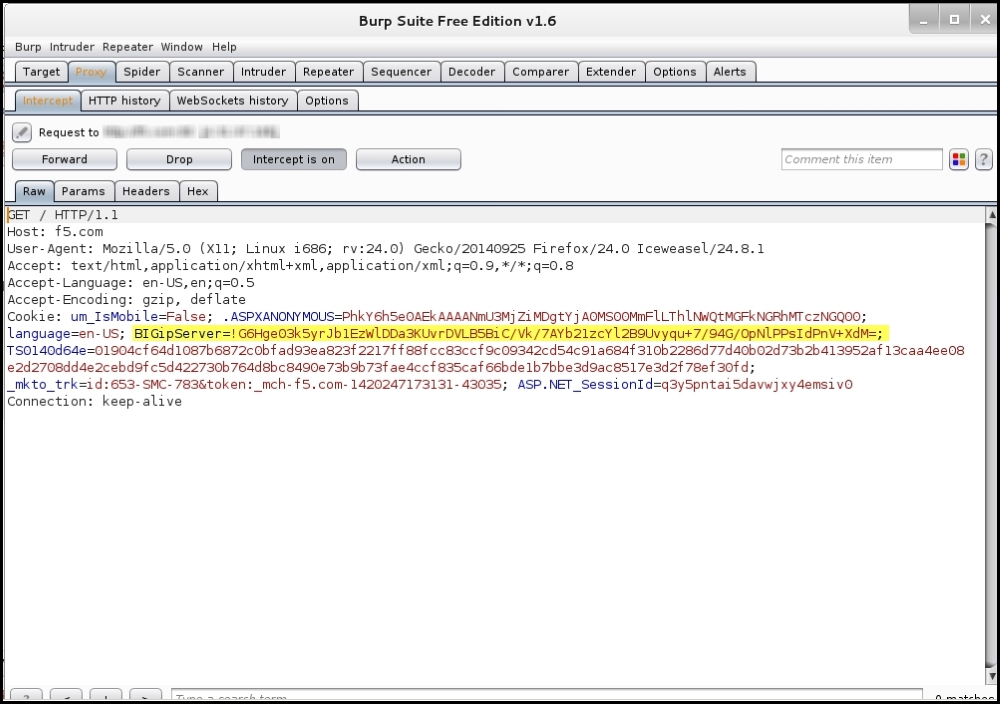
The Burp proxy can be configured to intercept the connection, and we can look out for the cookie by analyzing the header. As shown in the following screenshot, the target is using a F5 load balancer. The long numerical value is actually the encoded value containing the pool name, web server IP address, and the port. So, here the load balancer cookie is revealing critical server details which it should not be doing. The load balancer can be configured to set a customized cookie that does not reveal such details. This is only done by large organizations that have a dedicated team working on their load balancers and have special training for the product:

The default cookie for the F5 load balancer has the following format:
BIGipServer<pool name> =<coded server IP>.<coded server port>.0000
In the following screenshot, you can see that the cookie is encrypted. Although a malicious attacker can determine the load balancer, the cookie is not revealing any information about the web server behind the load balancer:
Few other ways to identify a device such as a load balancer are listed as follows:
- Analyzing SSL differences between servers: There could be minor changes in the SSL configuration across different web servers. The timestamp on the certificate issued to the web servers in the pool can vary. The difference in the SSL configuration can be used to determine whether multiple servers are configured behind a load balancer.
- Redirecting to a different URL: Another method of load balancing request across servers is by redirecting the client to a different URL to distribute load. A user may browse to a website
www.example.combut gets redirected towww2.example.com. A request from another user gets redirected towww1.example.comand is delivered web page from a different server. This is one of the easiest ways to identify a load balancer but is not often implemented as it has a management overhead and security implications. - DNS records for load balancers: Host records in the DNS zone can be used to infer if the device is a load balancer.
- Load balancer detector: This is a tool included in Kali Linux. It determines whether a website is using a load balancer. The command to execute the tool from the shell is
lbd <website name>. The tool comes with a disclaimer that it's a proof of concept tool and prone to false positives. - Web application firewall: Besides a load balancer, the application might also use a web application firewall (WAF) to thwart attacks. The web application firewall detection tool, Wafw00f, in Kali Linux is able to detect whether any WAF device exists in the path. The tool is located at Information gathering | IDS/IPS Identification.
So far, we have dealt with the infrastructure part of the target. We need to analyze the underlying software and try to understand the different technologies working beneath the hood. Web applications designed with the default configurations are vulnerable to attacks, as they provide several openings for a malicious attacker to exploit the application.
Kali Linux provides several tools to analyze the web application for configuration issues. The scanning tools identify vulnerabilities by navigating through the entire website and looks out for interesting files, folders, and configuration settings. Server-side scripting languages such as PHP and CGI that have not been implemented correctly and found to be running on older versions can be exploited using automated tools.
Out of the several HTTP methods, only a few are actively used today and the ones such as DELETE, PUT, and TRACE should be disabled on the web server unless you have valid reason for enabling it.
As a penetration tester, you first task should be to identify what methods are supported by the web server. You can use Netcat to open a connection to the web server and query the web server with the OPTIONS method. We can also use Nmap to determine the supported methods.
In the ever increasing repository of Nmap scripts, you can find a script named http-methods.nse. When you run the script by using the --script option along with the target, it will list the allowed HTTP methods on the target and will also point out the dangerous methods. In the following screenshot, we can see this in action where it detects several enabled methods and also points out TRACE as a risky method:
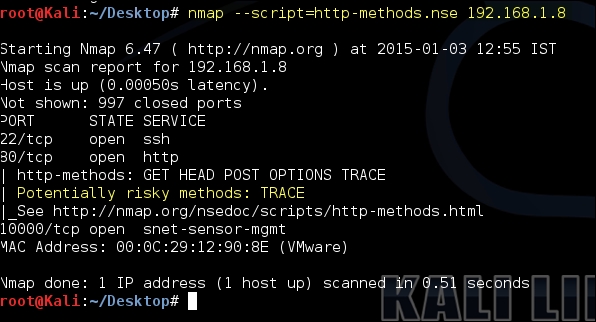
By default, the script probes the target with a user agent as Mozilla and also reveals that the packet was generated by the Nmap scripting engine:

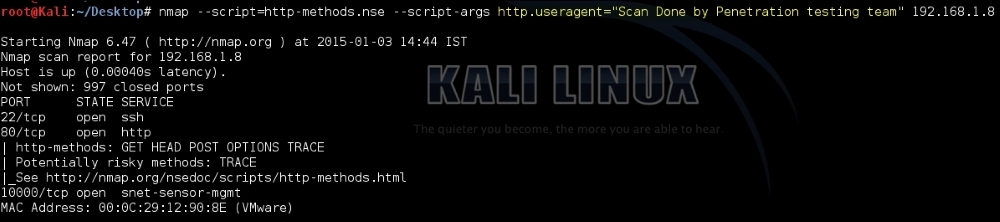
You can change the user-agent with the http.useragent script argument and hide any Nmap information from being leaked:
The following modules are useful for a penetration tester while testing a web server for vulnerabilities:
Dir_listing: This module will connect to the target web server and determine whether directory browsing is enabled on it.Dir_scanner: Using this module, you can scan the target for any interesting web directories. You can provide the module a custom created dictionary or use the default one.Enum_wayback: This is an interesting module that queries the Archive.org website and looks out for web pages in the target domain. Old web pages that might have been unlinked can still be accessible and can be found out using the Archive.org website. You can also identify the changes that the website has gone through over the years.Files_dir: This module can be used to scan the server for data leakage vulnerabilities by locating backups of configuration files and source code files.http_login: If the web page has a login page that works over HTTP, you can try to brute force it by using the Metasploit dictionary.robots_txt: Robot files can contain some unexplored URLs and you can query it using this module to find the URLs that are not indexed by a search engine.webdav_scanner: This module can be used to find out if WebDAV is enabled on the server, which basically turns the web server into a file server.
With the improvements that Metasploit has gone through over the years, the developers thought of integrating the several auxiliary module and many additional features in a plugin and automate the entire task of scanning the web server. This led to the creation of a tool known as WMAP. It is integrated into Metasploit, so you get all the features that Metasploit provide such as auto tab complete, importing data from other scanners, and database integration.
Once you have Metasploit up and running, you can load the WMAP plugin using the load wmap keyword. Wmap uses the PostgreSQL database that Metasploit uses to save its results. So, make sure you have the database connected before running wmap.
Following are the steps to automate scanning using WMAP:
- You first need to define a site. As shown in the following screenshot, it is done with the command
wmap_sites –a <site name/IP address>. Then, use thewmap_site –lcommand to identify the site ID. The site ID is now used to identify the site to be tested. Thewmap_targets –d 0command will then add the website as a target: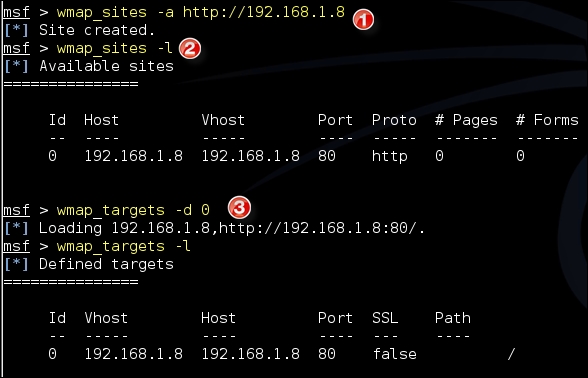
- You can have a look at the modules which the tool is going to run by invoking the
wmap_run -tcommand. Finally, run thewmap_run –ecommand to start the scan: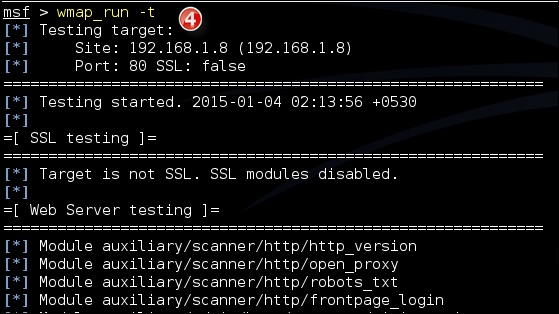
- Once the test is complete, you can check out the vulnerabilities found using the
vulnscommand: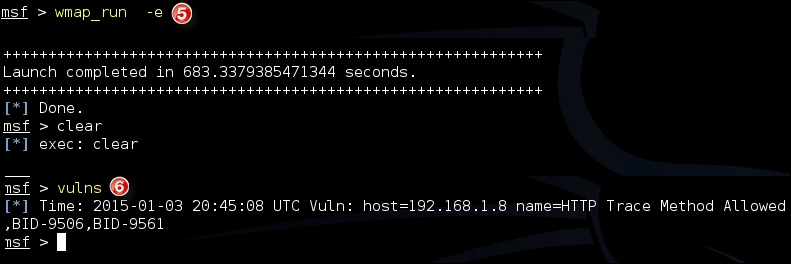
- Using WMAP, you can automate all the manual steps that we had to go through earlier.
The Skipfish scanner is less prone to false positive errors and also generates the report at the end of the scan in a nice graphical HTML file. The scanner is really fast; it also displays the number of packets sent and the number of HTTP connections created in real time on the terminal.
The scanner tries to identify several high-risk flaws in the web application, such as SQL and command injection flaws, and cross-site scripting flaws. It looks for incorrect and missing MIME types on the web application. It is also well known for identifying vulnerable CGI and PHP scripts. If the web server has an expired certificate, that is also reported in the HTML report.
The Skipfish vulnerability scanner is located at Applications | Web Application Analysis | Web Vulnerability Scanners. When invoked with the –h switch, it lists the several options you can use to customize the scan. You should provide the path to save the HTML report along with the target. The command with output location and target are as follows:
Skipfish –o <output location> <target>

The results are easy to read and are assigned a risk rating to gain attention of the testing team. As shown in the following screenshot, skipjack found a potential XSS flaw on the web page and the penetration tester will now have to further verify and test it using manual testing techniques:

When testing a large real-world application, you need a more exhaustive approach. As a first step, you need to identify how big the application is as there are several decisions that depend on it. The number of resources that you require, the effort estimation, and the cost of the assessment depends on the size of the application.
A web application consists of multiple web pages linked to one another. Before starting the assessment of an application, you need to map it out to identify its size. You can manually walk through the application, clicking on each link and viewing the contents as a normal user would. When manually spidering the application, your aim should be to identify as many webpages as possible—both from authenticated and unauthenticated users' perspective.
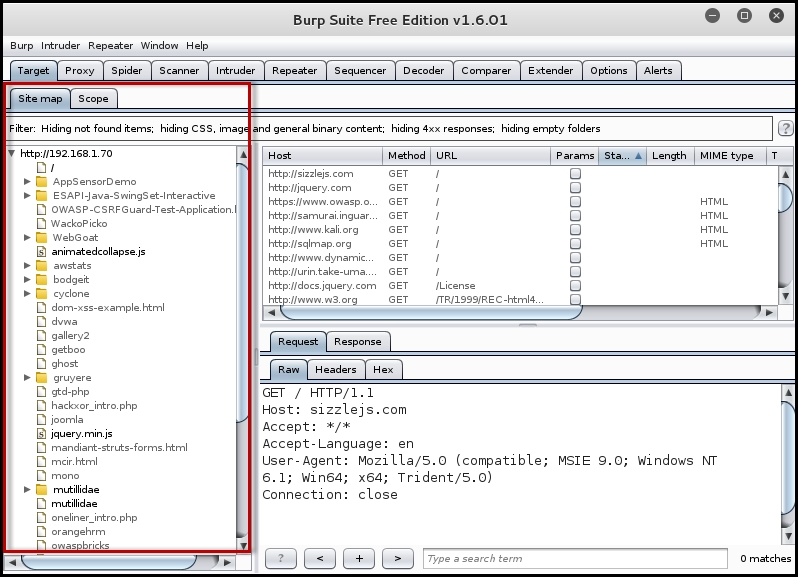
Manually spidering the application is both time consuming and prone to errors. Kali Linux has numerous tools that can be used to automate this task. The Burp spider tool in the Burp suite is well known for spidering web applications. It automates the tedious task of cataloging the various web pages in the application. It works by requesting a web page, parsing it for links, and then sending requests to these new links until all the webpages are mapped. In this way, the entire application can be mapped without any webpages been ignored.
The Burp spider maps the applications using both passive and active methods. When you start the Burp proxy, it runs by default in the passive spidering mode. In this mode, when the browser is configured to use the Burp proxy, it updates the site map with all the contents requested through the proxy without sending any further requests. Passive spidering is considered safe, as you have direct control over what is crawled. This becomes important in critical applications which include administrative functionality that you don't want to trigger.
For effective mapping, the passive spidering mode should be used along with the active mode. Initially, allow Burp spider to passively map the application as you surf through it and when you find a web page of interest that needs further mapping, you can trigger the active spidering mode. In the active mode, Burp spider will recursively request webpages until it maps all the URLs.
The following screenshot shows the output of the passive spidering as we click on the various links in the application. Make sure you have Burp set as the proxy in the web browser and the interception is turned off before passively mapping the application:
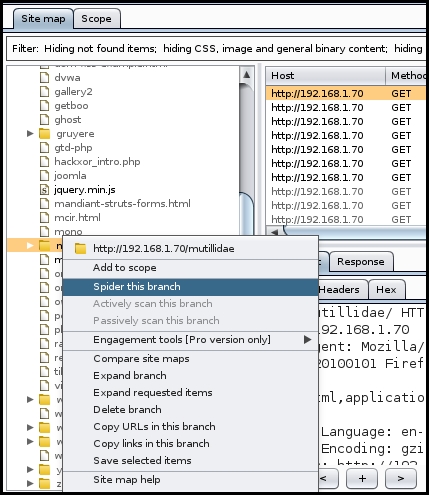
When you want to actively spider a webpage, right-click on the link in the Site map section and click on Spider this branch. As soon as you do so, the active spider mode kicks in. Under the Spider section, you would see requests been made and the Site map will populate with new items as shown in the following screenshot:
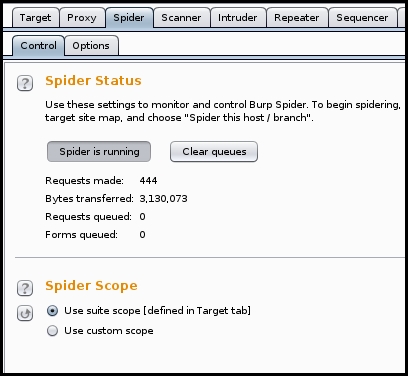
When the active spider is running, it will display the number of request made and a few other details. In the Scope section, you can create rules using regex string to define the targets:
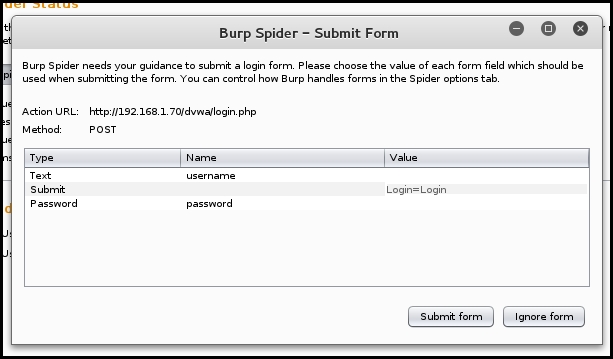
An application may require authentication before it allows you to view contents. Burp spider can be configured to authenticate to the application using preconfigured credentials when spidering it. Under the Options tab in the Spider section, you can define the credentials or select the Prompt for guidance option:

When you select the Prompt for guidance option, it will display a prompt where you can type in the username and password if the spider encounters a login page, as shown here:
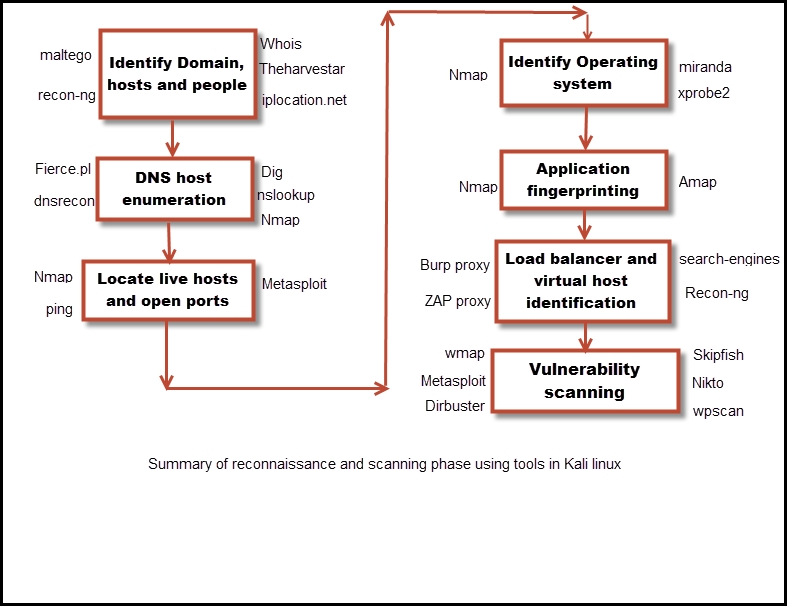
With this we come to the end of the chapter, we worked through the reconnaissance phase and finished with scanning the web server. In the following screenshot I have listed some useful tools in Kali Linux that can be used in each of these phases: