
Suppose that 60 is the threshold below which a student must retake the examination. Let's find out the list of students with a score below 60, that is, those who didn't succeed in the writing examination. Then, let's create one file per student telling him/her about this.
First of all, let's create a transformation that generates the list of students who will take the examination:
- Create a new transformation.
- Drag a Text file input, a Filter rows, and a Select values step to the canvas and link them in that order.
- Use the Text file input step to read the global examination file.
- Use the Filter rows step to keep only those students with a writing score below
60. - With the Select values step, keep just the
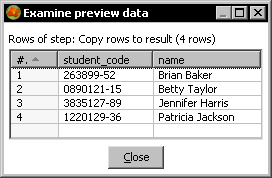
student_codeandnamevalues. - After this last step, add a Copy rows to result step.
- Do a preview on this last step. You will see the following (the exact names and values depend on the number of files you have appended to the global file):
- Save the transformation in the
transformationsfolder with the namestudents_list.ktr.
Now let's create a transformation that generates a single file. This transformation will be executed for each student in the list shown in the preceding screenshot:
- Create a new transformation.
- Drag a Get rows from result step to the canvas.
- Double-click the Get rows from result step and use it to define two
Stringfields—a field namedstudent_codeand another field namedname. - Add a Formula step and create a hop from the Get rows from result step to this new step.
- Use the Formula step to create a new
Stringfield namedtext. As value, type:"You'll have to take the examination again, " & [name] & ".". - After the Formula step, add a Delay row step. You will find it under the Utility category of steps.
- Finally, add a Text file output step, and double-click the step to configure it.
- As filename type
${LABSOUTPUT}/hello. Check the option Include time in filename?. - In the content tab, uncheck Header. As Field, select the field
text. - This is how your final transformation looks:

- Save the transformation in the
transformationsfolder under the namehello_each.ktr.
Let's create a job that puts everything together:
- Create a job.
- Drag a START, a Delete files, and two transformation entries to the canvas, and link them one after the other as shown:
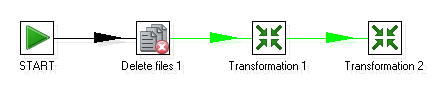
- Save the job.
- Double-click the Delete files step. Fill the Files/Folders: grid with a single row—under File/Folder type
${LABSOUTPUT}and under Wilcard (RegExp) typehello.*.txt. This regular expression includes all.txtfiles whose name start with the string "hello" in the${LABSOUTPUT}folder. - Double-click the first transformation entry. As Transformation filename, put
${Internal.Job.Filename.Directory}/transformations/student_list.ktrand click on OK. - Double-click the second transformation entry. As Transformation filename, put
${Internal.Job.Filename.Directory}/transformations/ hello_each.ktr. - Check the option Execute for every input row? and click on OK.
- Save the job and press F9 to run it.
- When the execution finishes, explore the folder pointed by your
${LABSOUTPUT}variable. You should see one file for each student in the list. The files are namedhello_<hhmmddss>.txtwhere<hhmmddss>is the time in your system at the moment that the file was generated. The generated files look like the following:
You built a list of students who had to retake the writing examination and, for each student, you generated a file with a custom message.
First, you created a transformation that built the list of the students and copied the rows outside the transformation by using the Copy rows to result step.
Then you created another transformation that gets a row from the result and generates a file with a custom hello message.
Finally, you created the main job. First of all, the job deletes all files just in case you run the job more than once. Then it calls the first transformation and then executes the transformation that generates the file once for every copied row, that is, once for every student. Each time the transformation gets the rows from the result, it gets a single row with information about a single student and generates a file with the message for that student.
Before proceeding with the details about executing each row mechanism, let's briefly explain the new step used here—the Delay row step that is used to deliberately slow down a transformation. For each incoming row, the step waits for the amount of time indicated in its setting window which, by default, is 1 second. After that time, the row is given to the next step.
In this tutorial, the Delay row step is used to ensure that each time the transformation executes, the name of the file is different. As part of the name for the file, you put the time of your system including hours, minutes, and seconds. By waiting for a second, you can be sure that in every execution of the transformation the name of the file will be different from the name of the previous file.
The execute for every input row? option you have in the transformation entry setting window allows you to run the transformation once for every row copied in a previous transformation by using the Copy rows to result step. PDI executes the transformation as many times as the number of copied rows, one after the other. Each time the transformation executes and gets the rows from the result, it actually gets a different row.
Note
Note that in the transformation you don't limit the number of incoming rows. You simply assume that you are receiving a single row. If you forget to set the execute for every input row? option in the job, the transformation will run but you will get unexpected results.
This drawing shows you the mechanism for a dataset with three rows:
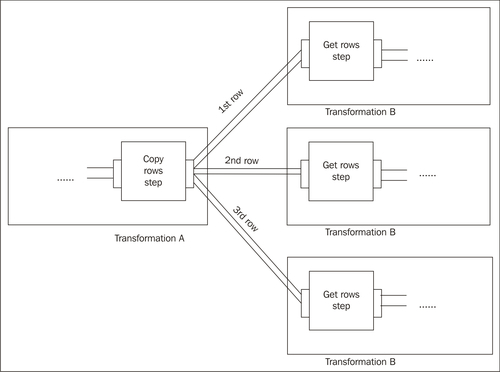
The transformation A in the example copies three rows. Then the transformation B is executed three times—first for the first copied row, then for the second, and finally for the third row.
If you look at the log in the tutorial, you can see it working:
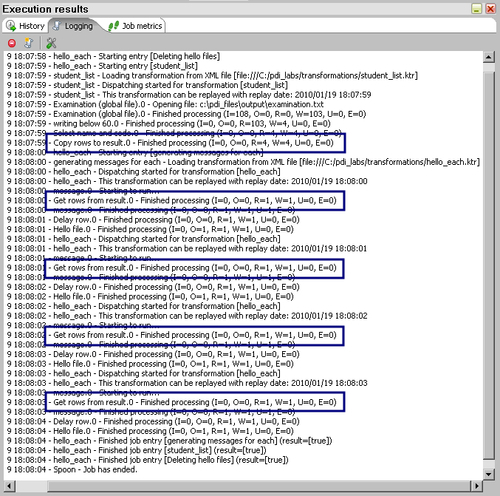
The transformation that builds the list of students copies four rows to the results. Then the main job executes the second transformation four times—once for each of those students.
The following sketch shows it clearly:

This mechanism of executing for every input row applies also to jobs. To execute a single job several times, once for every copied row, you have to check the execute for every input row? option that you have in the job entry settings window.
Modify the first tutorial about Updating a file with news about examinations. But this time accept a folder as parameter. Then process all the text files in that folder, ordered by date of the file. For each processed file, put a line in the log telling the name of the processed file.
You can use the following hint. Create a first transformation that, instead of validating the parameter as a file, validates it as a folder. In order to do that, use the File exists step inside the Lookup category of steps.
If the folder exists, use a Get File Names step. That step allows you to retrieve the list of filenames in a given folder, including the attributes for those files. To define which files to get, use the options in the box Filenames from field. Sort the list by file date and copy the names to the results.
In the second transformation, executed for every input row, get a row from the result, then use a Text file input step accepting the name from the previous step, and proceed as usual.
This exercise is related to the JS database.
Create a transformation to find out the manufacturers for the products that have been sold best in the current month. Take the first three manufacturers in the list.
Create another transformation that, for every manufacturer in that list, builds a file with a list of products out of stock.
Hint
The first transformation must copy the rows to the result. The second transformation must execute for every input row. Start the transformation with a Get rows from result step, then a Table Input step that receives as parameter a manufacturer's code. The SQL to use could be something like:
SELECT *
FROM products
WHERE code_man LIKE '?' AND pro_stock<pro_stock_min
Suppose some students have asked you to send them an e-mail to tell them how they did in the examination. Get the list of students from a file you'll find inside the resources, find out their scores, and send them an e-mail with that information.
Hint
Create a transformation that builds the list of students that have asked you to send them the examination results, along with their e-mail and scores, and copies the rows to the result.
Create a job that does the following: Call a transformation that gets a row from a result with the name, e-mail, and scores for a single student. Use that information to create variables needed to send an e-mail, for example Subject. After calling that transformation, use a Mail entry to send the e-mail by using the defined variables.
Create a main job. Execute the transformation that builds the list followed by the job described above, executing it for every input row.