In this tutorial you will build an Excel file with basic information about countries. The source will be an XML file that you can download from the Packt website.
- If you work under Windows, open the
kettle.propertiesfile located in theC:/Documents and Settings/yourself/.kettlefolder and add the following line:LABSOUTPUT=c:/pdi_files/output
On the other hand, if you work under Linux (or similar), open the
kettle. propertiesfile located in the/home/yourself/.kettlefolder and add the following line:LABSOUTPUT=/home/yourself/pdi_files/output
- Make sure that the directory specified in
kettle.propertiesexists. - Save the file.
- Restart Spoon.
- Create a new transformation.
- Give a name to the transformation and save it in the same directory you have all the other transformations.
- From the Packt website, download the
resourcesfolder containing a file namedcountries.xml. Save the folder in your working directory. For example, if your transformations are inpdi_labs, the file will be inpdi_labs/resources/. - Take a look at the file. You can edit it with any text editor, or you can double-click it to see it within an explorer. In any case, you will see information about countries. This is just the extract for a single country:
<?xml version="1.0" encoding="UTF-8"?>
XML filesbasic country information, building<world>
...
<country>
<name>Argentina</name>
<capital>Buenos Aires</capital>
<language isofficial="T">
<name>Spanish</name>
<percentage>96.8</percentage>
</language>
<language isofficial="F">
<name>Italian</name>
<percentage>1.7</percentage>
</language>
<language isofficial="F">
<name>Indian Languages</name>
<percentage>0.3</percentage>
</language>
</country>
...
</world>
- From the Input steps, drag a Get data from XML step to the canvas.
- Open the configuration window for this step by double-clicking it.
- In the File or directory textbox, press Ctrl+Space. A drop-down list appears as shown in the next screenshot:
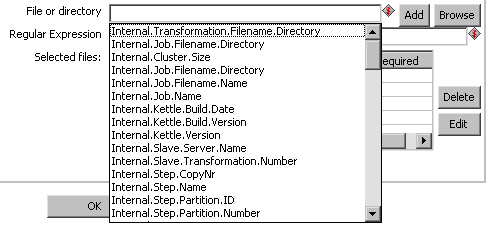
- Select
Internal.Transformation.Filename.Directory. The textbox gets filled with this text. - Complete the text so that you can read
${Internal.Transformation.Filename.Directory}/resources/countries.xml. - Click on the Add button. The full path is moved to the grid.
- Select the Content tab and click Get XPath nodes.
- In the list that appears, select /world/country/language.
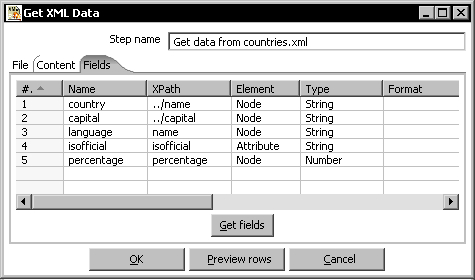
- Select the Fields tab and fill the grid as follows:
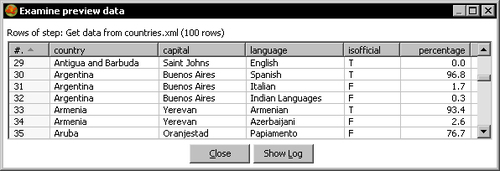
- Click Preview rows, and you should see something like this:
- Click OK.
- From the Output steps, drag an Excel Output step to the canvas.
- Create a hop from the Get data from XML step to the Excel Output step.
- Open the configuration window for this step by double-clicking it.
- In the Filename textbox press Ctrl+Space.
- From the drop-down list, select
${LABSOUTPUT}. - By the side of that text type
/countries_info. The complete text should be${LABSOUTPUT}/countries_info. - Select the Fields tab and click the Get Fields button to fill the grid.
- Click OK. This is your final transformation.
- Save the transformation.
- Run the transformation.
- Check that the
countries_info.xlsfile has been created in the output directory and contains the information you previewed in the input step.
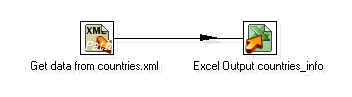
You got information about countries from an XML file and saved it in a more readable format—an Excel spreadsheet—for the common people.
To get the information, you used a Get data from XML step. As the source file was taken from a folder relative to the folder where you stored the transformation, you set the directory to ${Internal.Transformation.Filename.Directory}. When the transformation ran, Kettle replaced ${Internal.Transformation.Filename.Directory} with the real path of the transformation: c:/pdi_labs/.
In the same way, you didn't put a fixed value for the path of the final Excel file. As directory, you used ${LABSOUTPUT}. When the transformation ran, Kettle replaced ${LABSOUTPUT} with the value you wrote in the kettle.properties file. The output file was then saved in that folder: c:/pdi_files/output.
XML stands for EXtensible Markup Language. It is basically a language designed to describe data. XML files or documents contain information wrapped in tags. Look at this piece of XML taken from the countries file:
<?xml version="1.0" encoding="UTF-8"?>
<world>
...
<country>
<name>Argentina</name>
<capital>Buenos Aires</capital>
<language isofficial="T">
<name>Spanish</name>
<percentage>96.8</percentage>
</language>
<language isofficial="F">
<name>Italian</name>
<percentage>1.7</percentage>
</language>
<language isofficial="F">
<name>Indian Languages</name>
<percentage>0.3</percentage>
</language>
</country>
...
</world>
The first line in the document is the XML declaration. It defines the XML version of the document, and should always be present.
Below the declaration is the body of the document. The body is a set of nested elements. An element is a logical piece enclosed by a start-tag and a matching end-tag—for example,<country> </country>.
Within the start-tag of an element, you may have attributes. An attribute is a markup construct consisting of a name/value pair—for example, isofficial="F".
These are the most basic terminology related to XML files. If you want to know more about XML, you can visit http://www.w3schools.com/xml/.
Despite the .ktr extension, PDI transformations are just XML files. As such, you are able to explore them inside and recognize different XML elements. Look the following sample text:
<?xml version="1.0" encoding="UTF-8"?>
XMLPDI transformations files
<transformation>
<info>
<name>hello_world</name>
<description>My first transformation</description>
<extended_description>
This transformation generates 10 rows
with the message Hello World.
</extended_description>
...
</transformation>
This is an extract from the hello_world.ktr file. Here you can see the root element named transformation, and some inner elements such as info and name.
Note that if you copy a step by selecting it in the Spoon canvas and pressing Ctrl+C , and then pass it to a text editor, you can see its XML definition. If you copy it back to the canvas, a new identical step will be added to your transformation.
In order to get data from an XML file, you have to use the Get Data From XML input step. To tell PDI which information to get from the file, it is required that you use a particular notation named XPath.
XPath is a set of rules used for getting information from an XML document. In XPath, XML documents are treated as trees of nodes. There are several types of nodes; elements, attributes, and texts are some of them. As an example, world, country, and isofficial are some of the nodes in the sample file.
Among the nodes there are relationships. A node has a parent, zero or more children, siblings, ancestors, and descendants depending on where the other nodes are in the hierarchy.
In the sample countries file, country is the the parent of the elements name, capital, and language. These three elements are children of country.
To select a node in an XML document, you have to use a path expression relative to a current node.
The following table has some examples of path expressions that you may use to specify fields. The examples assume that the current node is language.
|
Path expression |
Description |
Sample expression |
|---|---|---|
|
|
Selects all child nodes of the node named |
This expression selects all child nodes of the node percentage. It looks for the node percentage inside the current node language. |
|
|
Selects the current node |
|
|
|
Selects the parent of the current node |
This expression selects all child nodes of the node |
|
|
Selects an attribute |
This expression gets the attribute |
Note
Note that the expressions name and ../name are not the same. The first selects the name of the language, while the second selects the name of the country.
For more information on XPath, follow this link: http://www.w3schools.com/XPath/.
In order to specify the name and location of an XML file, you have to fill the File tab just as you do in any file input step. What is different here is how you get the data.
The first thing you have to do is select the path that will identify the current node. You do it by filling the Loop XPath textbox in the Content tab. You can type it by hand, or you can select it from the list of available paths by Clicking the Get XPath nodes button.
Once you have selected a path, PDI will generate one row of data for every found path.
In the tutorial you selected /world/country/language. Then PDI generates one row for each /world/country/language element in the file.
After selecting the loop XPath, you have to specify the fields to get. In order to do that, you have to fill the grid in the Fields tab by using XPath notation as explained in the preceding section.
Note that if you click the Get fields button, PDI will fill the grid with the child nodes of the current node. If you want to get some other node, you have to type its XPath by hand.
Also note the notation for the attributes. To get an attribute, you can use the @ notation as explained, or you can simply type the name of the attribute without @ and select Attribute under the Element column, as you did in the tutorial.
In the last tutorial, you used the string ${Internal.Transformation.Filename.Directory} to identify the folder where the current transformation was saved. You also used the string ${LABSOUTPUT} to define the destination folder of the output file.
Both strings, ${Internal.Transformation.Filename.Directory} and ${LABSOUTPUT}, are Kettle variables, that is, keywords linked to a value. You use the name of a variable, and when the transformation runs, the name of the variable is replaced by its value.
The first of these two variables is an environment variable, and it is not the only available. Other known environment variables are ${user.home}, ${java.io.tmpdir}, and ${java.home}. All these variables are ready to use any time you need.
The second variable is a variable you defined in the kettle.properties file. In this file you may define as many variables as you want. The only thing you have to keep in mind is that those variables will be available inside Spoon after you restart it.
These two kinds of variables—environment variables and variables defined in the kettle.properties file—are the most primitive kinds of variables found in PDI. All of these variables are string variables and their scope is the Java virtual machine.
Any time you see a red dollar sign by the side of a textbox, you may use a variable. Inside the textbox you can mix variable names with static text, as you did in the tutorial when you put the name of the destination as ${LABSOUTPUT}/countries_info.
To see all the available variables, you have to position the cursor in the textbox, press Ctrl+Space, and a full list is displayed for you to select the variable of your choice. If you put the mouse cursor over any of the variables for a second, the actual value of the variable will be shown.
If you know the name of the variable, you don't need to select it from the list. You may type its name, by using either of these notations—${<name>} or %%<name>%%.
Now you can explore by yourself. On the Packt website there are some sample XML files. Download them and try this:
- Read the
customer.xmlfile and create a list of customers. - Read the
tomcat-users.xmlfile and get the users and their passwords. - Read the
areachart.xmland get the color palette, that is, the list of colors used.Note
The customer file is included in the Pentaho Report Designer software package. The others come with the Pentaho BI package. This software has many XML files for you to use. If you are interested you can download the software from http://sourceforge.net/projects/pentaho/files/.
Modify the transformation in the tutorial so that the Excel output uses a template. The template will be an Excel file with the header and format already applied, and will be located in a folder inside the pdi_labs folder.
As explained, transformations are nothing different than XML files. Now you'll create a new transformation that will take as input the transformations you've created so far, and will create a simple Excel spreadsheet with the name and description of all your transformations. If you keep this sheet updated by running the transformation on a regular basis, it will be easier to find a particular transformation you created in the past.