Let's explore the sample database:
- Open the transformation you just created.
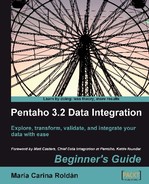
- Right-click the connection in the Database connections list and select Explore in the contextual menu. The Database explorer on connection window opens.
- Expand the
Tablesnode of the tree and selectCUSTOMERS. This is how the explorer looks:
- Click on the Open SQL for [CUSTOMERS] option.
- The following SQL editor window appears:

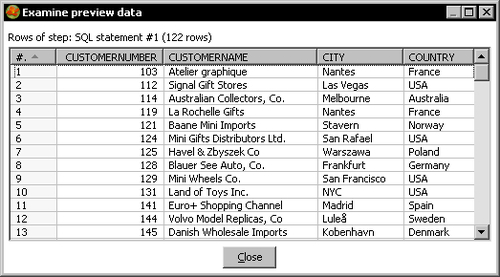
- Modify the text in the window so that you have the following:
SELECT
CUSTOMERNUMBER
, CUSTOMERNAME
, CITY
, COUNTRY
FROM CUSTOMERS
- Click on Execute. You will see the following result:
- Close the preview window (the window that tells the result of the execution) and the SQL editor window.
- Click on OK to close the database explorer window.
You explored the Pentaho sample database with the PDI Database explorer.
Before explaining the details of the database explorer, it's worth giving an introduction to SQL—a central topic in relational database terminology.
SQL, that is, Structured Query Language is the language that lets you access and manipulate databases in a RDBMS.
SQL can be divided into two parts—DDL and DML.
The DDL, that is, Data Definition Language is the branch of the language that basically allows creating or deleting databases and tables.
The following is an example of DDL. It is the DDL statement that creates the CUSTOMERS table.
CREATE TABLE CUSTOMERS
(
CUSTOMERNUMBER INTEGER
, CUSTOMERNAME VARCHAR(50)
, CONTACTLASTNAME VARCHAR(50)
, CONTACTFIRSTNAME VARCHAR(50)
, PHONE VARCHAR(50)
, ADDRESSLINE1 VARCHAR(50)
, ADDRESSLINE2 VARCHAR(50)
, CITY VARCHAR(50)
, STATE VARCHAR(50)
, POSTALCODE VARCHAR(15)
, COUNTRY VARCHAR(50)
, SALESREPEMPLOYEENUMBER INTEGER
, CREDITLIMIT BIGINT
)
;
This DDL statement tells the database to create the table CUSTOMERS with the columns CUSTOMERNUMBER of the type INTEGER, the column CUSTOMERNAME of the type VARCHAR with length 50, and so on.
Note that INTEGER, VARCHAR, and BIGINT are HSQLDB types of data, not PDI ones. The DML, that is, Data Manipulation Language allows you to retrieve data from a database. It also lets you insert, update, or delete data from the database.
The statement you typed in the SQL editor is an example of DML:
SELECT
CUSTOMERNUMBER
, CUSTOMERNAME
, CITY
, COUNTRY
FROM CUSTOMERS
This statement is asking the database to retrieve all the rows for the CUSTOMERS table, showing only CUSTOMERNUMBER, CUSTOMERNAME, CITY, and COUNTRY columns. After you clicked Execute, PDI queried the database and showed you a window with the data you had asked for.
If you were to leave the following statement:
SELECT * FROM CUSTOMERS
the window would have showed you all columns for the CUSTOMERS table.
SELECT is the statement that allows you to retrieve data from one or more tables. It is the most commonly used DML statement and you're going to use it a lot when working with databases in PDI. You will learn more about the SELECT statement in the next section of this chapter.
Other important DML statements are:
INSERT:This allows you to insert rows in a tableUPDATE: This allows you to update the values in rows of a tableDELETE:This statement is used to remove rows from a table
It is important to understand the meaning of these basic statements, but you are not forced to learn them as PDI offers you ways to insert, update, and delete without typing any SQL statement.
Although SQL is a standard, each database engine has its own version of the SQL language. However, all database engines support the main commands.
Note
When you type SQL statements in PDI, try to keep the code within the standard. Your transformations will then be reusable in case you have to change the database engine.
If you are interested in learning more about SQL, there are a lot of tutorials on the Internet. The following are a few useful links with tutorials and SQL references:
Until now, you have used only HSQLDB. In the tutorials to come, you will also work with the MySQL database engine. So, you may be interested in specific documentation for MySQL, which you can find at http://dev.mysql.com/doc/. You can find even more information in books; there are plenty of books available about both SQL language and MySQL databases.
The database explorer allows you to explore any configured database. When you open the database explorer, the first thing you see is a tree with the different objects of the database. As soon as you select a database table, all buttons to the right side become available for you to explore that table. The following are the functions offered by the buttons at the right side of the database explorer:
|
Option |
Meaning |
|---|---|
|
Preview first 100 rows of ... |
Return the first 100 rows of the selected table, or all the rows if the table has less that 100. This option shows all columns of the table. |
|
Preview first...rows of ... |
The same as the previous option, but here you decide the number of rows to show. |
|
Number of rows of ... |
Tells you the total number of records in the table. |
|
Show layout of ... |
Shows you the metadata for the columns of the table. |
|
Generate DDL |
Shows you the DDL statement that creates the selected table. |
|
Generate DDL for other connection |
It lets you select another existent connection. Then it shows you the DDL just like the previous option. The difference is that the DDL is written with the syntax of the database engine of the selected connection. |
|
Open SQL for ... |
Lets you edit a |
|
Truncate table |
Deletes all rows from the selected table. |
In the tutorial you just tried the Open SQL button. Feel free to try other buttons to explore not only the CUSTOMERS table but also the rest of the tables found in the Steel Wheels database.
In the previous section, there was a Hero exercise that asked you to connect to your own databases. If you have done that, then use a database connection defined by you and explore the database. See if you can recognize the different objects of the database. Run some previews to verify that everything looks as expected.