Let's continue working with the sample data.
- Create a new transformation.
- Select the Design view.
- Expand the input category of steps and drag a Table Input step to the canvas.
- Double-click the step.
- Click on the Get SQL select statement... button. The database explorer window appears.
- Expand the tables list and select
ORDERS. - Click on OK.
- PDI asks if you want to include the field names in the SQL. Answer Yes.
- The SQL box gets filled with a
SELECTSQL statement.SELECT ORDERNUMBER , ORDERDATE , REQUIREDDATE , SHIPPEDDATE , STATUS , COMMENTS , CUSTOMERNUMBER FROM ORDERS
- At the end of the SQL statement, add the following clause:
WHERE STATUS = 'Shipped'
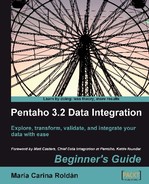
- Click Preview and then OK. The following window appears:
- Close the window and click OK to close the step configuration window.
- After the Table input step add a Calculator step, a Number Range step, a Sort step, and a Select values step and link them as follows:

- With the Calculator step, add an
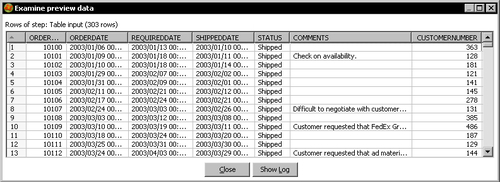
Integerfield to calculate the difference between the shipped date and the required date. Use the calculation Date A - Date B (in days) and name the fielddiff_days. Use the Number ranges step to classify the delays in delivery.
- Use the Sort rows step to sort the rows by the
diff_daysfield. - Use the Select values step to select the
delivery, ORDERNUMBER, REQUIREDDATE, andSHIPPEDDATEfields. - With the Select values step selected, do a preview. The following is how the final data will look:

From the sample database, you got information about shipped orders. After you read the data from the database, you classified the orders based on the time it took to do the shipment.
The Table input step is the main step to get data from a database. In order to use it, you have to specify the connection with the database. In the tutorial you didn't explicitly specify one because there was just one connection and PDI put it as the default value.
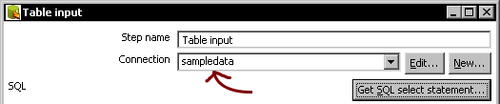
The connection was available because you shared it before. If you hadn't, you should have created here again.
The output of a Table Input step is a regular dataset. Each column of the SQL query leads to a new field and the rows generated by the execution of the query become the rows of the dataset.
As the data types of the databases are not exactly the same as the PDI data types, when getting data from a table, PDI implicitly converts the metadata of the new fields.
For example, consider the ORDERS table. Open the Database Explorer and look at the DDL definition for the table. Then right-click the Table input step and select Show output fields to see the metadata of the created dataset. The following table shows you how the metadata was translated:
|
Table columns |
Database data type |
PDI metadata |
|---|---|---|
|
|
|
|
|
|
|
|
|
|
|
|
|
|
|
|
Once the data comes out of the Table input step and the metadata is adjusted, PDI forgets that it comes from a database. It treats it just as regular data, no matter if it came from a database or any other data source.
The SQL area of a Table input step is where you write the SELECT statement that will generate the new dataset. As said before, SELECT is the statement that you use to retrieve data from one or more tables in your database.
The simplest SELECT statement is as follows:
SELECT <values>
FROM <table name>
Here<table name> is the name of the table that will be queried to get the result set and<values> is the list of the desired columns of that table, separated by commas.
This is another simple SELECT statement:
SELECT ORDERNUMBER, ORDERDATE, STATUS
FROM ORDERS
If you want to select all columns, you can just put a * as here:
SELECT *
FROM ORDERS
There are some optional clauses that you can add to a SELECT statement. The most commonly used among the optional clauses are WHERE and ORDER BY. The WHERE clause limits the list of retrieved records, while ORDER BY is used to retrieve the rows sorted by one or more columns.
Another common clause is DISTINCT that can be used to return only different records.
Let's see some sample SELECT statements:
|
Sample statement |
Output |
|---|---|
|
|
Returns the number and order date for the orders that have not been shipped. |
|
|
Returns all columns for the employees whose job is sales representative, ordered by last name and first name. |
|
|
Returns the list of products whose product line contains cars—for example, Classic cars and Vintage cars. |
|
|
Returns the list of customer numbers who have made payments with checks above USD80,000. The customers who have paid more than once with a check above USD80,000 appear more than once in the |
You can try these statements in the database explorer to check that the result sets are as explained.
When you add a Table input step, it comes with a default SELECT statement for you to complete.
SELECT <values> FROM <table name> WHERE <conditions>
If you need to query a single table, you can take advantage of the Get SQL select statement... button that generates the full statement for you. After you get the statement, you can modify it at your will by adding, say, WHERE or ORDER clauses just as you did in the tutorial. If you need to write more complex queries, you will have to do it manually.
Note
You can write any SELECT query as long as it is a valid SQL statement for the selected type of database. Remember that every database engine has its own dialect of the language.
Whether simple or complex, you may need to pass some parameters to the query. You can do it in a couple of ways. Let's explain this with two practical examples.