
Suppose you love jigsaw puzzles and decided to open a store for selling them. You have made all the arrangements and the only missing thing is the software. You have already acquired a software to handle your business, but you still have one hard task to do—insert data into the database, that is, load the database with the basic information about the products you are about to sell.
As this is the first of several tutorials in which you will interact with that database, the first thing you have to do is to create the database.
Note
For MySQL-specific tasks such as the creation of a database, we will use the MySQL Query Browser, included in the MySQL GUI Tools software. If you don't have it or don't like it, you can accomplish the same tasks by using the MySQL Command Line Client or any other GUI Tool.
- From the Packt website, download the script file
js.sql. - Launch the MySQL Query Browser.
- A dialog window appears asking you for the connection information. Enter
localhostas Server Host, and as Username and Password, enter the name and password of the user you created when you installed the software . - Click on OK.
- From the File menu, select Open Script....
- Locate the downloaded file and open it.
- Click on the Execute button or press Ctrl+Enter.
- In the Schemata tab window, a new database,
js, appears. - Right-click the name of the database and select Make Default Schema.
- In the Schemata tab window, expand the
jstree and you will see the tables of the database. - Close the script window.
Now that the database has been created, let's load some data into it:
- From the Packt website, download the
manufacturers.xlsfile. - Open Spoon and create a new transformation.
- Create a connection to the created database. Under Connection Type, select MySQL. In the Settings frame, insert the same values you provided for the connection in MySQL Query Browser—enter
localhostas Host Name andjs(the database you just created) as Database Name, and as User Name and Password, enter the name and password of the user you created when you installed MySQL. For other settings in the window, leave the default values. Test the connection to see if it has been properly created. - Right-click the database connection and share it.
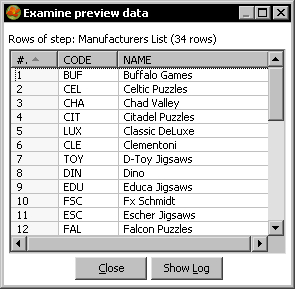
- Drag an Excel Input step to the canvas and use it to read the
manufacturers.xlsfile. - Click on Preview Rows to check that you are reading the file properly. You should see the following:
- From the Output category of steps, drag a Table Output step to the canvas.
- Create a hop from the Excel Input step to the Table output step.
- Double-click the Table output step and fill the main settings window as follows—select
jsas Connection, as Target table, browse and select the table manufacturers or type it. Check the Specify database fields option. - Select the Database fields tab.
- Fill the grid as follows:
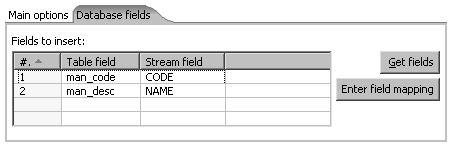
- Click OK.
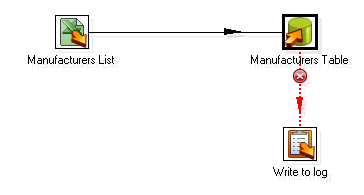
- After the Table output step, add a Write to log step.
- Right-click the Table output step and select Define error handling....
- Fill the error handling settings window. As Target step, select the Write to log step. Check the Enable the error handling? option. Enter
db_err_descas Error descriptions fieldname,db_err_fieldas Error fields fieldname, anddb_err_codas Error codes fieldname. - Click OK. The following is your final transformation:
- Save the transformation and run it.
- Take a look at the Steps Metrics tab window. You will see the following:

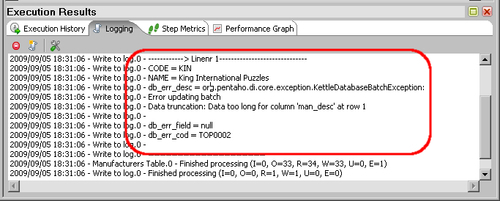
- Now look at the Logging tab window. The following is what you see:
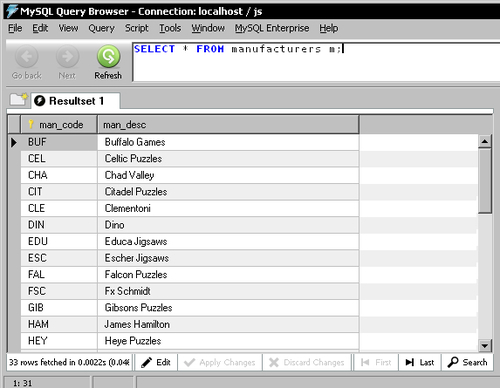
- Switch to MySQL Query Browser.
- In the Schemata window, double-click the manufacturers table.
- The query entry box is filled with a basic
SELECTstatement for that table such as:SELECT * FROM manufacturers m;
- Click Execute. The following result set is shown:
In the first part of the tutorial, you created the Jigsaw Puzzle database.
In Spoon, you created a connection to the new database.
Finally, you created a transformation that read an Excel file with a list of puzzle manufacturers and inserted that data into the manufacturers table. Note that not all rows were inserted. The row that couldn't be inserted was reported in the log.
In the data for the tutorial, there was a description too long to be inserted in the table. That was properly reported in the log because you implemented error handling. Doing that, you avoided the abortion of the transformation due to errors like that. As you learned in the previous chapter, when a row causes an error, it is up to you to decide what to do with that row. In this case, the row was sent to the log and wasn't inserted. Other possible options for you are:
- Fixing the problem in the Excel file and rerunning the transformation
- Validating the data and fixing it properly (for example, cutting the descriptions) before the data arrives to the Table output step
- Sending the full data for the erroneous rows to a file, fixing manually the data in the file, and creating a transformation that inserts only this data
The Table output step is the main PDI step for inserting new data into a database table.
The use of this step is simple. You have to enter the name of the database connection and the name of the table where you want to insert data. The names for the connection and the table are mandatory, but as you can see, there are some extra settings for the Table output step.
The database field tab lets you specify the mapping between the dataset stream fields and the table fields.
In the tutorial the dataset had two fields—CODE and NAME. The table has two columns named man_code and man_desc.
As the names are different, you have to explicitly indicate that the CODE field is to be written in the table field named man_code, and that the NAME field is to be written in the table field named man_desc.
The following are some important tips and warnings about the use of the Table output step:
- If the names of the fields in the PDI stream are equal to the names of the columns in the table, you don't have to specify the mapping. In that case, you have to leave the Specify database fields checkbox unchecked and make sure that all the fields coming to the Table output step exist in the table.
- Before sending data to the Table output step, check your transformation against the definition of the table. All the mandatory columns that don't have a default value must have a corresponding field in the PDI stream coming to the Table output step.
- Check the data types for the fields you are sending to the table. It is possible that a PDI field type and the table column data type dont match. In that case, fix the problem before sending the data to the table. You can, for example, use the Metadata tab of a Select values step to change the data type of the data.
In the Table output step, you may have noted a button named SQL. This button generates the DDL to create the output table. In the tutorial, the output table, manufacturers, already existed. But if you want to create the table from scratch, this button allows you to do it based on the database fields you provided in the step.