
4. Endurance
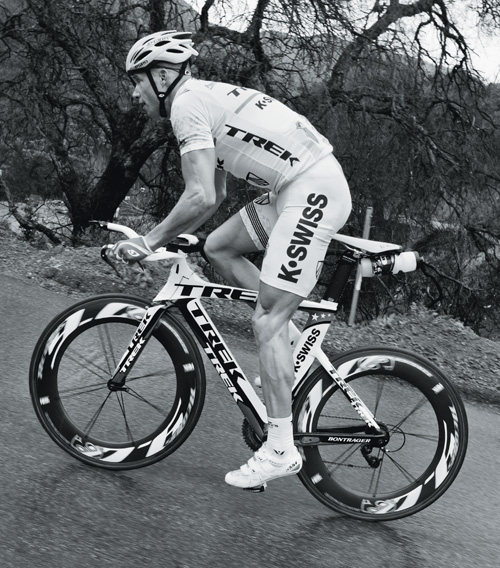
I was on assignment to photograph Chris Lieto, four-time Ironman Champion, for a cover and feature story in Triathlete magazine. The first part of the shoot involved capturing some pictures of Chris in action while he was riding up a world-class climb in the Santa Barbara Mountains. This is what he calls fun and the definition in his leg muscles tells a thousand tales.
Canon 5DMii, 24–70mm lens, f/5.6
ENDURANCE ATHLETES fascinate me the most. I think this is because their efforts have so many parallels to life—they are in it for the long haul and their goal is to win. Chris Lieto is one of those athletes. A top ironman triathlete, he approaches his sport with vigor, intelligence, and fight. One week of Lieto’s training regimen is like a superhuman feat. Each year he begins his preparations with a 300-mile ride along the California coast. When I asked him about this tradition he explained, “To be good at a long-distance sport, you have to put in time building a strong foundation.”
Many aspiring triathletes have wondered about Lieto’s secret to success. Why is it that he shines so bright? I once heard him quote Viktor Frankl, who said, “What is to give light must endure burning.” And enduring is something that Chris does better than anyone I know.
Building a strong photographic foundation requires the same type of endurance, commitment, and resolve. To be good at photography, we have to train. One of the most effective ways to do this is to set your digital camera down and to capture photographs using film.
Training with Film
Digital is exciting but it can be too casual and quick. The instant feedback on the LCD screen and the ability to go from capture to output in a short time is like an ironman training by riding his beach cruiser around town. It’s just too easy. Sure, digital capture allows you to quickly see what mistakes you have made, yet it removes the sting—it’s like working out and never being sore.
Working with film requires that you are present and committed to each shot. It is a combination of the mechanics of the cameras, the cost of film, and the lag of processing time that forces you to slow down. The process is methodical, and this can help you become connected to your pictures in a completely different way.
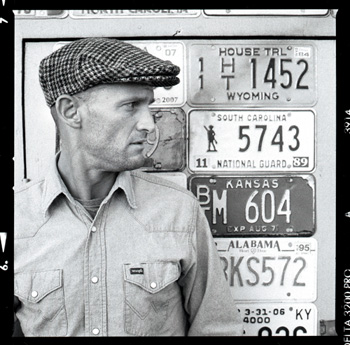
Different types of film allow you to express in different ways. For this shot I chose an ultra-high ISO film to give it a gritty and grainy feel.
Hasselblad 503CW, 80mm lens, f/8 Ilford Delta 3200 Professional Black and White Print Film
Exercise: Three Days of Portraits with Black and White Film
I was visiting with the singer-songwriter Seal at his home in Beverly Hills, and we were talking about photography. He said something profound. “When I shoot with digital, I look for the flaw in the frame. When I shoot with film, I embrace the mistake.” The promise of digital is perfect pixels or at least software to make them that way. Film doesn’t make such a claim, and this can help us create a distinct and sometimes more expressive type of look.
Don’t get me wrong, I fully embrace digital and work in Photoshop practically every day. Yet shooting with film leads to different results and it is the best photo teacher that I’ve found. In the long run, whatever the format, the experience of shooting with film informs how to create a more authentic and handcrafted look. Let’s explore how we can shoot with film in order to improve our skills.
Tips
Shoot on a regular basis. As Robert Frank once said, “Like a boxer trains for a fight, a photographer needs to practice by getting out and taking pictures every day.”
Getting good at photography requires learning about the traditions of the past.
When composing with black and white film, consider each color as brightness and tone.
Step 1 Find a Camera
If you are a native digital photographer, finding a film camera may seem like a difficult thing to do. Start off by asking family members or friends. Send out a mass e-mail to see if anyone has one you can borrow. Look at online ads or try visiting a thrift store. If you can’t find one, you could always buy a plastic “toy” camera like a Holga or Diana for a relatively small amount. Consider the expense part of paying your dues. Ideally, find a camera that you’ve never used before.
Step 2 Choose Film
When it comes to choosing film, consider this advice from Robert Frank, one of the most important 20th-century photographers, who shot exclusively with black and white film. His words about the format are poetic and true: “Black and white are the true colors of photography. They symbolize the hope and despair to which mankind is forever subject.”
There is something different about shooting with black and white film. It is a simplification that opens up potential for the more profound. The most classic black and white film is Kodak Tri-X, and this might be a good place to start.
Step 3 Day 1—Pound the Pavement
Shooting with film is difficult, like riding a bike up a hill—but the more you do it, the higher the elevation and the better the view. You have to let go of making perfect or memorable shots. Instead, square off with the challenge and accept the mistakes. The goal isn’t a few lucky snaps but building a foundation that will last.
Exercise Details
Goal: 30 black and white people pictures. Tools: Camera; lens of your choice. Light: Natural or available light. Location: Outdoors or inside. Theme: Endurance. Duration: Three different days.
Begin by loading the Tri-X film and bring your camera with you wherever you go. If you can’t figure out how to load the film, look it up online. Throughout the day capture candid or posed photographs of people who catch your eye. Work up close or far away—it’s completely up to you. Capture ten pictures of people.
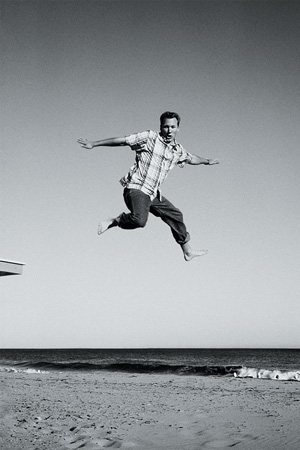
ABOVE Sometimes having a camera and shooting with film will provoke a response. Here Ryan volunteered to leap off of a lifeguard tower at the beach.
Canon Eos Elan II, 24–105mm lens, f/5.6, Agfa Scala Black and White Film
Step 4 Day 2—Window Light Portrait
Ask a friend if you can make a window light portrait of her. Make the shoot casual or formal. Choose a window without directional or direct sunlight. Position the subject next to the window and fire away. As a way to test the film, bracket your exposure by capturing photographs that are properly exposed, overexposed, and underexposed. Make ten window light portraits.
Step 5 Day 3—Outdoor Portrait
With your camera in hand, head to an interesting outdoor location. Photograph a stranger or someone you know. Don’t worry about the quality of light or the time of day. Let go, relax, and try to work with the light and location that you have. Create ten outdoor portraits.
Step 6 Make Prints
Take your film to your local photo lab or mail it to a service like Richard Photo Lab in Los Angeles. Ask the lab to develop the film and make prints.
Step 7 Reflection
When your film and prints are ready, go pick them up and set aside some time. Pull out your journal and open it to a new page. Write down your thoughts about what you hope to find inside. Slowly tear open the envelope and look at the pictures one by one. Set aside the top five photos and tape them to your journal’s page. Write notes about each picture and why you think it works. If none of the pictures turned out, repeat the seven steps.
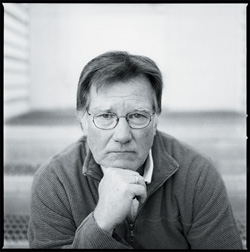
OPPOSITE Photographer and Brooks Institute faculty member Eliot Crowley sitting on the school’s back steps.
Hasselblad 503CW, 80mm lens, f/5.6, Tri-X Black and White Film
“When people look at my pictures, I want them to feel the way they do when they want to read a line of a poem twice.”
—Robert Frank