Chapter 3. Managing Tests
All the normal rules of programming apply to tests: stay organized, reduce duplication, and don’t take on more technical debt than you need. For small projects, it’s easy to create and manage single test files. Large or important projects need more thought and care. Where do you put your tests? How do you organize them between files? What options do you have to reduce complexity to manageable levels?
This chapter’s labs explain how to organize your test files into test suites, know and improve the reach of your tests, write your own custom testing libraries, and interpret test results.
Organizing Tests
Writing tests is easy. Managing tests well is more difficult. Having complete test coverage is worthless if running the complete test suite is so difficult that no one ever does it. Making your tests easy to run without user intervention and making it easy to interpret their results will pay off over and over again.
Using the standard testing tools that understand the Test Anything Protocol is just one part of the process. Organizing your tests sensibly is another.
How do I do that?
Consider the tests for the Test::Harness module. Download the latest distribution from the CPAN and extract it. Change into the newly created directory, run Makefile.PL, and build and test the module:
Note
Look for the Download link at http://search.cpan.org/dist/Test-Harnes/ .
    $ perl Makefile.PL
    Checking if your kit is complete...
    Looks good
    Writing Makefile for Test::Harness
    $ make
    cp lib/Test/Harness/TAP.pod blib/lib/Test/Harness/TAP.pod
    cp lib/Test/Harness/Iterator.pm blib/lib/Test/Harness/Iterator.pm
    cp lib/Test/Harness/Assert.pm blib/lib/Test/Harness/Assert.pm
    cp lib/Test/Harness.pm blib/lib/Test/Harness.pm
    cp lib/Test/Harness/Straps.pm blib/lib/Test/Harness/Straps.pm
    cp bin/prove blib/script/prove
    /usr/bin/perl5.8.6 "-MExtUtils::MY" -e "MY->fixin(shift)" blib/script/prove
    <output snipped>
    $ make test
    PERL_DL_NONLAZY=1 /usr/bin/perl5.8.6 "-MExtUtils::Command::MM" "-e"
            "test_harness(0, 'blib/lib', 'blib/arch')" t/*.t
    <output snipped>
What just happened?
Until now, all of the examples have mixed code and tests in the same file. That’s fine for teaching, but it won’t work as well in production code. There’s no technical reason to keep all of the tests for a particular program or module in a single file, so create as many test files as you need, organizing them by features, bugs, modules, or any other criteria.
The only technical requirement when using separate test files is that the files must be able to load the modules they test. That means you must manage Perl’s library paths appropriately. Fortunately, most good CPAN modules handle this. The magic of making these tests work is the magic of Perl module installation tools such as ExtUtils::MakeMaker and Module::Build. Test::Harness uses the former, as the presence of Makefile.PL implies.
By convention, CPAN modules follow a standard directory hierarchy:
    $ ls -l
    total 52
    drwxr-xr-x  2 chromatic wheel  4096 Jan 20 09:59 bin
    -rw-r—r--  1 chromatic wheel 19110 Jan 20 09:51 Changes
    drwxr-xr-x  2 chromatic wheel  4096 Jan 20 09:59 examples
    drwxr-xr-x  3 chromatic wheel  4096 Jan 20 09:59 lib
    -rw-r—r--  1 chromatic wheel   950 Dec 31 13:28 Makefile.PL
    -rw-r—r--  1 chromatic wheel  1262 Dec 31 13:28 MANIFEST
    -rw-r—r--  1 chromatic wheel   347 Jan 20 09:49 META.yml
    -rw-r—r--  1 chromatic wheel   434 Dec 31 13:28 NOTES
drwxr-xr-x 4 chromatic wheel 4096 Jan 20 09:59 tThe modules themselves live in various subdirectories under the lib/ directory:
    $ ls -lR lib/
    lib:
    total 4
    drwxr-xr-x  3 chromatic wheel 4096 Jan 20 09:59 Test

    lib/Test:
    total 36
    drwxr-xr-x  2 chromatic wheel  4096 Jan 20 09:59 Harness
    -rw-r—r--  1 chromatic wheel 29682 Jan 20 09:35 Harness.pm

    lib/Test/Harness:
    total 36
    -rw-r—r--  1 chromatic wheel   958 Dec 31 13:28 Assert.pm
    -rw-r—r--  1 chromatic wheel  1230 Dec 31 13:28 Iterator.pm
    -rw-r—r--  1 chromatic wheel 18375 Dec 31 13:28 Straps.pm
    -rw-r—r--  1 chromatic wheel  5206 Dec 31 13:28 TAP.pod
All of the test files live under the t/ directory:
    $ ls -l t/
    total 112
    -rw-r--r--  1 chromatic wheel   541 Dec 31 13:28 00compile.t
    -rw-r--r--  1 chromatic wheel   656 Dec 31 13:28 assert.t
    -rw-r--r--  1 chromatic wheel   198 Dec 31 13:28 base.t
    -rw-r--r--  1 chromatic wheel  2280 Dec 31 13:28 callback.t
    -rw-r--r--  1 chromatic wheel   328 Dec 31 13:28 harness.t
    -rw-r--r--  1 chromatic wheel   539 Dec 31 13:28 inc_taint.t
    drwxr-xr-x  4 chromatic wheel  4096 Jan 20 09:59 lib
    -rw-r--r--  1 chromatic wheel   151 Dec 31 13:28 nonumbers.t
    -rw-r--r--  1 chromatic wheel    71 Dec 31 13:28 ok.t
    -rw-r--r--  1 chromatic wheel   275 Dec 31 13:28 pod.t
    -rw-r--r--  1 chromatic wheel   755 Dec 31 13:28 prove-globbing.t
    -rw-r--r--  1 chromatic wheel  2143 Dec 31 13:28 prove-switches.t
    drwxr-xr-x  2 chromatic wheel  4096 Jan 20 09:59 sample-tests
    -rw-r--r--  1 chromatic wheel 17301 Dec 31 13:28 strap-analyze.t
    -rw-r--r--  1 chromatic wheel  8913 Dec 31 13:28 strap.t
-rw-r--r-- 1 chromatic wheel 26307 Dec 31 13:28 test-harness.tRunning Makefile.PL or Build.PL (in the case of Module::Build) writes out either a Makefile or a Build file, respectively, that knows how to build the module and its documentation as well as how to run the tests.
The default behavior is to run everything in the t/ directory that ends in .t. The full command that make test ran earlier shows more details:
    PERL_DL_NONLAZY=1 /usr/bin/perl5.8.6 "-MExtUtils::Command::MM" "-e"
            "test_harness(0, 'blib/lib', 'blib/arch')" t/*.t
The most important part of this command is the shell pattern at the end, t/*.t. The shell expands it to include all of the files in the t/ directory in sorted order.
If you’ve never installed this module before, how can the tests find the module files? The preceding command-line invocation includes the blib/ subdirectories created during the make stage. Tests can also include a little magic at the beginning to set up their working environment appropriately:
    BEGIN { chdir 't' if -d 't' }
    use lib '../lib';
    use blib;
Note
You can omit the blib line if you have pure-Perl modules that rely on nothing tricky during the building process.
The contents of the BEGIN block change the current directory to the t/ directory immediately after Perl encounters it. This is important for the next command, which loads the lib module to add the ../lib directory (a sibling of t/) to @INC. Finally, the blib module adds the blib/lib and blib/arch directories to @INC. All together, this set of commands allows you to run your tests with perl itself, not just prove, make test, or perl Build test.
As long as you follow the convention of storing modules under lib/ and tests under t/ and add the appropriate path manipulations to the start of the test files, you can run and distribute your tests automatically with the standard Perl tools.
What about...
Q: How can I run tests in a specific order?
A: Both ExtUtils::MakeMaker and Module::Build run tests in a predictable order (alphabetically, with numbers coming before names). You can control this order yourself by prepending numbers to the test names. For example, 00-first.t will run before 99-last.t.
Note
If you need even more customization, subclass Module::Build to override the ACTION_test() method. It’s painful to override ExtUtils:: MakeMaker behavior, so avoid it if possible.
If a directory full of flat files isn’t enough organization for you, you can put your tests in as many subdirectories of t/ as you like. Remember to tell your build process about the change, though! See the test attribute for Makefile.PL in the ExtUtils::MakeMaker documentation or the test_files parameter for Build.PL in the Module::Build documentation.
Q: Do I need that magic BEGIN block? It looks complicated.
A: Not all tests need it. It’s useful if you need to know that you’re in a specific directory—to create temporary files under t/ or to load testing modules from t/lib/, for example. If your test file does neither, you can safely omit it.
Checking Your Coverage
Having some tests is better than having no tests, but having enough tests is better yet. Code coverage is one way to measure how much of the code the tests actually test. Analyzing code coverage by hand is tedious. Fortunately, the Devel::Cover module from the CPAN automates the analysis and reporting for you. Best of all, it works with the standard Perl test harness.
How do I do that?
Install Devel::Cover and its dependencies (see "Installing Test Modules" in Chapter 1). You need the ability to build XS modules, unless you install it via ppm or some other binary package.
Note
XS is the Perl extension system. It allows the use of code written in languages other than Perl and requires a working C development environment.
From the top level of a module directory, such as Test::Harness (see "Organizing Tests,” earlier in this chapter), build the module, and then run the following commands:
Note
If your module uses Module:: Build, use perl Build testcover instead of make test. Otherwise, install ExtUtils:: MakeMaker:: Coverage and use make testcover.
    $ cover -delete
    Deleting database /home/chromatic/dev/install/Test-Harness-2.46/cover_db
    $ HARNESS_PERL_SWITCHES=-MDevel::Cover make test
    PERL_DL_NONLAZY=1 /usr/bin/perl5.8.6 "-MExtUtils::Command::MM" "-e"
    "test_harness(0, 'blib/lib', 'blib/arch')" t/*.t
    t/00compile.........ok 1/5# Testing Test::Harness 2.46
    t/00compile.........ok
    t/assert............ok
    t/base..............ok
    t/callback..........ok
    t/harness...........ok
    t/inc_taint.........ok
    t/nonumbers.........ok
    t/ok................ok
    t/pod...............ok
    t/prove-globbing....ok
    t/prove-switches....ok
    t/strap-analyze.....ok
    t/strap.............ok
    t/test-harness......ok
            56/208 skipped: various reasons
    All tests successful, 56 subtests skipped.
    Files=14, Tests=551, 255 wallclock secs
        (209.59 cusr +  4.98 csys = 214.57 CPU)

    $ cover
    Reading database from /home/chromatic/dev/Test-Harness-2.46/cover_db


    ---------------------------------- ------ ------ ------ ------ ------ ------
    File                               stmt branch   cond    sub   time  total
    ---------------------------------- ------ ------ ------ ------ ------ ------
    blib/lib/Test/Harness.pm             71.6   51.6   61.1   80.8    0.0   65.9
    blib/lib/Test/Harness/Assert.pm     100.0  100.0    n/a  100.0    0.0  100.0
    blib/lib/Test/Harness/Iterator.pm    70.0   25.0    n/a   80.0   98.9   65.5
    blib/lib/Test/Harness/Straps.pm      92.9   82.7   69.0   96.2    1.0   87.6
    Total                                80.8   66.0   65.4   88.3  100.0   76.0
    ---------------------------------- ------ ------ ------ ------ ------ ------


    Writing HTML output to /home/chromatic/dev/Test-Harness-2.46/cover_db/coverage.html ...
    done.
Note
See the documentation for your shell to learn how to set the HARNESS_ PERL_ SWITCHES environment variable.
Note
By default, Devel::Cover ignores the coverage of any file found in @INC, all *.t files, and Devel:: Cover itself. See the +ignore, -ignore, +inc, and -inc options in perldoc Devel:: Cover to learn how to customize this.
This will take a while—several times as long as it takes your test suite to run normally. Your reward is a nice tabular summary at the end as well as some HTML files in the reported location.
What just happened?
When Devel::Cover runs a test suite, it profiles Perl code at the operational level, marking every subroutine, statement, branch, and condition in the code being tested to see if the tests actually exercise them. It writes its output to a database file from which it can produce coverage reports.
The important results are in the report shown at the end, where each file being tested has a percentage for subroutine, statement, branch, and condition coverage as well as the percentage of the time spent testing for that file and its overall coverage.
What are all of the types of coverage?
- Statement coverage
Asks whether a test exercised a particular statement. Given the statement
$flag = 1;, any test that causes that statement to execute will count as having covered it.- Branch coverage
Tracks whether the tests exercised both parts of a branching statement. Given the code
print "True!" if $flag;, the statement must run twice—once where$flagis true and once where it is false—to achieve 100 percent branch coverage.- Condition coverage
Considers all of the possibilities of a logical condition. Given the assignment
my $name = shift || 'Ben';within a subroutine, the test must pass in a string with an actual value for$nameat least once and pass in no argument or an empty string at least once (receiving the default value) to achieve full coverage for that conditional expression.This is a very simple type of condition coverage, with only one variable and two paths for coverage. More common are conditions with two variables: short-circuiting expressions such as
$a = $x || $yhave three paths for coverage, and fully evaluated expressions such as$a = $x xor $yhave four paths for coverage.Note
Devel::Cover also runs Pod::Coverage (see "Testing Documentation Coverage,” in Chapter 4) and reports its results if you have it installed.
- Subroutine coverage
Checks that a test exercised at least part of a subroutine. If you don’t have full coverage for a particular module, start with the subroutine coverage report to see which pieces of code need more tests.
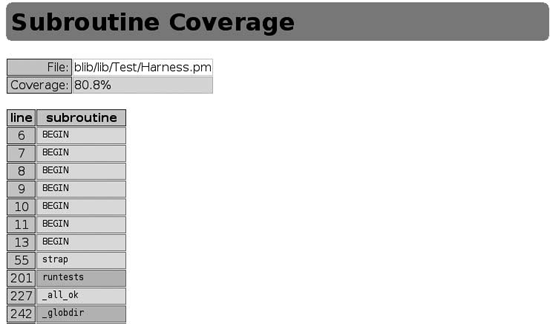
Open the reports in your favorite web browser. You’ll see a colorful hyperlinked summary generated by the final cover run (Figure 3-1).
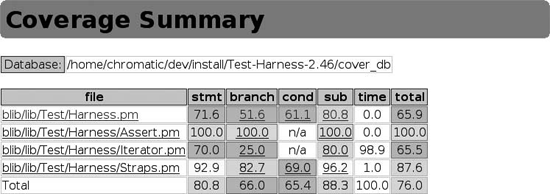
Click on the branch, condition, or subroutine coverage links to reach a page of metrics that Devel::Cover gathered for every affected line in each tested module.
Note
Devel::Cover uses B::Deparse to produce the output for the branch and condition reports. This generates behaviorally—but not necessarily typographically—equivalent code.
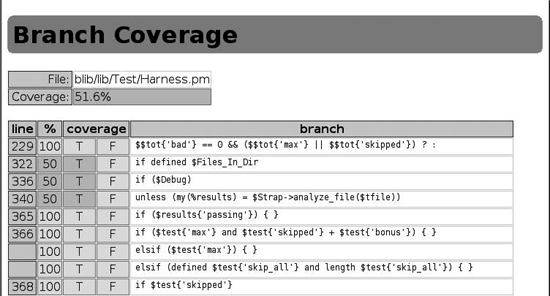
Consider the links for Test::Harness. The branch coverage is 51.6 percent. Click on that link to see a report showing line numbers for all of branches, the percentage of coverage for each branch, the true or false conditions taken for the branch, and the approximate branch expression. Figure 3-2 shows more details. The T and F columns show whether Devel::Cover believes that the tests exercised the true and false versions of the branch, respectively. A green background means yes and a red background means no. The test run of this example exercised both true and false branches of the condition in line 229, but exercised only the false branch in line 322.
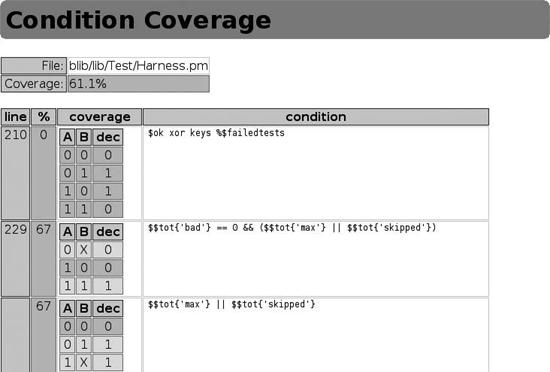
The condition coverage report page is more complex. For each condition, it reports the line number, the percentage of the condition the tests exercised, and the deparsed code of the conditional expression. However, the important details appear in a truth table that lists all possible boolean combinations for each element of the expression.
In Figure 3-3, the tests exercised none of the possible combinations on line 210. Line 229 fared better, with the first expression tested for the two cases: where A is false and then where both A and B are true. The second expression had two tests as well, for the cases where A is false and B is true and for the case where A is true.
The final report, which shows subroutine coverage, is very simple. It lists the name and the line number of each subroutine, indicating with a red or green cell background whether the tests covered it. Figure 3-4 shows several BEGIN blocks (mostly use statements), with strap() and _all_ok() having at least some tests and runtests() and _globdir() having none.
What about...
Q: How do I improve my test coverage?
A: Start with the subroutine coverage report. Any subroutine marked as untested may have lurking bugs, or it may go unused throughout the code. Either way, consider the affected code carefully.
Achieving complete test coverage can be difficult; Devel::Cover has a complicated job to do and does it well, but it’s not perfect. Running
Note
1 means true, 0 means false, and X means that it doesn’t matter because of a short-circuited condition.
a recent version of Perl will help, as will upgrading to newer versions of Devel::Cover as they release. At times, you may have to simplify complex constructs or live with less than 100 percent coverage. As the documentation says, though, reporting potential bugs to the [email protected] mailing list is a good way to find enlightenment.
Note
Perl 5.8.2 is the minimum recommended version for using Devel::Cover. Any newer version should work.
It is not always possible to achieve 100 percent coverage for all metrics. Even when it is, trying to reach that goal may not be the best use of your testing efforts. Code coverage can highlight areas in which your test suite is weak and help you reason about your code. Understand what your test suite does not test and why is valuable, even if you decide not to write a test for it.
Writing a Testing Library
By now, tests should seem less daunting. They’re just programs; all of the normal good advice about design and organization applies. It makes sense to keep related code in the same place. In Perl terms, this is a module: a self-contained library of code.
Previous labs have demonstrated how to use several testing libraries. Some come with Perl’s standard library. Others live on the CPAN, with new modules released frequently. If you find yourself solving the same testing problem repeatedly by twisting existing test modules in new directions, consider writing
your own testing library. Test::Builder makes it possible.
How do I do that?
The following example implements one function of a very simple testing library. It adds one new function, is_between(), that tests whether a given value is between two other values. Save the code under a lib/ directory where you can reach it (see "Installing Test Modules,” in Chapter 1) as Test/Between.pm:
Note
The use of subroutine prototypes is a convention in testing modules, but they’re not like subroutine signatures in other languages. See the Prototypes section in perldoc perlsub for more information.
    package Test::Between;

    use strict;
    use warnings;

    use base 'Exporter';

    our@EXPORT = qw( is_between );

    use Test::Builder;
    my $Test = Test::Builder->new();

    sub is_between ($$$;$)
    {
        my ($item, $lower, $upper, $desc) = @_;

        return
        (
            $Test->ok( "$lower" le "$item" && "$item" le "$upper", $desc ) ||
            $Test->diag( "        $item is not between $lower and $upper" )
        );
    }

    1;
Now you can use it within your own test programs. Save the following code as test_between.t:
    #!perl

    use strict;
    use warnings;

    use Test::More tests => 3;

    use Test::Between;

    is_between(    'b', 'a', 'c', 'simple alphabetical comparison' );
    is_between(     2 ,  1 ,  3 , 'simple numeric comparison'      );
    is_between(  "two",  1 ,  3 , 'mixed comparison'               );
Note
By design, Test:: Between doesn’t allow its users to set the plan. Why reinvent the wheel when it’s likely that users will use the module with Test:: Simple or Test:: More anyway?
Run the test with perl:
    $ perl test_between.t
    1..3
    ok 1 - simple alphabetical comparison
    ok 2 - simple numeric comparison
    not ok 3 - mixed comparison
    #     Failed test (examples/wtm_01.t at line 12)
    #         two is not between 1 and 3
    # Looks like you failed 1 test of 3.
What just happened?
The test file behaves just like other tests shown so far, using Test::More to set up a test plan. It also uses Test::Between just as it would any other necessary module.
Test::Between uses the Exporter module to export the is_between() function. The action starts with Test::Builder. All of the testing modules shown so far use Test::Builder internally; it provides the basic ok() function, the test plans, the test counter, and all of the output functions.
Note
Use Test::Builder and your module will work with all of the other testing modules that also use Test::Builder.
Calling Test::Builder->new() returns a singleton, the same object every time, to all of the testing modules. This is how it keeps the testing environment consistent.
The is_between() function is simple by comparison. It has three required arguments—the value to test, the lower bound, and the upper bound—and one optional argument: the test description. The actual comparison happens on a single line:
"$lower" le "$item" && "$item" le "$upper"
This terse expression stringifies all of the arguments, then compares the lower bound to the item and the item to the upper bound. If the lower bound is less than or equal to the item and the item is less than or equal to the upper bound, the expression evaluates to true. Otherwise, it’s false. Either way, the result is simple enough to pass to Test::Builder’s ok() method, along with the test description.
ok() records and reports the test appropriately, returning its truth or falsehood. That allows another idiom for printing diagnostic information. If the test has failed, the return value will be false and the function will call diag() on the Test::Builder object to print the values of the item and the bounds. This makes debugging much easier, of course.
What about...
Q: Can you add other types of comparisons?
A: Absolutely! is_between() has a few limitations, including treating all of its arguments as strings and allowing the item to equal its lower or upper bounds. As the third test showed, it’s not smart enough to know that the number the string two represents is between one and three.
Test::Between would be more useful if it allowed numeric comparisons, permitted “between but not equal” tests, and supported custom sorting routines. These are all reasonably easy additions, though: just figure out how to make the proper comparison, feed the results to $Test->ok(), report a failure diagnostic if necessary, and add the new function to @EXPORT.
Q: How do you know that Test::Between works? Don’t you have to write tests for your tests now?
A: Yes, but fortunately it’s not difficult. See "Testing a Testing Library,” next.
Testing a Testing Library
Test::Builder makes writing custom testing
libraries easy (see the previous lab, "Writing a Testing Library“) by handling all of the distracting test bookkeeping and management. They’re just code. Good libraries need good tests, though.
Fortunately, using Test::Builder makes writing tests for these custom libraries easier too, with a little help from Test::Builder::Tester.
How do I do that?
Consider a test suite for Test::Between (from "Writing a Testing Library“). Save the following test file as between.t:
    #!perl

    use strict;
    use warnings;

    use Test::Between;
    use Test::Builder::Tester tests => 3;

    my $desc;

    $desc = 'simple alphabetical comparison';
    test_pass( $desc );
    is_between( 'b', 'a', 'c',  $desc );
    test_test( $desc );

    $desc = 'simple numeric comparison';
    test_pass( $desc );
    is_between(  2,  1,  3, $desc );
    test_test( $desc );

    $desc = 'mixed comparison';
    test_out( "not ok 1 - $desc" );
    test_fail( +2 );
    test_diag( '        two is not between 1 and 3' );
    is_between(  "two",  1,  3, $desc               );
    test_test( 'failed comparison with diagnostics' );
Note
The $desc variable appears multiple times so as to avoid copying and pasting the test description multiple times. Avoid repetition in tests as you would in any other code.
Run it with perl:
    $ perl between.t
    1..3
    ok 1 - simple alphabetical comparison
    ok 2 - simple numeric comparison
    ok 3 - failed comparison with diagnostics
What just happened?
between.t looks almost like any other test that uses Test::Between except for one twist: instead of using Test::More to declare a test plan, it uses Test::Builder::Tester, which provides its own test plan. From there, it has three blocks of tests that correspond to the tests shown in "Writing a Testing Library“--an alphabetical comparison that should pass, a numeric comparison that should also pass, and a mixed comparison that should fail.
Test::Builder::Tester works by collecting information about what a test should do, running the test, and comparing its actual output to the expected output. Then it reports the results. This requires you to know if the test should pass or fail and what kind of output it will produce.
The first test should pass, so the test file calls test_pass() to tell Test::Builder::Tester to expect a success message with the test description. Next, it calls the simple alphabetic comparison from the previous lab. Finally, it calls test_test() to compare the actual result to the expected result; this line produces the test output for Test::Harness to interpret. Passing the description here produces nicer output for humans.
Testing the numeric comparison test works the same way.
The mixed comparison test should fail, so the test file uses test_fail() to tell Test::Builder::Tester to expect a failure message. Because failure messages include the line number of the failing test, the sole argument to this function refers to the line number of the test call to test. That call occurs in the second line following in the test file, just after the call to test_diag(), so the argument is +2.
Because Test::Between produces diagnostics for failed tests, the code uses test_diag() to test that diagnostic output.
Next comes the mixed comparison test that test_fail() expected, and then a test_test() call to compare all of the expected output—both the failure message and the diagnostics—to the received output. Test::Builder::Tester expects the is_between() test to fail. If it does, the test—whether Test::Between reports failures correctly—passes.
What about...
Q: How do you distribute tests for test modules?
A: Either set a dependency on Test::Builder::Tester in your Makefile.PL or Build.PL file or bundle it with your code. Place it under your t/ directory (in t/lib/Test/Builder/Tester.pm) and add the following lines to your test files to set its path appropriately when they run. It requires no modules outside of the standard library.
    BEGIN
    {
        chdir 't' if -d 't';
        use lib 'lib';
    }
Q: Debugging failed test library output is difficult. Can this be easier?
A:
Test::Builder::Tester::Color, which ships with Test::Builder::Tester, colorizes diagnostic output to make differences easier to see. It requires the Term::ANSIColor module, so install that too.
To enable color debugging, either add the line:
use Test::Builder::Tester::Color;
directly to your test files or load it from the command line when you run your tests:
$ perl -MTest::Builder::Tester::Color between.t
By default, matches between the received and expected output appear in green reverse type and differences appear highlighted in red reverse type.
Writing a Testing Harness
TAP is a simple protocol (see "Interpreting Test Results" in Chapter 1), but you shouldn’t have to write your own parser when Test::Harness already knows how to interpret the results. However, Test::Harness only prints out what it discovers.
Test::Harness::Straps is a thin wrapper around a TAP parser. It collects the results in a data structure but does not analyze or print them. Writing a program to report those results in an alternate format is easy. If you want to do something when tests fail, or if you want to do something more complicated than simply reporting test results, why not write your own testing harness?
How do I do that?
Save the following program somewhere in your path as new_harness.pl and make it executable:
    #!perl

    use strict;
    use warnings;


    use Test::Harness::Straps;
    my $strap = Test::Harness::Straps->new();

    for my $file (@ARGV)
    {
        next unless -f $file;
        my %results = $strap->analyze_file( $file );
        printf <<END_REPORT, $file, @results{qw( max seen ok skip todo bonus )};
    Results for %s
        Expected tests:    %d
        Tests run:         %d
        Tested passed:     %d
        Tests skipped:     %d
        TODO tests:        %d
        TODO tests passed: %d
    END_REPORT
    }
Run it on a directory full of tests (the Test::Harness suite, for example):
    $ new_harness t/strap*t
    Results for t/strap-analyze.t
        Expected tests:    108
        Tests run:         108
        Tested passed:     108
        Tests skipped:     0
        TODO tests:        0
        TODO tests passed: 0
    Results for t/strap.t
        Expected tests:    176
        Tests run:         176
        Tested passed:     176
        Tests skipped:     0
        TODO tests:        0
TODO tests passed: 0What just happened?
The first few lines start the program as normal, loading a few modules and pragmas and creating a new Test::Harness::Straps object. The program then loops around all filenames given on the command line, skipping them if they don’t exist.
All of the magic happens in the call to analyze_file(). This method takes the name of a test file to run, runs it, collects and parses the output, and returns a hash with details about the test file. The rest of the program prints some of these details.
As documented in Test::Harness::Straps, most of the keys of this hash are straightforward. Table 3-1 lists the most important ones.
|
Key |
Description |
|
max |
The number of tests planned to run |
|
seen |
The number of tests actually run |
|
ok |
The number of tests that passed |
|
skip |
The number of tests skipped |
|
todo |
The number of TODO tests encountered |
|
bonus |
The number of TODO tests that passed |
Note
The current version of Test:: Harness::Straps, as distributed with Test:: Harness, is an alpha release. Andy Lester, the maintainer, plans to change the interface. Take this lab’s information as a guideline and consider the module’s documentation as authoritative.
Another important key is details. It contains an array reference of hashes containing details for each individual test. Table 3-2 explains the keys of this hash.
|
Key |
Description |
|
ok |
Did the test pass, true or false? |
|
actual_ok |
Did it pass without being a skipped or TODO test, true or false? |
|
name |
The test description, if any. |
|
type |
The type of the test, skip, todo, or normal (an empty string). |
|
reason |
The reason for the skip or TODO, if either. |
Testing Across the Network
Test::Harness::Straps makes writing custom test harnesses easy, but it’s more flexible than you might think. Its input can come from anywhere. Have you ever wanted to run tests on a remote machine and summarize their output locally? That’s no problem.
How do I do that?
Save the following code as network_harness.pl:
    use Net::SSH::Perl;
    use Test::Harness::Straps;

    my $strap   = Test::Harness::Straps->new();
    my $ssh     = Net::SSH::Perl->new( 'testbox' );
    $ssh->login(qw( username password ));

    my ($stdout, $stderr, $exit) = $ssh->cmd( 'runtests' );
    my %results = $strap->analyze_fh( 'testbox tests', $stdout );

    # parse %results as normal
Note
The first argument to analyze_fh() is the test’s name, corresponding to the test file name used with analyze_file().
Suppose that you have code running on a machine named testbox. You have access to that machine via SSH, and you have a program on that machine called runtests that knows how to run tests for your application. Run network_harness.pl as a normal Perl program and it will gather and parse the output from testbox, reporting the results.
What just happened?
The harness connects to the testbox machine through SSH by using the provided username and password. Then it issues the runtests command to the remote machine, collects the results, and passes the output of the command to the TAP parser object. From there, do whatever you like with the results.
What about...
Q: Does the other machine have to have Perl running?
A: No, it can use any other language as long as it produces TAP output.
Q: What if you don’t want to or are unable to read from a socket on the remote machine?
A: Put the test output into an array of lines, perhaps by reading it from a web page on a remote server, and then use the analyze() method:
    use LWP::Simple;
    use Test::Harness::Straps;

    my $strap   = Test::Harness::Straps->new();
    my $output  = get( 'http://testbox/tests/smoketest.t' );
    my @lines   = split( /
/, $output );
    my %results = $strap->analyze( 'testbox smoketest', @lines );

    # parse %results as normal
The only trick to this example is that analyze() expects a reference to an array of lines of test output as its second argument. Otherwise, it behaves exactly as normal.
Automating Test Runs
Improving code quality is the primary benefit of writing a large test suite, but there are several other benefits, such as encouraging more careful coding and better design. Well-written tests provide feedback on the state of the project. At any point, anyone can run the tests to find out what works and what has broken.
This is valuable enough that, besides encouraging developers to run the test suite at every opportunity while developing, many projects automate their test suites to run unattended at regular intervals, reporting any failures. This smoketesting is highly valuable, as it can catch accidental mistakes as they happen, even if developers forget to run the tests on their machines or check in all of the necessary changes.
How do I do that?
Save the following code as run_smoketest.pl:
    #!perl

    use strict;
    use warnings;

    use constant SENDER    => '[email protected]';
    use constant RECIPIENT => '[email protected]';
    use constant MAILHOST  => 'smtp.example.com';

    use Cwd;
    use SVN::Client;
    use Email::Send;
    use Test::Harness::Straps;

    my $path     = shift || die "Usage:
$0 <repository_path>
";
    my $revision = update_repos( $path );
    my $failures = run_tests(    $path );

    send_report( $path, $revision, $failures );

    sub update_repos
    {
        my $path     = shift;
        my $ctx      = SVN::Client->new();
        return $ctx->update( $path, 'HEAD', 1 );
    }

    sub run_tests
    {
        my $path  = shift;
        my $strap = Test::Harness::Straps->new();
        my $cwd   = cwd();

        chdir( $path );

        my @failures;

        for my $test (<t/*.t>)
        {
            my %results = $strap->analyze_file( $test );
            next if $results{passing};


            push @failures,
            {
                file => $test,
                ok   => $results{ok},
                max  => $results{max},
            };
        }

        chdir( $cwd );

        return @failures;
    }

    sub send_report
    {
        my ($revision, $path, $failures) = @_;
        return unless @$failures;

        my $message = sprintf(<<END_HEADER, RECIPIENT, SENDER,
            $path, $revision);
    To: %s
    From: %s
    Subect: Failed Smoketest For %s at Revision %d

    END_HEADER

        for my $failure (@$failures)
        {
            $message .= sprintf( "%s:
	Expected: %d
	Passed: %d
",
                @$failure{qw( file max ok )} );
        }

        send( 'SMTP', $message, MAILHOST );
    }
Note
By default, SVN:: Client uses cached credentials to log in to the Subversion repository. See its documentation to change this.
Note
The chdir() calls exist to set up the testing environment just as if you’d run make test or perl Build test on your own.
Be sure to install a recent version of Test::Harness, Email::Send, and Subversion with its Perl bindings. Modify the three constants at the top of the file to reflect your network setup.
Run the program, passing it the path to the working version directory of a Subversion repository. For example:
Note
If you receive svn_path_join errors, remove the trailing slash from the working directory path.
$ perl run_smoketest.pl ~/dev/repos/Text-WikiFormat/trunkIf any of the tests fail, you’ll receive an email report about the failures:
    To: [email protected]
    From: [email protected]
    Subect: Failed Smoketest at Revision 19

    t/fail.t:
        Expected: 3
        Passed: 2
What just happened?
run_smoketest.pl is three programs at once, with a little bit of glue. First, it’s a very simple Subversion client, thanks to the SVN::Client module. Second, it’s a test harness, thanks to Test::Harness::Straps (see "Writing a Testing Harness,” earlier in this chapter). Third, it’s an email reporter, using Email::Send.
The program starts by pulling in the path to an existing Subversion repository. It then calls update_repos() which creates a new SVN::Client module and updates the repository with the absolute freshest code (denoted by the symbolic constant HEAD tag in CVS and Subversion), recursively updating all directories beneath it. It returns the number of this revision.
Note
Many other revision control systems have Perl bindings, but you can also use their command-line tools directly from your programs.
Next, run_tests() cycles through each file with the .t extension in the the repository’s t/ directory. It collects the results of only the failed tests—those for which the passing key is false—and returns them in an array.
The program then calls send_report() to notify the recipient address about the failures. If there are none, the function returns. Otherwise, it builds up a simple email, reporting each failed test with its name and the number of expected and passing tests. Finally, it sends the message to the specified address, where developers and testers can pore over the results and fix the failures.
What about...
Q: How do you run only specific tests? What if you have benchmarks and other long-running tests in a different directory?
Note
The Aegis software configuration management system (http://aegis.sourceforge.net/) takes this idea further, requiring all checkins to include tests that fail before the modifications and that pass after them.
A: Customize the glob pattern in the loop in run_tests() to focus on as many or as few tests as you like.
Q: Is it possible to automate the smoketest?
A: Because run_smoketest.pl takes the repository path on the command line, it can run easily from cron. Beware, though, that Test::Harness::Straps 2.46 and earlier spit out diagnostic information to STDERR. You may need to redirect this to /dev/null or the equivalent to avoid sending messages to yourself.
Q: Could the report include other details, such as the diagnostics of each failed test?
A: The limitation here is in what Test::Harness::Straps provides. Keep watching future releases for more information.
Q: CVS and Subversion both provide ways to run programs when a developer checks in a change. Can this smoketest run then?
A: Absolutely! This is an excellent way to ensure that no one can make changes that break the main branch.