
Chapter 7. Testing Web Sites
Are you designing a web site and creating tests before or during its construction? Do you already have a site and want to prove that it works? A variety of design choices can help you make more robust web-based applications, from isolating the logic behind the pages to ensuring what happens when a user clicks the Submit button. The CPAN provides several modules that allow you to create useful tests for your web applications.
This chapter demonstrates how to build web applications with testing in mind as well as how to test them when you deploy them. The labs show how to record your interaction with these programs and how to validate HTML in a few different ways. Finally, the chapter walks through setting up an instance of the Apache web server specifically designed to make testing Apache modules easy.
Testing Your Backend
A friend of one of the authors has frequent table tennis tournaments at his workplace and has long considered building a web application to keep track of player rankings. The application, Scorekeeper, should maintain a list of games, who played in each game, the final scores for each game, and when the game took place. The application also should show how well players perform against others overall—mostly for heckling purposes.
The conceptual relationships are immediately apparent: a game has two scores and each score has a player and a game. It’s easy to model this with a relational database. The next step is to build the GUI, right?
Suppose that you write this application in the unfortunate style of many CGI programs in Perl’s history. It’s 1,500 lines long, and it contains giant conditional blocks or maybe something resembling a dispatch table. It might contain raw SQL statements, or it might use some kind of hand-rolled database abstraction. How hard is it to add a ladder system or add play-by-play recording? What if your friend suddenly wants a command-line client or a GTK interface?
To make this program easier to extend and test, separate the backend database interaction, the display of the data, and the logic needed to control them. This pattern, sometimes referred to as Model-View-Controller, allows you to test your code more easily and leads to better code organization and reuse.
How do I do that?
The introduction described the relationships of the application, so the database structure is straightforward: every game, score, and player has a table. Each game has scores, and each score has a player associated with it. This lab uses SQLite, which provides a fully functional SQL database without running a server. Save the following SQL as schema.sql:
    BEGIN TRANSACTION;
    CREATE TABLE game (
        id   INTEGER PRIMARY KEY,
        date INTEGER
    );
    CREATE TABLE score (
        id     INTEGER PRIMARY KEY,
        game   INTEGER,
        player INTEGER,
        value  INTEGER
    );
    CREATE TABLE player (
        id   INTEGER PRIMARY KEY,
        name TEXT UNIQUE
    );
    COMMIT;
Now, pipe the SQL file to the sqlite command, providing the path to the database file as the first argument:
$ sqlite keeper.db < schema.sql
Note
If you need to start with an empty database, remove the keeper.db file and rerun the sqlite command.
You now have an empty SQLite database stored in keeper.db, and you can work with it using the sqlite utility. The rest of this lab uses only Perl modules to manipulate the Scorekeeper data. Save the following code as player.t:
    use Test::More tests => 18;
    use Test::Exception;
    use Test::Deep;

    use strict;
    use warnings;

    BEGIN
    {
        use_ok('Scorekeeper'),
    }

    my $a = Scorekeeper::Player->create( { name => 'PlayerA' } );
    my $b = Scorekeeper::Player->create( { name => 'PlayerB' } );
    my $c = Scorekeeper::Player->create( { name => 'PlayerC' } );

    END
    {
        foreach my $player ( $a, $b, $c )
        {
            $player->games->delete_all();
            $player->delete();
        }
    }

    dies_ok { Scorekeeper::Player->create( { name => $a->name() } ) }
        'cannot create two players with the same name';

    foreach my $tuple ( [ 11, 8 ], [ 9, 11 ], [ 11, 7 ], [ 10, 11 ], [ 11, 9 ] )
    {
        my ( $score1, $score2 ) = @$tuple;

        my $g = Scorekeeper::Game->create( {  } );
        $g->add_to_scores( { player => $a, value => $score1 } );
        $g->add_to_scores( { player => $b, value => $score2 } );
    }

    my $g2 = Scorekeeper::Game->create( {  } );
    $g2->add_to_scores( { player => $a, value => 11 } );
    $g2->add_to_scores( { player => $c, value => 8 } );

    is( scalar( $a->games() ), 6 );
    is( scalar( $b->games() ), 5 );

    is( $a->wins(),   4, "player A's wins"   );
    is( $b->wins(),   2, "player B's wins"   );
    is( $c->wins(),   0, "player C's wins"   );

    is( $a->losses(), 2, "player A's losses" );
    is( $b->losses(), 3, "player B's losses" );
    is( $c->losses(), 1, "player C's losses" );

    cmp_deeply( [ $a->opponents() ], bag( $b, $c ), "player A's opponents" );
    is_deeply(  [ $b->opponents() ], [$a],          "player B's opponents" );
    is_deeply(  [ $c->opponents() ], [$a],          "player C's opponents" );

    is( $a->winning_percentage_against($b), 60,  'A vs B' );
    is( $b->winning_percentage_against($a), 40,  'B vs A' );

    is( $a->winning_percentage_against($c), 100, 'A vs C' );
    is( $c->winning_percentage_against($a), 0,   'C vs A' );

    is_deeply(
        [ Scorekeeper::Player->retrieve_all_ranked() ],
        [ $a, $b, $c ],
        'players retrieved in the correct order of rank'
    );
One of Class::DBI’s many extensions is Class::DBI::Loader, which uses table and field names from the database to set up Class::DBI classes automatically. Another is Class::DBI::Loader::Relationship, which allows you to describe database relations as simple English sentences. The Scorekeeper module uses these modules to initialize classes for the database schema. Save the following as Scorekeeper.pm:
    package Scorekeeper;

    use strict;
    use warnings;

    use Class::DBI::Loader;
    use Class::DBI::Loader::Relationship;

    my $loader = Class::DBI::Loader->new(
        dsn       => 'dbi:SQLite2:dbname=keeper.db',
        namespace => 'Scorekeeper',
    );

    $loader->relationship( 'a game has scores'              );
    $loader->relationship( 'a player has games with scores' );

    package Scorekeeper::Game;

    sub is_winner
    {
        my ( $self, $player ) = @_;

        my @scores =
            sort {
                return 0 unless $a and $b;
                $b->value() <=> $a->value()
            }
            $self->scores();
        return $player eq $scores[0]->player();
    }

    sub has_player
    {
        my ( $self, $player ) = @_;

        ( $player =  = $_->player() ) && return 1 for $self->scores();
        return 0;
    }

    package Scorekeeper::Player;

    sub wins
    {
        my ($self) = @_;
        return scalar grep { $_->is_winner($self) } $self->games();
    }

    sub losses
    {
        my ($self) = @_;
        return scalar( $self->games() ) - $self->wins();
    }

    sub winning_percentage_against
    {
        my ( $self, $other ) = @_;

        my @all = grep { $_->has_player($other) } $self->games();
        my @won = grep { $_->is_winner($self) } @all;

        return @won / @all * 100;
    }

    sub retrieve_all_ranked
    {
        my ($self) = @_;
        return sort { $b->wins() <=> $a->wins() }
            $self->retrieve_all();
    }

    sub opponents
    {
        my ($self) = @_;

        my %seen;
        $seen{$_}++ for map { $_->player() } map { $_->scores() }
            $self->games();
        delete $seen{$self};

        return grep { exists $seen{$_} } $self->retrieve_all();
    }

    1;
Note
Replacing the “return if true for any” idiom in has__player() with the List::MoreUtils:: any() function will make the code much clearer. That module has many other wonderful functions, too.
Now run player.t with prove. All of the tests should pass:
    $ prove player.t
    player....ok
    All tests successful.
    Files=1, Tests=18,  1 wallclock secs ( 0.68 cusr +  0.08 csys =  0.76 CPU)
What just happened?
If you’ve written database code before, you may have spent a lot of time storing and retrieving data from various tables. If only there were a really slick way to turn these relationships into Perl classes without ever writing a single SQL statement! There are, in fact, a handful of modules that do just that, including Class::DBI. If you’re not familiar with Class::DBI, this test file demonstrates how little code it takes to set up these relationships.
When testing databases, it’s a good idea to clean up any data left over after the tests end. To do this, the test file declares an END block containing statements to execute when the program ends, even if it dies. The END block iterates through every new player created and deletes any games and scores associated with that player and then the player itself, leaving no extra records in the database. (See “Testing Database Data” in Chapter 6 for more.)
The database schema specified that a player’s name must be unique. To test this constraint, player.t attempts to create a fourth player in a dies_ok() block with the same name as player $a. If creating the player fails, as it should, dies_ok() will report a success.
After adding some fake scores, player.t performs a couple of tests to see if the games(), wins(), losses(), and winning_percentage_against() methods return accurate values. The most interesting test uses Test::Deep’s cmp_deeply() to verify the opponents of $a are indeed the two other players that $a has played.
Note
cmp_deeply() and bag()can check the contents of an array without knowing the order of the items it contains.
The backend for Scorekeeper now has decent test coverage. You can be confident that any graphical view that you create for the Scorekeeper data will display accurate information.
Testing Your Frontend
Once you’ve fully tested the backend of your web application, you should test its frontend as well. Assume that you have expanded the Scorekeeper application (see "Testing Your Backend,” earlier in this chapter) to contain interfaces for adding players and games. The steps for testing by hand are straightforward: open the application in the browser, type things into the form fields, click Submit, and check the contents of the resulting page. Then repeat. Unfortunately, as the application grows, so does the punch list of manual regression tests you need to perform to make sure everything works.
This lab shows how to automate the testing of web applications using Test::WWW::Mechanize, a subclass of WWW::Mechanize that works well for test programs.
How do I do that?
This lab tests the frontend of the CPAN Search site (http://search.cpan.org/). This web site has one primary form that allows users to find modules as well as some navigational links to take visitors to the most-frequented parts of the site.
When constructing tests for web applications, always start by listing the behavior you expect from the application. How do you expect the CPAN Search Site to work?
I should be able to retrieve the CPAN Search Site home page successfully.
If I search the modules for “frobnicate”, there shouldn’t be any results.
If I search the modules for “test”, there should be many results.
Once I’ve searched for “test”, all of the links on the resulting page should work.
These assertions sound pretty solid. Save the following file as mech.t:
    #!perl

    use strict;
    use warnings;

    use Test::More tests => 6;
    use Test::WWW::Mechanize;

    my $mech = Test::WWW::Mechanize->new();

    $mech->get_ok( 'http://search.cpan.org/' );

    $mech->title_is( 'search.cpan.org: The CPAN Search Site' );

    $mech->form_name( 'f' );
    $mech->field( 'query', 'frobnicate' );
    $mech->select( 'mode', 'module'     );
    $mech->submit();

    $mech->content_contains( 'No matches' );

    $mech->back();

    $mech->field( 'query', 'test' );
    $mech->submit();

    $mech->content_like( qr/ Results .+ Found /sx );
    $mech->content_lacks( 'No matches' );
    $mech->page_links_ok();
Running mech.t should result in six successful tests. The last test may take a bit longer than the first five, depending on the speed of your network connection.
What just happened?
After useing the Test::WWW::Mechanize module, the test file creates an object of that class, $mech. The $mech object pretends to be a real human that fills in forms and clicks on links and buttons. It even keeps a history, meaning that the back() method works just like the Back button in your favorite browser.
The first step is to instruct $mech to retrieve the CPAN Search home page, which contains a single form named simply f. The get_ok() method not only does this, but also reports a successful test if it fetched the web page without an error.
Next, $mech checks the title of the fetch page. title_is() ensures that the title is exactly the string specified. Test::WWW::Mechanize also provides alternative title_like() and title_unlike() methods that check whether the title matches or does not match a given regular expression.
Many of the other methods on Test::WWW::Mechanize objects have is()/isnt() or like()/unlike() variants. See the Test::WWW::Mechanize module documentation for details.
The test selects the form named f as the form for which to specify input values. $mech then simulates filling out the text field named query and selecting the item from the pop-up menu named mode with the value of module. The submit() method then “clicks” the Submit button for the form, and the $mech object happily retrieves the resulting page.
At the time of this writing, there aren’t any modules with names containing the word “frobnicate,” thus the search results should be empty. $mech ensures that the resulting page contains the phrase “No matches” by using the content_contains() method.
$mech next clicks its virtual Back button and jumps back to the page containing the original web form. Because the object has already selected the correct pop-up menu item in the form, $mech only needs to change the text field to contain “test.” It then submits the form again.
This time, there are lots of modules with the word “test” in their names. The test checks that the results page does not contain the phrase “No matches” as seen earlier.
Test::WWW::Mechanize provides a convenience function, page_links_ok(), to test that it can follow all of the links on the current page successfully. Because there are more than 50 links on the results page, and Mechanize retrieves each one, this takes a little while. If all of the links are indeed valid, page_links_ok() produces a sixth successful test.
Record and Play Back Browsing Sessions
Creating lengthy programs to test web applications might seem a bit tedious. The mech-dump utility that comes with WWW::Mechanize prints the names and elements of every form and provides some relief when searching for form and form element names. However, using that data in your tests means that you’ll have to cut and paste multiple small blocks of code. Yuck.
Note
The mech-dump utility that comes with WWW:: Mechanize prints out everything that a WWW:: Mechanize object knows about a web page.
Relieve some of the hassle by using HTTP::Recorder to set up an HTTP proxy to record the pages you visit and the forms you fill out. As you browse, HTTP::Recorder saves each action as WWW::Mechanize code.
How do I do that?
Save the following listing as recorder.pl:
Note
At the time of this writing, HTTP::Recorder is incomplete, though it’s still worth using as a base from which you can develop test files for web interaction.
#!perl
use strict;
use warnings;
use HTTP::Recorder;
use HTTP::Proxy;
my $agent = HTTP::Recorder->new( file => "mech2.t", showwindow => 1 );
my $proxy = HTTP::Proxy->new(
port => 4567,
agent => $agent,
);
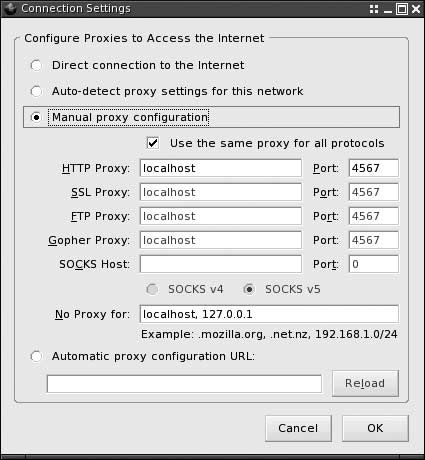
$proxy->start();Next, configure your browser’s proxy settings to connect to your own machine as a proxy on port 4567, as Figure 7-1 shows. Don’t forget to restore the original settings after you finish this lab!
Now run recorder.pl. You won’t see any output from the program while it’s running, so don’t hold your breath.
$ perl recorder.plGo to http://search.cpan.org/ in your browser. If everything went as planned, you’ll see a pop-up window appear with Perl code!
Note
Using Mozilla Firefox or some other pop-up - blocking tool? Allow pop-ups while you’re doing this lab to see HTTP::Recorder’s window.
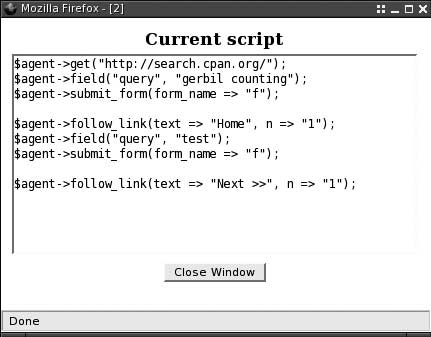
Search the CPAN for “gerbil counting” and click the Submit button, and then click on the Home link at the top. Search for something else and click Next once a page of results appears. As you’re doing this, the pop-up window will refresh with every request to show updated Perl code. Figure 7-2 shows an example.
What just happened?
Running recorder.pl starts an HTTP proxy daemon that your browser uses to make requests. The proxy uses an HTTP::Recorder agent, which attempts to keep track of submitted forms and log the requests in the form of Perl code. It saves a logfile as mech2.t, which you specifed when creating the HTTP::Recorder object. Additionally, because showwindow is true, the proxy modifies the content of the requested page to display a pop-up window with the current contents of mech2.t.
The Perl code saved to mech2.t is actually a series of statements involving a hypothetical WWW::Mechanize object. You can add the object yourself:
               #!perl

    use WWW::Mechanize;

    my $agent = WWW::Mechanize->new( autocheck => 1 );

    $agent->get("http://search.cpan.org/");
    $agent->field("query", "gerbil counting");
    $agent->submit_form(form_name => "f");

    $agent->follow_link(text => "Home", n => "1");
    $agent->field("query", "test");
    $agent->submit_form(form_name => "f");

    $agent->follow_link(text => "Next >>", n => "1");
In its current state, this program isn’t very useful. If the CPAN Search Site ceases to function and you run this program, WWW::Mechanize won’t be able to fill out the forms and will die. A better idea is to convert it to a test file, which is why you named the file with a .t suffix. Modify mech2.t to use Test::WWW::Mechanize (from the "Testing Your Frontend" lab, earlier in this chapter):
               #!perl

    use strict;

    use Test::More tests => 3;
    use Test::WWW::Mechanize;

    my $agent = Test::WWW::Mechanize->new;

    $agent->get_ok( 'http://search.cpan.org/' );
    $agent->field( 'query', 'gerbil counting' );
    $agent->submit_form( form_name => 'f' );

    $agent->follow_link_ok( { text => 'Home', n => '1' } );
    $agent->field( 'query', 'test' );
    $agent->submit_form( form_name => 'f' );

    $agent->follow_link_ok( { text => 'Next >>', n => '1' } );
Running the modified mech2.t should produce three passing tests.
To turn the HTTP::Recorder output into tests, the code instantiates $agent as a Test::WWW::Mechanize object. Note that statements that work as tests have changed. When defining $agent, the test file doesn’t need autocheck => 1 any more because it uses get_ok() and follow_link_ok() to test the success of a request. follow_link_ok() expects a hash reference of arguments just as follow_link() does.
Testing the Validity of HTML
As you test the features of your web applications, you also may want to make sure the HTML content that your code produces conforms to the standards set by the World Wide Web Consortium (http://www.w3.org/). Coding to standards makes your site cleaner, easier to maintain, and more accessible from a variety of browsers and clients, especially for users with disabilities.
How do I do that?
The Test::HTML::Tidy module provides a single function, html_tidy_ok(), that checks the completeness and correctness of an HTML document. Save the following code as tidy.t:
Note
You might already be familiar with the tidy command. Test:: HTML::Tidy uses HTML::Tidy as a backend, which in turn uses the tidy library.
    #!perl

    use strict;

    use Test::More tests => 2;
    use Test::WWW::Mechanize;
    use Test::HTML::Tidy;

    my $mech = Test::WWW::Mechanize->new();

    $mech->get_ok( 'http://search.cpan.org/' );

    html_tidy_ok( $mech->content );

    $mech->field( 'query', 'otter spotting' );
    $mech->submit();

    html_tidy_ok( $mech->content() );
When running the test file, you may see successes or failures, depending on the current conformity of the CPAN Search Site.
What just happened?
tidy.t uses Test::HTML::Tidy along with Test::WWW::Mechanize to make sure the CPAN Search Site’s home page is valid HTML. The first test passes the entire HTML document, $mech->content, to html_tidy_ok(), which reports success if the page validates. The test then searches the CPAN for “otter spotting” and checks the HTML of the resulting page as well.
What about...
Q: Can I check a smaller portion of HTML instead of an entire document?
A: Use Test::HTML::Lint, which exports an html_ok() function to which you can pass any bit of HTML. Save the following listing as table.t:
    #!perl

    use strict;

    use Test::More tests => 1;
    use Test::HTML::Lint;

    html_ok( <<'EOF' );

    <h1>My Favorite Sciuridae</h1>

    <table>
        <trh>
            <td>Grey squirrel</td>
            <td>plump, calm</td>
        </tr>
        <tr>
            <td>Red squirrel</td>
            <td>quick, shifty</td>
        <tr>
            <td>Yellow-bellied Marmot</td>
            <td>aloof</td>
        </tr>
    </table>

EOFRun the test file with prove:
    $ prove -v part.t
    part....1..1
    not ok 1
    #     Failed test (part.t at line 8)
    # Errors:
    #  (5:5) Unknown element <trh>
    #  (8:5) </tr> with no opening <tr>
    #  (16:1) <trh> at (5:5) is never closed
    #  (16:1) <tr> at (9:5) is never closed
    # Looks like you failed 1 tests of 1.
    dubious
        Test returned status 1 (wstat 256, 0x100)
    DIED. FAILED test 1
        Failed 1/1 tests, 0.00% okay
    Failed 1/1 test scripts, 0.00% okay. 1/1 subtests failed, 0.00% okay.
    Failed Test Stat Wstat Total Fail  Failed  List of Failed
    -----------------------------------------------------------------------
    part.t         1   256     1    1 100.00%  1
html_ok() reports the single test as a failure and reports exactly where the document has errors. The error reports take the form of (
line number
:
character position
), where the line number is the line number of the provided HTML. As the output explains, Test::HTML::Lint has no idea what a <trh> tag is. Nevertheless, neither it nor the <tr> tag ever close. There’s more work to do before putting this table of favorite furry animals online.
Running Your Own Apache Server
Testing web applications or Apache modules might be as easy as testing the web applications in previous labs: configure Apache, run the server, and then run the tests. However, it can become a pain to make sure the Apache server is in a pristine state every time you want to run the tests. Apache-Test gives you the ability to start and stop a special Apache server to use for automated testing of Apache modules.
How do I do that?
Apache-Test needs a t/ directory for the server configuration, document root, and test files. Create the directories lib/, t/, and t/conf/.
You also need a tiny program to start and stop the Apache server as well as to run the tests. Save the following as t/TEST:
    #!perl

    use strict;

    use Apache::TestRun;
    Apache::TestRun->new->run(@ARGV);
Suppose that you want to serve your photo album from the test server, a step that requires adding custom directives to Apache’s configuration. Save the following as t/conf/extra.conf.in:
Note
You need to adjust the second argument of Alias to the full path of the directory you want to serve.
    Alias /pictures /home/anu/pictures

    <Location /pictures>
        Options +Indexes
        Allow from all
    </Location>
It’s also a good idea to tell Apache-Test where your Apache executable is. Do this by setting the APACHE_TEST_HTTPD environment variable in your shell:
$ export APACHE_TEST_HTTPD=/usr/sbin/apache-perlNow, run TEST with the -start-httpd argument to start the demo server on the default Apache-Test port:
Note
If you use something besides the Bourne shell or a derivative, consult the manual for instructions on setting an environment variable.
    $ perl t/TEST -start-httpd
    [warning] setting ulimit to allow core files
    ulimit -c unlimited; /usr/bin/perl /home/anu/setup/t/TEST -start-httpd
    /usr/sbin/apache-perl  -d /home/anu/setup/t -f
        /home/anu/setup/t/conf/httpd.conf -D APACHE1 -D PERL_USEITHREADS
    using Apache/1.3.33

    waiting 60 seconds for server to start: .
    waiting 60 seconds for server to start: ok (waited 0 secs)
    server localhost:8529 started
Congratulations—you now have a web server serving your photo gallery!
There are a few things to note in the output, such as which Apache executable actually ran (/usr/sbin/apache-perl). The output also shows two options passed to the executable, the server root (-d /home/anu/setup/t) and the configuration file it used (-f /home/anu/setup/t/conf/httpd.conf). The output displays what version of Apache is in use, and then a few lines while the server starts. Finally, the last line of the output shows the host and port the daemon uses.
Navigate to the host and port with your browser. You should be able to browse the directory you specified in extra.conf.in, as Figure 7-3 shows.

When you finish browsing and want to shut down the server, run TEST with the -stop-httpd argument:
    $ perl t/TEST -stop-httpd
    [warning] setting ulimit to allow core files
    ulimit -c unlimited; /usr/bin/perl /home/anu/setup/t/TEST -stop-httpd
    [warning] server localhost:8529 shutdown
You should no longer be able to access the web server with your browser.
What just happened?
The TEST program puts together all of the pieces to execute and manage an Apache server and test suite that uses it. When you run TEST, it creates a configuration file that incorporates any additional files you provide, such as conf/extra.conf.in. TEST also creates a logging directory, t/logs/ by default, which holds the standard access_log and error_log files. After initialization, TEST launches an Apache server that listens on port 8529 by default.
TEST has many command-line options such as -verbose, which shows many more diagnostics. You can also use the -clean option to remove the slew of autogenerated files Apache-Test creates when it starts the server. Run TEST -help for a complete list of options.
Testing with Apache-Test
"Running Your Own Apache Server" demonstrated how to start and stop an Apache server manually. In real life, you’ll probably start and stop the test server automatically when you want to run your test suite. This lab shows how to test and create a simple Apache module, called Thumbnail, that uses the Imager module to resize images to a certain width and height. How do you know this module works? Use Apache-Test to test it!
How do I do that?
First, create a lib/ directory. You should already have the t/ and /t/conf/ directories from the previous lab. t/TEST will be the same, but t/conf/extra.conf.in needs some editing.
In custom configuration files such as extra.conf.in, the server substitutes special variables (in the form of @
NAME
@) with useful values when it starts. The server uses those directives in the file as its configuration. Adding the lib/ directory to Perl’s module search path is easy; add it to the SERVERROOT variable.
Save the following as t/conf/extra.conf.in:
    <IfModule mod_perl.c>

        <Perl>
            use lib '@SERVERROOT@/../lib';
            use Thumbnail ();
        </Perl>

        <Location /images>
            SetHandler perl-script
            PerlHandler Thumbnail
        </Location>

    </IfModule>
Save the Thumbnail module as lib/Thumbnail.pm:
    package Thumbnail;

    use strict;
    use warnings;

    use Apache::Constants qw(:common);
    use Apache::File;
    use Imager;

    our $constraint = 150;

    sub handler
    {
        my ($r) = @_;

        return DECLINED unless $r->content_type() =~ m{^image/};

        my $img = Imager->new();
        $img->open( file => $r->filename ) or die $img->errstr();

        $img    = $img->scale( xpixels => $constraint, ypixels => $constraint );

        my ( $tmpfile, $tmpfh ) = Apache::File->tmpfile();
        $img->write( file => $tmpfile, type => 'jpeg' )
            or die $img->errstr();

        $r->send_http_header('image/jpeg'),
        $r->send_fd($tmpfh);

        return OK;
    }

    1;
Save the following test file as t/thumbnail.t:
    #!perl

    use strict;
    use warnings;

    use Apache::Test;
    use Apache::TestUtil;
    use Apache::TestRequest qw( GET_BODY );
    use Imager;

    plan( tests => 1, need_module('mod_perl') );

    my $content = GET_BODY('/images/panorama.jpg'),

    my $img     = Imager->new();
    $img->open( data => $content, type => 'jpeg' )
        or die $img->errstr();

    my $max     = 150;

    t_debug( "assuming constraint is $max pixels" );

    t_debug( 'width: '  . $img->getwidth()    );
    t_debug( 'height: ' . $img->getheight()   );

    ok( ( $img->getwidth() =  = $max ) or ( $img->getheight() =  = $max ) );
Finally, you need a picture for the module to transform. Pick something large, such as a breathtaking scene of Bryce Canyon with deer grazing in the distance. Save it as t/htdocs/images/panorama.jpg.
First make sure that Apache-Test knows where to find your Apache executable by setting the APACHE_TEST_HTTPD environment variable:
Note
If you’re not using a bash-like shell, see your shell’s documentation to set this variable correctly.
$ export APACHE_TEST_HTTPD=/usr/sbin/apache-perlRun TEST to run the tests:
    $ perl t/TEST
    [warning] setting ulimit to allow core files
    ulimit -c unlimited; /usr/bin/perl /home/anu/thumbnail/t/TEST
    /usr/sbin/apache-perl  -d /home/anu/thumbnail/t -f
        /home/anu/thumbnail/t/conf/httpd.conf -D APACHE1 -D PERL_USEITHREADS
    using Apache/1.3.33

    waiting 60 seconds for server to start: .
    waiting 60 seconds for server to start: ok (waited 0 secs)
    server localhost:8529 started
    t/thumbnail....ok
    All tests successful.
    Files=1, Tests=1,  2 wallclock secs ( 0.35 cusr +  0.05 csys =  0.40 CPU)
    [warning] server localhost:8529 shutdown
Within the Apache-Test diagnostic output, you’ll see that all of the tests succeeded.
What just happened?
t/ is the server root directory, which is where Apache looks for the conf/ or htdocs/ directory. If an htdocs/ directory is present, Apache will use it as the document root. By default, Apache-Test saves a simple index.html in the document root when it starts, but the images/ directory is more interesting right now.
Requesting the URI /images/panorama.jpg without using the handler would simply return the picture of the canyon with the lovely grazing Cervidae. extra.conf.in, however, uses a <Location> directive to specify that the thumbnail-generating module will handle paths beginning with /images.
Thumbnail is a fairly straightforward Apache module. It handles only images, returning DECLINED if Apache doesn’t believe that the file’s type is some sort of image. If it is an image, the handler reads in the file and resizes it (in memory, not on disk) so that it is at the most 150 pixels square. Finally, it sends the resized image as the content of the response.
Note
Instead of printing a gigantic scalar, Thumbnail.pm uses Apache:: File to create a temporary file and uses the send_fd() method with a filehandle.
...or does it? Does the module truly resize the image? This is precisely what t/thumbnail.t tests.
thumbnail.t doesn’t use Test::More. Instead, it uses Apache-Test’s framework, which is a bit different. Remember, though, that tests always boil down to a simple “ok” or “not ok.”
The first difference is that Apache::Test provides a different plan() function. While it appears the same as the Test::More version, it actually provides many more features, allowing developers to specify requirements for the tests that skip the tests if not met. thumbnail.t ensures that the Apache server used for testing does indeed have mod_perl enabled by specifying need_module('mod_perl'). Without mod_perl, the file skips the tests.
Alternatively, you can use need_module() to specify that the tests require a certain Perl module. For example, to modify the plan() statement to specify that you need the Imager module, write:
plan tests => 1, need_module('Imager');To skip the test file completely, use the skip_reason() function exported by Apache::Test in combination with plan():
plan tests => 1, skip_reason("our Perl ain't up to snuff");This is merely the tip of the iceberg in terms of what Apache::Test’s plan() function can do. For more information, see the Apache::Test documentation.
Continuing with differences between Apache-Test and Test::More, note that there are no is() or diag() functions. Instead, Apache::TestUtil exports t_cmp() and t_debug(). t_cmp() takes the same arguments as is(), but you must use it in conjunction with ok(). For example, to test that the image uses 16-bit color:
ok( t_cmp($img->bits(), 16, 'image has sixteen bits') );
t_debug() prints out diagnostic messages in the same manner as Test::More’s diag() function. thumbnail.t uses t_debug() to print out the value of the image’s actual size. To see these diagnostic messages, run TEST with the -verbose option. When you do, you’ll see other debugging information in addition to your own messages:
Note
If your tests suddenly stop working, run TEST with the “-clean” option to remove extra generated files. Then be sure to run TEST with -verbose”.
    $ perl t/TEST -verbose
    [warning] setting ulimit to allow core files
    ulimit -c unlimited; /usr/bin/perl /home/anu/thumbnail/t/TEST -verbose
    /usr/sbin/apache-perl  -d /home/anu/thumbnail/t -f
        /home/anu/thumbnail/t/conf/httpd.conf -D APACHE1 -D PERL_USEITHREADS
    using Apache/1.3.33

    waiting 60 seconds for server to start: .
    waiting 60 seconds for server to start: ok (waited 0 secs)
    server localhost:8529 started
    t/thumbnail....1..1
    # Running under perl version 5.008004 for linux
    # Current time local: Thu Mar 24 11:13:55 2005
    # Current time GMT:   Thu Mar 24 16:13:55 2005
    # Using Test.pm version 1.24
    # Using Apache/Test.pm version 1.20
    # assuming constraint is 150 pixels
    # width: 200
    # height: 150
    ok 1
    ok
    All tests successful.
    Files=1, Tests=1,  1 wallclock secs ( 0.35 cusr +  0.06 csys =  0.41 CPU)
    [warning] server localhost:8529 shutdown
Note
Want even more diagnostic output? Set APACHE_ TEST_TRACE_ LEVEL=debug and APACHE_ TEST_COLOR=1 to see colorized, lower-level debugging information.
The biggest step is to contact the test server to make requests so that you can test whether the returned content is what you expected. Apache::TestRequest optionally exports a slew of functions that make this easy. thumbnail.t uses the GET_BODY() function, which makes a simple GET request to the test server and returns the content. By using Apache::TestRequest’s functions, you never have to know the port number or IP address of your test server.
Other useful Apache::TestRequest exports include functions such as GET(), HEAD(), PUT(), and POST() to make those types of requests. Each of these has a corresponding _OK function. For example, GET_OK() makes a GET request and checks the resulting response code. Similarly, _BODY functions retrieve just the content of the response. _BODY_ASSERT functions check the success of the request and return the content. Finally, a set of UPLOAD() functions exist for sending entire files.
What about...
Q: Can I use other test modules with Apache::Test?
A: Sure. Provide -withtestmore as an argument to use Apache::Test and all of Test::More’s functions instantly become available:
    #!perl

    use strict;
    use warnings;

    use Apache::Test qw(-withtestmore);
    use Apache::TestUtil;
    use Apache::TestRequest qw( GET_BODY );
    use Imager;

    plan( tests => 1, need_module('mod_perl') );

    my $content = GET_BODY('/images/panorama.jpg'),

    my $img     = Imager->new();
    $img->open( data => $content, type => 'jpeg' )
        or die $img->errstr();

    my $max     = 150;

    diag( 'assuming constraint is $max pixels' );

    diag( 'width: '  . $img->getwidth()    );
    diag( 'height: ' . $img->getheight()   );

    ok( ( $img->getwidth() =  = $max ) or ( $img->getheight() =  = $max ) );
Note that at the time of this writing, compatibility with test modules that use Test::Builder is still experimental.
Where to learn more
This lab is only a glimpse into the world of testing Apache with Perl. More advanced concepts include testing C modules and debugging tests. “Running and Developing Tests with the Apache::Test Framework” at http://perl.apache.org/docs/general/testing/testing.html covers these subjects in more detail.
Distributing Modules with Apache-Test
The previous lab, "Testing with Apache-Test,” created a simple Apache module that you tested with Apache-Test. Suppose that the module is so handy, useful, and original that you want to share it with the world. How do you set up your tests in a module distribution?
This lab demonstrates how to set up a module distribution for use with Module::Build and the Apache-Test testing framework.
How do I do that?
Keep all of the files you created from the previous lab except for t/TEST; Apache-Test will create it for you automatically. Save the following as Build.PL in the directory that contains both t/ and lib/:
    #!perl

    use Module::Build;

    my $build_pkg =
        eval { require Apache::TestMB } ? 'Apache::TestMB' : 'Module::Build';

    my $build = $build_pkg->new(
        module_name  => 'Thumbnail',
        dist_version => 0.01,
        license      => 'perl',
        requires     => {
            'Apache::Test' => 1.12,
            'Imager'       => 0.40,
        },
    );

    $build->create_build_script();
Then build and test like any other Module::Build-based distribution:
    $ perl Build.PL
    Creating new 'Build' script for 'Thumbnail' version '0.01'
    $ perl Build test
    lib/Thumbnail.pm -> blib/lib/Thumbnail.pm
    /usr/bin/perl -I /home/anu/thumbnail/blib/lib -I
        /home/anu/thumbnail/blib/arch t/TEST -clean
    [warning] setting ulimit to allow core files
    ulimit -c unlimited; /usr/bin/perl /home/anu/thumbnail/t/TEST -clean
    /usr/bin/perl -I /home/anu/thumbnail/blib/lib -I /home/anu/thumbnail/blib/arch
        t/TEST -bugreport -verbose=0
    [warning] setting ulimit to allow core files
    ulimit -c unlimited; /usr/bin/perl /home/anu/thumbnail/t/TEST -bugreport
        -verbose=0
    /usr/sbin/apache-perl  -d /home/anu/thumbnail/t -f
        /home/anu/thumbnail/t/conf/httpd.conf -D APACHE1 -D PERL_USEITHREADS
    using Apache/1.3.33

    waiting 60 seconds for server to start: .
    waiting 60 seconds for server to start: ok (waited 0 secs)
    server localhost:8529 started
    t/thumbnail.............ok
    All tests successful.
    Files=1, Tests=1,  4 wallclock secs ( 0.67 cusr +  0.08 csys =  0.75 CPU)
    [warning] server localhost:8529 shutdown
Note
Did “Build test” fail? Check to see that Apache-Test has the correct path to the Apache executable.If it’s not correct, set the APACHE_TEST_HTTPD environment variable to what you used in the previous lab.
Add documentation (if you haven’t already) and some tweaking to Build.PL, and your distribution is ready to go!
What just happened?
Apache::TestMB adds Apache-Test features to Module::Build, which, among other things, automatically create a TEST file for you. Running perl Build test prepares the distribution and runs the test suite using TEST.
Users who don’t have Apache-Test installed when they run perl Build.PL will see a large warning about the missing prerequisite. However, they can still build and install the distribution.
What about...
Q: What if I’m using ExtUtils::MakeMaker to distribute my modules?
A: There’s a little more syntax you’ll need to have Apache-Test generate the t/TEST file automatically. The following Makefile.PL is similar to the Build.PL shown in the lab:
    #!perl

    use ExtUtils::MakeMaker;
    use Apache::TestMM qw(test clean);
    use Apache::TestRun;

    Apache::TestMM::filter_args();

    Apache::TestRun->generate_script();