
Chapter 7. Printing Your Photos
Let’s face it—digital pictures have a lot of advantages over printed images. They’re super easy to store, share, and show off to others. Heck, once you turn on iCloud Photo Library (Importing from iCloud), your entire photo collection travels around with you on your iOS device(s). Nevertheless, there will come a time when you want to print some pictures. Maybe you want to frame a favorite face to place atop your desk, order a slew of prints to chronicle your latest sporting achievement, or experience the unique joy of seeing your own artwork adorn a wall. (Prints make great gifts, too!)
The process for printing your own pictures from Photos for Mac is exceedingly simple, and you don’t even have to wrestle with your printer—you can order gorgeous prints in a variety of popular sizes from Apple instead. Photos lets you customize your print order in a variety of ways to ensure your pictures are perfectly cropped, zoomed, and positioned to fit the print size you pick. (If you did any printing in iPhoto, you’ll find more customization options in Photos.) This is the easiest way to go, especially if you want to print at sizes beyond what your home printer can handle, such as panoramas and posters.
In this chapter, you’ll learn everything you need to know to about producing high-quality prints on your own inkjet printer and ordering them from Apple. This chapter also explains what resolution is, and teaches you how to calculate it yourself so you know exactly what kind of print quality to expect. Let the printing party begin!
Note
As of this writing, you can only order prints using Photos for Mac; you can’t place print orders on an iOS device. If the printer you have at home supports AirPrint—Apple software that lets you print from your iOS device without having to install drivers for a particular printer—you can print pictures using Photos for iOS, though you can’t print more than one per page (in other words, there are no layout options). To do that, select the thumbnails you want to print (Selecting and Hiding Files), and then tap the Share icon. Next, tap the Print icon in the bottom row, and then on the Printer Options screen, tap to select your printer, use the + and – buttons to specify how many prints you want, and finally tap Print.
Printing at Home
As long as your computer can connect to a printer—arguably the most challenging part of printing—you can easily print your own pictures. You can pick from a variety of common sizes or enter a custom size (though you’re limited by the size paper your printer can handle, of course). You can print one photo per page or put a few onto a single sheet to save paper (the number of photos you can print on a single page is determined by the paper and photo sizes you pick).
While Photos makes printing a simple and uncomplicated affair, you need a good printer to produce good results—that “all in one” printer/copier/scanner/fax machine won’t produce gallery-quality prints.
There are many printer companies to choose from, but you can’t go wrong if you stick with Epson, Canon, or even HP. For the best results, buy a printer that’s made specifically for printing pictures, like the Epson Stylus Photo or Canon Pixma series. Printers in those two lines use between 5 and 11 different ink colors, depending on the model, so they produce a wider range of colors than printers that use the standard four inks. Of course, this extra quality comes at a cost: The more ink colors your printer uses, the higher its price tag and the more it costs to replenish your ink stash when it runs—or dries—out. (The sale of ink cartridges—and paper—is how printer manufacturers make the bulk of their profits.)
Note
High-quality printers aren’t cheap. While you can certainly find an inkjet printer that’ll spit out decent prints for around $100, you’ll need to spend $350–$1,000 to produce really good ones.
Once you’ve procured the right printer, there are other factors to consider before reaching for the Print command. For example, your picture needs to have enough pixels to produce a high-quality print at the size you want, and it needs to be the right aspect ratio. You’ll learn how to do all of that in the pages that follow.
Resolution Matters
Resolution is one of the most commonly misunderstood concepts in digital imaging. Understanding it involves realizing that your digital pictures are made up of thousands of tiny, square blocks of color called pixels, as Figure 7-1 illustrates.
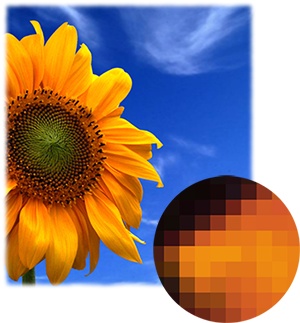
Contrary to popular belief, pixels have no predetermined size, which is where resolution enters the, uh, picture. Resolution is the measurement that determines how many pixels get packed into a linear inch in your images, which controls how big or small the pixels are. With that in mind, you may find it helpful to think of resolution as pixel size. On your computer screen, resolution is measured in terms of pixels per inch in the U.S. (ppi, as folks typically call it); in most other countries, it’s measured in pixels per centimeter (ppc). Scanners and printers, on the other hand, refer to resolution as dots per inch (dpi).
So the higher the resolution of an image, the smaller its pixels become. Small pixels make for smooth, high-quality prints and big pixels make for ugly, blocky prints that look like a stack of Lego bricks. Generally speaking, you need a resolution of at least 240 ppi to produce a nice print on most inkjet printers. However, if you forked out the big bucks for an inkjet printer that can spray ink at higher resolutions—say, 720 ppi or 1440 ppi—then you’ll get better results by printing at those resolutions instead.
To keep things simple, Photos doesn’t show you the resolution setting of your image, so you can’t even see it, much less change it. However, you can calculate the resolution yourself using the image’s pixel dimensions and the size of the print you want to make. Doing so lets you know exactly what level of quality to expect from printing at a certain size. And if the resolution you calculate isn’t high enough to print at, say, 8 x 10, then you can make an informed decision to print at a smaller size. If you value your time and money—or rather, ink and paper—consider this quick calculation step one in your printing process.
Note
It’s especially important to calculate resolution for prints you intend to make from images captured on lower-quality devices, such as smartphones and older point-and-shoot cameras. You may find that they don’t have enough resolution to create good prints, and it’s better to discover that before wasting precious photo paper.
The first step in calculating resolution is to find your image’s pixel dimensions by peeking inside the Info panel. To do that, select a picture, and then press ⌘-I to open the Info panel. When the floating Info panel appears onscreen, locate the camera info in the second section and jot down the image’s pixel dimensions, which are listed beneath it. Next, figure out what size print you want to make, open your Mac’s Calculator app, and then divide the longest edge of the print (measured in inches) by the longest edge of your image (measured in pixels).
For example, the image shown in Figure 7-2 measures 3840 x 5760 pixels. If you want to make an 8 x 10 print, take the longest edge in pixels and divide it by the longest edge in inches of the target print size: 5760 pixels divided by 10 inches = 576 ppi. You’re in luck: That’s more than enough resolution to produce an exceptional print.

However, if you want to take that same image and make a poster out of it (poster size is 30 x 20 inches), you’d have a resolution of 192 ppi (5760 ÷ 30), which isn’t high enough for a good print. The picture might not look horrible, but it won’t be as clear, sharp, and detailed as it could be. Since poster-size prints aren’t cheap—they’re currently $18 from Apple, plus tax and shipping—you’ll likely decide that printing at such a large size isn’t worth it. By printing at a smaller size, you’ll save money and be more satisfied with the end result. It’s a win-win situation!
Tip
As you learned on The Rotate Tool, when you crop an image, you delete pixels. If you don’t have enough resolution to print at the size you want and you previously cropped the image, try uncropping it or cropping it less severely. By doing so, you just might gain back enough pixels to produce the resolution you need at the print size you want.
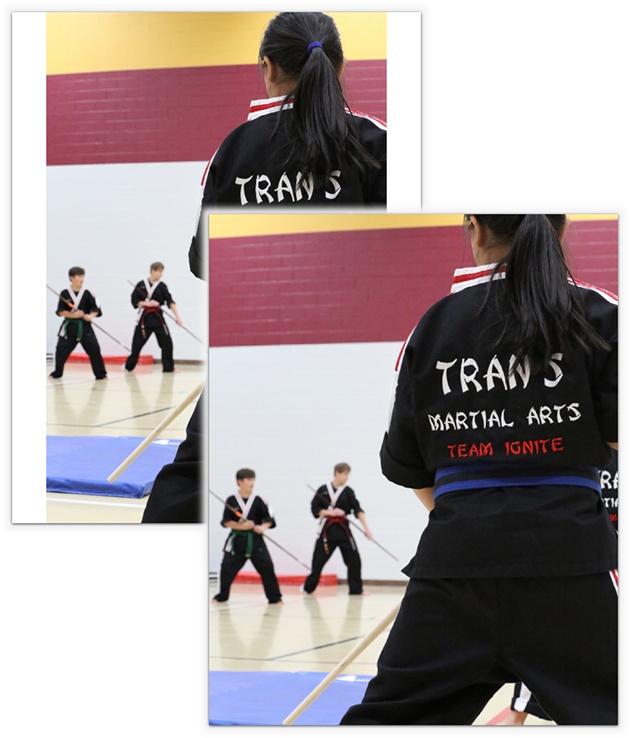
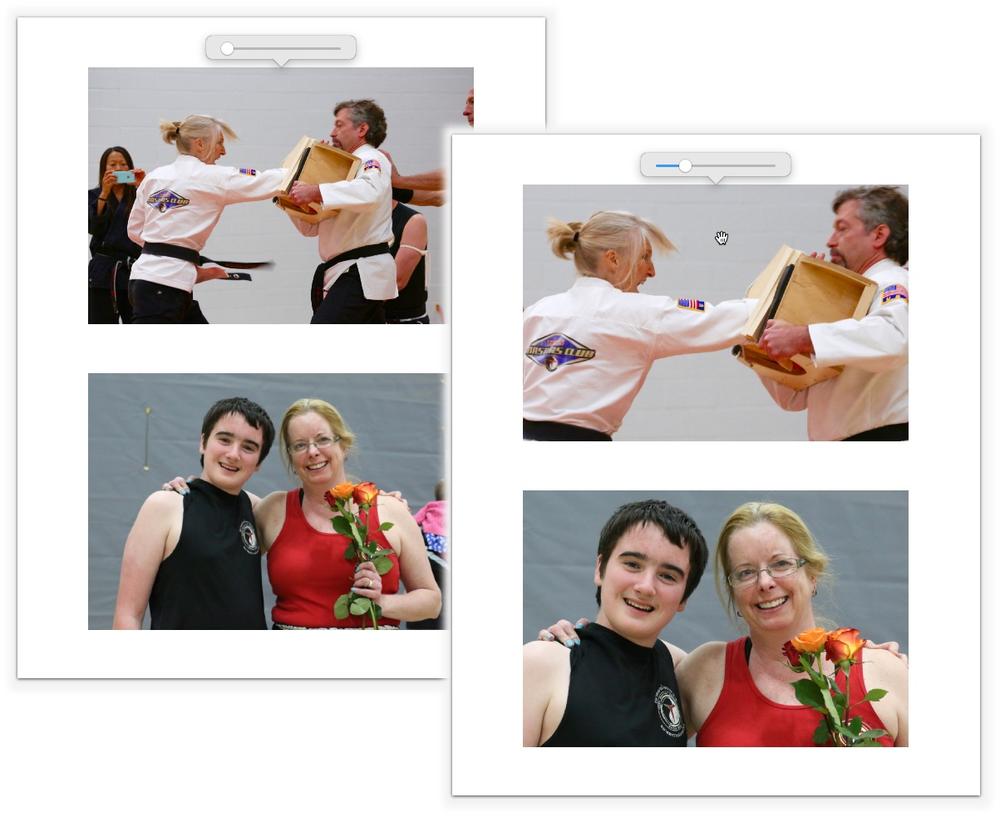
Another printing concern is that of aspect ratio, which is the relationship between the image’s width and its height. For example, a widescreen television has an aspect ratio of 16:9 (which is why the picture is wider than it is tall), a 35mm film camera has an aspect ratio of 3:2, and most digital cameras have an aspect ratio of 4:3. Unfortunately, a 4:3 aspect ratio produces pictures that don’t quite fit onto some standard photo paper sizes such as 5 x 7 and 8 x 10. For example, if the paper you’re printing on has the same aspect ratio as the image you’re printing—say, you’re printing a 3:2 aspect ratio image on a 6 x 4 piece of paper—then all is well. But thanks to Murphy’s Law, the image you want to print likely won’t fit the paper you want to print it on.
In that case, one of two things will happen: Photos will either shrink the image proportionately to fit the paper, resulting in white bands on either edge of the print, or Photos will fill the paper by chopping off some of your image. The outcome is determined by which option you pick in Photos’ Print pane: Fit or Fill. You’ll learn more about those two options later in this chapter, but they’re helpful in understanding the problem of mismatched aspect ratios.
The example shown here illustrates what happens if you print an image with a 4:3 aspect ratio on a 5 x 7 piece of paper: You get white edges on either side of the picture (left) or Photos crops your image (right). If there’s nothing important along the edges of your picture, this autocropping business isn’t a big deal, but if half your subject’s head disappears, as in this example, you need to crop the image yourself. Flip back to How to Crop, Straighten, and Flip a Photo to learn how.
If, on the other hand, you order prints from Apple, you can adjust the autocropping when you place your order so you don’t lose anything important. Cropping, Editing, and Ordering Multiple Copies has the lowdown.
Printing from Photos
Here’s the wonderfully simple process for printing pictures on your own printer:
Tip
Before you feed that $1-per-page photo paper into your printer, use your printer’s software to print a test page. (Press Shift-⌘-A to open your Applications folder and hunt for a file or folder that carries the name of the printer’s manufacturer, such as Epson Software or Epson Printer Utility. Then follow the onscreen instructions.) A test page consists of a series of colored lines, typically one line for each ink color. A break in one or more lines indicates a problem with the ink or print heads. Doing a test print gives you the opportunity to clean the heads or replace an ink cartridge before you waste expensive photo paper.
Select the picture(s) you want to print.
Use the techniques described on Selecting and Hiding Files to select thumbnails of the images you want to print. It doesn’t matter what view you’re in; the Print command is accessible from anywhere within the program (even Edit mode). Feel free to pick as many pictures as you want. Photos is happy to print them in succession or even gang a few onto a single page (paper and image print size permitting, of course).
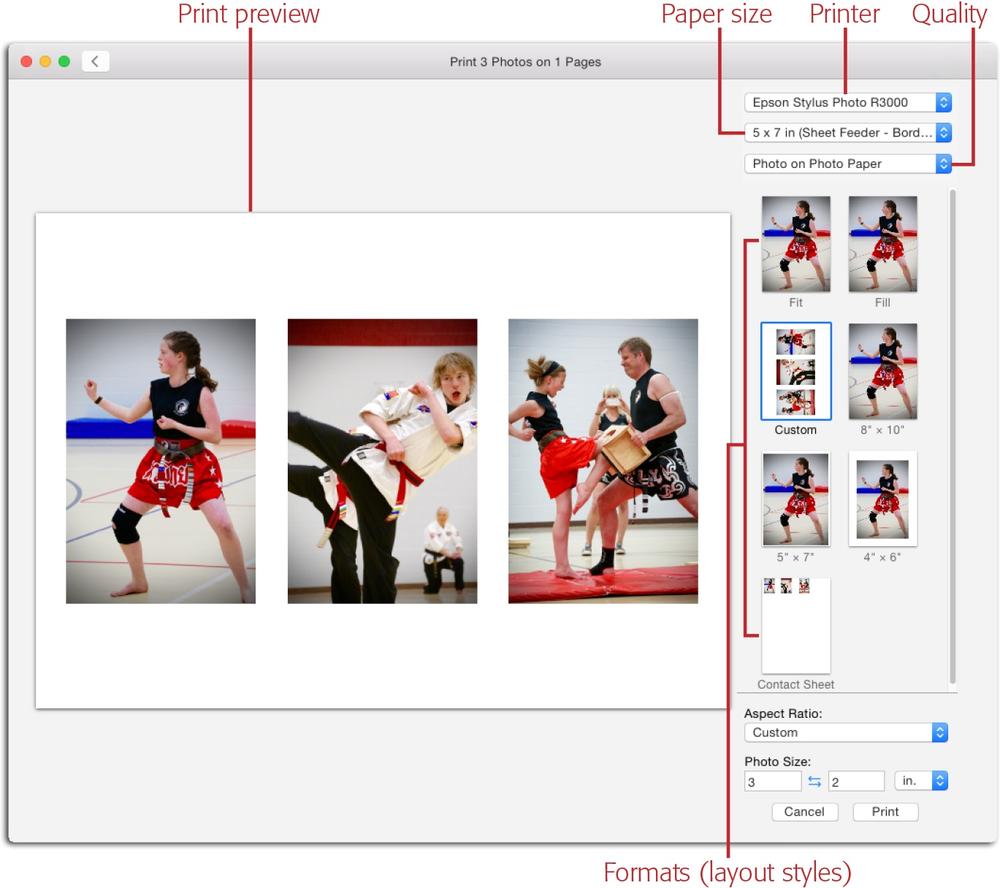
When you’re ready, choose File→Print or press ⌘-P and the refreshingly simple Print pane shown in Figure 7-3 appears.
Choose your printer, paper size, and quality.
Use the three menus perched at the pane’s upper right to tell Photos what printer you want to use (if you have more than one), paper size, and quality.
There’s no rocket science involved in choosing a printer or paper size—just pick the printer you want to use and the size paper you want to print on. However, if your printer supports edge-to-edge printing, be sure to pick a paper size that includes the word “borderless.” Otherwise, the printer will leave an annoying strip of white around the edges of the print.
The Quality menu’s contents depend on the capabilities of your printer. For example, if you have a laser printer, the menu may include the option of printing in black and white at various levels of quality (such as draft). For most inkjet printers, you get the following options:
Photo on Matte Paper, Photo on Matte Paper–Fine. These options set the printer up for printing on high-quality paper. Commonly referred to as presentation paper or fine art paper, it’s a little heavier than inkjet paper, but it’s not thick or glossy. The Fine option prompts the printer to take more time carefully spraying the ink; it takes longer to print but you end up with a higher-quality result. These two options aren’t suitable for printing photographs, but they’re perfect for printing your own greeting cards (Step 4: Final Inspection).
Photo on Photo Paper, Photo on Photo Paper–Fine. Choose one of these options if you’re wisely using the stiff, more expensive paper designed for photographic printing. Photo paper can be glossy or matte (non-glossy), and this stuff resembles the kind of paper used when your prints are developed at Costco or your local camera shop. Here again, the Fine option takes longer to print, but produces a better result.
Note
Most folks are attracted by the shine of glossy paper, but that’s not really the best choice for printing photos. While glossy papers produce rich colors, their reflective properties make them a poor choice for passing around or framing. To put your best print foot forward, use high-quality matte photo paper instead. By doing so, you won’t have to worry about reflections, plus good matte papers make your blacks look darker, which boosts contrast.
When choosing a paper brand, it’s usually easiest to stick with paper made by your printer manufacturer, though there are higher quality papers out there. If you’ve got money to burn, you can get excellent pro-level paper from Hahnemuhle.com, RedRiverPaper.com, MoabPaper.com, and Ilford.com.
On all but the simplest of printers, Photos’ Quality menu is fairly useless because it gives you no real control over specific paper type—for example, you can’t specify Ultra Premium Luster Paper or Exhibition Fiber Paper—or the output resolution of the printer itself. To produce the best possible print, you need to access your printer’s settings, which you can only do by clicking Print (you’ll do that in step 6).
Choose a format (layout style).
This is where you tell Photos how to handle your picture if it isn’t the same aspect ratio as the paper size you picked, and what size the printed picture should be on the paper itself. On the right side of the Print pane, if you click a format thumbnail, you see what the print will look like in the preview area at left. At the top of the Print pane, Photos dutifully reports how many images will print on how many pieces of paper. Here are your options:
Fit. Pick this format to fit your photo onto the paper size you picked in step 3. Photos doesn’t enlarge your image with this option, so if the aspect ratio of your picture doesn’t match the aspect ratio of the paper size, you get a white edge on either side of the print. There’s more on this topic in the box on When Aspect Ratios Collide.
Fill. This format instructs Photos to enlarge your image so it fills the page. And as the box on When Aspect Ratios Collide explains, important bits of your image may be chopped off if you haven’t cropped the picture to match the paper’s aspect ratio. (For more cropping tips for print, see the box on Cropping Tips for Print.)
Custom. If you selected more than one picture in step 1, this option shows you the size necessary to squeeze more than one picture onto a page (Figure 7-3 shows this choice in action). You can also use this format to print at a size that’s not among the format presets. When you choose Custom, the Aspect Ratio menu appears, along with two fields where you can enter the width and height of the print you want. (These fields are visible in Figure 7-3.) Unfortunately, you can’t save custom settings as a format preset.
8“x10", 5“x7", 4“x6“. Use these formats to print in traditional sizes. Depending on the paper size you picked in step 3, you may be able to fit more than one picture onto a page (that is, if you selected more than one image in step 1). Remember, these options don’t set paper size; they set the print size of the image.
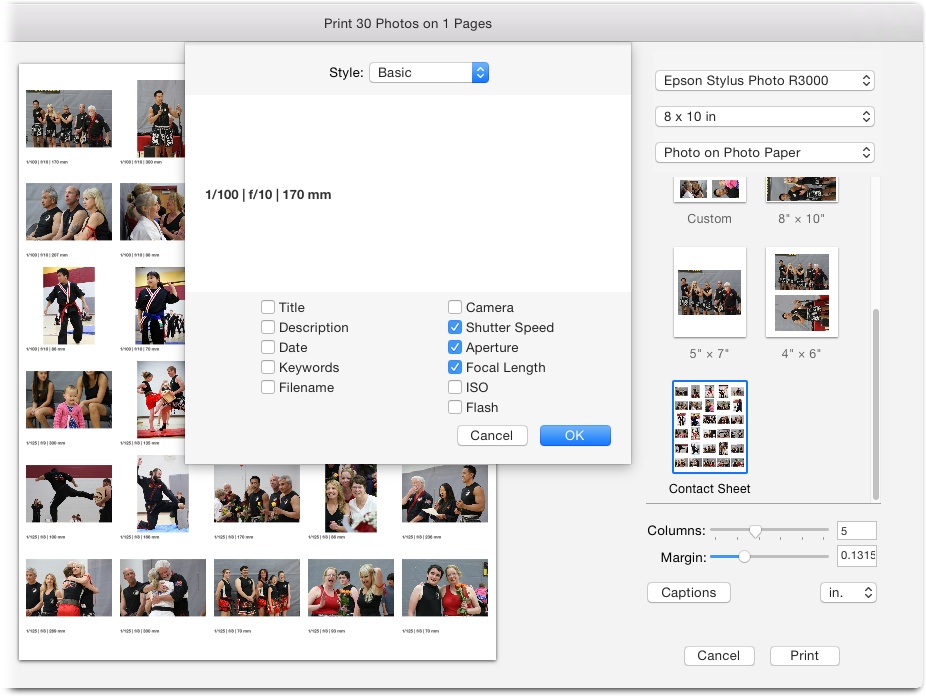
Contact Sheet. This option puts multiple thumbnails onto a page in grid-style fashion, as Figure 7-4 shows. You set the number of columns (up to 12) and the margin width, which controls the space between the thumbnail and the paper’s edge.
You can also choose to add captions—info that’s printed beneath each thumbnail. If you click Captions, the pane shown in Figure 7-4 appears. Your caption choices include image title, description, date, keywords, and filename, as well as a host of camera settings such as shutter speed and focal length (handy for, say, teaching or comparing shots taken at different settings to improve your photographic skills).
Tip
For the best results when printing Contact Sheets, don’t choose a borderless paper option from the paper size menu. If you do, the thumbnails will look like they’re about to fall off the edges of the page!
Figure 7-4. The Contact Sheet format is handy for printing several pictures side by side on the same page to compare the quality of different images or for showing to others so they can pick which shots to print. The Captions pane shown here lets you choose from three text formatting styles. Basic left aligns and bolds the info beneath each thumbnail, Labeled left aligns with no bolding, and Condensed uses gray text (instead of black) and centers the info in a slightly smaller font than the other styles.If you didn’t crop your image before printing, you can fill the frame with your subject by using the Print pane’s zoom slider. Just click an image in the preview area to summon the zoom slider shown in Figure 7-5. Drag the slider rightward to zoom into your image. Once you do that, you can drag your image to reposition it within the frame (your cursor turns into a hand).
When the preview looks just right, click Print.
Clicking Print displays the OS X print pane shown in Figure 7-6, where you can control your printer’s settings (which are different than Photos’ print settings), such as how many copies to print and which pages to print. Most importantly, this pane lets you tell your printer exactly what paper you’re using and what resolution to print at. To reveal these mission-critical settings, choose Printer Settings (or something similar) from the menu circled in in Figure 7-6, and then adjust the options that appear. When you’re finished, click Print (or press Return) and your printer whirs to life.

Tip
If you get your print settings just right and then decide that you’re not quite ready to fire up your printer after all (maybe you realized you’re out of ink), the only way to save your settings for printing later is to click the PDF button in the lower left of the OS X print pane shown in Figure 7-6. Choose “Save as PDF” from the menu, and then click Save. When you’re ready to print the document, open it in Preview and print away.
Ordering Prints Online
As you learned in the previous section, printing on your own printer is a simple affair…at least theoretically. To be honest, there are a host of problems you can encounter when you print pictures yourself. For example, if the planets aren’t properly aligned, your Mac may refuse to connect to your printer, your ink cartridges may be dried out or need replacing, or your paper might not load properly. Or maybe you just want to print at a size that’s bigger than your printer can handle.
If sparring with your printer sounds like the opposite of fun, just get someone else to print them. The easiest solution is to leave the printing to Apple (technically, Kodak does the printing on Apple’s behalf). Having high-quality, fuss-free prints delivered to your home is just a few clicks away (provided you have an Internet connection, of course). Pricing for prints is extremely affordable and ranges from 12 cents for a 4 x 6 to $18 for a 20 x 30 poster. Even with sales tax and a shipping fee, you’ll likely save time and money over printing them yourself.
You can also export your pictures (see Exporting from Photos) for printing elsewhere and upload them to your local camera shop, Costco, or other online printing services. This method will likely be cheaper than ordering prints from Apple, though it does take time to export the pics, upload them to the printing service’s website, pick your print sizes, and so on. If you want to go that route, some excellent online printing resources include Mpix.com, NationsPhotoLab.com, PinholePress.com, Shutterfly.com, and Snapfish.com. Many of these websites offer to print your pictures on a variety of other products, too, like coffee mugs, shopping bags, and puzzles, which make great gifts!
Tip
To learn more about creating gifts made from your own pictures, check out your author’s video Holiday Photo Gifts. You can find it at www.photolesa.com/videos.
Buying Prints from Apple
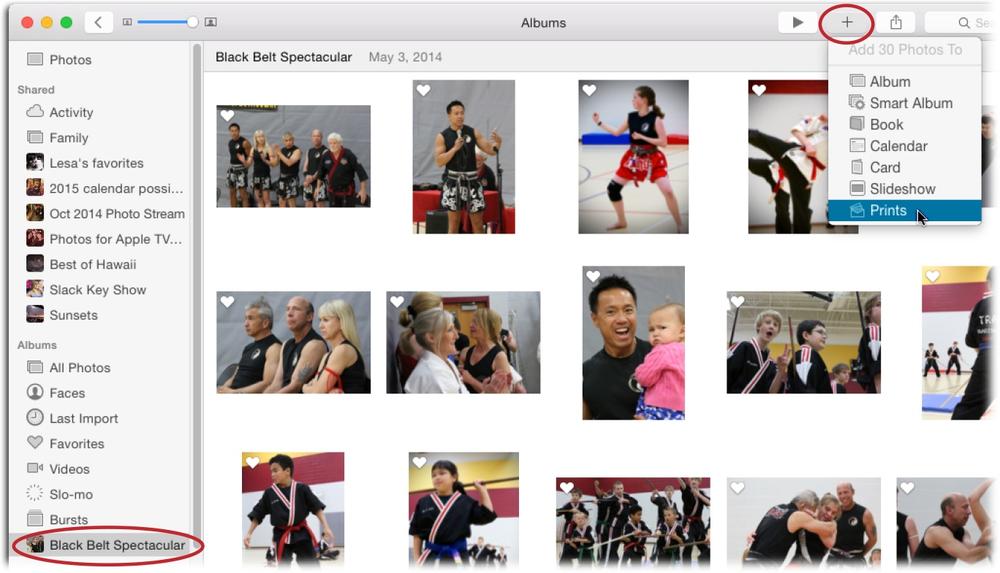
The easiest and most foolproof way to order prints online is to buy them from Apple. The process is incredibly simple: Just select the pictures you want to print—or a whole album, if you want to print every image in it—and then choose File→Order Prints, or click the Create icon circled in Figure 7-7 and then choose Prints.
Tip
You can also create a print project from a Moment or Collection while you’re in Photos view. Just point your cursor at the thumbnails, and then click the Create icon that appears to the right of the date, above the thumbnails (it looks like a big + sign). Choose Prints from the menu and you’re off and running!
Either way, Photos creates a print project that you can customize to your liking (it’s treated like an album, really). You can change print sizes, order additional print sizes of a certain image, adjust any autocropping that occurs due to mismatched aspect ratios, add a filter effect (like the ones you get in Edit mode; see Applying Filters), change the zoom level, set the number of copies you want of each print, and even enter Edit mode if you need to (whew!). You can also save the print project to work on later—say, after you finish watching Game of Thrones.
The Choose Format & Size screen that appears after you create a print project lets you pick a print size by clicking Select to the right of the size you want to order. Options in the Auto-Sized column produce irregularly sized prints—instead of resizing your picture to fit standard paper sizes, Apple resizes the paper to fit your picture. Oddly, Photos seems to assume you’ll order just one size print for all the pictures in your project. If that’s not the case, don’t panic. Just pick one size for now, and then change sizes for individual prints on the resulting screen, as explained next.
Note
If you haven’t cropped your pictures to the aspect ratio you’ll print—and you don’t pick a size in the Auto-Sized column—you get a message saying that Photos cropped some pictures to fit the paper size you picked. If that happens, click OK—and then remember to examine the print previews to ensure your subject’s heads are intact and, if necessary, adjust the crop as explained later in this chapter. (You can also click Cancel and then go crop the pictures yourself in Edit mode, but that’s a lot of unnecessary work since you can adjust cropping right in your print project.)
Changing and Adding Print Sizes
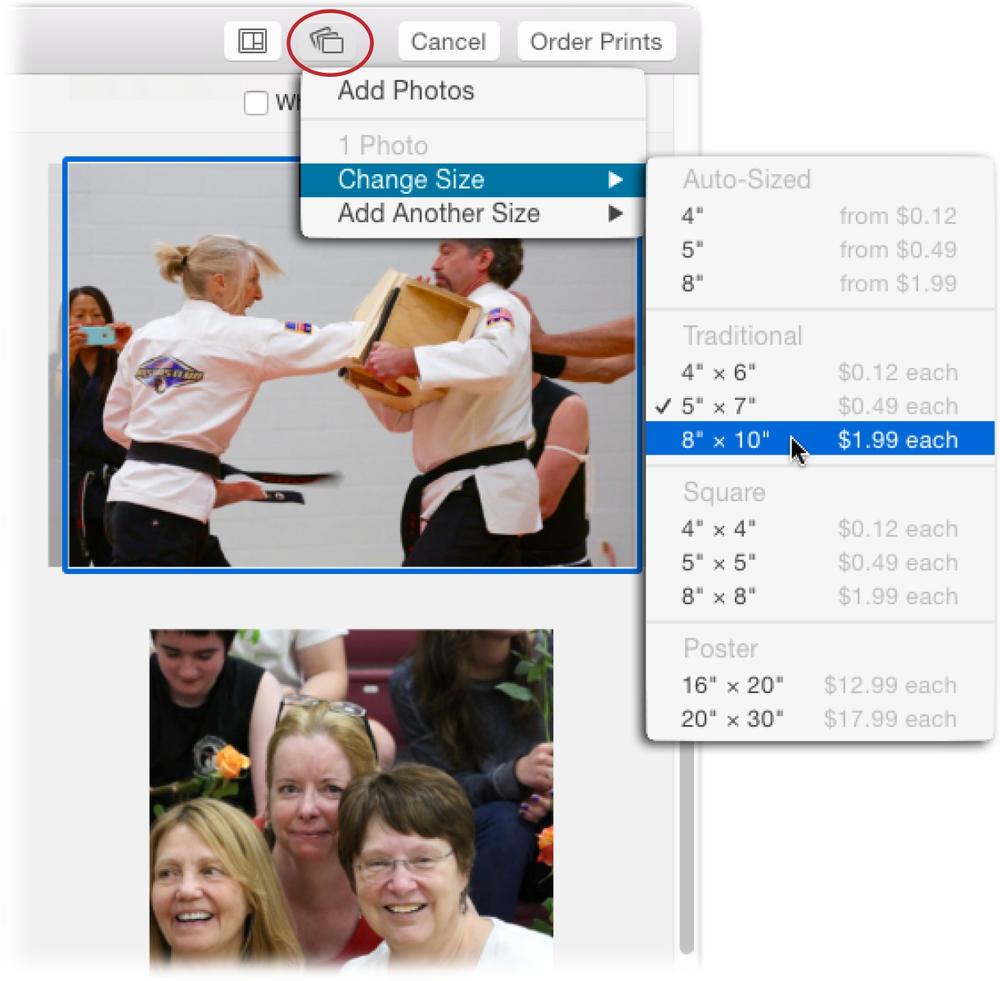
After you click the Select button next to a print size, Photos displays the Review Your Prints screen. To change the size of a print, or to add another size of the same print, simply click its preview, and then click the “Add photos or change print size” button circled in Figure 7-8. In the resulting menu, either choose a size from the Change Size submenu to change the current size to something else, or pick a size from the Add Another Size menu to add another print of the same image, but in a different size.
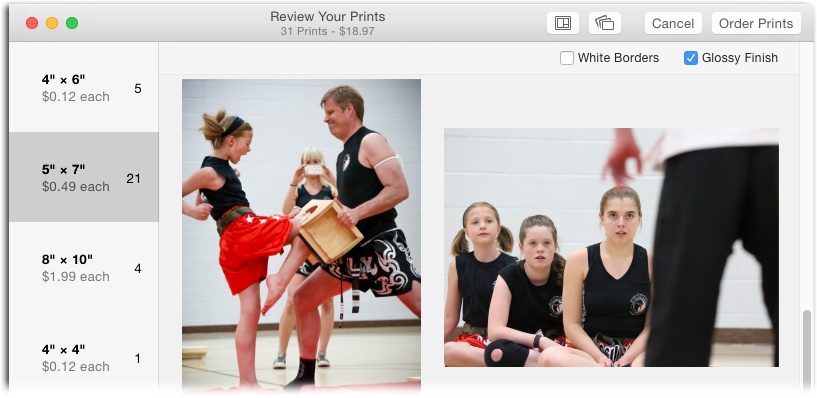
Once you’ve selected more than one print size in your order, the view of your print project changes to reflect that. As Figure 7-9 shows, Photos displays a list of all the sizes and quantities you’ve selected on the left and previews of the images that’ll print at those sizes on the right.
Adding and Deleting Images from Your Order
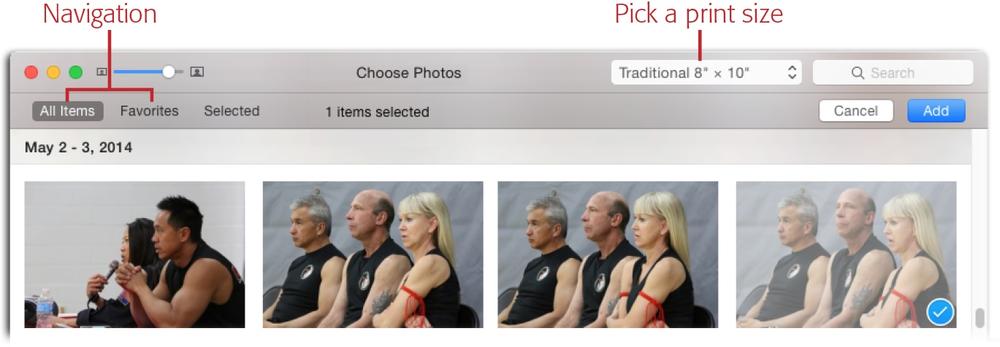
If you forgot to include a certain picture in your print project, you don’t have to start over. You can easily add it to the order you’re currently working on by choosing Add Photos from the “Add photos or change print size” menu (it’s circled back in Figure 7-8). When you choose this command, you see the Choose Photos screen shown in Figure 7-10. Just navigate to where the picture lives in your Photos library and click its thumbnail to add it. (You can select more than one photo if you want to add several.) Next, pick a size from the menu at the top of the window (labeled in Figure 7-10), and then click Add. Photos adds the picture to the end of your print project and returns you to the Review Your Prints screen.
Conversely, if you decide not to order a print of a particular picture that’s included in your print project, just select the preview, and then choose Image→“Remove Photo from Album” or press the Delete key on your keyboard. In the resulting pane, click Remove to send the picture packin’ or click Cancel to keep it in your order. (You can also use this technique to select and remove several photos.) To remove all the prints of a certain size from your order, click the size in the list on the left, press Delete, and then click Remove. If one of those photos is in your order at a different size, it remains in the print project.
Tip
If at any point you want to bail on the print ordering process—or you just want to take a break to wash your hair or bathe the cat—click Cancel in Photos’ upper right corner. When you do, Photos gives you the option of saving the order for later or sending it into oblivion. Click Save Order, and Photos saves the order as a project named with the current date and time. When you’re ready to resume futzing with the order, simply double-click the project to reopen it. To trash the order completely, click Cancel Order instead.
Cropping, Editing, and Ordering Multiple Copies
Once you’ve gotten the print sizes just right, you can adjust the images’ cropping, zoom level, or positioning within the frame; apply a filter (Applying Filters); or even pop into Edit mode (Editing Basics). You can also tell Photos how many copies of each print you’d like to buy. You do all this on the Review Your Prints screen.
Note
Any edits you make to pictures in a print project only affect the prints; these edits don’t show up anywhere else in Photos.
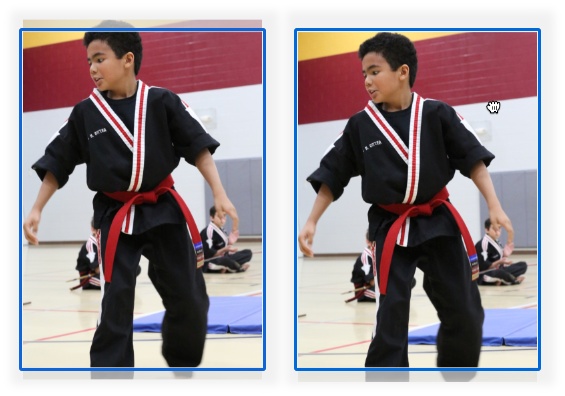
To adjust the autocropping Photos performed to make your pictures fit the aspect ratio of the print size you picked, click the image preview to reveal a blue crop box. Note whether the edges of your picture appear outside the box. If there are important bits of your image loitering outside the crop box, click the photo (your cursor turns into a hand) and then drag to reposition it within the box, as Figure 7-11 demonstrates.
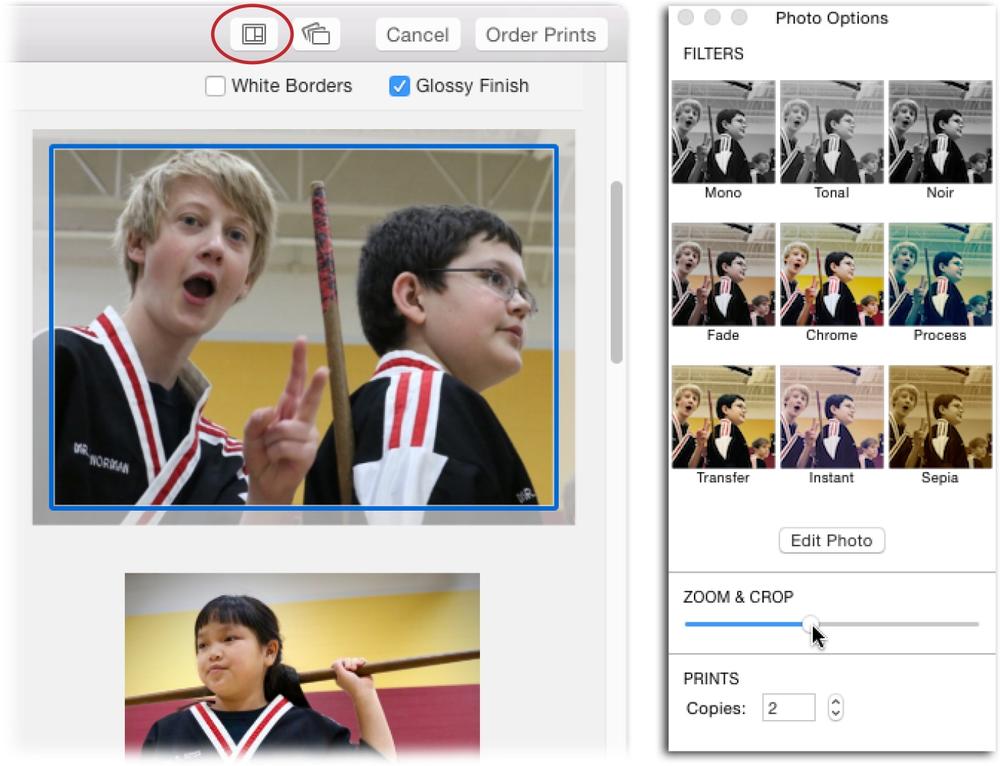
When the cropping’s all set, consider zooming further into your picture so the subject fills the frame. To do that, open the Photo Options panel by clicking the button circled in Figure 7-12. With an image selected, drag the Zoom & Crop slider rightward to zoom in, and then drag the image itself to adjust its positioning within the frame.
The rest of the goodies in the Photo Options panel are self-explanatory: To apply a filter, just click one of the print previews in the Filters section of the panel. To adjust the lighting and color of your print, click Edit Photo to open it in Edit mode. When you’re finished editing the shot, click Done at upper right and Photos returns you to your print project.
The Copies field at the bottom of the panel lets you control how many copies of that size print you want to buy. If you want to duplicate your entire order, don’t fuss with this field. Instead, use the Quantity field in the Checkout pane described in the next section.
Finalizing Your Order
Hang in there—you’re almost done! The next-to-last step in completing your order is to choose a finish for your prints. If you want your goodies printed on glossy photo paper, turn on the Glossy Finish checkbox at the top right of the Review Your Prints screen. If you (wisely) prefer non-glossy matte paper instead, make sure this checkbox is turned off (the note on Note explains why glossy isn’t the best option). If you’re feeling retro and want a thin white border around each image—like a vintage Polaroid—turn on the White Borders checkbox (this option isn’t available for Auto-Sized prints).
Note
If you plan on framing your prints, leave the White Borders option turned off because you may see the white area inside the frame. If, on the other hand, you plan on decorating your refrigerator or other magnetic surface with the prints, the White Border option gives prints a cool yet classy edge (great fun if you plan on passing prints among friends).
When everything is just right, click Order Prints at the upper right of the screen. An empty-ish Checkout pane appears that shows the date, time, and number of prints—you don’t see a list of thumbnails with sizes next to them nor an order total. Nevertheless, soldier on by clicking Add Shipping Address, and Photos tunnels into your Contacts app. Pick a name from the resulting list or enter a name in the search field at the top of the pane, and then click to select a contact. To add a new address, click New at the Ship To pane’s upper right, fill in the resulting fields, and then click OK. Click Done and the address appears in the Checkout pane with a checkbox to its left and a Quantity setting to its right. The pane also displays the total cost of your order. To send more than one set of your entire order to an address, click the + sign on its right to increase the order quantity. To add another lucky recipient to your order, click Add Shipping Address.
If you deem a recipient unworthy of receiving the gift of prints, simply turn off the checkbox to the left of his name. To edit an address once it’s in the Checkout pane, click the down-pointing icon to its right and choose Edit from the menu that appears. Other addresses associated with that contact appear in the menu, too.
Next, check the order total at the bottom of the Checkout pane. If everything looks good, take a deep breath and click Place Order (if not, click Cancel to exit the Checkout pane and return to your print project). Enter your Apple ID when prompted, click Sign In, and Apple dutifully sends your order to Kodak for processing. If this is your first print order, you may be asked to enter the security code for the credit card you have on file with Apple. Finally, Photos confirms of your order and lets you know when to expect it in the mail.
Tip
If your impatience gets the best of you, you can check the status of your order by choosing Photos→Print Product Store Account. Photos transports you to Apple’s website so you can see what’s going on. On the page that appears, you get a handy list of links that let you check your order status, track a shipment, cancel your order, print an invoice, return items, change shipping or billing info, view your order history, and so on.
All in all, the convenience of ordering prints from Apple is awesome, even if it does take a little time to finesse your order. You can do it all from the comfort of your home (and pajamas), and you don’t have to worry about quality, paper jams, or mailing prints to far-flung friends or family yourself. What’s not to love?