
Chapter 8. Sharing and Exporting
Let’s face it: Prints are expensive and the postal service is slow. To get your pictures and videos in front of others faster (or instantly), you’ve got to use other methods. Fortunately, Photos includes several ways to share your goodies online. For example, you can easily send them via email or text message, and post them on social media sites such as Twitter, Facebook, and Flickr.
However, one of the coolest tricks in the sharing realm is to create shared albums and then invite people to subscribe to them (don’t worry, it’s free). Doing so lets you share pictures and videos with certain people in a private fashion; only the people you invite to the album can see them. The opportunities for sharing your photographic life in this way, and for you to share in the photographic lives of others, are vast. For example, in the vacation scenario, your adoring subscribers can instantly see, and comment upon, the picture of the macadamia-nut–encrusted coconut-pineapple pancakes you had for breakfast this morning in Maui. For important life events—graduations, weddings, births, black-belt tests—you can set up a shared album so family and friends can see pictures of the event as you add them. And if you grant them permission, they can upload their own images to the shared album. Shared albums aren’t just for Photos-using folks, either: If the person you want to share pictures with doesn’t have a Mac, Photos is happy to generate a public web gallery so that person can enjoy and download pictures (so she can print an image or two, say).
This chapter also includes the step-by-step process for setting up family sharing, which creates a special Family album that anyone in your household can contribute pictures to. Of course, you can also export your images from Photos in order to use them in a different app, hand them off to someone else, or whatever. Photos is happy to export files in a variety of formats and sizes, with all your edits applied (you can also export files in their original, unedited state). Photos handles the heavy lifting such as resizing the files and changing their file formats—all you have to do is enter a little descriptive text and choose a few settings.
As you’re about to learn, sharing and exporting can be a lot of fun. This chapter teaches you everything you need to know to get your digital goodies out of Photos and in front of other people.
Sharing via Email
If you’re like most people, one of the most common things you’ll do in Photos is email pictures and videos to other folks. The process is painless, quick, and simple. There are no fancy graphical templates to choose from or captions to customize—you simply select thumbnails and Photos attaches them to a new email message in the email app of your choice. The process is as straightforward as it gets.
Note
iPhoto veterans who mourn the death of graphical email themes can take comfort in the fact that you no longer have to rely on your image-organizing app to maintain a record of who got which pictures. Since Photos hands the whole process off to your email app, you can keep track of what pictures you sent to whom there, just like every other email you send.
Unless you tell them otherwise, your Mac and iOS devices use Apple’s Mail program for all email-related tasks (the box on Switching Email Apps describes how to change this), so that’s the app Photos uses to email your digital goodies. All you really have to do is select some thumbnails, add a recipient, type a pithy message, and click Send. Here are the steps on a Mac:
In Photos, select some pictures and/or videos.
Use the techniques described on Selecting and Hiding Files to select the thumbnails of the pictures and/or videos you want to send.
If you use Mail for email, you don’t have to worry much about sending too many files. If you try to send an email with an attachment that’s too large for your recipient to receive, Mail knows not to include the attachment. Instead, it uses the OS X Mail Drop feature to save the attachment on Apple’s servers. Your recipient merely receives a download link that he can click to download the files.
The maximum file size for Mail Drop is five gigabytes per email, but the files only stay on Apple’s servers for 30 days, so keep your fingers crossed that your recipient checks her email at least once a month. Fortunately, Mail Drop attachments don’t count against your iCloud storage allowance (Meet the iCloud Photo Library), though Apple does impose a one-terabyte Mail Drop limit in any 30-day period.
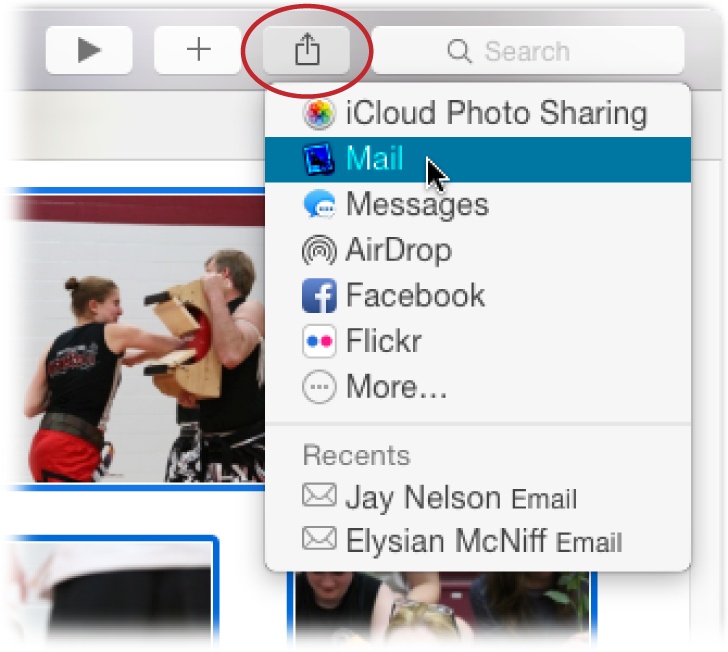
Click the Share icon in Photos’ toolbar and choose Mail.
The share icon (circled in Figure 8-1) lets you send your files to many places, including your preferred email app. When you choose Mail, your preferred email app launches and a new message appears with your files attached. (See the box on Switching Email Apps to learn how to change your preferred email app.)
Figure 8-1. When you choose Mail, your Mac creates a new email message in the Mail app or in the email program of your choice. The selected thumbnails are either attached to it or—if you’re using Mail and the attachment is really big—the files are uploaded to Apple’s servers (see step 1 for details).Choose your recipient(s).
Pick a recipient or several the same way you do for any other email message: Click the To: field and start typing the person’s name. If the recipient is in the Contacts app, you only have to type part of his name—OS X tries to guess and fill it in automatically for you as you type. (If you haven’t emailed this person before, you need to enter his full address.) Alternatively, you can click the + button on right of the To: field and pick a recipient from the Contacts app.
To send the email to more than one person, type a comma (,) after the first email address, and then enter another address (or pick one from the Contacts app using the + button). Each person will receive a copy of your message and all the attachments it contains.
Enter a subject and add a message.
Give your recipient(s) a clue about what’s inside your message by entering something meaningful in the subject line. You can customize the email further by entering a message in the body of the email, such as, “Here’s me breaking a board during my third-degree black belt test in Taekwondo. Wish those bullies from elementary school could see me now!”
Choose an image size.
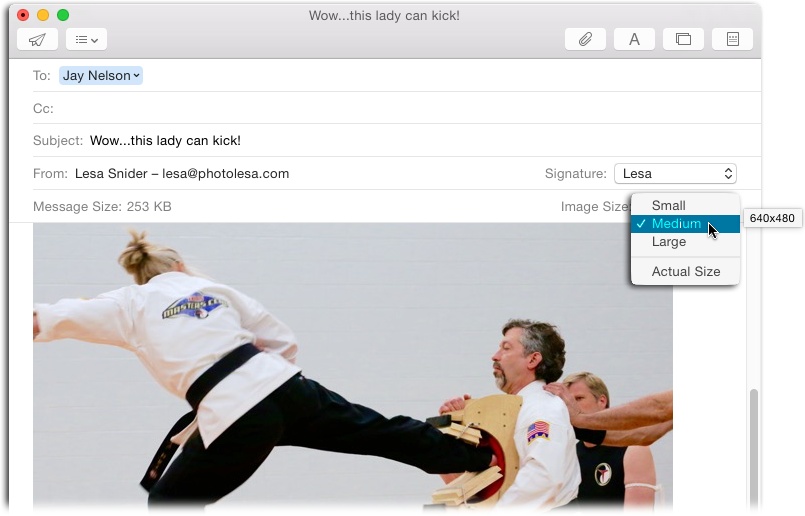
In Apple’s Mail app, use the Image Size menu at the upper right of the email body to pick a size (see Figure 8-2). Here are your options and why you might choose each one:
Figure 8-2. Use the Image Size menu shown here to tell your email program what size images to send. If you’re using an email program other than Mail, you’ll need to root around within that program to find its image-size options.Note
If you’re using Apple’s Mail app and you’re sending a huge image, Apple’s Mail Drop feature may step in to handle the big file. For example, you may see a message that says, “Would you like to send these attachments using Mail Drop?” By clicking Use Mail Drop, the image cools its heels on Apple’s servers and is only downloaded when the recipient checks her email. This handy feature is described in depth on Sharing Exported Movies Online and 202.
Actual Size transmits the image at its original dimensions. If the recipient plans to print the image, pick this option. However, both you and the recipient need to have a fast Internet connections and large inboxes for this to work. Many email services limit attachments to 20 megabytes, so keep an eye on the Message Size value to the left of the Image Size menu—you may need to send multiple messages with fewer images attached. (As you learned in step 1, if you use the Mail app to send emails, OS X’s Mail Drop feature kicks in to handle large attachments.) Because of these size issues, you should use this option sparingly.
Small produces an image that’s 320 x 240 pixels and weighs in at roughly 100 KB in file size. Use this option only if your recipient lives in a rural area and has a painfully slow dial-up Internet connection.
Medium yields a file that’s 640 x 480, which is plenty of detail to fill a good chunk of your recipient’s screen, plus it doesn’t take long to download. For example, this option trims a two-megabyte image down to less than 150 KB. Choose this setting if you’re sending a lot of pictures with a program other than the Mail app, but don’t use it if the recipient will print the file—at best, they’d be able to produce a 2 x 3-inch print.
Large downsizes your photos to 1280 x 960 pixels, which fills the average person’s screen and is good enough to produce a 4 x 6-inch print. That said, if you’re sending a bunch of pictures, this size can push your recipient’s mailbox beyond its limit, meaning he may miss out on important emails until he empties his inbox, and be angry with you as a result.
To practice good email etiquette, always try to send the smallest size you think your recipient wants; in most cases, that’s Medium. After all, she can always ask for a larger one if she wants it. (As Resolution Matters explains, bigger images can have a higher resolution so they print far better than smaller ones.)
Click Send.
In Mail, the Send button is perched at the upper left of the message window and has a paper airplane icon on it (it’s visible in Figure 8-2). When you click it, your attachments go sailing through the ether.
As you can see, using Photos to send email is a straightforward process. But if you manage your email using a web browser, you’ll need to export your goodies from Photos in order to attach them to a web-based email message. It’s not as convenient as using Photos to send emails, but it gets the job done. Exporting from Photos explains how to export images.
Emailing Photos from an iOS Device
The process for emailing pictures and videos using your iOS device is nearly the same as on a Mac. The hardest part to remember is to start the email from the Photos app, instead of the Mail app (the latter doesn’t let you attach images).
To email pictures from your iOS device, use the techniques on Hiding Thumbnails to select some thumbnails in Photos, and then tap the share icon at the lower left. On the screen that appears, tap the Mail icon. After a moment, a new email message pops open. Just tap the To field and enter an address, tap Subject and enter something clever to get your recipient’s attention, and then tap the body of the message—above the attached image thumbnails—and enter your message.
When you’re finished, tap Send, and then pick an image-size option from the resulting screen. (You get the same size options as you do when emailing images in Photos for Mac [Sharing via Email].) Once you tap a size, Photos for iOS prepares the images for their journey and sends your email. You don’t get a confirmation message with this method, so you just have to trust that the email actually went where you told it to.
Sharing via Text Message
Another easy way to share pictures and videos with others is to send them via text message. When you do, Photos employs the Messages app that’s preinstalled on your Mac and iOS device(s). The recipient receives the communiqué on his cell phone or iOS device, and in the Messages app on his Mac.
In Photos for Mac, the first step is to select some thumbnails of the items you want to send (Selecting and Hiding Files); you can send up to 10 full-size pictures or one video in a single text message. Next, click the share icon in Photos’ toolbar and choose Messages. A new text message appears in the middle of the Photos window, as Figure 8-3 shows.

Note
The first time you choose Messages from the Share menu, Photos prompts you to sign in. Just click Sign In and you’re transported to the preferences pane of the Messages app where you can enter your Apple ID or the user name and password of your AIM, Jabber, Google Talk, or Yahoo account.
Enter the recipient’s name or cell phone number, or click the + to tunnel into the Contacts app and pick a recipient from there instead. Then click within the body of the message and enter a comment. When you’re finished, click Send. If you listen closely, you hear a satisfying whoosh sound as the message rockets into the ether (if you don’t have your Mac’s sound muted, that is).
You can also send text messages from your Mac using the Messages app itself. If you already have a message thread going with your intended recipient, just drag a few thumbnails from the Photos window onto her name, and then press the Return key on your keyboard to send the pictures on their merry way.
In Photos for iOS, select a few thumbnails (see Hiding Thumbnails), and then tap the share icon (the square with the up arrow). In the sheet that appears, tap the green-and-white Message icon. Enter a person’s name or cell number, and then tap Send.
If you’re on the receiving end of a text message, you can save the pictures it contains to your Photos library in a couple of ways:
On a Mac, in the Messages app, double-click the photo to open it, and then click the Share menu that appears at the window’s upper right and choose “Add to Photos.” Alternatively, Control-click the photo in Messages and, from the shortcut menu, choose “Add to Photos Library.”
On an iOS device, in the Messages app, tap the photo, and then tap the share icon and choose Save Image.
Sharing Online
It’s great fun to post pictures and videos on social media websites such as Twitter, Facebook, and Flickr. People can immediately start interacting with you by adding comments, clicking the coveted Like button, and so on. Heck, your buddies can even download your pictures to their own Photos libraries. This section teaches you how to do all that and more.
Note
As of this writing, Photos lets you post both pictures and videos to your Facebook page, but you can only post pictures onto Twitter and Flickr. You have to visit those two sites directly (using a web browser like Safari) to post videos.
As you probably know, Twitter is the free microblogging site that lets you announce to the world—in brief, 140-character messages—exactly what you’re doing or thinking. You can liven up your posts by using Photos to include a picture. For example, instead of declaring that you enjoyed a delicious bowl of oatmeal this morning, you can show the world exactly what it looked like. Ain’t technology grand?
Start the Twitter party by visiting www.twitter.com and creating an account. Next, in Photos for Mac, select a picture to share, click the share icon in Photos’ toolbar (it’s circled back in Figure 8-1), and then choose Twitter; the sheet shown in Figure 8-4 appears. (If this is the first time you’ve used Twitter on your Mac, Photos prompts you to set up your account. Click Add Account and you’re transported to the Internet Accounts pane of your Mac’s System Preferences. Enter your account user name and password, click Next, and then click Sign In. If everything goes well, switch back to Photos and choose Twitter from the share icon again.) Enter something clever and, if you like, click Add Location at lower left to add your computer’s current location to the message. Click Send and Photos cheerfully lets you know your picture was successfully published.

On an iOS device, the process is almost exactly the same except that you click the share icon (the square with an up arrow) to get started.
Love it or loathe it, Facebook is an integral part of over a billion people’s daily lives. It’s the easiest way to share pictures and videos among a large group of people because it’s user-friendly and it doesn’t matter what flavor of computer or smartphone you use to interact with it. To get a free account, mosey on over to www.facebook.com where you can create a profile page and, if you wish, add résumé-like details, lists of your favorite books, movies, quotes, and so on. You can then link your profile to the profiles of other people by sending them a friend request. Once the request is accepted, you can see each other’s profile pages and socialize with them in the virtual realm. You also get notifications of what they’re up to.
Once you get your Facebook page going, you can use Photos to upload individual pictures and videos to your Facebook Timeline, add them to an existing Facebook album, or create a new one. You get full control over who sees your goodies. And by tagging friends in your pictures, those pictures appear on your friends’ Facebook Timelines, too.
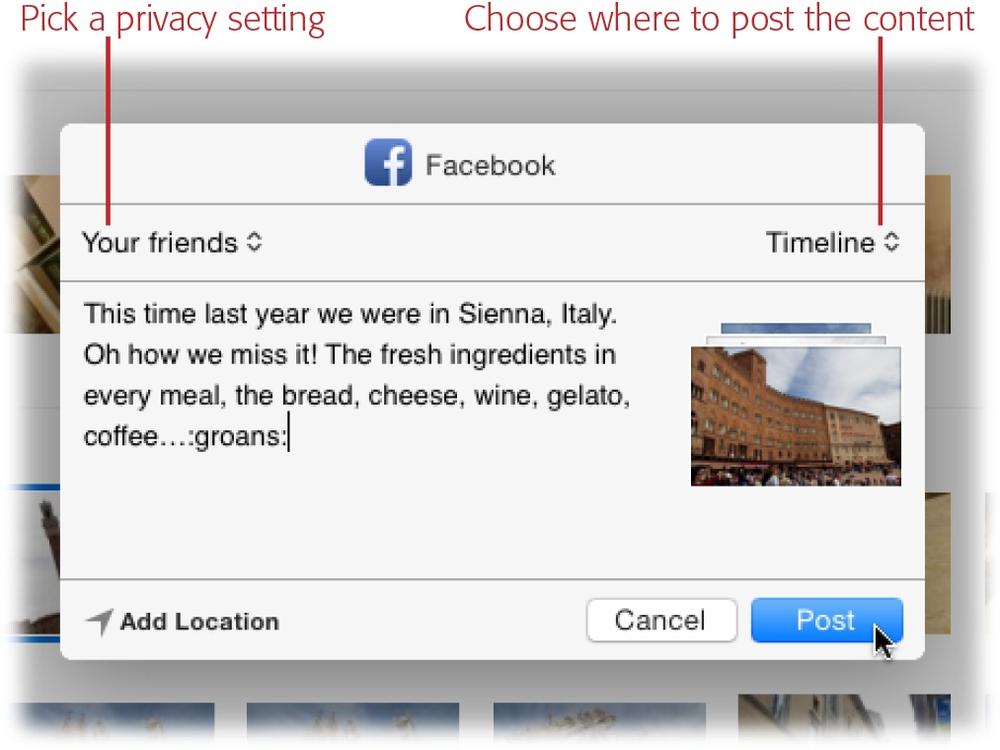
Posting pictures and videos to Facebook is unbelievably easy. Begin by selecting thumbnails (Selecting and Hiding Files) of the content you want to share. Next, in Photos for Mac, click the share icon in Photos’ toolbar and choose Facebook. (If this is the first time you’ve done this, or if you haven’t yet added your Facebook account to your Mac, Photos prompts you to log into your Facebook account; click Add Account, and Photos opens the Internet Accounts pane of your Mac’s System Preferences. Enter your user name and password, click Next, and then click Sign In. Switch back to Photos, click the share icon again, and choose Facebook.) A message pane appears in the middle of the Photos window (see Figure 8-5), where you can set options for the post and enter a description. Click Post, and Photos uploads it to Facebook.
Note
Seasoned Mac users who interacted with Facebook via iPhoto may find Photos’ simplistic Facebook integration disappointing—or relieving. Gone are the complicated, two-way pipelines between your Mac’s photo library and Facebook. There’s also no way to connect more than one Facebook account to your Photos library, nor can you use Photos to change your Facebook profile picture. As usual, when Apple replaces a creaking old program (iPhoto) with a sleek new one (Photos), it giveth and taketh away features.
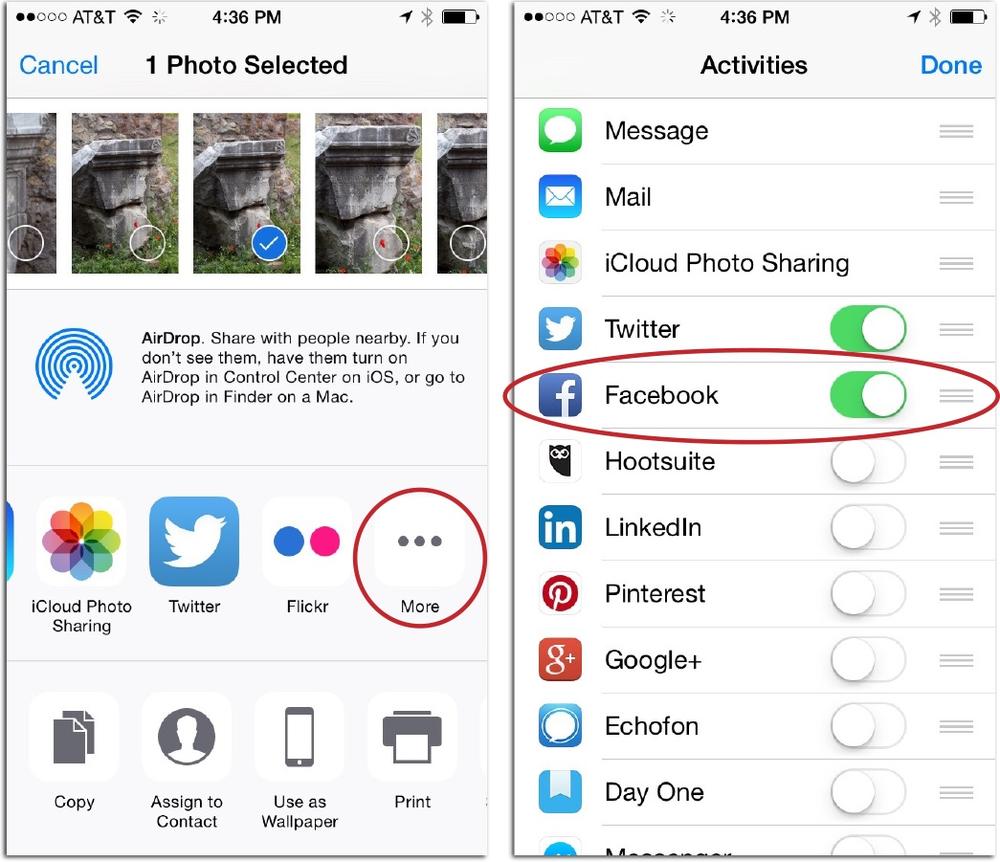
Posting to Facebook using Photos for iOS is quite similar, though you need to log into your Facebook account using the Facebook app (it’s free from the App Store). Facebook also needs to be added to your iOS device’s list of sharing destinations, as Figure 8-6 explains. Once you’ve done that, select the picture(s) you want to post, and then tap the share icon and choose Facebook.
After your post is complete, you can sit back and watch the comments and likes happen in real time. It’s actually quite fun and satisfying, especially when sharing stuff with far-flung friends and family members who you don’t get to see often (or at all).
Flickr
Rounding out the list of Photos’ social-media sharing destinations is Flickr, an extremely popular site dedicated to photography. You can get a free account by signing up at their website, www.Flickr.com, though you can also log in with your Facebook or Google account (if you have one).
Amazingly, Flickr lets you upload up to a terabyte of photos and videos at full resolution (Resolution Matters). For example, if you shoot with a 6.5-megapixel camera, that’s 537,731 photos (sounds like a backup solution, doesn’t it?). Pictures are limited to 200 megabytes each; videos can’t weigh more than 1 gigabyte, and their pixel width can’t exceed 1080 pixels in high definition.
When you join Flickr, you’re in for quite a ride—it’s not just a place to post your pictures on the Web for your friends and family to see, although it’s great for that. It’s also a place where photography fans give feedback, link to one another’s Flickr pages, and so on. Many Flickr fans add tags to their images so folks can easily find them—say, “NASA,” “macro,” “portrait,” or location-based tags such as “Maui” or “Rome.” You can also order hardcover, printed books of your Flickr posts, complete with matching dust jackets.
Note
Posting a picture to Flickr doesn’t mean the whole world can see it. By using the site’s privacy settings, you can keep personal shots out of public view. The site also lets you create lists of friends and family so that only the people on those lists can see specific pictures. For more info, visit https://help.yahoo.com/kb/flickr.
Posting pictures to Flickr works just like it does for Twitter and Facebook. First, visit www.Flickr.com and create an account. Second, in Photos for Mac, select some thumbnails, click the share icon, and then choose Flickr. If this is the first time you’re interacting with Flickr on your Mac, Photos prompts you to add the account. Click Add Account and the Internet Accounts pane of your Mac’s System Preferences appears. Enter your user name and password, click Next, and then click Sign In. Next, switch back to Photos, choose Flickr from the share menu again, and you see the pane shown in Figure 8-7.
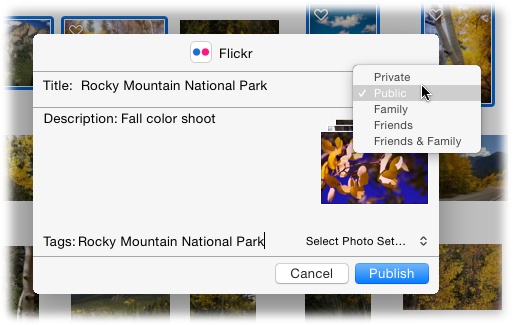
When you’re finished filling out the message form, click Publish. Depending on the size and number of items you’re uploading, this process can take awhile.
The process for posting content to Flickr using Photos for iOS is nearly the same. Use the techniques described on Hiding Thumbnails to select some content, and then tap the share icon. Scroll through the horizontal row of sharing destinations until you see Flickr, and then tap its icon. Fill out the resulting message and tap Publish. That’s all there is to it!
Using iCloud Photo Sharing
As you learned in Chapter 2, iCloud has several components. For example, iCloud Photo Library (Meet the iCloud Photo Library) can back up your whole Photos world and sync all your pictures and videos across all your devices. My Photo Stream (My Photo Stream), on the other hand, is for those who don’t use iCloud Photo Library and wish to sync their most recent 1,000 files between devices.
iCloud Photo Sharing is a wonderfully private way to share digital memories with certain people. It works on Macs, PCs, and iOS devices, and the sharing can work in both directions. You start the sharing spree by creating an album and inviting people to subscribe to it via email (Photos handles that part). If your subscribers have an iCloud account, they can like what you post and add comments. They can download your content and, if you grant them permission, add their own to the shared album. If they’re rolling sans iCloud, you can have Photos generate a public website that they can use to see your stuff.
Note
PC users can join the iCloud Photo Sharing party by installing iCloud for Windows. For info on how to download it and set it up, visit https://support.apple.com/en-us/HT201391.
When you create or subscribe to a shared album, it appears on all of your devices. This makes iCloud Photo Sharing a serviceable alternative to using—and paying for—iCloud Photo Library (Meet the iCloud Photo Library) to get certain imagery onto your iOS devices. Since iCloud Photo Sharing doesn’t count against your allotted iCloud storage space (Meet the iCloud Photo Library), it’s basically free. That said, it doesn’t back up the original, high-quality versions of all your stuff to Apple’s servers like iCloud Photo Library does.
Turning on iCloud Photo Sharing
In order to use iCloud Photo Sharing, you first have to turn it on. Here’s how:
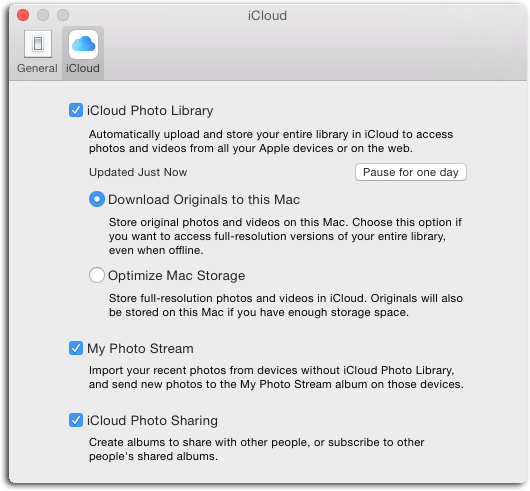
In Photos for Mac choose Photos→Preferences, and then in the iCloud pane (Figure 8-8), turn on iCloud Photo Sharing.
On an iOS device, tap Settings on your home screen (or whatever screen it lives on), and then scroll down until you see Photos & Camera. Give it a tap, and on the next screen, tap the switch next to iCloud Photo Sharing (it turns green).
Creating a Shared Album
Creating a shared album in Photos for Mac is mercifully simple. Photos for iOS lets you create albums, too, so you can quickly share content with others no matter where you are (talk about instant gratification!).
In Photos for Mac, simply select an album or use the techniques described on Selecting and Hiding Files to select a few thumbnails. Next, click the share icon in Photos’ toolbar and choose iCloud Photo Sharing, or Control-click a selected thumbnail and choose Share→iCloud Photo Sharing. You can also choose File→Share→iCloud Photo Sharing to get started.
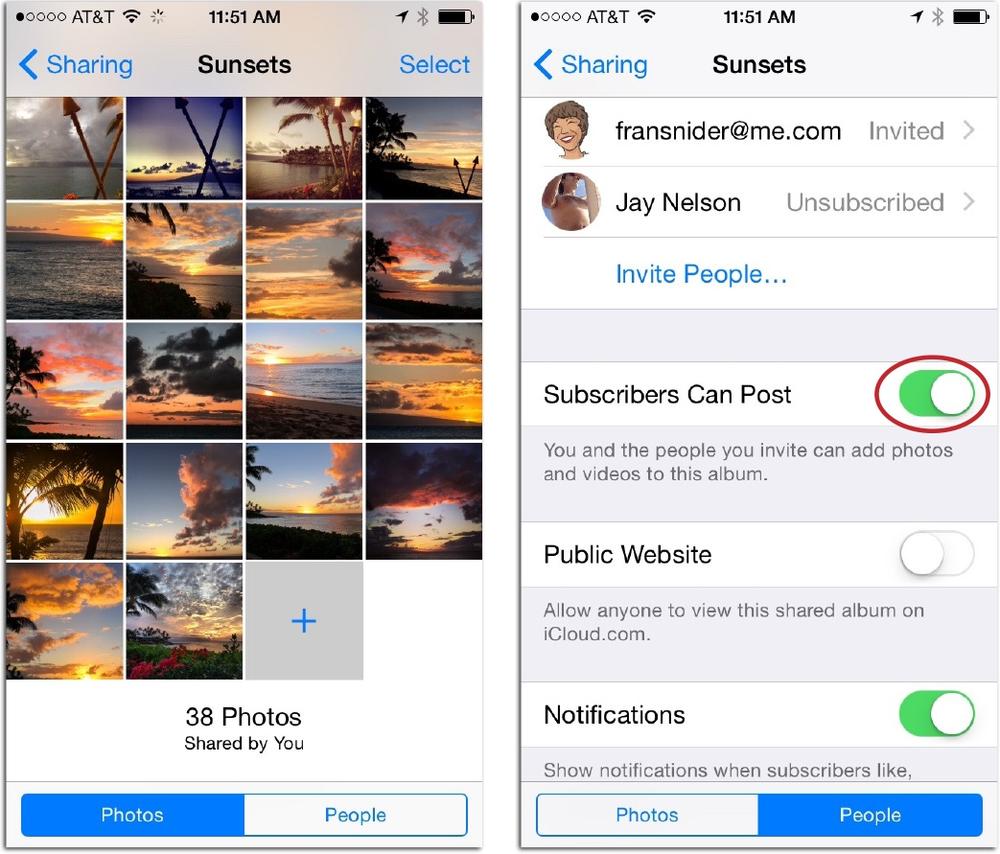
In the “Add to Shared Album” sheet that appears (Figure 8-9, left), click New Shared Album, and the sheet shown in Figure 8-9 (right) appears, which lets you name the album and invite someone to subscribe to it by entering his name, email address, or cell phone number into the To field. In the Comment field, enter a description of the pictures you’re sharing.
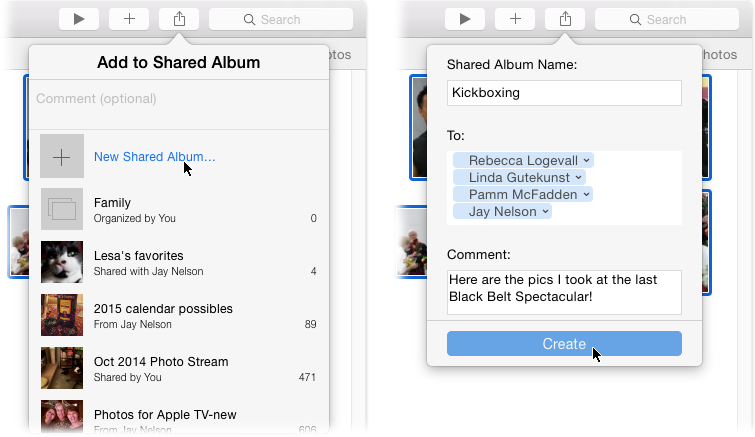
When you’re finished filling out the all the fields, click Create. The lucky people you include in the To field promptly receive an email invitation to subscribe to your freshly shared album. Once they click the Subscribe button in the email, the shared album appears in Photos’ Shared view on all their devices. The Photos icon in the Dock on the recipient’s Mac shows a tiny red circle containing the number of invitations that await them. (When invitations are awaiting your attention, you see the same red circle on the Photos icon in your Mac’s Dock and on your iOS devices.)
To create a shared album in Photos for iOS, use the techniques described on Hiding Thumbnails to select some thumbnails—unfortunately, there’s no way to select a whole album—and then tap the share icon. On the resulting screen, tap the colorful iCloud Photo Sharing icon. In a moment, you see a message screen with a stack of tiny thumbnails representing the images you’re about to share (see Figure 8-10, left). If you like, you can tap the Comment field to enter some descriptive text (don’t worry; you’ll get another chance to enter a comment before the album is shared). Next, tap Shared Album at the bottom of the message; you see a list of the albums you’ve shared and the ones you subscribe to (see Figure 8-10, right). Tap New Shared Album at the top of the list, and enter a name for the album on the next screen. Tap Next, and then tap the To field on the next screen to enter an email address. Tap the + icon at the right of the field to tunnel into your Contacts app and search for the lucky recipient, or scroll to find her name in the list. Keep tapping the + icon to return to your Contacts list until you’re finished adding email addresses. Once you’re done, tap Next and you see the first message screen, where you can enter a comment if you didn’t do so before. Finally, tap Post to send your album invitations!

Tip
You can also create a new, empty shared album in Photos for iOS in Shared view. Tap Shared at the bottom of your screen and, if necessary, use the Back button at the upper left to close the shared album you’re viewing so you see thumbnails of all your shared albums. Then tap the + button at the upper left and fill out the resulting message screens as described above. When you’re finished, tap Create and you see a new, empty album in Shared view. To populate it with pictures, open the album by tapping its thumbnail, and then tap the + icon that appears. Photos for iOS transports you to Photos view, where you can tap to select the pictures and videos you want to include. When you’re finished, tap Done.
Once you share or subscribe to a shared album (or several), Photos collects updates to shared albums in the Activities album (Shared View) in Shared view, which you can see in both Photos for Mac and Photos for iOS. When you open this album, you see big, beautiful thumbnails of the most recent additions to each album, grouped according to album name. Just scroll through the list to see all recent activity, including comments (Downloading Shared Content). Beneath the thumbnails of albums that you’ve shared, you’ll spot a clickable link that takes you into the contents of that particular album (“See all 89 photos,” say). This is a great way to breeze through all the goodies in your shared albums and see what everyone is up to.
Adding Content to a Shared Album
Once you’ve created a shared album, you can add more goodies to it in Photos for Mac in the following ways:
Drag and drop onto the sidebar. First, make sure the sidebar is turned on by choosing View→Show Sidebar. Next, select the pictures and videos you want to add, and then drag them onto the shared album’s name in the sidebar’s Shared section. (If you see the Shared heading but no albums, expand the section by pointing your cursor at it and then clicking Show.)
Choose from a list of shared albums. Select some pictures and videos to add, and then click the share icon in Photos’ toolbar and click iCloud Photo Sharing or choose File→Share→iCloud Photo Sharing. Either way, you see the “Add to Shared Album” sheet (Figure 8-9, left), which lists all your shared albums. Add a pithy comment to the field at the top of the sheet, and then click the album you want to add the content to.
Open the shared album and click “Add photos and videos” at its upper right. When you do, your view changes to let you pick thumbnails to add. Use the buttons at the upper left to navigate between All Photos and Favorites. When you find something to add, click its thumbnail and a blue circle with a white checkmark appears on the thumbnail’s lower right (click the thumbnail again to deselect it). Click Selected at the upper left to see all the thumbnails that are already included in the shared album, along with those you’ve chosen to add.
Open the Activity album in Shared view and click the “Add Photos or Videos” link that appears above the images at left. You get the controls described in the previous bullet point to add stuff.
To add content to a shared album in Photos for iOS, use the techniques described on Hiding Thumbnails to select some photos and/or videos, and then tap the share icon. Next, tap the iCloud Photo Sharing icon; a message screen appears and you can add a comment. Tap Shared Albums at the bottom of the screen, and in the resulting list of albums, tap the album you want to tuck the content into. A blue checkmark appears to the right of its name. Tap Post, and Photos adds your goodies to the album you picked. Alternatively, you can open the shared album first, and then tap the + button that appears at the end of the album. When you do, you’re whisked into Photos view, where you can tap to select thumbnails of the stuff you want to include. When you’re finished, tap Done. You can also add stuff while viewing the Activities album on your iOS device, as described in the last bullet point above.
Deleting and Unsubscribing from a Shared Album
If, for whatever reason, you no longer wish to share the contents of your Kickboxing album (say, you don’t want to give Grandma a heart attack), or if you don’t want to subscribe to an album someone else shared with you, you can delete the album. If you’re the owner of the album, deleting it doesn’t remove its contents from your Photos library. But if you merely subscribe to the album, the content disappears when you delete it (that is, unless you downloaded its content as described on Downloading Shared Content).
Note
If you merely wish to stop sharing the album with a certain person, don’t throw out the shared album with the bathwater. Instead, remove the person (or several) from your subscriber list as explained on Managing Subscribers.
Deleting a shared album is simple, and you can do it in a few different ways in Photos for Mac:
In Photos view or in the sidebar, Control-click the shared album’s thumbnail and choose Delete Shared Album from the shortcut menu that appears.
In the preview area or sidebar, select the album’s thumbnail, click the subscriber icon in Photos’ toolbar (it’s circled in Figure 8-11), and then click Delete Shared Album. It’s the big red button at the bottom of the sheet—you can’t miss it.
In Shared view, click the < button in Photos’ toolbar until you see thumbnails of all the shared albums you’ve made or subscribed to. Next, in the preview area (not the sidebar), select the one you want to obliterate, and then press ⌘-Delete. In the confirmation box that appears, click Delete. (If you merely subscribe to the shared album you’re deleting, the confirmation message gives you an Unsubscribe button instead.)
Dust off your hands and imagine a tiny poof sound as the shared album instantly disappears from all your subscribers’ devices. Of course, any content your subscribers downloaded from the shared album (Downloading Shared Content) still exists on their devices.
In Photos for iOS, tap Shared at the bottom of your screen and, if necessary, use the Back button at upper left to close the shared album you’re viewing so you see thumbnails of all your shared albums. Tap Edit at upper right, and then tap the red circle with a dash that appears to the album’s left. Tap the big red Unsubscribe button that appears at right, and then tap Unsubscribe in the confirmation message that appears. The album disappears from Shared view in Photos for iOS and in Photos for Mac.
Letting Subscribers Add to a Shared Album
A bonus (and semi-hidden) feature of shared albums is that you can let any subscriber add his own pictures and videos to the album. Doing so creates incredibly convenient, two-way sharing between you and your subscribers.
To set it up in Photos for Mac, double-click a shared album to open it or, if you have the sidebar turned on (The Two Faces of Photos), just click the album’s name in the Sharing section to select it. Next, click the subscriber icon in Photos’ toolbar (it’s circled in Figure 8-11). In the sharing sheet that appears, turn on Subscribers Can Post.
Note
In order to edit an item added by someone else, you have to import it into your Photos library first. Downloading Shared Content tells you how.
In Photos for iOS, tap Shared at the bottom of your screen and, if necessary, tap the Back button at the upper left to close the shared album you’re viewing so you see the thumbnails of all your shared albums. Next, tap the thumbnail of the album that you want to grant uploading permission to; you see the album’s thumbnails, as shown in Figure 8-12, left. Next, tap People at the bottom right and the screen shown in Figure 8-12, right, appears. Tap the Subscribers Can Post switch to turn it on (it turns green). Now your subscribers can add their own stuff to the album.
From this point on, the shared album synchronizes everyone with access to it: Any items you, or a subscriber, add to the shared album is sent to every device of every person who subscribes to it. Likewise, any items you, or a subscriber, remove from the shared album disappear on all subscribed devices. It’s a heck of a lot of fun and the perfect way to share pictures with folks who aren’t on Facebook or who aren’t particularly tech-savvy.
Tip
Don’t underestimate the power of creating an empty shared album that you add items to later. This is handy when you want to, say, set up a shared album for a friend or relative to put stuff into. To do that in Photos for Mac, choose View→Shared, and Photos shows you thumbnails of all the albums in Shared view. Next, click the + button in Photos’ toolbar and you see the sheet shown in Figure 8-9 (right). Give the subscriber(s) permission to add content to the album as described in this section, and you’re good to go! The tip on Tip explains how to do this in Photos for iOS.
Managing Subscribers
So you forgot to add Aunt Edna to a shared album and now she’s upset. No big deal—you can easily invite her after creating the album. On the flip side, perhaps you want to remove an existing subscriber from a shared album (handy for breakups and other squabbles). These kinds of subscriber-management chores are easy to handle in both Photos for Mac and Photos for iOS.
First, select the shared album by either clicking it in the sidebar’s Shared section or by clicking the album’s thumbnail in Shared view. Next, click the subscriber icon in Photo’s toolbar (it’s circled in Figure 8-11). In the sheet that appears, you can do all kinds of practical stuff such as edit the album’s name, invite new subscribers, remove existing ones, resend invitations, and so on:
To add a subscriber, click inside the To field and enter her name. Like most Apple apps, Photos tries to automatically fill in the rest of the name based on the first few letters you type. If the person is stored in the Contacts app, her name appears in a list; just click it to select it. If your intended recipient isn’t in your Contacts app, enter her email address or cell phone number to add her to this list (this maneuver doesn’t add them to the Contacts app).
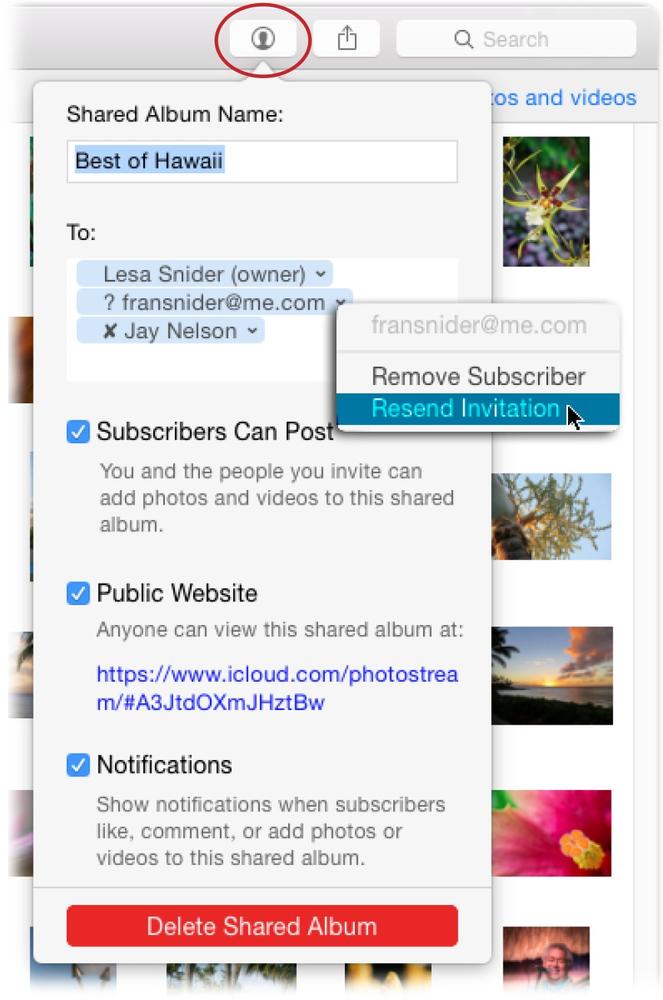
To remove a subscriber, click the tiny down-pointing triangle to the right of his name and choose Remover Subscriber from the menu visible back in Figure 8-11.
To resend an invitation, click the tiny down-pointing triangle to the right of her name and choose Resend Invitation.
To stop receiving notifications about subscriber activity, turn off Notifications at the bottom of the sheet. Doing so means you won’t hear about each time a subscriber likes, comments, or adds his own content to the shared album.
In Photos for iOS, you can do all of the above using the People screen shown back in Figure 8-12 (right). To get there, tap a shared album to open it, and then tap the People button at the bottom of your screen. There you can:
Add a subscriber by tapping Invite People and entering an email address on the resulting screen. To tunnel into your Contacts app to fetch the email address, tap the + button; you see a list of all the people in your device’s Contacts app. Use the search field to find the person you want to invite to the album, or simply scroll through the list. When you find the name you want, tap it. If there’s more than one email address associated with that person, her contact sheet opens. Tap the email address you want to use, and it’s added to your invite list. To invite more people, tap the + icon again. When you’re finished adding email addresses, tap the Add button at upper right to go back to the People screen.
Resend an invitation or remove a subscriber by tapping the person’s name at the top of the sheet, and then scrolling down to the bottom of the resulting sheet and tapping Resend Invitation or Remove Subscriber.
Turn off notifications for subscriber activity by tapping the Notifications switch near the bottom of the People sheet.
The ability to manage your shared albums in this way on your iOS device is pretty amazing. Simply put, you don’t have to be home and in front of your Mac to do this stuff. You can easily manage shared albums while globetrotting, waiting at the car wash, or getting a tattoo. Just remember to put down your iOS device every once in awhile so you can interact with other humans in person!
Publishing a Shared Album on the Web
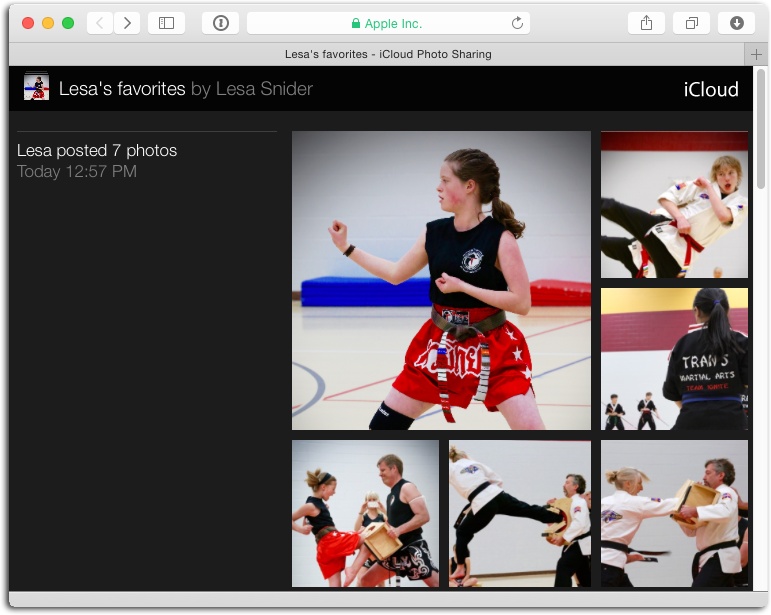
If the people you want to share your digital mementos with don’t have an iCloud account, don’t worry; Photos for Mac and iOS is more than happy to whip up a quick public web page that anyone can view in a web browser. Figure 8-13 shows an example of a public site.
To create a website from a shared album in Photos for Mac, open the album or select it in the sidebar’s Shared section. Click the Subscriber icon in Photos’ toolbar (circled in Figure 8-11) and turn on Public Website. A custom web address for the album appears (it begins with https://www.icloud.com). Click it and Safari (or your preferred web browser) springs into action and displays the page. If you use Safari, you can easily share the address with others by choosing File→Share→Email This Page in Safari (or choose one of the other sharing options in the same menu). You can copy the address by highlighting it and choosing Edit→Copy, and then you can paste the address into, say, a group email message.
To do this in Photos for iOS, tap to open the shared album, and then tap the People button at the bottom of your screen. In the sheet that appears (visible back in Figure 8-12, right), tap to turn on the Public Website switch (it turns green). Next, tap the Share Link that appears and use the icons on the resulting screen to choose how you want to share the link. You can send it via AirDrop (Sharing via AirDrop), Messages (Sharing via Text Message), Mail (Sharing via Email), Twitter (Sharing Online), or Facebook (Facebook)—swipe left to scroll horizontally to see more icons or tap More icon to view additional apps. You can also tap the Copy button to copy the link to your device’s clipboard so you can paste it in another app on that device (such as Safari, so you can see what the site looks like).
Either way, visitors to your public web gallery can click a photo to enlarge it, and then click the left and right arrows that appear to move through the content (the arrow keys on your keyboard work, too). Even more options appear at the top of the enlarged picture’s page, as Figure 8-14 explains.

People who view your public website can easily download stuff you shared. All they have to do is click to enlarge an image, point their cursor near the top of the page, and then click Download. When they do, the full-resolution picture or video is deposited in their computer’s Downloads folder. This is great news for far-flung friends or relatives who want to print an image, but maybe bad news for you in terms of would-be picture thieves who can easily grab your content and use it as their own. That said, the probability of such a thing happening is somewhat slim, because the site is a bit hard for the masses to find.
Tip
If you’re viewing a web gallery using your iOS device, you can download any images it contains to that device. To do so, tap an image to open it, and then tap and hold the image to reveal a sheet that lets you save or copy the image. If you tap Save Image, the picture lands at the bottom of the All Photos album in the Photos app on that device.
Another downside (besides your full-resolution images being available to anyone who happens upon the site) is that your subscribers can’t comment or like any of the pictures the site contains. However, if any comments were made before you created the public website, then those comments remain visible.
Fortunately, public websites are as easy to take down as they are to create. All you have to do is open the shared album, click the subscriber icon circled in Figure 8-11, and then turn off Public Website. Deleting the shared album using the techniques described on Deleting and Unsubscribing from a Shared Album works, too. In Photos for iOS, open the People sheet as described earlier (Managing Subscribers), and then simply turn off the Public Website switch (it goes from green to gray).
Downloading Shared Content
Once you give others permission to add their own content to a shared album, you may want to include some of their images in a book, card, or calendar project (see Chapter 9). Or perhaps you want to zap a blemish or add a slick filter to an item shared by someone else. Either way, you have to import the item into your own Photos library first.
To do that, Control-click a thumbnail and choose Import from the shortcut menu. Photos dutifully adds the item to your Last Import album, where you can treat it like any other picture or video in your library: Edit it, add it to another album, include it in a project, and so on. Alternatively, you can double-click a shared image, click Edit (or press Return) to enter Edit mode, and then click Import in the message pane that appears. Next, make your changes to the image, and then click Done. If you want to add the edited version of a downloaded image to the shared album from whence it came, you need to add it to the shared album again.
The previous section explains how to download content from a public website created in Photos.
Adding and Viewing Comments
By now you’re getting the idea that using shared albums is a bit like having your own personal Facebook experience inside Photos, which is just the ticket for folks who are put off by the social-media behemoth. For example, subscribers can like or add comments to your goodies, which kicks the value and fun factor up several notches.
To like and comment on an item in a shared album in Photos for Mac, open the album, double-click a picture or video (or press the spacebar), and then click the + icon that appears in the picture’s lower-left corner (it looks like a thought bubble). When you do, a comment sheet appears. Figure 8-15 has more.
When someone likes or comments on a picture, all the album’s subscribers are alerted via their Macs’ Notification Center. Whenever you enlarge a picture, you see a tiny number at its lower left that lets everyone know how many comments await your reading pleasure. To view comments your subscribers have made, simply click the + icon at the picture’s lower-left corner.

To like an image or add and view comments in Photos for iOS, tap to open the shared album, and then tap the picture itself to open it. Beneath the picture, you see the controls shown in Figure 8-15, which let you like the image, view comments, and add your own. To delete a comment, tap and hold your finger down on it, and then tap the Delete button that appears just above the comment.
Tip
If your photo streams get a lot of action—comments, likes, or new content—the notifications may drive you insane. Managing Subscribers offers one way to silence them, but you can also shut them up by Option-clicking the Notification Center icon at the right end of your Mac’s menu bar. Doing so dims the icon (it turns gray) and stifles all notifications for the rest of the day or until you Option-click the icon again. On an iOS device, you can turn off notifications by tapping Settings→Notifications. On the screen that appears, tap Photos, and then turn off Allow Notifications (the switch goes from green to gray). Whew!
Family Sharing
If more than one Mac- or iOS device-using person lives under your roof—or if you share your Mac with one or more people—iCloud Family Sharing is the best thing since sliced bread. As you learned on Photos for Families, using Photos in a family situation is a complicated matter: You quickly end up with multiple Photos libraries and nobody remembers which pictures live where.
Apple’s solution is called Family Sharing, which lets you create a special group that you invite family members to join. The end result is an album named Family in Shared view that everyone in the group can access (it can’t be shared with anyone outside the group). Family members can easily add or remove their own pictures and videos, which are viewable and downloadable by everyone else in the group. This special album is also accessible on the Web; just visit www.iCloud.com and sign into your iCloud account to see all the goodies it contains (handy for those rare occasions when you’re not parked in front of your Mac or clutching an iOS device).
If you think about it, this solution is brilliant. By using Family Sharing, each family member maintains his or her own Photos library and gets to choose what’s shared with everyone else. This gives each member of the group some level of privacy while you, Family Commander-In-Chief, have access to shared items and can include them in projects such as saved slideshows (Chapter 6), or books, calendars, and cards (Chapter 9).
Note
The Family Sharing album is just one of several services that you can share among the members in a Family Group. Others services include a shared Apple Calendar; shared purchases from Apple’s App store, iBooks store, and iTunes store; and the ability to track the locations of Macs and iOS devices. (For the full story on Family Sharing, grab a copy of OS X: The Missing Manual.)
Setting up Family Sharing is a multistep affair. For example, if you share your Mac with anyone else, each person who uses it needs his own Mac user account. As Photos for Families explains, this grants each person his own Photos library (see https://support.apple.com/kb/PH18891 if you need help creating user accounts). Next, everyone involved needs their own Apple ID, you need to create a Family Group, and then you need to invite the family members to join the group. Grab a beverage, and then follow these steps to accomplish all that:
Give everyone an Apple ID.
If any of your family members lack an Apple ID, visit https://appleid.apple.com to create one (or five). Bear in mind that an Apple ID is automatically created when someone purchases an item from Apple.com or you turn on iCloud services on a device running iOS 5 or later, so check for existing accounts.
Create a Family Group.
On a Mac, choose
 →System Preferences→iCloud. In the pane that appears, click Set Up Family, and then follow the onscreen instructions. Because Family Sharing extends beyond sharing pictures and videos and into the realm of iTunes purchases and so on, you’re prompted to enter a credit card.
To set up Family Sharing on an iOS device, tap Settings→iCloud. On the screen that appears, tap Set Up Family Sharing, and then tap Get Started. Confirm that you want to be the family organizer and that you’re signed in with your personal Apple ID, and then follow the onscreen instructions. Of course, you’ll need a credit card.
Invite people to join the Family Group.
Now that you have a Family Group, you can invite family members to join it:
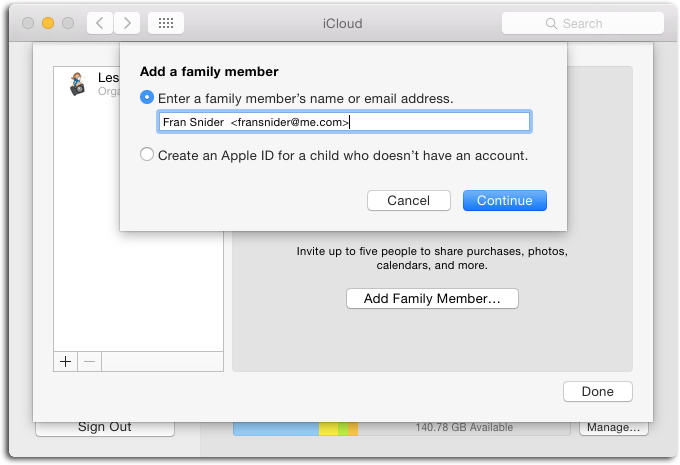
On a Mac, choose Apple→System Preferences→iCloud. Click Manage Family, click Add Family Member or click + at the lower left, and then follow the onscreen instructions. You’ll need each family member’s email address, as Figure 8-16 shows, and you’ll need the security code for the credit card you entered in step 2 (that’s the three-digit code on the back of the card). When you’re finished entering the address, click Continue (you have to invite each person one at a time), and then enter your credit card’s security code when prompted. If you entered an email address that’s associated with an Apple ID, you can enter the person’s Apple ID password (if you know it) on the next sheet, which lets you skip the whole invitation bit (handy if you’ve got kids or a parent who’s not particularly tech-savvy). Otherwise, turn on “Send [person’s name] an invitation” instead so he gets an email invite.
On an iOS device, go to Settings→iCloud→Family→Add Family Member. Enter the person’s name or email address and follow the onscreen instructions. (It’s the same as the process described in the previous bullet point.)
Either way, your invitation winds up in the recipient’s email inbox. Once she clicks the big blue View Invitation button in the body of the email, the Family Sharing preferences pane springs open, listing all the slick things she can now do—share purchased music, movies, apps, and books; share pictures and videos; and share events on a family calendar. Next, your recipient can click Accept. If she happens to be part of another family group, a message appears stating that she has to leave that group before joining another one. Your recipient can click OK, and then use the preference pane that appears to extricate herself from the other group.
Figure 8-16. You can invite up to five family members to join your group using the iCloud preference pane shown here. This same pane also lets you create an Apple ID if you don’t have one already.To check whether your invitation has been accepted, go to Apple→System Preferences, click iCloud, and select Manage Family. Select a person’s name to see the status of his invitation. If you need to resend it, select Resend Invitation. (To check your invitations on an iOS device, tap Settings and, in the iCloud pane, tap Family. If necessary, you can resend an invitation from there.)
Set up a shared family album.
Just kidding! This really isn’t a step at all because Photos automatically creates a new album named Family in Shared view. Apple also adds a Family category to the Calendar and Reminders apps. Nifty, eh? (If you don’t spot the Family album in Shared view, you’re probably viewing the contents of another shared album. In that case, just click the Back button on the left side of Photos’ toolbar to close the album so you see all your albums’ thumbnails instead.)
Add photos or videos to the shared family album.
Now the sharing fun starts. Anyone in your family group can now add pictures and videos in a variety of ways. For example, if the sidebar (The Two Faces of Photos) is visible, you can drag thumbnails directly into the Family album. Alternatively, you can select some thumbnails, click the share icon in Photos’ toolbar, choose iCloud Photo Sharing, and then click the Family album in the resulting list. Or, if you’re viewing the contents of the Family album, click “Add photos and videos” at the upper right, and then pick the thumbnails of the goodies you want to add. Either way, the new content immediately appears in the Family album on the other group members’ devices.
Import pictures or videos from the Family album to your Photos library.
Remember, shared items don’t live on your hard drive. So if a family member wants to edit a photo or or include a picture or video in a project, you need to download it from the Family album into your personal Photos library. You can do it in the following ways:
Drag the thumbnail(s) onto the Photos item at the top of the sidebar.
Drag the thumbnail(s) onto any album in the sidebar.
Control-click the item and choose Import from the shortcut menu that appears.
Now you can sit back and enjoy the fruits of your family-sharing labors. This really is the only sane approach for managing multiple Photos-using people in your immediate family. Remember though, this isn’t the way to share content with just anyone: As you recall, you entered a credit card that’s now shared by all the family members in your group. Consider yourself warned.
Sharing via AirDrop
When you need to transfer files between two iOS devices, Macs, or between a Mac and an iOS device, consider using AirDrop. It’s fast, simple, and efficient. There’s no setup or password involved, no software to install, and you don’t even need an Internet connection.
AirDrop has been around for years. You can use it to transfer files to another AirDrop-enabled device up to 30 feet away. Since it uses Bluetooth (a data-sharing technology), you can fling files to and fro in places that you normally can’t—airplanes, cruise ships, and on camping trips, to name a few.
Happily, AirDrop is easily accessible inside both Photos for Mac and Photos for iOS. Here’s how to use it:
To transfer files between iOS devices, you need an iPhone 5 (or newer), an iPad (fourth generation or newer), an iPad mini, or an iPod touch (fifth generation or newer). In iOS 8, launch the Control Center by swiping upward from the bottom edge of the display (in iOS 7, use the Settings app instead). Tap the AirDrop icon that sits to the left of the AirPlay icon. In the resulting menu, pick who you want to share files with: Contacts Only or Everyone. (If you pick Contacts Only, then only those folks who are in your Contacts app can send you files.) Once you make a choice, your device automatically turns on both Bluetooth and WiFi (while a WiFi network isn’t required, WiFi still has to be turned on).
To transfer files between an iOS device and a Mac (or vice versa), your Mac has to be made in 2012 (or later) and it must be running OS X 10.10 (Yosemite) or later. Use System Preferences to turn on both Bluetooth and WiFi (the latter is found in Network preferences). Next, open a AirDrop window in the Finder by choosing Go→AirDrop or by pressing Shift-⌘-R.
To transfer files between two Macs, they both need OS X 10.10 (Yosemite) or later and both need to have an open AirDrop window.
Using AirDrop in Photos is incredibly easy: Simply select the items you want to share (Selecting and Hiding Files), and then click the share icon in Photos’ toolbar or the one that appears at the upper right of a moment in Photos view. From the resulting menu, choose AirDrop and you get a window (or screen in iOS) containing icons of any nearby AirDrop users. Click the icon of the person you want to send the file(s) to and that’s it! (If you’re sending files from Photos for Mac and you don’t see the person’s AirDrop icon, try opening an AirDrop window yourself, as described earlier, which oftentimes awakens the AirDrop engine.)
If your recipient is on an iOS device, she sees a message asking her to accept the shared file. If she’s on a Mac instead, a message appears in her AirDrop window giving her the option to save or decline the file(s). When she accepts the goodies on an iOS device, they land in her Photos library. If she’s on a Mac, your digital gift lands in her Downloads folder. At this point, she can drag the files onto the Photos icon in her Mac’s Dock to add them to their Photos library (Chapter 2 has more importing options).
Desktops, Lock Screens, and Wallpaper
Every so often, a photo means so much to you that you’d like to see it every time you look at your Mac or iOS device. On your Mac, you can make the image your desktop picture, and on your iOS device, you can make it the lock-screen image or wallpaper (you can assign a different picture for each one). Using an image in this way lets you enjoy your prized photo 24/7.
Don’t underestimate the power of customizing your Mac or iOS device in this way. It’ll give you a surge of enjoyment each time you look at your device’s screen from that point on.
Setting a Photo as Your Desktop (Mac)
In Photos for Mac, select the thumbnail of the image you want to use as your desktop picture, click the share icon, and then choose Set Desktop Picture. Ta-da! Next topic.
Tip
If you don’t see the Set Desktop Picture command in your share menu, you likely selected an album’s thumbnail instead of an image’s thumbnail. The fix is to open an album, click an image, and then try again.
Well, there’s a tiny bit more to it, but not much. If your photo isn’t the same aspect ratio (How to Crop, Straighten, and Flip a Photo) as your monitor, OS X fits it to the width of your monitor, centers it, and chops off the top and bottom. For that reason, you may want to crop your chosen masterpiece (see The Rotate Tool) to the shape of your monitor—or relatively close to it.
Also, be sure to pick a photo that has enough pixels to fill your screen, or else you’ll see jagged blocks instead of a smooth picture. To learn your monitor’s pixel dimensions, choose ![]() →System Preferences→Displays. In the pane that appears, turn on the Scaled radio button; in the list that appears, the topmost item is your monitor’s resolution. Back in Photos, you can see a picture’s dimensions using the Info panel (The Mighty Info Panel). For the best results, make sure the desktop picture you pick has at least as many pixels as your monitor.
→System Preferences→Displays. In the pane that appears, turn on the Scaled radio button; in the list that appears, the topmost item is your monitor’s resolution. Back in Photos, you can see a picture’s dimensions using the Info panel (The Mighty Info Panel). For the best results, make sure the desktop picture you pick has at least as many pixels as your monitor.
Setting a Photo as Your Wallpaper (iOS)
In Photos for iOS, select the picture you want to use as your lock screen or home screen. (The lock screen is the one you see when you first wake up your device; the home screen is what appears behind all your app icons while you’re using your device.)
Next, tap the share icon and, in the pane that appears, tap “Use as Wallpaper” (you may have to scroll sideways to see this option). Drag to position the photo, and use the pinch gesture (The Very Basics) to set its scale. Choose whether you want Perspective Zoom—the effect that moves your photo slightly as you tilt your device—on or off (if you get seasick easily, leave it off). Finally, tap Set, and then choose whether to use this photo on your lock screen, home screen, or both.
Photos: The Best Screensaver in the West
OS X’s screensaver feature is beautiful to behold. When your Mac is turned on but you don’t use it for a few minutes, your screen can take on a life of its own and display world-class photo collections at full size (say, from National Geographic) in a variety of animated themes. Better still, you can tell the screensaver to use your pictures instead of the preinstalled stuff. In fact, you can pick any set of pictures from your Photos library.
Note
If you’ve got more than one monitor hooked up, you see different photos on each monitor as the screensaver plays, which makes for a really nice effect.
To customize your Mac’s screensaver, choose ![]() →System Preferences→Desktop & Screen Saver. At the top of the resulting pane, click the Screen Saver tab. There, choose from one of the 14 photo-based screensaver themes in the list on the left (the ones at the bottom of the list aren’t photo-based). When you do, the Source menu shown in Figure 8-17 appears beneath the theme’s preview.
→System Preferences→Desktop & Screen Saver. At the top of the resulting pane, click the Screen Saver tab. There, choose from one of the 14 photo-based screensaver themes in the list on the left (the ones at the bottom of the list aren’t photo-based). When you do, the Source menu shown in Figure 8-17 appears beneath the theme’s preview.
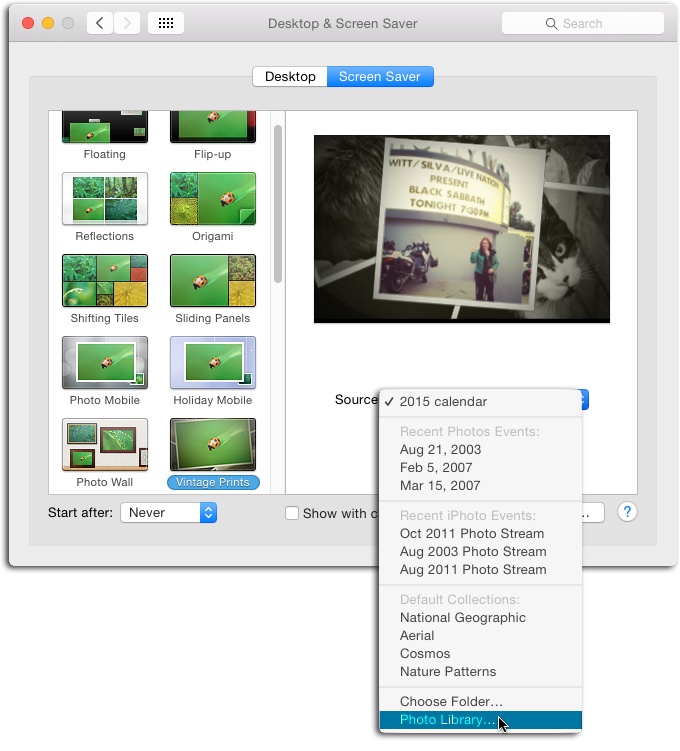
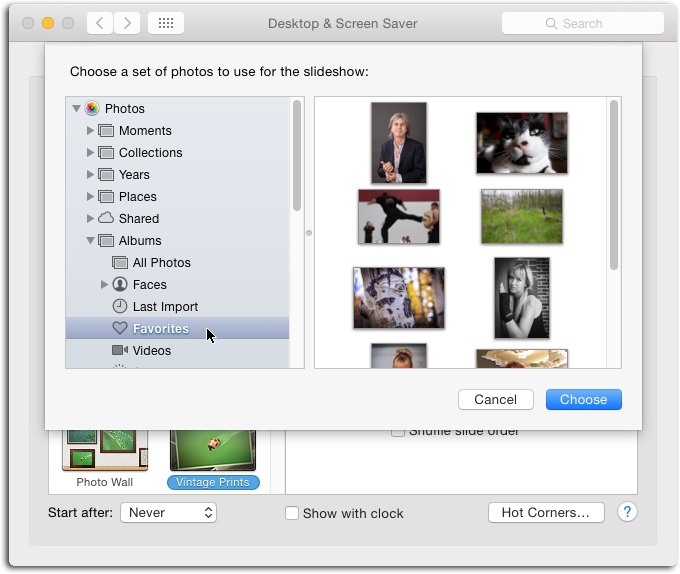
From the Source menu, choose Photo Library, and you see the pane shown in Figure 8-18, which includes all of Photos’ different views as well as your iPhoto and Aperture libraries (if you have any). Click any view and the pictures it contains appear as tiny thumbnails on the right. To peek inside a view, click its flippy triangle to expand it so you can see any albums it contains. When you find the view or album you want to use, select it and then click Choose. Back in the Desktop & Screen Saver pane, you see a mini version of your personalized screensaver playing on the right. To shuffle the order of pictures, turn on “Shuffle slide order” beneath the Source menu. To display a clock atop your pictures, turn on “Show with clock.” To control when your screensaver kicks in, choose an option from the “Start after” menu at the lower left.
You can also summon your Mac’s screensaver using Hot Corners, which let you point your cursor at a specified corner of your screen to turn it on. To set it up, in the Desktop & Screen Saver preference pane, click Hot Corners, choose Start Screen Saver from one of the four resulting menus, and then click OK. To exit the screensaver, press any key on your keyboard or click your mouse button.
Exporting from Photos
As you learned in Chapter 1, Photos doesn’t apply your edits to your pictures and videos until you export them. So if you want to use some pictures (or videos) you’ve edited in Photos somewhere else—say, in another program—or burn them onto a CD or DVD (Burning Movies onto CDs or DVDs and 281), you need to export them. You can also use Photos’ export command to reduce a file’s pixel dimensions in order to post it online or change its file format.
Exporting by Dragging
Exporting content from Photos is incredibly easy. If you don’t want to change the picture’s dimensions or file format, just drag its thumbnail onto your desktop, onto a folder icon on your desktop, or into an open Finder window (as you drag, you see a slightly see-through version of the thumbnail next to your cursor). The resulting file is named the same thing it was in Photos, though you can always rename it by clicking its name and entering something else.
You can also drag a picture into a message in the Mail app, or into a document in Pages, Keynote, any of the Microsoft Office apps, and so on. However, for professional publishing in non-Apple apps—all eyes are on you, Adobe—it’s best to export your pictures using the Export command (explained next) and then import them into your documents.
The Mighty Export Command
To change the dimensions and file format of your pictures, you need to use the Export command. Use the techniques described on Selecting and Hiding Files to select some thumbnails, or press ⌘-A to select the contents of a whole album, and then choose File→Export→Export [number] Photos or press Shift-⌘-E. (If you have got thumbnails of videos and pictures selected, the command changes to read “Export [number] Items” instead.) The next thing you see is the Export sheet shown in Figure 8-19.
Tip
If you want to email just a few photos, don’t bother with the Export dialog box—click Photos’ share icon instead. Sharing via Email has the scoop.

Note
Photos won’t let you export images in a shared album (Using iCloud Photo Sharing), regardless of whether you shared the album yourself or merely subscribe to it. So if the Export command is dimmed, that’s probably why. The fix is to locate the images in Photos or Albums view, and then try again.
Photo Kind. Use this menu to specify the file format of the picture(s) you’re about to export. Here are your choices (if you don’t see the size options, be sure to expand the pane by clicking the icon circled in Figure 8-18. After all, no pane, no gain!):
— JPEG. This abbreviation stands for Joint Photographic Experts Group (the group of geeks who came up with this format). JPEG is the most popular format for photos because it uses an enormous range of colors, though it uses a lossy compression method to produce relatively small file sizes, so you may lose some fine details.
— TIFF. This format (whose name is short for Tagged Image File Format) also uses a wide range of colors but doesn’t compress images, so they maintain every bit of quality in the original. However, they consume a lot more disk space than JPEGs. TIFF is a good choice if quality is more important than file size. When you choose this option, a checkbox labeled “16 bit” appears beneath the menu. Sixteen-bit images contain a gazillion colors (65,536 to be exact) in each color channel (red, green, and blue) and are produced by high-end digital single-lens reflex (DSLR) cameras shooting in raw format and by really good scanners.
— PNG. This format (short for Portable Network Graphics) uses a wide range of colors and compresses images to produce smaller file sizes. PNG files are smaller than TIFF images but larger than JPEGs, but don’t exhibit any of the compression-related quality issues of JPEGs.
Size. This menu lets you specify a size for the exported file. Your choices include Small (320 x 240 pixels, perfect for emailing to people who have dial-up connections), Medium (640 x 480, great for email and posting online), Large (1280 x 960, superb for slideshows), and Full Size (the picture’s original size, which is fit for printing). If the size you need isn’t in the list, choose Custom and you get a menu named Max that lets you specify the maximum (hence the menu’s name) pixel dimensions for each photo’s width, height, or—if you choose Dimension from this menu—the longest side. If you’re wondering why Photos doesn’t give you two separate fields for width and height instead, it’s because the pictures you export may have different proportions, and these controls let you determine the maximum dimensions for the exported image’s width, height, or longest side.
Titles and keywords. Photos keeps track of two names for each picture or video you import: the original filename your camera assigned to it and the title you give it in Photos (if any; see Photos for iOS). If you turn on the Export sheet’s “Title, Keywords, and Description” checkbox (which works for JPEG and TIFF formats only), then each exported file carries the name you gave it in Photos, as well as any keywords (Using Keywords) and, if you added one, a description (The Mighty Info Panel). That means you can locate the file on your Mac using a Spotlight search, and if you import the file into a program that understands keywords (say, another Photos library, Adobe Photoshop Lightroom, or Photoshop Elements), the keywords and description you gave it travel along with it.
Location information. Turn on this setting to include any location info (Viewing Metadata) your file includes.
File Name. Use this menu to specify how you want Photos to name the exported files. Your options are:
— Use Title results in files that are named using the titles you added in Photos (Photos for iOS).
— Use File Name results in files named with the original names given to them by your camera, like IMG_1312.JPG and so on.
— Sequential summons a text field named Sequential Prefix, where you can enter a custom name such as Roller Derby, and you end up with files named Roller Derby 1, Roller Derby 2, and so on.
— Album Name With Number instructs Photos to name your exported photos according to the name of the album they’re in and their sequence inside the album. For example, if a soon-to-be-exported file is the third picture in the Roller Derby album, Photos names the exported file Roller Derby-03.jpg. Since you control the sort order in an album (Sorting Thumbnails in Albums), you can use this option to control the numbering of exported files.
— Subfolder Format. This option clusters the exported files into folders based on moments (each subfolder is named after the moment). Choose None to export the photos without creating any subfolders.
Tip
If you have an iCloud account, you can export your pictures to iCloud Drive and then access them from any Mac, iOS device, or Windows PC set up to use iCloud Drive. For more about iCloud Drive, search for iCloud Drive in Mac Help or pick up a copy of OS X: The Missing Manual.
Exporting Unmodified Originals
You don’t have to export the edited versions of your pictures and videos. If you prefer, you can export the original versions instead. By choosing File→Export→Export Unmodified Original, you instruct Photos to export the selected files in whatever state, format, and size they were in when you first imported them.
Tip
If your camera captured the picture in raw format (Fun with File Formats), this command lets you export the original raw file so you can, say, work with it in a more sophisticated editor such as Adobe Photoshop Lightroom or Adobe Camera Raw (the latter comes with both Photoshop and Photoshop Elements).
You get the same control over filenames and subfolders using the Export Unmodified Original command as you do using the Export command (Exporting by Dragging). If you added copyright or keyword info to the files in Photos, turn on “Export IPTC as XMP” to export the IPTC (International Press Telecommunications Council) metadata as a sidecar file in XMP (Extensible Metadata Platform) format. You can read and edit this file in many apps, including Adobe Photoshop Lightroom, Adobe Bridge, and ACDSee.
Exporting Videos
All the information about exporting photos (file naming, how to include keywords, and so forth) also applies to exporting videos. The only unique decision you need to make when exporting a video is Movie Quality, which is explained in detail on Sharing and Exporting Video.