Chapter 2. Importing Pictures and Videos
With Photos up and running, you’re ready to import your pictures and videos to populate your library. After all, why doom your digital mementos to a life lived only on an iOS device or memory card? Once they’re in Photos, you can do amazing things with them if you invest a little time.
The easiest stuff to import comes from your iPhone and iPad—the process is practically automatic—but you can also import pictures from digital cameras, scanners, your iCloud photo streams, and even websites you visit. And if you’ve got any pictures and videos tucked into folders on internal or external hard drives, or archived on CDs, DVDs, or other storage devices, importing them is just a drag-and-drop away.
If you previously used iPhoto or Aperture and you imported those libraries into Photos, then you already have a bunch of pictures and videos in Photos to play with. (If you haven’t yet done that, flip back to Chapter 1 for info on how to get it done). This chapter teaches you how to import additional content from sources other than your old libraries.
But first, a quick tour of the Photos workspace is in order.
The Two Faces of Photos
Photos for Mac gives you two different ways to view and work with pictures and videos. The first option looks a lot like Photos for iOS—you get one giant, uncluttered window with tabs that let you change your view (see Figure 2-1). The Photos tab displays all your pictures and videos in chronological order; the Shared tab lets you see any pictures you’ve shared via iCloud;the Albums tab lets you see thumbnails of all the albums you’ve made; and the Projects tab shows you all the slideshows, books, cards, and calendars you’ve made. You’ll learn more about these views in Chapter 3.
The second option for viewing and working with your digital goodies adds a sidebar to the left of the Photos for Mac window, which displays your organizational structure in a vertical list (Figure 2-2). You can turn it on by choosing View→Show Sidebar or by pressing Option-⌘-S; to turn it off, choose press the keyboard shortcut again or choose View→Hide Sidebar. While you can accomplish all your organizational tasks without the sidebar—scooting pictures between albums, adding images to projects, and so on—displaying it may make you more efficient.
You’ll learn all about navigating around Photos and organizing your digital mementos in Chapter 3. The rest of this chapter focuses on getting your goodies into the program.
Importing from iCloud
As you learned in Chapter 1, iCloud is Apple’s syncing and sharing service. If you’re one of the over 350 million iCloud users, then you’ve got some pictures to import from it. There are three different iCloud sources from which you can import pictures into Photos: iCloud Photo Library, iCloud Photo Sharing, and My Photo Stream. This section explains you how to get your photos out of those sources and into Photos.
iCloud Photo Library
If you turn on iCloud Photo Library on your Mac and your iOS device(s), and you sign into the same iCloud account on all your Apple gadgets (meaning you use the same Apple ID everywhere), then all the pictures and videos you take (or edit) with your iOS devices magically appear in Photos for Mac. The opposite is also true: When you add, delete, or edit items in Photos for Mac, your changes are automatically reflected in Photos for iOS. Here’s how to make this magic syncing happen:
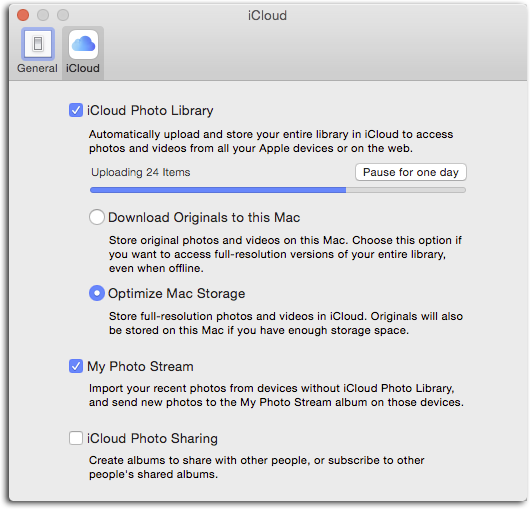
On your Mac. In Photos for Mac, choose Photos→Preferences, and then in the iCloud pane that appears, turn on iCloud Photo Library (see Figure 2-3). When you do, fireworks explode (kidding!) and your Mac starts uploading your System Photo Library (What Gets Uploaded) to iCloud. This process hogs all the upload bandwidth your Internet connection can handle, which is good because it takes a really…long…time.
Figure 2-3. Uploading the contents of your System Photo Library to iCloud can take hours or days, and can slow your Internet experience to a crawl. For that reason, you’ll want to start this process just before you go to bed. That way (hopefully!) the upload will be finished by the time you wake up.Tip
Your Photos library continues uploading even if you quit Photos. If you suspect the upload is interfering with your other Internet-related work—or if your Internet usage is metered and you need to break up the process over several days—you can tell Photos to pause for a day. Choose Photos→Preferences and in the iCloud pane, click “Pause for one day.” Photos stops uploading your library and resumes 24 hours later. To resume the upload manually—say, when you go to work or out for dinner—click the same button again, which is now labeled “Resume.” Photos then diligently ferries your pictures to iCloud until it finishes or you tell it to pause again.
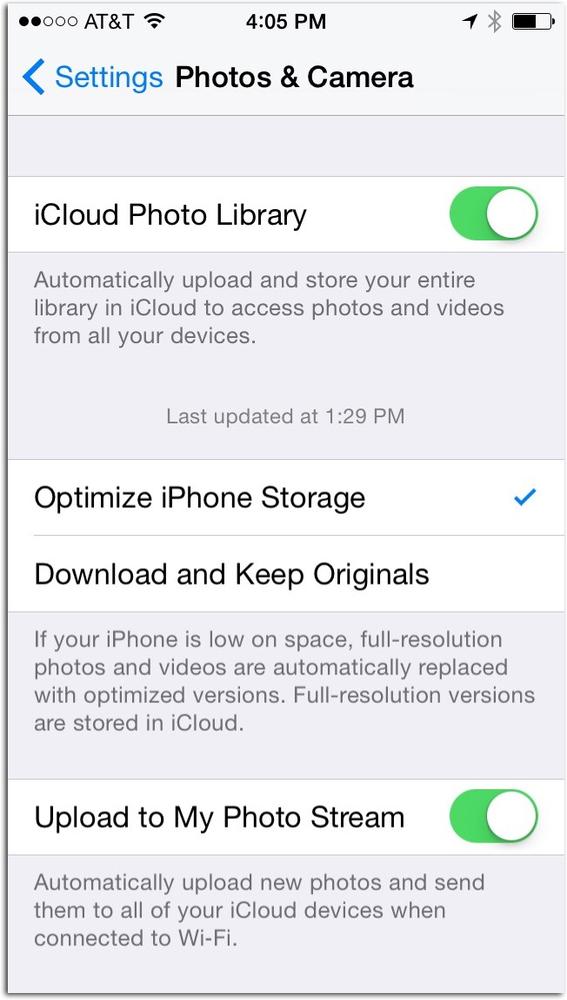
On your iOS device. To use iCloud Photo Library, your iOS device needs to be running iOS 8.1 or later, so you may need to update your software; to do that, tap Settings→General→Software Update. Once you’re running the necessary software, you’re ready to turn on iCloud Photo Library. Fire up your iOS device, tap Settings (it’s probably on your home screen), and then scroll down until you see Photos & Camera. Give it a tap and on the next screen, tap the switch next to iCloud Photo Library (it turns green as shown in Figure 2-4). That’s it!
Note
If you’ve been using iTunes to sync your pictures and albums onto your iOS devices, you can continue doing so—right up until the second you turn on iCloud Photo Library. Once you do that, all picture-syncing operations are taken out of iTunes’ hands and given solely to Photos (which, if you think about it, makes a lot more sense than using a music app to manage your pictures ever did). If you copied photos to your iPhone or iPad via iTunes, you’ll see a message that all images will be removed if you activate iCloud Photo Library. Tap Remove Photos to proceed.
As you turn on iCloud Photo Library on each Mac and iOS device you own that uses the same Apple ID, that device’s contents get uploaded to the iCloud’s servers and merged with what’s already there. The combined content is then downloaded to all of your devices. In fact, this is one way you can merge multiple Photos libraries, as Merging Libraries explains.
iCloud Photo Library isn’t cheap (Meet the iCloud Photo Library has current pricing), but the convenience and confidence you get as a result are worth the cost. Once iCloud Photo Library is enabled on all your devices, you can enjoy working with your pictures and videos on any of those devices, and your changes are instantly visible on all the others.
iCloud Photo Sharing
Another way to import pictures into Photos is through iCloud Photo Sharing, whose special purpose is sharing a handpicked batch of pictures and videos with specific people you invite to a shared album. If a recipient accepts your invitation, she can import the shared content into her own Photos library and (if you allow it) add her own content to the album, which you can then import into your Photos library. The same holds true if you’re on the receiving end of a shared-album invitation.
Chapter 8 teaches you everything you need to know about turning on and using iCloud Photo Sharing (Using iCloud Photo Sharing), but the iPhoto veterans among you are likely knee-deep in it already. Here’s how to import previously shared content into your Photos library:
Photos for Mac. It’s easier to import content from a shared album if you have Photos’ sidebar turned on, so do that first (choose View→Show Sidebar or press Option-⌘-S). Next, in the Shared section of the sidebar, click an album that someone shared with you, and then select the thumbnail(s) of the items you want to import. You’ll learn several ways to do this on Selecting and Hiding Files, but you can pick and choose certain thumbnails by ⌘-clicking or select everything in the album by pressing ⌘-A. Next, either Control-click one of the thumbnails and choose Import from the shortcut menu that appears, or simply drag the thumbnails onto the word “Photos” at the top of the sidebar or into any album or project you’ve made (as you drag, a green circle with a + sign appears next to your cursor).
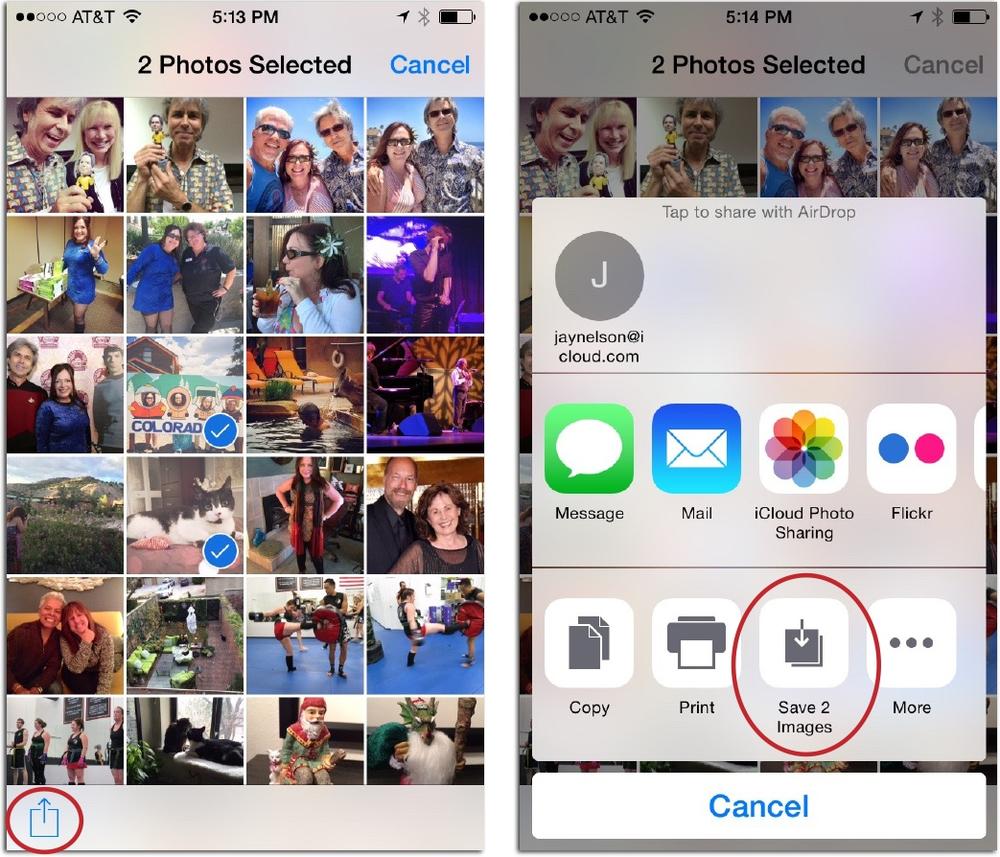
Photos for iOS. To import shared content in Photos for iOS, tap Shared (if that takes you to the Activity page, tap Sharing in the top left), and then tap an album that someone shared with you. Tap Select at the screen’s upper right, and then tap the thumbnails of the items you want to import. Finally, tap the share icon circled in Figure 2-5, left, and then, in the pane that appears, tap Save 2 Images (or however many you selected).
My Photo Stream
If you’d like some of the convenience of iCloud Photo Library without uploading all your pictures and videos, you can use My Photo Stream instead. It collects all the pictures you’ve taken in the last 30 days on all your devices (up to 1,000 photos) and sends them to the My Photo Stream album on all your devices that have My Photo Stream turned on (you’ll learn how to turn it on in a sec). Unlike iCloud Photo Library or iCloud Photo Sharing, My Photo Stream is limited to pictures—videos aren’t included—and syncing to your iOS devices only occurs when they’re on a WiFi network (it doesn’t work over a cellular network). Also, the pictures that are downloaded to your iOS devices are optimized and smaller than the full-resolution versions stored on your Mac. (The box on Optimizing iCloud Storage Space on Your Devices has more about optimized vs. full-size files.)
Note
My Photo Stream only understands a few file formats: JPEG, TIFF, PNG and raw. If you import images to Photos that are in any other format (such as GIF, BMP, or PDF), they won’t be included in your Photo Stream.
Here’s how to turn on My Photo Stream:
On a Mac, choose Photos→Preferences and then, in the iCloud pane that appears (Figure 2-3), turn on My Photo Stream.
On an iOS device, open Settings and scroll down until you see Photos & Camera. Give it a tap and on the next screen, tap the switch next to My Photo Stream (it turns green). While you’re in the Photos & Camera settings on your iPhone 5S (or later) or iPad Air 2 (or later), have a look at the Upload Burst Photos option (burst mode is explained in the box on Bursting at the Seams). Since Burst mode captures 10 shots per second, it can generate a ton of pictures in a matter of seconds. From the factory, Apple wisely disables uploading all those shots to your iCloud Photo Stream. Instead, only the pictures you select from that burst get uploaded (the box on Bursting at the Seams tells you how to do this). However, if you turn on Upload Burst Photos, your iOS device uploads all the pictures in the burst set to your Photo Stream.
Note
My Photo Stream pictures are only stored on Apple’s servers for 30 days, so if you don’t import them into the Photos app on your iOS devices, only those pictures that were captured on that specific device continue to live on that device. You can think of My Photo Stream as a way of temporarily ensuring that your recent pictures exist on more than one device for 30 days.
When you turn on My Photo Stream on a Mac or iOS device, an album named after the current month and year—such as October 2015 Photo Stream—appears in Shared view (Shared View). If you’re using iCloud Photo Library, the items in My Photo Stream simply appear in Photos view in chronological order according to the date they were captured.
My Photo Stream has some additional limitations. Aside from the drawbacks already mentioned, Apple limits the number of pictures you can upload to 1,000 per hour, 10,000 per day, or 25,000 per month (as noted earlier, only the most recent 1,000 appear). If you exceed those limits, nothing new is added to your Photo Stream until the next hour, day, or month has passed (depending on which limit you blew past). But we’re talking about a free service here, so what do you expect?
Tip
If you prefer to avoid using the airwaves to transfer your photos and videos to your Mac (or if you’re somewhere without a cellular or WiFi network), you can attach your iOS device to your Mac with a cable and transfer those valuable files the old fashioned way. Just grab the USB cable that came with your iOS device, and plug one end of it into the device and the other into a USB port on your Mac. Your iOS device then behaves just like any other camera or memory card reader that you plug into your Mac (see the next section for details).
Importing from a Camera or Card Reader
Every digital camera comes with a cable that you can use to connect it to your Mac’s USB port, but that’s not the necessarily the best way to import your digital goodies. A better approach is to remove the memory card from your camera and stick it into a card reader, and then plug that into your Mac. Heck, some iMacs and MacBook Pro models even have built-in SD card readers.
The advantage of connecting your camera directly to your Mac is that you don’t have to fish out the memory card, but there are three advantages to using a card reader. First, you won’t use up your camera’s battery while you’re importing stuff, which saves it for taking pictures. Second, card readers copy files more quickly than your camera’s cheapo USB cable, so there’s less time for something to go wrong during the transfer. And third, most card readers can read multiple kinds of memory cards, which is handy if you shoot with different camera brands that use different kinds of memory cards (like, say, Canon and Sony).
The process for importing pictures into Photos is the same whether you plug a camera, memory card, card reader, or iOS device into your Mac. Here’s what you do:
Connect your camera (or card reader) to your Mac.
Your digital camera has a tiny USB port (it’s usually under a rubber flap) and your Mac has a larger, rectangular USB port. Grab the cable that came with your camera; plug the small end into your camera and the bigger end into a USB port on your Mac. Then turn on your camera so Photos can detect it.
If you’re using a card reader, or if your Mac has a built-in card reader (you lucky person, you), turn off your camera, eject its memory card, and then simply insert the memory card into the card-reader slot.
If necessary, launch Photos.
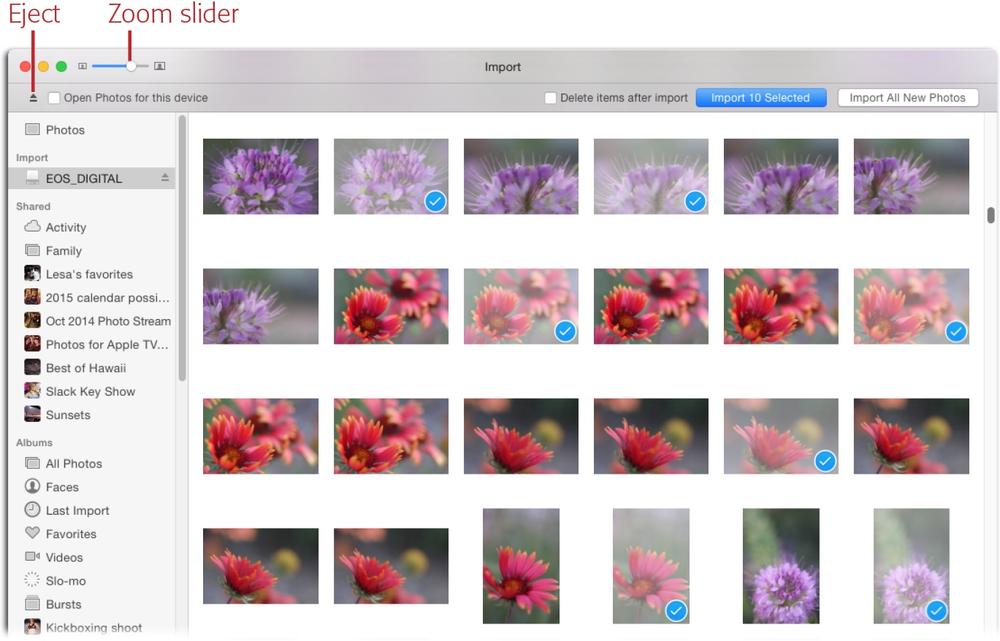
A few moments after you connect your camera (and turn it on) or insert your memory card, Photos should open automatically and place you in Import view where you see thumbnails of the memory card’s contents (see Figure 2-6). If Photos doesn’t launch, fire it up yourself.
Tip
If your Mac doesn’t see your camera after you connect it, try turning the camera off and back on again.
You see the name of the camera or memory card at the screen’s upper left and in the sidebar (if you have it turned on). If you want Photos to automatically spring open whenever you attach the same camera or memory card, be sure the “Open Photos for this device” checkbox is turned on.
Select the pictures and videos you want to import.
If you want to import everything on the memory card, you can skip to the next step.
If you prefer, you can pick and choose only the items that are worthy of importing. Tell Photos which items to import by clicking any thumbnail to select it; Photos dims the thumbnail and adds a blue circle with a checkmark to its lower right. (To enlarge the image thumbnails so you can see them better, drag the zoom slider rightward.) To deselect a thumbnail, click it again to remove the checkmark. You can also click in the white space outside the thumbnails, and then drag across multiple thumbnails to select or deselect them—each thumbnail your cursor touches changes to the opposite condition (selected or deselected).
Figure 2-6. When Photos detects a memory card, it opens Import view, where you can see thumbnails of the card’s contents. Files that you’ve already imported into Photos appear at the top of the window (not shown). A running count of the number of goodies you’ve selected for import appear in the blue Import button (here, that’s 10). This screen may take a few seconds to appear as Photos prepares all the thumbnails for your viewing pleasure.Tip
Resist the urge to turn on the “Delete items after import” checkbox. If you turn on this setting, Photos will remove the imported pictures from your memory card. That sounds convenient, but if anything were to go wrong during the import process, you could lose all your pictures. It’s much safer to clear your memory card using your camera’s software instead. In fact, try reformatting the card instead of merely erasing the pictures it contains (check your camera’s owners’ manual to find out how). Doing so wipes your memory card spick and span so it’s ready for your next batch of pictures—just double-check that Photos successfully imported your pictures before you erase that card.
Import your images.
To import all the new items the memory card contains, click Import All New Photos. If you selected a few thumbnails in the previous step, click Import # Selected. Either way, Photos starts copying the files onto your Mac. As it finishes importing each one, it moves that each image’s thumbnail to the Already Imported section at the top of the window.
As those photos are being imported, Photos switches to Album view and displays the Last Import album, which shows the files as they’re being imported. When importing lots of files, a little pie-chart icon appears at the right of the zoom slider to show the progress of the import process. When it’s full, the import is complete.
Unplug your camera, or eject and then unplug your memory card or card reader.
When you’re finished importing, turn off your camera and unplug its USB cable (there’s no need to eject it first). If you plugged a memory card into your Mac or a card reader, you see a tiny eject icon at the upper left of Photos’ toolbar (it’s labeled in Figure 2-6) and to the right of the memory card’s name in the sidebar. Just click this icon to let your Mac know you’re finished with it, and then unplug it.
Importing Other Image Files
Chances are good that you’ve got pictures and videos to import that don’t live on a memory card or smartphone. For example, maybe you scanned some old pictures (or paid a service to do it) onto your hard drive, you archived some pictures onto a CD or DVD, someone sent you a disc full of pictures, or you snagged some images off of a photo-sharing website and saved them on your hard drive.
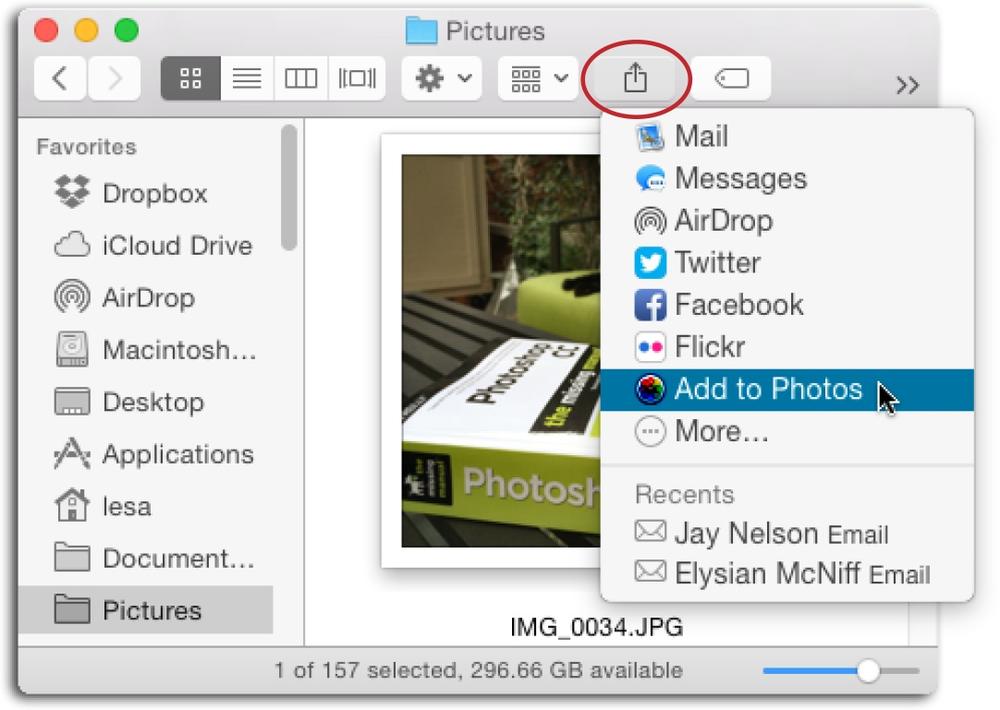
All this stuff is easy to import into Photos. Simply drag the files (or a whole folder full of them) onto the Photos icon in your Dock or into the Photos window. Alternatively, you can select one or more files in the Finder, and then click the Share icon at the top of any Finder window (the square with the up arrow on it) and choose “Add to Photos” from the menu that appears. To add files from inside the Photos app, choose File→Import, and then navigate to the files or folder and click “Review for Import.” A window opens where you can select items, and then click Import Selected or Import All New Photos.
Whichever method you use, the newly added files appear in the Photos view in chronological order according to when the files were last modified, burned onto disc, or originally imported onto your hard drive. The new files also hang out in the Last Import album—that is, until you import something else. Since images you add in this way can be difficult to find in Photos later on—due to the variety in dates—you may want to select the newly imported files and stick them into an album (The Wide World of Albums). Or you can apply a keyword to the files so you can easily find them later (say, “Macworld 2000,” “Space Camp,” or whatever). Using Keywords tells you how.
Note
When you import files from a folder on your hard drive (or from a CD or DVD), Photos ignores whatever directory structure that folder used. For example, if you’ve painstakingly stored your pictures on your hard drive using subfolders named by date or event—say, a folder named 2016 that contains a folder named San Diego Comic-Con that contains a folder named Thor—those folders disappear in Photos and the images are all lumped together in the Last Import album. To recreate your original organization, you need to divvy the pictures into albums (see The Wide World of Albums).
Copied vs. Referenced photos
Photos can keep track of the pictures and videos you import in two different ways: either by copying them into its library or by referencing their location outside its library. From the factory, Photos copies your digital mementos into its library file for safekeeping. But you can change this behavior so that Photos doesn’t copy the original files, it merely remembers where they are—on your internal or external hard drive, a CD or DVD, a flash drive, a networked hard drive, and so on. Photos refers to these files as referenced, and they remain firmly rooted where they are on your hard drive.
You control this behavior with Photos’ preferences: Choose Photos→Preferences→General (see Figure 2-7). If you turn off “Copy items to the Photos library,” any future content you import won’t be copied into Photos’ library. Instead, Photos remembers the original locations of your pictures and videos, and that’s where it expects to find them…forever.
Let us count the reasons why using referenced photos is fraught with peril:
If you move a referenced file, Photos loses track of it. If you try to open the referenced picture in Photos, you get a message politely requesting you to go find it. If you can locate it in the Finder, Photos happily relinks it, at which point you can continue working with the image in Photos. If not, you may as well delete it from Photos, because you’ll never be able to do anything with it there.
If you rename a referenced file, Photos loses track of it permanently. If you try to open the referenced picture in Photos, you get a message requesting you to find it. Even if you can locate the renamed file in the Finder, Photos won’t relink to it, because the file’s name has changed.
Only copied pictures and videos work with iCloud Photo Library (Meet the iCloud Photo Library). In other words, using referenced files defeats the whole purpose of iCloud Photo Library, which is to have a backup of your files, sync all of your content across your devices, and optimize storage space on those devices.
Referenced files don’t live in the Photos library, so you have more files to remember to back up.
If you delete a referenced file in the Photos app, the program forgets about it but the file still lives in its original location, so you don’t reclaim any hard drive space.
If you forget that you switched to using referenced files and you import some files and then innocently delete them in the Finder, those files are gone for good.

So why offer the referenced file option at all? Well, if you have a laptop and you’re not using iCloud Photo Library (Meet the iCloud Photo Library), you’ve got limited storage space on your internal drive, so you may be forced into keeping pictures elsewhere and referencing them. Though in all honesty, if your image collection is spread out across multiple hard drives, you probably shouldn’t be using Photos. Try a program that’s made to track pictures that live in other locations, such as Adobe Photoshop Lightroom.
Nevertheless, if you have referenced files, you may want to see where those files live or decide to copy them into your library and be done with the whole referenced business. Here’s how to do both:
View a referenced file. In Photos, select a referenced file’s thumbnail, and then choose File→“Show Referenced File in Finder.” Photos opens a Finder window and shows you the file’s last known location.
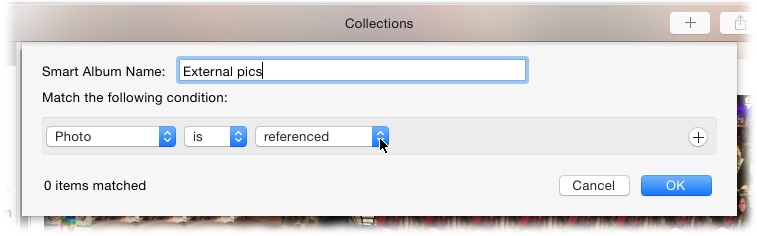
Consolidate referenced files. In Photos, select the thumbnail(s) of the referenced file(s), choose File→Consolidate, and then click Copy. Photos dutifully copies the referenced files into its library. Of course, your success with this command depends on your ability to locate referenced files to begin with. Figure 2-8 explains a quick way to round them all up.
Importing Files from Other Apps
OS X is very wise. It knows full well that you’ll encounter files you want to import into Photos in several places on your Mac, including in other programs. Here are a few likely scenarios:
Finder. If you encounter a photo or video in a folder or on your desktop—perhaps a scan you made, a photo you were given, or something you downloaded from the Internet—Control-click that item, and then choose Share→“Add to Photos” from the resulting shortcut menu or, if the item is in a Finder window, click the share icon circled in Figure 2-9, and then choose “Add to Photos.”
Tip
In some cases, you can import an image into Photos by dragging it from an app’s window onto the Photos window. However, this doesn’t always work. If you don’t see a green circle with a + sign appear next to your cursor when you drag the item to the Photos window, you’re out of luck. There seems to be no rhyme or reason as to why this works with some images and not others, but hey, it doesn’t hurt to try. After all, nothing ventured, nothing gained!
Mail. If you get an email with a picture or video attached, simply Control-click the item and, from the shortcut menu that appears, choose “Export to Photos” or Share→“Add to Photos.” You can also drag the item onto the Photos icon in your Dock.
Messages. If you receive an image in the Messages app, Control-click it and choose “Add to Photos Library” from the shortcut menu. Alternatively, you can drag the image from the Messages app onto the Photos icon in your dock or atop the Photos window.
Safari. If you use Safari to browse the Web or check your email, you can snatch an image on the page or in an email message by Control-clicking it and choosing “Add Image to Photos.” You can also drag the file onto the Photos icon in your Dock.
Photo Booth. If you capture an image using Photo Booth (an app that comes preinstalled on your Mac), select the image, and then click the Share icon and choose “Add to Photos.” Or simply drag it onto the Photos icon in your Dock or onto the Photos window.
Preview. If you open an image in Preview, click the Share icon in Preview’s toolbar and choose “Add to Photos.”
Fortunately, Photos doesn’t have to be running for these import tricks to work. When you use any of these commands, OS X quietly and efficiently adds the files to your System Photo Library (What Gets Uploaded) whether it’s open or not (technically they’re tucked into a “waiting area” folder inside the library file). This is a good reason to maintain a single Photos library: If you have multiple libraries (Using Multiple Libraries) and the open one isn’t the System Photo Library, then you won’t see the newly imported content until you open the System Photo Library.
You can also import goodies into Photos for iOS using other iOS apps. Many iOS apps sport a share icon, which you can use to save the image to your device’s Photos library. If you’re the lucky recipient of a picture or video in the Mail or Messages app, simply tap the file preview, and then tap the Save Image icon that appears. If you’re surfing the Web in Safari and you come across an image you want to save—say, an image of the couch, car, or man cave of your dreams—tap the image and hold your finger down until a menu appears. In that menu, tap Save Image.
Importing Images from Apps that Don’t Share
Some apps are selfish and don’t offer a way to easily pass pictures to Photos. Shockingly, the list of such apps includes Apple’s own Pages and Keynote, as well as Adobe’s Acrobat and Reader; unsurprisingly, none of the Microsoft Office apps share. Fortunately, your Mac’s Preview app can moderate the situation and import images from those programs into Photos. Here’s how:
Copy the image to your Mac’s clipboard.
In any program that lets you select an image, click the image, and then copy it to your Mac’s clipboard (memory) either by choosing Edit→Copy or by Control-clicking the image and choosing Copy from the shortcut menu.
Launch Preview, and then choose File→New from Clipboard.
The Preview app lives in your Applications folder as well as in your Dock (unless you removed it). Once you launch the program, create a new document by choosing File→New from Clipboard. When you do, your Mac automatically pastes the contents of your clipboard—namely, the image you just copied—into the new document.
In Preview’s toolbar, click the share icon and choose “Add to Photos.”
The share icon looks like the one circled in Figure 2-9. When you choose this command, your Mac imports the image into your System Photo Library (What Gets Uploaded), where—after a second or two—it appears at the end of the All Photos album. The newly imported image is also visible in Photos view, inside the moment it belongs to (based on the date and time you created the Preview document). You’ll learn all about moments in Chapter 3.
Interestingly, this Preview trick also works for importing headshots that are stored in the Contacts app on your Mac. In Contacts, click an image associated with one of your acquaintances and choose Edit→Copy (or press ⌘-C). Switch to the Preview app, follow steps 2 and 3 in this section, and—ta-da!—your Mac swiftly imports the image into Photos.
Importing Videos
Today’s smartphones and digital cameras can capture remarkably high-quality video clips. Conveniently, Photos can import, organize, play, and even trim (Trimming Videos) your videos right alongside still images. It recognizes any video format the QuickTime Player app can play (a lengthy list indeed), though its favorite formats are MOV and AVI.
You don’t have to do anything special to import or work with video files in Photos. The program includes an album that automatically gathers your videos so you can find them easily, as Albums View explains.
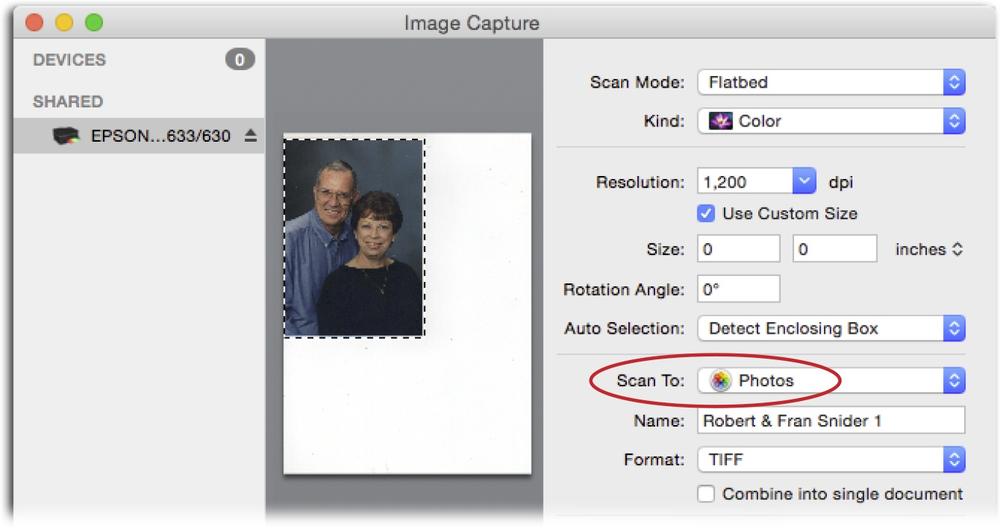
With portable, high-quality scanners available for about $70, swarms of family historians are invading the homes of their relatives to politely ask permission to scan meaningful documents and photos. For example, Epson’s Perfection V19 is about the size of a 15-inch MacBook—and only about an inch thicker—and is powered by the same USB cable that connects it to your Mac. With a resolution of 4800 x 4800 dpi and powerful image-enhancement features built in, this scanner is a family historian’s dream.
What most people fail to realize is that you can scan directly into your Photos library. The trick is to use Apple’s Image Capture utility (it’s in your Applications folder.) Whenever your scanner is plugged into your Mac, or available wirelessly on your network, Image Capture recognizes it and summons that scanner’s own scanning software and adds Photos to its Scan To menu, as shown here.
Fun with File Formats
You can import and work with all kinds of image files in Photos, though the most common format is JPEG—the acronym stands for the Joint Photographic Experts Group that developed it. This is the format that most folks capture on their cameras, which makes perfect sense; JPEGs contain a wonderfully wide range of colors, so they’re perfect for color photographs. JPEGs are also compressed, which means they consume less disk space than other files while maintaining a very high level of quality.
In addition to JPEGs, Photos can work with a slew of other file formats, as this section explains.
Raw Files
Most newer (and pricier) cameras can capture photos in raw format—the fully uncompressed, unprocessed raw information the camera recorded when you took the picture. You may not realize it, but when you shoot in JPEG format, your camera processes the image by applying a little noise reduction, sharpening, and color boosting. If you compared the exact same picture in both JPEG and raw format, the JPEG always looks better, due to the in-camera processing. However, using raw data in Photos gives you more editing flexibility and control because you can process the image however you want. So if you’re serious about having total control over how your images look, you may want to try shooting in raw format. Your camera’s manual should explain how to do that.
The only caveat to shooting and importing raw files into Photos is that the file sizes are humongous, and consume giant swaths of storage space on your camera’s memory card and your hard drive.
Note
Many cameras let you shoot in JPEG + raw format, wherein two files are produced for each shot you take. While doing so gives you the best of both JPEG and raw worlds, it’s also one of the fastest ways to use up space on your memory card or hard drive. If you shoot in JPEG + raw, Photos lets you specify which file to use as the original in Edit mode. Beyond Photos has the lowdown.
Other File Formats
Here are a few other file formats that Photos is happy to import and let you play with:
TIFF, whose name is short for tagged image file format, has long been considered the gold standard for high-quality image files, so nearly any program can work with this format. Saving a file in this format doesn’t compress it, so the quality is always as pristine as the original. Some cameras can capture images in this format.
GIF is often used for website graphics that have a limited number of colors (think cartoon art), a transparent background (so it’s see-through), or are animated. You may encounter this kind of file in emails or on the web.
PNG is the up-and-comer because it supports transparency and a wide range of colors. It produces higher-quality images than JPEG format, but the file sizes are bigger, soo.
PSD is a format used by Adobe Photoshop (and Photoshop Elements), the world’s most popular image-editing and photo-retouching program. Photos can import layered Photoshop files—ones where different image adjustments or graphic elements live on separate layers stored inside a single document. (To master Photoshop, pick up a copy your humble author’s book Photoshop CC: The Missing Manual. It’s 1,000 pages of pure Photoshop fun!)
PDF is short for portable document format, and is hugely popular for sharing single- and multipage documents. Saving a file in this format is like taking a picture of the file: All the fonts, images, and videos it contains are included, so it looks just like the original, but you don’t have to own the software that created it. This format can be opened and printed by most every computer on the planet, so it’s often used when saving a file from a desktop scanner or all-in-one printer/scanner. (You may receive scans of business documents in PDF format, too.) While Photos lets you import multipage PDFs, you can only see, and thus edit, the first page of them.
Tip
You can generate a PDF file from anything your Mac can print. With the file open, choose File→Print, and in the resulting OS X Print dialog box, click PDF at the dialog box’s lower left and choose “Save as PDF.” Pick a location to save the new file, and then drag it onto the Photos icon in your Dock or onto the Photos window (or use the File→Import command in Photos). Remember: Photos only displays the first page of long PDFs, so reserve this trick for single-page documents only. You can also save book, calendar, and card projects in PDF format for easy sharing with others; see Step 5: Preview Your Project for details.
BMP is a popular graphics file format used on Windows-based PCs. So if you use a PC at work, or if you’ve got friends who do, you may encounter this format.
SGI and Targa are specialized graphics formats used on high-end Silicon Graphics workstations and Truevision video-editing systems. Unless you moonlight for the likes of Pixar or DreamWorks, you’ll likely never encounter these formats, but if you do, Photos can work with them!
After the Import
After you import a batch of pictures into Photos, you’ll want to have a good, long look at them to see if they’re worth the library space they take up. Unless you shoot on an iPad, this is likely your first opportunity to see your images at full-screen size.
As you learned on Importing from a Camera or Card Reader, when Photos finishes importing, it displays the Last Import album, which contains the files you just imported. (If you don’t see the Last Import album, you can get there by clicking Albums in Photos’ toolbar, and then double-clicking the Last Import album’s thumbnail. If you turned on the sidebar [The Two Faces of Photos and the box on Displaying the Sidebar], just single-click Last Import in the sidebar’s Album section.) To kick off your post-import inspection, double-click a thumbnail to enlarge the picture in Photos’ preview area; alternatively, you can single-click the thumbnail, and then tap the space bar. Once you’re viewing a picture at this large size, you can move through the album using the arrow keys on your keyboard—a satisfying way to assess your captures. To see all your thumbnails again, press the spacebar or double-click the enlarged image.
If you’re feeling frisky, you can make your pictures even bigger by using Full Screen view, as shown in Figure 2-10. Just click the green button at the upper left of the Photos window or choose View→Enter Full Screen, and your image consumes every last pixel on your screen.
Tip
To keep Photos’ toolbar visible while you’re in Full Screen view, choose View→“Always Show Toolbar in Full Screen.”
Viewing your pictures in this manner is perfect for deleting bad shots, fixing a picture’s rotation, marking images as favorites (Using Favorites), and more. Here’s the full list of things you can do as you walk through your pictures at large size, either in Full Screen view or not:
Browse photos by pressing the left and right arrow keys on your keyboard. You can also use the sidebar (The Two Faces of Photos and the box on Displaying the Sidebar) to see other albums and such.
Delete a photo by pressing the Delete key on your keyboard. A confirmation dialog box appears asking if you’re sure you want to delete the item(s). Click Delete to confirm, or Cancel if you change your mind. To bypass this confirmation message, hold down the ⌘ key when pressing the Delete key; with this method, the picture immediately disappears. (But don’t worry—you can bring it back by pressing Edit→Undo Delete Photo before you do anything else in Photos.)
Mark a photo as a favorite by pressing the period (.) key on your keyboard. You’ll learn more about favorites on Using Favorites, but they’re a great way to flag pictures that you want to do something with later—say, create an album or print. Photos corrals pictures you mark in this way into an album named (not surprisingly) Favorites.
View a photo’s details by Control-clicking it and choosing Get Info. When you do, Photos opens the Info panel, which shows the picture’s filename, the date and time you took it, what camera you used, and more. You’ll learn all about the Info panel on The Mighty Info Panel.
Figure 2-10. You can use Full Screen view (shown here with the sidebar turned on) anywhere in Photos: while browsing, editing (Chapter 5), or building a project (Chapter 9). Once you enlarge an image, you can cruise through others in the same album, moment, or collection by using your keyboard’s arrow keys or by pointing your cursor at the left or right side of the image to reveal navigational arrows like the one circled here.Rotate a photo by Control-clicking it and choosing Rotate Clockwise from the shortcut menu. This rotates the picture clockwise 90 degrees each time you choose the command. Press and hold the Option key while choosing this command to rotate the photo counterclockwise instead. This is handy if you shoot a lot of pictures while holding your camera vertically. That said, most newer cameras are capable of flipping your photos in the right direction automatically, before they get to Photos.
Duplicate a photo by Control-clicking it and choosing Duplicate 1 Photo from the shortcut menu. This creates a copy of the file, which is handy when you want to edit it in different ways (say, you want a full-color version and a black-and-white). You’ll get the full story on editing pictures in Chapter 5.
Share a photo by Control-clicking it and choosing Share. The resulting menu displays the myriad sharing options Photos offers, such as email, text message (Messages), AirDrop, iCloud Photo Sharing, or posting to Facebook, Twitter, or Flickr. You can even use this menu to assign the photo as your desktop picture (Desktops, Lock Screens, and Wallpaper). Sharing is covered in detail in Chapter 8.
Hide a photo by Control-clicking it and choosing Hide 1 Photo. Hiding isn’t the same as deleting. When you hide an image, it remains in your Photos library but you can’t see it. This lets you get it out of the way without deleting it. You’ll learn more about hiding pictures on Hiding Thumbnails.

By taking the time to assess your pictures right after you import them, you keep your Photos library lean and mean. And using the commands listed above while viewing your pictures in a big, beautiful format makes this process feel less like a chore.
Tip
Deleting photos on an iOS device becomes tedious very quickly—especially if you have lots to delete. Rather than using those few square inches of glass to select and delete items, you can use the Image Capture app in your Mac’s Applications folder instead. First, attach your iOS device to your Mac with the cable that came with it. Then launch Image Capture and select your iOS device from the list of devices. Now you can select multiple items quickly (see Selecting and Hiding Files for tips on selecting), and then click the red circle-with-a-slash icon at the bottom of the Image Capture window. A confirmation dialog box asks you to Confirm or Cancel deleting these items. When you click Confirm, those items are removed from your device.
Dealing With Duplicates
Photos is mercifully smart when it comes to preventing duplicate pictures and videos from infiltrating your library. By using filenames, dates, file sizes, and other technical data, the program can spot duplicates from a mile away. When it encounters a file on your memory card or camera that matches one that’s already in your library, Photos politely asks whether you want to import it.
Note
If you converted one or more iPhoto libraries to use in Photos (Migrating from iPhoto or Aperture to Photos), the program automatically removes any duplicates images it finds in those old libraries. Sweet!
That said, duplicates may occasionally sneak into your Photos library. Unfortunately, there’s no automated way to locate them. But if you browse pictures in Moments view (Photos View), you can easily spot duplicates, because their thumbnails are sitting side by side.
Visiting Your Photos Library
One of the beautiful things about using Photos to organize your digital image world is that you don’t ever need to know where Photos stashes your files or how it performs its special brand of file-management and manipulation magic. Much like a refrigerator, telephone, or light switch, you don’t have to know how Photos works to enjoy and appreciate its benefits. But in case you’re curious, here’s some info about where Photos stores your stuff. (For more details, see Chapter 10.)
As you learned in the note on Visiting Your Photos Library, Photos is a database, and thus your Photos experience consists of two separate parts: the Photos app (which lives in your Applications folder) and a database called the Photos Library file. Technically, the latter can live anywhere on your internal or external hard drive, but it’s usually tucked inside your Pictures folder (for example, Macintosh HD→Users→[Your name]→Pictures→Photos Library).
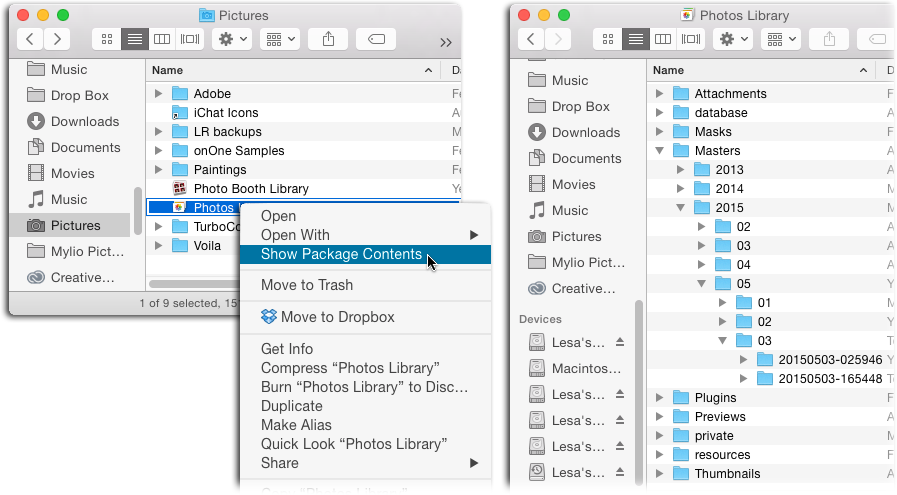
The Photos Library is no ordinary file—it’s a package of folders and files that behaves like a single file. If you’re the inquisitive type, you can peek inside the Photos Library file, though doing so requires a bit of OS X voodoo, as Figure 2-11 explains.
Note
Look but don’t touch! Your Photos app expects everything in these folders to be exactly where it put them. If you move or rename anything in the Photos Library package, Photos gets confused and will alert you the next time it needs to access the file you changed. The exception is that it’s okay to copy a file in your Photos Library package to another location. However, it’s safer to use Photos to do that rather than mucking about in the library’s innards.
There are really only two interesting folders in the Photos Library package file (remember, this is look-but-don’t-touch-territory!):
Masters. This folder houses your original pictures and videos, exactly as you imported them. It’s the key to one of Photos’ most remarkable features: the “Revert to Original” command (Undoing Your Changes).
Previews. Once you use one of Photos’ editing tools (Chapter 5), Photos duplicates the file and stores the edited copy in this folder.
In case you’re dying to know what the other folders in the Photos Library file are for, here you go (depending on your situation, you may see some or all of these folders):
Apple TV Photo Cache. If you have an Apple TV, this is where Photos keeps the database of photos you’ve told it to use as a screensaver. (See the box on Viewing Slideshows on an Apple TV for more on Apple TV’s ultra-cool screensaver feature.)
Background Import. When you import a file using the “Add to Photos” feature in the Finder or in other apps (Importing Other Image Files), this is where the file goes. If Photos is running when you do the importing, Photos immediately imports the file. If it isn’t, the file cools its heels here until you next launch Photos; think of this folder as a waiting area.
Database. All the parts and pieces of your Photos library are tracked here—albums, face and location tagging, and so on.
iPhoto or Aperture Items. You’ll only see these folders if you upgraded an iPhoto or Aperture library to Photos. They store info about that old library.
Modified and Originals. These folders include aliases (pointer files) to the Previews and Masters folders, respectively. In other words, opening the Modified folder opens the Previews folder, and opening the Originals folder opens the Masters folder.
Thumbnails. This folder contains index-card-sized previews of your pictures, organized by date.
If this sneak peek has piqued your interest, you can read tons more about your Photos library in Chapter 10.