Chapter 6. Slideshows and Movies
When it comes to showing off your pictures and videos, nothing beats a great slideshow. Imagine watching your digital memories take over your entire screen, set in motion through smooth animations and transitions, complete with background music. It’s one of the simplest and most impressive Photos stunts you can pull off.
Such personalized and polished cinematic experiences are easy to create because Photos does all the heavy lifting. All you have to do is pick the images you want to include, and then fiddle with a few settings. The program includes several animated themes that get your images moving, and automatically pairs each one with a specially selected, high-quality soundtrack (though you can use your own music if you prefer).
You can trigger collection-, moment-, or album-based slideshows instantly, which is handy when you’ve got a neighbor or delivery guy trapped in your house for a few minutes. In fact, the program is riddled with play buttons for just this purpose; you see one when you point your cursor at a collection or moment in Photos view, when you view the contents of an album, and so on.
Or, if you prefer, you can take your time and prepare a slideshow project to play at your parents’ anniversary party, your next photography club meeting, or whatever. These saved slideshows are highly customizable. In addition to choosing a theme and music, you can determine how long each slide stays onscreen; choose the style, speed, and direction of transitions for each slide; and add custom text. When you’re finished, you can export the slideshow as a movie file for sharing with others or for playing on another device.
Photos also lets you edit the videos you capture with your camera and iOS devices. You can’t do a lot to them, but you can trim footage off the beginning and end, as well as export video frames as still images. And if you shoot slow-motion video on an iOS device, you can specify when the footage slows down and speeds up (a slick trick).
In this chapter, you’ll learn how to craft instant and saved slideshows in Photos, as well as how to edit videos (tips for editing video in QuickTime Player are included, too). You’ll also discover how to play a slideshow on an Apple TV, export slideshows and videos you’ve edited, share those files with others, and transfer them onto your iOS devices.
Slideshow Basics
Your slideshow journey starts by telling Photos what pictures and videos you want to include. You can base your slideshow on a moment or collection you’re viewing, a whole album (including Faces, Last Import, Favorites, and so on), multiple albums, or specific thumbnails. Simply choose the photos/videos you want to include by selecting an album, a collection, or individual photos using the techniques described on Selecting and Hiding Files. After you’ve done that, you can trigger a slideshow in two different ways:
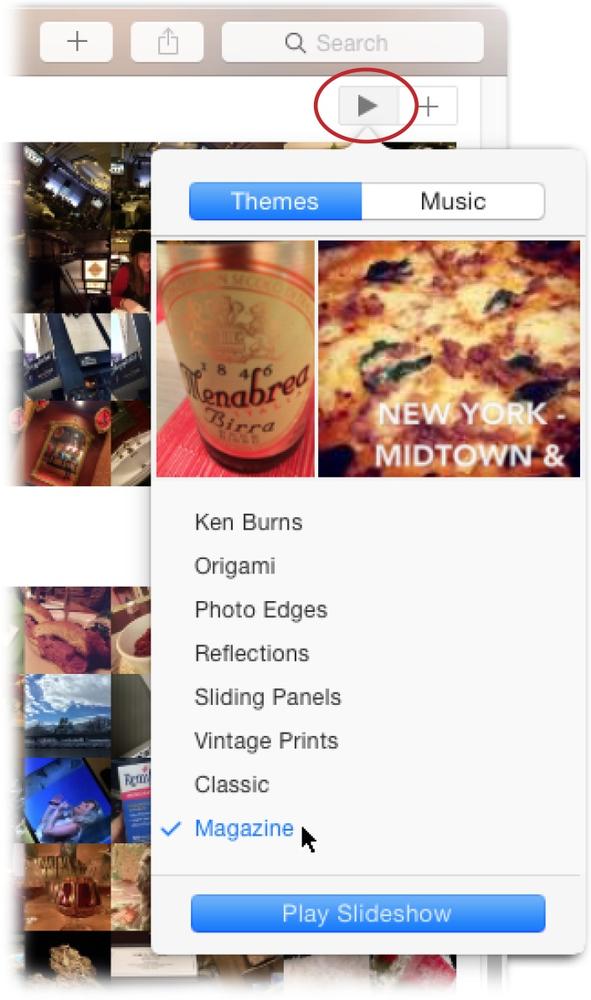
Instant. Think of instant slideshows as quick and temporary—you can’t customize them very much, add text, or save and export them. To start one on a Mac, click one of the triangular play buttons you see throughout Photos, or Control-click any album and choose Play Slideshow. Either way, the Themes pane appears and lets you pick an animation style for the slideshow (you’ll learn about themes in a minute). Photos displays a small preview of your slideshow at the top of the pane and starts playing music. (To change the music, click the Music tab at the top of the pane, or just silence the music by muting your Mac’s audio.) If you click Play Slideshow at the bottom of the pane, your pictures take over your screen.
Note
You can create instant slideshows in Photos for iOS, too, though you don’t get a choice of themes (but you can pick a transition style). And just like on a Mac, you get to pick a song to use as the show’s soundtrack. Skip ahead to Instant Slideshows in Photos for iOS for the full scoop.
Saved. This kind of slideshow produces a saved project that you can play and export. Slideshow projects are highly customizable, just like Photos’ other projects (the books, cards, and calendars described in Chapter 9). You can add text to any slide, control slide order and timing, fiddle with transition styles, fit the slideshow to the music you’ve picked, and so on. Unfortunately, you can only create saved slideshows in Photos for Mac, not in Photos for iOS.
In this chapter, you’ll learn everything there is to know about both kinds of slideshows, as well as how to export saved slideshows so you can share them with others.
Note
The slideshows you make in Photos play on one screen at a time. So if you’ve got more than one monitor plugged into your Mac or if your laptop is plugged into an external monitor, the other monitor goes black so it doesn’t distract from the show. To create a slideshow that plays on both screens, you need to use your Mac’s screensaver preferences to tunnel into your Photos library. See Setting a Photo as Your Desktop (Mac) for the scoop on this impressive trick.
Picking a Theme
Photos for Mac sports several slideshow presentation styles called themes, which add personality to your slideshow through graphical embellishments and animations. Friends and family will declare you a computer wizard and swear you spent hours crafting the visual feast that is your slideshow when in fact all you did was click a button to pick a theme (let this be your little secret). (You don’t get to pick themes when playing a slideshow in Photos for iOS.)
You get the same set of themes with instant slideshows as you do with the saved variety. Your choices are Ken Burns, Origami, Reflections, Sliding Panels, Vintage Prints, Classic, and Magazine. Rather than reading descriptions of each theme, it’s far more fun to preview them yourself (Figure 6-1 explains how). The box on Who’s Ken Burns? has more about the Ken Burns theme.
Choosing a Soundtrack
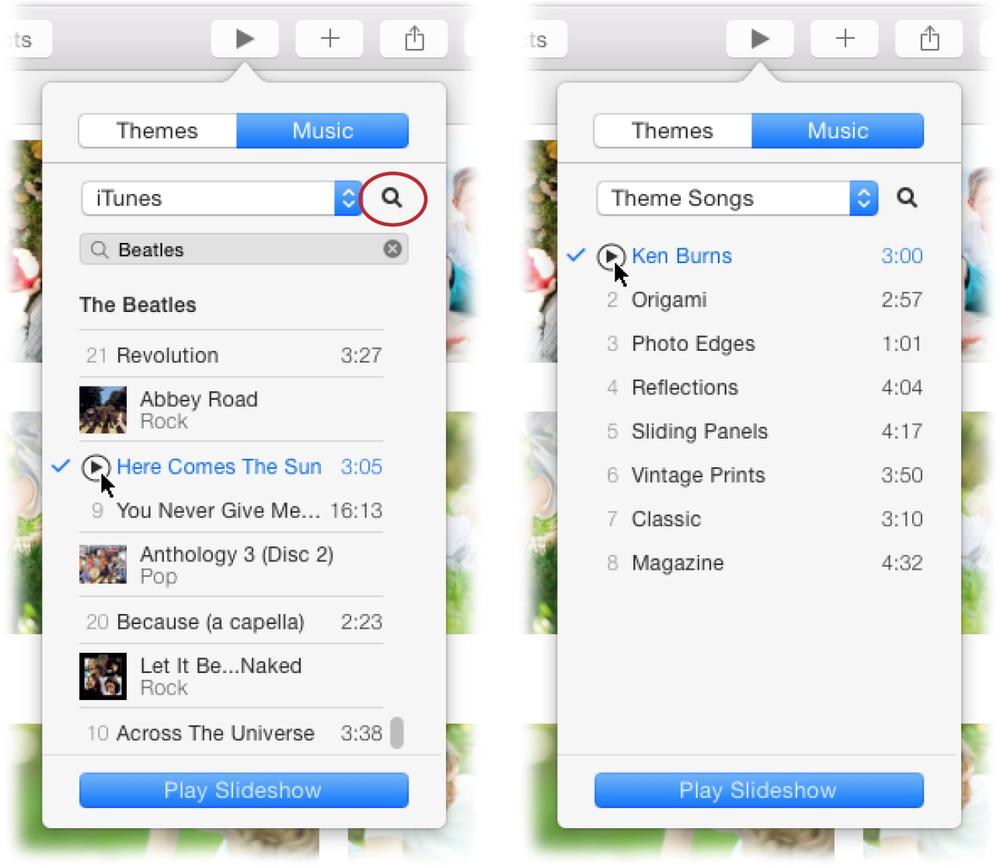
Apple understands the importance of background music, so each slideshow theme is paired with a specific theme song licensed for your slideshow-viewing pleasure. However, you’re not stuck with tunes by the likes of Randy Newman, Miles Davis, and Vince Guaraldi. Using the Music pane shown in Figure 6-2, you can access your iTunes library and pick the songs you want to use as a soundtrack.
Using your own music lets you control the mood of your show. For example, if you vacationed in Hawaii and came home with a bunch of slack-key guitar music, suck those CDs into iTunes and then use a few songs as background music. If you partake in winter holiday festivities, you can create a smart album that contains all the pictures you took in December, and then pair it with your favorite holiday tunes. The creative possibilities are endless.
Alas, the Music pane only lets you see the artists and songs in your iTunes library; you can’t see any playlists you’ve made or music you’ve handcrafted in GarageBand (Apple’s music-recording app). There are other surprising limitations, too. As of this writing, you can’t select whole albums to use as a soundtrack, and the Music pane for an instant slideshows lets you pick just one song per show. The song repeats until the slideshow ends. The Music pane for a slideshow project, on the other hand, lets you pick as many songs as you want (Creating a Saved Slideshow has details).
Note
Due to copyright laws, you can’t use DRM-protected music in a slideshow (DRM is short for “digital rights management”). DRM-protected songs appear gray in the Music pane. If you’re the determined sort and you double-click a DRM-protected song, Photos displays a message shaming you into making a different selection. This restriction keeps you from violating copyright laws by, say, exporting a slideshow movie that includes your favorite Beatles song and posting it on YouTube.
This could also be the reason Photos won’t let you choose whole albums or playlists for background music: Maybe Apple doesn’t want to disappoint you when DRM-protected music refuses to play.
Oddly, there’s no way to turn off slideshow background music. If you don’t want any tunes to play, you have to mute your Mac’s audio. Bummer!
Creating Instant Slideshows
There’s precious little setup required before creating an instant slideshow on a Mac: All you have to do is tell the program what pictures and videos to include. (The next section explains how to create these slideshows on an iPad.) While you can’t customize an instant slideshow beyond switching themes and music—you can’t even loop it so it plays continuously—creating one is the quickest way to show off your photos when a viewing opportunity arises.
You can start an instant slideshow in a variety of ways, depending on what you’re viewing in the Photos window:
In Photos view, point your cursor at a moment or collection, and then click the play button that appears above the thumbnails on the right. When you do, Photos automatically selects all the thumbnails in that moment or collection. (While you can click the play button in Photos’ toolbar, doing so doesn’t make the program select the thumbnails for you.)
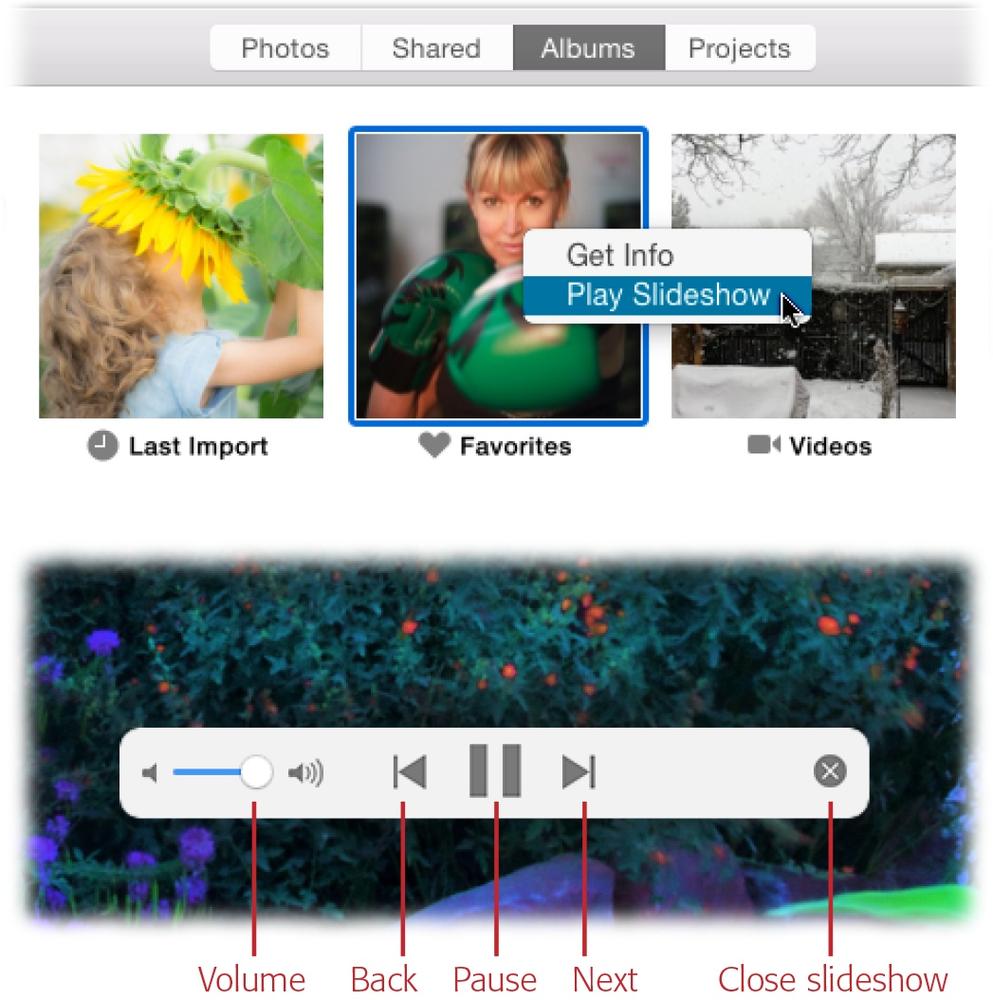
In Albums view, Control-click an album and choose Play Slideshow from the shortcut menu shown in Figure 6-3, top. To play an instant slideshow of multiple albums, select them by ⌘-clicking each one, and then Control-click one of the selected albums and choose Play Slideshow. The albums play in the order in which they appear in Albums view.
To play a slideshow of the currently open album’s contents, make sure you don’t have any thumbnails selected by clicking an empty area between two thumbnails, and then click the + button in Photos’ toolbar and choose Slideshow. Photos automatically includes all the images inside the current album in your show. (If you did have a thumbnail selected, only that image gets included in the show.) To play a slideshow of just a few pictures in the album, select their thumbnails first (Selecting and Hiding Files), and then play the show.
To control the order of pictures inside each album, you have to rearrange them before you start the slideshow. Just double-click the album to open it, and then drag the pictures to reorder them. Doing so lets you handcraft a storytelling experience instead of displaying pictures in random order.
Figure 6-3. Top: You can trigger an instant slideshow from nearly anywhere in the program. In Albums view, just Control-click any album—even those created by Photos—and choose Play Slideshow. Bottom: If you wiggle your mouse (or touch your trackpad) while a slideshow is playing, you reveal the handy controls shown here. Within a few seconds after you let go, the slideshow controls disappear.Note
As of this writing, you can’t trigger an instant slideshow while in Year view, but you can dip into Albums view and play a slideshow based on the All Photos album. While there’s no official limit to the number of pictures a slideshow can contain, it’s possible that you may have too many pictures for your Mac’s memory to handle, causing Photos or your Mac to crash.
When viewing the contents of an album, click the play button in Photos’ toolbar (it’s visible in Figure 6-2).
In the sidebar (The Two Faces of Photos), Control-click an album and choose Play Slideshow from the shortcut menu.
Tip
To pause a slideshow that’s playing, press the space bar on your keyboard, and then press it again to restart the show. To move through the slides manually, use the left and right arrow keys on your keyboard to go backward or forward (respectively). To end a slideshow, press the Esc key or wiggle your mouse to summon the slideshow controls, and then click the X labeled in Figure 6-3, bottom.
And that, dear friends, is all there is to an instant slideshow. You don’t have any other customization options, at least not in Photos for Mac: You can’t loop the show, change slide timing or transitions, or save or export it. To do any of that, you need to create a saved slideshow project as explained starting on Saved Slideshows. (As you’ll learn in the next section, the Settings app gives you a few more instant slideshow options in Photos for iOS.).
Instant Slideshows in Photos for iOS
You can play an instant slideshow in Photos for iOS, too, though you don’t get to pick a theme (you get to pick a transition style instead). The process varies ever-so-slightly on iPads versus iPhones and iPod Touches, as this section explains.
Note
While Photos for iOS doesn’t give you any way to customize slideshows beyond transition style and (one) song choice, you can employ other apps to spice up your iOS slideshows. Check the App Store for third-party slideshow options such as Flipjam and Slideshow Builder Lite. Just enter slideshow in the Search field to see what apps are currently available.
Either way, to trigger an instant slideshow on your iOS device, you have to be viewing the contents of an album in Photos. So tap Albums, and then tap an album to open it. If you’re on an iPad, tap the word “Slideshow” at the program’s upper right and you see the Slideshow Options pane shown in Figure 6-4. On an iPhone or iPod Touch, you don’t see a Slideshow option. Instead, tap the first thumbnail in the album to open it (or whatever image you want to play first), and then tap the Share icon at the lower left. In the row of icons that appears at the bottom of your screen, swipe left to scroll horizontally, and then tap the Slideshow icon (it looks like a big play button) to reveal the Slideshow Options pane.
Tip
To control slide duration, looping, and shuffling on an iOS device, you have to use the Settings app. Once you open it, scroll down until you see Photos & Camera. Give it a tap and then scroll down to the Slideshow section where you’ll find three easy to use controls (who knew?).
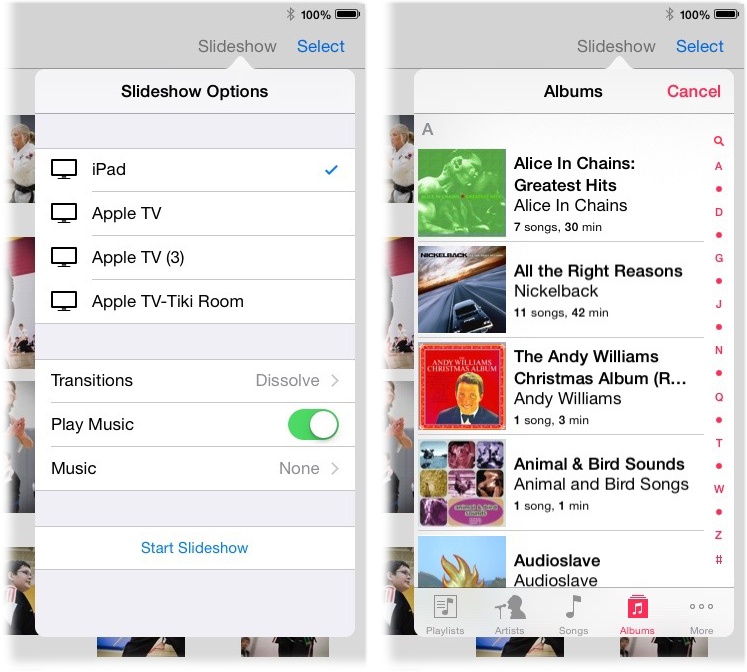
The first section of the Slideshow Options pane lets you pick what device to play the slideshow on (it’s automatically set to iPad). If you’re on a wireless network that includes an Apple TV, it’s included in the list, too. This lets you pull off a slick stunt: You can play the slideshow on the TV connected to the Apple TV (obviously, the Apple TV and the TV itself have to be turned on for this to work). Give it a try the next time your neighbor pops over with vacation photos on their iPad; you’ll blow people’s minds when you effortlessly project a slideshow of their photos onto your big-screen TV.
Tip
As the box on Viewing Slideshows on an Apple TV describes, you can use AirPlay on your iOS device to peruse your Photos library on an Apple TV-connected screen. In other words, you don’t have to create an instant slideshow to view your pictures on a TV screen.
The pane’s next option lets you control the type of transition Photos uses between pictures. Just tap the word “Transitions” to reveal a list of your options: Cube, Dissolve, Origami, Ripple, Wipe Across, and Wipe Down. Tap the transition style you want and Photos returns you to the Slideshow Options pane. To stick with the same transition, just tap Back at the pane’s upper left.
Unlike Photos for Mac, Photos for iOS doesn’t automatically assign background music to your slideshow. If you want a soundtrack, tap the Play Music switch (it turns green), and then tap the word “Music” that appears beneath it (see Figure 6-4, left) to access your iTunes music library (Figure 6-4, right). Use the buttons at the bottom of the resulting pane to find the song you want to play, and then tap the song to select it. Finally, tap Start Slideshow to play the show.
Saved Slideshows
This is where the real slideshow fun begins. By creating a slideshow project, Photos saves your slideshow as a clickable icon in Projects view so you can play it again later with the same settings or continue editing it. Saved slideshows are far more customizable than their instant siblings. For example, you can rearrange the slide order, pick more than one song for background music (yay!), control song order, and set the duration of the show to match the music, among many other options.
You can also export saved slideshow projects to share them with others, post online, or sync onto your iOS device. As you’ll discover, saved slideshows are as suitable for creating portfolios of your photography or other artwork as they are for showing off vacation pics.
Note
Seasoned iPhoto slideshow creators will enjoy Photos’ simplified controls for customizing slideshows. However, one casualty of that simplification is that, as of this writing, there’s no way to pull captions from the image titles or descriptions you’ve added in the Info panel like you can in iPhoto. The fix is to add a text field to your slides instead. Deleting and Duplicating Slides explains how.
Creating a Saved Slideshow
Here’s how to create a surprisingly sophisticated slideshow:
Select some pictures and/or videos, and then choose File→Create Slideshow, or click the + button and then choose Slideshow.
You can create a slideshow from an album, multiple albums, or individual thumbnails. You can also start a slideshow project from a moment or collection you’re perusing in Photos view. As Figure 6-5 explains, this route doesn’t require you to make a selection first.
Tip
For the smoothest slideshow-editing experience, before you create your slideshow project, gather your pictures and videos into an album and drag them into the order you want them to appear. While you can adjust slide order once you’ve created your project, it’s easier to do it in an album where you can make the thumbnails big enough to see.
Figure 6-5. In Photos view, point your cursor at the thumbnails in a moment or collection, and then click the + button that appears (circled). Photos automatically selects everything inside the moment or collection you’re viewing, as evidenced by the blue borders visible here.Note
Technically, you can create a saved slideshow using the + button in Photos’ toolbar, instead of the one that appears when you point to a moment or collection, but Photos won’t select the thumbnails for you if you do. So reserve the toolbar’s + button for creating projects while viewing the contents of an album.
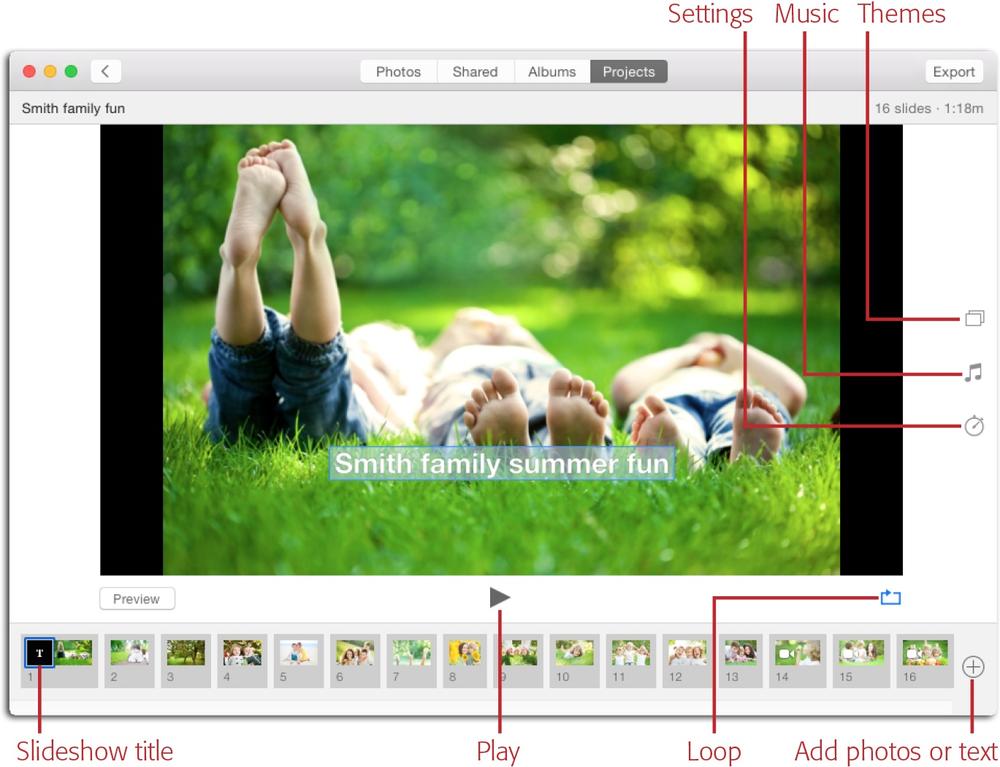
In the resulting pane, enter a name for your show, and then click OK.
Photos drops you into the slideshow editor shown in Figure 6-6. You see your pictures and video as numbered thumbnails at the bottom of the window, and a preview of the first slide takes center stage with the slideshow (or album) name superimposed on it. Icons for themes, music, and settings are on the right. (Behind the scenes, Photos creates a thumbnail for your slideshow in Projects view. You can click the tiny play button in this thumbnail’s lower right to play the slideshow without opening the project itself.)
Drag the thumbnails into the order you want the slides to play.
To change the playback order of your content, drag the thumbnails horizontally. You can reorder thumbnails en masse, too: Just ⌘- or Shift-click to select more than one, and then drag them into place. When you do, the other thumbnails scoot out of the way to make room for the ones you’re moving.
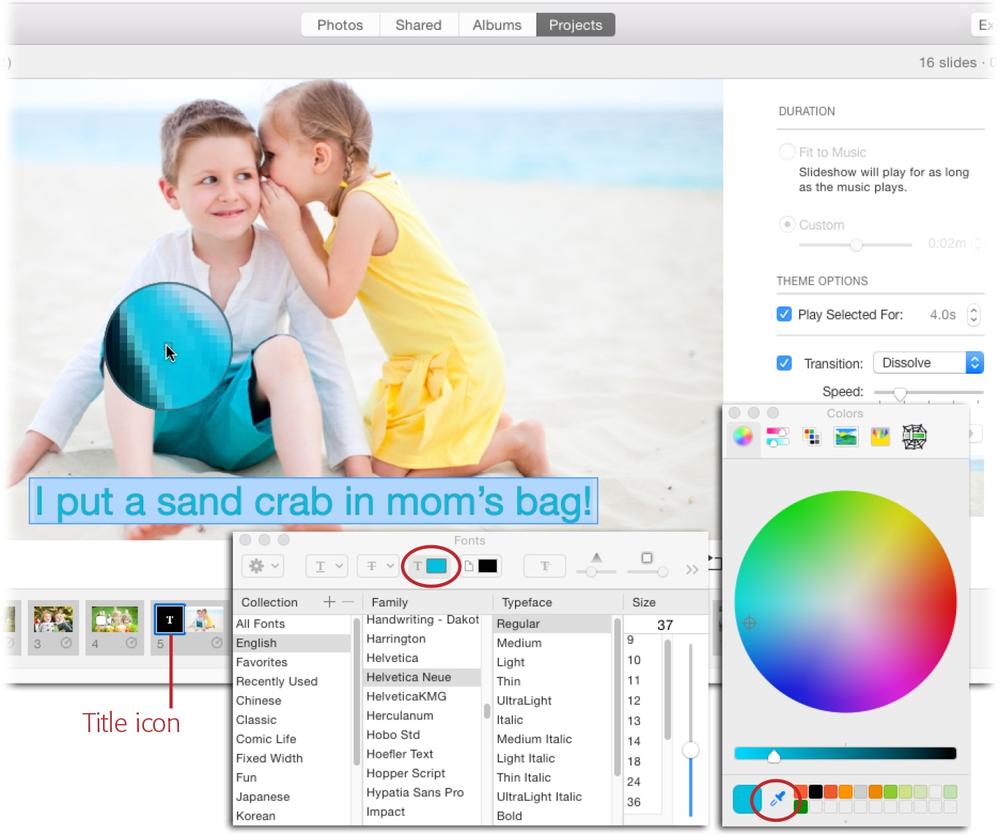
Figure 6-6. When you first create a slideshow project, the title slide is active (note the blue border around it at lower left) and Photo displays the slideshow’s duration at its upper right (here, that’s 1 minute, 18 seconds). To edit the slideshow’s name, simply click within the text atop your picture, as shown here.Click the Theme Picker icon (it’s labeled in Figure 6-6), and then pick an animation style (Picking a Theme).
The slideshow preview shifts leftward and a list of Photos’ slideshow themes appears on the right. Just click the name of the theme you want to use. Remember, you can switch themes anytime you want.
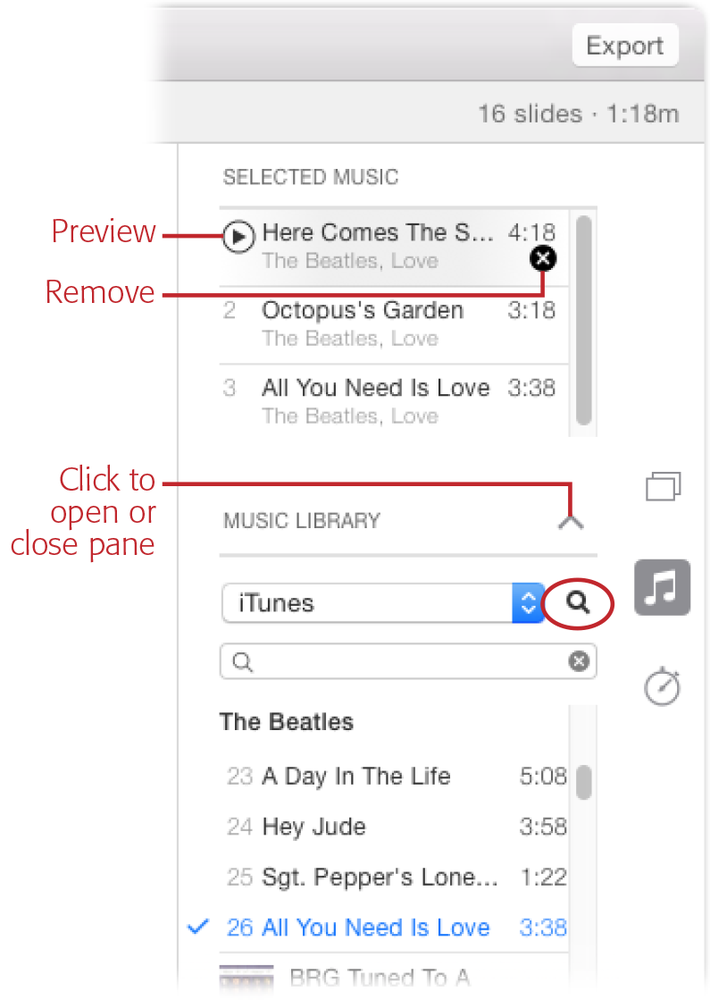
Click the Music icon (the eighth notes), and then pick some songs for your soundtrack.
Unlike instant slideshows, saved slideshows let you pick multiple songs to use as background music. To access your iTunes library, click the down-pointing arrow next to the words “Music Library.” You can then scroll through your library or click the tiny magnifying glass next to the drop-down menu to bring up a search field—just start typing the name of the artist or song you want and Photos tries to find it for you. To preview the song, point your cursor at it, and then click the play icon that appears to its left. To select a song for your show, give it a click (the song’s name turns blue). When you do that, Photos adds it to the Selected Music section, where you can rearrange the songs into the order you want. Figure 6-7 has details.
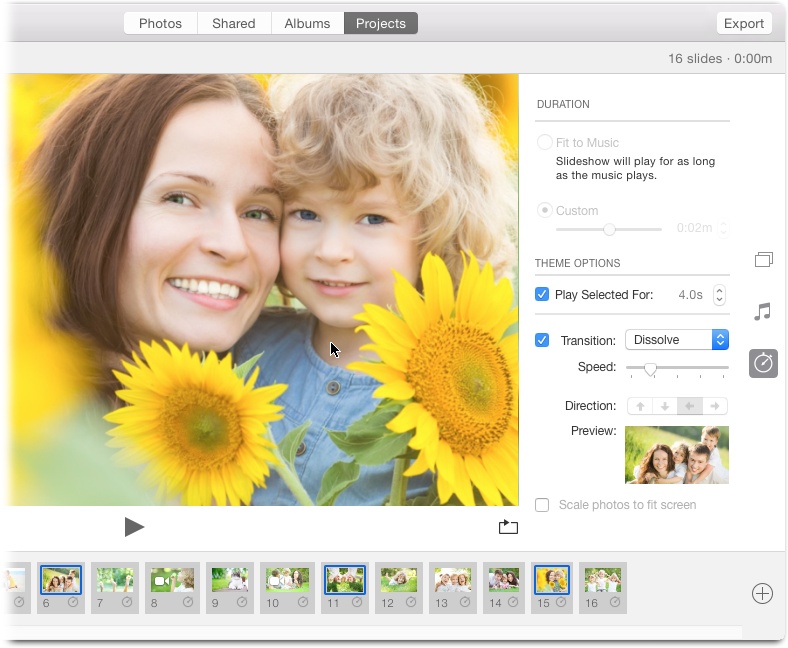
Click the Duration Settings icon (the stopwatch), and then adjust the duration of the slideshow, tweak its transitions, and tell Photos whether you want to scale your photos to fit the slideshow’s aspect ratio.
The Duration Settings icon reveals all manner of options for customizing your slideshow. Some settings affect the whole slideshow while others can affect individual slides, depending on the number of thumbnails selected at the bottom of the window. Here’s what all those settings do:
Duration. Choose “Fit to Music” to adjust the duration of your slideshow to match the length of the music you picked in step 5. Straight from the factory, this option is set to Custom so the length of your slideshow is determined by the duration of the individual slides (discussed next).
Play Selected For. This option lets you specify how long each picture stays onscreen. To turn it on, you must have at least one thumbnail selected at the bottom of the window, as Figure 6-8 shows (and it can’t be a video). If you want all the slides to remain onscreen for the same length of time, select them all by pressing ⌘-A. (If there are videos in your slideshow and you use this keyboard shortcut, Photos still selects them, but ignores the duration setting you enter.)
Resist the urge to keep photos onscreen for longer than 5 seconds, or your viewers may feel like hostages. After all, you can always pause the slideshow to admire a certain picture for longer if you want to.
Transition, Speed, Direction. Use these options to specify a transition style, its speed, and which direction you want the transition to move (say, up or down, left or right). The number of slides these settings affect depends on how many thumbnails you have selected at the bottom of the window. The tiny preview beneath these settings lets you see what your transition will look like.
Note
With great power comes great responsibility. Just because you can set a different transition style for every slide doesn’t mean you should. Generally speaking, it’s best to stick with one to three transition styles for the duration of your slideshow. Otherwise, the transition animations will become the focal point of the show instead of your pictures.
Scale photos to fit screen. This option lets you determine whether, when you play your slideshow, Photos enlarges the pictures in it to fill the screen. This checkbox is automatically turned on, so Photos fits 100% of each image onscreen; that’s why you see black bars on either side of them.
If, on the other hand, you want the photo to fill the screen (in other words, no black bars), turn this option off. Doing so crops the image, so be sure to preview your slides to determine whether this setting works for your slideshow (unless Cousin Andy is positioned at the left or right edge of your picture, it probably will). If you find that people are getting cut in half, you can reposition each photo within the slideshow frame. Simply select the thumbnail you want to adjust, and then drag the photo in the main preview area to reposition it so the important bits are in view (see Figure 6-8). It’s worth taking the time to do this for every slide in your show.
As you can imagine, these settings let you dig in and customize your slideshow in incredible ways. For example, you can make prizewinning photos remain onscreen longer than others, and you might mix up your transitions a little to add visual interest. Doing so is especially helpful if you’re creating a portfolio piece to showcase your photography or other artwork (say, to post online).
Preview your slideshow.
Click the Preview button below the main preview area to see your slideshow. If you’ve got a thumbnail selected at the bottom of the window, that’s where the preview starts. Click Preview again to stop the playback.
Figure 6-8. To make your best photos remain onscreen longer than the rest, select them at the bottom of the window, and then adjust the Play Selected For setting (three thumbnails are selected here). Once you turn off the “Scale photos to fit screen” checkbox, Photos enlarges your images to fill the screen. By dragging the photos in the main preview area, you can reposition them within the frame.Set your looping option and roll the show!
From the factory, your slideshow is set to loop (repeat) continuously. To make it play just once and end, click the Loop icon labeled back in Figure 6-6 so it turns black (as shown in Figure 6-8).
To play your slideshow from start to finish—or to see a larger preview—click the triangular play button below the preview area, and the slideshow takes over your Mac’s screen. (The play button starts your slideshow from the beginning even if you have a slide selected at the bottom of the window.) See the Tip on Tip for info about pausing, controlling, and stopping a slideshow while it’s playing.

When you’re finished, there’s no need to save your project; Photos does that for you automatically. To exit the slideshow editor, simply click one of the view tabs at the top of the Photos window. The next time you dip into Projects view and double-click the slideshow to open it, you’ll find all your customization work fully intact. (If you only have one project, it opens automatically.)
Deleting and Duplicating Slides
To delete content from your slideshow, simply open it in the slideshow editor (go to Projects view and double-click the slideshow’s thumbnail), select the offending thumbnail(s) at the bottom of the window, and then press the Delete key on your keyboard. Photos won’t ask if you’re sure—it simply removes the selected items. If you change your mind, you can press ⌘-Z to undo the deletion, so long as it was the last thing you did.
If you decide to delete the entire slideshow, just pop into Projects view (or click the Back button if you’re in the slideshow editor), select the slideshow’s thumbnail, and then press the Delete key. Photos asks if you’re certain—click Cancel to keep the slideshow or Delete to send it packin’. Alternatively, you can Control-click the slideshow’s thumbnail in Projects view and choose Delete Slideshow from the shortcut menu. The same shortcut menu also lets you duplicate a slideshow, which can be handy if you want to experiment with different slideshow settings without messing up what you’ve already done.
Adding Text and Photos
Photos lets you put custom text on any slide you want. As you may imagine, this presents more captioning opportunities than you can shake a stick at. And if you somehow forgot to include that shot of you cavorting with Paul McCartney, you can easily add it to your slideshow project.
Both maneuvers involve the Add button at the slideshow editor’s lower right (it looks like a circled + sign and is labeled back in Figure 6-6). However, before you click this button, take a moment to select the thumbnail of the slide you want to add text to or, if you’re adding pictures, click the thumbnail you want to precede the new content. Then, click the Add button and do one of the following:
To add text to a slide, choose Add Text. Photos adds a text icon (labeled in Figure 6-9) to the thumbnail and the words “Default Text” appear atop the image. Highlight the placeholder text by clicking it and then pressing ⌘-A or by triple-clicking it, and then enter the text you want. You can’t change the position of the text, but you can its font, size, and color by pressing ⌘-T to summon OS X’s Fonts panel. Figure 6-9 has more info.
To delete text you’ve added to a slide, click the Title icon, and then press the Delete key on your keyboard.
To add pictures (and/or videos), choose Add Photos. Photos transports you into Moments view so you can scroll to find and select items to add, as shown in Figure 6-10. When you’re finished, click the Add button at the program’s upper right. Photos returns you to your slideshow project and adds the content after the selected thumbnail.

Exporting a Slideshow
After spending all that time carefully crafting your saved slideshow, you’ll likely want to share it with others. Fortunately, Photos can easily export it in a popular format (.M4V, to be exact) in the size of your choice that folks can play on most any device. You can also send the slideshow over to iTunes so you can sync it onto your iOS devices.
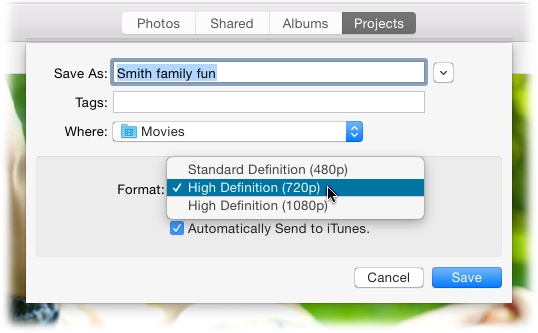
To get the export party started, open the project in the slideshow editor, and then click Export in Photos’ toolbar; the Export pane shown in Figure 6-11 appears. Enter a filename for your soon-to-be-exported slideshow, and then use the Where menu to tell Photos where to store it on your hard drive (initially, it automatically chooses your Movies folder, which is as good a choice as any). Next, choose an option from the Format menu. Here are your choices:
Tip
You don’t have to have the slideshow editor open to export a slideshow project. Alternatively, go to Projects view, select the slideshow’s thumbnail it, and then choose File→Export→Export Slideshow.
Standard Definition (480p). This option gives you a resolution of 640 x 480 pixels, which is great for transferring onto an iPod Touch (third generation), iPhone 3GS, iPad 1, and Apple TV (first generation). This option produces the smallest file size, so it’s a good choice if you plan to share the slideshow with someone who doesn’t have high-speed Internet access.
High Definition (720p). Choose this option to produce a resolution of 1280 x 720, which makes for a larger file size but it looks fantastic onscreen. This option is great for iPod Touch (fourth generation), iPhone 4, iPad, Apple TV (second generation), and for posting home movies on Facebook or YouTube (Google’s free video-sharing site), or for sharing movies using a file-transfer service like iCloud Drive or Dropbox (see Sharing Exported Movies Online).
High Definition (1080p). This option produces a resolution of 1920 x 1080 pixels, which is perfect for viewing on the latest and greatest iOS devices, Apple TVs, and TV screens. The file size will be humongous, but the movie will look awesome. (You can post a movie of this size on YouTube, though it’ll take forever to upload. However, if you’re out to win a photo competition, the extra time might be worth it for the quality you gain.)
The “Automatically Send to iTunes” checkbox at the bottom of the pane sends the exported movie to the Home Videos section of iTunes, which lets you sync the movie onto your iOS devices (you only see the Home Videos section after exporting a movie in this way). Likewise, the resulting video can be found in the Home Videos section of the Videos app on your iOS device.
When you get the settings just right, click Save. Photos compiles and compresses your slideshow into a movie file that anyone can play. You see a status bar along with a Cancel button that lets you bail out of the export process if you realize you want to edit the slideshow some more.
Sharing Exported Movies Online
With all the fancy animation and transition styles tucked into your slideshows, the file size of exported slideshows is huge—especially if you include videos in them. The question that naturally arises is how to share these honkin’ big files with other people. The answer depends on the file’s size and how you want to send it. Here’s a roundup of your choices:
AirDrop. To transfer a movie file between Macs on the same network, open an AirDrop window on the sending and receiving Macs, and then drag the file onto the recipient’s icon. There’s no official file-size limit with this method, but your results may vary if the file is really big—say, over 20 gigabytes. (Sharing via AirDrop has more on using AirDrop.)
Apple Mail. If you’re signed into your iCloud account and you use Apple’s Mail app, you can email the movie—or any large file—using OS X’s Mail Drop feature. Just attach the exported movie to an email like you normally would, and then click Send. In the background, Apple uploads the file to iCloud, and then downloads it onto the recipient’s machine when they retrieve their email. Your recipient will have no idea that iCloud acted as an intermediary for the file transfer; they simply see the movie as an email attachment. Mail Drop works for files up to five gigabytes in size. (Happily, Mail Drop file transfers don’t count against your total iCloud storage allotment.)
iCloud Drive. This is the name for the online storage space you get with an iCloud account. When you upload files to iCloud Drive, you can download them onto another computer (Mac or a PC running Windows 7 or later) or iOS device. Files can be up to 15 gigabytes in size, but you can’t exceed your overall iCloud storage limit (you get five gigabytes with a free account and substantially more with a paid account, depending on the plan you pick). There are two ways to upload files to iCloud Drive:
— In the Finder, choose Go→iCloud Drive or press ⌘-Shift-I to open an iCloud Drive window. You can also open a Finder window and click iCloud Drive in the Favorites section at the upper left of the sidebar. Next, drag the file(s) into the iCloud Drive window to upload them.
— In the Photos Export pane (or any Save pane that you encounter when saving a file in OS X), choose iCloud Drive as the location to save your file. This works in any app, including Photos. This lets you export items straight to your iCloud Drive—say, a saved slideshow (Saved Slideshows) or video you’re exporting (Sharing and Exporting Video).
Downloading iCloud Drive goodies onto your Mac is as easy: Just open an iCloud Drive window in the Finder, and then drag the file(s) onto your Mac’s desktop. Annoyingly, as of this writing, downloading files from iCloud Drive onto an iOS device requires another app such as the free Documents app by Readdle Inc., or the $1.99 iCloud Opener. Once you download the app, use its Open command to access your stuff. This process is tragically clunky, but it works great and alleviates the need to use iTunes File Sharing to sync big files like exported videos onto your iOS devices.
Dropbox. This free file-sharing service lets you upload big files to its servers and send a download link to others via email. When the lucky recipient is ready to download the file, they click the link in the email they received and the file transfer begins. This is a brilliant, fuss-free, multiplatform way to share files with people who don’t use iCloud. To sign up for a free account with two gigabytes of storage space, point your web browser to http://dropbox.com. Once you’ve created your account, Dropbox creates a folder named Public. Double-click it to open it, and then drag your exported movie into it. When it’s finished uploading, Control-click the filename and then, from the shortcut menu, choose Share→Mail. Alternatively, you can choose “Copy public link” from the same menu, and then paste it into the body of an email. Either way, once the recipient downloads your movie, you can delete it from the Public folder.
Facebook. If you’re a Facebook fan—and billions are—you can post your exported slideshows there for friends and family to enjoy. As Chapter 8 explains (Facebook), Photos can upload the videos you capture with your camera or iOS device onto your Facebook timeline, but to upload an exported movie slideshow, you have to visit Facebook.com via a web browser like Safari. As with all things you post on Facebook, you can make your movie public or private. Movies must be less than 40 minutes long and have a resolution of no more than 1280 pixels wide.
YouTube. This free video-sharing site owned by Google is great for posting videos online. You can easily make your files public or private and, once you’ve uploaded a file, you can share a link to it via email, or send the movie to Facebook, Twitter, Google+, Pinterest, and so on. A handy Embed option produces a chunk of HTML code that you can use to embed the video onto your own website. Movies must be less than 15 minutes long and have a file size of less than 32 gigabytes.
Another way to upload an exported slideshow movie to social-sharing sites such as Facebook, YouTube, and Flickr is to use QuickTime Player, Apple’s free movie-playing app that’s installed on every Mac. The box on QuickTime Player Tricks tells you how.
Burning Movies onto CDs or DVDs
Hard as it is to believe, not everyone on the planet has an Internet connection, nor is every human equipped with an iOS device or Apple TV (the horror!). So what if you want to send your exported slideshow movie to, say, far-flung relatives in the piney woods of East Texas or rural Italy? The answer is to burn the movie onto a CD or DVD that you send to them via snail mail. When they get it, they can pop the disc into their computer or DVD player and enjoy your handiwork at their leisure.
When you burn an exported movie—or several, space permitting—onto a CD or DVD, you create a data disc, which is like sharing files on an USB-based flash drive. The movie(s) don’t start playing automatically when you insert the disc; you have to tell the computer or DVD player which file to play. On a Mac, simply double-click a movie file and QuickTime Player springs into action and plays the file. (On Windows-based PCs, the file may open in Windows Media Player instead, or folks can download QuickTime from https://www.apple.com/quicktime/download). On a DVD player, use the arrow keys on the DVD’s remote to navigate to the file you want to play, and then click the remote’s play button to get it started.
While Photos itself doesn’t give you a way to burn slideshow movies onto a CD or DVD, OS X does. The process is described in full step-by-step glory in Chapter 10.
Working with Videos
These days, everyone is recording video. Whether you’re using a smartphone, a point-and-shoot camera, or a fancy DSLR (digital single lens reflex) camera, high-quality digital video is easy to capture. Photos happily imports and manages videos alongside your pictures and, as you learned earlier in this chapter, you can include videos in your slideshows.
You can’t do a whole lot with videos in Photos for Mac, and even less in Photos for iOS. In Photos for Mac, you can view videos at a variety of speeds, trim footage off either end, change the point at which slow-motion videos slow down and speed up, and export a still image from the video as a picture—and that’s it. After all, Photos is a photo editor, not a video editor like iMovie. The Note on Note has more on iMovie, and the box on QuickTime Player Tricks explains what you can do with videos in QuickTime Player. In Photos for iOS, you can only view clips at normal speed, but you can trim footage off either end and adjust a slow-motion clip.
Tip
Photos helpfully places a teeny-tiny video icon at the lower left of video thumbnails, and the duration at the lower right, so you can spot them while perusing your photo collection. But there’s an easier way to find them: Go into Albums view and double-click the Videos folder. All the videos you import automatically go into this built-in smart album. Sweet!
Playing Videos
To play a video in Photos, double-click the video’s thumbnail or select it and then press the spacebar. Next, point your cursor at the video preview to reveal the control bar shown in Figure 6-12. Click the play button to watch the footage at normal speed. (The play button turns into a pause button, which you can click to stop the playback.)
Note
Unlike in iPhoto, pressing the spacebar in Photos merely opens and closes the video file; it doesn’t start and stop playback.
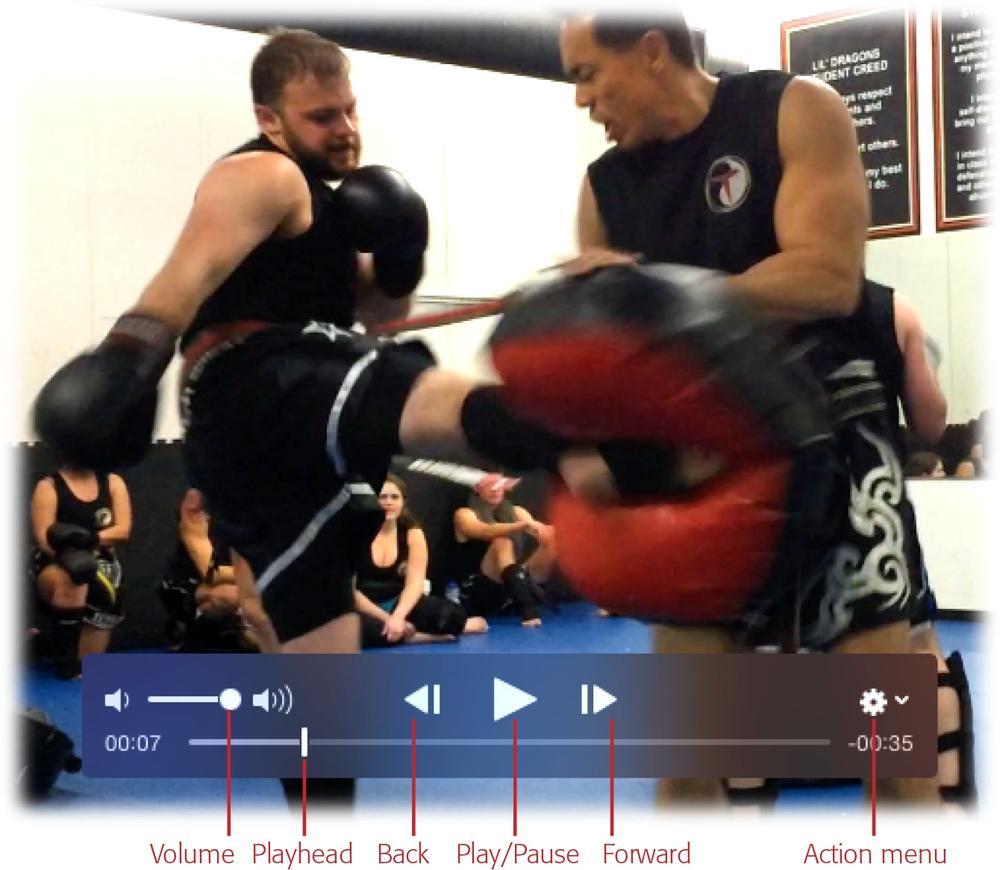
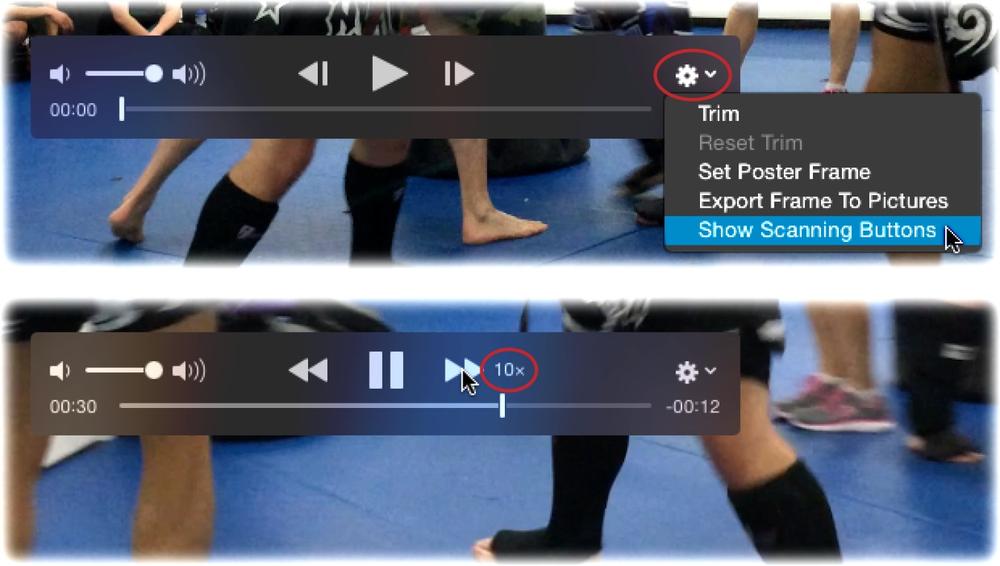
To play the video at a higher speed, click the gear icon and choose Show Scanning Buttons, as Figure 6-13 shows. Now when you click the Back or Forward buttons, your video increases playback speed to 2x. Keep tapping either button to increase playback speed up to a whopping 60x in either direction. You can also scrub through your video by dragging the playhead left or right.
In Photos for iOS, tap the video to open it, and then either tap the big play button that appears on top of it or the blue play button that appears at the bottom of your screen. To pause the video’s playback, tap the playing video, and then, in the toolbar that appears at the bottom of your screen, tap the blue pause button. (To start the video playing again, tap the blue play button.)
Trimming Videos
As mentioned earlier, Photos offers precious little in the way of video-editing options. But it does let you trim footage off the beginning or end of your video in order to eliminate boring bits.
Tip
Trimming your videos is a wise thing to do, especially the beginning, as that part is typically riddled with camera fumbling, shot framing, and waiting for the action to start. In fact, the Wadsworth Constant theorizes that the first 30% of any video is irrelevant, no matter the content (Google that phrase the next time you get a chance). The folks at YouTube apparently agree—if you add @wadsworth=1 to the end of any YouTube URL, the site automatically skips the first 30% of the video.
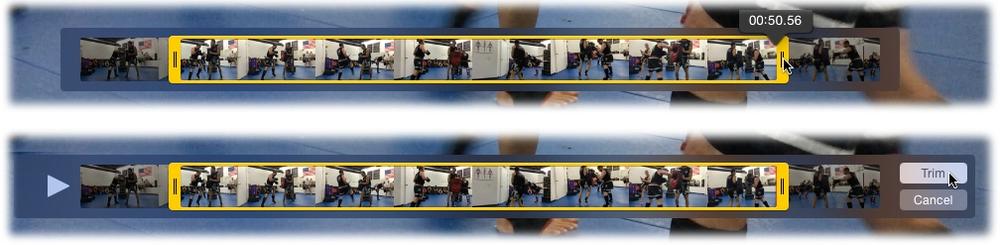
To trim a video in Photos for Mac, open it and then point your cursor at it to reveal the control bar. Click the gear icon and choose Trim from the menu shown in Figure 6-13. When you do, the control bar changes to display the individual still images your video contains (if you previously moved the control bar, it also repositions itself near the bottom of the screen). Photos surrounds the stills with a yellow border and places a yellow handle at either end (see Figure 6-14, top). To isolate the part of the video you want to keep, drag the yellow handles inward to where you want the video to begin and end (see Figure 6-14, bottom).
As you can see, trimming footage from your video is a piece of cake. Your edits aren’t permanent, either; to bring back the trimmed footage at any time, just click the gear icon and choose Reset Trim.
Note
Photos can’t hold a candle to the editing prowess of iMovie, Apple’s video-editing app for Mac and iOS. You can use iMovie to combine still images, video, and text to create a truly one-of-a-kind digital memento complete with Hollywood-style special effects, opening titles, and credits. To learn more about it, check out iMovie: The Missing Manual.
Heck, in Photos for iOS, you can send a video straight to iMovie if it’s installed on that iOS device. To do so, open the video, tap the Share icon at the lower left, and then tap the More button. In the resulting list of apps, tap iMovie. Neat, huh?
To trim a video in Photos for iOS, tap the video’s thumbnail to open it and a control bar appears above it. If you tap and hold the control bar’s far left or right edge, the control bar sprouts a yellow border. While you’re holding down your finger, drag right or left to trim the beginning or end of your clip (respectively). Once you drag one of the trim sliders, you can lift your finger, and then tap and drag the other trim slider if need be. When you’re finished, tap Trim at the upper right and then, on the sheet that appears, tap “Save as New Clip.” If you change your mind about trimming the clip, tap Cancel.
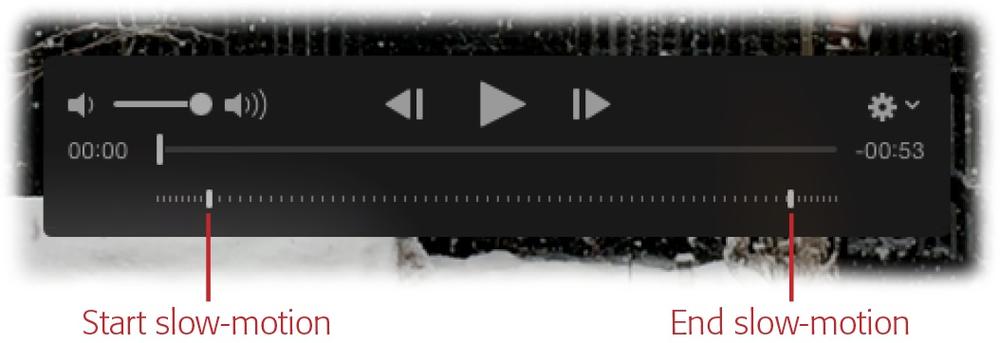
Adjusting Slow-Motion Video
When you capture a slow-motion video on your iOS device, you may be annoyed with the apparent lack of control over when the motion slows and speeds up again. The footage seems to start out fast, then it slows in the middle and speeds up again at the end; but that’s not really what’s happening. In the background, your iOS device captures the entire video at a high frame rate, which is what creates the illusion of slow motion. The iOS device then merely speeds up the beginning and end of the video.
Fortunately, you can use Photos for Mac or iOS to control when the action slows to a crawl and gets going again. Or, if you like, you can make the entire video play in slow motion.
As you learned in Chapter 3, Photos gathers your slow-motion videos into the Slo-Mo album so they’re easy to find. When you open a slow-motion video, you see an extra row of controls in the control bar. Figure 6-15 explains how to use them.
Tip
On an iPhone 6 or later, you can adjust the frame rate at which your slow-motion video is captured before you start shooting. Grab your device and launch the Camera app, and then swipe rightward until SLO-MO is selected. Take a peek at the lower right of your screen, which displays the current frame rate. Tap it to toggle between the two speeds: 240 FPS (frames per second) and 120 FPS. The frame rate that’s listed is the one that the Camera app will use the next time you tap record. However, a higher frame rate produces a slower-looking video, so you’ll most likely want to keep your frame rate at 240.
The process for adjusting slow-motion videos works exactly the same way in Photos for iOS: Just drag the sliders that appear beneath the control bar to adjust when the videos slows and speeds up. And unlike trimming a clip in Photos for Mac, you don’t have to save your edits as a new clip. In fact, you can open the video and adjust the slow-motion timing as often as you want.
Fun with Frames
In the video control bar (Figure 6-12), click the gear icon and you’ll find a couple of menu options that let you access the individual frames in your video. Here’s what the two frame-related options do:
Set Poster Frame. Much like setting the key photo in an album (Viewing an Album) assigns it as the thumbnail for that album, this command lets you pick a video frame to use as a video’s thumbnail. To set a new poster frame, open a video and position the playhead so you’re looking at the frame you want to use (the playhead is labeled back in Figure 6-12). Then simply click the gear icon and choose Set Poster Frame.
Export Frame To Pictures. Choose this command to export the frame you’re currently viewing as a picture file. This is handy when you want to share, print, or use a certain frame from your video in another project (say, a slideshow, book, card, or calendar). You don’t get any kind of status bar or confirmation message when you choose this command; the exported file merely lands in the moment that contains the video.
Sharing and Exporting Video
When you’re finished editing your video, you can easily share it with others via iCloud Photo Sharing (Using iCloud Photo Sharing); send it to someone else in an email or text message; transfer it to another Mac using AirDrop; or post it on Vimeo, Facebook, or Flickr. Chapter 8 explains how to do all that. (Spoiler alert: Control-click the video thumbnail and choose Share from the shortcut menu to reveal your options. Easy-peasy!)
Exporting your movie, on the other hand, prepares it for life outside Photos. It takes a bit more effort than sharing, but exporting lets you to do things like open it in another program, post it on a website, and share it using a method other than the ones listed above (say, on a USB Flash drive). But if you only plan to use a video inside Photos—say, in a saved slideshow (Saved Slideshows)—then you don’t have to export it.
Note
As you learned in Chapter 2 (Importing from iCloud), iCloud Photo Library syncs all the pictures and videos in your Photos library onto all your devices (except for saved slideshows that you’ve exported). However, if you’re avoiding iCloud—say, you don’t have an iCloud account—it’s harder to get edited videos onto your iOS devices. The only way to do it is to sync the video onto your device using iTunes.
Here’s how: Plug your iOS device into your Mac (this step isn’t necessary if you’ve turned on wireless syncing), and then fire up iTunes on your Mac and select your device at the program’s upper left. From the list of Settings that appears (also on the left), choose Photos. At the top of the resulting screen, turn on “Sync Photos from” and pick Photos from the menu to its right. From there, you can choose to sync your entire library, only certain albums that you select, or everything you’ve tagged as a Favorite (Using Favorites). The trick is to turn on the Include Videos checkbox so that, when you click the Sync button, any videos lurking in the items you’ve picked to sync come along for the ride.
Here’s how to export videos:
Select the thumbnail(s) of the video(s) you want to export, and then choose File→Export→Export [number] Video.
For example, if you selected just one video, the command is File→Export→Export 1 Video; if you selected two videos, the command is File→Export→Export 2 Video; and so on. The pane shown in Figure 6-16 appears. To export your video in its unedited glory, choose File→Export→Export Unmodified Original instead.
Set the exported file’s quality.
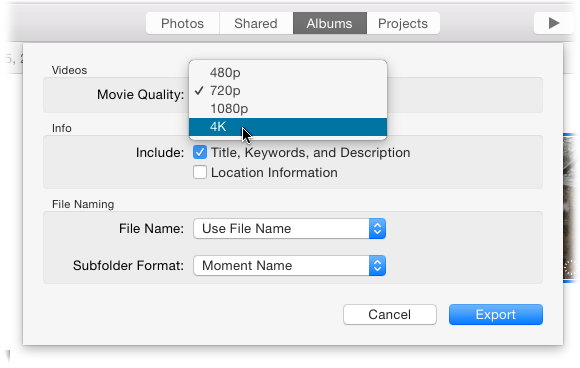
The Movie Quality menu contains the same options you learned about back on Exporting a Slideshow, plus the option to save the exported file at 4k resolution, which is (as of this writing, anyway) the highest resolution possible for a video in Photos. If you’ll show the video on a 60-inch plasma screen, pick this option.
Choose which metadata to include.
The Info section lets you include metadata such as the video’s title (Photos for iOS), any keywords you’ve assigned (Using Keywords), and a description (The Mighty Info Panel). Photos automatically includes this info unless you turn off this checkbox, which helps make your files easier to find later on, plus other apps can use this info. The Location Information checkbox lets you tell Photos whether or not to include your video’s location tags in the metadata—if your video was taken with a device that captured such info, that is (your iOS device does), or if you added it using the Info panel.
Choose a filename and subfolder scheme.
From the factory, Photos sets the File Name menu to Use File Name, which means it simply uses the video’s filename for the exported file. But you’ve got other options: Title (Photos for iOS), Sequential (you enter text that appears before a sequential number, to produce filenames such as blackbelt01, blackbelt02, and so on), and—if your video is part of an album—Album Name With Number.
The Subfolder Format menu is automatically set to None, which means Photos exports the file(s) without subfolders. If you happen to be exporting videos from different moments (Photos View), choosing Moment Name from this menu instructs Photos to export each video into a subfolder named after the moment it lives in.
Click Export, and then tell Photos where to save the file.
When you’ve got all the settings just right, click Export. The standard OS X Save pane appears so you can tell Photos where to save the file. Choose a location, click Export, and Photos sets about compressing and saving your video file.