
Chapter 9. Creating Custom Books, Calendars, and Cards
Welcome to one of the most rewarding chapters in this book. There’s nothing like the satisfaction of handcrafting a printed project you can hold in your hands, and Photos lets you do just that. The books, calendars, and cards you can create in Photos are among the most beautiful printed products available. While you can order the same kinds of photo-based products from various companies, the ease in which you can build and customize them in Photos is unmatched. Same for the print and paper quality you get from Apple, even though they’re not technically the ones who do the printing (the identity of their printer is a closely guarded secret). Even the packaging they arrive in is awesome—they’re stylishly swathed in white, Apple-logoed envelopes. Photos’ built-in book, calendar, and card themes aren’t cheesy, either; they’re professionally designed and drop-dead gorgeous.
Books come in a variety of sizes and greeting cards can be folded, flat, or letterpress (where the ink is physically pressed into the paper). Many of the card themes are designed with a family newsletter in mind, which makes that yearly ritual feel more enjoyable and less like a chore. You can order as many cards you want, whether that’s one or one hundred. For calendars, you pick how many pages you want and which month they start with, as well as which country-specific holidays to include. You can also include items from OS X’s Calendar app such as birthdays and vacations. The calendars themselves are huge, bigger than you can get anywhere else, and they’re printed on super-thick paper stock so they hold up to frequent flipping (handy because everyone who sees yours will want to flip through it).
You can customize many aspects of these projects. For example, you choose how many pictures go on each page, set the zoom level of each image, precisely position each picture within its frame, and add captions.
These printed goodies make impressive gifts. Imagine attending a friend’s wedding and presenting them with a book of pictures you took, or giving your mom a stack of personalized thank-you cards she can send out. If you have trouble coming up with yearly gift ideas, a calendar is the perfect solution. But beware: Once you give someone a Photos calendar, they’ll badger you for one every year.
Note
This chapter focuses solely upon Photos for Mac. You can’t create books, cards, or calendars in Photos for iOS.
In this chapter you’ll learn how to create all of these projects, starting with a custom photo book. Happily, the process is nearly the same no matter what you’re creating.
Creating a Book Project
The books you create in Photos are highly customizable and a lot of fun to make. Once you pick some pictures and the format you want, Photos lays out the book and you set off on a customization adventure: carefully crafting each page, choosing how many photos to include, adjusting the zoom level, writing captions, and so on. When you’re finished, you’re rewarded with a beautifully printed book (on acid-free paper at 300 dots per inch) that’s hand-delivered to your door. It may well be the most satisfying thing you ever do in Photos.
Any book projects you create stay in Projects view, which lets you easily reorder a book later on or duplicate the project so you can tweak it for another purpose without having to start over. The books you make in Photos work well as portfolios, too, allowing you to professionally showcase your photography or other art. In this section, you’ll learn how to make a book worthy of showing off at any opportunity, for pleasure or for business.
Tip
Once you create some projects, you can use the Info panel (The Mighty Info Panel) to view all kinds of neat info about them. In Projects view, click a project’s thumbnail, and then open the Info panel by choosing Window→Info (or press ⌘-I). The Info panel opens to reveal who’s in that project (or rather, which Faces tags the project contains), how many pictures the project includes, the date range in which the pictures were taken, the combined file size of all those images, and a map showing location info for any pictures that include it. Cool!
Step 1: Selecting Images
The first step in creating a book is selecting the pictures you want to include, which is probably the most challenging part of the whole project. For the best results, pick only your best and brightest shots. This keeps the book engaging and helps keep the cost down.
Tip
If you prefer, you can create an empty book that you add pictures to later. This technique is helpful when you want to concentrate on the page design rather than the images; Photos displays empty gray boxes where your pictures will eventually live. Adding Pictures explains how to add pictures to your project after creating it.
Most of Photos’ built-in book themes let you place up to seven pictures per page, though some let you squeeze in up to 16. Keep in mind that the more pictures you put on a page, the smaller and less impactful they become—after all, how much of an impact can postage stamp-size art have? For the best results, alternate the number of pictures on each page and mix in some pages that contain one large image—or an image that’s spread across two pages—to make the design more visually pleasing.
To get started, try gathering 50–75 pictures and organizing them into an album (The Wide World of Albums). That way you can drag the thumbnails into the order you want them to appear in the book instead of leaving it to Photos. You can always rearrange them in the book itself, but corralling them into an album first lets you easily assess them by, say, triggering an instant slideshow (Creating Instant Slideshows) of the album’s contents.
If you want to base your project on multiple existing albums, activate the albums, press ⌘-N to create a new album that includes all of their contents, and then simply delete the pictures you don’t want to include in the book. (Remember, as Removing Files from an Album explains, deleting pictures from an album doesn’t delete them from your library.) Arrange the album so your best two shots are at the beginning and end, as Photos automatically uses those for the front and back covers, respectively. (If you forget, you can easily swap cover shots later.)
Tip
If you’re (wisely) creating a new album for your project, it’s helpful to name it appropriately: say, “Italy for book.” That way you know at a glance what’s in the album and why you made it.
If you don’t want to go the album route, just use the methods described on Selecting and Hiding Files to select some pictures to start your project with. Either way, you can always add more pictures to your book project after creating it.
Step 2: Choosing a Format and Theme
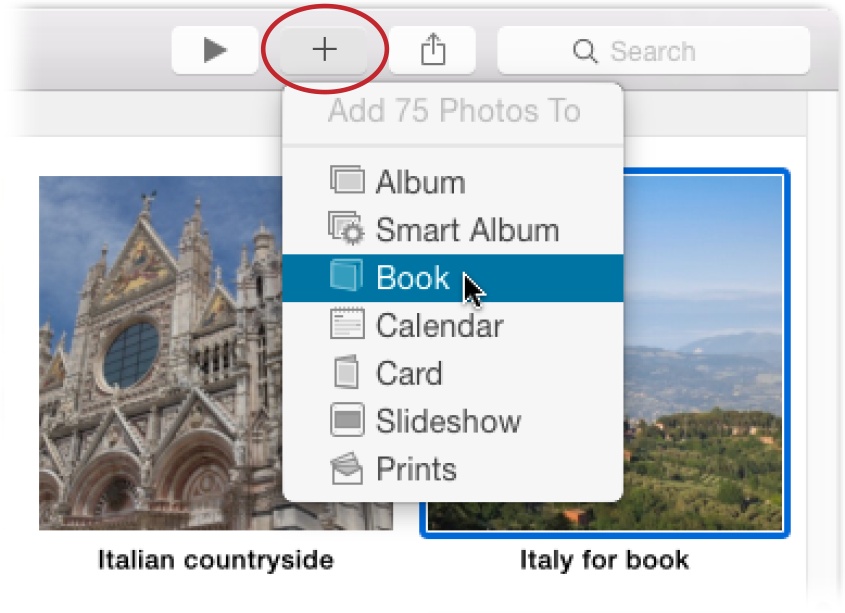
Once you’ve selected an album or some individual shots, you’re ready to create the book project. To do that, choose File→Create Book or click the + button in the toolbar and choose Book, as shown in Figure 9-1.
The next screen lets you pick a book format and size, and displays pricing info. You get a couple of square and horizontal size options for hardcover and softcover books. The hardcover option isn’t plain; your pictures are printed right on the cover itself (front and back). Hardcover books also come with a matching dust jacket and a semitransparent protective sleeve. Softcover books, on the other hand, sport a thick, glossy cover but don’t include a dust jacket or sleeve. As you might suspect, softcover books are cheaper than hardcovers: An 8 x 6 softcover book is just $10 for 20 pages, which makes it an extremely affordable personalized gift.
Books have to be at least 20 pages long, but they can be longer than that. Peek beneath each book’s price to see the cost for each additional page; it ranges from $0.49 to $1.49 per page, depending on the book’s format.
To pick a format, click one of the Select buttons beneath the pricing info, and you then see the screen in Figure 9-2, which is where you pick a theme.
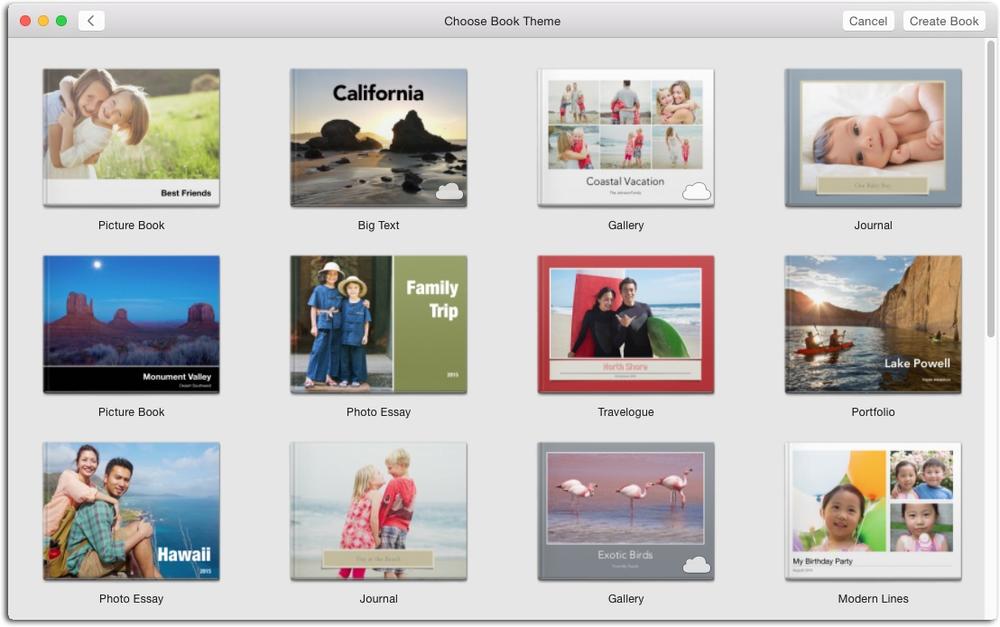
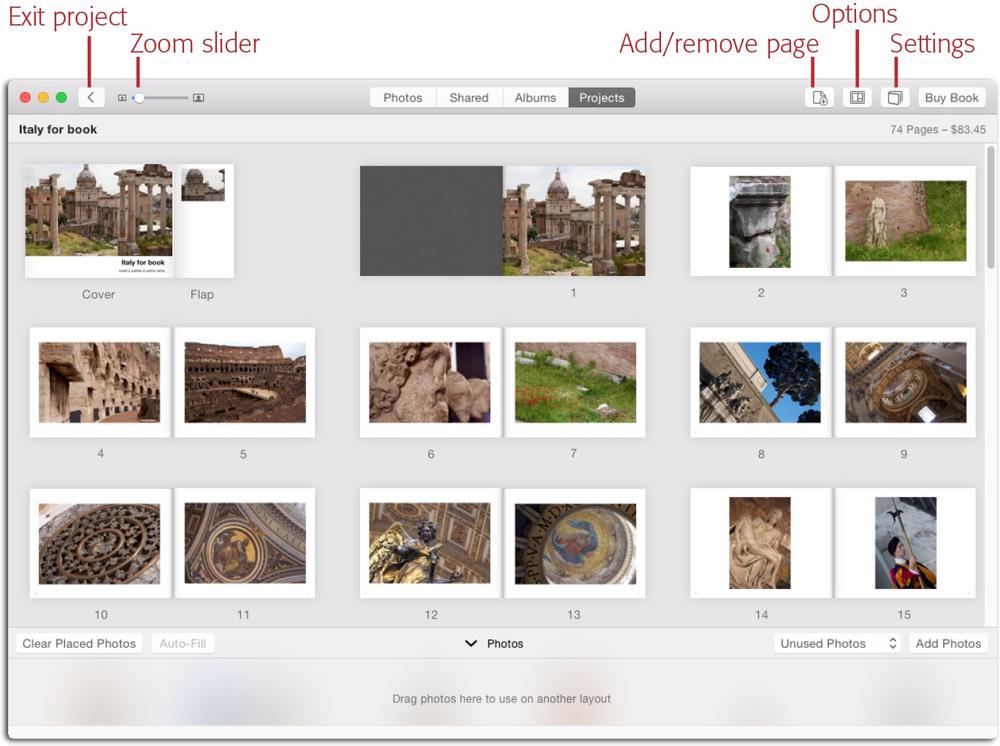
To choose a theme, either double-click one of the thumbnails or click a thumbnail, and then click Create Book in Photos’ toolbar. Either way, Photos creates the book project and plops your shots onto just enough pages to hold the number of pictures you picked in step 1. You see the layout screen shown in Figure 9-3, which shows thumbnails of all the pages in your book. This view doesn’t have an official name, but it’s helpful to think of it as All Pages view.
Note
Don’t worry if you don’t like the theme you picked—none of the decisions you’ve made so far are set in stone. You can switch book formats and themes any time. The next section has the scoop.
Behind the scenes, Photos creates a saved project for your book that’s visible in Projects view and, if you turned it on, the sidebar (The Two Faces of Photos). Because the project is saved, you can exit it and return to it when you’ve got time. You can rename the project by clicking its existing name and typing something else, tuck it into a folder (Using Folders) for organizational purposes, and duplicate or delete it by Control-clicking its thumbnail and picking an option from the shortcut menu that appears.
Note
The projects you create in Photos aren’t tied to the albums from which they sprang (if you started a project from an album, that is). So feel free to rearrange and edit your albums however you want—doing so won’t affect your projects.
Changing the Theme and Format
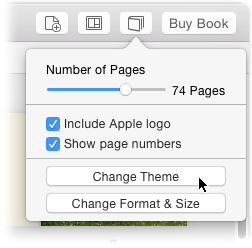
Once you get the first glimpse of your book, you may decide to swap themes or pick a different format. Changing either one can zap any customizations you’ve made to individual pages, so it’s best to nail down these options now. To change your book’s theme or format, click the Settings button labeled in Figure 9-3. In the menu that appears (Figure 9-4), click Change Theme to pick a different theme or Change Format & Size to select a different format. Either button takes you back to the screens you saw when you first started the project.
Note
If you decide to experiment with a different theme or format after you customize some pages, all your design work will be lost. To preserve your work, duplicate your project, and then change the theme of the duplicate instead of your original. To do that, in Projects view or the sidebar, Control-click the project’s icon and choose Duplicate. This maneuver saves you a ton of time should you decide you like the original theme after all.
Now you’re ready to begin the fun yet time-consuming process of customizing the individual pages in your book. Grab a beverage, get comfortable, and read on!
Step 3: Customizing the Pages
Once you settle on a theme and format, you can dig into customizing each page in your book. You can reorder the pages within the book, swap photos between pages, change a page’s layout, enter captions, specify a picture’s zoom level, apply a filter to a picture, and so on. Much of your initial customization will likely involve dragging pages and pictures around to get the placement you want. Then you can dig into fine-tuning each picture and adding captions.
Happily, Photos lets you do most of this stuff in All Pages view (Figure 9-3), which includes thumbnails of all the pages in the book. This view gives you an overview of your whole project. It’s great for placing pictures onto pages, moving them between pages, picking page layouts and border colors, and generally creating the overall look and feel of the book.
If you double-click a page thumbnail in All Pages view, you enter Single Page view, where you see the thumbnail of just one two-page spread. This view is handy for adjusting how each picture appears on the page, and it’s the only place you can edit text (titles and captions). To switch back to All Pages view, click the < at the top left of the window.
This section teaches you how to use both views to customize your book project.
Removing and Replacing Pictures
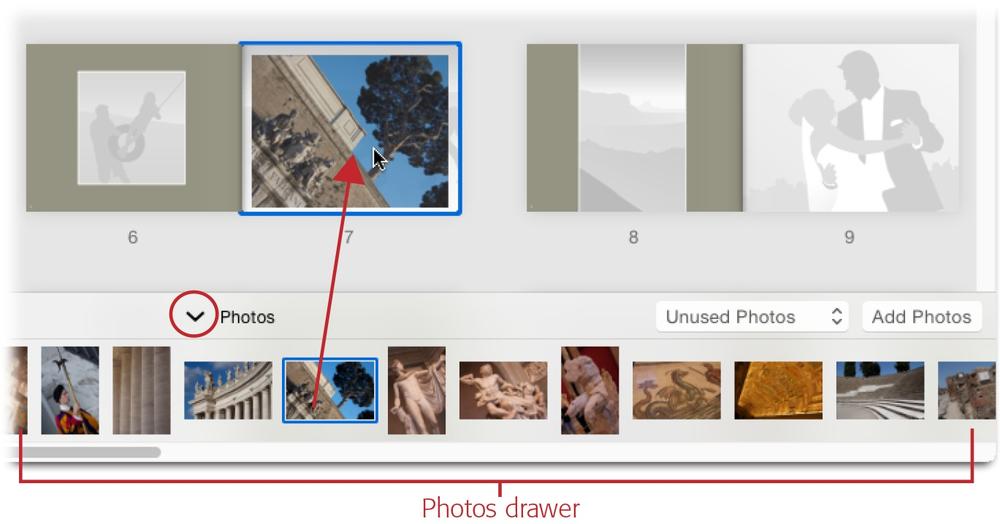
If you started your project by selecting a bunch of images, Photos places them onto your book pages in chronological order. If you started with an album, they appear in your custom sort instead. Either way, you’re not stuck with this arrangement. If you prefer to manually place pictures on each page, then at the bottom left of All Pages or Single page view, click Clear Placed Photos. When you do, Photos asks if you’re sure. If you click Continue, Photos replaces your images with generic gray placeholders, as Figure 9-5 shows. The pictures in your project now appear in the area at the bottom of the window (called the Photos drawer). You can drag them from there onto pages.
Tip
When you’re arranging pictures in your book, pay attention to where your subject’s eyes are pointing. If possible, position your subjects so they’re looking toward the middle of the book instead of off the page.
Also, you can amp up the visual interest by placing contrasting shots on the left and right side of each two-page spread. For example, if you put a portrait-type photo on the left-facing page, put a group shot on the right. Or if you put a shot of scenery on the left, use a shot with people in it on the right.
(Photos is happy to refill your newly emptied pages, too. Just select one or more thumbnails in the Photos drawer, and then click the Auto-Fill button. Photos automatically places those shots onto pages for you.)
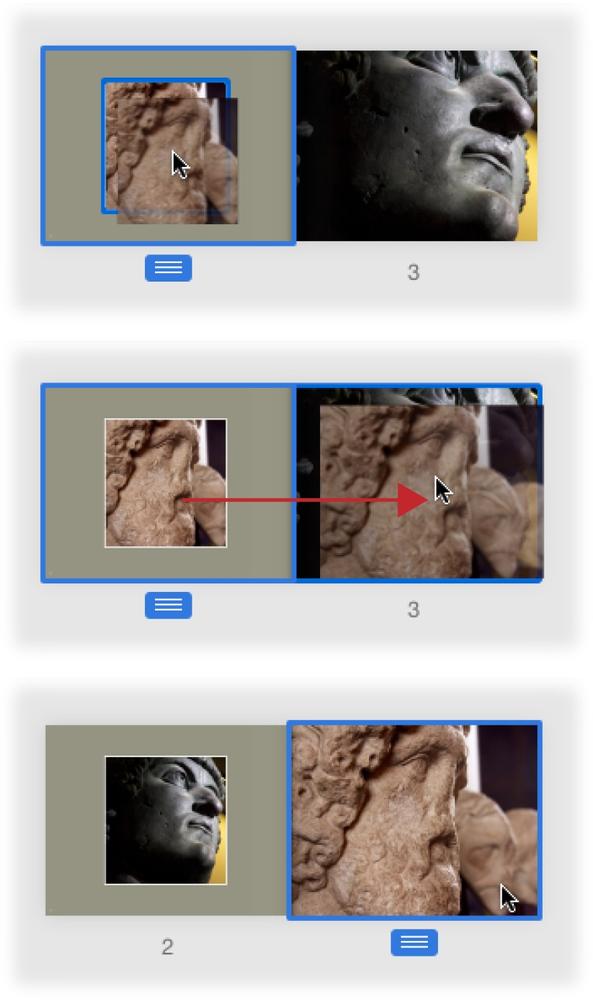
If, on the other hand, you want to remove just a few pictures from the pages in your book, simply click a picture and hold down your mouse button until the picture pops out of its frame. Then drag it to the Photos drawer at the bottom of the window, and Photos swaps in a gray placeholder. To replace one picture with another, drag the picture from the Photos drawer onto the picture you want to replace it with. To swap two images, simply drag a picture from one page onto another, as Figure 9-6 explains.
To remove a picture from your project, select it in the Photos drawer and press the Delete key on your keyboard. You don’t get any kind of confirmation; the image simply disappears from the project (but remains in your Photos library).
Adding Pictures
If you neglected to include a prizewinning shot of you and Benedict Cumberbatch in your project, don’t panic—you don’t have to start over. You can add more pictures to your book project anytime by clicking Add Photos at the Photos window’s lower right.
Note
Photos works hard to keep you from duplicating pictures in your project. That’s why, unless you adjust the menu described in Figure 9-5, only pictures that you haven’t yet placed onto a page appear in the Photos drawer at the bottom of the window. The program automatically places the first picture in your project on both the cover and on the first page of your book, which makes sense. However, if you want to repeat other pictures in your project, you have to add them to the project again. Generally speaking, repeating the same image in multiple places in your book is a waste of space.
When you click that button, Photos plops you into the Choose Photos Screen (it’s really Moments view), the same view you see when adding pictures to a slideshow project (Deleting and Duplicating Slides). Just scroll to find the pictures you want to add, and then select them by clicking their thumbnails. A blue circle with a gray checkmark appears at lower right of each thumbnail you click (pictures that are already in your book project are dimmed and have a gray circle with a checkmark at lower right of their thumbnails). If you point your cursor at a moment, the words “Select Moment” appear at its upper right—click them to select all the images in that moment.
The Favorites button at the upper left of Choose Photos Screen lets you view and select items in your Favorites album. The Selected button lets you view the pictures you’ve picked to add to your book, as well as all the images that are already in it. When you’re finished adding pictures, click Continue at the screen’s upper right and Photos returns you to your book project. The new images are displayed chronologically in the Photos drawer at the bottom of the window (which means you’ll need to scroll around a bit to find ‘em!). To use the new picture(s) on a page, just select them in the Photos drawer, and then drag them onto a page as shown in Figure 9-5.
Reordering Pages
At some point, you’ll likely want to adjust the order of the pages in your book project. After all, it’s only when Photos lays out your book that you get an idea of what it’ll look like once it’s printed.
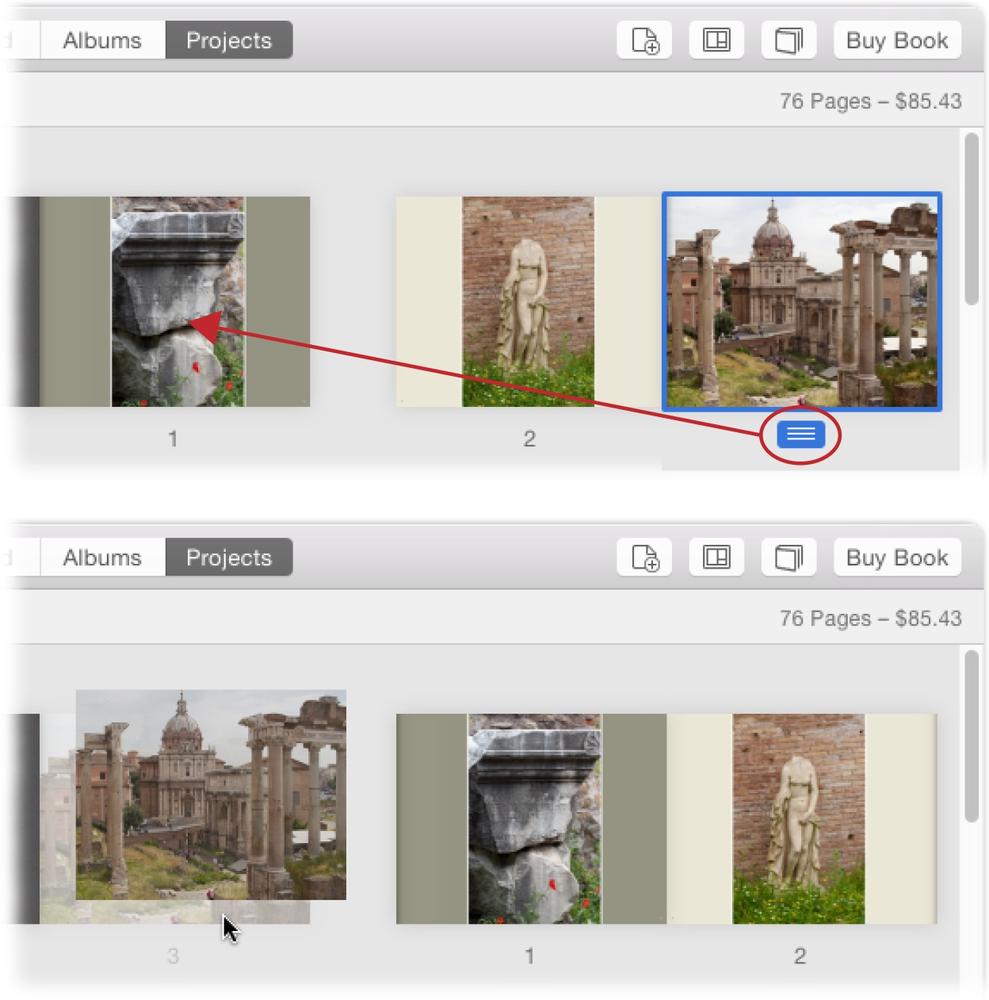
To change the order of pages in the book, you need to be in All Pages view (Step 3: Customizing the Pages tells you how to get there from Single Page view). Click a page to select it or ⌘-click to select more than one. A blue border appears around the page(s) and a blue Page button appears beneath it (there’s one circled in Figure 9-7). To move the page(s) elsewhere, click the Page button, and then drag it until your cursor is pointing to where you want to move the selected page(s). Figure 9-7 has details.
Adding and Removing Pages
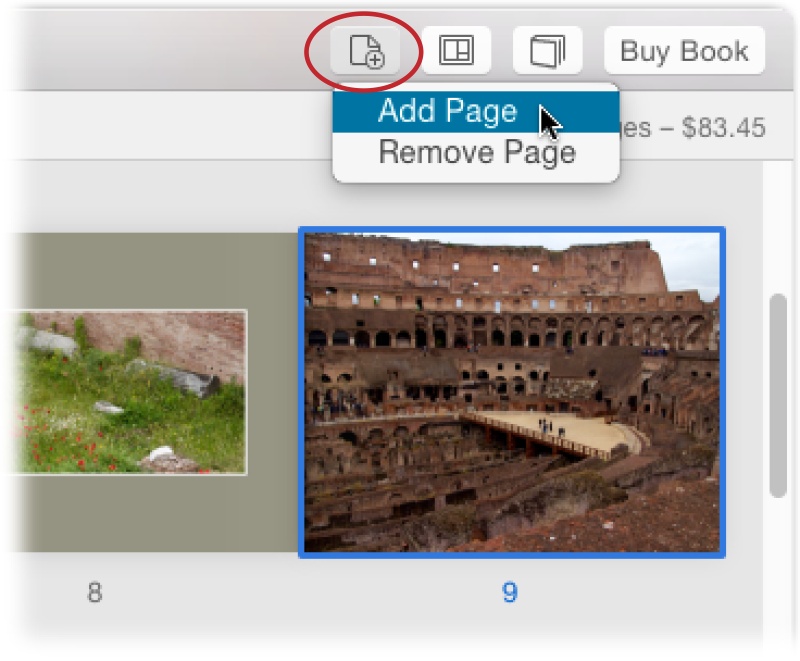
You can easily add or remove pages from your book project, as Figure 9-8 explains. Just be aware that your book has to be at least 20 pages long and have an even number of pages. You get a message saying that Photos will add a blank page if you delete a page that results in an odd number of pages. Removing a page doesn’t remove any of the pictures your project contains, but it does delete any captions you’ve added (Step 4: Edit and Format Text).
The maximum number of double-sided pages a book can contain is 100. If you need more pages than that to cover your adventures in the piney woods of East Texas, you’ll need to make a second book.
Changing a Page’s Layout
When Photos lays out your book, it sprinkles in a variety of different page layouts. For example, some pages include one picture, while others contain two or three, and some pages have captions while others don’t. If you’re happy with Photos’ layout choices, great! You can skip to the next section and learn how to tweak the book’s photos. If not, you can easily change the book’s page layouts.
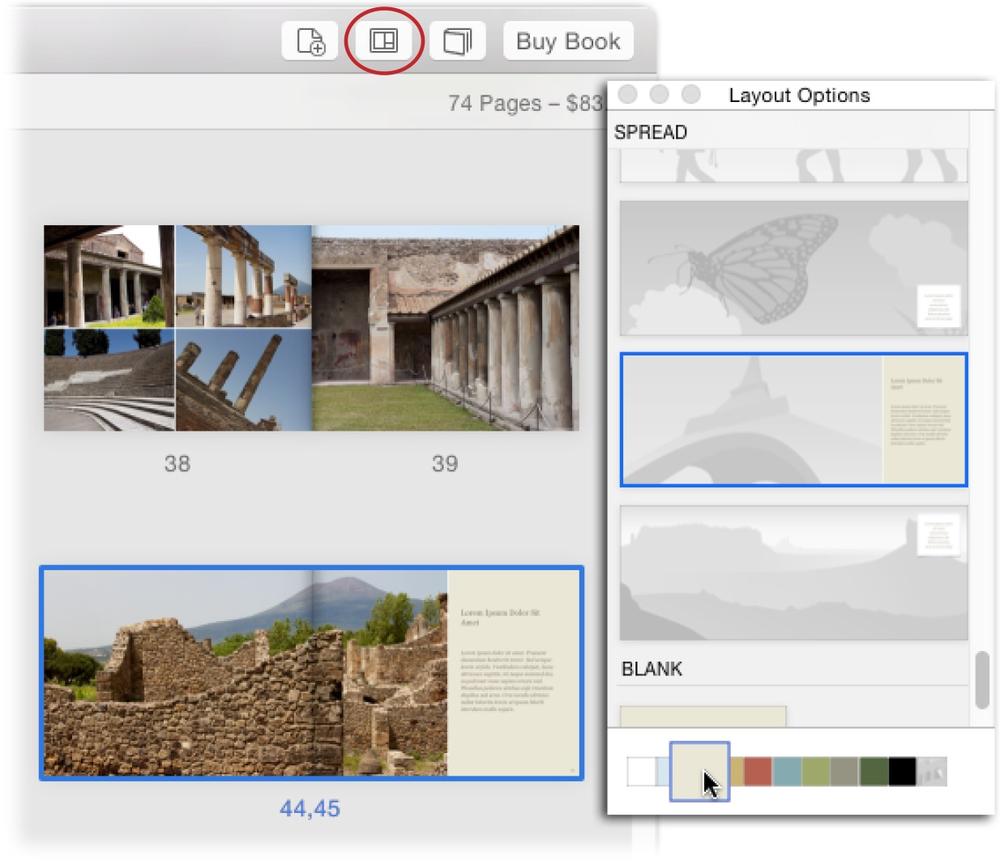
To do that, select the page you want to change, and then click the button circled in Figure 9-9 to open the Layout Options panel. Use the panel’s scroll bar to view all the different layout options; your choices depend on the kind of page you selected and the theme you picked when you started the project (Step 2: Choosing a Format and Theme).
Tip
The Layout Options panel floats on your screen independently of the Photos window. That means you can keep it open all the time if you want.
It’s important to understand that not all layouts are available for every kind of page, and not all layouts are available in every theme. Heck, some themes, such as Showcase, only let you have one photo on a page, so you don’t see layout options for more pictures than that as you scroll through the panel.
Front and back covers and flaps have the fewest layout options. For covers, you can generally choose between one and three photos with or without a title, and for flaps you can typically pick one small picture with or without text, or a completely blank page. Fortunately, you get a smorgasbord of layout design options for the other pages in your book:
1 Photo, 2 Photos, and so on. Layouts in these categories let you specify the number of pictures on the page. You get a wide array of choices for photo placement within each category. For example, some themes offer up to 17 different layouts for one photo per page, six layouts for two photos per page, and so on. Some layouts fill the whole page with your picture, some have room for text, some include borders—you get the idea.
Figure 9-9. To open the Layout Options panel, click the button circled here. As you scroll in the panel, you see thumbnails of different layouts organized by the number of pictures per page. Scroll far enough down and you’ll find layouts that include maps and two-page spreads. If the layout you pick has blank space around the picture or an empty spot for captions, you can pick a background color by clicking one of the color chips shown here.Text. This option doesn’t include any picture slots; it simply creates a blank page with placeholder text that you can edit. For example, you can make page one of your book a text page that tells your audience the story behind the book. Or, if you’ll use the book as a portfolio, a text page could detail your artwork. Text pages can also serve as section dividers, telling the story of the images that follow.
Map. The designs in this category add a map to your book page, which is a fun way to illustrate where you took your pictures (the top of Machu Picchu, anyone?). Once you add a map to a page, Photos checks to see if there are any locations associated with your pictures and, if it finds any, they automatically appear on the map. Happily, you can edit the map and remove, rename, or add your own locations, as well as customize the map’s zoom level and appearance.
To open a map for editing, double-click the page it’s on to enter Single Page view. Next, double-click the map itself to select it and open the Map Options panel shown in Figure 9-10. (If the Options panel is already open, just single-click the map instead.)
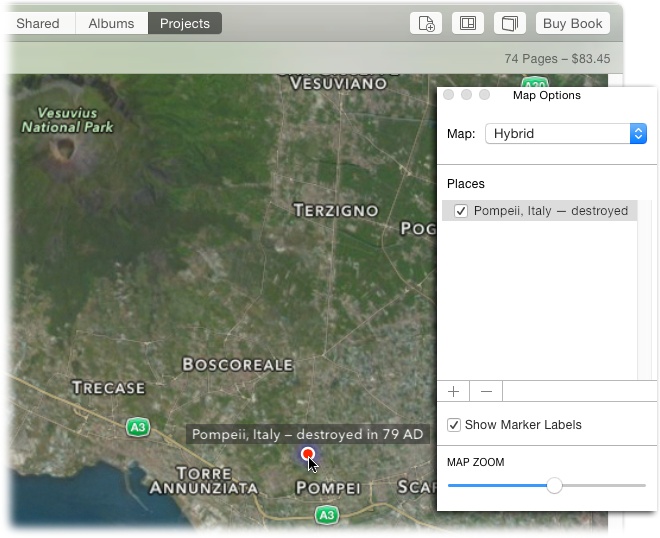
— Change map style. The drop-down menu at the top of the panel lets you change map styles. Your choices are Standard (street-level view with text labels), Satellite (topographic view with no text labels), and Hybrid (topographic view with text labels—Figure 9-10 shows an example).
— Add a place marker. If your pictures don’t contain location info, you can add your own place markers to the map. First, adjust the map so you can see the location you want to add. You can use the Map Zoom slider at the bottom of the panel to change the map’s zoom level (drag it left to zoom out) and drag the map itself to reposition it. When you find the spot you’re after, drag the Map Zoom slider rightward to zoom in, and then drag to reposition the map so you’re viewing the area you want.
Next, add the place marker by Control-clicking the appropriate spot on the map, and then choosing Drop Pin from the shortcut menu that appears. (You can also click the Map Options panel’s + button to add a place marker to the area you’re currently viewing on the map.) To move the marker, point your cursor at the red dot, and then click and hold down your mouse button. When the dot gets bigger, drag to move the marker wherever you want.
— Edit place marker. You can change a place marker’s label to say anything you want. Just double-click a label in the Map Options panel’s Places list or on the map itself, and then type the new text. If you’re tempted to enter more than one line of text, don’t (Figure 9-10 explains why). Instead, pick a layout option that includes a map and has room for your prose elsewhere on the page.
— Remove a place marker. On the map, click a place marker to select it, and then press the Delete key on your keyboard. Alternatively, select a marker in the Map Options panel’s Places list, and then click the — sign.
— Show/hide Marker Labels. If you don’t want to see place-marker labels, turn off this checkbox and you see only the place-marker dots.
When you’re finished editing the map, you can return to All Pages view by clicking the < button at the upper left of the Photos’ window.
Spread. Layouts in this category spread a single picture across two full pages. These layouts have a big impact and give the viewer a visual treat because they’re so different from the rest. Try to use at least two or three spread layouts in a 20-page book; if your book is longer than that, consider using a spread layout every five pages or so.
Blank. While this option doesn’t really sound like a layout at all, blank pages are quite useful for separating sections of your book. When you choose this layout, Photos creates a blank page that doesn’t include any photo frames—but that doesn’t mean it has to be stark white. You can fill it with color using the color bar at the bottom of the Layout Options panel or add a background image (Page Backgrounds tells you how).
Whew—that’s a lot of layout options! You’ll need to experiment to find the ones you like best. Generally speaking, it’s best to sprinkle different layouts throughout your book for the sake of variety, but there’s no law against using the same layout on every page. In fact, sticking to a one-photo layout with a wide, colored border can give your book a classy, fine-art feel.
Manipulating Pictures
Once your layouts are (somewhat) finalized and you’ve (pretty much) arranged the pictures onto pages the way you want, you can fine-tune the appearance of each photo on each page. For example, you can adjust a picture’s zoom level and its position within the frame, apply a filter to the picture, or open it in Edit mode.
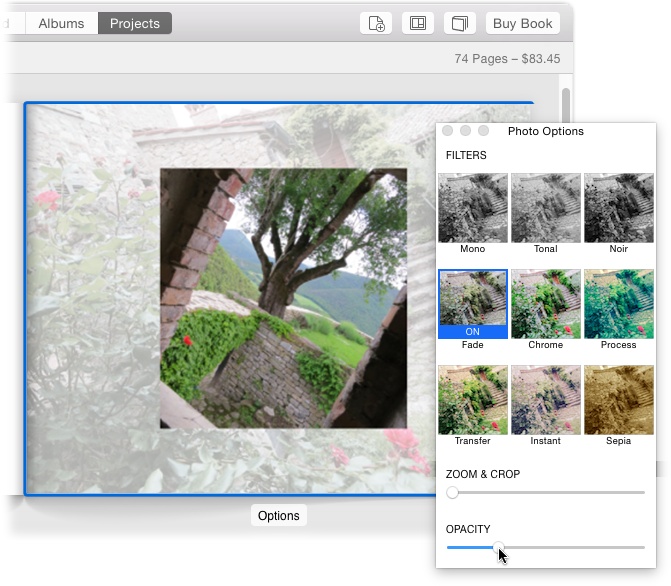
To do any of that stuff, double-click a page to open it in Single Page view. Next, double-click the picture you want to adjust or click the picture once to select it, and then click the Options button beneath it. (If you select a page instead of the picture on the page—easy to do if the page contains a full-size photo—the Layout Options appear instead. Click the image and the panel changes to Photo Options.) Here’s what you can do in the Photo Options panel:
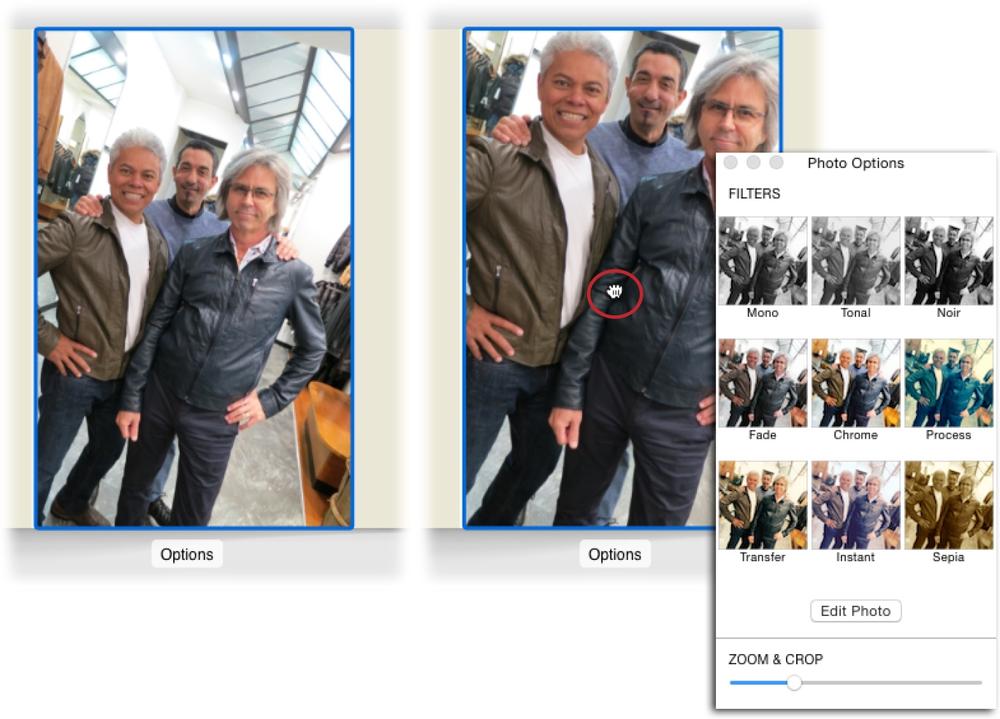
Enlarge and reposition a picture within its frame by dragging the Zoom & Crop slider in the Options panel rightward. Once the picture is the size you want, click and drag the picture to reposition it within its frame, as shown in Figure 9-11 (right). This is a great way to minimize distracting backgrounds and fill the frame with your subject. If you haven’t already cropped your images (How to Crop, Straighten, and Flip a Photo), you need to do this for every picture on every page of your book—the polished results you’ll get are well worth the effort!
Note
Be careful not to drag the Zoom & Crop slider all the way right. If you do, you may enlarge the picture so much that it won’t print well. Be on the lookout for any yellow warning triangles with exclamation points. These symbols appear at the lower left of images in Single Page view to let you know that the pictures don’t have enough pixels to print at a high enough resolution at the zoom level you picked. (It’s a good idea to trot through every page in your project in Single Page view to check for these triangles.) The fix is to drag the Zoom & Crop slider to the left until the symbol disappears, or pick a different picture.
Figure 9-11. Left: As you can see, the original uncropped shot has a distracting and overexposed background. Right: By using the Zoom & Crop slider, you can enlarge the shot so it fills the frame. Once you’ve enlarged an image, you can drag it to adjust its position within the frame (your cursor turns into a tiny hand like the one circled here).Add a filter by clicking one of the nine thumbnails in the Filters section of the Photo Options panel (visible in Figure 9-11, right). When you do, a blue strip with the word “ON” appears on the thumbnail you clicked. These Filters are the same ones you get in Edit mode (see Chapter 5). Fortunately, applying a filter in a project doesn’t affect the original image; Photos only applies the filter to the instance of the picture in the project. Neat, huh? To remove a filter, simply click the filter’s thumbnail again.
Edit a picture by clicking Edit Photo in the Photo Options panel. Your book project temporarily disappears and Photos transports you into Edit mode (Chapter 5), where you can adjust the image’s lighting and color, zap blemishes, or straighten it. When you’re finished, click Done at the window’s upper right and your book project reappears with your changes reflected. Unlike the filters you apply in the Photo Options panel, any changes you make in Edit mode do affect the original photo wherever it appears in the program (in albums, in other projects, and so on).
If a layout has overlapping picture frames (as in the Travelogue and Journal themes), you can change how the pictures are stacked by Control-clicking a photo and, from the shortcut menu, choosing “Move to Front” or “Send to Back.”
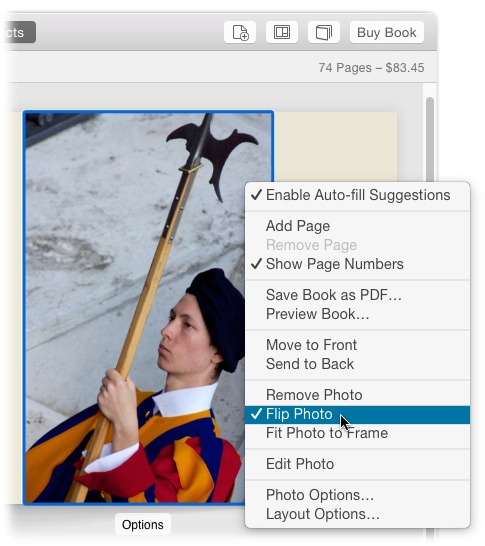
Flip a photo by Control-clicking it and choosing Flip Photo from the shortcut menu, as shown in Figure 9-12.
Fit a photo to its frame by Control-clicking it and choosing “Fit Photo to Frame” from the shortcut menu. When you do, Photos adjusts the zoom level of the shot so that every single pixel in it fits into the frame. This typically results in white bars above and below or on either side of your shot. Why? Because the aspect ratio of the image rarely matches the aspect ratio of the frame. (For more than you ever wanted to know about aspect ratio, see the box on Resolution Matters.) If you want to use the Zoom & Crop slider again, you have to turn this command off by Control-clicking the image and choosing “Fill Frame with Photo.”
Remove a photo from a frame by dragging it to the Photos drawer at the bottom of the window, by Control-clicking and choosing Remove Photo, or by selecting the photo and then pressing the Delete key on your keyboard.
Page Backgrounds
If the layout you picked has some empty space—meaning the photo doesn’t extend to the page’s edges on all four sides—you can specify a background color that’s visible in those empty areas. To do that, select the page in All Pages or Single Page view, and then open the Layout Options panel. In All Pages view, you do that by clicking the Options button in Photos’ toolbar (it’s circled back in Figure 9-9). In Single Page view, click the Options button beneath the page.
Either way, you see a color bar at the bottom of the Layout Options panel. Just click a color swatch to apply it as the background color. If you lean toward your screen and squint, you can see that the last swatch in the color bar is actually a gray picture placeholder (if the theme has a ton of background-color options, this swatch may be the last one in the first row of swatches). Click it to convert the page’s background to a picture frame that you can fill with another image. Then, when you select the background image, the panel changes to Photo Options and includes an Opacity slider, as Figure 9-13 shows.
You might not want to add a background image to every page, but on some it can make a big impact. Good candidates for background images include scenic shots such as sunsets, trees, and beaches, as well as closeup shots of textures (in other words, people pictures generally don’t work well as backgrounds).
Note
As of this writing, there’s a bug in the program that prevents you from seeing a background image you’ve placed onto a page in Single Page view, though it’s perfectly visible in All Pages view. Ah…such are the joys of using version 1.0 software.
Step 4: Edit and Format Text
Once you’re finished playing with layouts and pictures, you can move on to adjusting the text in your project. There’s no sense in messing with text until you finish placing your pictures and adjusting layouts, so save this step until the end.
Text opportunities abound in your book. For example, every book has a title that’s printed on the cover and, if you picked a hardcover format, its matching dust jacket. If you started your project with an album, Photos automatically uses the album’s name as the title, so you’ll probably need to change it. If you picked any layouts that have room for captions, you’ll want to edit those, too. Perhaps you added a text-page layout that you want to use to describe the motivation for your book or to serve as a bio, or maybe you want to add your contact info to the cover flap.
Tip
You can turn page numbers on (or off) by clicking the Settings button (labeled in Figure 9-3), though you can also do it by Control-clicking anywhere on a page and choosing Show Page Numbers to turn them on or off. Unfortunately, you can’t select them in order to change their font or style. Oh well!
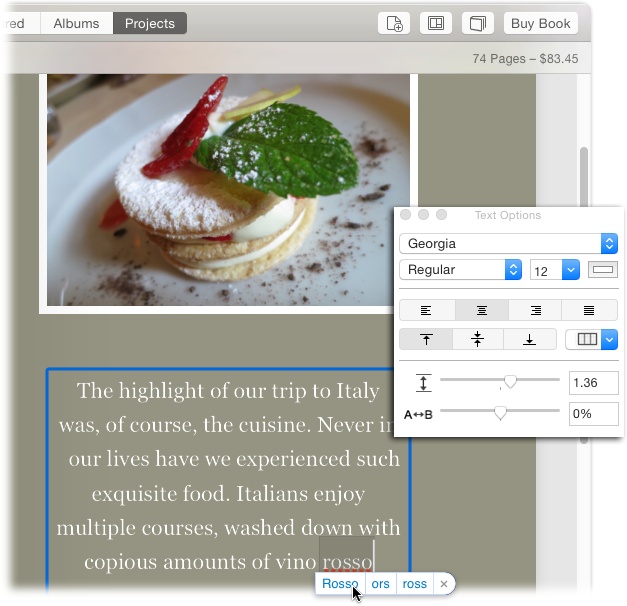
If there’s text on a page, you can easily edit it in Single Page view. After all, that’s the only place you can make the page thumbnails big enough to see the placeholder text they contain. Once you double-click a page to enter Single Page view, drag the zoom slider at the window’s upper left rightward to enlarge the page so you can see the text. Then use the scroll bar above the Photos drawer to position the text so you can see it (if the scrollbar is tough to grab with your cursor, try using a gesture on your Apple Magic Mouse or trackpad instead). Next, click a text box and start typing (Photos automatically highlights the placeholder text). When you do, the formatting controls shown in Figure 9-14 appear (if they don’t, just click the Options button in Photos’ toolbar to summon the panel).
Note
If your text doesn’t fit within a text box, Photos alerts you of impending doom by displaying a red triangle with an exclamation point inside. If you see that warning symbol, either whittle down your text or reformat it so it fits.
When you’re finished, just click outside the text box to see the end result. You’re not forced into crafting your prose in Photos either. You can just as easily open your favorite text editor, enter your text there, and then use the Edit menu’s Cut, Copy, and Paste commands to transfer it from your text editor into Photos’ text boxes.
Spell Checking
Few mistakes are as embarrassing (or avoidable) as a misspelled word. Most software comes with a built-in spell checker, and Photos is no exception, so there’s little excuse for typos (wordos—real words in the wrong place—are another story). And let’s face it: It’s difficult to spot your own mistakes, either because you’ve been staring at them for too long or because you’re in a rush. That’s why it’s best to employ a spell checker before ordering your book.
Happily, Photos comes set to check spelling automatically. As illustrated in Figure 9-14, if Photos finds a suspect word, it puts a red dotted line beneath it. Control-click the underlined word and, if the shortcut menu contains the correct spelling, choose it. If the word is correctly spelled, choose Ignore Spelling, and Photos stops underlining the word. Choose Learn Spelling to add the word to OS X’s dictionary so it won’t be flagged in the future. If you find the red underlines distracting, choose Edit→Spelling and Grammar→Check Spelling While Typing to turn off this setting.
Photos also automatically fixes common spelling mistakes. If you type “exercize,” for example, the program changes it to “exercise” and puts a blue dotted line under the word to let you know that it did so. If Photos’ correction is wrong, you can Control-click the word and choose “Change back to ‘[original word].’” And if this behavior drives you batty, choose Edit→Spelling and Grammar→Correct Spelling Automatically to turn off the checkmark next to this setting and stop Photos from meddling with your prose.
Here are a few other spelling- and grammar-related options:
Check grammar with spelling. To have Photos automatically hunt for spelling and grammar mistakes as you type, choose Edit→Spelling and Grammar→Check Grammar With Spelling.
Check just some text. If you’ve turned off Photos’ automatic spelling and grammar checking, that doesn’t mean you have to live with typos. To have Photos examine a specific block of text, click it, and then choose Edit→Spelling and Grammar→“Show Spelling and Grammar.” (Alternatively, you can highlight a section of text before choosing that command.) You can also Control-click a text box and choose the same command from the shortcut menu, or simply press ⌘-: (that’s a colon). Whichever method you use, OS X’s “Spelling and Grammar” dialog box appears and alerts you to potential problems.
To check the spelling but not the grammar of a selected text box or highlighted text, choose Edit→Spelling and Grammar→Check Document Now (or press ⌘-; [that’s a semicolon]).
Step 5: Preview Your Project
Photo books aren’t cheap, and you’ve just spent a lot of time carefully crafting the contents of every page. After all that hard work, one final round of proofing is in order, just to make sure everything is squared away. Photos gives you a couple of different ways to do this.
The best way to proof a document of any kind is to print it. While that may not sound very earth-friendly, seeing your project on paper can illuminate errors you’d never spot on a computer screen. Plus, the print serves as a fantastic preview of what the real thing will look like. To print your book, open it in Projects view and then choose File→Print. In the OS X Print dialog box that opens, pick a printer, and then click Print (obviously, the printer needs to be turned on for this to work!).
Another option is to turn the project into a PDF file, which is short for Portable Document Format. PDFs can be opened on any kind of computer (Mac, Windows, Linux, or whatever). The great thing about PDFs is that they preserve all the images, fonts, and backgrounds so they look exactly like they do on your screen. That means you can send a PDF of your project off to someone else for proofing or approval, or just so they have a digital copy of the book (maybe you created a genealogy book for your family, and 20 of your closest cousins want a copy). Plus, PDFs are searchable. So if you captioned your pictures, your cousins can search for whomever they want to find in the book. You can also sync the PDF file onto your iOS devices using iTunes’ file-sharing abilities so you can show the book off on your iPad.
Here’s how to create a PDF file of your book and then get it onto your iOS device:
With your book project open, choose File→Print.
At the dialog box’s lower left, click PDF and choose “Save as PDF.”
The Save sheet appears.
Enter a name for the PDF in the Save As field, pick where you want to save it, and then click Save.
A status bar appears as OS X processes each page and creates the PDF file. To bail out of the PDF-making process, click Cancel.
If all you wanted to do was create a PDF of your book, you’re done! But if you want to get the PDF onto your iOS device(s), keep reading.
Tip
The OS X Print dialog box isn’t the only place you can create PDFs. If you Control-click any page in your project, either in All Pages or Single Page view, you can choose “Save Book as PDF” from the shortcut menu that appears. When you choose that command, you see the same Save sheet described in step 3 above. To see the PDF before saving it, choose Preview Book from the shortcut menu instead. Doing so also creates a PDF, but it opens in the OS X Preview app so you can determine whether it’s worth saving to your hard drive. To save the file, choose File→Save.
Fire up iBooks on your Mac and drag the PDF file into its window.
The iBooks app comes preinstalled on every Mac, and it’s just the ticket for viewing PDFs on your iOS device. To launch it, double-click its icon in your Mac’s Applications folder. Next, in the Finder, press ⌘-N to open a new Finder window. There, find the PDF you just created (unless you changed the save location of the file, it likely landed in your Pictures folder), and then drag the PDF file into the iBooks window (a green circle with a + sign appears next to your cursor as you drag). After a moment, the book’s icon appears in the iBooks window.
Launch iTunes, connect your iOS device to your Mac, and then click your device’s icon.
Once you attach your device, its icon appears toward the upper left of the iTunes window. (If you use wireless syncing, you don’t even need to attach your iOS device to your Mac to see its icon.) Give this icon a click to select your iOS device. When you click your device’s icon, a list of settings appears on the left, as shown in Figure 9-15.
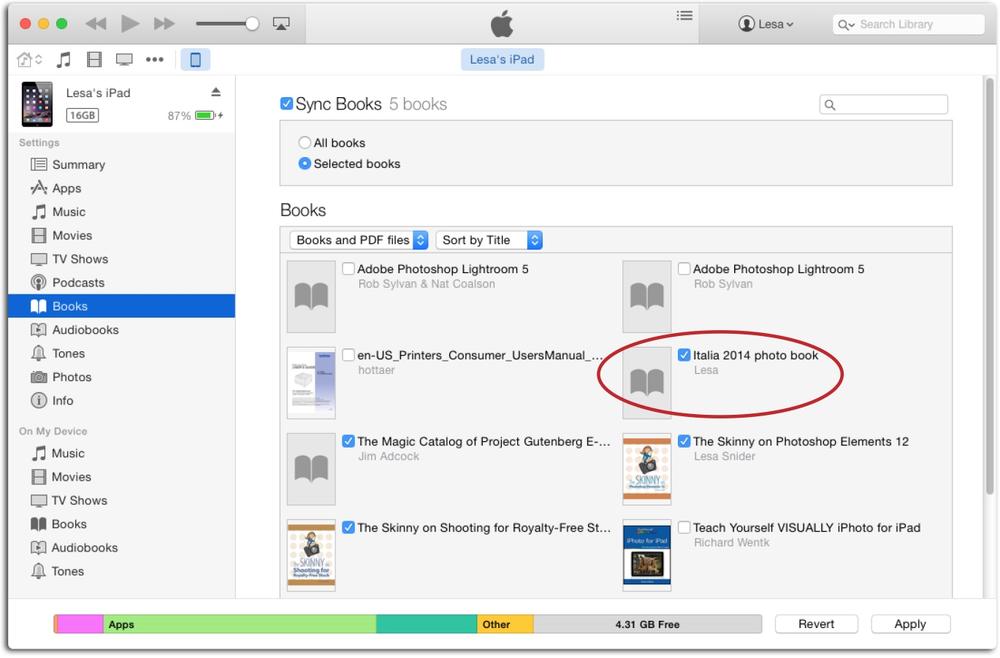
Figure 9-15. Once you add your PDF to iBooks, you can see it in the Books settings in iTunes. If iTunes was running when you added the PDF to iBooks, you may need to choose another option in the Settings list (anything other than Books), and then click Books again for the PDF to show up. Think of this as a manual screen refresh.On the left side of the iTunes window, click Books. Next, turn on Sync Books, and then pick which files to sync.
You can sync all your books or just ones that you pick. Make sure you see your PDF in the Books area in the middle of the screen. If you pick “All books,” the PDF will automatically sync onto your device. If you pick “Selected books,” turn on the checkmark next to the PDF’s name, like the one circled in Figure 9-15.
Click Apply to sync the PDF onto your iOS device.
Within a few seconds, the PDF will be on your device. To see it, launch the iBooks app on your iOS device and tap your PDF to open it.
Now your beautiful book project will travel around with you wherever you go.
Step 6: Buy the Book
Once you finish proofing your book and it’s ready for printing, in Photos’ toolbar, click Buy Book. Photos does a quick check of your book to find any problems.
If the program finds any placeholder text (say, a caption that you didn’t edit), a message appears. Click Continue to ignore the message, or click Review to return to your project for more editing. Photos helpfully shows you where the problem is. Fix it, and then click Buy Book again.
Photos repeats the checking process each time you try to buy the book. Another kind of message you may encounter during this process is one involving text that’s too long to fit the box it’s in. You get the same Review and Continue options for this message, too. Once you fix the text, click Buy Book yet again.
A third kind of message you may encounter involves placeholder pictures; if Photos finds any, you see a message saying your book is incomplete. Click OK and Photos returns you to the page that needs fixing. Once you fix all the problems, click Buy Book again.
If Photos doesn’t find any more issues, a Checkout sheet appears. If this is the first time you’ve ordered a print product using Photos, you may be prompted to enter your Apple ID and password. Next, select a shipping address from the list by clicking the checkbox to the left of the name—you see all the addresses you’ve previously shipped stuff to—or click Add Shipping Address to add a new one. You can also ship books to more than one address. Once you pick a shipping address (or several), Apple calculates the order total. Use the Quantity field on the right to tell Photos how many books you want to send to each address: Click the + to increase the quantity or the — to decrease it.
When you’re finished, pull the trigger by clicking Place Order. Now all you have to do is bide your time until the book arrives in the mail. You’ll be mightily impressed when you hold the finished product in your hands! Now, pat yourself on the back for a project well done.
Note
You can order books if you live in Europe, the Asia Pacific, Japan, or North America, but Apple offers shipping only to addresses in your own region. To change your country of origin for print products, choose Photos→Preferences, click General, and then pick a country from the Print Products Store menu.
Photo Calendars
Calendars are perhaps the most practical project you create in Photos—they’re absolutely stunning, and they make memorable gifts. At 10.4 x 13 inches, they’re bigger than the custom calendars you can order anywhere else, and they’re printed on nice, thick stock. Each calendar is wire-bound with a big picture area above the date grid. Just like the book projects you create in Photos, you can customize your calendar with different page layouts and captions. You can add national holidays, pull events from your Calendar app, and put pictures on individual the date squares (fun for birthdays!).
Fortunately, the process of creating a calendar is nearly identical to that of creating a photo book, so there’s no need to rehash all those details here. The good news is that most calendars are 12 pages (instead of 20) so they don’t take as long to make as books. However, you can make your calendar longer than 12 months if you like—up to 24 months—and you don’t have to start with January. As of this writing, a 12-month calendar costs $20 and each additional month costs $1.50.
This section teaches you how to create and customize a calendar project, and refers you to the previous section for basic stuff such as placing pictures onto pages, changing layouts and backgrounds, editing text, and so on. As with book projects, you’ll use All Pages view to do high-level design stuff like moving pages and pictures around. When you’re ready to fiddle with specific pictures and add text, double-click a page to enter Single Page view.
Step 1: Pick the Pictures
As with any Photos project, the first step is to pick the pictures you want to include. Unless you want to feature just one picture per page, it’s best to start your calendar project with 20-35 pictures. While some layouts let you squeeze oodles of pictures onto a page, calendars tend to look best when they feature just one to three photos per page; just use your own judgment.
It’s easiest to start your project from an album created specifically for the calendar project. That way, you can put the pictures in the order you want them to appear in the calendar, which saves you a bit of clicking and dragging later on. But if you prefer, you can begin your project by selecting a moment, individual thumbnails, or multiple albums. Chapter 3 teaches you how to select pictures and create albums.
Step 2: Choose the Length, Start Date, and Theme
Once you’ve selected your pictures, click the + button in Photos’ toolbar and choose Calendar. The screen shown in Figure 9-16 appears, which lets you set the length and starting date of the calendar.

Once you choose your settings, click Continue and the Choose Calendar Theme appears and shows you all of Photos’ calendar themes. Just like the book themes, each design has different layouts and color schemes. Photos checks online to see if Apple’s added any new themes. If it finds any, it adds their thumbnails, which display a tiny cloud icon at their lower right to indicate that they must be downloaded; that happens automatically if you choose one of those themes.
It’s tough to get any real sense of what the calendar will look like based on this screen’s thumbnails, so just pick one that looks good. You can always change it after Photos assembles the calendar (that way, you can see what each theme looks like using your pictures). The Big Date theme is especially nice because it uses really big numbers, which means you can see them without being nose-to-nose with the page itself.
To pick a theme, single-click its thumbnail and then click Create Calendar, or simply double-click its thumbnail. Either way, Photos assembles your calendar and presents it in All Pages view (Figure 9-17).
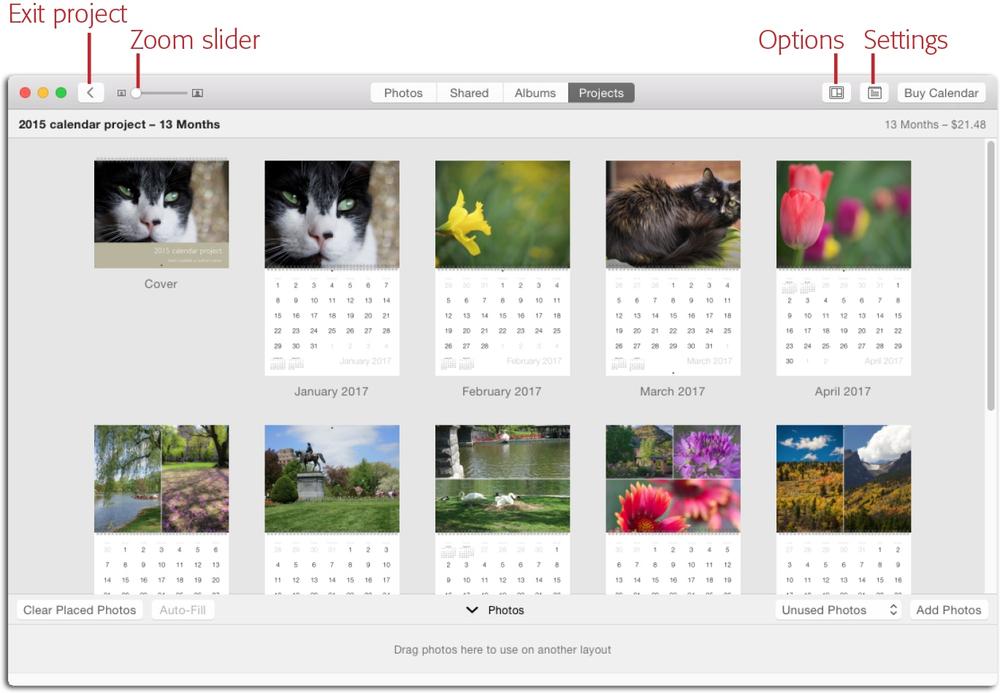
Photos also saves your project so that it’s visible in Projects view and, if you turned it on, the sidebar (The Two Faces of Photos). You can rename the project, file it in a folder, or delete it, just like you can with any other project. You can exit the project and return to Projects view by clicking the left-facing arrow at the screen’s upper left (labeled in Figure 9-17), and then simply double-click your calendar project later on to reopen it and continue working on it. In other words, you don’t have to build the whole thing in one sitting.
Changing Settings
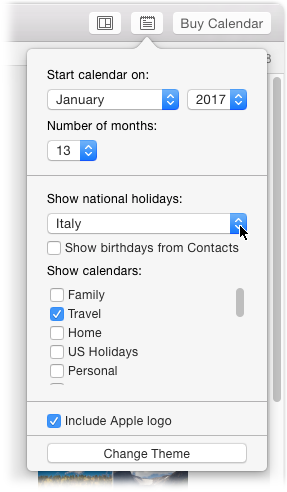
The decisions you’ve made thus far aren’t set in stone. Ever flexible, Photos lets you change a great deal about your calendar using the Settings panel. To open it, click Settings in Photos’ toolbar (it’s labeled in Figure 9-17). This panel—shown in Figure 9-18—is where you can change your calendar’s length and start date. You also get these handy options:
Show national holidays. Choose a country from this menu to add events that your country’s government deems important. For example, United States holidays include Valentine’s Day, Mother’s Day, Thanksgiving, and so on; the Italian holidays include Epiphany, Liberation Day, St. Peter and Paul’s Day, and so on. When you pick a country, the relevant date numbers turn red and the holidays’ titles appears in red text below them.
Show birthdays from Contacts. This option adds any birthday entries you’ve made in OS X’s Contacts app (here again, the dates’ numbers turns red and red text appears beneath them). If you haven’t added birthdays to your Contacts app, you can always add a person’s picture to their birthday date square, or simply add custom text to the date square. The benefit of adding birthdays to the Contacts app is that you don’t have to remember to add notations to your calendar every single year.
Show calendars. If you use OS X’s Calendar app, you can pull those events into your calendar project. This is really handy if you schedule vacations in advance. There’s nothing like flipping a calendar page and realizing that you’ve got a two-week stay in Maui headed your way!
Include Apple Logo. Calendars you create in Photos include a small, light gray Apple logo on the back. If you don’t want to advertise for Apple, turn this option off. (Mac owners tend to be proud folk, so most leave it on for sheer bragging rights: “Look what I made with my Mac!”)
Change theme. If you want to test-drive other calendar themes, give this button a click and the theme screen reappears. Just pick the one you want to use and Photos makes it so.
Step 3: Customize the Pages
You customize a calendar just like you do a book (Step 3: Customizing the Pages). For example, to move a page, click or point your cursor at it. When a rectangular icon appears below it (like the one circled in Figure 9-7), click the icon and hold down your mouse button. Drag the page on top of the one that’s in the desired location (in other words, don’t drag it between two pages). When the page in the target location dims, release your mouse button. Photos moves the selected page to its new home and shifts the rest of the pages rightward.
To move pictures around, click an image and hold your mouse button down until the picture pops out of the frame, and then drag it to another frame (see Figure 9-6). To remove a picture, drag it to the Photos drawer at the bottom of the window. You can also clear the pictures Photos automatically placed and add images yourself (Removing and Replacing Pictures), add more pictures to your project (Adding Pictures), as well as change layouts (Changing a Page’s Layout) and background colors (Page Backgrounds).
Tip
For the best results, pair pictures with appropriate months. For example, prize-winning shots from your leaf-peeping tour of New England work well for autumn months, shots at the community pool are great for summer months, and so on. Also, be sure to repeat the cover shot on one of your calendar pages, or else you’ll never see it.
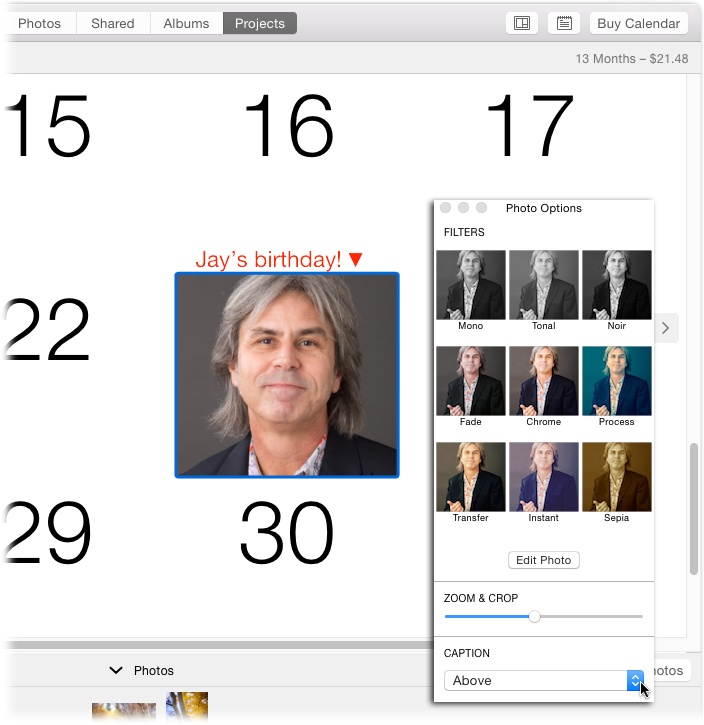
To fiddle with individual pictures and to mess with text, you need to double-click a page to enter Single Page view. That’s where you can change a picture’s zoom level and positioning with a frame, apply a filter, or open it in Edit mode. To do any of that stuff, double-click a picture in Single Page view and the Photo Options panel shown back on Manipulating Pictures appears.
To edit your calendar’s title or any captions, just click the placeholder text and type away. The Text Options panel shown back on Spell Checking automatically opens, which you can use to change the font family, size, style, color, and alignment. To add custom text to a date square, click the square and a text box appears (the Text Options panel also pops open). Just enter the text you want, and then format it to your liking. Date squares are really small, so it’s best to keep your prose brief.
For even more creativity, you can add a picture to a date square, as shown in Figure 9-19. Just drag a picture from the Photos drawer onto a date square; the square’s number disappears and the picture takes over the whole square. This is a great way to mark an important date involving someone special, such as a birthday, anniversary, or graduation.
Tip
The text you edit or add in Single Page view is really small. Save your eyesight and use the zoom slider in Photos’ toolbar to zoom in so you can see what you’re doing.
To remove a picture you’ve dropped onto a date square, click it, and then press the Delete key on your keyboard, or simply drag the picture into the Photos drawer at the bottom of the window. Removing the picture also removes the caption you added.
When you’re finished editing the pictures and text in a particular month, you can move to the next month by clicking one of the left or right-facing arrows that appear on either side of the calendar page in Single Page view (you can also use the arrow keys on your keyboard).
Step 4: Final Inspection
You can proof your calendar just like you can a book project, and it’s equally important to do, even though it may not include as much text as a book. So take the time to print it or turn it into a PDF as described on Step 5: Preview Your Project. And for goodness’ sake, remember to spell check your calendar using the techniques described on Spell Checking. Typos on a calendar are worse than typos in a book because you have to stare at the pages they’re on for a whole month!
Step 5: Buy the Calendar
When you’re finished inspecting your gorgeous new calendar, fire up Apple’s printing presses by clicking Buy Calendar at the upper right of the Photos window. When you do, the program takes a spin through your calendar looking for problems such as placeholder text, placeholder pictures, and text that’s too long to fit in its box. If Photos encounters any of these issues, it alerts you and lets you fix it. As Step 6: Buy the Book describes, just keep clicking Buy Calendar until you run out of error messages.
Photos then packages the calendar and uploads it. If this is the first print product you’ve ordered from Apple, you’ll be prompted to enter your Apple ID. The next screen lets you pick a shipping address, add additional addresses, and set the order quantity for each address. The total cost for your order appears at lower right. Click Place Order and try not to count the hours until your handcrafted calendar arrives in the mail (the packaging is nearly as impressive as the calendar itself). When it’s finally delivered, you’ll squeal with joy as you pore over every page as if it’s the first time you’ve seen it.
Custom Cards
You can also create gorgeous greeting cards and postcards. Since they’re just one or two pages, they take very little time to design. Photos also includes several templates for yearly newsletters, which take longer to craft.
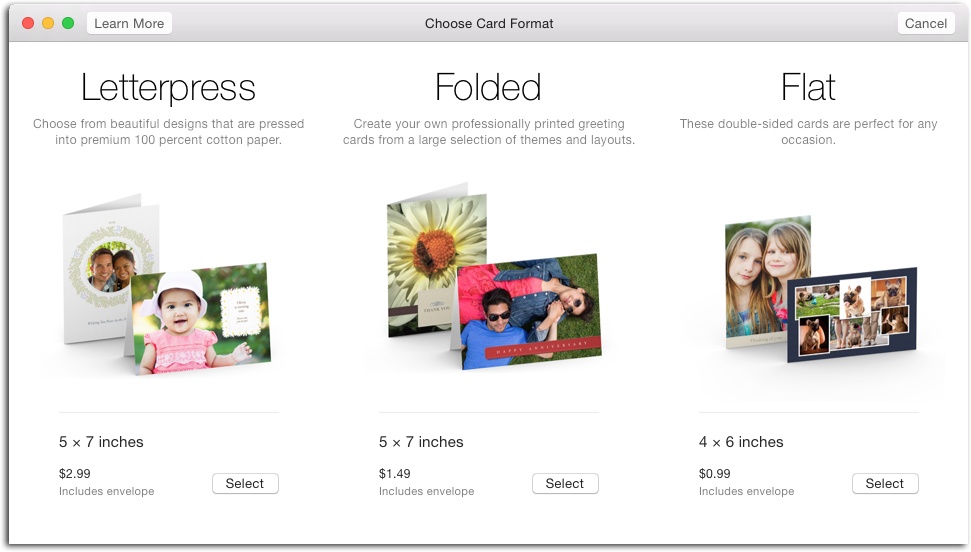
The cards you make in Photos are as high quality as the books and calendars, plus they’re perfect for any occasion: holidays, birthdays, congratulations, thank yous, and more. Cards can be folded or flat and, if you’ve got the money, you can even order letterpress cards, where each letter and image is physically pressed into textured paper. There’s no minimum order for cards: You can order one or 100. There are no quantity discounts either, but they do come with matching envelopes.
Creating a Card
Creating a Card
Card projects work exactly like book and calendar projects: start by corralling photos (say, 5–20) into an album, and then click the + button in Photos’ toolbar. Choose Card and you see the Choose Card Format screen in Figure 9-20, where you can pick a format.
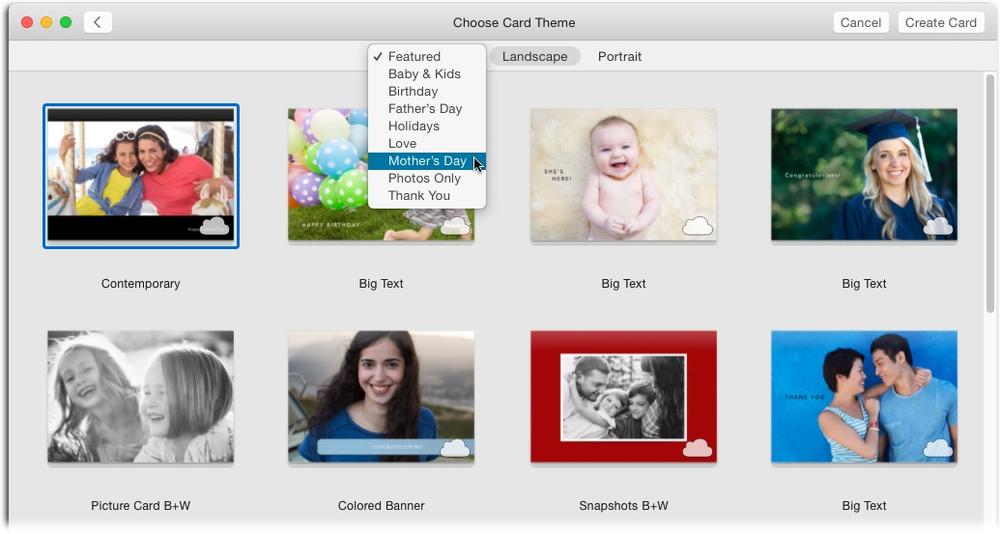
Click any Select button to pick a card format, and the next screen displays a variety of themes (see Figure 9-21). Photos also checks to see if there are any new themes online, and if so, displays their thumbnails with a cloud icon in their lower right. To choose a theme, click its thumbnail and then click Create Card, or simply double-click the thumbnail.
Note
Because there’s no need to rearrange pages in a card project, you work only in Single Page view. In other words, there’s no All Pages view.
Once you pick a theme, Photos plops your pictures into the frames the theme includes and gives you a nice big preview of the card’s front. Now you can set about customizing it.
Customizing Your Card
Once you choose a theme, the buttons above the preview area let you switch between viewing (and customizing) the front, inside, and back of the card. To change theme or card format, use the Settings menu shown in Figure 9-22. As with all of Photos’ print projects, each theme includes different page layout options and background colors, all of which you can change via the Layout Options panel (Changing a Page’s Layout).

If you click a photo while the Layout Options panel is open, it changes to the Photo Options panel, which includes options for the picture instead of the page itself. For example, you can use it to alter a picture’s zoom level and positioning with the frame (Manipulating Pictures), or to add a filter or enter Edit mode (Editing Basics). If you click a text box while the panel is open, it changes to show you text-formatting controls (Spell Checking).
Tip
To switch the controls in the Options panel, say, from photo options to layout options or from text options to layout options, just click the Options button beneath the card preview.
If you prefer to place pictures into frames yourself, you can clear the automatically placed photos by clicking Clear Placed Photos at the screen’s lower left. When you do, all the pictures you started the project with are moved to the Photos drawer at the bottom of the window. Just drag a thumbnail from this area into a frame to place it manually. You can also swap pictures between frames by clicking and holding down your mouse button until the picture pops out of the frame, and then dragging it onto another image. To remove a picture, drag it to the Photos drawer. The Add Photos button at lower right lets you add more pictures to your project.
To edit any text the card contains, just click a text box to activate it, and then type away. If you double-click to highlight any of the text, the Text Options panel automatically opens (Spell Checking). If you picked one of the Year In Review themes, you’ve got a lot of text to edit—the inside of the card includes a huge text box flanked by a column of small photos on either side. Since there’s so much text to enter for this particular kind of theme, you may want to type your prose in a word processor, copy it, and then paste it into your card.
Finalizing the Card
After you customize the card to the best of your abilities, take the time to proof and spell check it. As Step 5: Preview Your Project describes, you can print the card or save it as a PDF. Spell Checking details your spell checking options.
Buying the Card
When you’re finished, click Buy Card at the upper right of the Photos window. If this is the first time you’ve ordered a print product using Photos, you’ll need to enter your Apple ID. On the next screen, pick an address or click Add Shipping Address to enter a new one. You can choose multiple addresses and specify a card quantity for each one. The total cost of your order appears at lower right once Photos knows at least one shipping Zip code. Click Place Order and try to exercise patience as you wait for your cards to arrive.
As you’ll discover, the cards you make in Photos are incredibly impressive and—unless you opted for letterpress—affordable. Once you start sending them to friends and family, your status level will soar. After all, you’re now one of the few humans left who cares enough to design your own cards and put them in the physical mail.