11. Fine Art Media
This chapter covers painting techniques that are the antithesis of high tech—well, except that they’re all done in Photoshop. One advantage to working electronically is that you can create images that have a handmade look without slavishly trying to mimic a specific medium.
This chapter begins with an introduction (or rehash, if you’re already experienced with brushes in Photoshop) to brushes and painting techniques, which you can use as a reference guide. The first exercise is to create a brush from imagery and use it in a composition. This is a great way to apply a single shape repetitively or to apply a texture.
If you’re not confident about your artistic skills or your ability to handle a brush, don’t worry: You can easily simulate a fine art look by using filters. For example, we’ll show you how to create a sketch by using the Gaussian Blur and Glowing Edges filters, then polish it off with a few brush strokes on a layer mask. To simulate pastels, you’ll apply the Rough Pastels filter. For a more painterly look (similar to gouache or crayon), you’ll use a combination of the Colored Pencil, Paint Daubs, and Smudge Stick filters. And finally, to create the look of a watercolor, you’ll use the Noise Median, Poster Edges, and Glowing Edges filters. In most of the exercises, you’ll apply multiple filters to a single image. Our experience has been that applying filters in twos, threes, or more often yields the best results.
We like the effects that can be achieved with brushes and filters in Photoshop, but tend to shy away from simulating thick surfaces, such as oil paint or impasto, because the faux versions lack three-dimensionality. Working on the flat plane of a computer screen, we gravitate to media that are traditionally applied to paper, such as pencil, charcoal, watercolor, and gouache (but hey, that’s just our bias).
There are no hard and fast rules in the world of electronic or traditional art-making. You can develop your own electronic art media in any way that appeals to you. And remember that in addition to giving whole images a more handmade look, you can apply the techniques that you learn in this chapter (or your own variations thereof) to sections of an image, such as to individual layers in a collage.
Note: Settings listed in the captions in this chapter were chosen for photos that are approximately 3000 × 2000 pixels.


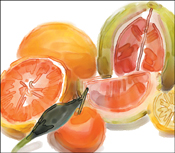
Quick Summary: Shortcuts for Changing Tool Settings
You can use shortcuts to change settings for many tools, such as the Brush, Pencil, Color Replacement, Clone Stamp, Pattern Stamp, Smudge, Dodge, Burn, History Brush, Art History Brush, Spot Healing Brush, Healing Brush, Eraser, Magic Eraser, or Background Eraser, if the tool has that feature:
* If the Airbrush option is on, press a number to change the Flow percentage or Shift-press a number to change the Opacity percentage. Note: When Shift-pressing in Windows, use the numbers on the main keyboard, not on the keypad.
Creating brush tips from imagery
After creating a brush tip from a selected area of an image, you can click or drag with the Brush tool to quickly create multiple monochromatic repeats of that tip in the current Foreground color.
To create a brush tip from an image:
1. With the Quick Selection ![]() or Magic Wand tool
or Magic Wand tool ![]() , select a small area of a picture.A
, select a small area of a picture.A
2. Choose Edit > Define Brush Preset. The Brush Name dialog opens.B Enter a Name, then click OK.
3. To practice using the tip, choose the Brush tool ![]() and a Foreground color, click the tip on the Brush preset picker (the last preset on the picker),C turn on the Airbrush option,
and a Foreground color, click the tip on the Brush preset picker (the last preset on the picker),C turn on the Airbrush option,![]() if desired, then click or drag in another image (see the illustrations on the next two pages).
if desired, then click or drag in another image (see the illustrations on the next two pages).
• When you use a brush tip that you’ve created from an image, you can reset the brush diameter to the original sample size by clicking Use Sample Size on the Brush preset picker.
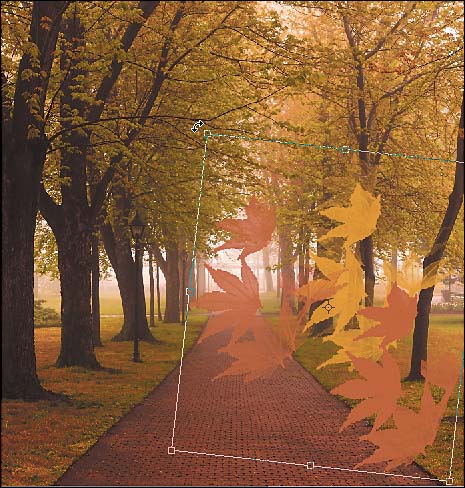
A We selected some leaf shapes, which will be made into a brush tip.

B We chose Edit > Define Brush Preset and then, in the Brush Name dialog, entered a name for our custom brush.

C After choosing the Brush tool, we clicked our new brush tip on the Brush preset picker, set the Opacity and Flow to 100%, and clicked the Airbrush option. (Stroke Thumbnail view is chosen for this picker.)

Painting With a Brush Made From an Image
A To create the semitransparent brush mark (leaf shapes) in the center of this image, we created a new, blank layer, chose a Foreground color, then clicked with the Brush tool. To create the more opaque marks in the lower right, we held the mouse down (the marks gradually became darker, due to the Airbrush function).

B We changed the Foreground color to gold, then clicked again to create another brush mark. To rotate all the marks on that layer, we chose the Move tool, then dragged a corner handle on the transform box.
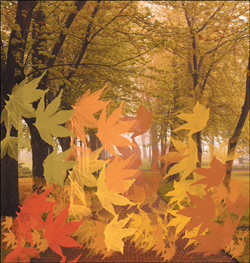
A Next, we created a second new layer and stacked it below the first one. We pressed [ to reduce the brush diameter, changed the Foreground color to tan and then, to create a trail of leaves and a feeling of movement, dragged horizontally across the bottom of the image.

B We created one more layer, pressed ] to increase the brush diameter, then added green, orange, and red brush marks. Finally, to change the orientation of that layer and make the leaves look as though they’re swirling in an autumn breeze, we chose Edit > Transform > Flip Horizontal and Flip Vertical.
Creating a sketch by using filters
In the remaining exercises in this chapter, you’ll reinterpret a photo as a sketch, painting, or watercolor. In this exercise and the next, you’ll reduce an image to a line art sketch by using filters and by drawing a few strokes on a layer mask.
To create a line art sketch:
1. Open an RGB image.A Press Ctrl-Alt-J/Cmd-Option-J to duplicate the Background. In the dialog, name the layer “blur,” then click OK. Keep the layer selected.
2. Lower the Opacity of the blurred layer to 50%.
3. Choose Filter > Blur > Gaussian Blur. Set the Radius value to around 20 pixels, then click OK.B
4. The blur layer will supply the color, whereas a line art layer will supply the necessary details. Duplicate the Background again, then drag the second duplicate layer to the top of the stack.
A This image will convert well to a sketch because it has strong contrast and broad color areas.

B To create a layer of soft color, we duplicated the Background, lowered the layer opacity to 50%, then applied the Gaussian Blur filter at a Radius of 20 px.
5. Choose Filter > Stylize > Glowing Edges. In the Filter Gallery dialog, click the Hide Thumbnails button to expand the preview panel, and lower the zoom level for the preview. Increase the Edge Brightness and Smoothness values to create bright, crisp lines without too many tiny details. Click OK.A
6. Press Ctrl-I/Cmd-I to invert the layer (the background switches to white).B And to allow some color from the blurred layer to show through, choose Overlay as the layer blending mode.C
7. To restore some underlying color by hand, with the topmost layer still selected, click the Add Layer Mask button.![]() With the Brush tool,
With the Brush tool,![]() a large, Soft Round, low-opacity tip, and Black as the Foreground color, drag across areas that you want to restore color to (A–B, next page). To remove any of your strokes, paint with white.
a large, Soft Round, low-opacity tip, and Black as the Foreground color, drag across areas that you want to restore color to (A–B, next page). To remove any of your strokes, paint with white.
• If you need to brighten the sketch, see C on the next page.
A In the Filter > Stylize > Glowing Edges dialog, we increased the Edge Brightness to make the line work brighter and set the Smoothness to eliminate superfluous lines from low-contrast areas.

B Next, we pressed Ctrl-I/Cmd-I to invert the colors.

C Overlay, the blending mode of the line art layer, allows color from the blurred layer to show through.

A To restore more color and detail from the underlying layers, we added a layer mask and then, with the Brush tool (Soft Round 200 Pixels tip, Opacity 65%, Flow 50%), drew horizontal strokes across the face. Next, we lowered the brush Opacity to 30% and painted a stroke across the eyes and the mouth (see the layer mask insert at right).

B The partial mask is allowing some color and some details from the lower layers to show through.

C To brighten the final sketch, we created a Levels adjustment layer, and set the white Input Levels slider to 222. We also chose Soft Light as the blending mode for the adjustment layer.

Creating a Line Art Sketch: A Variation on the Prior Exercise
The main difference between this method for converting a photo to a line art sketch and the previous one is that here you’ll restore colors from the original Background image, whereas in the previous exercise colors were restored from a blurred layer A–B (and A–C, next page).
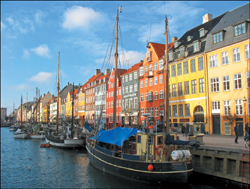
A With its strong geometry, color, and linear details, this photo of Nyhavn harbor in Copenhagen, Denmark, will translate beautifully into a sketch.

B We duplicated the Background, then used the Glowing Edges filter to convert the duplicate layer to line art. In this image (unlike the portrait on the preceding page), we wanted to preserve most of the delicate lines, so we chose low settings for all three options.

A As in the preceding exercise, we inverted the line art (Glowing Edges) layer to produce dark lines on a light background.

B We added a layer mask to the line art layer and kept the mask thumbnail selected. We chose the Brush tool, the brush tip called “Chalk 60 Pixels,” and a Flow value of 50%. Using different brush Opacities between 25% and 50%, we added strokes to remove areas of the mask.


C The strokes that we applied to the layer mask restored color from the Background, which added a watercolor-like effect to the line art.

Simulating pastels
Another fine art medium that can be simulated in Photoshop is pastels. The way we suggest doing so is to apply the Rough Pastels filter to a desaturated copy of the Background. You can leave the desatu-rated effect as is or change the layer mode to allow colors from the Background to peek through.
To create a pastel sketch:
1. Open an RGB image.A Press Ctrl-J/Cmd-J to duplicate the Background, and keep the copy selected.
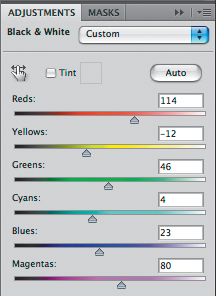
2. On the Adjustments panel,![]() click the Black & White button.
click the Black & White button.![]()
![]() Use the sliders to create adequate contrast in the grayscale layer.B
Use the sliders to create adequate contrast in the grayscale layer.B
3. Press Ctrl-E/Cmd-E to merge the adjustment layer into the duplicate layer.
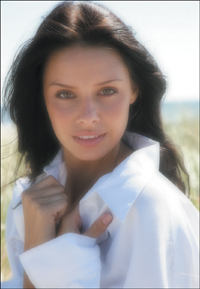
A With its clearly defined color areas and good contrast, this photo will convert well to a pastel.

B To produce the results at right, we chose the settings shown above for our Black & White adjustment layer: To darken the midtones, we moved a few sliders slightly to the left; to lighten the face, we moved the Reds slider to the right.

4. To enable editing of the filter you’re going to apply, choose Filter > Convert for Smart Filters to create a Smart Object layer (click OK in any alerts).
5. Choose Filter > Artistic > Rough Pastels. In the dialog, drag a key area of the image into view.A Adjust the Stroke Length and Stroke Detail values, and use the Texture sliders to control the graininess and roughness of the strokes. Click OK (A–B, next page).
A We converted the duplicate layer to a Smart Object. Via the Filter Gallery, we applied the Rough Pastels filter, increasing these values: Stroke Length and Stroke Detail to make the strokes more clearly defined; Scaling to make the Canvas texture more prominent; and Relief to accentuate the strokes.

A The final pastels image is shown above.

B As a variation, to allow traces of color from the Background to show through, we changed the blending mode for the Smart Object layer to Luminosity and changed the layer Opacity to 80%.

Turning a photo into a painting
To create a painting, you’ll start with a grayscale layer, as in the previous exercise, but apply a different series of filters and then add a texture. You won’t have to use the Brush tool!
To turn a photo into a painting:
1. Open an RGB photo that has bright, clearly defined color areas.A Duplicate the Background (Ctrl-J/Cmd-J).
2. Follow steps 2–4 on pages 258–259 to create a grayscale Smart Object layer, and to reveal some color from the Background, choose Luminosity as the layer blending mode.
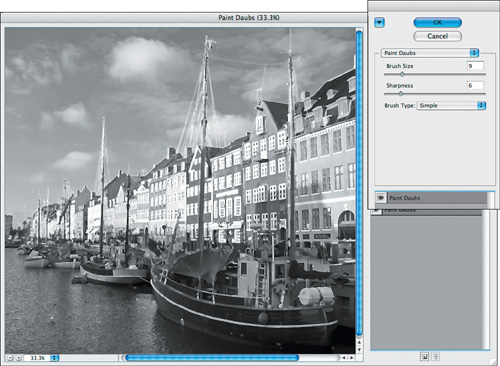
3. Choose Filter > Filter Gallery. In the dialog, click the Hide Thumbnails button ![]() to expand the preview panel and choose Paint Daubs from the menu. Set the sliders to convert the shapes into smooth, blocky areas.B Keep the dialog open!
to expand the preview panel and choose Paint Daubs from the menu. Set the sliders to convert the shapes into smooth, blocky areas.B Keep the dialog open!
A We’ll use this photo again because its vivid colors and geometric shapes will also translate well into a painting.
B We converted a duplicate image layer to grayscale and then to a Smart Object, and chose Luminosity as the layer blending mode. Next, we chose Filter > Filter Gallery and applied the Paint Daubs filter. To soften the details while preserving shapes, we chose low Brush Size and Sharpness settings.
4. Click the New Effect button ![]() at the bottom of the dialog, then choose Colored Pencil from the menu. Choose settings to turn the paint daubs into a collection of strokes.A
at the bottom of the dialog, then choose Colored Pencil from the menu. Choose settings to turn the paint daubs into a collection of strokes.A
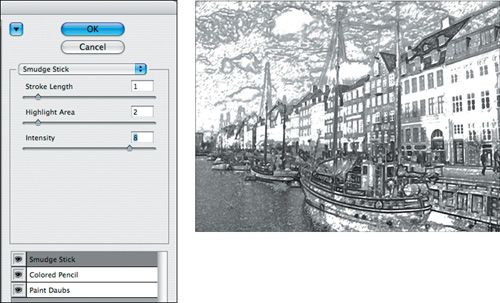
5. Click the New Effect button once more, and choose Smudge Stick from the menu. Choose settings to increase the contrast and make the strokes look more expressive.B Click OK (A, next page).
A Next, we applied the Colored Pencil filter to break up the paint daubs into strokes: a Pencil Width value of 8 for moderately thick strokes, a Stroke Pressure value of 8 for good contrast, and a very high Paper Brightness value of 43 to lighten the image.

B The last filter effect we applied was Smudge Stick, to boost the contrast and make the strokes look more expressive. We chose a low Stroke Length because the line work was already present, a low Highlight Area value to produce fewer highlights, and a high Intensity value to preserve the contrast.
6. Optional: To add texture to the image, click the filter effects mask thumbnail on the Layers panel. Choose Filter > Sketch > Conté Crayon. Set the Foreground Level slider to around 8 and the Background Level slider to a low value of 2 or 3. Choose a Texture option and a Light direction option B (we like Bottom Left). Click OK.C
7. Optional: To restore more color from the Background image, lower the opacity of the Smart Object layer to around 70%.
A This is the result after we applied the three filters via the Filter Gallery and lowered the Opacity of the Smart Object layer to 70%. The image has an Impressionist feel but still plenty of detail.

B To add a texture to the image, we clicked the filter effects mask thumbnail on the Layers panel, then applied the Conté Crayon filter.

C In this closeup view of the image, you can see that the Conté Crayon filter (burlap texture) added a “tactile” quality to the painting.

Creating a watercolor
If you don’t have the time, patience, or skill to paint a watercolor with a brush, you can simulate a watercolor effect by using just filters.
To create a watercolor by using filters:
1. Open an RGB image, preferably one that has clearly defined color areas.A Press Ctrl-J/Cmd-J to duplicate the Background, and keep the duplicate layer selected.
2. To keep the filters you’re going to apply editable, Ctrl-click/Cmd-click the layer and choose Convert to Smart Object.
3. To convert the colors into blocky shapes, choose Filter > Noise > Median. In the dialog, choose a Radius of 10–12 pixels, then click OK.
4. To posterize the colors, choose Filter > Artistic > Poster Edges. In the Filter Gallery dialog, set the Edge Thickness and Edge Intensity to 0 and the Posterization to 2, then click OK.B
A Our watercolor effect will work well on this image because it has clearly defined colors.
B After creating a Smart Object layer, we applied the Median and Poster Edges filters. The color transitions are no longer smooth or continuous, and color areas are now separate, distinct shapes.

5. Optional: To lighten areas and restore some of the white of the “paper” background, choose Filter > Sharpen > Unsharp Mask. In the dialog, set the Amount to 125, the Radius to 20, and the Threshold to 3–4, then click OK. To soften the sharpening effect, on the Layers panel, drag Unsharp Mask to the bottom of the list of Smart Filters.A Note: If the Unsharp Mask filter made the highlights too bright, double-click the Edit Blend Options icon ![]() for that filter on the Layers panel, lower the Opacity to 60–70%, then click OK.
for that filter on the Layers panel, lower the Opacity to 60–70%, then click OK.
6. To add lines along the edges of the shapes, click the Background, press Ctrl-J/Cmd-J to duplicate it once more, then choose Filter > Stylize > Glowing Edges. Set the Edge Width to around 3, the Edge Brightness to around 5, and the Smoothness to around 7–9, then click OK.
7. Press Ctrl-I/Cmd-I to invert the Glowing Edges layer, then drag it to the top of the layer stack. Change the layer blending mode to Multiply, and adjust the layer Opacity as needed.B Done!
A We applied the Unsharp Mask filter to intensify the brightness and contrast, but restacked it to the bottom of the list of Smart Filters to lessen its effect.

B Finally, we applied the Glowing Edges filter to a duplicate of the Background, inverted the duplicate layer, dragged it to the top of the layer stack, changed its mode to Multiply, and lowered its Opacity to 60%. Now the line work blends beautifully with the colors on the Smart Object layer.

In traditional watercoloring, pigment has a tendency to pool, or collect, at the edges of the brush strokes. In Photoshop, you can mimic this effect in a unique way: Create a pattern preset from an entire photo, then with the Pattern Stamp tool and an assortment of brushes, paint (stamp, actually) the image onto a new layer.
To create a watercolor with the Pattern Stamp tool:
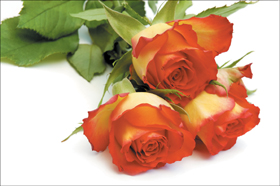
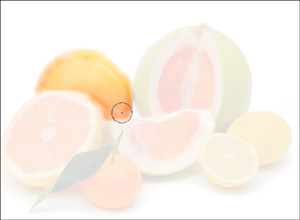
1. Open an RGB photo that contains broad color areas.A
2. Without selecting anything first, choose Edit > Define Pattern. In the Pattern Name dialog, enter a name or keep the default name, then click OK.
3. Choose the Pattern Stamp tool ![]() (S or Shift-S).
(S or Shift-S).
4. On the Options bar,B do all of the following:
Click the brush thumbnail to open the Brush preset picker. From the picker menu,![]() choose Wet Media Brushes. In the alert, click Append to add the brush library to the existing presets.
choose Wet Media Brushes. In the alert, click Append to add the brush library to the existing presets.
Scroll to the bottom of the picker, then click the last brush tip, which is Watercolor Light Opacity. (You’ll be using the last five “Watercolor” brushes in this exercise.)
Choose Mode: Normal, Opacity 60%, and Flow 50%, and check Aligned and Impressionist.
Click the Pattern thumbnail to open the Pattern preset picker. Click the pattern you defined (the last preset on the picker).
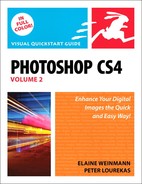
A To reinterpret this still life as a watercolor, the first step will be to create a pattern preset from the whole image.

B We chose the following: the Pattern Stamp tool; a Watercolor brush tip on the Brush preset picker; the settings shown on the Options bar above; and, from the Pattern preset picker, our newly defined preset.

5. Create a new, blank layer. Press Shift-Backspace/Shift-Delete to open the Fill dialog. Choose these settings: Use: White, Mode: Normal, and Opacity: 100%, then click OK.
6. Lower the layer Opacity to 85%. You’ll use this faint version of the image as a guide as you apply strokes.
7. Press ] to enlarge the brush tip, then fill in the main shapes in the image.A For an authentic watercolor look, leave some of the white (paper) showing and use distinct, separate strokes.B
8. Once the main areas have been blocked in, right-click/Control-click on the image to open the Brush preset picker, then click the Watercolor Textured Surface brush tip.
9. Increase the brush Opacity via the Options bar, then paint in details on the edges or interiors of the shapes. You can switch to other Watercolor brushes and brush settings between strokes (A–B, next page) and periodically raise, (then lower) the layer opacity to check your progress.
A To use a faint version of the image as a guide for painting, we created a new layer, filled it with white, and lowered its Opacity to 85%. We chose the Watercolor Light Opacity brush tip, increased the brush size, and then “painted in” the grapefruit. The color derived from the pattern preset automatically.
B We continued to paint in the other large fruit shapes, pressing [ or ] as needed to resize the brush tip in order to fit the sizes of the different shapes.
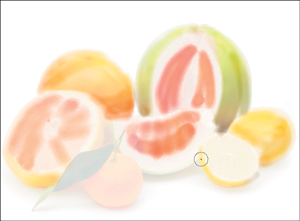
A We switched to the Watercolor Textured Surface brush tip to add details along the edges and surfaces of the fruit.

B To concentrate more on the watercolor that was starting to take form, we reset the layer Opacity to 100% to hide the Background. We chose the Watercolor Heavy Pigments brush tip, lowered the brush Opacity, and increased the brush size, then added a light color wash along each fruit shape. To add final details, we used the Watercolor Textured Surface brush tip again.

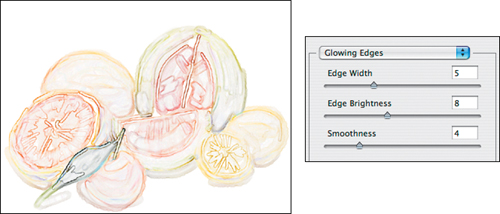
C We duplicated the paint layer, applied the Stylize > Glowing Edges filter to the duplicate (settings shown above), then inverted the layer to restore the white background.
10. When you’re done painting in the image, press Ctrl-J/Cmd-J to duplicate the paint layer, and keep the duplicate selected.
11. To enhance the watercolor look, choose Filter > Stylize > Glowing Edges, choose settings, then click OK. Press Ctrl-I/Cmd-I to invert the layer colors (C, previous page), change the layer blending mode to Multiply to blend the lines with the paint layer,A then press Ctrl-E/Cmd-E to merge the line art layer into the paint layer.
12. To heighten the color contrast and saturation, use the Adjustments panel to create a Levels adjustment layer,![]() and move the black and gray Input Levels sliders to the right. To lessen the impact of the adjustment layer, lower its Opacity slightly.B
and move the black and gray Input Levels sliders to the right. To lessen the impact of the adjustment layer, lower its Opacity slightly.B
13. Your watercolor is almost done. To add a texture to the white “paper” background, double-click the paint layer to open the Layer Style dialog, then click Pattern Overlay.
14. In the Pattern Overlay panel, click the pattern thumbnail to open the Pattern preset picker. From the picker menu, choose Artist Surfaces, then click Append to add the pattern library to the existing presets. Click the Watercolor pattern thumbnail. Set the Scale to around 132, the blending mode to Multiply (to blend the pattern with the paint layer), and the Opacity to 100%, then click OK.
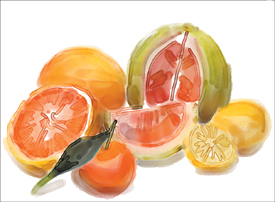
Your watercolor is finished (A, next page).
A We chose Multiply mode for the line art layer to blend the line work with the underlying paint layer. Now the edges and details look more crisp and provide a needed counterpoint to the broad shapes.
B We used a Levels adjustment layer to heighten the color contrast and saturation, then lowered the Opacity of the adjustment layer to 90%.

A This is our final watercolor, complete with a subtle Pattern Overlay paper texture.
