14. Actions
To automate repetitive (and boring!) editing steps and tasks, you can record a sequence of commands in an action and then replay the action on one image or on a batch of images. Actions can be used to execute anything from one simple editing step, such as converting files to a different format or color mode, to a complex sequence of commands, such as running a series of adjustment commands or filters or a series of preflight steps to ready files for output. Actions can boost your productivity, relieve your life of drudgery, and standardize your edits. Photoshop ships with dozens of ready-made actions, some of which you may find useful (including those in the Default Actions set on the panel). In this chapter, you’ll learn how to create, play, and edit custom actions.
Features of the Actions panel
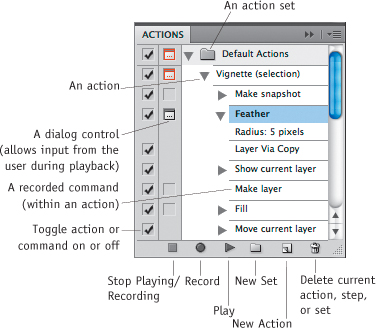
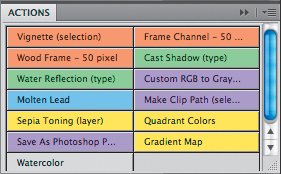
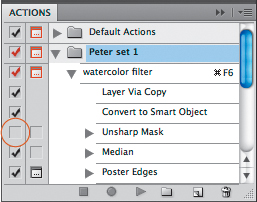
Using the Actions panel,![]() you can record, store, edit, play, delete, save, and load actions. The panel has two modes: List (edit) A and Button (A, page 313). In List mode, you can expand or collapse a listing of all the commands in an action; toggle a dialog control on or off; add, exclude, delete, rerecord, or change the order of commands; or save actions and action sets to an actions file. To switch to List mode, uncheck Button Mode on the panel menu.
you can record, store, edit, play, delete, save, and load actions. The panel has two modes: List (edit) A and Button (A, page 313). In List mode, you can expand or collapse a listing of all the commands in an action; toggle a dialog control on or off; add, exclude, delete, rerecord, or change the order of commands; or save actions and action sets to an actions file. To switch to List mode, uncheck Button Mode on the panel menu.
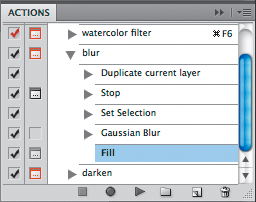
A This Actions panel is in List mode.
Recording actions
To create an action, you click the Record button, execute a series of commands, then click the Stop button. Recorded commands are nested below the action name on the Actions panel. Actions, in turn, are saved in sets.
To record an action:
1. Optional: To create a new set for the action you’re about to record, click the New Set button ![]() at the bottom of the Actions panel,
at the bottom of the Actions panel,![]() type a descriptive Name, then click OK.
type a descriptive Name, then click OK.
2. Open a document or create a new one. Just to be on the safe side, copy the document using File > Save As.
3. Click the New Action button ![]() at the bottom of the Actions panel.
at the bottom of the Actions panel.
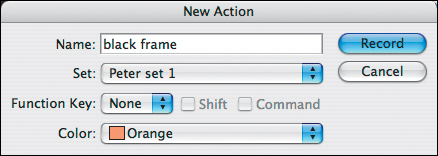
4. In the New Action dialog,A enter a Name for the action, and from the Set menu, choose either the set you created in step 1 or a different one.
5. Optional: Assign a Function Key (keyboard shortcut) and/or display Color to the action. The color will display when the panel is in Button mode.
6. Click Record.
7. Execute the commands that you want to record, as you would normally apply them to any image. When you enter values in a dialog and click OK, your settings will be recorded (unless you click Cancel).
8. When you’re done recording, click the Stop Playing/Recording button ![]() on the Actions panel.
on the Actions panel.
9. The new action will appear on the panel. (With the panel in List mode, click the arrowhead next to the action name to expand or collapse its list of commands.)
• When recording the Save As command in an action, be especially careful not to enter specific file names that could be overwritten when the action is played. We recommend that you either avoid changing the name or add a modal control to make the action pause at the Save As command (see page 319).
• To change the shortcut that is assigned to an action, click the action name, then choose Action Options from the panel menu to open the dialog.
A Use the New Action dialog to assign a name and set to your action, as well as an optional function key or color, and to begin recording.
Playing actions
Actions can be triggered in various ways: via the Play button on the Actions panel; via the keyboard shortcut that has been assigned to it; by dragging a file or folder full of files onto a droplet icon (a mini-application that was created from the action); or by using the Batch command. We’ll explain the Play button and shortcut methods first.
To play an action on one image:
1. Open an image.
2. Optional: Create a snapshot of your document for the History panel. This will give you the option to restore it quickly to its preaction state.
3. Do one of the following:
If the Actions panel is in List mode, click an action name, then click the Play button.![]()
If the panel is in Button mode,A click the button for the action to be played.
Execute the keyboard shortcut, if one has been assigned to the desired action.
• To play an action starting from a specific command in the action, put the panel in List mode, click the command name, then click the Play button. Or to play just one command in an action, click the command name, then Ctrl-click/Cmd-click the Play button; or simply Ctrl-double-click/Cmd-double-click the command.
• When creating layers or alpha channels in a document, assign them descriptive, nongeneric names to prevent the wrong edits from occurring when the action is played.
• To load other action sets onto the panel, see page 322.
To exclude a command from playback:
1. Put the Actions panel in List mode (actions can’t be edited in Button mode).
2. Expand the list for the action to be edited.
3. Click in the leftmost column for the command to be excluded from playback, to remove the check mark.B
Beware! If you click the check mark for an entire action or action set, as an alert will tell you, any individual commands that you’ve painstakingly checked will become unchecked.
• To reinclude a command at any time, click in the same spot again to restore the check mark.
A When the Actions panel is in Button mode, a brightly colored button displays for each action, as well as its shortcut, if one was assigned.
B The Unsharp Mask step within this action is unchecked, so it’s currently excluded from playback.
The ability to play an action on multiple files is a super timesaver. You can do this quickly by dragging a folder of files onto a droplet (see “To create a droplet for an action” on page 316). Or if you need to choose a destination, a file-naming scheme, or other options for the files to be processed by the action, use the Batch command instead, as described below.
Note: If you choose Folder as the Destination in step 6, further options will become available for naming the resulting files so they don’t replace the original ones.
To play an action on a batch of images:
1. In Bridge, put all the files to be processed into one folder and display the folder contents (or to limit which images are to be processed, select their thumbnails), then choose Tools > Photoshop > Batch.
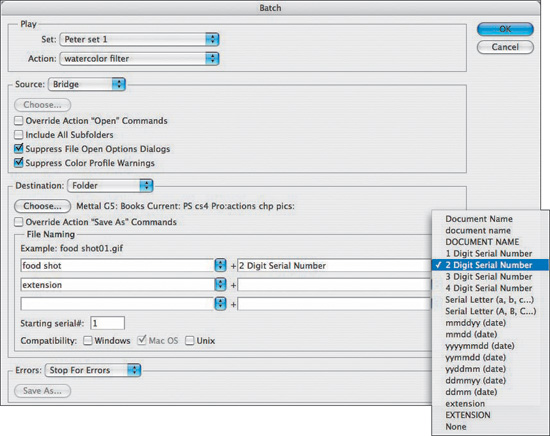
2. The Batch dialog opens (A, next page). Under Play, choose a set from the Set menu and an action from the Action menu.
3. For the Source, make sure Bridge is chosen.
4. Optional: If the action contains an Open command, you can check Override Action “Open” Commands to have the batch command ignore the specific file name in the Open step.
5. Check Suppress File Open Options Dialogs and/or Suppress Color Profile Warnings to have the command bypass any dialogs or alerts that appear onscreen as source files are opened.
6. From the Destination menu, choose one of the following options:
None to keep all the files open after processing.
Save and Close to have the files save after processing and then close.
Folder to have the files save to a new folder and to access the File Naming options. Click Browse/Choose, then choose a destination folder.
Optional: If the action contains a Save As command, you can check Override Action “Save As” Commands to have the batch command save the file while ignoring the name and location specified in that command.
7. If you chose Folder as the Destination, you can do the following:
Choose options from the menus in the File Naming area, or type the text to be included in the name. Make sure the Example displays the desired naming convention.
If you chose a naming option that uses sequential (serial) numbers, enter a 1- to 4-digit starting number in the Starting Serial # field.
Check any or all of the file name Compatibility options for the platforms you need the files to be compatible with.
8. Optional: By default, Photoshop will end the Batch process if it encounters an error. To have it play the whole action and keep track of error messages in a text file instead, from the Errors menu, choose Log Errors to File, then click Save As. In the Save dialog, type a name for the text file, choose a location for it, then click Save. If errors are encountered, you will be alerted via a prompt that errors were logged into the designated error log file.
9. Click OK to start the batch processing.
A In the Batch dialog, choose the Action to be played, locate the Source files to be processed, specify a Destination, and choose optional File Naming settings for the processed files.
An action can be turned into its own little mini-application, called a droplet,A that sits out on the Desktop or in a folder, waiting to be triggered. If you drag a file or a folder full of files onto a droplet icon, Photoshop will launch (if it’s not yet running), and the action that the droplet represents will be played on those files. Droplets can be shared with other Photoshop users.
To create a droplet for an action:
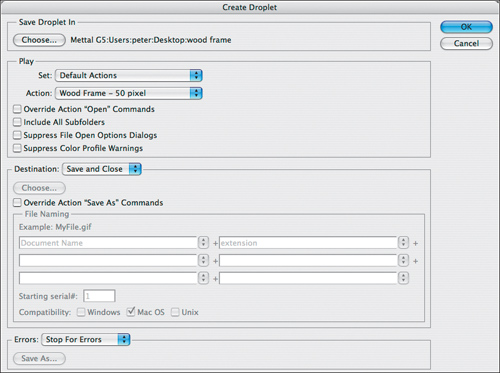
1. Choose File > Automate > Create Droplet. The Create Droplet dialog opens.B
2. Click Choose. A Save dialog opens. Enter a name in the Save As field, choose a convenient location for the droplet, then click Save.
3. Back in the Create Droplet dialog, choose an action set from the Set menu, then choose the Action to be saved as a droplet.
4. Check any Play options to be included in the droplet, and choose Destination and Errors options for the processed files (see steps 3–8 on page 314).
5. Click OK. The droplet will appear in the designated location. To use the droplet, drag a file or a folder full of files onto it, and the action will begin.
A This is a droplet icon for an action.

B Use the Create Droplet dialog to choose a location and other options for your action droplet.
Editing actions
You can insert a variety of special commands into your actions. For example, if you insert a Stop, the playback will pause at that point in the action to allow the user to perform a manual or nonrecordable edit, such as the use of the Brush or Clone Stamp tool. When the manual edit is completed, the user clicks the Play button again to resume the playback. A Stop can also include a text message for the user, which displays in an alert dialog.
To insert a Stop in an action:
1. Do either of the following:
As you’re creating an action, pause at the point at which you want the Stop to appear.
To add a Stop to an existing action, on the Actions panel, click the command name after which you want it to appear.
2. Choose Insert Stop from the Actions panel menu. The Record Stop dialog opens.
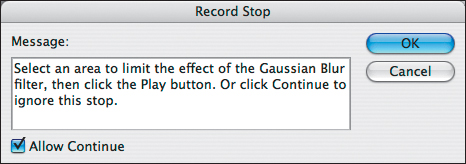
3. Type an instructional or alert message.A We recommend spelling out in the message that after performing the desired edit, the user should click the Play button to resume the playback.
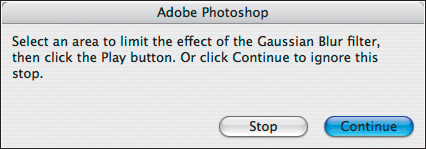
4. Optional: Check Allow Continue to include a Continue button in the alert dialog.B This will give the user an easy way to continue the action playback without performing the requested manual edits. Without this option, the user will still be able to resume the playback by clicking Stop when the alert dialog appears, then clicking the Play button on the panel.
5. Click OK. The Stop listing will appear below the command you paused after or clicked in step 1.C
A In the Record Stop dialog, type an instructional message for the user. The Allow Continue option creates a Continue button that the person replaying the action can click to quickly resume the playback.
B The Continue button lets the user continue the playback of the action without performing the requested manual tasks.
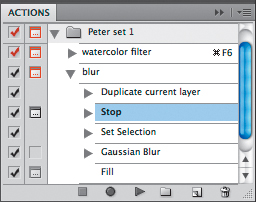
C The Stop command appears as a listing within the action.
If you forgot to include a particular command or editing step in an action, or you want to improve an action by adding a command, here’s your second chance.
To add a command or edit to an action:
1. On the Actions panel, expand the list for the action the edit is to be added to, then click the command name after which you want the new one to appear.
2. Click the Record button.![]()
3. Execute the desired command(s). Note: You can’t add a command that’s available only under certain conditions (e.g., the Feather command requires an active selection) unless the creation of those conditions is also included as steps in the action.
4. Click the Stop Playing/Recording button ![]() to stop recording.
to stop recording.
• To expand or collapse all the steps that are nested within an action, Alt-click/Option-click the arrowhead next to the action name.
Some dialog features aren’t recordable, but there’s a next best option. Via the Insert Menu Item command, you can force the dialog for a particular menu command to open and pause onscreen during playback, allowing the user to choose custom settings.
To insert a menu item in an action:
1. Expand the listing for an existing action, then click the command after which you want the new menu command to be inserted.
2. From the Actions panel menu, choose Insert Menu Item. The Insert Menu Item dialog opens.
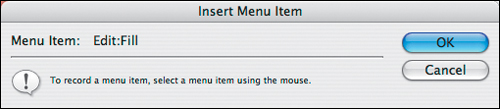
3. From the Photoshop menu bar, choose the command to be added to the action. The command name will appear in the Insert Menu Item dialog.A
4. Click OK.B The ability to display a dialog and allow user input may be disabled for inserted menu commands. To allow a particular dialog in an action to pause onscreen, use a modal control, as discussed on the next page.
A When we chose the Fill command from the Edit menu, the command name magically appeared in the Insert Menu Item dialog.
B The menu item that we inserted appears as a listing on the Actions panel.
Copying Commands Within or Between Actions
• To copy a command from one action to another, expand the listings for both, then Alt-drag/Option-drag the command to be copied from one list to the other (if you don’t hold down Alt/Option, you’ll cut the command from the original action). Note: Be careful when copying a Save command, as it may contain information that pertains only to the original action.
• To duplicate a command within an action, either drag the command over the New Action button ![]() or Alt-drag/Option-drag it to the desired location.
or Alt-drag/Option-drag it to the desired location.
A modal control, or pause, in an action, can be enabled for any command that uses a dialog, any tool that requires pressing Enter/Return in order to be executed, or for other edits. If users encounter a modal control for a dialog upon playing an action, they can either enter different settings in the dialog or simply click OK to proceed with the settings that were recorded originally.
To add a modal control for a command in an action:
1. With the Actions panel in List mode, expand the list for the action in question.
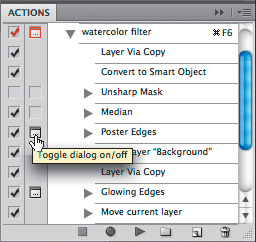
2. For any individual listing within the action, click in the second column; the dialog icon ![]() appears.A
appears.A
When the action is played, it will pause when it encounters a command bearing a modal control. If the command involves using a dialog, the dialog will appear onscreen. The user can then enter new values, accept the existing values by clicking OK, or click Cancel. When the user exits the dialog, the playback resumes.
• To remove a modal control, click the dialog icon.
To enable or disable all modal controls for an action
Click in the dialog column for an action name to turn all the modal controls in that action on or off. If the dialog icon for the action is red, it means that some modal controls in the action are off and some are on; click the red icon, then click OK in the alert dialog.
A Via the dialog icon, you give the user an opportunity to enter different settings in a dialog while playing the action.
If you want to experiment with an action or add to it without messing around with the original, work on a duplicate.
To duplicate an action
Do either of the following:
Click an action, then choose Duplicate from the Actions panel menu.
Drag an action over the New Action button ![]() on the Actions panel.
on the Actions panel.
• To rename an action, double-click the name.
To rerecord an action using different dialog settings:
1. Click the name of the action that contains the settings to be edited.
2. From the Actions panel menu, choose Record Again.
3. The action will play back, stopping at each command that uses a dialog. Enter new settings, if desired, then click OK. Each time you close a dialog, the rerecording continues.
4. To stop the rerecording, either click Cancel in a dialog or click the Stop Playing/Recording button ![]() on the panel.
on the panel.
To change the settings for a command in an action:
1. Expand the listing for an action on the Actions panel, then double-click a command that uses a dialog (or alert dialog) that you want to change the settings for.
2. Enter new settings.
3. Click OK. (Click Cancel to have your revisions disregarded.)
This may seem obvious, but remember that if you change the order of edits in an action, the revised action may produce different results from the original.
To change the order of edits in an action:
1. On the Actions panel, expand the list for an action, if it’s not already expanded.
2. Drag a command upward or downward on the list. Easy.
Deleting commands and actions
You can delete a whole action, or merely delete individual commands from it.
To delete an action or delete a command from an action:
1. Optional: To save the current actions on the panel as a set for future use, before deleting any actions or commands, follow the instructions on the next page.
2. Do either of the following:
Click the action to be deleted.
Click the individual command to be deleted. Ctrl-click/Cmd-click to highlight additional commands, if desired.
3. Click the Delete button ![]() on the Actions panel, then click OK (or to bypass the prompt, Alt-click/Option-click the Delete button).
on the Actions panel, then click OK (or to bypass the prompt, Alt-click/Option-click the Delete button).
Saving and loading action sets
Each time you create a new action, you need to choose a set for it to be stored in. You can save a set of actions to a separate file for use on another computer or as a backup for safekeeping.
To save an action set to a file:
1. Click the action set to be saved.
2. Choose Save Actions from the panel menu.
3. In the Save dialog, type a name for the action set file, keep the default location (see the side-bar at right), then click Save. The new file will be regarded as one set, regardless of how many actions it contains.
4. When you relaunch Photoshop, your newly saved set will appear on the Actions panel menu. Note: If you edit any actions in the set, save the set again by following the steps above.
Photoshop includes many useful actions that don’t appear on the panel by default. You can load them by following the instructions below, plus you can also load any user-created set.
To load a set onto the Actions panel:
1. Click the set name that you want the loaded set to appear below.
2. From the Actions panel menu, choose a predefined action set (Commands, Frames, Image Effects, Production, Text Effects, Textures, or Video Actions), or choose a user-saved set, if there are any, from the bottom of the menu.
If you prefer to have only one set on the Actions panel at a time, use the Replace Actions command instead of the Load Actions command.
To replace the current action set with a different set:
1. Choose Replace Actions from the Actions panel menu.
2. Locate and click the action set file to replace the existing sets, then click Load.
To load the default action set
Choose Reset Actions from the panel menu, then click Append in the alert dialog to add the default set to the existing sets on the panel, or click OK to replace the existing sets with the default one.