15. Output

Whether you’re planning to print your document directly from Photoshop to a desktop printer, place it in a page layout application for commercial printing, or import it into a Web page layout application for display online, Photoshop provides a variety of output options.
To obtain a quality color print from an inkjet printer that closely matches your onscreen image, you’ll need to follow up on the color management workflow that you began in Chapter 1 by selecting the proper printer profile. With that in place, you’ll be ready to choose options for your printer and send your document to print.
If you’re planning to export your file to a page layout application that can read Photoshop PSD files, see page 334. If, on the other hand, your target application doesn’t read Photoshop PSD files, find out from your client or output service provider which format (and settings) will work for your particular output scenario, then follow the instructions in this chapter to save the file in the Photoshop PDF, Photoshop EPS, or TIFF format.
By using the Web Gallery controls (in the Output workspace) in Bridge, you can create a gallery for displaying your photos on a website. Not only does it give you many options for creating and customizing a gallery, but it also has an optional feature that will upload the gallery to a Web server.*
* Instructions for optimizing files in the GIF and JPEG formats are included in our Photoshop CS4, volume 1: Visual QuickStart Guide.
With so many print and output options available in Photoshop, your files can be prepped for use in a wide variety of media. In fact, multiple versions of the same file can be saved in various sizes and formats for different purposes.
Preparing a file for print output
By now, your “master” Photoshop document may contain multiple image, adjustment, shape, or Smart Object layers, and possibly also a few masks. Before reaching for the Print command, you need to prepare the file for printing (or, rather, prepare a copy of the file) by flattening layers, changing the bit depth, possibly changing the dimensions, and applying output sharpening.
To prepare an RGB file for printing:
1. Open a high-resolution RGB file that you intend to print. Choose File > Save As (Ctrl-Shift-S/Cmd-Shift-S). Choose a location in which to save the new file, and enter a different name in the File Name/Save As field.
Leave any options in the Save area that are already checked as is. In the Color area, check ICC Profile/Embed Color Profile [profile name] to preserve the profile in the new file. Click Save.
2. If the Photoshop Format Options alert displays, uncheck Maximize Compatibility, then click OK.
3. The new file will appear in the document window. You need to flatten the layers to prepare the file for sharpening. Right-click/Control-click a layer and choose Flatten Image, and click OK in any alert dialogs.
4. On the Image > Mode submenu, make sure 8 Bits/Channel is checked.
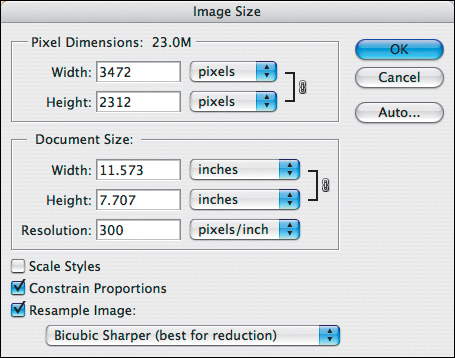
5. To make sure the image has the proper dimensions for the chosen paper size, choose Image > Image Size (Ctrl-Alt-I/Cmd-Option-I), and note the Width and Height under Document Size.A If that size will fit on the paper size, you’re all set; click Cancel.
If you need to modify the dimensions, check Resample Image to prevent the Resolution value from changing (it should already be set to the necessary high resolution for your printer). Change just the Width or the Height value to fit the paper size. From the menu at the bottom, choose Bicubic Smoother (Best for Enlargement) if you enlarged the dimensions, or Bicubic Sharper (Best for Reduction) if you reduced the dimensions, then click OK.
6. Apply output sharpening by following the instructions on the next page.
A To fit the image to your paper size, check Resample Image in the Image Size dialog, change the Width or Height, then choose an interpolation method from the menu at the bottom.
On pages 56–58, we showed you how to apply capture sharpening in Camera Raw, and in Chapter 9, we showed you how to apply sharpening in Photoshop. Before printing your file, you should apply a last round of sharpening to help compensate for potential “softening” from dot gain (the slight spreading of printing inks on paper).
To apply output sharpening:
1. Keep the high-res RGB file that you prepared for printing open onscreen (see the previous page).
2. Press Ctrl-J/Cmd-J to duplicate the Background.
3. Double-click next to the duplicate layer name to open the Layer Style dialog.
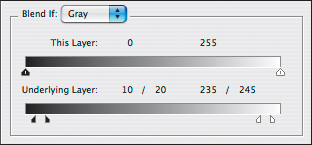
4. You’ll use the Blend If sliders A to hide the highlight and shadow pixels on the duplicate layer in order to prevent any sharpening from affecting those areas (this technique was also used on pages 214–215):
Move the black Underlying Layer slider to 10, then Alt-drag/Option-drag the right part of that slider to 20.
Move the white Underlying Layer slider to 245, then Alt-drag/Option-drag the left part of that slider to 235.
Click OK.
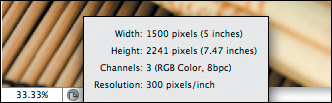
5. Next, you’ll set the zoom level to help you judge the sharpening. Click the status bar at the bottom of the document window and note the pixel dimensions of your file.B![]() If it’s 2000 × 3000 pixels (6 megapixels) or smaller, zoom to 100%; if it’s 2400 × 3600 pixels (8 megapixels) or larger, zoom to 50%.
If it’s 2000 × 3000 pixels (6 megapixels) or smaller, zoom to 100%; if it’s 2400 × 3600 pixels (8 megapixels) or larger, zoom to 50%.
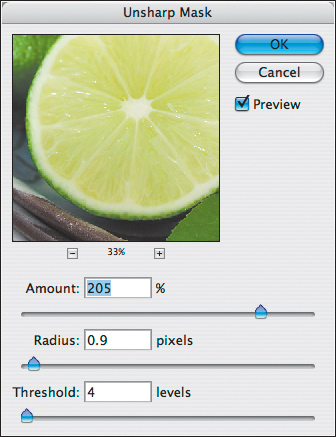
6. Choose Filter > Sharpen > Unsharp Mask. In the Unsharp Mask dialog,C check Preview, then set the Amount value to around 200, the Radius to between 0.7 and 1.0, and the Threshold to 3 or 4. Don’t worry if the image now looks too sharp. This final sharpening should be judged from the print output, not from how the image looks onscreen. Click OK.
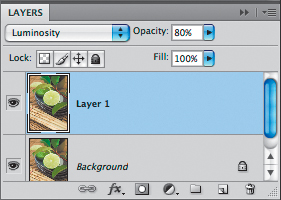
7. To limit the sharpening to just tonal values,D on the Layers panel, choose Luminosity as the blending mode for the duplicate layer; also lower the layer Opacity to 80%.
8. Save your file, then print it (see the next section). If the image looks too sharp on the printout, lower the Opacity of the duplicate layer to lessen the sharpening effect, then print it again.
A In the Layer Style dialog, set the Blend If sliders to the positions shown above.
B Click the status bar to view the file’s pixel dimensions (Width and Height).
C In the Unsharp Mask dialog, choose values similar to those shown above.
D On the Layers panel, choose Luminosity as the blending mode, and lower the Opacity.
Printing from Photoshop
Before printing a document on any type of device, via the Properties/Page Setup dialog, you need to tell Photoshop which printer model and paper size you’re going to use. The available options will vary depending on your printer driver and operating system.
In this section, we’ll focus on desktop inkjet color printing, to produce either initial test prints before a commercial print run or photo prints as final output.
To choose a paper size for inkjet printing:
1. Choose File > Print (Ctrl-P/Cmd-P). The Print dialog opens.
2. From the Printer menu, choose the printer you’re planning to use.
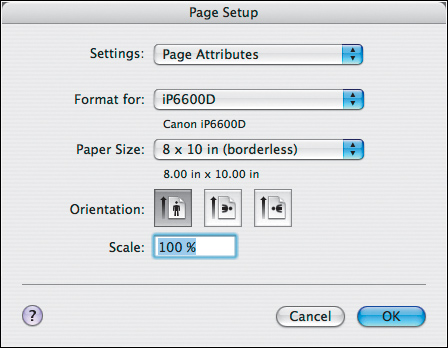
3. Click Page Setup to open the [printer name] Properties dialog in Windows A or the Page Setup dialog in the Mac OS.B
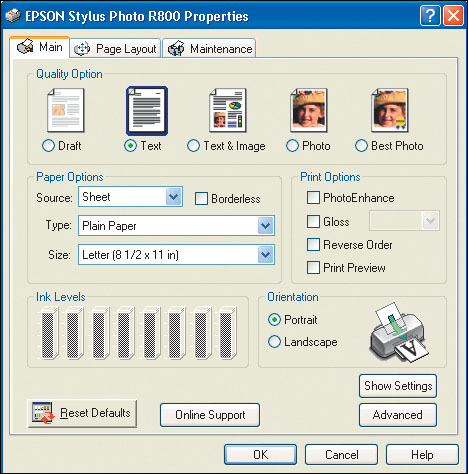
4. In Windows, from the Source menu, choose the tray that holds the media you want to print on, and from the Type menu, choose the specific kind of media to be used (the menu names may differ, depending on your printer model).
In the Mac OS, from the Format For menu, choose your inkjet printer once again.
5. From the Size or Paper Size menu, choose a paper size for printing. If your device can print borderless pictures, choose one of the sizes that is listed as “(borderless).”
Leave the Scale value at 100% (because you already adjusted the image size on page 324).
6. Click OK. To choose settings for your printer, follow the instructions that begin on the next page.
A This is the Properties dialog (for an Epson printer) in Windows.
B This is the Page Setup dialog (for a Canon printer) in the Mac OS.
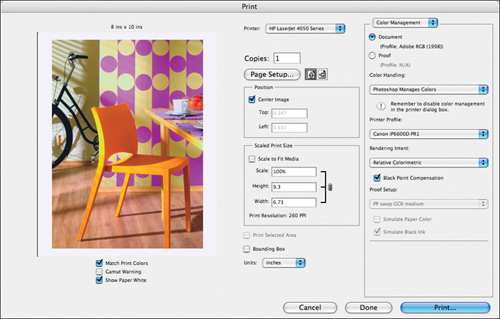
In these instructions, you’ll choose settings for your printer via the Print dialog in Photoshop, incorporating color management as you do so. In addition to showing you a preview of the image on your chosen paper size, this dialog lets you choose print size and color management settings, and also lets you control the position of the image on the paper.
To choose settings for an inkjet printer:
1. If you completed the preceding task, the Print dialog is still open. If not, choose File > Print (Ctrl-P/Cmd-P). The white area in the dialog preview represents your chosen paper.A
2. Make sure the correct output device is listed on the Printer menu, and click a portrait or landscape orientation button.
3. If you haven’t chosen page settings yet, follow steps 3–6 on the preceding page.
4. Check Center Image to position the image in the center of the paper. Or to reposition the image on the paper, uncheck Center Image and enter new Top and Left values using the scrubby sliders (note the preview).
5. Optional: To scale the print output slightly (not the actual saved image), do one of the following:
Check Scale to Fit Media to have the image fit automatically to the paper size you chose in Properties/Page Setup.
Change the Scale percentage or enter a specific Height or Width value (choose a unit from the Units menu). These three values are interdependent; changing one causes the other two to change.
A In this Print dialog, the Color Management panel is displayed.
Check Bounding Box to display the image boundary in the preview, then drag a handle or the side of the box to scale the print slightly.
Note: Use the scaling features to scale the print by a small amount (i.e., fractions of an inch or a few percentage points). To scale more than that, cancel out of the dialog and use Image > Image Size to scale your image (see page 89).
6. From the menu in the top right corner of the dialog, choose Color Management (A, next page). Here, you will tell Photoshop to use the profile for your specific printer and paper.
7. Click Document to use the color profile that’s embedded in the image, which will be Adobe RGB (1998) if you’re continuing with the color management workflow that we began in Chapter 1.
8. From the Color Handling menu, choose Photoshop Manages Colors to let Photoshop handle the color conversion. Assuming you downloaded and installed a profile for your specific printer, ink, and paper (see the instructions on page 8), this option will ensure optimal color management.
9. Next, from the Printer Profile menu, choose the printer, ink, and paper profile that you downloaded and installed.
10. From the Rendering Intent menu, choose the same intent that you used when you created the soft-proof setting for your inkjet printer, which is likely to be either Perceptual or Relative Colorimetric (see the sidebar on page 10).
• You could run one test print for the Perceptual intent and one for the Relative Colorimetric intent, and see which one produces better results.
11. Check Black Point Compensation. This option preserves the darkest blacks and shadow details by mapping the full color range of the document profile to the full range of the printer profile, and is recommended for printing RGB images.
12. Below the preview, check Match Print Colors to display a color-managed soft proof of the image in the preview, based on the chosen printer and printer profile settings; uncheck Gamut Warning; and check Show Paper White to set any white in the preview to the color of the paper, also based on the current print profile.![]()
13. Click Print to access the systemwide Print dialog, then carefully follow the steps on page 330 for Windows or 331 for the Mac OS to turn off color management for your printer before sending the file to print.
• Click Done in the Print dialog if you want to preserve most (but not all) of your settings and close the dialog.
• For technical information and documentation on specific printer models, see Photoshop Help.
• To print a 16-bits-per-channel file from the Mac OS (to a printer that can print such files), choose Output from the menu in the upper right corner of the Print dialog, and under Functions, check Send 16-Bit Data. The result will be a print with finer details. ![]()
A To optimize the color accuracy of your printout, choose Color Management settings in the Print dialog in Photoshop.

The last step before outputting your file from an inkjet printer is to turn off color management for that device to allow Photoshop to manage the color conversion.
In Windows, the dialog that contains color management settings for printing is part of the printer driver software, not part of the system software. Therefore, the names and locations of the controls will vary depending on the manufacturer. In these instructions, printer color management will be turned off for an Epson printer driver. If you have a different printer model, research how to access print quality and color management settings for it, and use our steps as general guidelines.
To turn off color management for your printer in Windows, and print the file:
1. Open the File > Print dialog in Photoshop, then click Print to get to the Print dialog for your system.
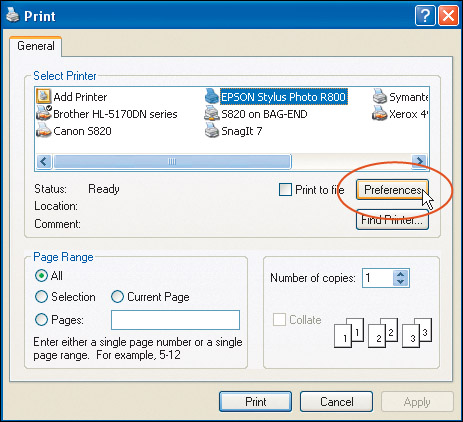
2. In the Select Printer area of the General tab, click the name of your inkjet printer.
3. Click Preferences A to open the Printing Preferences dialog for your printer, which is identical to the Properties dialog that you used to specify the size and media type.
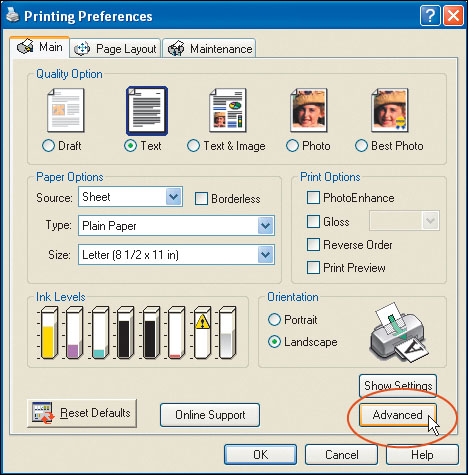
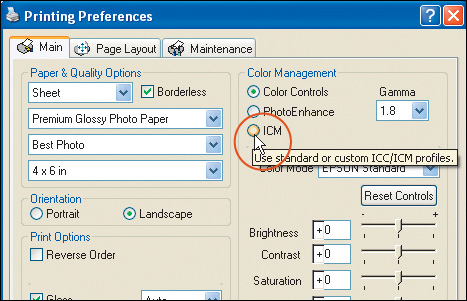
4. On the Main tab of the Printing Preferences dialog, click Advanced.B A different set of options will appear, including controls for color management.
5. In the Color Management area, click ICM C to switch color management from the Epson driver to the color management system that’s built into Windows XP.
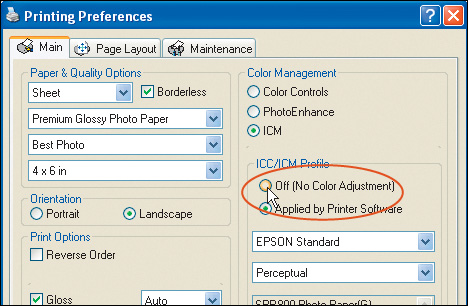
6. In the ICC/ICM Profile area, click Off (No Color Adjustment) to turn off color management for the printer (A, next page).
7. Click OK to close the Printing Preferences dialog and return to the Print dialog. Now you’re ready to click Print. Phew!
• When you need to enable printer-based color management in Windows, follow steps 1–7 above, except in step 6, click Applied by Printer Software.
A In the Print dialog in Windows (here, for an Epson printer), click Preferences to open the next dialog.
B On the Main tab of the Printing Preferences dialog for an Epson printer, click Advanced.
C These Color Management options display when you click the Advanced button.
In the Mac OS, the dialog that contains color management settings for the printer builds its list of options from both the system and the printer driver. Therefore, option names in the dialog will vary depending on the printer manufacturer. In these instructions, printer color management will be turned off for a Canon or Epson printer driver. If your printer is a different model, research how to access quality and color management settings for it, and use our steps as general guidelines.
To turn off color management for your printer in the Mac OS, and print the file:
1. Open the File > Print dialog in Photoshop, then click Print to get to the Print dialog for your system.
2. From the Printer menu, choose the name of your inkjet printer.
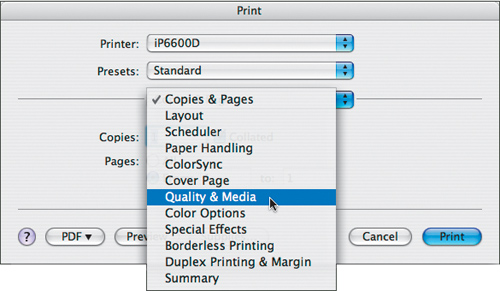
3. From the third menu, for a Canon printer choose Quality & Media,B or for an Epson printer choose Print Settings.
4. Choose the Media Type (the kind of paper to be used) and the Paper Source (how the paper feeds into the printer).C
5. In the Print Mode area, click the highest print quality option.
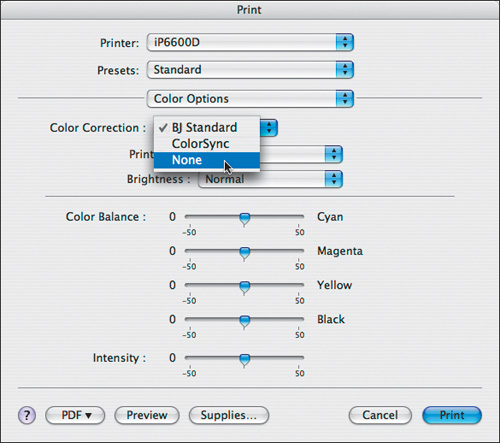
6. Returning to the third menu from the top, choose Color Options (Canon) D or Color Management (Epson). A new set of options displays in the dialog. Choose None from the Color Correction menu (Canon), or click Off (No Color Adjustment) (Epson).
7. Click Print. Congratulations!
A In Windows, click Off in the ICC/ICM Profile area to turn off color management.
B In the Print dialog, we chose the Canon Pixma iP6600D printer from the Printer menu and are now choosing Quality & Media from the third menu.
C For the Quality & Media settings, choose your paper type and source, and click the desired Print Mode.

D From the third menu, choose Color Options, then choose Color Correction: None.
The Proof option in the Print dialog instructs your desktop printer to simulate the output of a commercial, four-color press. This “hard” proof won’t match the press output exactly, but it will give you an idea of how the image will look in the restricted color range (color gamut) of a commercial press.
To output a CMYK proof from an inkjet printer:
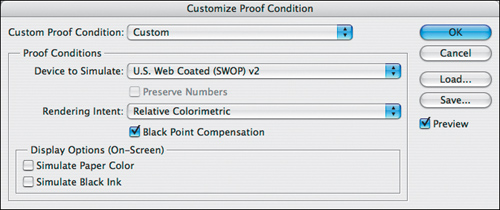
1. For the best results, create a custom CMYK proof setup for your RGB file via View > Proof Setup > Custom (see pages 9–10).A
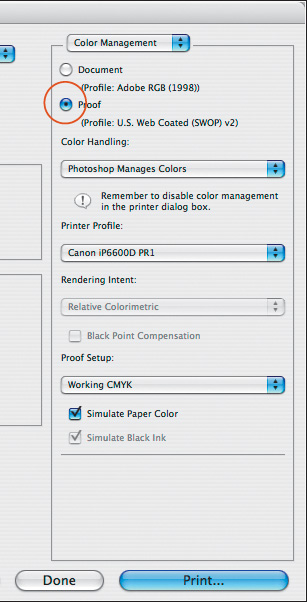
2. Open the File > Print dialog, display the Color Management pane, then click Proof.B
3. Make sure the Color Handling menu is set to Photoshop Manages Colors and the Printer Profile menu is set to the correct profile for your inkjet printer.
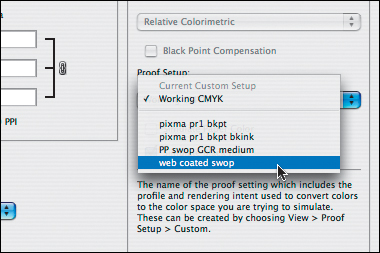
4. From the Proof Setup menu, C choose a profile for proofing, preferably the one you saved via View > Proof > Custom (the same profile will also appear on the View > Proof Setup submenu).
5. Below the Proof Setup menu, check Simulate Paper Color (see page 9) and/or Simulate Black Ink to mimic those commercial printing conditions. See also Photoshop Help.
6. Click Print, then follow the steps on page 330 for Windows or 331 for the Mac OS.
A Use the Customize Proof Condition dialog to create a custom CMYK proof.
B In the Color Management pane of the Print dialog, click Proof, then choose Color Handling and Printer Profile menu options.
C Choose a proofing profile from the Proof Setup menu in the Print dialog.
Preparing a file for commercial printing
Computer monitors display additive colors by projecting red, green, and blue (RGB) light, whereas commercial presses print subtractive colors using CMYK (cyan, magenta, yellow, and black) and/or spot color inks. Obtaining good CMYK color reproduction of digital images from a commercial press is an art.
Nowadays, with print shops creating their own profiles for their commercial presses, you don’t need to concern yourself with creating a profile; you can leave this step to the pros. Do concern yourself with saving the custom profile from your print shop to the correct folder (as we showed you on page 7) so it can be accessed from the Color Settings dialog.
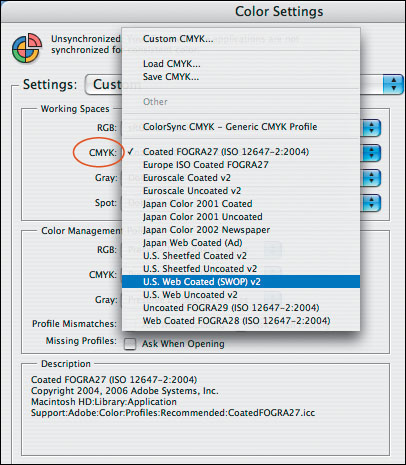
When you’re ready to convert your file for commercial printing, you need to set the current CMYK working space to either the custom profile your print shop provided or to a predefined prepress profile. This CMYK profile will control the conversion of your images from RGB to CMYK color mode.
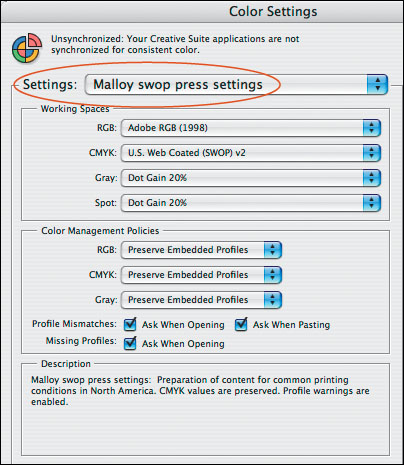
A From the Settings menu in the Color Settings dialog, choose the .csf profile you received from your print shop.
To choose a predefined CMYK profile:
1. Choose Edit > Color Settings (Ctrl-Shift-K/Cmd-Shift-K).
2. Do either of the following:
From the Settings menu, choose the .csf profile that you received from your commercial printer.A
From the CMYK menu in the Working Spaces area, choose either the .icc predefined prepress profile that your print shop sent you or a profile that matches your chosen press and paper type.B
B From the CMYK menu in the Color Settings dialog, choose either a custom .icc profile that you received from your print shop or a preset CMYK profile that they recommend.
Exporting Photoshop files to Adobe InDesign and Adobe Illustrator
If you’re going to export your Photoshop file to Adobe InDesign or Adobe Illustrator, be aware that Photoshop (PSD), TIFF, Photoshop PDF, and the less practical Large Document (PSB) are the only formats that preserve Photoshop features such as multiple layers, Smart Objects, adjustment layers, etc. Because you can import a Photoshop PSD file into InDesign or Illustrator via the Place command, or into Illustrator via the Open command, exporting files to those programs is a cinch. If you decide to allow layers to be converted to objects, each layer will appear as an object on its own editable layer, nested within a group.
Photoshop to InDesign
To speed up performance when importing a Photoshop PSD file into InDesign, save a flattened, composite preview of the file with the layered version. To ensure that a flattened, composite preview of the layered file is always included when the Save or Save As command is used, go to Edit/Photoshop > Preferences > File Handling, and on the Maximize PSD and PSB File Compatibility menu, choose Always. With this option on, a rasterized copy of any vector art will also be included for applications that don’t support vector data. This option produces larger files that take longer to save, but it ensures compatibility for applications that don’t support Photoshop-specific features.
Or if you prefer to decide on a file-by-file basis whether to include the additional flattened version with your layered file, choose Ask from the Maximize PSD and PSB File Compatibility menu instead. With this setting chosen, if you create one or more layers and then save your file using the Save or Save As command, an alert dialog will appear, giving you the option to include the composite preview or not.
If you need to preserve the possibility of editing a 16-bits-per-channel Photoshop file after importing it into InDesign, don’t change the bit depth. Or if you’re ready to lower the bit depth now, before exporting the file, from the Image > Mode submenu, choose 8 Bits/Channel.
InDesign can import Photoshop PSD files and color-separate them (both RGB and CMYK files), and it can also read embedded ICC color profiles. In InDesign, you can turn the visibility of Photoshop layers on or off at any time, as well as view layer comps. Since alpha channels, layer masks, and transparency are preserved, you won’t need to create a clipping mask when you want to block areas of an image from printing. And like other programs in the Adobe Creative Suite, InDesign lets you use Adobe Bridge for file and color management.
Photoshop to Illustrator
It’s also a cinch to get Photoshop files into Illustrator.
• If you drag and drop a Photoshop selection or layer into Illustrator, in Windows the imagery will appear on the Layers panel in Illustrator as an image layer, whereas in the Mac OS it will appear as a group with a generic clipping path and an image layer. Opacity settings are reset to 100% but are preserved visually, the blending mode is reset to Normal, and layer and vector masks are applied to their respective layers. Transparent areas surrounding the imagery are ignored, whereas transparent areas within the imagery are filled with white.
• Via File > Place in Illustrator, you can place either a whole Photoshop image or just a single layer comp. If you place a Photoshop image with the Link option checked, the image will appear on the Layers panel on a single image layer, and any masks in the file will be applied. If you embed the Photoshop image as you place it (uncheck the Link option), you’ll be given the option to convert layers into objects or flatten them into one layer.
• The presence of adjustment layers in a Photoshop image will prevent the underlying layers from becoming individual layers in Illustrator. To work around this limitation, merge any adjustment layers downward before opening or placing the file into Illustrator.
• If you flatten the Photoshop layers into one layer, all transparency, blending modes, and layer mask effects will be preserved visually but won’t be editable in Illustrator.
• Illustrator can’t import 16-bit files. If you don’t reduce the bit depth of your file to 8-bit via the Image > Mode menu in Photoshop, Illustrator will flatten the layers and lower the bit depth when it imports the file.
Exporting a silhouetted image from Photoshop
To place just a portion of a Photoshop PSD image into InDesign or Illustrator, the first step is to isolate it to a separate layer.
To create a silhouetted image in Photoshop:
1. Do either of the following:
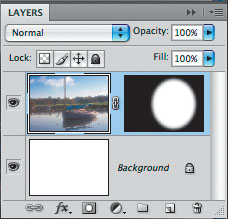
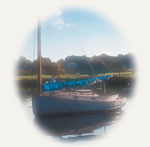
With an area of a layer selected, create a layer mask.A
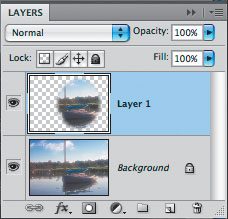
Select the area to be silhouetted, and put it on its own layer by pressing Ctrl-J/Cmd-J.B
2. Optional: Hide the Background by clicking its visibility icon. You’ll also have the option to hide the Background once the file is imported into InDesign or Illustrator (see the next page).
3. Choose File > Save As, check As a Copy in the dialog to save a copy of the file, then follow either set of instructions on the next page.
• Instead of creating a path or text in Photoshop, consider using the File > Place command in Illustrator to import your Photoshop image, then create your vector paths or text on top of the image in Illustrator.
A In Photoshop, we created a layer mask to hide part of an image layer, then saved the file in the Photoshop PSD format.
B In Photoshop, we created a silhouette by copying a selected area to a new layer, then saved the file in the Photoshop PSD format.
To place a Photoshop file into InDesign as a silhouette:
1. In InDesign, open or create a document, then import the Photoshop file via File > Place.
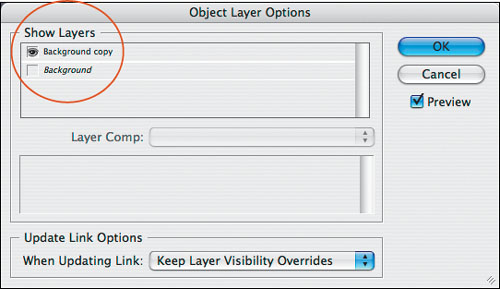
2. Choose Object > Object Layer Options.
3. In the dialog,A check Preview, show the layer that contains the layer mask, hide any other layers, then click OK.C–D
To import a Photoshop file into Illustrator as a silhouette:
1. In Illustrator, open the file via File > Open, or import it via File > Place with the Link option unchecked.
2. In the Photoshop Import Options dialog, click Convert Layers to Objects, then click OK. On the Layers panel, the image will appear on editable nested layers, within a group.B–D Note: When a Photoshop layer is converted into an Illustrator object, transparency and blending mode settings are preserved (and are listed as editable appearances), and any layer masks become opacity masks, as identified by a dashed line under the layer name.
A In the Object Layer Options dialog in InDesign, we clicked the visibility icon for the Background to hide it.
B In Illustrator, we chose File > Place, then chose Convert Layers to Objects in the Photoshop Import Options dialog. On the Layers panel, we hid the Background by clicking its visibility icon.
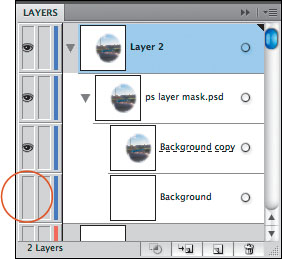
C This is the imported Photoshop PSD file with the Background visible.

D Here it is with the Background hidden.
E And here it is with both layers hidden. ;0)
Saving files in the TIFF format
TIFF files are versatile in that they can be imported into most applications and are usable in many color management scenarios. Both InDesign and QuarkXPress can color-separate a CMYK color TIFF.
To save a file in the TIFF format:
1. If the document will be printed on a four-color press and your print shop requests that it be a CMYK file, choose Image > Mode > CMYK Color.
2. Choose File > Save As.
3. In the Save As dialog, do the following:
Enter a name and choose a location for the file.
Choose Format: TIFF.
Optional: Although you could check Layers to preserve any layers in your file, few image or layout programs can work with layered TIFF files, and those that don’t will flatten them upon import. You can also choose to save Alpha Channels, Notes, or Spot Colors; or check ICC Profile/Embed Color Profile [profile name] to include the currently embedded color profile with the file.
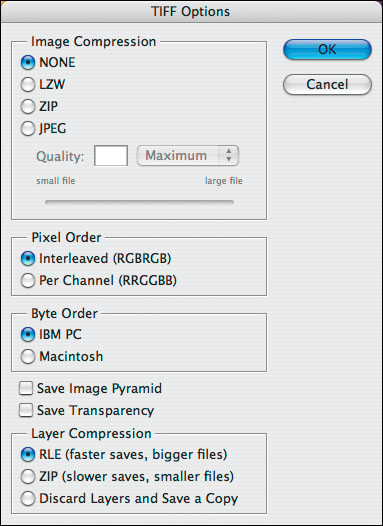
Click Save. The TIFF Options dialog opens.A
4. In the TIFF Options dialog, do the following:
If the file is going to be color-separated, click None under Image Compression because output service providers usually prefer uncompressed files. If you do need to compress the file, LZW and ZIP are the preferred methods because they don’t cause data loss. Note that some programs can’t open compressed TIFF files.
For the Pixel Order, keep the default setting of Interleaved (RGBRGB).
For the Byte Order, click IBM PC or Macintosh (the platform the file will be used on).
Optional: Check Save Image Pyramid to include multiple resolutions in one file. Photoshop doesn’t offer options for opening image pyramids, whereas InDesign does.
Optional: If the file contains transparency that you want to preserve, check Save Transparency. Bear in mind that some applications can’t open TIFF files containing transparency.
If the file contains layers, click one of the Layer Compression options.
Click OK.
A Choose settings in the TIFF Options dialog.
Saving files in the Adobe PDF format
PDF (Portable Document Format) files can be opened in many Windows and Macintosh applications, and in Adobe Reader (available as a free download), Acrobat Standard, and Acrobat Professional.
There are two different PDF formats to choose from. The default format, Photoshop PDF, preserves image, font, layer, and vector data but saves only one image per file. To create this type of file, check Preserve Photoshop Editing Capabilities in the Save Adobe PDF dialog.
The other format is a generic PDF file, which provides backward compatibility with Photoshop versions CS and earlier. To create this type of file, uncheck Preserve Photoshop Editing Capabilities in the Save Adobe PDF dialog. The file will be flattened and rasterized, which will make your reediting choices in Photoshop quite limited.
Adobe has simplified the process of choosing settings for a PDF file by offering an array of presets.
To save a file as a PDF using a preset:
1. Open an 8-bit or 16-bit file (not a 32-bit file), choose File > Save As, enter a file name, choose a location, choose Format: Photoshop PDF, then click Save. If an alert appears, click OK.
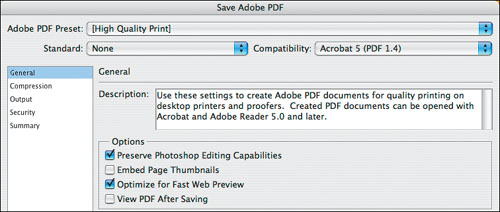
2. The Save Adobe PDF dialog opens.A From the Adobe PDF Preset menu, choose a settings preset that’s appropriate for the intended output medium (press, Web, etc.). The High Quality Print and Press Quality presets embed all fonts automatically, compress the file using JPEG at Maximum quality, and create a large Photoshop PDF file that is compatible with Adobe Acrobat 5 and later. Also, the Preserve Photoshop Editing Capabilities option (discussed at left) is selected for these two presets automatically.
High Quality Print (the default preset) is for desktop printers and color proofing devices. The printer driver handles the color conversion, and the profile for the chosen printer is included.
Press Quality is for high-quality prepress output. Colors are converted to CMYK using the current CMYK workspace profile.
The following presets produce a generic PDF file:
PDF/X-1a: 2001, PDF/X-3: 2002, PDF/X-4: 2007, and PDF/X-4: 2008 files will be checked for compliance with specific printing standards, to help prevent printing problems. PDF/X-4 files are compatible with Acrobat 5 and later; the others are compatible with Acrobat 4 and later.
Smallest File Size uses higher levels of JPEG compression to produce very compact files for output to the Web, e-mail, etc.
• You can read about the currently selected preset in the Description field.
3. Click Save PDF. If an alert appears, click Yes.
A In the Save Adobe PDF dialog, choose a preset from the Adobe PDF Preset menu.
To save a file as a PDF using custom settings:
1. Via the Standard menu, you can apply a PDF/X compliance standard to any non-PDF/X preset to ensure printing compliance. If you opt not to do this, from the Compatibility menu, choose which version of Acrobat you need your file to be compatible with, bearing in mind that not all applications can read Acrobat 7 or 8 files. (As of this writing, Acrobat 9 isn’t an available option.)
If you change any settings from the preset defaults, “[Preset Name] (Modified)” becomes the listing on the Adobe PDF Preset menu.
2. Under Options, check any of the following:
Preserve Photoshop Editing Capabilities to allow the PDF file to be reopened and edited in Photoshop CS2 or later. Photoshop data—such as layers, alpha channels, and spot channels—are preserved.
Embed Page Thumbnails to save a thumbnail of the file for display in the Open and Place dialogs.
Optimize for Fast Web Preview to enable the file to display quickly in a Web browser.
View PDF After Saving to have your system’s default PDF viewer (usually Adobe Reader or Acrobat) launch automatically and display the file after you click Save PDF.
To choose more custom options, follow the remaining steps.
3. If you need to reduce the image resolution, click Compression on the list of panels on the left side of the dialog,A then choose options to control how your image will be compressed (downsampled). From the first menu under Options, choose an interpolation method for downsampling:
Do Not Downsample keeps the image at its present resolution.
Average Downsampling To divides the image invisibly into sample areas, averages the pixels in each area, and substitutes the average values for the original ones.
Subsampling To replaces a sampled area with pixel data taken from the middle of that area, producing a smaller but possibly less accurate file.
Bicubic Downsampling To replaces the sampled area with an average of that area’s values, which usually produces a more accurate result than average downsampling.
For any of the interpolation methods, enter the desired ppi resolution and the minimum resolution the image must have for downsampling to occur.
A In the Save Adobe PDF dialog, click Compression, then choose compression options for your image.

Choose other Compression settings:
Choose a compression type from the Compression menu: None for no compression, ZIP, or either of the JPEG options. JPEG2000 is available only when Acrobat 6 or higher is chosen on the Compatibility menu.
The ZIP option is lossless. If you chose a JPEG option, choose an Image Quality for the amount of compression. Maximum applies very little compression (a minimal reduction in file size) but produces a higher-quality image, whereas Minimum applies more compression (and yields a smaller file size), but produces a lower-quality image. All the JPEG options are lossy (cause data loss), except for JPEG2000 when the Lossless option is also chosen.
If Acrobat 6 or higher is chosen on the Compatibility menu, you can convert your file to a lower color depth by checking Convert 16 Bit/Channel Image to 8 Bits/Channel.
4. Click Output on the left side of the dialog. There, you will see options for controlling the color conversion and profile inclusion in the PDF file. Unless you’re experienced with using a color-managed workflow, it’s best to either leave these menus on the default settings or ask your print shop which settings to choose. (For Web output, we suggest choosing Smallest File Size from the preset menu in the General panel; the Output options will be set correctly for your file.)
Note: Although the PDF/X options will be available if you chose a PDF/X preset from the Standard menu, you should keep the default settings in these fields unless your press shop instructs you to do otherwise.
5. Optional: Click Security on the left side of the dialog to view features for restricting user access to the PDF (these are available only if None is chosen on the Standard menu):
Check Require a Password to Open the Document to protect the file with a password, and type a password in the Document Open Password field. (Note that this option doesn’t offer complete protection.)
• The password can’t be recovered from the document, so jot it down in a separate location.
Check Use a Password to Restrict Printing, Editing and Other Tasks if you wish to maintain control over these options. Type a password in the Permissions Password field. Also choose Permissions options:
Choose an option from the Printing Allowed menu to control whether users can print the file: None, Low Resolution (150 dpi), or High Resolution.
Choose an option from the Changes Allowed menu to control precisely what users can and cannot alter.
Check Enable Copying of Text, Images and Other Content to permit users to alter text or images.
Check Enable Text Access of Screen Reader Devices for the Visually Impaired to permit screen readers to view and read the file.
Check Enable Plaintext Metadata to enable the file’s metadata to be searchable by other applications (available only for Acrobat versions 6 through 8).
6. Click Summary on the left side of the dialog, then expand any category in the Options scroll window to view a list of settings that you’ve chosen for that category.
7. Click Save PDF, click Yes in the alert dialog, then give yourself a nice pat on the back.
• To learn more about the PDF options, see Saving and Exporting Images > Saving PDF Files in Photoshop Help.
Saving files in the EPS format
If the drawing or page layout program you’re planning to export your files to can’t read Photoshop PSD or PDF files, the Photoshop EPS format is the next best option. Note that this format flat-tens layers and discards alpha channels and spot channels. To access it, your file can be in any color mode except Multichannel, but its color depth must be 8 bits per channel. Printing an EPS file requires a PostScript or PostScript-emulation printer.
To save a file in the EPS format:
1. Optional: If the file is going to be color-separated by another application and you want to see how it will be affected by the mode conversion, choose Image > Mode > CMYK Color, then choose Edit > Undo immediately.
2. Choose File > Save As (Ctrl-Shift-S/Cmd-Shift-S). The Save As dialog opens.
3. Enter a file name or keep the current name, choose Format: Photoshop EPS, and choose a location in which to save the file.
Optional: Check ICC Profile/Embed Color Profile to have Photoshop embed the document color profile or current working color space in the file (see page 6).
Click Save. All layers will be flattened. The EPS Options dialog opens.
4. From the Preview menu, choose TIFF (1 bit/pixel) to save the file with a black-and-white preview or TIFF (8 bits/pixel) to save the file with a grayscale or color preview. Mac OS users, choose one of the “Macintosh” previews only if you’re sure you won’t need to open the file on another platform.
5. If the file is to be used in the Mac OS, choose Encoding: Binary, the default method used by PostScript printers; binary-encoded files are smaller and process more quickly than ASCII files. You must choose ASCII or ASCII85 if the file is to be used in Windows, or for applications, PostScript printers, or printing utilities that can’t handle binary files. JPEG is the fastest encoding method, but it causes some data loss. A JPEG file can print only on a PostScript Level 2 or higher printer.
6. If you changed the frequency, angle, or dot shape settings in the Halftone Screen dialog in Photoshop, check Include Halftone Screen. (To get to the Halftone Screen dialog, choose File > Print, choose Output from the menu in the upper right corner of the dialog, then click Screen.)
7. The PostScript Color Management option converts the file’s color data to the printer’s color space. We recommend keeping this option off, especially if you’re going to import the file into another color-managed application (such as InDesign), as unpredictable color shifts may result.
8. If your document contains vector elements, such as shapes or type, check Include Vector Data. Although saved vector data in EPS files is available to other applications, as an alert will tell you when you reopen the file in Photoshop, the vector data will be rasterized.
9. Check Image Interpolation to allow other applications to resample pixels in an effort to reduce jagged edges on a low-resolution printout.
10. Click OK.
Creating a Web gallery
One way to display your Photoshop photos on the Web is via a gallery, in which the images display as thumbnails on a colored or neutral background, with viewer controls for displaying any thumb-nail as a larger preview and for displaying images sequentially. You can create a gallery by using the Web Gallery controls in Bridge.
To create a gallery for the Web: ![]()
1. In Adobe Bridge, put all the files to be displayed in the gallery in the same folder, in the desired order.
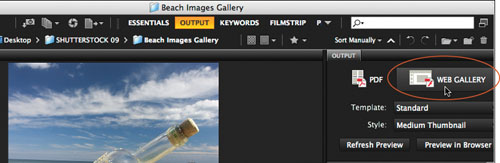
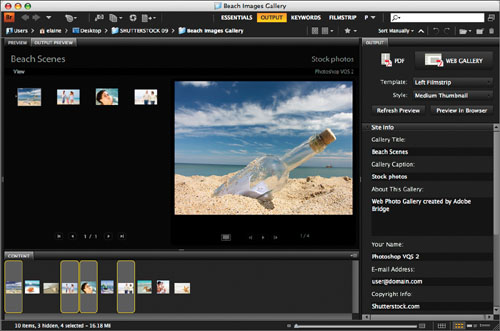
2. On the workspace switcher, click Output,* then click Web Gallery at the top of the Output panel.A A large Preview panel and the Output panel display.
* If the Output workspace isn’t listed, go to Edit/Adobe Bridge CS4 > Preferences > Startup Scripts, check Adobe Output Module, then relaunch Bridge.
3. In the Folders panel on the left side, click the name of the folder that contains the images to be used, to display them as thumbnails at the bottom of the Content panel. Ctrl-click/Cmd-click around four or five thumbnails in the Content panel (so you won’t have to wait for a lot of previews to render as you choose options).
4. Click Refresh Preview; the Output Preview panel displays. Double-click the vertical bar between the left and center panes to hide the Favorites/Folders panel (A, next page).
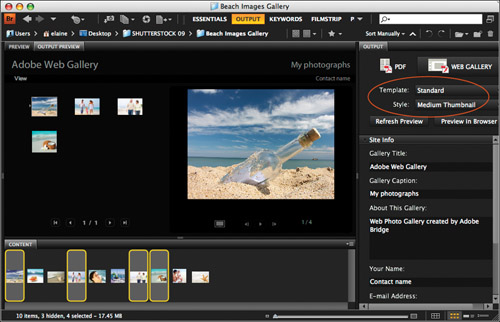
5. From the Template menu at the top of the Output panel, choose a layout (B, next page), then click Refresh Preview. It’s important to make this decision first. If you change the layout later, you will lose the custom changes you’ll be making in other categories on the panel.
The Standard template displays the thumbnails to the left of the large preview. From the Style menu, choose a thumbnail size.
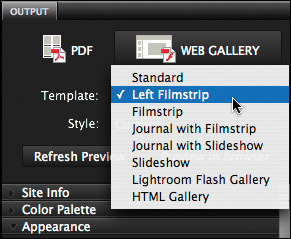
The Filmstrip templates display the thumbnails either to the left of or below the large preview. From the Style menu, choose a thumbnail size.
The Journal templates list metadata information for the currently selected thumbnail.
The Slideshow template displays the large preview but no thumbnails.
For the Lightroom Flash Gallery template, you have a choice of preset layouts that you can choose from the Style menu.
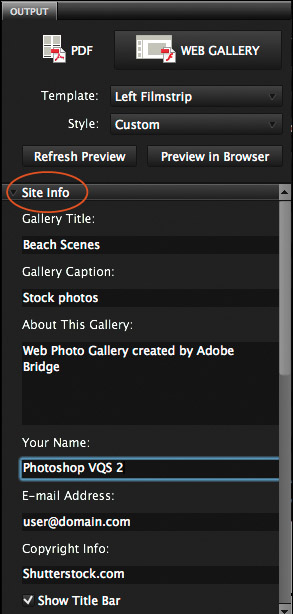
6. Click the Site Info bar to expand that category. Click in a field to activate it, then enter text to be displayed on the left and right sides of the title bar (C, next page).
A In Bridge, we clicked Output on the workspace switcher, then clicked Web Gallery at the top of the Output panel.
A This is the Standard gallery template (Style: Medium Thumbnails). The left pane of the Bridge window is hidden.
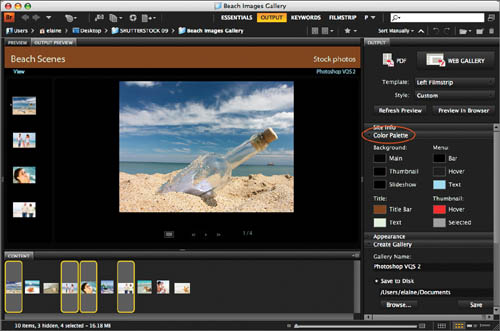
B From the Template menu, we chose the Left Filmstrip layout for our gallery.
C Next, we clicked the bar for Site Info and entered data to be displayed in the Title and Menu areas of the gallery.
7. Click Refresh Preview again (you have to do this for every change) to generate a preview of the selected thumbnails and the data that you just entered.A
• Click any gallery thumbnail to view it as a large preview.
8. Click the Site Info bar to collapse that category, then click the Color Palette bar. To change the color for any of the components of the gallery—Background, Title, Menu (below the title), or Thumbnail—click the color swatch, choose a color from the system color picker, then click OK. Click (you guessed it!) Refresh Preview to preview your choices (A, next page).
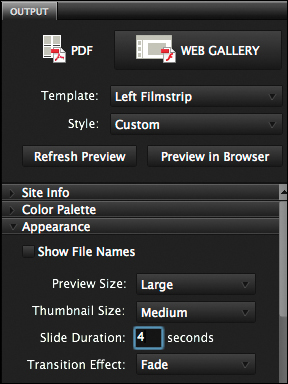
9. Click the Color Palette bar to collapse it, then click the Appearance bar. Check Show File Names if you want file names to display in the gallery (helpful for enabling clients to identify specific photos). Choose a Preview Size and Thumbnail Size (this will overwrite your Style menu choice), and choose Slideshow Duration and Transition Effect options (B, next page). Click Refresh Preview.
10. Click the View Slideshow button ![]() below the large preview image to hide the thumbnails.
below the large preview image to hide the thumbnails.
11. Click the Play Slideshow button ![]() to start the slideshow and preview your settings; click it again to stop the show. Click the View Gallery button
to start the slideshow and preview your settings; click it again to stop the show. Click the View Gallery button ![]() to redisplay the gallery.
to redisplay the gallery.
12. To view the gallery in your default browser, follow the instructions on page 346.
A After choosing the Left Filmstrip template and entering text in the Site Info fields, we clicked Refresh Preview to preview our changes.
A In the Color Palette category, we chose new colors for the Title Bar and Menu Text, then clicked Refresh Preview to view our choices.
B In the Appearance category, we left the preview and thumb-nail settings as is, but chose custom Slide Duration and Transition Effect options for the slideshow. Note: The Extra Large previews and thumbnails take longer to update.
To view the gallery in your default browser: ![]()
1. Select all the thumbnails to be included in the gallery.
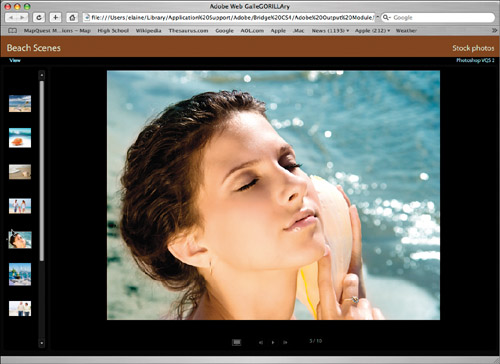
2. In the Output panel, click Preview in Browser (next to Refresh Preview), then pause for processing. The gallery will open in your default browser, conveniently scaled to fit the window.
3. When you’re done looking at the gallery and playing with the buttons,A exit/quit the browser, then click in the Bridge window.
To save the gallery, follow the instructions on the next page.
• A maximum of 10 thumbnails can display in the Output Preview panel and in the browser preview, but all the thumbnails that you selected will display in the “actual” gallery.
• To change the order of images in a gallery, before saving it, rearrange the thumbnails in the Content panel.
A You can click the thumbnails or the navigation buttons as you preview the gallery in your default browser.
Once you’ve finalized your gallery, be sure to save it!
To save a Web gallery: ![]()
1. Select all the thumbnails you’ve decided to include in the Web gallery.
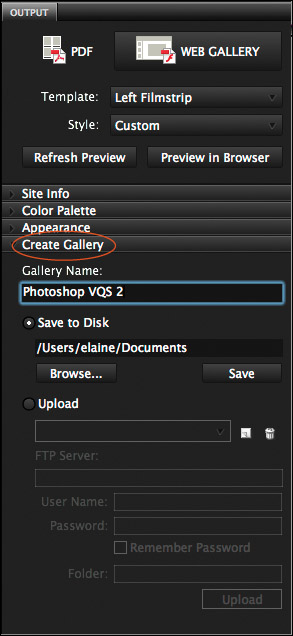
2. Click the Create Gallery bar to expand that category.A
3. Enter a Gallery Name for a folder to be created, click Save to Disk, click Browse and locate a destination folder, then click OK/Choose.
4. In the Create Gallery category, click Save. Pause for processing. All the necessary files for the gallery will be saved to the chosen folder.
You can even let Bridge upload your gallery to a Web server. What service!
To upload a Web gallery: ![]()
1. Verify that you’ve been authorized to upload data to a Web server.
2. Click the Upload button in the Create Gallery category.
3. Obtain the necessary data from your Web administrator, and enter it in the FTP (file transfer protocol) Server, User Name, Password, and Folder fields. (The folder is the location on the server to which the gallery files will be uploaded.)
4. After entering all the necessary data, click the Upload button at the bottom of the Create Gallery category. Your gallery files will be sent to the server.
5. Give your viewers the address of the website so they can view your beautiful gallery.
A In the Create Gallery category, enter a Gallery Name for the folder to hold the images, click Save to Disk, choose a location, then click Save.
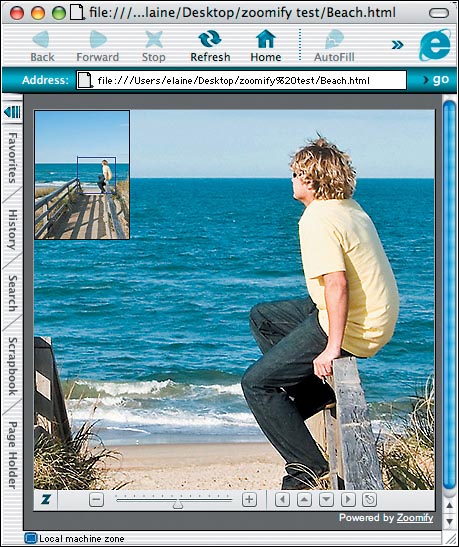
Using Zoomify
If you want to share a high-resolution image with viewers, but don’t want to shrink it down to a speck in order to download it, check out Zoomify. This command creates an HTML file, along with a folder containing a Flash file, an XML file, and a series of JPEG tiles (slices) of the high-resolution image. Once the files are uploaded to a Web server, the viewer can zoom in on a detail. The slice for each area will display quickly because it’s merely a segment of the larger image.
To create a Zoomify file:
1. With a high-resolution file open in Photoshop, choose File > Export > Zoomify. The Zoomify™ Export dialog opens.A
2. Do all of the following:
Choose a preset Template for the background color behind the image in the browser. The Navigator templates include a blue frame that the viewer can click to display a different area of the image, which is very handy.
For Output Location, click Folder, choose a location for the file, then click OK/Choose; also enter a one-word Base Name for the tile folder and HTML file.
A In the Zoomify™ Export dialog, choose a template style, location, name, and quality, and choose image dimensions.
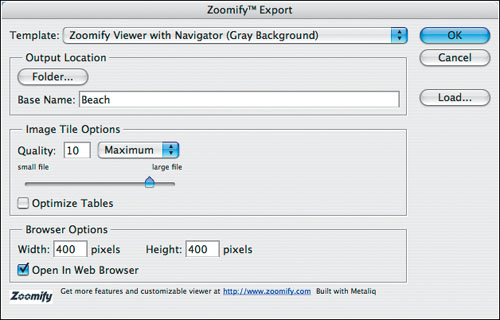
Under Image Tile Options, choose a Quality setting for the tiles (slices).
For Browser Options, you can either keep the default pixel Width and Height dimensions for the image when viewed in a browser or enter slightly larger values.
Check Open in Web Browser to have the file open in your default browser automatically after you click OK, so you can see how it looks.
Click OK.
3. The HTML page will open in your default Web browser.B To zoom in or out, use the plus and minus buttons or the slider. To pan (bring a different area of the image into view), use the arrows; or if you chose one of the Navigator templates, you can also click or drag the blue frame inside the thumbnail.
4. Upload the files to your Web server, making sure that the HTML file and [base name]_img folder are located in the same folder.
B In the browser, you can use the controls below the image to zoom and pan, or click or drag the navigation frame (if the template you chose offers that option).