1. Color Management
Although you may be tempted to start editing your images right away, you should make sure your display is properly calibrated and choose the appropriate color management settings first.
What is color management?
Each device in your workflow reads colors differently, from the camera to the display in Adobe Photoshop and finally to the printer. As a result, the colors you see through the viewfinder in your camera may not look the same on your computer display, let alone on a printout. A color management system can solve most of these color inconsistencies by acting as a color interpreter. It knows how each device and program interprets color and adjusts colors, if necessary, to keep them as consistent as possible when you shift your file among various devices and programs. With the proper color management settings in place, your colors will display and output more accurately.
Each device can capture and reproduce only a limited range (gamut) of colors, which is known as its color space. The mathematical description of the color space of each device is stored in a type of file called a color profile and is the key feature of any color management system. Each input device, such as a camera, embeds a color profile into the image files it produces. Photoshop then uses this embedded profile to determine how to display the document colors, or if a file doesn’t have a profile, Photoshop uses data from the current working space instead (a color space that you’ve chosen for Photoshop) to display the document color.
To enable you to maintain color consistency throughout your workflow, in this chapter we’ll show you how to set the color space of your digital camera to Adobe RGB, calibrate your display, choose the same color space for Photoshop, acquire the proper profiles for your intended printer and paper type, and finally, use those profiles to view a soft proof of your document onscreen. We recommend using the Adobe RGB (1998) color space because it encompasses a wider range of colors than the sRGB color space and is particularly well suited for inkjet printing.
In Chapter 15, color management will come into play once again as you learn how to choose the correct output profile for an inkjet printer.
Setting your camera to the Adobe RGB color space
Most digital SLR cameras, and most of the high-end, advanced amateur digital cameras, have an onscreen menu that enables you to customize how the camera processes digital images. In this task, we’ll demonstrate how to set a camera to the Adobe RGB color space using the example of a Canon EOS 40D, but you can follow the same basic procedure to set the color space for your camera model.
If you shoot photos in the JPEG format, you should choose Adobe RGB as the color space for your camera, regardless of the camera model. If you shoot raw files, these steps are optional, because you’ll assign the Adobe RGB (1998) color space when converting your photos via the Adobe Camera Raw plug-in.
To set a camera to the Adobe RGB color space:
1. On the back of the camera, click the Menu button to access the menu on the LCD screen, then press the right arrow to select the Shooting Menu tab.A
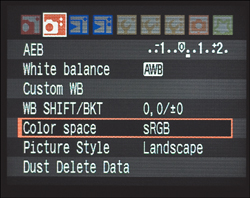
2. Press the down arrow to select the Color Space category.B Press the Set button to shift to the submenu on the right (on a Nikon camera, press the proper arrow key instead).
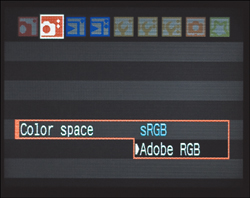
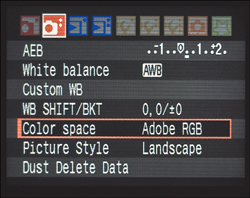
3. Press the down arrow to select Adobe RGB.C–D
4. Press the Set button (on a Nikon, press the right arrow), then press the Menu button to exit the Menu screen.
A On the Menu screen for our Canon camera, we chose the Shooting Menu tab.

B We used the down arrow to select the Color Space category (we will press Set to get to the submenu).
C We chose Adobe RGB from the submenu (then will press Set to assign that option).
D Adobe RGB is now established as the color space for our camera.
Calibrating your display
Display types
There are two basic types of computer displays: CRT (cathode ray tube, as in a traditional TV set) and LCD (liquid crystal display, or flat panel). The display performance of a CRT fluctuates due to its analog technology and the fact that its display phosphors (which produce the glowing dots that you see onscreen) fade over time. A CRT display can be calibrated reliably for only around three years.
An LCD display uses a grid of fixed-size liquid crystals that filter color coming from a backlight source. Although you can adjust only the brightness on an LCD (not the contrast), the LCD digital technology offers more reliable color consistency than a CRT, without the characteristic flickering of a CRT. The newest LCD models provide good viewing angles, display accurate color, use the desired daylight temperature of 6500K for the white point (see below), and are produced under tighter manufacturing standards than CRTs. Moreover, the color profile that’s provided with an LCD display (and that is installed in your system automatically) usually describes the display characteristics accurately.
• Both types of displays lose calibration gradually, and you may not notice the change until the colors are way off. To maintain color consistency, try to stick to a regular monthly calibration schedule.
Understanding the calibration settings
Three basic characteristics are adjusted when a display is calibrated: The brightness (white level) is set to a consistent working standard; the contrast (dark level) is set to the maximum value; and finally, a neutral gray (gray level) is established using equal values of R, G, and B. To adjust these characteristics, calibration devices evaluate the white point, black point, and gamma in the display.
• The white point data enables the display to project a pure white, which matches an industry-standard color temperature. Photographers normally use D65/6500K as the temperature setting for the white point.
• The black point is the darkest black a display is capable of projecting. All other dark shades will be lighter than this darkest black, thereby ensuring that shadow details display properly.
• The gamma defines how midtones are displayed onscreen. A gamma setting of 1.0 reproduces the linear brightness scale that is found in nature. Yet human vision responds to brightness in a nonlinear fashion, so this setting makes the screen look washed out. A higher gamma setting redistributes more of the midtones into the dark range, where our eyes are more sensitive, producing a more natural-looking image. Photography experts recommend using a gamma setting of 2.2 in both Windows and the Mac OS.
Buying a calibration device
The only way to properly calibrate a display is by using a hardware calibration device. Such a device will produce a profile with the proper white point, black point, and gamma data settings for your display. The Adobe color management system, in turn, will use this data to display colors in your Photoshop document with better accuracy.
If you’re shopping for a calibration device, you’ll notice a wide range in cost, from a colorimeter that will run you between $100 and $300 to much more costly, but more precise, high-end professional gadgets, such as a spectrophotometer. Instead of relying on subjective “eyeball” judgements, the colorimeters and step-by-step wizard tutorials that are included with these devices will enable you to achieve more accurate calibration.
Among moderately priced calibrators, our informal reading of hardware reviews and other industry publications has yielded the following as some of the current favorites: Spyder3Pro and Spyder3Elite by Datacolor; Eye-One Display 2 by X-Rite; and hueyPRO, which was developed jointly by Pantone and X-Rite.
The steps outlined here apply loosely to all three of the hardware display calibrators that are mentioned on the previous page. We happen to use Spyder3Elite.
To calibrate your display using a hardware device:
1. Set the room lighting to the usual level that you use for work. If you have a CRT, let it warm up for 30 minutes, to allow the display to stabilize.
2. Increase the brightness of your display to its highest level. In the Mac OS, if you have an Apple display, choose System Preferences > Displays and drag the Brightness slider to the far right. For a third-party display, or any display in Windows, use either an actual button on the display or a menu command in the OnScreen Display (OSD).
3. Launch the calibration application that you’ve installed, then follow the straightforward instructions in the “step-by-step wizard” screens. Proceed from one screen to the next, choosing options as you go.A
The important information that you need to tell the application is: what type of display you have (CRT or LCD); the desired white point (choose D65/6500K); and the desired gamma (choose 2.2 for both Windows and Macintosh). If you’re calibrating a CRT display, you may see a few more instructional screens requesting more display setting choices.
4. After entering your display information, you’ll be prompted to drape the hardware calibration sensor (the colorimeter) over the monitor. For an LCD, remember to clip on the baffle that’s included with the device to prevent the suction cups from touching and potentially damaging the screen. Follow the instructions to align the sensor with the image onscreen (A, next page). Click OK or Continue to initiate a series of calibration tests, which will take around 5 or 10 minutes to complete.
5. After removing the calibration sensor, you’ll be prompted to name your new display profile (B, next page). Include the date in the profile name, so you’ll be able to tell which profile is the latest. The application will place the new profile in the correct location for use by your Windows or Macintosh operating system. The wizard will step you through one or two more screens (C, next page), then you’re done. Upon launching, Photoshop will automatically be aware of the new display profile.
A We launched the Sypder3Elite application, then answered questions on two consecutive screens to tell the wizard software what features are present on our LCD monitor, clicking Next to get from one screen to the next. The resulting settings appeared on this Current Settings screen.

A When this Measuring Display screen appeared, we aligned the colorimeter with the onscreen image, then clicked Continue to start the actual calibration process. (Note: Although the Spyder3Elite instructions state that the sensor can either be attached with suction cups to or draped over the LCD monitor, we play it safe by doing the latter.)

B When the calibration was finished, we clicked Next, and this Specify Profile Name screen appeared. We included the monitor name and the current date in our profile name.

C After we clicked Next again, this SpyderProof™ screen appeared. We clicked Switch to compare the pre- and postcalibration results, then clicked Next a last time to exit the software.

Choosing a color space for Photoshop
Next, you will choose a color space for Photoshop. If you use the program primarily for print work (whether outputting from a desktop printer or a commercial press), you can choose a color settings preset by following the simple steps below.
To set the color space to Adobe RGB (1998):
1. Choose Edit > Color Settings (Ctrl-Shift-K/Cmd-Shift-K). The Color Settings dialog opens.A
2. Choose Settings: North America Prepress 2 (foreign readers, choose an equivalent for your output device and geographic location). This preset changes the RGB working space to Adobe RGB (1998); it also sets the color management policies to the safe choice of Preserve Embedded Profiles, so each file you open in Photoshop will keep its own profile.
3. Click OK. (Note: The Adobe RGB (1998) color space includes more colors in the CMYK print range than the sRGB color space, which is designed for online output. For some reason, Adobe feels compelled to keep sRGB as the default RGB working space in the Color Settings dialog, which can spell disaster for print output.)
A North America Prepress 2 is chosen from the Settings menu in the Color Settings dialog.

For commercial printing, you can ask your print shop to recommend a Settings menu preset or a list of suggested settings. Even better, find out if they can supply you with a color settings (.csf) file that contains the correct Working Spaces and Color Management Policies settings for their press. If they send you a .csf file, all you need to do is install it in the proper location, as we show you here. Once installed, you’ll be able to access it via the Settings menu in the Color Settings dialog.
To install custom color settings as a preset for the Creative Suite:
1. In Windows, put the file in C:Documents and Settings[user]Application Data Adobe ColorSettings. (To learn how to display the Application Data folder, refer to Windows Help.)
In the Mac OS, put the file in Users/[user name]/Library/Application Support/Adobe/Color/Settings.
2. To access your newly saved settings file, relaunch Photoshop, choose Edit > Color Settings, then choose the .csf file name from the Settings menu.
If your print shop supplies you with a list of recommended settings for the Color Settings dialog box—but not an actual .csf file—you can choose and then save that collection of settings as a .csf file.
To save custom color settings as a preset:
1. Choose Edit > Color Settings (Ctrl-Shift-K/Cmd-Shift-K). The Color Settings dialog opens.
2. Choose the recommended menu options and check the recommended boxes.
3. Click Save. In the Save dialog, enter a file name (we recommend including the printer type in the name, for easy reference), keep the .csf extension and the default location (the Settings folder), then click Save.
4. The Color Settings Comment dialog opens. Enter the name of the print shop and the printer type, to help you identify the preset, then click OK.
5. Note that the new settings preset is now listed on the Settings menu. Click OK to exit the Color Settings dialog.
Acquiring a printer profile
Thus far, you’ve learned how to set your camera to the Adobe RGB color space, calibrate your display, and specify Adobe RGB (1998) as the color space for Photoshop. Next, you need to acquire the necessary printer profile (or profiles) so you can incorporate color management into your specific printing setup.
To download a printer profile:
1. Most printer manufacturers have a website from which you can download either a profile for a specific printer/paper combination or a printer driver that contains a collection of specific printer/paper profiles. Be sure to choose a profile that matches the particular printer/paper combination that you’re planning to use.
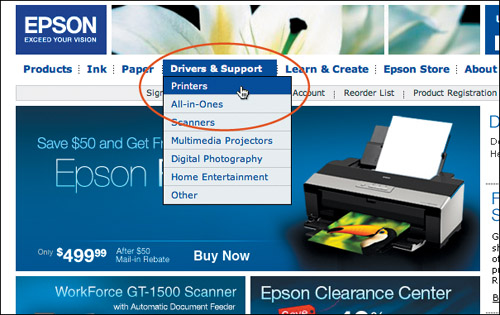
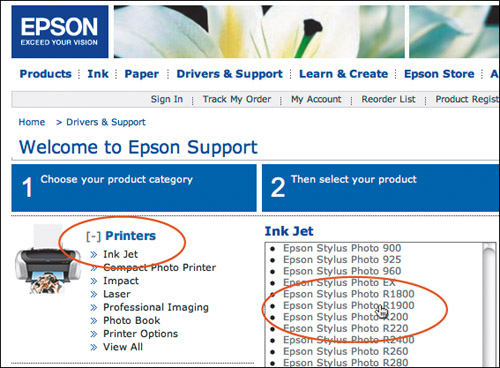
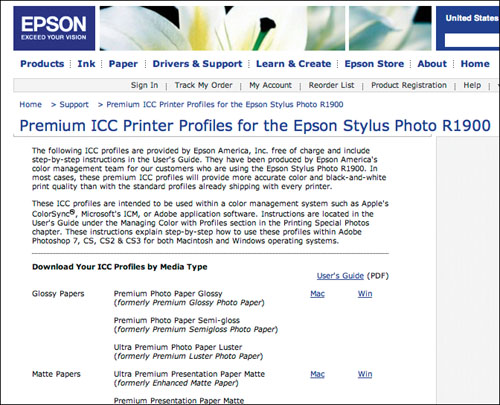
If you have an Epson Stylus Photo inkjet printer, you can follow the images on this page to navigate through the epson.com website.A–D
You could also download a profile for a specific printer/paper combo from the website for a paper manufacturer, such as ilford.com or museofineart.com.
Note: The profiles for the newest printer models may not be available yet on these sites. Check back periodically.
2. After visiting the website, follow the installation instructions for the file you downloaded. To use the newly installed profile to proof a document onscreen, see the following page.
A On the Epson homepage for your geographic region, click Drivers & Support, then click Printers.
B Click Ink Jet, then scroll down and click your printer model on the list.
C On the page for the printer model, click the link below Drivers & Downloads for your platform. On the Drivers & Downloads page, click the Premium ICC Profiles for [printer name] link.

D On the Premium ICC Printer Profiles page, click the profile for your chosen paper type.
Proofing a document onscreen
In this final step in the color management setup, you’ll create a custom preset for soft proofing, using settings for your specific inkjet printer and paper, then use that preset to view a soft proof (onscreen simulation) of how your colors will look in print.
To simulate an inkjet print onscreen:
1. Open an RGB image, then from the View > Proof Setup submenu, choose Custom. The Customize Proof Condition dialog opens.A
2. Check Preview, then from the Device to Simulate menu, choose the color profile for your particular inkjet printer and paper (the profile that you either downloaded from a website or that your printer driver installed).
3. Uncheck Preserve RGB Numbers to have Photoshop simulate how the colors will look when converted to the chosen profile. This option is available only if the color mode of the output profile chosen from the Device to Simulate menu matches the mode of the current file (e.g., if your image is in RGB Color mode and will be output to an RGB printer).
4. From the Rendering Intent menu, choose the Perceptual or Relative Colorimetric option to control how colors will change as the image is shifted from one profile to another. You can evaluate each intent via the preview. (For a description of the intents, see the sidebar on the next page.)
Check Black Point Compensation to improve the printing of blacks. With this option on, the full dynamic range of the image color space is mapped to the full dynamic range of the printer’s color space. With this option off, blacks in the image may display or print as grays. We recommend checking this option when outputting a file to an inkjet printer.
5. Optional: For the Display Options (On-Screen), if available, check Simulate Paper Color to preview the white of the printing paper, as defined in the printer profile. For this simulation to work, the chosen printer profile must include the specifications for your printing paper.
6. To save your custom settings, click Save, enter a name (keep the .psf extension and the default location as the Proofing folder), then click Save. Your proofing preset is now available on the Customize Proof Condition menu, and also at the bottom of the View > Proof Setup submenu.
7. Click OK. View > Proof Colors will be checked automatically, enabling you to view the soft proof onscreen. Also, the Device to Simulate profile will be listed in the document title bar.
Note: A soft proof is merely an onscreen simulation of your print output. Colors in the file won’t actually be converted to the chosen profile until you either change the document color mode (e.g., from RGB to CMYK) or send the file to print.
A To establish which printer the soft proof will simulate, in the Customize Proof Condition dialog, choose your printer model as the Device to Simulate.

Photoshop can also create a soft proof of your file to simulate how the RGB colors will look when printed with CMYK inks on a commercial press.
To proof colors for commercial printing:
1. Open your document, then from the View > Proof Setup submenu, choose Custom. The Customize Proof Condition dialog opens.
2. Check Preview, then from the Device to Simulate menu, choose the color profile for the type of commercial press and paper stock the file will be printed on. Click OK.
3. The View > Proof Colors feature will be checked automatically. You can uncheck it at any time to turn off soft proofing (Ctrl-Y/Cmd-Y).
• The Working CMYK option on the Device to Simulate menu in the Customize Proof Condition dialog is automatically set to the current CMYK Working Space that is specified in Edit > Color Settings.
Moving on
If you followed the instructions in this chapter, you’ve successfully completed the first (and most lengthy) part of the color management setup. You set your camera to the Adobe RGB color space, calibrated your display, chose Adobe RGB (1998) as the color space for Photoshop, acquired the proper profile for your inkjet printer and paper type, and created a soft-proof setting using that profile. You’ll need to focus on color management once more when you prepare your file for printing. In Chapter 15, you’ll learn how to let Photoshop handle color conversions for an inkjet printer, using the printer profiles that were used for soft proofing.
The benefit of using color management is that it helps ensure color consistency among all the devices in your workflow—from camera to display to printer. Now, as you use Photoshop to enhance your photos, you can be confident that the colors in your printout will closely match what you see onscreen.
In the next chapter, you’ll learn how to download your digital photo files, then use Adobe Bridge to locate, sort, organize, preview, and manage them. And don’t miss Chapter 3, which covers the powerful Camera Raw plug-in. Camera Raw lets you apply extensive adjustments to your photos before opening them into Photoshop.

