3. Camera Raw
The Adobe Camera Raw plug-in lets you apply powerful correction commands to photos before opening them into Photoshop, and is a digital darkroom in and of itself.
Learning how to use this plug-in is essential if you want to maximize the potential of your digital photos. In this chapter, you’ll choose Camera Raw preferences; correct white balance, exposure, contrast, and luminance problems; apply split toning; sharpen, crop, and straighten; use Camera Raw tools to apply local adjustments; blend dual exposures; process multiple photos; import photos as Smart Objects; and more!
Why use Adobe Camera Raw?
Advanced amateur and pro digital SLR cameras let you capture photos as raw files, which has many advantages over capturing them in the JPEG or TIFF format. For JPEG and TIFF, the camera applies internal processing to the original pixels, such as sharpening, white balance, and color adjustments. With raw files, you get only the raw data that the camera captured onto its digital sensor, giving you full control over subsequent image correction. Raw files must be converted by the Camera Raw plug-in before they can be opened and edited in Photoshop. The plug-in can process raw files from most of the current camera manufacturers, as well as JPEG and TIFF files.
With Camera Raw, you not only get a converter, you also get powerful adjustment controls. Camera Raw adjustments (e.g., exposure, white balance, hue/saturation, noise reduction) are less destructive than similar commands in Photoshop, and preserve more of the original pixel data in your photos. Furthermore, many Camera Raw features, such as the sharpening controls, produce better results and are easier to use.
The Camera Raw conversion redistributes tonal values from the highlight areas of the tonal range (which contain an abundance of pixel data) to the shadow areas (which usually contain insufficient pixel data). This helps prevent posterization and a loss of detail in the shadow areas that may result from applying tonal adjustments in Photoshop.
Note: Settings listed in the captions in this chapter were chosen for photos that are approximately 3000 × 2000 pixels.
Camera Raw edits made to raw files are stored as a series of instructions, which in turn are saved either in a sidecar file or in the Camera Raw database, whereas instructions for edits made to JPEG and TIFF files are saved in the file itself. Regardless of the photo’s file type, when you open it from Camera Raw into Photoshop, the instructions are applied to a copy of the file, leaving the original digital file intact. This is one of the key advantages to using the Camera Raw plug-in: Even after applying corrections, the original capture file is preserved (like a traditional film negative). You can reopen a photo into Camera Raw and modify or remove any of your corrections at any time. Note: This chapter has been written for version 5.3 of Camera Raw.
Although the instructions in this chapter apply to raw and JPEG files, if your camera is capable of shooting raw files, we recommend choosing that option. Regardless of your format choice, however, you should process your photos and apply tonal and color corrections to them in Camera Raw before opening them into Photoshop. (A third file format option, camera-generated TIFFs, are as large as raw files and lack the advantages of raw files.)
Choosing preferences for Camera Raw
To choose preferences for the Camera Raw plug-in:
1. Do either of the following:
In Bridge, choose Edit/Adobe Bridge CS4 > Camera Raw Preferences.
If the Camera Raw dialog is open, click the Open Preferences Dialog button ![]() at the top of the dialog (Ctrl-K/Cmd-K).
at the top of the dialog (Ctrl-K/Cmd-K).
2. In the General area of the Camera Raw Preferences dialog (A, next page), choose a Save Image Settings In option. We recommend choosing Sidebar “.xmp” Files (this won’t increase the file size significantly). Leave the Apply Sharpening To setting as All Images, to allow Camera Raw to sharpen your photos.
3. In the Default Image Settings area, we recommend leaving Apply Auto Tone Adjustments unchecked, as this option would allow Camera Raw to apply Auto settings to your photos automatically. Also leave the two “Make Defaults” options unchecked unless you use more than one camera body of the same model or want the default settings to be used for a specific ISO setting. You can leave Apply Auto Grayscale Mix When Converting to Grayscale checked.
4. Camera Raw Cache specifies the cache size for thumbnail and preview data. Leave this on the default setting of 1.0 GB unless you’re blessed with a lot of extra space on your hard disk.
5. For DNG File Handling, we recommend checking both options. The first one allows metadata to be written into your DNG files, and the second one allows the previews to update automatically when edits are made in Camera Raw.
6. For JPEG and TIFF Handling, choose options from the JPEG and TIFF menus to either allow files in those formats to open into Camera Raw or to have them bypass Camera Raw and open into Photoshop instead.![]() (For our suggestions on how to set these two preferences, see below.)
(For our suggestions on how to set these two preferences, see below.)
7. Click OK.
How we set our Camera Raw preferences for opening JPEG photos 
Because we shoot only raw or JPEG (not TIFF) photos, we choose these JPEG Handling settings in the Camera Raw Preferences dialog:
• From the JPEG menu at the bottom of the dialog, we choose Automatically Open JPEGs with Settings (JPEG files “with settings” are those that have been previously opened into Camera Raw). With this option chosen (instead of Automatically Open All Supported JPEGs), JPEG files that haven’t yet been opened into Camera Raw will open directly into Photoshop when double-clicked. To open JPEG files into Camera Raw, see step 1 in the left column on page 42.
• We don’t capture photos in the TIFF format, so from the TIFF menu, we choose Disable TIFF Support. This way, our TIFF files open directly into Photoshop instead of into Camera Raw.
We prefer to have our raw and JPEG photos open into Camera Raw hosted by Bridge (instead of by Photoshop), whether they have been opened previously into Camera Raw or not. This way, after editing a file and then exiting Camera Raw, we’re right back in Bridge.
To choose Bridge as the host for Camera Raw: ![]()
1. In Bridge, choose Edit/Adobe Bridge CS4 > Preferences (Ctrl-K/Cmd-K), then click General on the left side.
2. Check Double-Click Edits Camera Raw Settings in Bridge.
3. Click OK. Now if you double-click any thumb-nail for a raw or JPEG photo in Bridge, it will open into Camera Raw, hosted by Bridge.
A The Camera Raw Preferences dialog

Opening files into Camera Raw
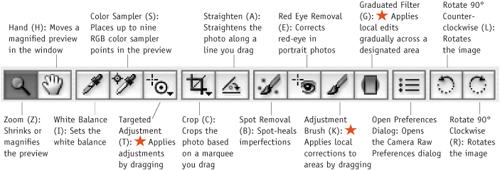
Next, you will open a file into the Camera Raw dialog (A, next page). Later in this chapter you’ll apply corrections using basic and specialized adjustment tabs (shown in B, next page) and some of the Camera Raw tools (shown in C, next page).
Note: These steps for opening files into Camera Raw assume that you have set your Camera Raw preferences as we do (see the preceding two pages).
To open a digital photo into the Camera Raw plug-in: ![]()
1. In Bridge, locate a raw or JPEG photo. (Each digital camera manufacturer attaches a unique extension to its raw files, such as .nef for Nikon, .crw or .cr2 for Canon.) Do either of the following:
Double-click the photo thumbnail.
Click the photo thumbnail, then click the Open in Camera Raw button.![]() Note: The button is available only for file formats that can be opened directly into Camera Raw.
Note: The button is available only for file formats that can be opened directly into Camera Raw.
• If a photo has been opened and edited previously in Camera Raw, a badge ![]() displays above its thumbnail.
displays above its thumbnail.
2. The photo opens into Camera Raw. Information about the photo (which is taken from the meta-data that the camera attached to it) is listed in the following locations in the Camera Raw dialog: the camera model in the title bar at the top of the dialog, the file name below the preview, and the camera settings that were used to take the photo (aperture, shutter speed, ISO sensitivity, and focal length) below the histogram in the upper right.
The underlined link (color space, bit depth, dimensions, and resolution) below the preview gets you to the Workflow Options dialog.
To correct the photo, you’ll wend your way through some or all of the nine tabs: Basic, Tone Curve, Detail, HSL/Grayscale, Split Toning, Lens Corrections, Camera Calibration, Presets, and Snapshots. You will use most of the tabs in this chapter.
Once you’re satisfied with how the corrected photo looks, you’ll click Open Image. Camera Raw will convert and open a copy of the image into Photoshop using your chosen settings, leaving the original data unchanged.
Now that you’ve opened a photo into Camera Raw, you can magnify it to get a closer look. And once it’s magnified, you can shift it around in the preview window.
To use the zoom features in Camera Raw:
1. Do any of the following:
Choose the Zoom tool ![]() (Z), then click the preview image to zoom in or Alt-click/Option-click it to zoom out.
(Z), then click the preview image to zoom in or Alt-click/Option-click it to zoom out.
Below the preview image, click the – or + zoom level button, or from the Zoom Level menu, choose a preset percentage.
Press Ctrl –/Cmd – (hyphen) to zoom out or Ctrl- +/Cmd- + to zoom in.
To change the zoom level to 100%, double-click the Zoom tool.
To change the zoom level to Fit in View, double-click the Hand tool.
2. If the image preview is magnified, you can use the Hand tool (H) ![]() to move it in the preview window. (With another tool chosen, hold down the Spacebar for a temporary Hand tool.)
to move it in the preview window. (With another tool chosen, hold down the Spacebar for a temporary Hand tool.)
The Camera Raw interface
A THE CAMERA RAW DIALOG
B THE CAMERA RAW TABS
C THE CAMERA RAW TOOLS
Choosing workflow options
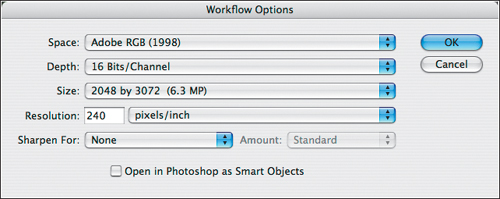
Via the Workflow Options dialog, you can establish a default color space, and bit depth (number of bits per channel), size (width and height), and resolution settings for your photos before opening them into Photoshop—without altering the original files.
To choose default workflow options:
1. With a photo open in the Camera Raw dialog, click the underlined link below the preview that lists the color space, file dimensions, etc. The Workflow Options dialog opens.A
2. From the Space menu, choose the color profile to be used for converting the raw file to RGB: Adobe RGB (1998), ColorMatch RGB, ProPhoto RGB, or sRGB IEC61966-2.1 (“sRGB,” for short). If you followed our instructions in Chapter 1, you assigned Adobe RGB (1998) as the default color space for color management, so we recommend choosing that option here, too.
3. From the Depth menu, choose a color depth of 8 Bits/Channel or 16 Bits/Channel (see page 90). Note: If you have a large hard drive and a fast system with a lot of RAM, you can more easily work with 16 Bits/Channel images. With the extra pixels, more of the original tonal levels will be preserved as you edit the photo in Photoshop.
4. If you want to resize the photo to a preset size (in megapixels, or MP), choose from the Size menu. If a crop marquee is present, the crop size will be listed as the default image size (the size without a − or +). If you choose a larger size than the original, the image will be resampled. To help prevent pixelization, avoid choosing the largest size.
• At the present time, experts disagree on whether Camera Raw or Photoshop does a better job of resampling. Until they reach a consensus, take your pick.
5. Enter a Resolution (e.g., for an image that is 2000 × 3000 pixels or larger and is to be printed on an inkjet printer or a commercial press, enter a resolution between 240 and 300). This value will affect only the print output size of the file.
6. Optional: From the Sharpen For menu, choose Screen, Glossy Paper, or Matte Paper to apply predefined output sharpening to your photo for the chosen medium. Also choose the desired amount of sharpening from the Amount menu.![]() Note: For greater control over output sharpening, use the sliders in the Detail tab instead (see pages 56–58).
Note: For greater control over output sharpening, use the sliders in the Detail tab instead (see pages 56–58).
7. Click OK. The new workflow information will be listed below the preview and will be applied to the current photo and to future photos that you open into Camera Raw.
• If you want future photos to open from Camera Raw into Photoshop as Smart Objects when you click Open Object, check Open in Photoshop as Smart Objects in the Workflow Options dialog (see page 80). We keep this option off.
A Use the Workflow Options dialog to choose color space, bit depth, size (width and height), and resolution settings for the current and future photos.
Cropping and straightening photos
Qualities to look for in a great photo are a winning composition, intriguing subject matter, sharp focus in the key details, and proper exposure and lighting to create the right mood. If you didn’t align your photo perfectly in the viewfinder, the steps on this page will enable you to improve the composition.
After opening a photo in Camera Raw, the first step (before applying any adjustments) is to decide whether it needs cropping and to straighten it if it’s askew. By stripping away nonessential areas, you can eliminate distracting features, create an intimate close-up, or draw the viewer’s attention to a key area. With the Crop tool in Camera Raw, you can control which part of a photo opens into Photoshop. (But fear not: Whether cropped or not, all the original raw pixels are preserved.)
To marquee a photo for cropping:
1. Choose the Crop tool (C).![]()
2. Do either of the following:
Drag a marquee in the preview window.
To create a marquee based on a fixed proportion, from the Crop tool menu or the context menu, choose a preset (or choose Custom and enter values), then drag in the preview window. (To deactivate the preset, choose Normal.)
3. Optional: To move the crop marquee, drag inside it; to resize it, drag a handle.
4. Press Enter/Return to preview the result. Only the area within the marquee will import into Photoshop. (To redisplay the crop marquee at any time, choose the Crop tool.)
To remove a crop marquee:
1. Choose the Crop tool (C).![]()
2. Press Esc, or choose Clear Crop from the Crop tool menu or from the context menu. You can undo the crop even after closing and reopening the dialog (you can’t do the same in Photoshop).
To straighten a crooked photo:
1. Choose the Straighten tool (A).![]()
2. Drag across the preview, along an edge in the image that you want to align to the horizontal or vertical axis.A A crop marquee will appear, aligned to the angle you drew.B Press Enter/Return. When you open the image in Photoshop, that edge will be aligned with the document window.C
A With the Straighten tool, drag along an edge to be aligned to the horizontal or vertical axis.

B A crop marquee appears, based on the angle we drew.

C The straightened image is opened into Photoshop.

Correcting the white balance
With cropping out of the way (pun intended), it’s time to study the photo, diagnose its weaknesses, and decide which Camera Raw options are best suited to fix them. Make any broad corrections that are called for before making local corrections. For example, with an exposure correction, you can compensate for under- or overexposure, enhance the details in both the shadow and highlight areas, and light up key features of the composition. A color cast, another broad (and common) problem, can be corrected via the temperature controls.
The Basic tab is the best place to begin making corrections (it’s in the first slot for good reason). For the first round of adjustments, we recommend using the sliders in the order in which they appear.
To apply white balance adjustments:
1. Click the Basic tab ![]() and double-click the Hand tool to change the zoom level to Fit in View.
and double-click the Hand tool to change the zoom level to Fit in View.
2. To see the effect of one of the preset temperature settings, from the White Balance menu, choose a preset that best describes the lighting conditions under which the photo was taken. The presets are available only for raw files.
3. If the preset you chose successfully corrected the white balance, you’re all set. If not, restore the original camera settings by choosing As Shot from the White Balance menu, and proceed to the next step.
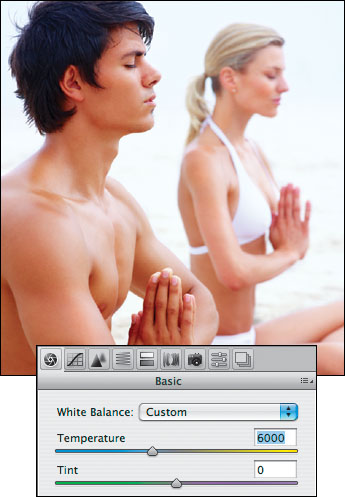
4. Use the Temperature slider A–B to add blue or yellow (make the photo look cooler or warmer). This is a subjective adjustment. For outdoor shots, consider the time of day: Sunsets naturally have a warm tone, whereas midday shots usually have a neutral, blue-gray tone. An interior shot could be warm, cool, or neutral, depending on the light source. Portraits need the most careful adjustment, to ensure that the skin tones look natural.
• Although the white balance can be adjusted based on a sampled area (by clicking the White Balance tool ![]() on a grayish-white area that contains some details), deciding which area to click can be tricky, so we use the Temperature and Tint sliders instead.
on a grayish-white area that contains some details), deciding which area to click can be tricky, so we use the Temperature and Tint sliders instead.
A This photo has the default Temperature setting. It has a yellowish cast (looks too warm).

B We chose a lower Temperature setting to make the photo cooler and neutralize the color cast.
Adjusting the White Balance
A This photo is underexposed, and the clouds have a slightly greenish cast; the As Shot settings are shown above. We’ll correct the white balance first and then the exposure. But rather than changing the Temperature, we’ll let a white balance preset do the initial work for us, followed by a simple tweak of the Tint slider.

B Since the photo was shot on a cloudy day, we chose the Cloudy preset from the White Balance menu. The higher Temperature and Tint values in this preset successfully removed the greenish cast.

C The Cloudy preset added a slight reddish cast to the clouds, though, which we were able to correct by lowering the Tint value.

Correcting the exposure
To demonstrate how to correct common exposure problems via the Basic tab, we’ll use two photos, one underexposed, the other overexposed.
To correct an underexposed photo:
1. Open an underexposed photo into Camera Raw, then click the Basic tab.![]() The sliders are set automatically to the default values for your camera model (the word “Default” is dimmed).
The sliders are set automatically to the default values for your camera model (the word “Default” is dimmed).
• To view which slider adjustments Camera Raw recommends, click Auto; then before proceeding, reset the sliders to their default settings by clicking Default.
2. Study the histogram to see how much the shadow pixels are being clipped (clustered at the left edge). Unless the subject matter itself is very dark or light, there should be a fairly uniform distribution of pixels from left to right in the histogram. The goal is to redistribute pixels to conform to the Adobe RGB (1998) color space, which you’re using for color management.
3. Turn the clipping warnings on to view a representation of any shadow or highlight clipping in the preview:
In the top left corner of the histogram, click the Shadow Clipping Warning button (U). Clipped shadows are represented by blue areas.A
In the top right corner, click the Highlight Clipping Warning button (O). Clipped highlights are represented by red areas.
4. To reduce the clipping of shadow pixels, do the following:
To lighten the photo and recover detail in the midtones, increase the Exposure value (A–B, next page). A value change of plus or minus 1 is equivalent to widening or reducing a camera aperture by one full f-stop.
To recover shadow details, use the Fill Light and Blacks sliders as a pair. Move the Fill Light slider a quarter of the way to the right, and lower the Blacks value so only a trace remains of the blue shadow clipping color.
5. If you need to lighten and restore detail in the midtones, increase the Brightness and Clarity settings. To decrease the contrast and lighten the shadows, reduce the Contrast value slightly (C, next page). Note: The default Brightness and Contrast settings for a raw photo are +50 and +25, respectively; for a JPEG photo, the default setting for these sliders is 0.
A Turn on the clipping warnings via the buttons above the histogram (a white frame around a button indicates that the warning is on). This is the histogram for the original photo that is shown in A on the next page. Most of the pixels are clustered to the left side of the graph, signifying that the photo is underexposed.

6. To boost the color saturation slightly, increase the Vibrance value by a moderate amount. This feature doesn’t cause oversaturation. We’ve found it usually improves our photos.
Correcting Underexposure
A To correct this underexposed photo, we’ll use the controls in the Basic tab.

B A new Exposure setting (shown above) lightened the entire photo, and a new Fill Light setting lightened the shadows and darker midtones. The blue clipping warning disappeared, which confirms that our adjustments corrected the shadow clipping.

C Next we increased the Brightness value to lighten the midtones, increased the Contrast, and increased the Clarity to sharpen the shapes (by darkening the edges). Finally, we increased the Vibrance value to boost the color saturation. (To lighten the photo even more, we’ll use the Tone Curve tab; see pages 52–53.)

To correct an overexposed photo:
1. Open an overexposed (bleached out) photo into Camera Raw,A then click the Basic tab.![]()
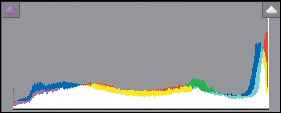
2. The histogram shows that the highlight pixels are clustered at the right edge (are being clipped).B
3. Click the Shadow Clipping Warning (U) and Highlight Clipping Warning (O) buttons.
4. To reduce the clipping of highlight pixels, do either of the following:
To darken the photo and recover details in the highlights, reduce the Exposure and increase the Recovery until you see none of the red highlight warning color.
Alt-drag/Option-drag the Exposure and/or Recovery slider and release the mouse when only tiny areas of white (representing all three color channels) display on the black background C (and A, next page).
You can also Alt-drag/Option-drag the Blacks slider to display a clipping preview against a white background, and release the mouse when only tiny areas of black display. Color areas, if any, represent clipping in those channels.
5. If you need to darken and restore details in the lighter midtones, reduce the Brightness value slightly (B, next page).
6. Finally, to adjust the color intensity and contrast in the photo, work with the Contrast, Clarity, and Vibrance controls as a trio (C, next page). If you want to strengthen the contrast, increase the Contrast setting; and to darken the edges of shapes and restore contrast to the midtones, increase the Clarity setting slightly. You can also adjust the Vibrance setting to boost the color saturation.
A This photograph is overexposed (note the lack of detail in the highlights).
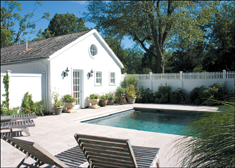
B In this Camera Raw histogram for the overexposed photo shown above, pixels are clustered at the right edge, which indicates that highlight areas are being clipped.
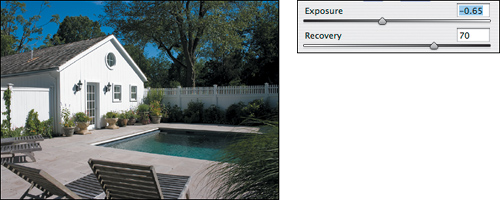
C In the Basic tab, we Alt/Option dragged the Recovery slider until only a few white highlight areas remained in the clipping preview.

A We lowered the Exposure setting and readjusted the Recovery setting to darken the entire photo and recover details in the highlights. These corrections made the midtones too dark, however, so we’ll need to remedy that next.
B Increasing the Fill Light setting lightened the shadows and darker midtones (note that the shadows in the trees and at the far side of the pool are now lighter). We also reduced the Brightness slightly to recover more detail in the highlights and lighter midtones.

C Finally, we reduced the Contrast to further lighten the midtones, increased the Clarity to sharpen the edges, and increased the Vibrance to restore some color saturation.

Using the Tone Curve tab
After using the Basic tab,A the next step is to tweak the adjustments in specific tonal ranges. In the Tone Curve tab (unlike in the Basic tab), you can adjust the exposure of such tonal ranges as the highlights or the lighter or darker midtones.
To adjust the curve, you could place points manually (as you would in the Curves dialog), but we prefer to use the Parametric sliders—one for each of the four tonal ranges. The sliders won’t misshape the curve (which creates posterization).
To make targeted adjustments using the Parametric sliders:
1. Click the Tone Curve tab,![]() then click the nested Parametric tab. Behind the curve is a static image of the current histogram.B
then click the nested Parametric tab. Behind the curve is a static image of the current histogram.B
2. Increase the value for the Highlights, Lights, Darks, or Shadows control to lighten that tonal range (and thereby raise the corresponding part of the curve above the diagonal line) C (and A–B, next page); or reduce the value to darken that tonal range (and thereby lower that part of the curve below the diagonal line).
3. Optional: Click and hold on the Targeted Adjustment tool,![]() then choose Parametric Curve from its menu. Drag up or down a short distance on a tonal range in the photo to move the slider that corresponds to that range.
then choose Parametric Curve from its menu. Drag up or down a short distance on a tonal range in the photo to move the slider that corresponds to that range.![]()
A This photo was adjusted by using the Basic tab (see pages 48–49).

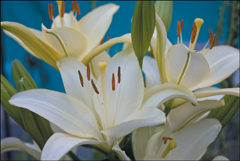
B By using the sliders in the Tone Curve tab (nested Parametric tab), you can fine-tune the exposure without throwing off the tonal balance that you achieved via the Basic tab. For our photo, we increased the Darks setting to lighten and restore detail in the lower midtones (the background behind the flowers).
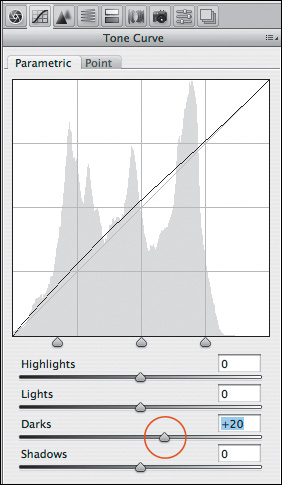
C The Darks adjustment in the Tone Curve tab produced this change.
4. Optional: To expand or contract the tonal range that a slider adjustment affects, move its corresponding region control, which is located below the graph. The left region control affects the Shadows slider, the middle control affects the Lights and Darks slider, and the right control affects the Highlights slider.C–D The more a control bends the curve away from the diagonal line, the more the adjacent tonal ranges are affected; the closer the curve gets to the diagonal, the less any of the adjacent ranges are affected.
A Increasing the Lights and Highlights raised the upper part of the curve.

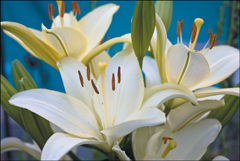
B Our Lights and Highlights adjustment lightened the flowers without diminishing the details in those areas. The contrast between the sunlit and darker areas was preserved as the tonal distribution was improved.
C Moving the middle region control to the right lowered the middle of the curve and narrowed the range and impact of the Lights slider.

D Moving the middle region control to the right darkened the midtones slightly and restored some detail.

Reviving color
If the contrast in your photo is pretty good but the colors are undersaturated and dull, make a few basic exposure corrections via the Basic tab and then try using the controls in the HSL/Grayscale tab to brighten it. By improving the color, you’ll also improve the contrast. (If you were to use only the Basic tab sliders to correct the color, the photo would probably end up looking washed out.)
To increase color saturation and luminance:
1. Into Camera Raw, open a photo that is under-saturated but has good contrast.A
2. To brighten the midtones by lightening them, do either of the following:
In the Tone Curve tab ![]() (nested Parametric tab), increase the Lights and/or Darks setting.B
(nested Parametric tab), increase the Lights and/or Darks setting.B
In the Basic tab, ![]() increase the Brightness setting.
increase the Brightness setting.
3. In the Basic tab, do any of the following:
If it’s hard to distinguish individual colors in the shadows or lower midtones, increase the Fill Light value.
To make the colors richer, set the Vibrance to around +20.
4. In the HSL/Grayscale tab ![]() (nested Saturation tab), use the sliders to boost the saturation of individual colors (A–B, next page), and in the Luminance tab, use the sliders to increase their brightness (C–D, next page).
(nested Saturation tab), use the sliders to boost the saturation of individual colors (A–B, next page), and in the Luminance tab, use the sliders to increase their brightness (C–D, next page).
• Click and hold on the Targeted Adjustment tool,![]() then choose Hue, Saturation, or Luminance from its menu (depending on what needs correction). Drag a short distance to the left or right on a color in the photo to adjust the sliders that it corresponds to.
then choose Hue, Saturation, or Luminance from its menu (depending on what needs correction). Drag a short distance to the left or right on a color in the photo to adjust the sliders that it corresponds to.![]()
A The colors in this photo look dull and undersaturated.

B In the Tone Curve tab, we set the Lights value to +28 to lighten and brighten the colors in just the upper midtones, taking care not to overlighten the sky.
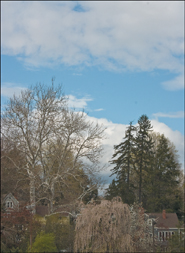
A In the HSL/Grayscale tab (nested Saturation tab), we increased the saturation of the greens and blues.

B The blue sky and the green foliage now look a bit brighter, but the colors still could use more oomph.

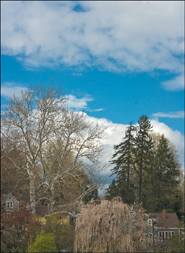
C In the nested Luminance tab, we increased the luminance (lightness) for the oranges and yellows but lowered it for the blues. (The effect of lowering the luminance for blues is like photographing a sky with a polarizing filter.)

D Now the darker blue sky is complemented by the richer colors in the lower half of the photo, and both provide a good contrast to the white clouds, white bark on the tree, and white trim on the houses.
Using the Detail tab
With the basic adjustments completed, you can now explore some of the more specialized features in Camera Raw, such as the Detail, Split Toning, and Lens Corrections tabs.
We’re enthusiastic about the sharpening controls in the Detail tab of Camera Raw because they’re very powerful yet easy to work with. And, of course, as with all Camera Raw adjustments, you can change the settings or undo the sharpening at any time without altering the original pixel data.
Note: The “capture” sharpening that you apply via Camera Raw shouldn’t be your only round of sharpening. After editing and resizing your document in Photoshop—and before printing it—you should apply another round of sharpening by using the Smart Sharpen or Unsharp Mask filter.
To sharpen a photo via the Detail tab:
1. Double-click the Zoom tool to set the zoom level for the preview to 100%, so you will be able to gauge the effects of the sharpening.
2. Click the Detail tab. ![]() Note: If the words “Preview Only” display there, open the Camera Raw Preferences dialog and choose Apply Sharpening To: All Images.
Note: If the words “Preview Only” display there, open the Camera Raw Preferences dialog and choose Apply Sharpening To: All Images.
3. With the Hand tool (press H or hold down the Spacebar), drag an area of detail to be monitored into view in the preview.
4. For subject matter that needs a lot of sharpening, such as hard objects or architecture, set the Amount value to 100;A–B if less sharpening is needed, try a value of around 50–60. For a portrait, keep the Amount at or below 70.
A We’ll apply sharpening to enhance the detailed surfaces and clearly defined shapes in this photo of a vintage windmill.

B After setting the zoom level to 100%, our next step was to Altdrag/Option-drag the Amount slider to 100 to set the strength for the sharpening.
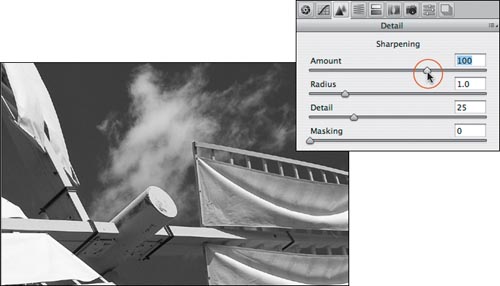
• To judge a sharpening setting in a monochromatic grayscale preview without the distraction of color, Alt-drag/Option-drag a slider.
5. The Radius setting controls how many pixels surrounding the edges are modified; keep this setting between 1 and 1.4.
6. Alt-drag/Option-drag the Detail slider until the grayscale preview displays the amount of edge detail that you want to revive in moderate to high-contrast areas.A At a low setting (25–50), only high-contrast areas will be affected; at a high setting (50 or higher), most areas will be affected.
A The next step was to Alt-drag/Option-drag the Detail slider to 78, to enhance edge details, such as on the canvas fabric and the crossbars.

B The last step was to Alt-drag/Option-drag the Masking slider to 42 to eliminate any sharpening from low-contrast areas, such as the sky.

7. To limit the sharpening to high-contrast edges, Alt-drag/Option-drag the Masking slider to the right until the black-and-white preview displays areas of black (low-contrast areas that won’t be sharpened) and white lines along the edges of shapes (areas of high contrast).B As you drag the slider to the right, the areas of black will increase in the display and the areas of white will be limited to high-contrast edges.A–B
• Try not to oversharpen your photo. Sharpen it only to the point where crisp edges start to become evident at 100% view. Remember, this is just the first round of sharpening; you’ll apply stronger sharpening, more selectively, in Photoshop.
• By using the Masking slider in Camera Raw and the visual feedback it provides, you can apply sharpening where needed without sharpening areas of low contrast or areas that contain artifacts or stray pixels (noise).
• To learn how to use the Luminance and Color sliders in the Detail tab to reduce color and luminance noise, see our Photoshop CS4, volume 1: Visual QuickStart Guide.
A This is the original photo before we applied sharpening.
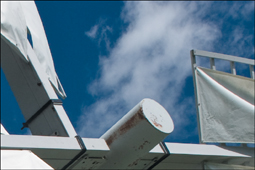
B And this is the same photo after using the sharpening controls in the Detail tab.

Using the Split Toning tab
The Split Toning tab lets you reduce an image to grayscale and then apply one or more color tints (“tones”) to make it look richer and more luminous, or to give it an aged quality. You can apply one tint to the highlight areas and a different one to the shadow areas. In our testing, this technique works well on photos of metallic objects or images that have subdued coloration.A
To convert a photo to grayscale and apply a color tint:
1. After correcting the exposure in the image, click the HSL/Grayscale tab, ![]() then check Convert to Grayscale.
then check Convert to Grayscale.
2. Click the Split Toning tab.![]()
3. Move both Saturation sliders about halfway across the bar to make it easier to judge the colors you’ll apply in the next step (this is just a temporary change).
4. Move the Highlights Hue slider to tint the highlights B and/or the Shadows Hue slider to tint the shadows.
5. Readjust the Saturation value for each hue. Avoid oversaturating the highlights, or the coloring effect will be too strong.
6. Optional: Reduce the Balance setting to apply more of the Shadows tint to the entire photo, or increase it to apply more of the Highlights tint to the entire photo.C–D
A To emphasize the elegant geometric shapes and linear details in this photo of an antique car, we’ll apply a tint to the dark areas.
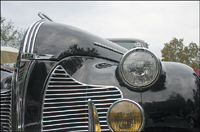
B Via the HSL/Grayscale tab, we tinted the highlights with blue.

C Next, we tinted the shadows with brown. Finally, an adjustment made to the Balance setting to favor the shadow color more lends the photo an antique feel.

D These are the final Split Toning settings that we chose.

Using the Lens Corrections tab
The Lens Corrections tab provides controls for correcting two peculiarities of photography. Depending on the lens and aperture being used, sometimes a camera lens can’t properly focus all the wavelengths of colored light to exactly the same spot. The result may be a color fringe around some of the shapes in the photo, most noticeably along the edges of high-contrast areas. To correct this problem in Camera Raw, you can resize the offending color channel by using one of the Chromatic Aberration sliders.
Another problem, over- or underexposure near the edges of a photograph, is usually created by a wide-angle or telephoto lens. This can be corrected by using the Lens Vignetting sliders. The same sliders can also be used to intentionally add a vignette, in order to focus the viewer’s attention toward the center of a photo.
To fix chromatic aberrations:
1. Click the Lens Corrections tab ![]() and zoom in to a high-contrast area in the photo.
and zoom in to a high-contrast area in the photo.
2. Under Chromatic Aberration, do any of the following:
Reduce the Fix Red/Cyan Fringe setting to remove a red fringe from high color-contrast edges,A–C or increase it to remove a cyan fringe. (The image may “jump” in the preview while the color channel is being scaled.)
Reduce the Fix Blue/Yellow Fringe setting to remove a blue fringe from high color-contrast edges, or increase it to remove a yellow fringe.
3. From the Defringe menu, choose All Edges.
A Note the red fringe around the rock on the left, which is noticeable against the light color of the water.
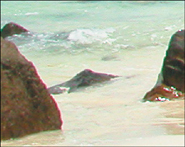
B We reduced the Fix Red/Cyan Fringe value in the Lens Corrections tab.

C The Chromatic Aberration adjustment reduced the red fringe.

To correct or apply lens vignetting:
1. Click the Lens Corrections tab.![]()
2. Under Lens Vignetting:
If your camera lens created a dark area (vignette) around the edges of the photo that you want to remove, increase the Amount. Or conversely, if you want to focus attention to the center of your photo by softly darkening the outer border, reduce the Amount.
Reduce the Midpoint setting to widen the vignette toward the center of the photo,A–B or increase it to shrink the vignette outward toward the edges.
A Adding a dark vignette around the edges of this photo will help focus attention to the center, which is the area we want to showcase.
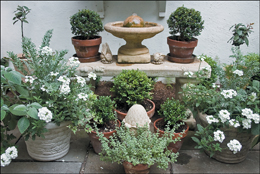
B In the Lens Corrections tab, we moved the Amount slider all the way to the left to create a dark edge. Then, to widen the darkening vignette (expand it inward), we set the Midpoint value to 8.

Applying Post-Crop Vignetting 
If you crop a photo that you previously applied lens vignetting to, parts of the vignette will be cropped out. Using the Post Crop Vignetting sliders in the Lens Corrections tab, ![]() you can readjust the vignette, as shown in A–B this page and A–C, next page.
you can readjust the vignette, as shown in A–B this page and A–C, next page.
A Using the Lens Vignetting sliders in the Lens Corrections tab, we applied a dark vignette to the outer edges of this photo.

B Then a crop that we applied to the photo eliminated the vignette along the top and right edges.

A Under Post Crop Vignetting, we lowered the Amount value to darken the edges, then lowered the Midpoint value to expand the vignette inward (see the values at right).

B The Roundness setting controls the shapes of the vignette; the Feather setting controls the softness of the transition. The values shown above produced an obvious round vignette, with a relatively sharp transition area.

C We lowered the Roundness value and increased the Feather value, to produce a soft-edged oval vignette.

Using the Adjustment Brush tool 
Unlike settings chosen in the Camera Raw tabs which apply to the overall photo, the Adjustment Brush tool lets you make local adjustments to specific areas. You can do this to apply corrections or to emphasize a particular detail in a composition. The sliders are similar to the ones in the Basic tab, except in this case, you apply a mask with the tool first to isolate areas for adjustment.
To use the Adjustment Brush tool:
1. After adjusting the photo via the Basic and Tone Curve tabs, click the Adjustment Brush tool ![]() (K). The sliders for the tool display.A
(K). The sliders for the tool display.A
2. To “zero out” all the other sliders except one, click the + or – button for any one of the sliders.
3. Adjust the brush diameter by pressing [ or ], and choose a Feather value well above 0 to allow the adjustment to fade at the edges of your strokes. Set the Flow to 50 (for the smoothness of the stroke) and set the Density to 60 (for the strength of the adjustment).
4. Check Show Mask and Show Pins, then draw strokes over areas of the photo that you want to apply corrections to. You can release the mouse, then paint over any other noncontiguous areas that you want to add to the mask. A pin will mark the location of the mask.
5. Uncheck Show Mask, then adjust the masked areas by using the sliders (A, next page) and/or apply a tint via the Color swatch.
6. Optional: To apply local adjustments to other areas, click New, then repeat steps 2–5 (see B–C, next page and also pages 66–67).
7. Optional: To edit an adjustment, click a pin, then add to the mask and/or change the settings.
• To change the mask color, click the swatch next to Show Mask.
A In this photo, we want to smooth the model’s skin, lighten her eyes, and sharpen her lips and eyelashes. We clicked the Adjustment Brush tool. On the right, we clicked the – button (next to Exposure) to zero out the sliders, checked Show Mask and Show Pins, then started dragging over the face to paint a mask.

A A pin appeared when we finished creating the mask. We unchecked Show Mask, then lowered the Contrast, Clarity, and Sharpness values (shown at right) to smooth the skin.

B Next, we clicked New, checked Show Mask, zeroed out the sliders, then painted a mask over the white areas of the eyes. We unchecked Show Mask, then chose the values shown above.

C Now the skin is smoother and the eyes are lighter. To hide the pins temporarily, we unchecked Show Pins (V), then rechecked it before proceeding with the next step.
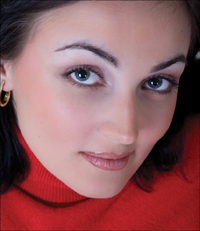
A To sharpen the lips, we clicked New and zeroed out the sliders. To help mask the specific color area of the lips, we checked Auto Mask, scaled the brush to an appropriate size, and applied brush strokes, each time starting with the pointer over the lip color. The mask covered only the areas that matched the initial color we clicked. We chose the values shown above.

B To sharpen the eyelashes, we clicked New, checked Show Mask, zeroed out the slider settings, then painted a mask over the eyelashes. We unchecked Show Mask, then chose the values shown above.

C Now the lips and eyelashes are sharper.

A To subdue the highlight above the eyebrow, we clicked New, checked Show Mask, zeroed out the slider settings, then painted a mask over the eyebrow. We unchecked Show Mask, then chose the values shown at left.

B To add a tint of “skin color” to the adjustment that we applied to the eyebrow area, we clicked the Color swatch on the panel, then chose a color from the Color Picker.

C The final results show the smoothing, sharpening, and tonal corrections that we applied to various areas with the Adjustment Brush tool.

Using the Graduated Filter tool
When shooting a landscape, sometimes setting the proper exposure for the foreground can result in an overexposed sky. To solve this problem on site, photographers reduce light on the upper part of the lens by using a graduated neutral-density filter. With the Graduated Filter tool in Camera Raw, you can simulate the effect of such a filter.
To adjust the exposure in part of a landscape with the Graduated Filter tool:
1. After adjusting the photo via the Basic and Tone Curve tabs, click the Graduated Filter tool ![]() (G). The sliders for the tool display.A
(G). The sliders for the tool display.A
2. To “zero out” all the other sliders except one, click the + or – button for one of the sliders.
3. Shift-drag the tool over an area in the photo to isolate it for editing, starting from where you want the strongest adjustment to be applied.B
4. Use the sliders to adjust the exposure of the filtered area (A–C, next page) and/or apply a tint by clicking the Color swatch.
• At any time, you can decrease or increase the length of the filter overlay by Shift-dragging the green or red dot. To reposition the overlay, drag the line that connects the two dots.
• To apply a separate filter to another area of the photo, click New, then repeat steps 2–4.
• To hide the filter overlay, uncheck Show Overlay or press V. To remove the filter overlay, click it, then press Backspace/Delete.
A The sky in this photo looks overexposed (washed out).

B We clicked the Graduated Filter tool, then clicked the – button (next to Exposure) to zero out the sliders. Next, we Shift-dragged the tool downward through the center of the sky.
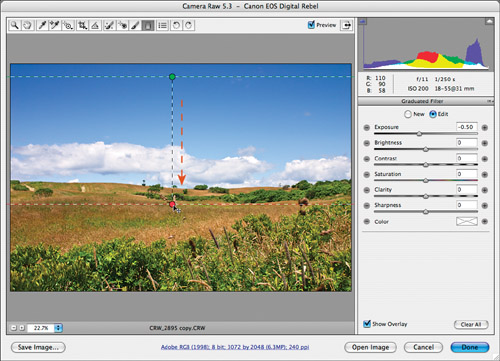
A The tool created an overlay, which defines the editable area. We chose the panel settings shown above to darken the exposure for the sky. The adjustment is applied fully at the green dashed edge of the overlay and gradually diminishes to no adjustment at the red dashed edge.

B To tint the upper part of the sky to enhance the color, we clicked the Color swatch on the panel, then clicked a deep blue in the Color Picker.

C In the final image, you can see that we were able to deepen the sky without changing the foreground.

Combining multiple exposures
You’ve probably had the experience of trying to shoot a subject against a bright sky or in front of a window. If you set the exposure properly for the figure or object in shadow, details will be lacking in the bright sunlit areas (and vice versa). To simulate what the human eye sees naturally, one solution is to shoot dual exposures and then combine them into one image. If you didn’t bracket your shots, you can simulate two exposure versions for a single raw photo with Camera Raw. If you did bracket your shots, follow the instructions in the sidebar on the next page. In either case, the last task is to blend the best of the two exposures by using a layer mask.
To simulate two exposures with one photo:
1. Open a raw photo A into Camera Raw.*
* JPEG photos are unlikely to contain enough pixel data for this technique to work successfully.
2. In the Basic tab, ![]() use the exposure sliders to create a proper exposure for the shadows and lower midtones,B then in the Tone Curve tab,
use the exposure sliders to create a proper exposure for the shadows and lower midtones,B then in the Tone Curve tab,![]() use the Parametric sliders to refine the adjustment in the four tonal regions.
use the Parametric sliders to refine the adjustment in the four tonal regions.
3. Hold down Shift (Open Image becomes Open Object) and click Open Object.** The photo will open in a new document window in Photoshop, on a Smart Object layer.
** If Open in Photoshop as Smart Objects is checked in the Workflow Options dialog, don’t hold down Shift.
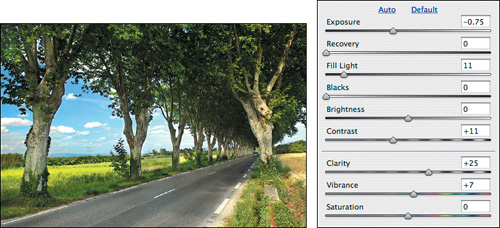
A The range of lighting in this scene was too wide to be captured in this single exposure: The alley of trees is slightly underexposed, whereas the sky and background are slightly overexposed. We’ll use Camera Raw to create a proper exposure for each area, then combine them to create the best of both worlds.

B We used the sliders in the Basic tab to recover shadow details (in the trees), then Shift-clicked Open Object to open the photo into Photoshop as a Smart Object layer.

4. Right-click/Control-click below the Smart Object layer name and choose New Smart Object via Copy from the context menu (don’t use Ctrl-J/Cmd-J, the Duplicate Layer command).A
5. Double-click the thumbnail on the Smart Object copy to reopen the photo in Camera Raw. Because you used the New Smart Object via Copy command, this Smart Object isn’t linked to the original one, and changes made in Camera Raw will affect only this copy. This time, use the Basic and Tone Curve tabs to create a proper exposure for the upper midtones and highlights,B then click OK. Upon your return to Photoshop, your edits will be applied to the copy of the Smart Object layer.
6. To blend the two layers, follow the steps on the next page.
A The New Smart Object via Copy command created an unlinked copy of the original Smart Object.

B We opened the copy of the Smart Object into Camera Raw, used sliders in the Basic tab to properly expose the upper midtones and highlights in the background and sky, then clicked OK to return to the Photoshop file.
To blend two exposures via a layer mask:
1. Continuing in Photoshop, select the upper of the two image layers. If more of the properly exposed areas are on the topmost layer, click the Add Layer Mask button ![]() at the bottom of the Layers panel to create a white mask;A or if the lower layer contains more of the properly exposed areas, Alt-click/Option-click the Add Layer Mask button to create a black mask.
at the bottom of the Layers panel to create a white mask;A or if the lower layer contains more of the properly exposed areas, Alt-click/Option-click the Add Layer Mask button to create a black mask.
2. Choose the Brush tool ![]() (B or Shift-B), a Soft Round tip, Normal mode, and an Opacity of 70–80%. If you created a white mask, paint with black, or if you created a black mask, paint with white. Press [ or ] to change the brush diameter. Draw strokes to reveal some of the corrected areas.B If you need to remask any areas, press X and paint with the reverse color.
(B or Shift-B), a Soft Round tip, Normal mode, and an Opacity of 70–80%. If you created a white mask, paint with black, or if you created a black mask, paint with white. Press [ or ] to change the brush diameter. Draw strokes to reveal some of the corrected areas.B If you need to remask any areas, press X and paint with the reverse color.
3. Make any other edits, then save your file.C
A In the layer mask thumbnail for the copy of the Smart Object layer, you can see the dark brush strokes that we applied to reveal areas from the underlying layer.

B We added a white mask to a copy of the Smart Object layer, then chose the Brush tool (70% Opacity) and black as the Foreground color, and painted to reveal some of the corrected midtone and shadow areas from the underlying layer.

C In the final image, the exposure information from the two Smart Object layers is combined (compare it with A on page 70). The sky looks richer now, and you can see more details in the trees. Note: As a last step, we applied a Hue/Saturation adjustment layer to tone down the acid green in the grassy field.

Retouching photos
Camera Raw has its own healing tool for zap-ping small imperfections: the Spot Removal tool (formerly called the Retouch tool). It’s useful for removing spots caused by dust or debris on a camera lens or to heal blemishes in a portrait, but we recommend using the healing tools in Photoshop for more complex retouching tasks.
To remove spots with the Spot Removal tool:
1. Open a photo that has spots that need retouching. Choose the Spot Removal tool ![]() (B) and zoom to 100%.
(B) and zoom to 100%.
2. Drag in the preview; a red and white target circle displays (don’t release the mouse button).A Drag inward or outward to scale the circle and cover the spot or blemish. When you release the mouse, a green and white source circle will appear, linked to the target circle.
3. Drag the source circle over an area to copy those pixels to the target circle.B
4. From the Type menu, choose Heal (our preferred setting) to blend source pixels into the texture and tonal values of the target pixels, or Clone to produce an exact copy of the source pixels.
5. Do any of the following optional steps:
Drag the edge of either circle to scale the pair, reposition a pair by dragging, or add more circle pairs to correct other blemishes. They’ll remain available even after you exit the dialog, because the original raw pixels haven’t been altered.
To hide the circles, uncheck Show Overlay or click a different tool.
To remove a pair of circles, click inside one circle, then press Backspace/Delete; or to remove all the pairs, click Clear All.
A With the Spot Removal tool, drag to create a target circle over a blemish...

B ...then drag to position the source circle. Pixel data will copy automatically from the source circle to the target circle.

Red-eye (red eyes) in portrait photos results from light emitted by a camera-mounted or built-in electronic flash reflecting off the retina. If your camera doesn’t have a built-in red-eye control (or you forgot to use it), a click of the Red Eye Removal tool in Camera Raw can fix it. It’s even easier to use than the Red Eye tool in Photoshop.
To remove red-eye from a portrait:
1. Zoom in on the eye area in a portrait.
2. Choose the Red Eye Removal tool ![]() (E).
(E).
3. Drag a marquee across the pupil of one of the eyes.A–B The tool will remove all traces of red.
4. Hide the overlay rectangle by unchecking Show Overlay or pressing V so you will be able to judge the slider adjustments. Adjust the Pupil Size for the recolored pupil. You don’t want the pupil to be enlarged.
5. Adjust the Darken value to control the darkness of the pupil. Try a value of 30–50%. Light-colored eyes need a lower setting than dark ones.
6. Repeat steps 3–5 for the other eye.
• To resize the overlay rectangle in order to expand its effect, drag one of its edges with the Red Eye Removal tool.
• To remove one overlay rectangle, click it with the Red Eye Removal tool, then press Backspace/Delete. To remove all rectangles, click Clear All.
A With the Red Eye Removal tool, we dragged a marquee over one eye.

B The tool removed the red area (shown here with the overlay hidden). We used the Darken slider to darken the pupil.

Using Camera Raw presets
By saving your carefully chosen Camera Raw settings as a preset, you’ll be able to reestablish those settings quickly when needed simply by choosing that preset. A saved preset can also be applied to a series of photos from the same shoot or that were taken under the same studio lighting conditions if they happen to need the same or similar corrections. Settings presets can be applied to a single photo or multiple selected photos in Camera Raw, or to multiple selected thumbnails in Bridge.
To save Camera Raw settings as a preset:
Method 1
1. Open a photo into Camera Raw that has been corrected with the settings that you want to save as a preset (or use Camera Raw to apply corrections to a photo now).
2. Choose Save Settings from the Settings menu.![]() The Save Settings dialog opens.A
The Save Settings dialog opens.A
3. Check which settings you want saved in the settings file (if you want to display check marks for just one category of settings, choose that category from the Subset menu). Click Save. In the next Save Settings dialog, enter a Name (preferably one that describes the type of settings being saved). Keep the .xmp extension, and keep the location as the Settings folder, then click Save.
Method 2
1. Follow step 1 in Method 1, above.
2. Click the Presets tab, ![]() then click the Add Preset button
then click the Add Preset button ![]() at the bottom. The New Preset dialog opens.
at the bottom. The New Preset dialog opens.
3. Enter a Name for the preset, then check which settings you want saved in the settings file (if you want to display check marks for just one category of settings, choose that category from the Subset menu). Click OK.
You can apply a user-defined preset (a saved collection of settings) to any photo in Camera Raw.
To apply a Camera Raw preset:
With a photo open in Camera Raw, do either of the following:
Click the Presets tab,![]() then click the desired preset.
then click the desired preset.
From the Apply Preset submenu on the Camera Raw Settings menu, choose the desired preset.
A In the Save Settings dialog, check which of your Camera Raw settings are to be saved in the preset.

Processing multiple photos via Camera Raw
In theory, you could open multiple files from the same photo shoot into Camera Raw, choose settings for one of the photos, then click Synchronize to apply those settings to all the photos. In actuality, it’s unlikely that all the adjustments needed for one photo will work like a charm on the rest—even if they were taken during the same shoot. However, for applying some initial settings, such as basic white balance, exposure, and tone curve adjustments, the Synchronize option may prove to be a useful timesaver.
To synchronize the Camera Raw settings of multiple files:
1. In Bridge, select two or more photo thumbnails that were shot under the same lighting conditions and that require the same corrections, then double-click one of them. Note: The photos should be in the same format (e.g., all raw or all JPEG photos).
2. The photos will display on the filmstrip panel on the left side of the Camera Raw dialog (A, next page).
3. Click one of the thumbnails, and make the necessary adjustments to it—including cropping, if you want all the photos to be cropped the same way.
4. Click Select All at the top of the filmstrip panel or Ctrl-click/Cmd-click multiple thumbnails, then click Synchronize (B, next page). The Synchronize dialog opens. It has the same options as the Save Settings dialog, which is shown on the previous page.
5. Check the settings to be applied; or choose a category of settings from the Synchronize menu, then remove or add any check marks.
6. Click OK. The current settings in the category you chose will be applied to all the thumbnails that you selected.
A If you open multiple raw photos into Camera Raw via Bridge, the image thumbnails will display in the filmstrip panel on the left side of the dialog. Click the thumbnail for one of the photos that you want to apply corrections to, then make the needed corrections.
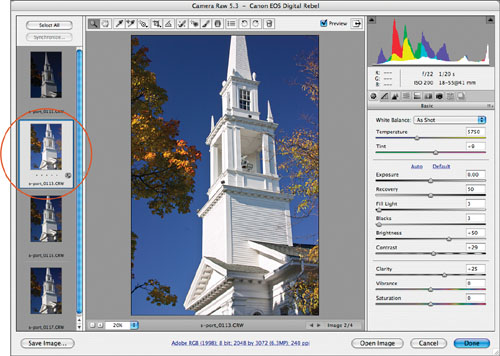
B Either Ctrl-click/Cmd-click the other thumbnails that you want to apply the same corrections to or click Select All, then click Synchronize.

The user-created settings presets that are listed in the Presets tab of the Camera Raw dialog are also accessible in Bridge and can be applied to multiple photos in one pass via batch processing. If you like, you can assign a series of preset settings to selected photos—with each one controlling a handful of adjustments—simply by choosing one preset after another.
To apply Camera Raw presets to multiple photos via Bridge:
1. In Bridge, do either of the following:
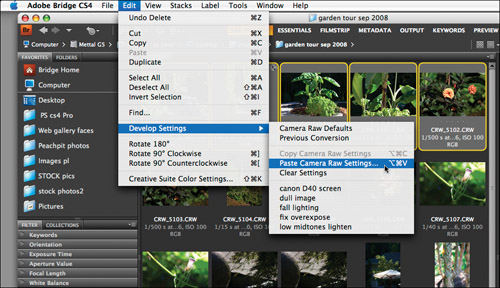
Shift-click or Ctrl-click/Cmd-click multiple photo thumbnails, then from the Edit > Develop Settings submenu, choose the desired preset or presets. Those settings will be applied to the selected photos.
Click the thumbnail for a photo that you know contains the desired settings, then choose Edit > Develop Settings > Copy Camera Raw Settings (Ctrl-Alt-C/Cmd-Option-C). Click one or more other thumbnails, then choose Edit > Develop Settings > Paste Settings (CtrlAlt-V/Cmd-Option-V).A The Paste Camera Raw Settings dialog opens. Check the settings to be pasted or choose a tab name from the Subset menu, remove or add any check marks, then click OK.
• To remove all Camera Raw settings from a selected photo thumbnail in Bridge, choose Edit > Develop Settings > Clear Settings or right-click/Control-click the thumbnail and choose that command from the Develop Settings submenu on the context menu.
A In Bridge, you can copy the Camera Raw settings from one photo and paste them to multiple selected thumbnails.
Saving files via Camera Raw
Via the Save Options dialog in Camera Raw, you can rename your photos and convert them to the DNG (digital negative), JPEG, TIFF, or PSD (Photoshop) format without having to open them in Photoshop. DNG is an up-and-coming format that Adobe has developed for long-term archiving of raw photos (see the sidebar on page 13). Camera Raw lets you save files in this format, but Photoshop does not.
To save a copy of a photo via Camera Raw:
1. Open a raw file (not a digital JPEG or TIFF photo) into Camera Raw; or if you opened multiple photos into the Camera Raw dialog, select the ones to be converted.
2. Click Save Image in the lower left corner of the dialog. The Save Options dialog opens.A
3. Choose a Destination (location), and choose File Naming options, which can include the file name, current date, and sequential numbering.
4. Choose a file Format, then check the desired options for that format. If you want to archive the files, choose Digital Negative (DNG).
• Via the Embed Original Raw File option, you can embed the entire original raw file into the DNG file. We recommend doing this only if you also plan to edit your raw photos in the conversion software that was included with your camera.
5. Click Save.
A One purpose of the Save Options dialog is for saving photos in a different format, such as Digital Negative (DNG).

Working with photos as Smart Objects
If you open or place a Camera Raw photo into Photoshop as a Smart Object, you’ll be able to readjust its Camera Raw settings at any time.
To open a Camera Raw photo into a new Photoshop file as a Smart Object:
With a photo open in Camera Raw, hold down Shift (Open Image becomes Open Object) and click Open Object.* A new document window opens in Photoshop, with the image on a Smart Object layer.
* If Open in Photoshop as Smart Objects is checked in the Workflow Options dialog, don’t hold down Shift.
To place a Camera Raw file into an existing Photoshop file as a Smart Object:
1. Open a Photoshop document.
2. In Bridge, click the thumbnail for a raw photo, or for a JPEG photo that was edited previously in Camera Raw.
3. Choose File > Place > In Photoshop. The Camera Raw dialog opens.
4. Make adjustments to the photo, then click OK. It will appear on its own layer in the Photo shop document, in a transform box.
5. Apply any scale or shape transformations, then either press Enter/Return or double-click in the transform box to accept the image. It is now a Smart Object layer.
To edit a Smart Object (Photoshop) layer in Camera Raw:
1. In Photoshop, double-click a Smart Object layer thumbnail to reopen an embedded copy of the photo into the Camera Raw dialog.
2. Make any desired adjustments, then click OK to apply your edits to the Smart Object layer. Like all Camera Raw edits, the original photo won’t be altered.
Note: When you scale a Smart Object layer, Photoshop uses the pixel data from the original photo, so the image quality isn’t diminished—provided you don’t enlarge it beyond the size at which it was originally captured.A–C To learn its original dimensions, click its thumbnail in Bridge, then look in the File Properties category of the Metadata panel.
The Best Way to Scale a Photo
A To scale a Smart Object layer in Photoshop, Shift-drag a corner handle on the transform box (Move tool).
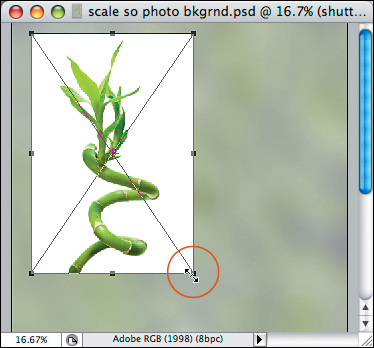
B This photo was opened in Photoshop as an ordinary layer. When we enlarged it, it lost definition.
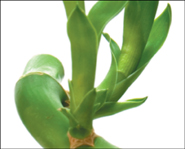
C This time, the photo was enlarged after being placed as a Smart Object layer: The details remained crisp and the image quality remained high.


