13. Vector Masks & Shapes

In this chapter, you’ll learn how to create vector masks, which serve the same purpose as layer masks except that they can be used on any kind of layer, have sharp and precise edges, and occupy less storage space than layer masks or channels. You’ll also learn how to use the shape tools to quickly create vector shapes.
Creating vector masks
Like layer masks, vector masks hide areas of a layer, except in this case the mask shape is delineated by a clean, sharp-edged path. We’ll show you how to create the path to be used for a vector mask by using a type tool and a shape tool. You can reposition the path that is being used for the mask, or discard the mask, at any time. Like a layer mask, each vector mask belongs to only one layer; it displays as a thumbnail on the Layers panel.
First, we’ll show you how to use a vector mask to make it appear as if type shapes are filled with imagery.
To create a vector mask from type:
1. Have an image layer available (you won’t be able to use the Background), and create a type layer.A
2. Right-click/Control-click the type layer listing and choose Convert to Shape.
A Type is created above an image layer.

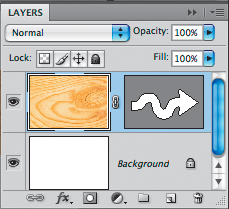
3. Drag the vector mask thumbnail to an image layer, then delete the shape layer.A–B
A We converted a type layer to a shape layer, then dragged its vector mask thumbnail downward to an image layer.
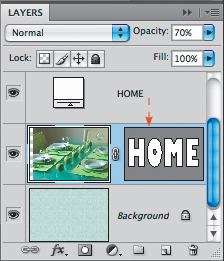
B The last step was to delete the shape layer. The image is visible only within the confines of the vector mask.

To create a vector mask from a custom shape:
1. On the Layers panel,![]() click an image layer that you want to add a vector mask to.
click an image layer that you want to add a vector mask to.
2. Do either of the following:
On the Layers panel, Ctrl-click/Cmd-click the Add Vector Mask button.![]() C
C
On the Masks panel,![]() click the Add Vector Mask button.
click the Add Vector Mask button.![]()
![]()
3. Choose the Custom Shape tool ![]() (U or Shift-U). On the Options bar, click the Paths button
(U or Shift-U). On the Options bar, click the Paths button ![]() and choose a shape on the Custom Shape preset picker.D–E
and choose a shape on the Custom Shape preset picker.D–E
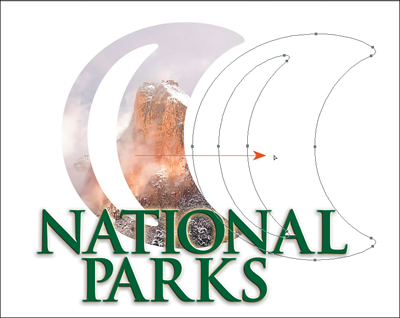
4. Shift-drag in the document.
C A vector mask is added to an image layer.
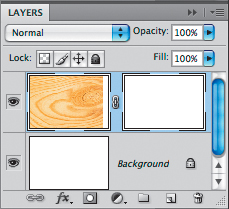
D The vector mask is hiding part of the wood image layer (this shape is Arrow 17 in the Arrows library).

E The shape appears in the mask thumbnail.
Working with vector masks
A vector mask can be moved independently of its layer pixels at any time.
To reposition a vector mask:
1. Choose the Path Selection tool ![]() (A or Shift-A).
(A or Shift-A).
2. If the mask consists of multiple paths (such as type shapes) and you want to reposition them all, marquee them.
3. Drag the vector mask in the document window.A A different part of the image is now visible within the vector mask.B
To deactivate a vector mask
Do either of the following:
On the Layers panel, Shift-click the vector mask thumbnail.
On the Layers panel, click the vector mask thumbnail, then on the Masks panel, click the Disable/Enable Mask button.![]()
![]()
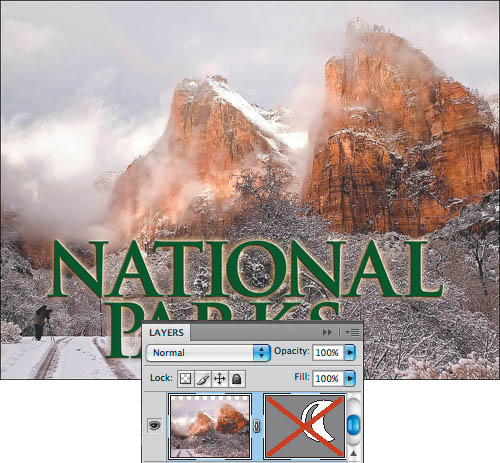
A red X will appear over the thumbnail, and the entire layer will now be visible.C
• To remove the X and restore the masking effect, repeat either method above.
To copy a vector mask to another layer
Alt-drag/Option-drag a vector mask thumbnail to another layer (not the Background). A duplicate vector mask appears.
B Now a different part of the image is visible within the mask shape.

C The vector mask is deactivated, as indicated by the red X.
To reverse the visible and hidden areas in a vector mask:
1. Choose the Path Selection tool ![]() (A or Shift-A).
(A or Shift-A).
2. On the Layers panel, click the thumbnail for a vector mask that you created by following the steps on page 303 or 304. The vector outline displays in the document.
3. Click the vector mask in the document window, or if the mask contains multiple shapes (such as shapes created from type), marquee them. Its anchor points and segments will become selected.A
4. Click the Subtract from Shape Area button ![]() on the Options bar, or press − (the minus key).B
on the Options bar, or press − (the minus key).B
To switch the revealed and hidden areas again, click the Add to Shape Area button ![]() on the Options bar, or press + (the plus key).
on the Options bar, or press + (the plus key).
A The segments and anchor points display when a vector mask is selected in the document.

You can delete any vector masks that you no longer need. You won’t recoup much file storage space by doing so, though.
To discard a vector mask
Do one of the following:
On the Layers panel, click the thumbnail for the vector mask to be removed, click the Delete Layer button,![]() then click OK in the alert dialog (or Alt-click/Option-click the button to bypass the prompt).
then click OK in the alert dialog (or Alt-click/Option-click the button to bypass the prompt).
On the Layers panel, right-click/Control-click the vector mask thumbnail and choose Delete Vector Mask.
On the Layers panel, click the vector mask thumbnail, then on the Masks panel, click the Delete Mask button.![]()
![]()
B We switched the hidden and visible (masked and unmasked) areas by pressing − (the minus key).

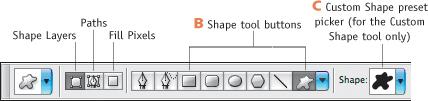
Using the shape tools
A shape layer is a precise geometric or custom-shaped clipping path that reveals a solid-color, gradient, or pattern fill within its contour. At any time, you can reposition, transform, or reshape a shape layer; modify its fill content or change it to a different type; and apply the usual Layers panel settings to it, such as layer effects and blending modes. Every shape layer automatically has a vector mask that controls which parts of the layer are visible and hidden. The easiest way to create a shape layer is by using a ready-made shape, as in these instructions.
To create a shape layer:
1. Click a layer on the Layers panel for the new shape layer to appear above.
2. Choose a Foreground color for the shape’s fill.
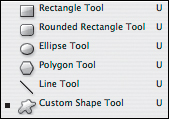
3. Choose one of the shape tools on the Tools panel (U or Shift-U).A Once a shape tool is selected, you can switch to a different one by clicking one of the six shape tool buttons on the Options bar.B
4. On the Options bar, do the following:
Click the Shape Layers button.![]()
For the Rounded Rectangle tool,![]() choose a Radius value; for the Polygon tool,
choose a Radius value; for the Polygon tool,![]() choose the desired number of Sides; for the Line tool,
choose the desired number of Sides; for the Line tool,![]() choose a Weight; or for the Custom Shape tool,
choose a Weight; or for the Custom Shape tool,![]() choose a shape from the Custom Shape preset picker.C
choose a shape from the Custom Shape preset picker.C
5. Drag in the document window to create the shape.A While dragging, you can hold down Shift to preserve the proportions of the original shape; or hold down Alt/Option to draw it from its center; or hold down Alt-Shift/Option-Shift to do both.
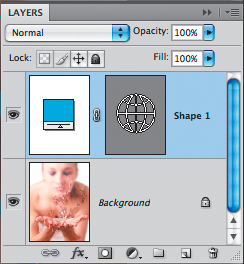
A new “Shape 1” layer will be listed on the Layers panel.B It will have an adjustment layer thumbnail that controls its fill content and a vector mask thumbnail that controls its contour and location. You can choose the usual Layers panel settings (blending mode, opacity, fill) for it.
• To append other libraries to the Custom Shape preset picker, choose a library name from the bottom of the Custom Shape preset picker menu, then click Append.
• When the Custom Shape tool![]() is selected, you can right-click/Control-click the image to open an “on-the-fly” shape preset picker.
is selected, you can right-click/Control-click the image to open an “on-the-fly” shape preset picker.
• To choose default options for a shape tool, click the Geometry Options arrowhead ![]() on the Options bar. For example, we like to keep the Defined Proportions option on for our Custom Shape tool so we don’t have to bother using the Shift key.
on the Options bar. For example, we like to keep the Defined Proportions option on for our Custom Shape tool so we don’t have to bother using the Shift key.
A We chose the Custom Shape tool, clicked the World preset on the Custom Shape preset picker (from the Symbols library), chose a Foreground color, then dragged in the document window to create this shape.

B The shape layer appeared on the Layers panel, complete with its own vector mask.
Recoloring shape layers
To recolor a shape layer
Do either of the following:
To apply a new solid-color fill, double-click a shape layer thumbnail on the Layers panel;A or choose any shape tool (U or Shift-U), click the mask thumbnail, then click the Color swatch on the Options bar. Choose a color from the Color Picker, then click OK.
To apply a stroke color or a gradient or pattern fill, double-click the layer to open the Layer Style dialog, then apply the Stroke effect or an Overlay effect.
To apply a style to a shape layer, click the layer, then click a style on the Style preset picker (on the Options bar) or on the Styles panel.![]() B
B
Drawing and Reshaping Custom Shapes
If you’re adept at drawing with the Pen tool in Adobe Illustrator, you have the skills to draw custom shapes in Photoshop. Choose the Pen tool,![]() click the Shape Layers button
click the Shape Layers button ![]() on the Options bar, then draw a shape. To reshape its contour, click the mask for the shape layer, then with the Direct Selection tool,
on the Options bar, then draw a shape. To reshape its contour, click the mask for the shape layer, then with the Direct Selection tool,![]() manipulate the points and segments.
manipulate the points and segments.
Saving Shapes
After editing the contour of a preset shape, pasting in a shape from Adobe Illustrator, or drawing a custom shape, you can save the results to the Custom Shape preset picker for future use. On the Layers panel, click the mask thumbnail for a shape layer, choose Edit > Define Custom Shape, enter a name in the Shape Name dialog, then click OK. The new shape appears at the bottom of the Custom Shape preset picker and is available for use in any document.
A We double-clicked the shape layer thumbnail, then chose a darker blue via the Color Picker.

B With the shape layer chosen, we clicked the Blue Glass (Button) style on the Style preset picker (it’s in the default style library).

Using shapes to create pixel areas
Finally, using the Fill Pixels function for any shape tool, you can create an area of pixels on an image layer in any predefined shape—without having to use a selection marquee or draw a path.
To create an area of pixels with a shape tool:
1. On the Layers panel, create a new blank layer, and keep it selected.
2. Choose a Foreground color.
3. Choose one of the shape tools (U or Shift-U).
4. On the Options bar, do the following:
Click the Fill Pixels button.![]()
If you’re using the Custom Shape tool,![]() choose a shape from the Custom Shape preset picker. For any other shape tool, choose tool options.
choose a shape from the Custom Shape preset picker. For any other shape tool, choose tool options.
5. Drag in the document to create the shape (or hold down Shift as you drag to keep its proportions). A filled area of pixels will be created.A
You can use brushes, editing tools, filters—whatever—to modify the pixels, or change the Layers panel settings (e.g., blending mode or Opacity). It’s just a regular ol’ layer. (Note: Click the Lock Transparent Pixels button ![]() on the Layers panel to restrict your edits to just the new shape.)
on the Layers panel to restrict your edits to just the new shape.)
• To add a shape to a layer mask, first Alt-click/Option-click the Add Layer Mask button (on the Layers panel) to create a black mask. Choose a shape tool, click the Fill Pixels button on the Options bar, then with white as the Foreground color, drag or Shift-drag in the document.B
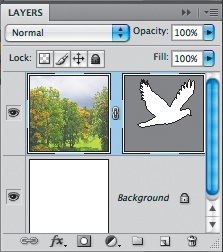
A The bird, created by using the Custom Shape tool with the Fill Pixels button clicked on the Options bar, is a standard image layer. (The Bird 2 preset shape is in the Animals library.)


B We created a Hide All layer mask. We chose white as the Foreground color and the Custom Shape tool, clicked the Fill Pixels button, then Shift-dragged in the document window.