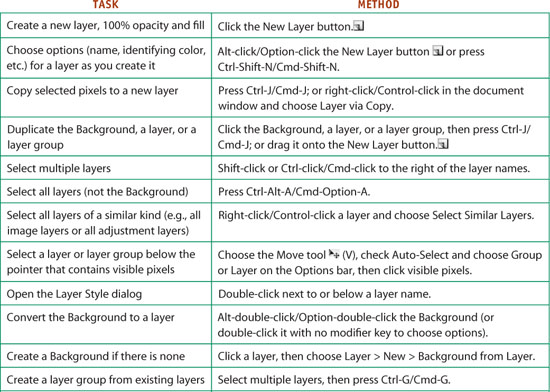
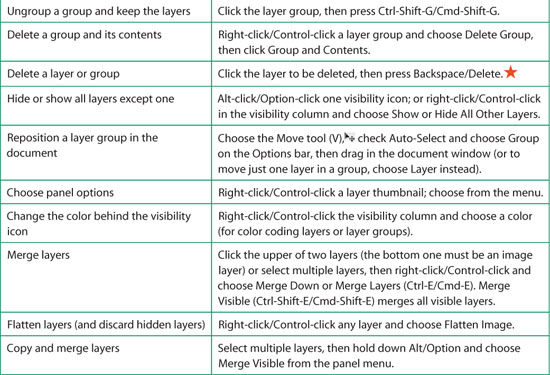
4. Using Photoshop

This chapter summarizes fundamental Photoshop features that you will use throughout the book. Topics include using the main application features; configuring the panel docks; choosing the correct image size and bit depth; cropping and rotating images; applying content-aware scaling; choosing and saving colors; using the Layers and History panels; creating and using adjustment and fill layers; and creating and managing presets.
Using the main application features
To display the Application frame (Mac OS): 
Choose Window > Application Frame. (The Application frame always displays in Windows.)
To dock document windows as tabs:
To dock a floating document window manually, drag its title bar to the tab area (or to the bottom of the Application or Options bar) of the Application frame or just below the title bar of another floating document window, and release when the blue drop zone bar appears. (If this doesn’t seem to work, make sure Enable Floating Document Window Docking is checked in Edit/Photoshop > Preference > Interface.)
If one or more documents are already docked as tabs and you want to dock all floating document windows into the Application frame or into the currently active document window, right-click/Control-click a tab and choose Consolidate All to Here from the context menu.A
To set a preference so all future documents that you open will dock as tabs automatically, go to Edit/Photoshop > Preferences > Interface and check Open Documents as Tabs.
• To cycle among currently open documents, press Ctrl-Tab/Control-Tab.
A Three documents are docked in this Application frame.
To use the Application bar:
Use the controls on the Application bar to manage your document windows.A In Windows, the main Photoshop menus also display on the Application bar. In the Mac OS, the Application bar is docked in the Application frame. When the Application frame is hidden, the Application bar is docked below the main menu bar; if you don’t see the bar, choose Window > Application Bar.
Using the Arrange Documents menu, you can quickly display multiple tabbed or floating documents in various layouts, such as two documents side by side or stacked vertically, or four or six documents in a grid.
To arrange multiple document windows:
Click the Arrange Documents menu icon ![]() on the Application bar to open the menu, release the mouse, then click one of the icons (the availability of the icons depends on how many documents are open).
on the Application bar to open the menu, release the mouse, then click one of the icons (the availability of the icons depends on how many documents are open).
You can just as effortlessly go back to displaying one document at a time.
To redisplay one document at a time:
On the Arrange Documents menu ![]() on the Application bar, click the Consolidate All icon
on the Application bar, click the Consolidate All icon ![]() (the first icon on the menu).
(the first icon on the menu).
The screen modes control which Photoshop interface features are displayed.
To change the screen mode:
From the Screen Mode menu ![]() on the Application bar, choose Standard Screen Mode, Full Screen Mode with Menu Bar, or Full Screen Mode; or press F to cycle through the modes. Note: In Edit/Photoshop > Preferences > Interface, you can customize the background and border colors for each screen mode.
on the Application bar, choose Standard Screen Mode, Full Screen Mode with Menu Bar, or Full Screen Mode; or press F to cycle through the modes. Note: In Edit/Photoshop > Preferences > Interface, you can customize the background and border colors for each screen mode.
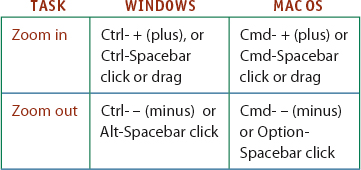
Shortcuts for Zooming
Choosing Zoom Preferences
The following options are available in Edit/Photoshop > Preferences > General:
• Check Animated Zoom for smooth, continuous zooming when using the Zoom tool or zoom shortcuts (OpenGL is required*).![]()
* Check Enable OpenGL Drawing in Preferences > Performance.
• With Zoom Resizes Windows checked, a floating document window will resize if you change the zoom level via the Ctrl/Cmd- + (plus) or Ctrl/Cmd- – (minus) shortcut or the Zoom tool.
• If your mouse has a scroll wheel and you check Zoom with Scroll Wheel, you can change the zoom level by scrolling the wheel.
• Check Zoom Clicked Point to Center to center the zoom view at the location you click.![]()
• Check Enable Flick Panning to move a magnified image across the screen by dragging with the Hand tool a short distance and then releasing the mouse (OpenGL is required*).![]()

Using the panels
When you need to fully maximize your screen space, you can hide all the currently open panels, then make them reappear only when needed. If you hide the panels when your document is in Standard screen mode, the document window will resize dynamically to the maximum screen width; when you redisplay the panels, the document window resizes again.
To hide (or show) the panels
Do any of the following:
Press Tab to hide (or show) all open panels, including the Tools panel.
Press Shift-Tab to hide (or show) all open panels except the Tools panel.
To make hidden panel docks reappear
With the panels hidden as per the instructions in the preceding steps, move the pointer to the dark gray bar at the right edge of the Application frame. The panel docks (but not freestanding panels) will redisplay temporarily. Move the pointer away from the panels, and they’ll disappear again. (If this doesn’t seem to be working, go to Edit/Photoshop > Preferences > Interface, and check Auto-Show Hidden Panels.) ![]()
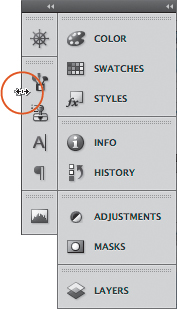
• If you want to conserve screen space, collapse the panels you use least frequently to icons A (see also the following page).
Choosing Values Quickly
• In many panels (e.g., Adjustments, Masks, Layers, Character, and Paragraph), in some dialogs, and on the Options bar, you can change numerical values quickly by using a scrubby slider: Drag slightly to the left or right over the option name or icon.
![]()
• To access a pop-up slider (e.g., to choose an Opacity percentage) click the arrowhead. To close a slider, click anywhere outside it or press Enter/Return. If you click an arrowhead to open a slider, you can press Esc to close it and restore its last setting.
• To change a value incrementally, click in a field in a panel or dialog, then press the up or down arrow key.
A Each panel in Photoshop has a unique icon, which displays when the panel is collapsed.
• Memorize the icons for the panels you use often, so you’ll be able to identify them quickly as you work.

Most edits made in Photoshop require the use of one or more panels. Photoshop has a clever system for storing and accessing panels so they’re easily expandable and collapsible and don’t intrude on the document window when they’re not being used.
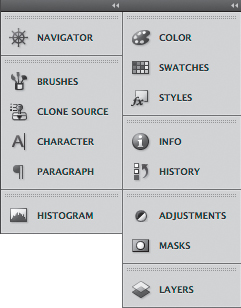
In the predefined workspaces (which are accessed from the Workspace menu on the Application bar), the panels are arranged in docks on the right side of your screen—except for the Tools panel, which is on the left side. Each dock can hold one or more panels or panel groups;A we’ll show you how to reconfigure them.
To configure the panel groups and docks
Show or hide an individual panel: Show a panel by choosing its name from the Window menu. The panel will display either in its default group and dock or in its last location. To bring a panel to the front of its group, click its tab (panel name). A few panels can also be shown or hidden via keyboard shortcuts, which are listed on the Window menu.
Show or hide an individual panel (icon): Click the icon or panel name. If Auto-Collapse Iconic Panels is checked in Edit/Photoshop > Preferences > Interface and you open a panel from an icon, it collapses back to the icon when you click elsewhere. With this preference unchecked, the panel stays expanded. To collapse a panel back to an icon, click the Collapse to Icons button ![]() on the panel bar or click the panel icon.
on the panel bar or click the panel icon.
Maximize or minimize a panel (non-icon) or group (to toggle the full panel to just a panel tab, or vice versa): Double-click the panel tab; or click the title bar (the gray bar next to the panel tabs).
Use a panel menu: Click the ![]() icon to open a menu for whichever panel is in front in its group.
icon to open a menu for whichever panel is in front in its group.
Close a panel or group:![]() To close (but not collapse) a panel, right-click/Control-click the panel tab and choose Close from the same context menu. To close a whole panel group, choose Close Tab Group from the context menu. To close a group that’s an icon, expand it first.
To close (but not collapse) a panel, right-click/Control-click the panel tab and choose Close from the same context menu. To close a whole panel group, choose Close Tab Group from the context menu. To close a group that’s an icon, expand it first.
Collapse a whole dock to icons or to icons with names: Click the Collapse to Icons button ![]() or the dark gray bar at the top of the dock.B To further collapse the dock to just icons (no names), drag the vertical edge of the dock inward horizontally; C to expand the dock, click the dark gray bar again.
or the dark gray bar at the top of the dock.B To further collapse the dock to just icons (no names), drag the vertical edge of the dock inward horizontally; C to expand the dock, click the dark gray bar again.
A Two docks are shown at right. Panels in the left dock are collapsed to icons with names; panels in the right dock are expanded, and are organized into four groups. The Adjustments/Masks group is minimized vertically.
B When we clicked the Collapse to Icons button to collapse the whole right dock to icons, the panel groups were preserved.
C We dragged the edge of the left dock inward to shrink it to just icons (no names).
Widen or narrow a dock and panels: Position the pointer over the vertical edge of the dock (![]() cursor), then drag sideways.
cursor), then drag sideways.
Lengthen or shorten a panel or group (in the Mac OS, when the Application frame is hidden): Position the pointer over the bottom edge of the panel or group, and when you see this pointer, ![]() drag upward or downward. Panels docked in the same group will scale accordingly.
drag upward or downward. Panels docked in the same group will scale accordingly.
Move a panel to a different slot, same group: Drag the panel tab (name) to the left or right.
Move a panel to a different group: Drag the panel tab over the title bar of the desired group, and release when the blue drop zone border appears.A
Move a panel group upward or downward in a dock: Drag the title bar, and release the mouse when the horizontal blue drop zone bar appears in the desired location.B
Create a new dock: Drag a panel tab or title bar sideways over the vertical edge of the dock,C and release the mouse when you see the blue vertical drop zone bar.
Make a panel or group free-floating: Drag the panel tab, icon, or title bar out of the dock. You can stack free-floating panels and groups together from top to bottom.
Reconfigure a dock (icons): Use methods similar to those for an expanded group. Drag the group “title” bar (double dotted line) ![]() to the edge of a dock to create a new dock; or drag the title bar between groups to restack it (look for a horizontal drop zone line); or drag the title bar into another group to add it to that group (look for a blue drop zone border).
to the edge of a dock to create a new dock; or drag the title bar between groups to restack it (look for a horizontal drop zone line); or drag the title bar into another group to add it to that group (look for a blue drop zone border).
• To redock floating panels into the Application frame, drag the dark gray bar at the top of the panel group to the right edge of the Application frame, and release when the pointer is at the edge and you see a vertical blue drop zone line.![]()
• To create a custom workspace that remembers panel locations and which panels are displayed, choose Save Workspace from the Workspace menu on the Options bar.
• To reset the panels to their default locations and visibility states, choose Essentials from the Workspace menu on the Application bar.![]()
A A blue drop zone border appears as we drag a panel into a different group.
B A blue horizontal drop zone bar appears as we move a panel group upward within the same dock.

C A blue vertical drop zone bar appears as we drag a panel out of a dock to create a new dock for it.
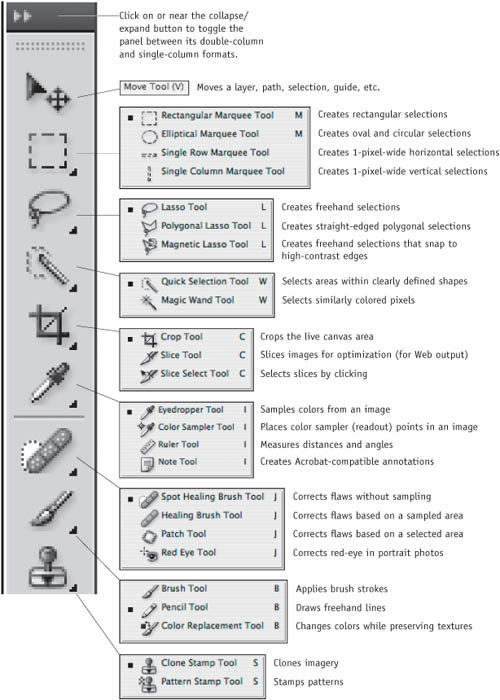
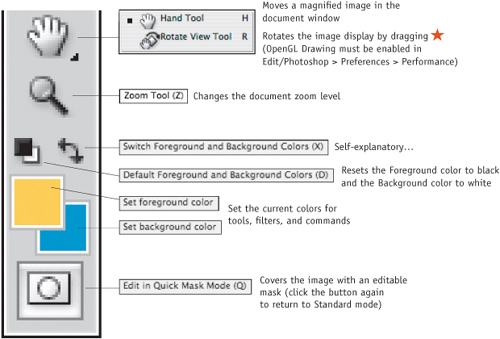
Tools on the Tools panel
Using the Toggle Panel Button
For any tool that uses a brush, you can click the Toggle Panel button ![]() on the Options bar to show or hide the Brushes panel. For the Type tools, this button displays the Character panel.
on the Options bar to show or hide the Brushes panel. For the Type tools, this button displays the Character panel.
A The upper part of the Tools panel
A The midsection of the Tools panel

A The lower part of the Tools panel
Spring-Load Your Tools
If you want to quickly access a tool and its Options bar settings temporarily without having to actually click the tool on the Tools panel, hold down the default letter that’s assigned to it.
For example, say you happen to have the Brush tool selected but you want to move imagery on a layer, which requires using the Move tool. You would hold down the V key, drag in the document window, then release V. Or to access the Hand tool temporarily, you would hold down the H key. This process is a little less efficient if you want to access a tool that shares a slot with other tools (which most tools do). In this case, the letter shortcut accesses whichever tool happens to be visible on the Tools panel, so you would have to plan ahead and select the two tools that you want to switch back and forth between before using them.
Changing the image size
There are three ways to choose a file resolution:
• When opening a raw digital photo, set the output resolution in the Workflow Options dialog (see page 44).
• For a JPEG photo or other image that you need to change the resolution for, use the Image Size dialog after opening the file in Photoshop.
• When scanning, set the input resolution to control how many pixels the device is to capture.
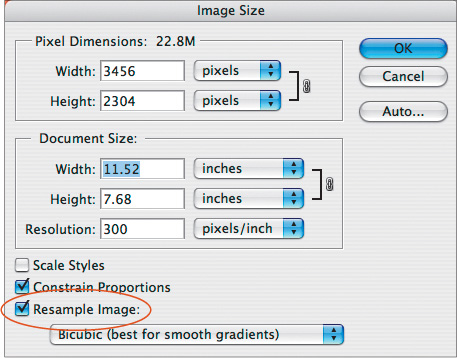
Changing the image size without resampling
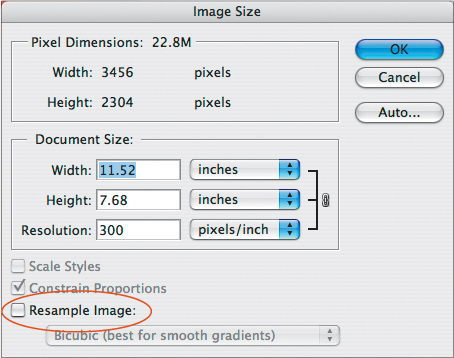
Via Image > Image Size (Ctrl-Alt-I/Cmd-Option-I), you can change the resolution of your file and/or its width and height. If you do so with the Resample Image option unchecked A (to prevent resampling), the image quality will remain at its current level. This method is recommended for digital photos and scanned images.
By default, JPEG photos from a digital camera have a low resolution (72–180 ppi) and very large width and height dimensions, with a sufficient number of pixels for high-quality output (prints as large as 8″ × 10″)—provided you increase the resolution to the proper value. When you increase the resolution to suit your output device, the pixel dimensions remain constant and the print dimensions are reduced.
Unlike photos from a digital camera, scanned images usually have small document size dimensions, yet contain a high resolution and sufficient pixel dimensions to produce large, high-quality prints. For a scanned image, change the Width or Height (under Document Size) with Resample Image unchecked; the Resolution and Pixel Dimensions values will remain constant.
Changing the image size with resampling
If your file contains too few pixels to meet the resolution requirement of your target output device, you’ll have to increase the resolution with Resample Image checked.B Pixels will be added to the file (its pixel dimensions will increase) and its storage size will increase. Increase the resolution only to a level that is sufficient for achieving the desired output quality.
When you downsample a file (decrease its resolution with Resample Image checked), pixels are discarded permanently. For a Web graphic, downsampling isn’t an issue, as users will view it on a computer display, which is a low-resolution device. For print output, on the other hand, try to avoid resampling, because it reduces the image sharpness (although you can use a sharpening filter to remedy blurring from a minor degree of resampling).
A With Resample Image unchecked in the Image Size dialog, the Document Size values can be changed, but not the Pixel Dimensions.
B With Resample Image checked, all the values are editable. For example, changing a Document Size value would cause the Pixel Dimensions values to change.
Choosing a bits per channel mode
To get good-quality output from any device, you must capture or input a wide range of tonal values. One of the challenges in photography is capturing detail in the shadow areas of a scene. The wider the dynamic color range of the camera, the more subtleties of color and tone it is capable of capturing. Most advanced amateur and professional digital SLR cameras capture from 12 to 16 bits of accurate data per channel, and the resulting photos contain abundant pixels in all levels of the tonal spectrum.
Consumer-level scanners capture 10 bits of accurate data per channel, whereas high-end professional scanners can capture up to 16 bits of accurate data per channel. Like photos from the better digital cameras, scans from a high-resolution device contain an abundance of pixels in all the tonal ranges.
Three bit depths are available on the Image > Mode submenu in Photoshop: 8, 16, and 32 Bits/Channel mode. At the present time, 16 Bits/Channel mode offers the most advantages. 32 Bits/Channel mode may be the mode of choice for high-end photographic work in the future, but at the moment Photoshop doesn’t support it sufficiently to make it a practical choice.
Another requirement for getting good-quality output is the ability to preserve the full tonal range of your images as you edit them in Photoshop. Because they contain more pixels, 16-bit images are better able to withstand the wear and tear of editing and resampling. Levels and Curves adjustments, for example, remove pixel data and alter the distribution of pixels across the tonal spectrum. After editing, the reduction in image quality will be visible on high-end print output of an 8-bit image, but not of a 16-bit image, because the latter contains more pixels in all parts of the tonal spectrum.
To summarize, the following are some basic facts about 16-bit files that you should know:
• Photoshop can open 16-bit CMYK and RGB files.
• 16-bit files can be saved in the following widely used formats: Photoshop (.psd), Large Document (.psb), PDF (.pdf), PNG (.png), TIFF (.tif), and JPEG2000 (.jpf).
• 16-bit images can be successfully edited and adjusted in Photoshop, with merely a few restrictions. Most of the filters on the Blur, Noise, Render, Sharpen, and Other submenus on the Filter menu are available, as is the Distort > Lens Correction filter, whereas filters on the other submenus are not.
• When you print your file, you will need to convert your 16-bit images to 8-bit (Image > Mode > 8 Bits/Channel).
If system or storage limitations prevent you from working in 16 Bits/Channel mode, consider taking this two-stage approach: Perform your initial tonal corrections (such as Levels and Curves adjustments) on the original 16 Bits/Channel version, then convert it to 8 Bits/Channel for further editing.
Cropping and rotating images
You can crop your photos in Camera Raw (see page 45) or by using the Crop tool in Photoshop.
To crop an image using a marquee:
1. Choose the Crop tool (C).![]()
2. Drag a marquee over the part of the image you want to keep.A
3. On the Options bar, do the following:
If you’re cropping a layer (not the Background), you can click Cropped Area: Delete to delete the cropped-out areas, or click Hide to save those areas with the file (they’ll extend beyond the visible canvas area but can be moved back into view with the Move tool).
Check Shield to cover the area outside the crop marquee with a dark shield to help you see which part will remain after cropping. You can change the shield color by clicking the Color swatch, or change its Opacity value.
For the Perspective option, see Photoshop Help. We prefer to use the Lens Correction filter to correct perspective problems (see our Photoshop CS4, volume 1: Visual QuickStart Guide).
4. Perform any of these optional steps:
To resize the marquee, drag any handle (double-arrow pointer). Shift-drag a corner handle to preserve the proportions of the marquee; Alt-drag/Option-drag a handle to resize the marquee from its center; hold down Shift and Alt/Option to do both.
To reposition the marquee, drag inside it.
To rotate the marquee, position the cursor just outside it (curved arrow pointer), then drag in a circ ular direction. To change the axis point around which the marquee rotates, drag the center point away from the center of the marquee before rotating. The image orientation will change after the next step. (For another way to straighten a crooked photo, see page 93.)
5. Do one of the following:
Press Enter/Return.B
Double-click inside the marquee.
Right-click/Control-click the image and choose Crop from the context menu.
• To cancel a crop marquee, press Esc.
• To create presets for the Crop tool, see page 111.
Cropping to a Specific Size
To crop an image to a specific size (say, a standard photo size of 4′ × 6′), before using the Crop tool, enter the desired Width and Height values on the Options bar. (You can click the Swap Width and Height button ![]() to swap the two current values.) For Web output, lower the image Resolution value to 72 ppi; for print output, enter the current image Resolution value to prevent it from changing when the image is cropped. Finally, drag a crop marquee on the image.
to swap the two current values.) For Web output, lower the image Resolution value to 72 ppi; for print output, enter the current image Resolution value to prevent it from changing when the image is cropped. Finally, drag a crop marquee on the image.
A With the Crop tool, drag a marquee across part of an image, and resize or reposition the marquee if needed.
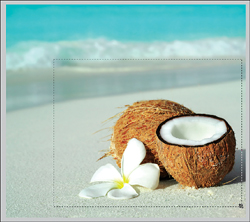

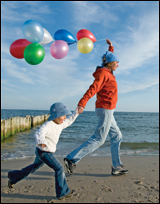
By using a temporary shape layer, you can crop an existing image based on the rule of thirds.
To crop an image using the rule of thirds: ![]()
1. Open an image, and choose a Foreground color for the temporary grid shape.
2. Choose the Custom Shape tool.![]() On the Options bar, click the Shape Layers button
On the Options bar, click the Shape Layers button ![]() and choose the Grid preset
and choose the Grid preset ![]() from the Custom Shape preset picker. (If you don’t see that preset, choose Reset Shapes from the picker menu, then click Append or OK.)
from the Custom Shape preset picker. (If you don’t see that preset, choose Reset Shapes from the picker menu, then click Append or OK.)
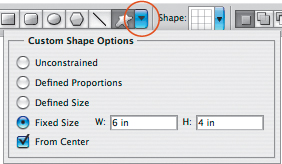
3. Click the Geometry Options arrowhead on the Options bar. Click Fixed Size, enter values, and check From Center.A
4. Click in the center of the image to make the shape appear. Press V, then reposition the shape so one of the points where the interior lines intersect is over a key feature of the composition.
5. With the Crop tool (C), ![]() drag a marquee around the outer edges of the grid shape,B then to accept the crop, either press Enter/Return or double-click inside the marquee.
drag a marquee around the outer edges of the grid shape,B then to accept the crop, either press Enter/Return or double-click inside the marquee.
6. Delete the selected shape layer by pressing Backspace/Delete).C
Playing by the Rule of Thirds
The rule of thirds is a guideline for composition that visual artists use: You imagine that a scene is segmented horizontally and vertically into thirds, and try to position the key features of the scene where the imaginary lines intersect. Aligning a subject at these points creates more visual tension and interest in a composition than simply centering the subject would.
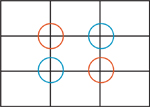
If the center of interest is positioned at one of the imaginary intersections, you can create balance in the picture by positioning a secondary object at the opposing intersection (see the pairs of red circles and blue circles above).
Remember that the rule of thirds is not hard and fast—you can produce a good composition without adhering to it. The important thing is to be conscious of where you position objects in your images and why, and to consider their visual impact.
A Choose Custom Shape options via the Options bar.
B With the Grid preset chosen, we clicked the image with the Custom Shape tool, then dragged the Crop tool across the grid.
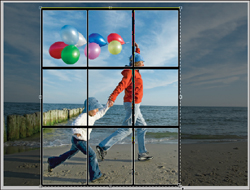
C The focal points of the improved composition land roughly at the intersections of the former grid.
The Image Rotation commands rotate all the layers in an image. (To rotate just one layer at a time, use a rotate command on the Edit > Transform submenu instead.)
To rotate an image by an exact amount
Do either of the following:
Choose Image > Image Rotation > 180°, 90° CW (clockwise), or 90° CCW (counterclockwise).
Choose Image > Image Rotation > Arbitrary. The Rotate Canvas dialog opens. Enter an Angle value, click °CW (clockwise) or °CCW (counterclockwise), then click OK.
You didn’t have a tripod handy for that unforget-table moment? Did a sloppy job of scanning? You can straighten out your photo with the Ruler tool.
To straighten a crooked image
1. Choose the Ruler tool ![]() (I or Shift-I).
(I or Shift-I).
2. Drag along a feature of the image that you want to orient horizontally or vertically,A noting the angle (A) value on the Options bar as you do so.
3. Choose Image > Image Rotation > Arbitrary. The angle you dragged will appear in the Angle field in the dialog automatically. Click OK.B
4. With the Crop tool (C), ![]() remove any background color areas that resulted from the rotation.C
remove any background color areas that resulted from the rotation.C
A We dragged the Ruler tool from left to right along the horizon.
B The Image > Image Rotation > Arbitrary command rotated the image along the angle we drew with the Ruler tool.
C We used the Crop tool to remove the resulting white areas. Now the image looks level.

Quick Summary: Choosing Colors
The current Fore ground color is applied when you create type and when you use some tools and commands, such the Brush or Pencil tool. The current Background color is applied by other edits, such as when you apply a transform command to, or move a selection on, the Background, or rotate the image. The two colors are displayed in the Foreground and Back ground color squares on the Tools panel A and Color panel.
There are many ways to choose a Fore ground or Background color:
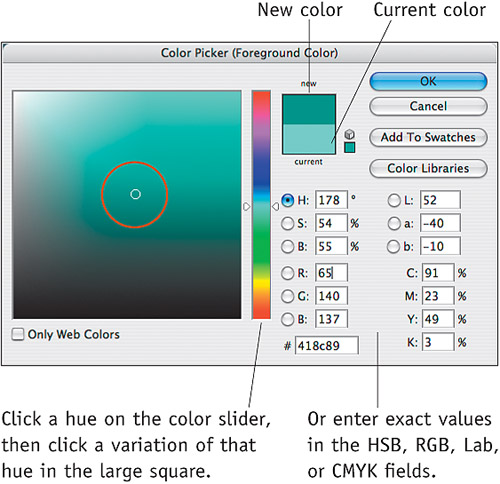
• Enter values or click a color in the Color Picker.B
• Sample a color in the image with the Eyedropper tool.![]()
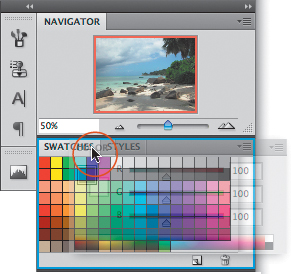
• Click a preset or user-saved swatch on the Swatches panel.![]()
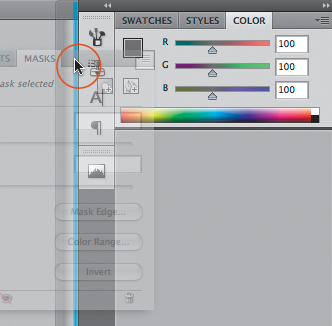
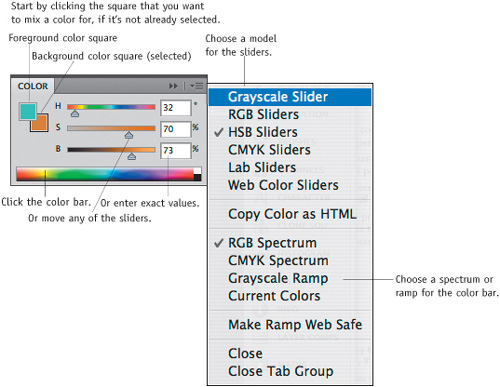
• Enter values or move sliders on the Color panel.C ![]()
• Choose a premixed color from a matching system via the Color Libraries dialog (click Color Libraries in the Color Picker to make the dialog appear).
A These are the color controls on the Tools panel.
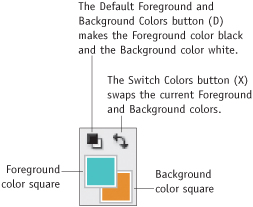
B To open the Color Picker, click the Foreground or Background color square on the Tools panel.
C Use the Color panel to mix colors.

A Alt-click/Option-click a swatch to delete it from the panel.

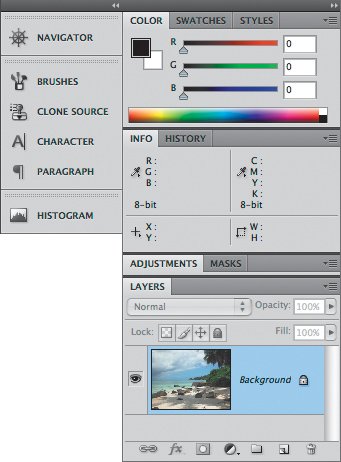
Using the Layers panel
Every new image contains either a Back ground or a transparent layer, on top of which you can add layers of many kinds, such as:
• Image layers, which can contain all opaque pixels or a combination of opaque, transparent, and semitransparent pixels.
• Adjustment layers and fill layers, which apply editable tonal or color adjustments to underlying layers.
• Editable type layers, which are created with the Horizontal Type or Vertical Type tool.
• Smart Object layers, which are created when you bring an Illustrator vector file, another Photoshop file, or a raw file into a Photoshop document via File > Place, or when you convert a standard layer. Double-click a Smart Object layer and the object reopens in its original application for editing; save and close it and the object updates in Photoshop. Apply a filter to a Smart Object layer and it becomes an editable and removable Smart Filter.
• Shape layers, which contain vector shapes.
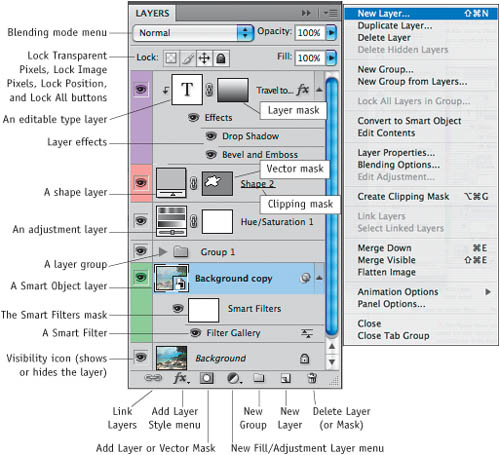
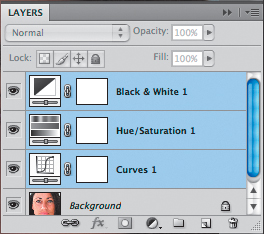
You will use the Layers panel A in most or all of your Photoshop sessions. It lets you create, select, show and hide, duplicate, group, restack, link, merge, flatten, and delete layers; change the layer blending mode, opacity, and fill opacity; apply editable effects; attach layer and vector masks; move layer content; and copy layers between files.
A This figure shows almost every conceivable Layers panel feature. As you work, your panel list may become as long as this one, but it won’t look as complex because you’ll probably use fewer types of layers and masks at a given time.
Creating adjustment layers
Unlike the commands applied via the Image > Adjustments submenu, which cause permanent changes to the current layer, adjustment layers are temporary and flexible. You can change their settings; restack, hide, show, or delete them at any time; and even drag-copy them between files—and they don’t increase the file size. The adjustment becomes permanent only when you merge the layer downward into the underlying one or flatten the document. Note: The last six commands on the Image > Adjustments submenu can be applied only via their respective dialogs, not via an adjustment layer.
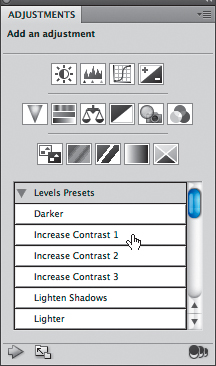
The Adjustments panel makes it super easy to create and edit adjustment layers. In addition to providing quick access to most adjustment controls, the panel also provides added features, such as adjustment presets and preview and resetting options. When creating an adjustment layer, you can choose a settings preset (if available) or custom settings. By using the presets, you can quickly apply basic adjustments, such as increasing the image contrast using three progressively stronger settings via Levels, or increasing the saturation using progressively stronger settings via Hue/Saturation. You can also customize the settings from any preset.
To create an adjustment layer: ![]()
1. Click the image layer above which you want the adjustment layer to appear.
2. Optional: To restrict the effect of the adjustment to a specific area, create a selection.
3. Display the Adjustments panel.![]() The Add an Adjustment buttons and scroll list display.A
The Add an Adjustment buttons and scroll list display.A
• To redisplay the Add an Adjustment list when controls for an adjustment layer are displaying, click the Return to Adjustment List button ![]() at the bottom of the panel.
at the bottom of the panel.
4. Do either of the following:
Click the button for the desired adjustment type. They are arranged as follows: tonal adjustments in the top row, color adjustments in the middle row, and miscellaneous adjustments in the bottom row.
Click an arrowhead on the scroll list to expand a category of presets, then click a preset (not all of the adjustment types have Adobe presets).
A On the Add an Adjustment list of the Adjustments panel, click a button to display controls for that adjustment type; or click a preset, if available on the scroll list, to display its predefined settings.
5. Controls for the adjustment layer will display on the panel. A new adjustment layer will appear on the Layers panel, containing a thumbnail icon for that particular adjustment type and an editable mask (A, next page). If you clicked a preset, the controls are set for you already.
6. Choose the desired settings (if you chose a preset, you can customize the settings or leave them as is).
• To enlarge the Adjustments panel, click the Switch Panel to Expand View button ![]() at the bottom of the panel; click the button again to restore it to Standard view.
at the bottom of the panel; click the button again to restore it to Standard view.
A Each kind of adjustment layer has a unique icon, which displays in the layer thumbnail (and in its button on the Adjustments panel).
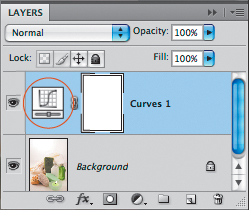
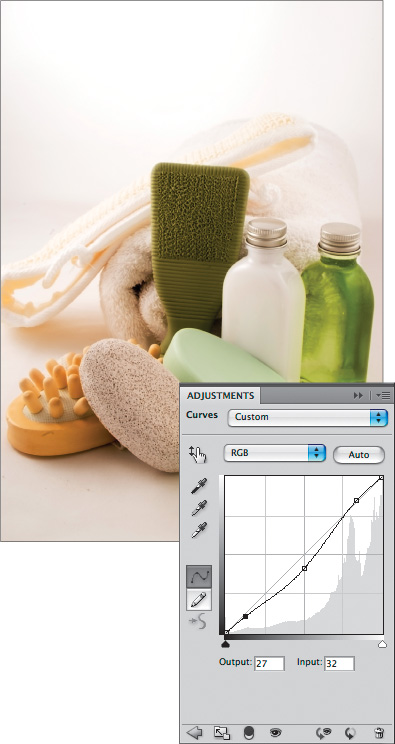
B First, we used a Curves adjustment to darken the midtones in this photo. Later, we double-clicked the Curves layer thumb-nail to display our initial settings...
Editing adjustment layers
To change the settings for an adjustment layer: ![]()
1. On the Layers panel, double-click an adjustment layer thumbnail to display its settings on the Adjustments panel (or click an adjustment layer and show the Adjustments panel).B
2. Do either or both of the following:
Edit the settings.C
For the Levels, Curves, Exposure, Hue/Saturation, Black & White, or Channel Mixer adjustment type, choose a preset from the menu at the top of the panel.
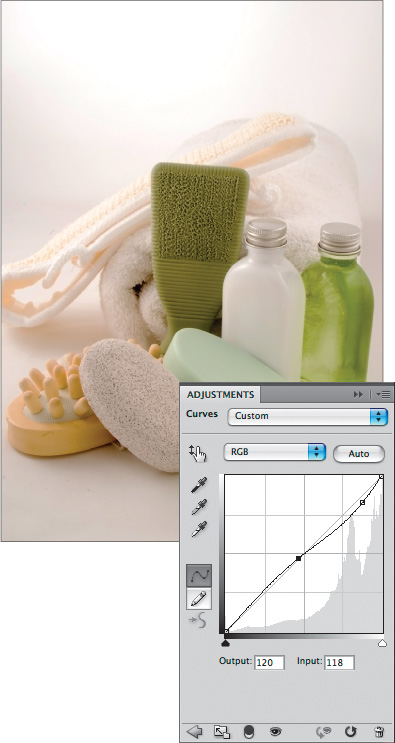
C ...and tweaked the adjustment by reshaping the curve for midtones and highlights.
By holding down the View Previous State button, you can temporarily display the image without any new settings you have chosen for the currently selected adjustment layer.
To view the image without the current adjustments: ![]()
1. On the Layers panel, double-click an adjustment layer thumbnail to display its settings on the Adjustments panel, then edit the settings.A
2. To toggle the latest edits off and on, press and hold the View Previous State ![]() button or the key, then release.B
button or the key, then release.B
To hide the effect of an adjustment layer:
Click the visibility icon ![]() on the Adjustments panel or Layers panel; click it again to redisplay.
on the Adjustments panel or Layers panel; click it again to redisplay.
The Reset button either undoes the most recent changes made to an adjustment layer (if any) since the document was opened or restores the default settings. The button icon changes depending on whether you have changed the adjustment layer settings.
To reset an adjustment layer: ![]()
1. On the Layers panel, double-click an adjustment layer thumbnail to select the layer and show the Adjustments panel.
2. Edit the settings.
3. Click the Reset to Previous State button ![]() to cancel the current changes (restore the last settings).
to cancel the current changes (restore the last settings).
4. Click the Reset to Adjustment Defaults button ![]() to restore the default settings.
to restore the default settings.
• To undo the last individual slider, check box, or other adjustment edit, press Ctrl-Z/Cmd-Z.
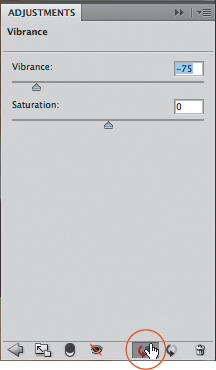
A We used a Vibrance adjustment layer to reduce the color intensity in this photo.
B We pressed the View Previous State button to temporarily remove the current Vibrance adjustment.
Limiting the effect of an adjustment layer
Normally, an adjustment layer affects all the layers below it, but you can clip (restrict) its effect to just the layer directly below it.
To restrict the effect of an adjustment layer to just the layer directly below it: ![]()
1. On the Layers panel, click an adjustment layer.
2. On the Adjustments panel, click the Clip to Layer button. ![]() (Click the button again to “unclip” the adjustment effect.)A–C
(Click the button again to “unclip” the adjustment effect.)A–C
• Another way to limit the effect of an adjustment layer is by lowering the adjustment layer opacity.
By default, all new adjustment layers have a layer mask. To limit which area of the image an adjustment layer affects, edit its mask by creating and filling a selection or by applying brush strokes.
To edit an adjustment layer mask manually
1. Click an adjustment layer.
2. Press D to choose the default colors (black as the Foreground color).
3. Do either or both of the following:
Create a selection with any selection tool (e.g., the Rectangular Marquee or Lasso), choose Edit > Fill (Shift-Backspace/Shift-Delete), choose Use: Black, then click OK. Deselect.
Choose the Brush tool ![]() (B or Shift-B). On the Options bar, choose a brush tip, Mode: Normal, and Opacity 100%, then paint on the image.
(B or Shift-B). On the Options bar, choose a brush tip, Mode: Normal, and Opacity 100%, then paint on the image.
4. Optional: To remove black areas from the mask, apply strokes with white chosen as the Foreground color.
Note: To see illustrations of this technique, see pages 124–127 and 182–183. To edit the mask further via the Masks panel, see pages 152 and 154.
• To remove all the black areas from the mask, deselect, click the adjustment layer, then apply Edit > Fill (choose Use: White).
A In the original image, the wind turbine has a yellowish cast.

B A Hue/Saturation adjustment layer is correcting the cast of the wind turbine, but is also affecting all the underlying layers in the image.

C We clipped the effect of the adjustment layer to just the wind turbine layer directly below it.

Saving adjustment presets
Regardless of how you arrive at custom settings (whether by choosing a preset first or not), you can save your settings as a preset for future use.
To save custom adjustment settings as a preset: ![]()
1. Create and choose settings for an adjustment layer.
2. From the Adjustments panel menu, choose Save [adjustment type] Preset. In the Save dialog, enter a name, keep the default location, then click Save. Your user preset is now available for any document via the Add an Adjustment list on the Adjustments panel, and also via the preset menu at the top of the panel when the controls for that adjustment type are displaying.
• To delete a user preset, choose that preset, then choose Delete Current Preset from the panel menu.
Merging and deleting adjustment layers
When an adjustment layer is merged downward, the adjustments are applied permanently to the underlying image layer. If you change your mind, either choose Edit > Undo right away or click the prior state on the History panel.
To merge an adjustment layer downward
Do either of the following:
Click the adjustment layer to be merged downward, then press Ctrl-E/Cmd-E.
Right-click/Control-click near the adjustment layer name and choose Merge Down.
To delete an adjustment layer:
Do either of the following:
Click an adjustment layer on the Layers panel, then press Backspace/Delete.
Click an adjustment layer on the Layers panel (not the mask thumbnail), then click the Delete Layer button on the same panel, ![]() or on the Adjustments panel, click the Delete Adjustment Layer button.
or on the Adjustments panel, click the Delete Adjustment Layer button. ![]() Click Yes if an alert appears. Optional: Click Don’t Show Again to prevent the alert from reappearing.
Click Yes if an alert appears. Optional: Click Don’t Show Again to prevent the alert from reappearing.
Working with layer groups
During the course of correcting an image, you may use multiple adjustment layers to address different tonal and color problems. If you nest all the adjustment layers in a group, the Layers panel will be better organized, plus you’ll have the option to add a layer mask that applies to all the layers in the group.
To create a layer group
On the Layers panel for an image that contains two or more consecutive adjustment layers, click the topmost adjustment layer, Shift-click the bottommost one,A then press Ctrl-G/Cmd-G (or from the Layers panel menu, choose New Group from Layers, then click OK).B The layers are now nested in a group. Click the triangle to expand or collapse the group listing.
• To quickly hide or show all the adjustment layers in a group, click its visibility icon.
As we showed you on page 101, you can limit which areas of the image an individual fill or adjustment layer affects by editing its mask. Now that you have created a layer group of adjustment layers, you can create (and edit) a layer mask specifically for that group.
To create a layer mask for a layer group:
1. Do either of the following:
Create a selection on an image layer.
To load a selection that you’ve already saved, Ctrl-click/Cmd-click the alpha channel on the Channels panel.
2. On the Layers panel, click the adjustment group, then click the Add Layer Mask button. ![]() A mask thumbnail will appear on the group layer.
A mask thumbnail will appear on the group layer.
3. Optional: Edit the layer mask, such as by applying a gradient or by applying strokes with the Brush tool.C
• Although each adjustment layer in a group has its own layer mask, the mask effect may be limited by any dark areas that are added to the group mask.
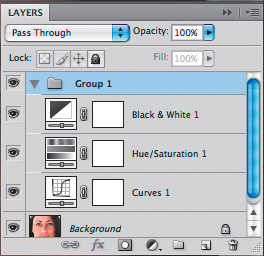
A We selected three adjustment layers on the Layers panel...
B ...then pressed Ctrl-G/Cmd-G to put the selected layers in a group.
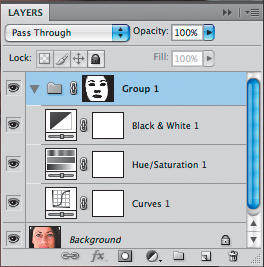
C A mask that we added to the group is controlling the visibility of all the adjustments in the group.
Applying content-aware scaling
The Content-Aware Scale feature is smart enough to resize parts of a photo that it deems to be neutral, or of lesser importance, without distorting key areas, such as figures, buildings, or prominent objects. It comes in handy if you want to change the proportions of a photo to fit a specific layout or to improve the overall composition.
To apply content-aware scaling: ![]()
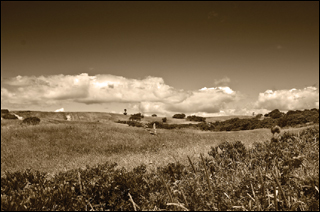
1. Open a photo.A Press Ctrl-J/Cmd-J to duplicate the Background. Leave the duplicate layer selected and hide the Background.
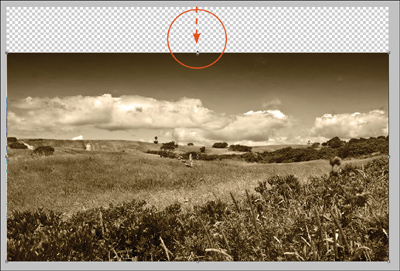
2. Choose Edit > Content-Aware Scale (Ctrl-Alt-Shift-C/Cmd-Option-Shift-C).
3. Drag a center handle on the bounding border. Nonessential areas are scaled first.B If you keep dragging, eventually more essential areas are also scaled; if this occurs, drag back in the opposite direction.
4. To accept the scaling, double-click the image or press Enter/Return (A–C, next page). Or to cancel it, press Esc.
• To protect an area from scaling, select it, choose Select > Save Selection, click OK, then deselect. Choose Edit > Content-Aware Scale, then choose Alpha 1 from the Protect menu on the Options bar.
A In the original photo, the horizon is located smack at the vertical center, which is boring. To reposition the horizon, we will shorten the sky and enlarge the foreground.
B To shrink the sky area, we dragged the top center handle on the Content-Aware Scale border downward. Note that the smart command scaled the sky but not the clouds or the details near the horizon! We will double-click the image to accept the scaling change.
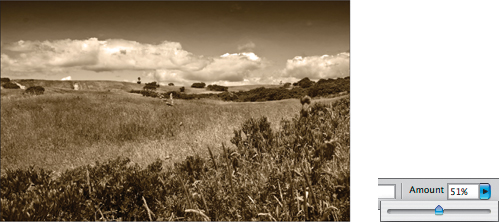
A We moved the imagery upward on its layer. To limit our next round of content-aware scaling to the foreground shapes at the bottom of the image, we created a selection with the Rectangular Marquee tool.
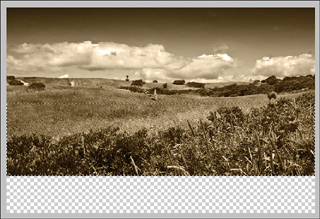
B When we chose Content-Aware Scale, the bounding border surrounded only the selected area. We dragged the bottom center handle downward. This time, the scaling primarily affected the grasses in the midground, and produced the result at left. (Had we not created a selection first, the neutral sky area would also have been scaled.)
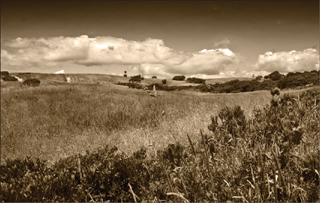
C As an additional option, before accepting the Content-Aware Scale edit, we lowered the Amount value (Options bar) to 51%. This changed the result to a blend of content-aware scaling and normal Free Transform scaling. Specifically, the scaling is now affecting the foreground more than the midground. Satisfied with the result, we accepted the edit by double-clicking the image.
Choosing a mode for the History panel
Whenever you work on a document, your edits are automatically listed as states on the History panel ![]() (whether the panel is displayed or not).A Via the History & Cache: History States setting in Edit/Photoshop > Preferences > Performance, you can specify the maximum number of states that the panel may list. If this number is exceeded, prior states are deleted to make room for the new ones. Each open document has its own list of states, but they will remain on the panel only until the document is closed.
(whether the panel is displayed or not).A Via the History & Cache: History States setting in Edit/Photoshop > Preferences > Performance, you can specify the maximum number of states that the panel may list. If this number is exceeded, prior states are deleted to make room for the new ones. Each open document has its own list of states, but they will remain on the panel only until the document is closed.
A fast way to undo multiple edits is by clicking a prior state on the History panel. You can work with the panel in either of two modes. To change modes, choose History Options from the panel menu, then check or uncheck Allow Non-Linear History. With the panel in linear mode (Allow Non-Linear History unchecked), if you click an earlier state and resume editing from or delete that state, all subsequent (dimmed) states are discarded. Simple.
In nonlinear mode, if you click (or delete) an earlier state, subsequent states aren’t deleted or dimmed. In this mode, if you resume image editing with an earlier state selected, your next edit will show up as the latest state on the panel. This latest state will incorporate the earlier stage of the image plus your newest edit, and all the states in between will be preserved. If you change your mind, you can click any in-between state whenever you like and resume editing from there. To learn more about this mode, see pages 108–110.
• The Make Layer Visibility Changes Undoable option in the History Options dialog causes the clicking on or off of a visibility icon on the Layers panel to register as a history state. If you want to prevent this from happening (so those states don’t take up needed space on the panel), keep this option off.
• To undo an unintentional file save, click a pre-Save state on the History panel.
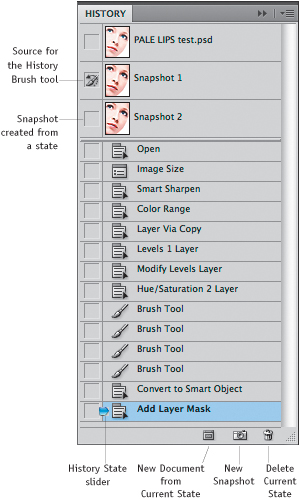
A The History panel lists edits made to a document (the most recent edit is listed at the bottom), lets you create snapshots of various editing stages, and lets you undo multiple steps.
Making snapshots of history states
A snapshot is like a copy of a history state, with one major difference: Unlike a state, a snapshot remains on the panel for the current editing session, even if you delete the state from which it was created. You can click a snapshot thumbnail at any time to restore your document to that stage of editing. Take note: All snapshots (and states) are deleted when you close your document.
You should get in the habit of creating snapshots periodically as you work, and certainly before running any actions on your document. To create snapshots manually, follow one of the methods below. In Method 2, you’ll be able to choose whether the snapshot will be made from the full document, from merged layers, or from just the current layer.
To create a snapshot of a state:
Method 1 (without choosing options)
1. On the History panel, ![]() click the state that you want to create a snapshot of.
click the state that you want to create a snapshot of.
2. If the Show New Snapshot Dialog by Default option is off in the History Options dialog, click the New Snapshot button at the bottom of the History panel.![]() If the aforementioned dialog option is on, Alt-click/Option-click the New Snapshot button. A new snapshot thumbnail will appear below the last snapshot in the upper section of the panel.A Click the last state on the panel to resume editing.
If the aforementioned dialog option is on, Alt-click/Option-click the New Snapshot button. A new snapshot thumbnail will appear below the last snapshot in the upper section of the panel.A Click the last state on the panel to resume editing.
Method 2 (choosing options)
1. Optional: To create a snapshot of a layer, click that layer on the Layers panel.
2. Right-click/Control-click a history state and choose New Snapshot. The New Snapshot dialog opens.
3. Type a Name for the snapshot.
4. Choose a From option:
Full Document creates a snapshot from all the layers on the Layers panel and is useful if you want to preserve all the edits at a particular stage of your document.
Merged Layers merges all the visible layers on the Layers panel at that state into the snapshot.
Current Layer makes a snapshot from only the currently selected layer in its current editing state.
5. Click OK.
To make a snapshot become the current state
Click a snapshot thumbnail. If the Allow NonLinear History option is off and you edited the document after taking that snapshot, the document will revert to the snapshot stage of editing and all the states will be dimmed; when you resume editing, all dimmed states will be discarded. If Allow Non-Linear History is on and you resume editing, subsequent states remain on the panel.
A Create snapshots to preserve editing states that you can potentially revert the document to for the current work session.
Working with nonlinear histories
The History panel’s nonlinear mode gives you the flexibility to go back to prior edit states without losing any of the recent edit states. In this exercise, you’ll set the History panel to nonlinear mode, create three different edit states, and then go back and compare the three states. This way, you won’t have to create a lot of duplicate or merged layers in order to compare your edits.
To compare history edits in nonlinear mode
1. Choose History Options from the History panel menu, check Allow Non-Linear History, then click OK.
2. Perform an edit in your document, then click the state prior to that edit.A–D
3. Create a new edit or a variation of the first one. Again, click the state prior to the first edit to restore the document to its preedited state (A–D, next page, and A–B, page 110).
4. Create a third edit. All three edits will be listed on the History panel. Click each edit state to compare them, click the one you prefer, and continue working on your document.
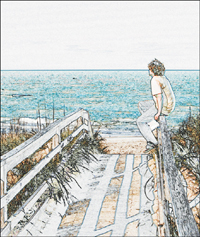
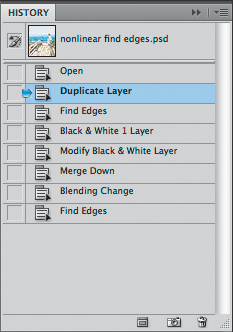
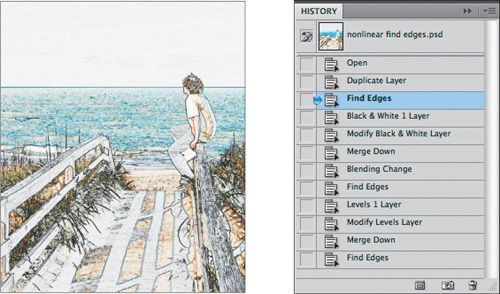
A We’ll try out three different ways to create a “find edges” version of this photo and use the nonlinear mode of the History panel to compare the results.
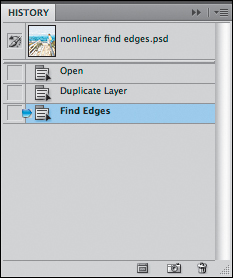
B When we applied the Find Edges filter to a duplicate layer...
C ...Duplicate Layer and Find Edges appeared as listings on the History panel.
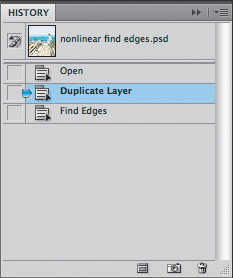
D Because the panel is in nonlinear mode, when we clicked the Duplicate Layer state to restore the photo to its prefilter stage, the more recent state didn’t become dimmed.
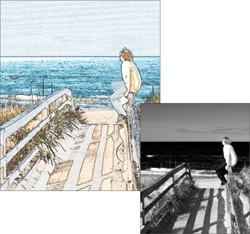
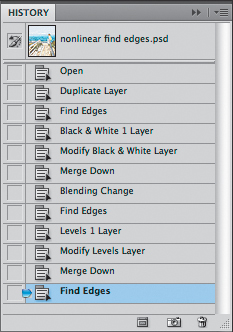
A We created a Black & White adjustment layer (right), merged it downward, changed its blending mode, and applied Find Edges a second time.
B Next, we clicked on “Duplicate Layer” to restore the image to its prefilter state.
C We applied a Levels adjustment layer to the photo (right), merged that adjustment layer down, then applied Find Edges once more.
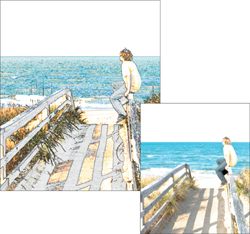
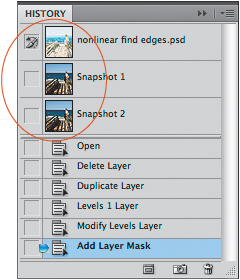
D This is the History panel after our third application of Find Edges.
A We clicked the second Find Edges state to display and compare it with the third Find Edges state...
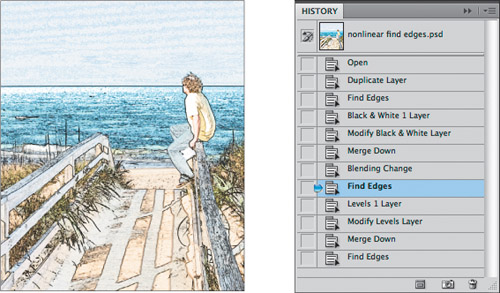
B ...and then we clicked the first Find Edges state to compare it with the second one. This is the History panel in action.
Using presets
For any tool, you can save a collection of the current Options bar settings as a tool preset. Thereafter, when you use that tool, you can choose your preset from either the Tool preset picker on the Options bar or the Tool Presets panel. Having a variety of tool presets at your disposal saves you setup time when you use specific tools, even if the differences among the presets are minor.
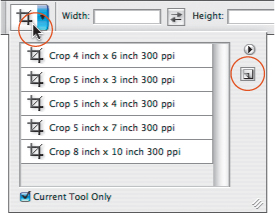
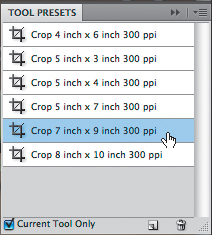
If you check Current Tool Only on the Tool Presets panel or on the Tool preset picker, only those tool presets that pertain to the current tool will display on the panel and picker, and you’ll have fewer presets to wade through. With Current Tool Only unchecked, the tool presets for all tools will display. Regardless of this setting, when you click a tool preset, the tool that the preset is used with becomes selected automatically.
To create a tool preset
1. Customize a tool, such as the Brush, Crop, or Type tool.A Choose a preset from the appropriate picker (such as a brush tip for the Brush tool or a gradient for the Gradient tool), choose settings from the Options bar (such as dimensions and a resolution for the Crop tool), and choose a Foreground color, if applicable, to be saved with the preset.
2. Do either of the following:
On the Options bar, click the Tool preset picker thumbnail or arrowhead to display a temporary Tool Presets panel.B
Display the Tool Presets panel. ![]()
3. Click the New Tool Preset button ![]() on the picker or panel. The New Tool Preset dialog opens.C
on the picker or panel. The New Tool Preset dialog opens.C
4. If the default Name doesn’t describe the preset adequately, change it. Also, if the dialog displays an Include Color option (such as for the Brush or Pencil tool), you can check it to save the current Fore ground color with the preset.
5. Click OK. The new tool preset will appear on, and can be chosen from, both the picker and the panel.D
6. To preserve your tool presets for future use in any document, save them to a tool presets library by choosing Save Tool Presets from the picker or panel menu. You can also load any previously saved preset library via either menu.
![]()
B Click the thumbnail or arrowhead to open the Tool preset picker (a temporary Tool Presets panel), then click the New Tool Preset button (on the right).
C Be sure to give the new tool preset a descriptive name.

D The new preset appears on the Tool Presets panel.
As an evolving pro user, you’re probably already familiar with many of the preset pickers in Photoshop, such as the Brush and Gradient preset pickers that can be accessed via the Options bar. The Swatches and Brushes panels are preset pickers, too. Each item on a picker is called a preset, and each collection of presets that can be loaded onto a picker or panel is called a library.
To create a preset
Each kind of preset—such as a pattern, color swatch, gradient, custom brush, custom shape, contour (for layer effects), or graphic style—is created in a particular way. The following are a few examples:
• Customize a brush via the Brushes panel or Brush preset picker, then click the New Preset button ![]() on the panel or picker.
on the panel or picker.
• Add a swatch to the Swatches panel by clicking the New Swatch of Foreground Color ![]() button.
button.
• Create a gradient by clicking New in the Gradient Editor dialog.
• Create a style by clicking the New Style button ![]() on the Styles panel or by clicking New Style in the Layer Style dialog.
on the Styles panel or by clicking New Style in the Layer Style dialog.
• Create a pattern via Edit > Define Pattern.
If you’ve created some presets that you want to preserve for future use, save them in a library.
To save all the presets currently on a picker as a new library
1. From the panel or picker menu, choose Save [preset type].
2. Enter a name, keep the default extension and location, then click Save.
3. To make the new library appear on the panel or preset picker menu and on the menu in the Preset Manager, you must relaunch Photoshop.
Preset and user-saved libraries can be loaded as needed from the lower portion of the appropriate panel or picker menu.
To load a library of presets
1. From the lower portion of the panel or the picker menu, choose the desired library name.
2. When the alert dialog appears, click Append to add the additional presets to the panel or picker, or click OK to replace the current presets on the panel or picker with those in the library.
Note: If you made changes to the current panel, another alert dialog will appear. Click Save if you want your changes saved.
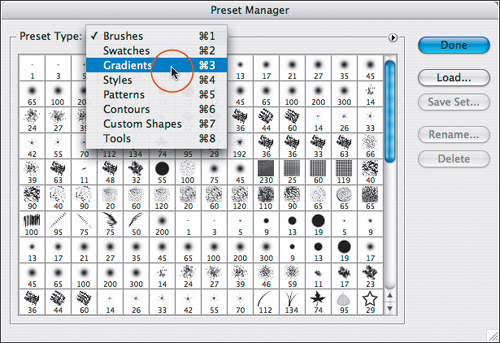
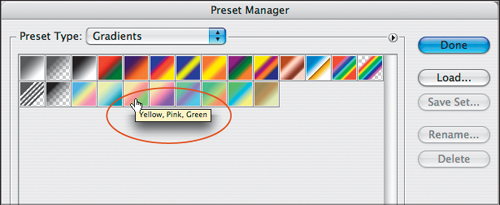
The Preset Manager is a central dialog in which you can organize, append, replace, and reset your preset libraries and control which libraries load onto individual panels and pickers at startup. Changes made to an individual preset picker are reflected in the Preset Manager, and vice versa.
To use the Preset Manager
1. Do either of the following:
Choose Edit > Preset Manager.
From the menu on any panel or picker that contains presets, such as the Brush Preset picker or the Brushes panel, choose Preset Manager.
2. In the Preset Manager (A, next page), choose from the Preset Type menu.
3. Do any of the following:
To add presets to the current library, from the menu ![]() , choose a library name (B, next page), then in the alert dialog, click Append (C, next page), or click OK to have them replace the current library.
, choose a library name (B, next page), then in the alert dialog, click Append (C, next page), or click OK to have them replace the current library.
To append (to the current presets) a library that isn’t currently listed on the menu, click Load, locate the library, then click Load again.
To restore the default library for the chosen type, from the menu ![]() , choose Reset [preset type], then click Append to append the default presets to the current library, or click OK to replace the current library with the default presets.
, choose Reset [preset type], then click Append to append the default presets to the current library, or click OK to replace the current library with the default presets.
4. Respond to any alert prompt that appears regarding saving changes to the current presets.
5. Click Done.
• To change how the presets are displayed, choose a thumbnail or list view from the Preset Manager menu.
A In the Preset Manager dialog, choose the Preset Type that you want to work with.
B From the menu in the dialog, choose a library, then in the alert dialog, click Append to add the presets to the existing ones on the picker or click OK to replace them.
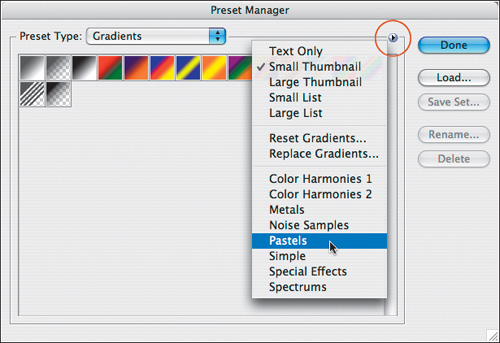
C The library will appear in the Preset Manager dialog and on the respective picker or panel when you exit the dialog.
Streamlining your workflow
This page lists some Photoshop features that you can incorporate into your workflow to add flexibility to your editing and boost your productivity.
Keep your edits flexible
• Copy imagery to duplicate or separate layers; use adjustment layers to try out tonal and color adjustments; use fill layers to try out colors, gradients, or patterns; apply editable and removable layer styles; and use layer comps to show variations of a document to your clients without having to open and close separate files.
• Place Camera Raw images or vector objects from Illustrator into Photoshop as Smart Objects for easy round-trip edits and updates.
• If you can afford the processing lag, apply filters as editable and removable Smart Filters to layers that you’ve converted to Smart Objects.
• Use layer masks and vector masks to conceal or reveal areas of a layer.
Save, reuse, recycle
• Save your Camera Raw and adjustment settings as presets.
• Create and save presets for brushes, swatches, gradients, type, patterns, shapes, contours, styles, and tools. Save your presets in libraries for safekeeping and easy access.
• Save collections of layer effect, opacity, and blending mode settings as styles in the Styles panel for use in any Photoshop file.
• Store selections as alpha (grayscale) channels, then load them as selections when needed.
• Save repetitive sequences of editing or processing steps as actions.
• Create and save theme-oriented workspaces for Photoshop (choose Save Workspace from the Workspace menu on the Application bar ![]() ).
).
Get there fast
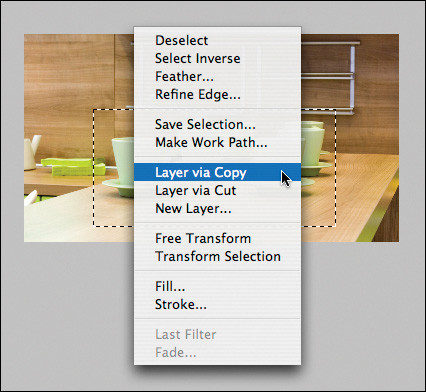
• To open a context-sensitive menu for quick access to related commands, right-click/Control-click the image, or on an interface feature, such as the Layers panel.A
• Memorize the panel icons, so you can identify and display them quickly.
• Practice keyboard shortcuts and gradually add them to your repertoire.
Keep a spare
• Duplicate a layer (or a file, for that matter) and edit the copy.
• Create snapshots on the History panel as you work, or save snapshots of your files as separate documents via the Create Document from Current State button on the History panel.
Work out your ideas on paper
• Get a notebook and use it to take notes (we’re not kidding!). Jot down command sequences—even specific settings—for future reference. Draw new design concepts, make quick sketches of images that inspire you as you go about your daily life, paste in clippings from magazines, or write down ideas for streamlining your work-flow. There’s something about working ideas out on paper....
A This is the context menu for a selection.