5. Selecting & Masking

To edit, adjust, copy, or move only part of a layer, you must select that area first to isolate it.A To hide or reveal part of a layer, you can use a mask. Creating selections and masks is prep work—and the more careful the prep, the better the results. Like house painting, some Photoshop work sessions can involve doing quite a bit of prep work before you get to the actual job of “painting.”
It’s not easy to distinguish among the many selection and masking controls in Photoshop, let alone decide which tasks they’re best suited for. Without this knowledge, you could spend hours trying one selection technique after another and get nowhere; with the right tool in hand, you’ll be better equipped to reach your goal. For techniques that will help you strategize at the beginning of your work sessions and make informed choices instead of guesses, see the summary of selection and masking methods that begins on the following page.
Following that summary, you’ll learn how to use the Quick Selection and Magnetic Lasso tools, then tackle some challenging selection and masking tasks, such as selecting a complex object in a landscape, using adjustment layer masks, selecting feathery edges and hair, and creating a selection based on a color range. Hopefully, you’ll exit this chapter with some useful new techniques up your sleeve.
Creating selections and masks, though exacting work, is far from an exact science. Even more variables are thrown in when you consider that every image—not to mention Photoshop user—is unique. As you work with increasingly complex assignments, adopt a pro mindset, which means taking the liberty to veer from “standard” practice. If it works, it works.
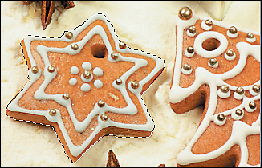
A The coins are selected in this image, as shown by the dashed outline.

Choosing a selection method
Select Irregularly Shaped Areas Based on Color or Tonal Values
Magic Wand tool  A (see pages 124, 129, 132, 224)
Click to select color areas based on Options bar settings: a Tolerance range (the number of shades or colors the tool may select) and whether you want to select Contiguous areas and/or Sample All Layers. This tool is useful for selecting a background in a photo, such as sky or water, or a solid-colored area.
Quick Selection tool  B (see pages 121, 132, 168)
Click or drag to select a well-defined but irregular area, such as a figure on a plain background. The tool detects color boundaries automatically.
Magnetic Lasso tool  C–D (see pages 122–123)
Click, then move the pointer along the border of a shape (mouse button up), and the tool will create fastening points where it detects a high-contrast edge. (Click if you need to create fastening points.) Use this tool to select objects or figures that are clearly delineated from their background in tonality or color; it’s more precise than the Lasso tool.
Color Range command (see pages 119, 134, 152–155)
For selecting areas by color, this dialog is more powerful than the Magic Wand tool. Hide any layers you don’t want to sample from, then choose Select > Color Range. With Sampled Colors chosen on the Select menu (the default option), click or drag with the eyedropper in the preview or document window. Add Shift to add to the selection or Alt/Option to subtract from it, or move the Fuzziness slider. Via the Select menu, you can limit the selection to a specific color family or tonal range, such as Reds or Highlights.
Select Straight-Edged or Geometric Areas
Rectangular Marquee tool 
Elliptical Marquee tool 
Drag to create a rectangular or elliptical selection. To specify a specific width-to-height ratio or dimensions, choose from the Style menu on the Options bar and enter Width and Height values before dragging. To draw from the center of the selection, start dragging, then hold down Alt/Option and continue dragging; or use Shift to constrain the selection to a square or circle.
A We selected the tabletop by clicking once with the Magic Wand tool.

B We selected the egg yolk with one quick drag of the Quick Selection tool.
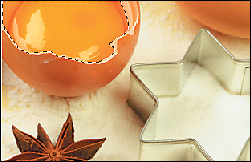
C We selected the cookie cutter by moving the Magnetic Lasso tool over its edges.
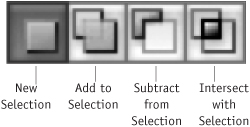
D Before using your selection tool, click one of these options on the Options bar (New Selection is the default setting).
Polygonal Lasso tool  (see pages 204, 296)
Click to create corners in a straight-edged selection. To reverse your steps, press Delete.
Select Irregular Areas
Lasso tool  A (see pages 120, 184, 296)
Drag to create an irregularly shaped nonmagnetic selection. You can use this tool to create a new selection, such as a loosely defined, feathered area for an adjustment, or to modify an existing selection that you created with another tool (see the next page). While using the Lasso tool, you can hold down Alt/Option to toggle to a temporary Polygonal Lasso tool, and vice versa.
Create a Selection by Painting a Mask
Quick Mask mode B (see pages 170, 174, 180)
Click the Edit in Quick Mask Mode button ![]() on the Tools panel, with or without creating a selection first. Choose the Brush tool, then with black as the Foreground color, paint a mask on the image. Protected areas are covered with a light red, non-printing “rubylith” shield. To remove unwanted areas of the mask, press X to switch the Foreground color to white, then paint out your strokes. When you’re done painting the mask, click the Edit in Standard Mode button; the mask will convert automatically to a selection.
on the Tools panel, with or without creating a selection first. Choose the Brush tool, then with black as the Foreground color, paint a mask on the image. Protected areas are covered with a light red, non-printing “rubylith” shield. To remove unwanted areas of the mask, press X to switch the Foreground color to white, then paint out your strokes. When you’re done painting the mask, click the Edit in Standard Mode button; the mask will convert automatically to a selection.
Create a Very Precise Selection
Pen tool  C
C
When you need the most precise and smooth selection possible, such as for a high-resolution image, click the Paths button ![]() on the Options bar for the Pen tool, then trace some shapes. To convert the path to a selection, Ctrl-click/Cmd-click the path listing on the Paths panel. Or to convert a path to a vector mask, select the path, create a new layer, then choose Layer > Vector Mask > Current Path. Note that a path (vector) will become less precise when converted to a selection (pixels).
on the Options bar for the Pen tool, then trace some shapes. To convert the path to a selection, Ctrl-click/Cmd-click the path listing on the Paths panel. Or to convert a path to a vector mask, select the path, create a new layer, then choose Layer > Vector Mask > Current Path. Note that a path (vector) will become less precise when converted to a selection (pixels).
Note: For more page references to specific tools, see the index. Our Photoshop CS4, volume 1: Visual QuickStart Guide also includes instructions for many Photoshop selection tools and techniques.
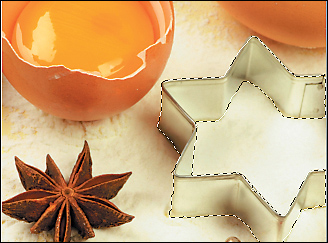
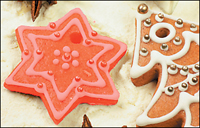
A We selected the cookie on the left by dragging with the Lasso tool.
B We put the image in Quick Mask mode, then with the Brush tool, painted a mask on the cookie.
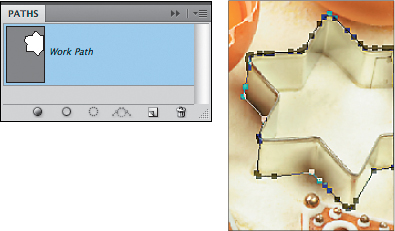
C A path, in the shape of the cookie cutter, is being stored on the Paths panel. A path can be converted to a selection at any time.
Clean Up or Modify a Selection
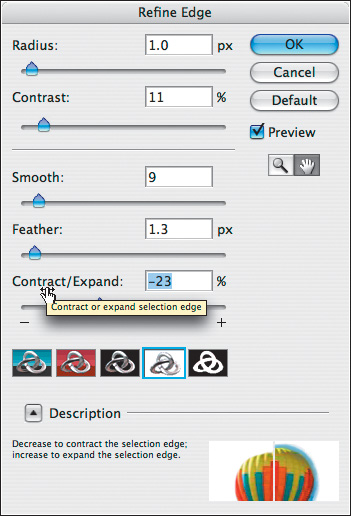
Refine Edge dialog A (see pages 120, 168)
With a selection active and a selection tool chosen, click Refine Edge on the Options bar; or press CtrlAlt-R/Cmd-Option-R;![]() or choose Refine Edge from the context menu. This versatile dialog lets you refine the smoothness, sharpness, and precision of a selection edge; expand or contract a selection; eliminate a fringe; and apply feathering, while allowing you to preview the refinements on a choice of backgrounds.
or choose Refine Edge from the context menu. This versatile dialog lets you refine the smoothness, sharpness, and precision of a selection edge; expand or contract a selection; eliminate a fringe; and apply feathering, while allowing you to preview the refinements on a choice of backgrounds.
Lasso tool* (see page 120)
* Use a stylus and graphics tablet, if available.
This tool is useful for enlarging selection areas or for removing stray selection areas after using the Magic Wand tool. Hold down Shift while dragging to add areas to a selection, or Alt/Option to remove areas from it.
Moving and Copying Selections
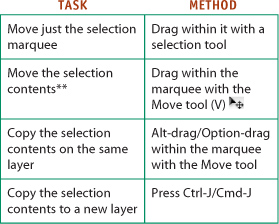
**If you move selection contents on a layer, the exposed area is replaced with transparency. If you move a selection on the Background, the exposed area is filled with the current Background color.
Mind Yer Layers!
Before or after creating a selection, click a layer or the Background to let Photoshop know which pixel areas are to be edited.
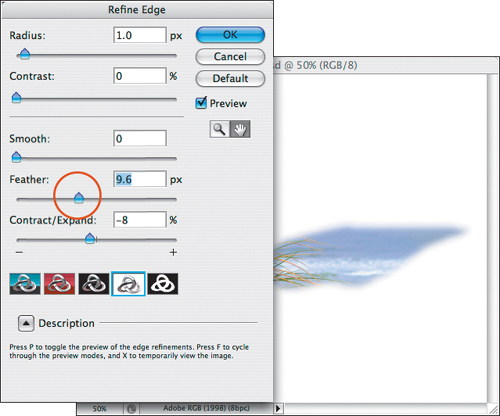
A The Refine Edge dialog lets you modify the edge of an active selection in many different ways.
Quick Mask mode (see pages 170, 174, 180)
To subtract from a selection, click the Edit in Quick Mask Mode button ![]() on the Tools panel, choose black as the Foreground color, then apply strokes with the Brush tool; or to add to the selection, paint with white.* This method can also be used to eliminate stray selection areas left from using the Magic Wand tool.
on the Tools panel, choose black as the Foreground color, then apply strokes with the Brush tool; or to add to the selection, paint with white.* This method can also be used to eliminate stray selection areas left from using the Magic Wand tool.
* Use a stylus and graphics tablet, if available.
Grow, Similar commands (see pages 124, 129, 224)
Based on the current Tolerance setting for the Magic Wand tool, the Grow command selects additional contiguous areas, and the Similar command selects additional noncontiguous areas.
Invert a selection (see pages 170, 174, 180)
To swap the currently selected and unselected areas, press Ctrl-Shift-I/Cmd-Shift-I (Select > Inverse).
Transform a selection marquee
To transform a selection marquee, choose Select > Transform Selection, then manipulate the handles on the transform box to scale (Shift-drag for proportional scaling), skew (Ctrl-drag/Cmd-drag a side handle), distort (Ctrl-drag/Cmd-drag a corner handle), or apply perspective (Ctrl-Alt-Shift/Cmd-Option-Shift drag a corner handle). To accept the edits, double-click inside the marquee.
Save Selections
Alpha channels
To store an active selection as an alpha channel, click the Save Selection as Channel button ![]() on the Channels panel. To display an alpha channel onscreen in grayscale, click the alpha channel name; or to display it as a rubylith shield, click the topmost channel, then click the visibility icon for the alpha channel.
on the Channels panel. To display an alpha channel onscreen in grayscale, click the alpha channel name; or to display it as a rubylith shield, click the topmost channel, then click the visibility icon for the alpha channel.
An alpha channel can store up to 256 shades of gray in an 8-bit image, and up to 32,000 shades in a 16-bit image. You can distort, blur, or sharpen the shapes in an alpha channel by various means, such as with the Brush tool or filters. To load an alpha channel onto your image as a selection, Ctrl-click/Cmd-click the channel thumbnail (see the sidebar at right).
Create Layer Masks
Layer masks (see pages 72, 162–164, 182, 194–198)
Vector masks (see pages 303–306)
Filter effects masks (see page 302)
The purpose of a mask is to hide or reveal parts of a layer, such as to limit adjustments to a specific area or to soften the seams between image layers. Black areas in a mask hide pixels fully, white areas reveal pixels fully, and gray areas create a partial mask. A mask won’t become permanent unless it’s applied, and it can be hidden or discarded at any time. Layer masks are used extensively throughout this book.
You can attach a mask to an image, adjustment, Smart Object, or type layer, but not to the Background. Adjustment, fill, and shape layers automatically have their own mask, as do Smart Object layers that contain Smart Filters. If you add a layer (pixel) mask while a selection is active, the selection shapes become either white or black areas in the mask, depending on whether you click or Alt/Option-click the Add Pixel Mask button ![]() on the Masks panel.
on the Masks panel.![]() To copy a mask to another layer, Alt-drag/Option-drag the mask thumbnail.
To copy a mask to another layer, Alt-drag/Option-drag the mask thumbnail.
Edit Layer Masks (see pages 101, 126–127, 132–133, 150, 152–155, 224–225)
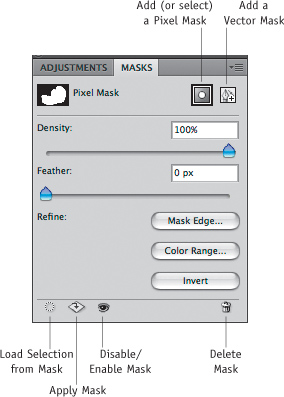
If created when no selection is active, a mask will be blank, but black or white areas can be added to it (e.g., with the Brush or Gradient tool). The Masks panel provides convenient, flexible controls for editing masks.A ![]() You can also edit a mask by using a filter (such as a blur filter) or an adjustment command (such as Levels or the Refine Mask dialog).
You can also edit a mask by using a filter (such as a blur filter) or an adjustment command (such as Levels or the Refine Mask dialog).
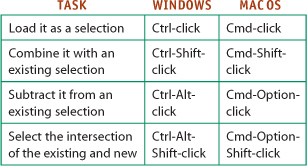
Loading as a Selection
To load a layer mask, a channel, or the nontransparent areas of a layer as a selection, use these modifier keys as you click the thumbnail on the panel:
A Via the Masks panel, you can add a pixel, vector, or filter mask to a layer; adjust the mask settings at any time; load the mask as a selection; disable or enable it; and finally apply or delete it. The Density control changes the mask opacity, the Feather control softens the transition between the white and black areas, Mask Edge gets you to the Refine Mask dialog (which is like the Refine Edge dialog), Color Range gets you to the Color Range dialog, and Invert swaps the black and white areas in the mask.
Next, we’ll review two selection tools that you probably use often: Lasso and Quick Selection. They both select irregular areas via dragging, but in distinctly different ways.
Using the Lasso tool
We use the Lasso tool to select nongeometric areas; to create loose selections for limiting adjustments or other edits; and to clean up selections made with another tool, such as the Quick Selection or Magic Wand tool (e.g., to eliminate stray areas remaining from a Magic Wand selection).
To create a free-form selection:
1. Choose the Lasso tool ![]() (L or Shift-L).
(L or Shift-L).
2. Click a layer, then drag to select an area.A Don’t worry if your initial selection isn’t perfect; you can refine it later. When you release the mouse, the open ends of the selection will join automatically with a straight edge.
3. Do any of the following:
To add to the selection, Shift-drag around the area to be added.
To subtract from the selection, starting with the pointer outside the selection, Alt-drag/Option-drag around the area to be removed.
To refine the selection, click Refine Edge on the Options bar, then adjust the settings.B–D
• To create a straight side with the Lasso tool, keep the mouse button down and Alt-click/Option-click to create corners. To resume drawing the free-form selection, release Alt/Option and continue dragging.
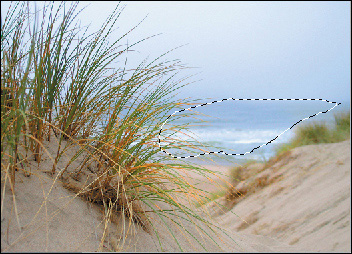
Using a Feathered Lasso Selection for a Saturation Adjustment
A With the Lasso tool, we selected an area of water that we will brighten.
B Using the Refine Edge dialog, we raised the Feather value of the selection.
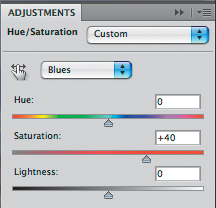
C Using a Hue/Saturation adjustment layer, we increased the Saturation for the Blues. (Our selection became the white area in the adjustment layer mask.)
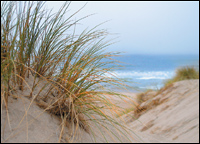
D The water is now a brighter blue. Because the edge of the selection was feathered, the adjustment is fading gradually into adjacent (unadjusted) areas.
Using the Quick Selection tool
The Quick Selection tool creates a selection more quickly and with less effort than the Lasso tool (all you have to do is drag across a shape), and the results are very precise when used on shapes that have distinct borders. You can enlarge the resulting selection to include adjacent shapes, or push back into the selection to contract it.
To use the Quick Selection tool:
1. Click a layer, then choose the Quick Selection tool ![]() (W or Shift-W).
(W or Shift-W).
2. On the Options bar, make sure the New Selection button ![]() is active and check Auto-Enhance for improved edge detection.
is active and check Auto-Enhance for improved edge detection.
3. To choose a diameter for the tool that’s appropriate for the area to be selected, press ] or [ , then drag within that area.A The selection will expand to the first distinct shape boundary that the tool detects. It will preview as you drag, then become more precise when you release the mouse.
4. Zoom in, then do the following:
To enlarge the selection, click or drag in an adjacent area; the selection will expand to include it.
• You can use another tool to add or subtract from the selection, such as the Lasso tool.B
To subtract from the selection, Alt-drag/Option-drag across the area to be subtracted.C–D
To contract the selection inward, Alt-drag/Option-drag along the edge of the selection.
• To block an adjacent area from becoming selected as you enlarge a selection, Alt-click/Option-click that area, release Alt/Option, then drag to enlarge the selection area. The block will remain in effect only until you click that area again with the Quick Selection tool.
• To undo the last click or drag of the Quick Selection tool, press Ctrl-Z/Cmd-Z.
Using a Quick Selection to Isolate Part of a Layer
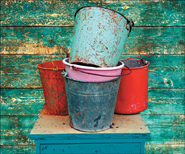
A We want to move the buckets and table in this image to a different background. Our first step was to select most of the background with the Quick Selection tool.
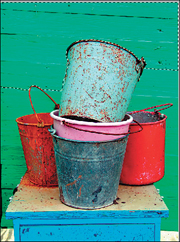
B We cleaned up some selection edges with the Lasso tool.
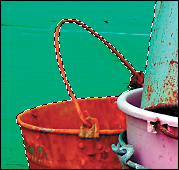
C With the Quick Selection tool and Alt/Option down, we dragged carefully on the handles of the pails to deselect them.
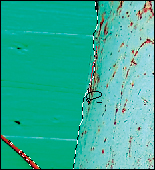
D We inverted the selection (Ctrl-Shift-I/Cmd-Shift-I), then with the Move tool, drag-and-dropped it into a different document.
Using the Magnetic Lasso tool
The Magnetic Lasso tool is well suited for selecting shapes that have clearly defined edges. Drag or move the tool along a shape, and a selection line snaps to where the tool detects a change in contrast. The stronger the contrast between the shape and the surrounding areas, the more precise the selection. You can set up parameters for the tool to control its accuracy (plus, it requires less dexterity than the Lasso).
To use the Magnetic Lasso tool:
1. Choose the Magnetic Lasso tool ![]() (L or Shift-L).
(L or Shift-L).
2. Choose Options bar settings:
Feather (0–250 pixels) to soften the edge of the selection (the effect won’t be visible until you edit the selected area). The higher the file resolution, the larger the feather value needed. For example, on a 300 ppi image, a Feather value of 5–7 would soften the edge slightly, whereas a Feather of 20–25 would soften a noticeably wider area. (If you prefer to feather the selection after creating it, use the Refine Edge dialog.)
Width (1–256 pixels) for the size of the area below the pointer that the tool considers when it places a selection line.A–B Try a wide Width (20 pixels or wider) for a high-contrast image that has clearly delineated edges, or a narrow Width (2–6 pixels) for an image that has small shapes in close proximity or is low in contrast.
Contrast (1–100%) for the degree of contrast needed between shapes in order for the tool to read it as an edge. For a low-contrast image, use a low Contrast value (less than 10%).
• If you choose a low or high Width, do the same for the Contrast.
Frequency (0–100) to control how often fastening points are placed as the selection is made (A–C, next page). The higher the Frequency, the more points are placed. We usually use a Frequency value of 50. To select a highly irregular contour, try using a high Frequency (70 or higher).
To use tablet pressure to control the Width, click the ![]() button.
button.
3. Click in the image to establish the first fastening point. Move the mouse—with the button up—along the edge of the shape to be selected.
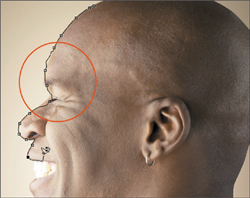
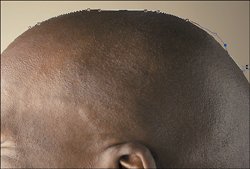
A At a Width setting of 10 pixels, the Magnetic Lasso tool correctly detected some parts of the man’s profile but missed his forehead and brow.
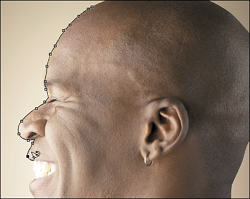
B At a Width setting of 4 pixels, the tool correctly detected the edge of the man’s forehead and brow.
A selection line will snap to the edge of the shape, and temporary points will appear (they’ll disappear after step 4).
If the selection line starts to follow adjacent shapes that you don’t want to select, click the edge of the shape that you do want to select to add a fastening point manually, then continue to move or drag the mouse. (To delete the last fastening point, press Backspace/Delete.)
Note: If you move or drag the mouse quickly on a large image, the selection border may not keep pace with you. Pause to let it catch up.
4. To close the selection, do one of the following:
Double-click anywhere over the shape.
Click the starting point (a small circle will appear next to the Magnetic Lasso tool pointer).
Press Enter/Return.
Alt-double-click/Option-double-click to create a new fastening point and close the selection with a straight segment.
• To change the Width value by 1 pixel at a time while creating a selection, press [ or ].
• To cancel (remove) an incomplete Magnetic Lasso selection, press Esc.
Making the Magnetic Lasso Stronger
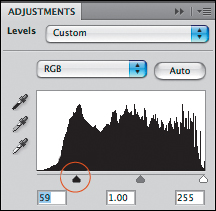
To temporarily heighten the contrast in an image to enable the Magnetic Lasso tool to work “smarter,” create a Levels adjustment layer. Move the black Input Levels slider to the right (and also move the gray Input Levels slider, if needed). When you’re done using the Magnetic Lasso, delete the adjustment layer.
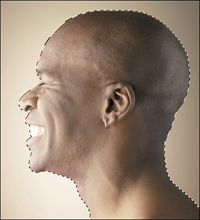
A The Magnetic Lasso tool used with a Frequency setting of 75 produced too many fastening points.
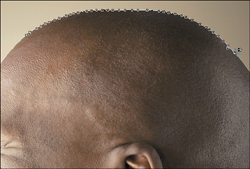
B The same tool used with a Frequency setting of 20 produced too few fastening points to accurately define the head shape.
C We selected the head successfully using a Width setting of 4 and a Frequency setting of 50.
Selecting leaves on a tree
Small, finely detailed shapes, such as leaves on trees in a landscape, are extremely tedious to select manually with just a selection tool. We’ve devised an easier method in which you use adjustment layers and other features to differentiate and isolate delicate shapes from surrounding areas. We’ll step you through three demanding tasks in which this method is used: selecting leaves on a tree, fur on an animal, and hair in a portrait.
In this first task, we will select leaves on a tree by using Black & White and Levels adjustment layers, the Similar command, and the Magic Wand and Lasso tools. Subsequent adjustments or edits can be limited to just the selected areas or unselected areas.
To select leaves on a tree: ![]()
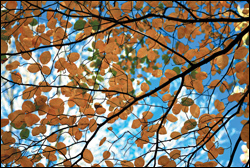
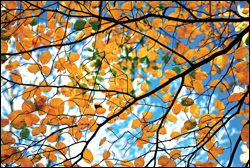
1. Open an RGB image of a leafy tree (A, next page).
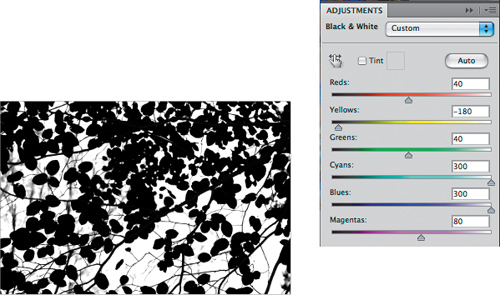
2. To simplify the selection process, you will heighten the contrast between the leaves and sky by using an adjustment layer. On the Adjustments panel, ![]() click the Black & White button.
click the Black & White button.![]() Using the Black & White controls, do the following: (B, next page)
Using the Black & White controls, do the following: (B, next page)
To darken the leaves, move the Yellows slider almost all the way to the left. If the leaves contain green, also move the Greens slider to the left by the same amount.
To lighten the sky, move the Cyans and Blues sliders almost all the way to the right.
Note: A different image may require different adjustments.
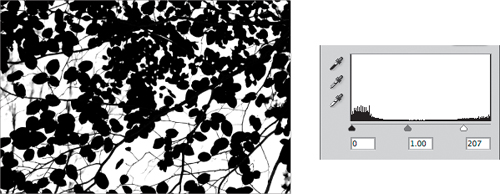
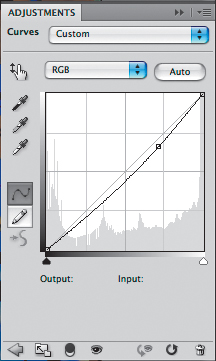
3. To pump up the contrast even more, click the Return to Adjustment List button ![]() on the Adjustments panel, then click the Levels button.
on the Adjustments panel, then click the Levels button.![]() Move the white Input Levels slider to the left to lighten the background (C, next page).
Move the white Input Levels slider to the left to lighten the background (C, next page).
• Click the Black & White or Levels adjustment layer if you need to change the settings for it.
4. Now you’re ready to create the selection. Choose the Magic Wand tool (W or Shift-W).![]() On the Options bar, set the Tolerance to around 40 and check Contiguous.
On the Options bar, set the Tolerance to around 40 and check Contiguous.
5. With the Levels adjustment layer still selected, click a dark area of leaves in the image. To add to the selection, Shift-click more areas of leaves and branches, then right-click/Control-click and choose Similar.
6. If your selection includes shapes that aren’t part of the tree, choose the Lasso tool ![]() (L or Shift-L), then Alt-drag/Option-drag around those areas to deselect them.
(L or Shift-L), then Alt-drag/Option-drag around those areas to deselect them.
7. On the Layers panel, hide both adjustment layers by clicking their visibility icons, and click the Background.
A We want to lighten and increase the saturation of just the leaves in this photo.
B For the Black & White adjustment layer, we moved the Yellows slider to –180 to darken the leaves and moved the Cyans and Blues sliders to +300 to lighten the sky.
C Next, we used a Levels adjustment layer to further lighten the sky, to make it contrast even more with the leaves.
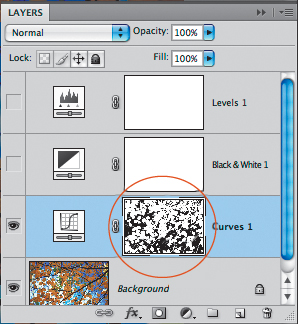
8. Next, you will save the selection to an adjustment layer mask, then fine-tune the edge of the mask. On the Adjustments panel, click the Curves button.![]() Note that the selection shapes are now white areas in the adjustment layer mask.A Keep the mask thumbnail selected.
Note that the selection shapes are now white areas in the adjustment layer mask.A Keep the mask thumbnail selected.
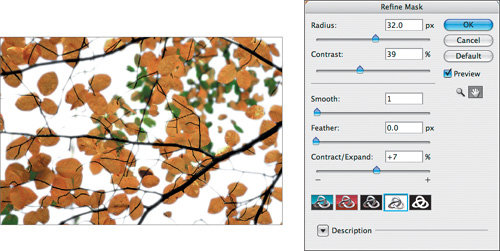
9. On the Masks panel,![]() click Mask Edge to open the Refine Mask dialog, then click Default. As you make the following adjustments, click the On Black preview button to gauge how much of the light background color appears in the selection, or On White to gauge the crispness of the selection edges: B
click Mask Edge to open the Refine Mask dialog, then click Default. As you make the following adjustments, click the On Black preview button to gauge how much of the light background color appears in the selection, or On White to gauge the crispness of the selection edges: B
To include soft-edged pixels while preserving the edge contrast, set the Radius to around 10–35 px and set the Contrast percentage to around 15–40%.
To preserve the jagged edges on the leaves, set the Smooth value to 1 and the Feather value to 0 px.
To ensure that the fine edges of the leaves and branches stay visible, but not so much that any sky areas are included, set the Contract/Expand value to +7.
Click OK, and save your document.
To use the Curves adjustment layer and mask to modify the image, follow the instructions on the next page.
A The former selection shapes are now white areas in the Curves adjustment layer mask. Also listed on the panel are the adjustment layers (hidden) that were used to heighten the contrast.
B As shown in this closeup of the preview in the Refine Mask dialog, the settings at right produced a cleaner and more clearly defined selection.
With the selection shapes from the preceding task stored as white areas in the adjustment layer mask, the adjustment will affect only those areas, while the rest of the image will remain protected.
To limit a tonal adjustment by using a mask: 
Double-click the Curves adjustment layer thumbnail. On the Adjustments panel, tweak the curve to improve the tonality of the former selection areas (the leaves, in our image).A
To restrict edits to the former unselected areas, simply invert the adjustment layer mask.
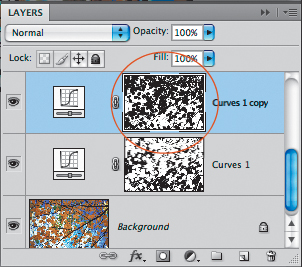
To invert an adjustment layer mask for further edits: ![]()
1. Click the Curves adjustment layer, then press Ctrl-J/Cmd-J to duplicate it. Keep the duplicate layer selected, and click its mask thumbnail.
2. On the Masks panel, click Invert to swap the black and white areas in the mask.B (In our image, the duplicate Curves adjustment layer is now affecting just the sky.)
3. Double-click the Curves thumbnail on the duplicate adjustment layer. On the Adjustments panel, click the Reset to Adjustments Default button ![]() to zero out the settings, then reshape the curve.C–D
to zero out the settings, then reshape the curve.C–D
A The white areas in the mask for the original Curves adjustment layer are revealing the leaves, which we lightened by reshaping the curve.

B We duplicated the Curves adjustment layer, then inverted its mask so the next adjustments will affect just the sky.
C The white areas in the mask for our second Curves adjustment layer are revealing the sky areas, which we darkened by choosing these settings.
D Compare this final image with A on page 125.
Selecting furry or feathered critters
Next, we’ll show you how to select the fine edges of fur or feathers on an animal (or other fuzzy-edged object), using steps similar to those in the previous exercise.
To select furry or feathered critters: ![]()
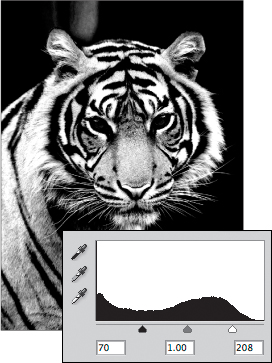
1. Open an RGB image of a fuzzy-edged subject, such as a furry or feathered beast.A Press Ctrl-J/Cmd-J to duplicate the Background.
2. On the Adjustments panel, ![]() click the Black & White button.
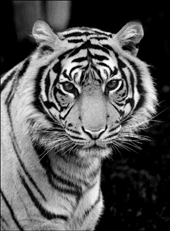
click the Black & White button.![]() Use the sliders to increase the contrast between the fur and background (the image is temporarily in grayscale). The goal is to heighten the contrast, not to create a pleasing image.B Keep the adjustment layer selected.
Use the sliders to increase the contrast between the fur and background (the image is temporarily in grayscale). The goal is to heighten the contrast, not to create a pleasing image.B Keep the adjustment layer selected.
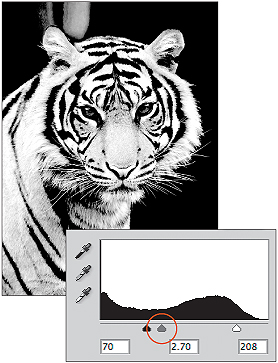
3. To heighten the contrast further, click the Return to Adjustment List button ![]() in the lower left corner of the Adjustments panel, then click the Levels button.
in the lower left corner of the Adjustments panel, then click the Levels button.![]()
Move the black Input Levels slider to the right and the white Input Levels slider to the left.C
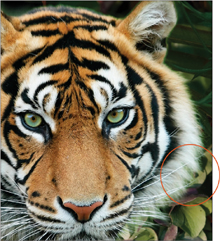
A We want to put the tiger on a different background, so the first step is to select him (or her?).
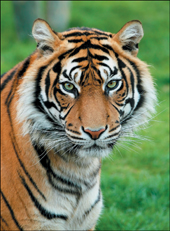
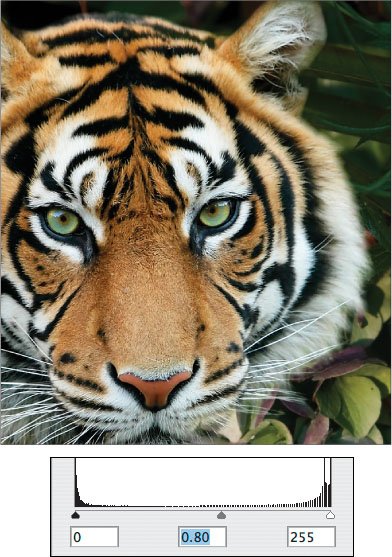
B For the Black & White adjustment, we moved the Reds slider to 300 to lighten the fur, moved both the Greens and Blues sliders to –150 to darken the background, and moved the Yellows slider to –44 to boost the contrast between the fur and background.
C For the Levels adjustment, we moved the black Input Levels slider to the right to darken the background and the white Input Levels slider to the left to shift lighter shades to white, for better contrast.
Move the gray Input Levels slider to the left to increase the contrast, or to the right to decrease it.A
4. The shape to be selected should now stand out distinctly from its background. To create the selection, choose the Magic Wand tool ![]() (W or Shift-W). On the Options bar, set the Tolerance to around 30–40 and check Anti-alias and Contiguous. Click the background area.
(W or Shift-W). On the Options bar, set the Tolerance to around 30–40 and check Anti-alias and Contiguous. Click the background area.
5. If necessary, choose Select > Grow to expand the selection.
6. Shift-click with the Magic Wand tool again, if necessary, to select the rest of the background. To clean up the selection, choose the Lasso tool ![]() (L or Shift-L), then Shift-drag around any unselected areas of the background that you want to add to the selection.
(L or Shift-L), then Shift-drag around any unselected areas of the background that you want to add to the selection.
7. When the cleanup is finished, hide the two adjustment layers, then click the duplicate image layer. On the Masks panel, click the Add Pixel Mask button,![]() then click Invert to reverse the black and white areas in the mask.
then click Invert to reverse the black and white areas in the mask.
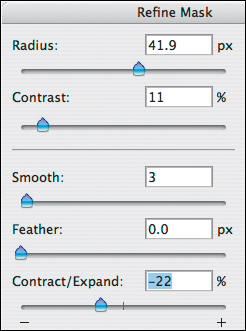
8. Click Mask Edge. In the dialog, click Default, adjust the settings to refine the mask edge (to delineate the fur),B then click OK.
9. Save your document. To put the masked imagery on a new background, continue with the steps on the next page.
A For the last Levels adjustment, we moved the gray Input Levels slider to the left, to increase the contrast and thereby preserve the finely detailed fur.
B In the Refine Mask dialog, we set Contrast, Smooth, and Feather to the values shown above to preserve the sharp edge, increased the Radius until we saw enough fine details on the edges of the fur, and reduced the Contract/Expand value to eliminate most of the remaining background pixels.
Putting masked imagery on a new background
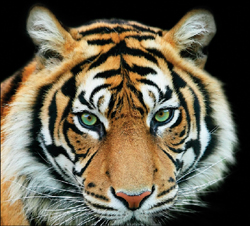
Next, we’ll show you how to place the soft-edged masked imagery (e.g., the tiger) on a new background. The black areas in the layer mask will reveal areas from the new Background.
To place masked imagery on a new background: ![]()
1. Open (or keep open) the document that contains masked imagery.
2. Open an RGB image to be used as a background for the masked layer, and make sure it has the same document resolution as, but a larger document size than, the masked image.
3. On the Arrange Documents menu ![]() on the Application bar, click a 2 Up button. Click the masked layer, then drag it from the Layers panel into the new background image. On the Arrange Documents menu, click the Consolidate All button.
on the Application bar, click a 2 Up button. Click the masked layer, then drag it from the Layers panel into the new background image. On the Arrange Documents menu, click the Consolidate All button.
4. With the Move tool (V), position the masked layer.
5. Zoom in to 100% view to examine the edge of the fur or feathers.A
6. If there’s still some original background color showing along the edge, with the layer mask thumbnail still selected, choose Image > Adjustments > Levels (Ctrl-L/Cmd-L) (don’t create an adjustment layer).
• If the original background color is visible only in a specific area of the masked imagery, drag a loose selection around that area with the Lasso tool before opening the Levels dialog.
In the Levels dialog, move the gray Input Levels slider to the right until you see less of the original background along the edge,B but not so far that details start disappearing. Click OK. This adjustment contracts the white area of the mask, so fewer pixels along the edge of the masked layer will now be visible.
• If the masked imagery has a different color temperature than the background image, click the masked image layer and create a Photo Filter ![]() adjustment layer. Choose a suitable Filter to make the layer warmer or cooler, and use the Density slider to control the degree of adjustment. Also click the Clip to Layer button
adjustment layer. Choose a suitable Filter to make the layer warmer or cooler, and use the Density slider to control the degree of adjustment. Also click the Clip to Layer button ![]() to limit the adjustment to the masked image layer.
to limit the adjustment to the masked image layer.
A The tiger layer is revealed through its mask, and the Background is visible underneath. However, in this closeup, you can see that some of the tiger’s original background is still visible on the edges of the fur.
B We loosely selected the right side of the tiger with the Lasso tool, then in the Levels dialog, moved the gray Input Levels slider to .80 to shrink the white area of the mask and hide a bit more of the tiger’s background.
Selecting hair in a portrait
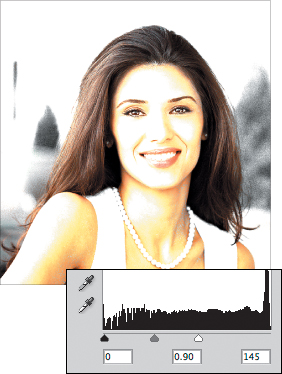
In this task, we’ll select the hair on a model in preparation for adding subtle color “highlighting.” The challenge will be to select all of her hair, including the delicate strands. As in the previous two exercises, we’ll heighten the contrast by using a Black & White adjustment layer, increase the contrast further by using a Levels adjustment layer, and tweak the edge of the layer mask by using the Refine Mask dialog. To keep the hair from being converted to grayscale, Lighter Color blending mode will be chosen for the Black & White adjustment layer.
Note: You may follow the trail of figures and captions on this page and the next two pages, using the image file that we have provided.
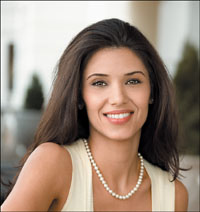
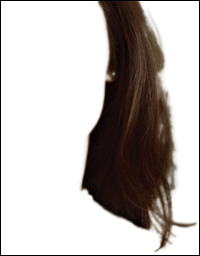
A Selecting the hair in a portrait like this is a challenge because some of the background colors are close in hue and value to the hair color.
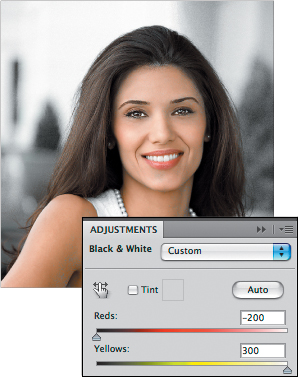
B We clicked the Black & White button on the Adjustments panel, then on the Layers panel, we set the blending mode for the new adjustment layer to Lighter Color. To increase the contrast between the hair and the background, on the Adjustments panel, we set the Reds value to –200 and the Yellows value to +300.
C To distinguish the hair even more from its background, we created a Levels adjustment layer and chose the Input Levels slider settings shown above. Our goal was to darken the edges of the individual hair strands slightly without making them disappear.
A We chose the Magic Wand tool and, on the Options bar, set the Tolerance to 60 and checked Contiguous. We clicked the hair, lowered the Tolerance to 30, then Shift-clicked to select the edges of her hair, including the small strands at the bottom.
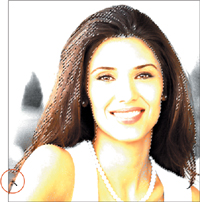
B With the Quick Selection tool (small brush diameter), we dragged to add unselected areas of hair to the selection, then dragged with an even smaller brush diameter to select small strands on the edge. Where the tool pushed the selection into the background, we clicked or dragged with Alt/Option held down to shrink it back to just the hair.
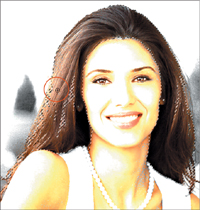
C With the selection active, we clicked the Background, then on the Masks panel, clicked the Add Pixel Mask button. Next, we clicked Mask Edge on the same panel. In the Refine Mask dialog, we set Smooth, Feather, and Contract/Expand to the values shown at right to keep the fine hair strands selected, while minimizing the selection of background pixels. (Keep the Refine Mask dialog open.)
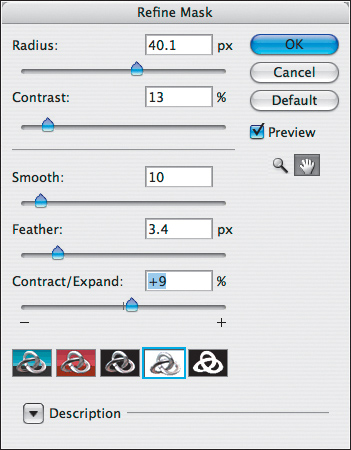
A Continuing with the Refine Mask dialog, we moved the Radius slider until individual hair strands looked soft but well defined (we settled on a value of 40), set the Contrast to 13 to sharpen the edge of the selection, then clicked OK.
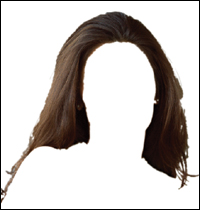
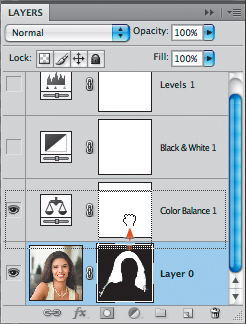
B We hid the Black & White and Levels adjustment layers. Next, we created a Color Balance adjustment layer above what had become Layer 0, then dragged the layer mask from Layer 0 over the layer mask of the Color Balance layer, clicking Yes in the alert dialog.
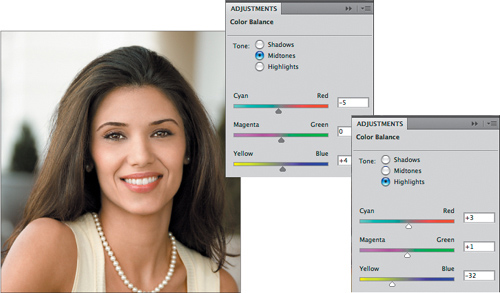
C To add “highlighting” to the model’s hair to produce the final image (left), we adjusted the Midtones range for the Color Balance adjustment layer, then adjusted the Highlights. Mission accomplished.
Using the Color Range command
Via the Color Range dialog, you can select areas of an image by clicking in the preview or, as in these instructions, simply by choosing a tonal range from the menu. See, not everything is complicated.
To select a tonal range in an image:
1. Open an image,A then choose Select > Color Range.
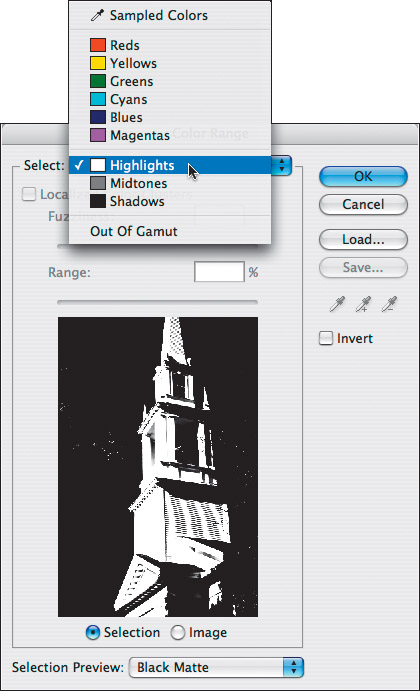
2. From the Select menu in the Color Range dialog,B choose a color or tonal range. If desired, you can choose a Selection Preview option, such as Black Matte, for the preview in the document window. Click OK. The selection displays in the document window.
3. Optional: With the selection active, apply a correction, such as via an adjustment layer.C For further corrections, you could use the Color Range dialog to select a different tonal range, such as Midtones, and create another adjustment layer.
• The Color Range dialog can also be opened from the Masks panel (see pages 119 and 152).
Selecting Highlight Areas for a Levels Adjustment
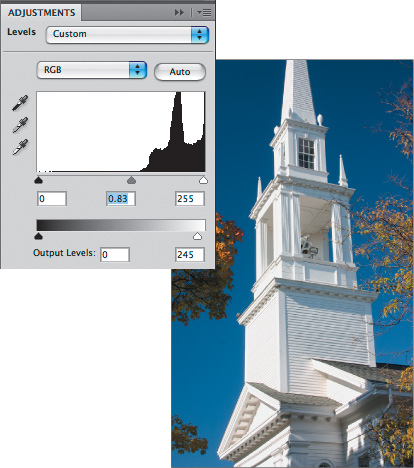
A In this image, the highlight areas look overexposed.
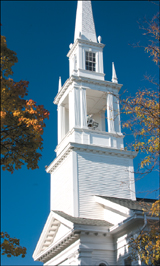
B We chose Highlights from the Select menu in the Color Range dialog.
C To darken and recover details in the highlight areas, we created a Levels adjustment layer; our selection converted to white areas in the layer mask. For the adjustment, we moved the gray Input Levels slider to the right to align with the left edge of the histogram and moved the white Output Levels slider to 245.